1
DIAMONDTOUCH, INC.
POS SOLUTIONS
DIAMONDTOUCH 5.5 SOFTWARE
USER MANUAL
Revised May 2007
Copyright 2007
page 1
DiamondTouch 5.5 Software Documentation
TABLE OF CONTENTS
Part 1
1.10
A.
B.
User Features
Screen Saver
Screen Saver User Log On
Clocking In
..................................................
..................................................
..................................................
6
6
6
1.15
A.
B.
Main Menu
User Log On from the Main Menu
Clocking Out
..................................................
..................................................
..................................................
6
7
7
1.17
Exit System
..................................................
7
1.20
A.
B.
C.
D.
E.
F.
Order Entry
Primary Control Bar
Menu Selection Control Window
Service Types
Ticket Printing
Advanced Functions
“Smart Check “ User Interface
..................................................
..................................................
..................................................
..................................................
..................................................
..................................................
..................................................
8
9
9
10
10
12
16
1.25
A.
B.
C.
D.
E.
Ticket Recall
Recall By Ticket Number
Recall By Table Number
Recall by Customer Name
Recall By Customer Phone Number
Recall Using Ticket Status
..................................................
..................................................
..................................................
..................................................
..................................................
..................................................
21
21
21
22
22
22
1.30
A.
B.
C.
Ticket Reprint
Reprinting from Ticket Status
Reprinting from Table Management
Reprinting from Order Entry
..................................................
..................................................
..................................................
..................................................
23
23
23
23
1.35
A.
B.
C.
D.
Ticket Cash Out
Standard Transaction
Split Tender Transaction
Split Ticket
No Sale
..................................................
..................................................
..................................................
..................................................
..................................................
24
24
24
25
25
1.37
Voiding a Ticket
..................................................
25
1.40
A.
B.
C.
D.
E.
F.
G.
H.
I.
H.
K.
Register Information
Signing On to a Cash Drawer
Opening a Cash Drawer
Register Information Display
View Transactions
View Selected Transactions
Print Transaction Report
Cash Pull Transaction
Pay Out Transaction
Detail
View All Drawers
Closing a Cash Drawer
..................................................
..................................................
..................................................
..................................................
..................................................
..................................................
..................................................
..................................................
..................................................
..................................................
..................................................
..................................................
26
26
26
27
30
30
30
31
31
31
31
32
DiamondTouch, Inc.
Copyright 2007
Page 2
DiamondTouch 5.5 Software Documentation
TABLE OF CONTENTS
1.50
A.
B.
C.
D.
E.
F.
G.
Table Management
Table Sections
Accessing Tickets w/ Table Icons
Accessing Table Status w/ Table Icons
Ticket Reprint
Server Info
Server Tickets
Cashing Out a Ticket
..................................................
..................................................
..................................................
..................................................
..................................................
..................................................
..................................................
..................................................
33
33
33
34
34
34
34
35
1.60
A.
B.
Ticket Status
User Display
Adjusting User Display Options
w/ Screen Set Up
Printing Ticket Status Reports
View & Reprint Tickets
Recalling Tickets
Cashing Out a Ticket
..................................................
..................................................
..................................................
35
35
36
..................................................
..................................................
..................................................
..................................................
37
37
37
37
1.70
A.
B.
C.
Server Management
Server Detail Reports
Server Status List
Server Cash Out
..................................................
..................................................
..................................................
..................................................
38
38
38
39
1.80
A.
B.
Phone Orders
Manual Phone Number Entry
Automated Entry using Caller ID
..................................................
..................................................
..................................................
40
40
41
1.85
A.
B.
C.
D.
E.
F.
Customer Information Screen
Primary Data Entry Fields
Delivery Information
Customer Information Windows
Looking Up a Customer by Phone Number
Looking Up a Customer by Name
Looking Up a Street Address
..................................................
..................................................
..................................................
..................................................
..................................................
..................................................
..................................................
41
41
42
42
43
44
44
1.90
A.
B.
C.
D.
E.
F.
G.
H.
I.
Delivery Management
Driver Display Screen
Adding A Driver
Dispatching a Driver
Removing a Ticket from a Driver
Returning a Driver
Cashing Out a Driver
Closing Out a Driver
Driver Summary Report
Driver Detail Reports
..................................................
..................................................
..................................................
..................................................
..................................................
..................................................
..................................................
..................................................
..................................................
..................................................
45
45
46
47
48
48
48
50
50
51
C.
D.
E.
F.
DiamondTouch, Inc.
Copyright 2007
Page 3
DiamondTouch 5.5 Software Documentation
TABLE OF CONTENTS
Part 2 Manager Features
2.10
A.
B.
C.
D.
E.
F.
G.
Sales Reporting
Daily Sales Reports
Daily Item Report
Daily Modifier Report
Period Sales Reports
Period Item Reports
Period Modifier Reports
Period Summary Report
..................................................
..................................................
..................................................
..................................................
..................................................
..................................................
..................................................
..................................................
52
52
54
55
55
56
56
57
2.15
A.
B.
C.
D.
E.
F.
Server Reporting
Server Summary Reports
Server Detail Reports
Server Sales By Category Reports
Server Tips
Daily Items/Sales
Period Item Sales
..................................................
..................................................
..................................................
..................................................
..................................................
..................................................
..................................................
57
57
58
59
59
60
60
2.20
A.
B.
C.
D.
Labor Reporting
Daily Labor Reports
Period Labor Reports
Productivity Reports
Sales VS Labor Reports
..................................................
..................................................
..................................................
..................................................
..................................................
61
61
62
62
63
2.25
A.
B.
C.
D.
Ticket Detail Reporting
Listing
Ticket Detail Reports
Event Log Reports
Discount Detail
..................................................
..................................................
..................................................
..................................................
..................................................
64
64
64
67
69
2.30
A.
B.
C.
D.
Database Reporting
Employees
Menus
Modifier Lists
PLU Tables
..................................................
..................................................
..................................................
..................................................
..................................................
70
70
70
71
71
2.35
A.
B.
C.
D.
E.
F.
G.
H.
I.
J.
Revenue Reporting
Transaction by Ticket
Transaction by Drawer
Daily A/R
Integrated Cc Raw Data
Integrated CC Report
Cashier Summary
Summary by Drawer
Period A/R by Customer
Balance Cash
Period Pay In/Out
..................................................
..................................................
..................................................
..................................................
..................................................
..................................................
..................................................
..................................................
..................................................
..................................................
..................................................
72
72
73
74
75
75
76
77
78
78
80
2.40
A.
B.
Delivery Reporting
Delivery Summary Reports
Driver Detail Reports
..................................................
..................................................
..................................................
81
81
81
DiamondTouch, Inc.
Copyright 2007
Page 4
DiamondTouch 5.5 Software Documentation
TABLE OF CONTENTS
2.45
A.
B.
C.
D.
E.
F.
G.
Customer Reports
Daily Customer Sales by Ticket
Daily Customer Sales by Customer
Daily Customer New vs. Repeat
Create Report
Customer Period Sales Report
Monthly customer New vs. Repeat
All Customers new vs. Repeat
..................................................
..................................................
..................................................
..................................................
..................................................
..................................................
..................................................
..................................................
82
82
82
83
84
85
85
87
2.50
A.
B.
C.
Report Periods
Defining Reporting Periods
Daily Server Sales By Item
Period Server Sales By Item
..................................................
..................................................
..................................................
..................................................
88
88
89
89
2.60
A.
B.
C.
D.
Utilities
Run File Back Up
Launch ISI
Launch Chef Tec
Launch Optimum Control 2001
..................................................
..................................................
..................................................
..................................................
..................................................
90
90
90
91
91
2.70
A.
Options
Export Inventory
..................................................
..................................................
91
91
2.80
A.
Close of Day
Auto Close
..................................................
..................................................
92
92
2.90
A.
B.
C.
D.
Time Cards
Viewing Employee Time Cards
Printing Employee Time Cards
Viewing and Adjusting Pay Periods
Editing Employee Time Cards
..................................................
..................................................
..................................................
..................................................
..................................................
94
94
94
95
96
2.95
A.
B.
C.
D.
Back Office
Daily Sales Report
Daily Performance
Balance Sheet
Weekly Performance
..................................................
..................................................
..................................................
..................................................
..................................................
97
97
98
99
99
DiamondTouch, Inc.
Copyright 2007
Page 5
DiamondTouch 5.5 Software Documentation
TABLE OF CONTENTS
Part 3 Set Up
3.10
A.
B.
C.
Terminal
Terminal Configuration
Utilities
Network Settings
..................................................
..................................................
..................................................
..................................................
100
100
104
104
3.15
A.
B.
C.
D.
Menu Set Up
Category
Items
Modifiers
Tax Rates
..................................................
..................................................
..................................................
..................................................
..................................................
105
106
111
118
120
3.20
A.
Printers
Printers
..................................................
..................................................
121
121
3.25
A.
B.
C.
D.
E.
Tickets
Service Types
Pattern Layouts
Profiles Assignments
Coupons
Price Adjustments
..................................................
..................................................
..................................................
..................................................
..................................................
..................................................
122
124
126
128
129
130
3.30
A.
B.
C.
D.
C.
D.
Cash Register
Starting Cash
Tender Options
Paid Outs
Paid In
Reimbursement Plan
Paid In/Out Reporting Group
..................................................
..................................................
..................................................
..................................................
..................................................
..................................................
..................................................
131
131
131
132
132
132
132
3.35
Tables
..................................................
133
3.40
A.
B.
Employees
Employee Set Up
Security Levels
..................................................
..................................................
..................................................
135
135
136
3.50
A.
B.
C.
D.
E.
Customers
Customer Database
Street Database
Zip Codes
Customer Points
Delivery Areas
..................................................
..................................................
..................................................
..................................................
..................................................
..................................................
137
137
138
139
139
140
DiamondTouch, Inc.
Copyright 2007
Page 6
DiamondTouch 5.5 Software Documentation
PART 1 USER FEATURES
1.10
Screen Saver
The DiamondTouch Screen Saver was designed to perform two (2) primary functions:
1.
2.
Increase the life of your monitor
Force all users to Log On prior to using the System
The Screen Saver can be set to run automatically, or can be enabled manually by touching the
Diamond control button at the bottom center of the Main Screen. See section 3.10 A for more
information on setting up your Screen Saver to run automatically.
Users should be trained to Log Off by enabling the screen saver as soon as they are finished
interacting with the system. Otherwise, they will be held responsible for the actions of the next
user on the system, should that user choose not to Log On.
A.
Screen Saver User Log On
To enter the Diamond Touch System from the screen saver, users must Log On to the System.
This can be accomplished in any one of three different ways :
1)
2)
3)
Swipe a magnetic stripe card on the optional “wedge” reader attached to the Monitor
Touch anywhere on the black background to activate an on screen keypad. Using the on
screen keypad, enter the user password and press Enter
Type the user password on the keyboard and press the Enter key
DiamondTouch systems are shipped with a default password of “0001”. For security reasons, this
password should be changed before the system is used in your operation.
B.
Clocking In
Users that have previously Clocked OUT of the system will be prompted to Clock IN immediately
after Logging On. To Clock IN, simply select an Employee Job Code. Job Codes 1, 3 and 5 are
reserved for servers. Servers will then be prompted to select a default Table Section. If you are
unsure of your Table Section, use Section A.
1.15
Main Menu
The Main Menu provides quick access to the features most often used within the system. These
features are as follows :
Screen Control
Described
Diamond Touch Logo
Phone Order
Driver Management
Server Management
Table Management
Cash register Manager
Tickets
Clock Out
Void Ticket
New Ticket
Recall Ticket
Cash Out
Section
Section
Section
Section
Section
Section
Section
Section
Section
Section
Section
Section
DiamondTouch, Inc.
1.15
1.80
1.90
1.70
1.50
1.40
1.60
1.15-B
1.37
1.20
1.25
1.35
Copyright 2007
DiamondTouch 5.5 Software Documentation
1.15
Page 7
Main Menu (cont)
The Main Menu also provides a lower control bar that provides fast access to the following
features :
Screen Control
Exit System
Reports
Setup
A.
User Log On from the Main Menu
Changing the current user from the Main Menu can be accomplished in any one of three different
ways:
1)
2)
3)
Swipe a magnetic stripe card on the optional “wedge” reader attached to the Monitor
Touch the Diamond Touch Logo to activate an on screen keypad. Using the on screen
keypad, enter the user password and press Enter
Type the user password on the keyboard and press the Enter key
The identity of the Current User is always displayed at the top of the Main Menu.
DiamondTouch systems are shipped with a default password of “0001”. For security reasons, this
password should be changed before the system is used in your operation.
B.
Clocking Out
At the end of the shift, all users should be encouraged to Clock Out of the system. The Time &
Attendance portion of the system, along with many of the other reports used by the system such as
the hourly productivity report, rely on the employee time records as a guide for analyzing and
reporting various activities within your operation.
To Clock Out of the system, simply touch the Clock Out control button on the touch screen, and
press “Clock Out”. Users that have Clocked IN with Job Codes 1,3 or 5 will also be prompted to
key in the amount of their tips. DiamondTouch will return to the Screen Saver once the user has
clocked out.
1.17
Exit System
To Exit the DiamondTouch System, touch the Exit System control located at the bottom left of the
Main Menu. DiamondTouch will ask you if you are sure that you want to exit; answer yes and
you will be returned to your desktop.
Note that a dedicated security level protects the Exit System control. Users without the proper
security level will not be able to use this control. Please see section 3.40 B for more information
on setting up your security levels.
DiamondTouch, Inc.
Copyright 2007
Page 8
DiamondTouch 5.5 Software Documentation
1.20
Order Entry
The heart of the DiamondTouch system, and by far the most used function, is Order Entry. By
following a few easy steps, most users can be placing orders within minutes. Order Entry can be
accessed in many ways, but the easiest way is to simply touch New Ticket on the Main Menu.
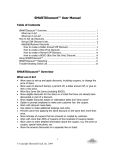
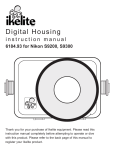
The Order Entry screen consists of 3 primary windows: the Menu Selection Control Window, the
Smart Check User Interface Window and the Primary Control Bar.
Menu
Selection
Control
Window
Smart
Check
User
Interface
Primary
Control
Bar
To place an order, follow these 3 steps :
1) Fill in the Smart Check
Select menu items from the Menu Selection Control Window
on the upper right hand portion of the screen. Once the order
is complete, press the Finished control on the Primary Control
Bar, located on the lower right portion of the screen.
2) Select a Service Type
Select a service type such as Dine In, Pick Up, Delivery, etc,
unless one has already been selected automatically (more
about this feature later).
3) Press Finished
The ticket will now be printed and saved .
Of course, there are many, many additional options and features within order entry, but in almost
all cases the above 3 steps will be all that is required to place an order.
To exit the Order Entry Screen at any time without completing an order, touch the “Cancel”
button in the upper left portion of the screen.
DiamondTouch, Inc.
Copyright 2007
Page 9
DiamondTouch 5.5 Software Documentation
1.20
Order Entry (cont)
A.
Primary Control Bar
The primary control bar provides instant access to the 5 most used functions in Order Entry:
B.
1) Menu
This control button will always return the Menu Selection Controls to the “top”
of the Menu; that is, to the first 25 Categories defined in your menu.
2) Modifier
This control button will allow scrolling through multiple “lists” of modifiers, for
those items that have been configured to take advantage of this feature in your
menu.
3) Whole
[ 1st Half / 2nd Half ] - This control button will allow the order taker to designate
certain modifiers, ingredients or toppings for only part of an item. For example,
a Pizza might contain Green Peppers on the Whole Pizza, but only contain
Onions and Olives on the 1st half.
4) Page 2
[Page 1] - Some menu Categories, Items or Modifiers in your menu may be
contained in lists greater than the 25 that can be shown on the screen at one
time. To view these choices, press Page 2. To return to Page 1, touch Page 1.
5) Finished
Once the check has been completed, press this control button to select a service
type (if required) and complete the order.
Menu Selection Control Window
DiamondTouch will guide the order taker through the order entry process with the Menu Selection
Controls. The menu can be configured to automatically force choices for cooking instructions,
included ingredients, sequenced modifier lists, optional modifier lists, and various other options
designed to fit your individual order entry requirements.
Because actual menus can vary greatly, it is not possible to specify instructions for your individual
menu. However, a typical order entry process might proceed as follows:
To Order Drinks :
To Order Meals:
Category Selection
Item Selection
Modifier Selection(s)
Soft Drinks
Diet Coke
Ice Water
With Lemon
Roast Beef
Pasta Supreme
Cheese, Onion
Mushrooms
Menu, Subs
Menu, Spaghetti
Each italicized selection represents 1 touch of the Order Entry screen. Thanks to the graphical
“visual cues” provided on the control buttons, the above order can normally be completed in just a
few seconds !
To start the order, the user touches the Soft Drinks category button. The Category choices are replaced
with the Menu Items listed under the Soft Drinks Category (such as Diet Coke, Sprite, Ice Water, etc). To
add a Menu Item to a ticket, the user simply touches the control button.
DiamondTouch, Inc.
Copyright 2007
DiamondTouch 5.5 Software Documentation
1.20
B.
Page 10
Order Entry (cont)
Menu Selection Control Window (cont)
Depending on the menu, the user may then be presented with a choice of modifiers or included
items from which to select, or the user may simply be presented with more Soft Drinks.
To continue with the above order, the user returns to the top of the menu by pressing the Menu
button, and then presses the Subs category button. Selecting Roast Beef causes an automatic
modifier list to appear, from which the user can select the Cheese and Onion choices. The user
presses Menu, followed by the Spaghetti category button to access the Pasta Supremo. After
adding the Mushrooms from the automatic list, the user presses Finished because the order is
finished!
Adding, editing, inserting or deleting Special Comments, Price and Percentage Discounts,
Delivery Charges, Ready Time, Customer Information, Table Number, Guest Counts, Price
Adjustments, Tax Status, Item Quantities, and Customer Separations are all just a touch away.
These features, and more, are detailed in the sections that follow.
C.
Service Types
Once an Order has been entered, a Service Type must be selected, either automatically, or by the
user.
DiamondTouch allows for up to 8 different Service Types, such as Dine In, Take Out, and
Delivery. Service Types can be each be designated to print different types of tickets to different
printers, prompt for Ready Time, automatically add delivery charges, interface to the integrated
dispatch system, automatically deduct sales tax, and report separate sales totals for the store as a
whole, or even for each order taker individually.
Any Service Type can be set as a default on any station, which eliminates the need for the order
taker to select a Service Type [ See Section 3.10 - A ]. A Service Type can be always be changed
after it is selected, whether it was selected automatically or manually, by simply selecting an
alternate Service Type.
D.
Ticket Printing
Once a Service Type has been selected, DiamondTouch will display the “Print Profiles” associated
with that Service Type. A Print Profile is simply an instruction to the system to print the ticket to
a designated Printer according to a designated Pattern. [See Section 3.10 - A]. Print Profiles
might be named “Make Table” or “Guest Check”, and are always shown next to a small “Printer”
Picture Icon.
To prevent a ticket from being printed, simply touch the Printer Icon, and the international “NO”
symbol will appear over that printer. To turn that printer back on, simply touch it again and the
“NO” icon will disappear. To finish the Order, press “Finish”, and the ticket will print to all
printers indicated. DiamondTouch will then return you to the screen from which you entered
Order Entry.
1)
New Tickets
Whenever a new ticket is printed, the description “New Ticket” will appear at the top of the
ticket. New tickets always contain all of the items on the ticket that were configured to print
in your Ticket Setup program. For example, drinks will print at the bar printer, while salads
will print at the salad make table [See Section 3.25 for more information on Ticket Print
Setup Options].
DiamondTouch, Inc.
Copyright 2007
DiamondTouch 5.5 Software Documentation
1.20
D.
Page 11
Order Entry (cont)
Ticket Printing (cont)
2)
Additional Items Tickets
Additional Items tickets are tickets that have been recalled, and have had items added to the
order. Additional Items tickets will always be labeled as such when they are printed, and
generally will only print those items that have been added to the ticket, and that pertain to the
station to which they are printed. For example, added drinks will print at the bar printer,
while added salads will print at the salad make table. Of course, printing options are fully
configurable by the user. [See section 3.25]
3)
Revised Tickets
A revised ticket is a ticket that has been recalled, but has undergone a more complex editing
process than just a simple added item. Items may have been erased or replaced, quantities
may have been changed, etc. Revised tickets will always be reprinted in their entirety to all
stations - it is the responsibility of the person reading the ticket to compare the original order
and note any changes.
4)
Updated Tickets
An updated ticket is a special type of ticket. In the printer setup options, tickets can be set
up with an option called “Full Ticket On Edit”. “Full Ticket On Edit” means that even if
only one item is added to a ticket, the entire ticket will be reprinted. While this feature
probably would not be used in the kitchen, it can be useful in other situations, such as with
Guest Checks that are to be presented to customers, and Delivery Checks that always need to
have every item listed.
These tickets will be designated as “Updated Tickets” to notify staff that they are allinclusive, and may include items or changes not included on the original ticket.
5)
Reprinted Tickets
Reprinted tickets are just that; reprinted. They do not contain any changes from the original
version; they are simply another copy of a ticket that has already been printed.
DiamondTouch, Inc.
Copyright 2007
Page 12
DiamondTouch 5.5 Software Documentation
1.20
Order Entry (cont)
E.
Advanced Functions
DiamondTouch includes a full set of Advanced Functions, located just a touch away under the
Advanced Functions control button. Some of these functions are protected by a dedicated security
level, which requires that an employee security status meets a minimum level before they can be
used [See Section 3.40-B for more information on setting security levels].
1) Item - $ New Price
Touching the New Item Price Discount feature will provide an on screen keypad upon which
to enter the new discounted price for a selected item. For example, a 10.95 item could be
discounted to 9.95 simply by keying in the new price. DiamondTouch will reflect the new
price by adding a line item that appears as follows:
Price Discount -1.00
All discount entries are displayed in red, so that discounts can be spotted more easily. In
addition, all discounts are tracked by discount type and will appear in the Discount Summary
portion of the Daily and Period Sales Reports. [See Section 2.10 for more information on
Sales Reporting].
If the new price is greater than the preset price, DiamondTouch will notify you that it cannot
adjust the price as requested.
2) Item - $ Discount
This feature is virtually identical to the above feature, the one difference being that instead of
entering in the new price of $ 9.95, the user enters in the difference of $ 1.00 as the
discounted amount. In both cases, the end result on the ticket is the same.
3) Item - % Discount
An item % discount will add an adjustment to the item price per the percentage entered by the
user. For example, entering 20% for an item priced at $10.00 will add a line item on the
ticket that appears as follows :
Percentage Discount - 2.00
4) All Above $ Discount
This feature will apply the amount keyed in by the user as a discount to the entire ticket. For
example, consider a ticket with the following line items :
1 Glass Red Wine
1 Sprite
1 Chef Salad
1 Spaghetti Dinner
Subtotal
2.50
1.25
7.25
8.75
19.75
If you attempted to apply a 10.00 discount using an Item Discount, DiamondTouch will alert
you that the discount is too high for any of the selected items. Instead, use the “All Above”
discount feature which will allow a discount up of to the 19.75 subtotal amount. The resulting
line item would appear as follows:
Above Price Discount - 10.00
DiamondTouch, Inc.
Copyright 2007
DiamondTouch 5.5 Software Documentation
1.20
Page 13
Order Entry (cont)
E. Advanced Functions (cont)
5) All Above % Discount
An item % discount will add an adjustment to the full ticket price, up to the currently selected
item, per the percentage entered by the user. For example, entering 20% for the above
example would add a line item on the ticket that appears as follows:
Above % Discount - 3.45
Note that the discount is calculated at the time the discount is issued. If items are
subsequently added, the amount of the discount does not automatically recalculate. If
automatic recalculation is required as new items are added, then the Price Adjustment feature
should be used instead of the Above % Discount feature (see below).
6) Price Adjustment
Price adjustments offer a more flexible way to apply percentage discounts, or gratuities, to an
entire ticket. Up to 10 different Price Adjustments can be programmed in advance, each with
their own security level [see Section 3.25 - E for more information on setting up your Price
Adjustments]. In addition, a “floating” Price Adjustment has been provided which allows the
user to enter a special description and adjustment level for each ticket.
To apply a Price Adjustment, touch Advanced Functions, Price Adjustment, then touch the
desired Price Adjustment (for example, “Employee”) and press OK. Once a price adjustment
has been assigned to a ticket, it appears at the bottom, just after the subtotal amount, as
follows:
Employee: 50% 12.50
Note that taxes are calculated per the amount of the subtotal and price adjustment together.
So, in the case of a price adjustment that is a discount, the effective tax will be lower.
Also, note that all Price Adjustments will be tracked and reported in the Price Adjustment
Summary portion of the Daily and Period Sales Reports. [ See Section 2.10 for more
information on Sales Reporting ].
7) Customer
DiamondTouch offers an extensive set of features and reporting for tracking your individual
customers. Generally, customer information will already be assigned to the ticket, if Order
Entry is accessed via the Phone Order button on the Main Menu [ See Section 1.80 for more
information about Phone Orders]. Touching the Customer button will return you to the
Customer Information screen to allow convenient editing of your customer information, if you
wish to do so. [NOTE: Customer Information is addressed in more detail in Section 1.85].
If a ticket is in process, and you wish to assign it to a customer after the fact, simply touch the
Customer button under Advanced Functions. DiamondTouch will prompt you for a Customer
Phone Number, if one has not already been assigned to the ticket. DiamondTouch will then
route you to the appropriate customer record, or open a new record if a matching phone
number was not found. To return to Order Entry, press Next on the Customer Information
Screen.
DiamondTouch, Inc.
Copyright 2007
DiamondTouch 5.5 Software Documentation
1.20
E.
Page 14
Order Entry (cont)
Advanced Functions (cont)
8) Delivery Charge
DiamondTouch allows for automatic delivery charges, which can be set up according to a
customer’s street address and delivery area. [See section 3.50 E for more information on
setting up Delivery Areas.]
The Delivery Charge button under Advanced Functions can be used to over-ride the automatic
delivery charge, if any, with a manually entered delivery charge amount. Once this manual
Delivery Charge has been attached to a ticket, the automatic Delivery Charge setting for the
ticket will be ignored, even if the ticket is recalled later.
Total delivery charges are summarized as a line item under the Sales by Category section of
the Daily and Period Sales Reports.
9)
Add a Separator
Separators are used to create separate subtotals on printed tickets, for guests wishing to pay
individually. To use a separator, first apply all items for the first guest to the ticket. Next,
touch Advanced Functions, then Add a Separator. A line item will be added to the ticket that
appears like the following :
====================
Next, add all of the items for the 2nd guest, add another separator, and so on until the ticket is
completed. You may wish to add a comment before or following each separator, such as
“Seat 3”, to assist you in editing the ticket later.
When the ticket is printed, separate subtotals will appear following each separator to assist
your guests and your cashiers in settling the bill. Of course, when editing the check you
should insert new items into the proper sections of the check to maintain the integrity of the
totals for your guests.
10) Add a Comment
On rare occasions, you may find it necessary to convey ordering information that was not
foreseen by the person that created your menu. For example, you may have one guest that
prefers to add an unusual ingredient or that requires some special substitutions or preparation
instructions, such as “Allergic to Wheat ”.
To add a comment to the ticket, touch Advanced Functions, then Add a Comment. A “virtual
keyboard” will appear on the screen that can be used to “touch type” in your comment on the
touch screen, or if you prefer, you can simply use your keyboard. When you are finished,
press the Enter key.
Note that your comment now appears on the ticket, highlighted in Violet.
DiamondTouch, Inc.
Copyright 2007
DiamondTouch 5.5 Software Documentation
1.20
E.
Page 15
Order Entry (cont)
Advanced Functions (cont)
11) Ready Time
For some orders, it might be desirable to print the required ready time on all tickets for that
order. That way, the salad make table, the sub make table and the gourmet cook all know
that Pick Up order #101 will not be required for another hour.
DiamondTouch can be configured to automatically prompt the Order Taker for the number of
minutes in which the order must be ready. This automatic prompt can be tied to the Service
Type, so that all Pick Up orders, for example, always prompt for ready time.
If you do not wish to set up the system to prompt for Ready Time on every ticket, or the
Service Type for your ticket does not require Ready Time, you can always add Ready Time to
any ticket by touching Advanced Functions, then Ready Time. On the keypad that appears on
your screen, simply enter the number of minutes from the current time that the order must be
ready. Once Ready Time has been entered, when the ticket is printed, the bottom of the ticket
will read, in wide print:
Ready Time: 12:45
12) Tax Exempt
Tax-Exempt is used to eliminate all taxes from a specific ticket. Once a ticket has been
marked as tax exempt, this same control can be utilized to remove the tax exempt status from
the ticket, by returning it to “Taxable” status.
DiamondTouch offers the ability to configure 10 different tax categories, and assign a tax
category to each item individually. Additionally, tax exempt status can automatically be
assigned to a specific Service Type. The tax-exempt button is generally only used to change
the tax status of a single ticket. [See Section 3.15 C for more information on Tax Set Up.]
DiamondTouch, Inc.
Copyright 2007
DiamondTouch 5.5 Software Documentation
1.20
F.
Page 16
Order Entry (cont)
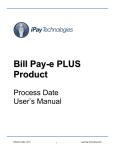
“Smart Check “ User Interface
One of the most powerful features in DiamondTouch Order Entry is the way in which the user can
interact with the graphical Smart Check display. More than simply a display of the order as it is
entered, this Smart Check user interface can also be used to intuitively edit the ticket in a number
of remarkable ways.
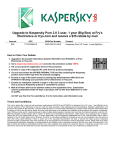
To edit a ticket at any time during
the order, simply touch the line
item of the ticket you wish to
edit.
For example, let’s say you want
to change the quantity of a drink
item.
Perform the following
steps:
1)
Touch the Drink Item on the
Smart Check;
2)
Touch the Quantity Button
on the Edit Control Bar at
the bottom of the screen;
3) Enter the New Quantity,
and press Enter
Note that the new quantity is displayed, and all of the pricing has been updated automatically.
This process of touching the item to be edited, then entering the change, is used for all ticket edit
functions on the system. In addition to changing the quantity of an item, you can insert and delete
line items, replace modifiers, insert separators, comments or discounts anywhere on the ticket, and
even change a medium pizza to a large pizza and watch all of the topping prices change
automatically ! Because the Menu Selection Control Window automatically finds the group
containing the line item you have touched, changing from a Regular Coffee to Decaf is a snap just 2 touches of the screen and you’re done. [Note: See section 3.15 A] for more information.]
Any discussion about ticket editing should always raise some concerns about security and audit
control. Please note that for audit control purposes any edit operations done to recalled tickets that
result in a lower overall ticket value will be singled out and logged in the Daily Event Log. In
addition, many edit operations cannot be performed at all unless the Order Taker holds the proper
security level. Finally, DiamondTouch provides full accountability and 100% trace-ability for
any and all edits performed on recalled tickets, whether they resulted in a lower value or not. In
fact, thanks to a unique data-compression methodology, DiamondTouch is able to retain a
complete ticket history for all tickets that can be viewed by a Manager at any time during the day,
later in the week, months or even years later. [NOTE: See Section 2.25 for more information on
Ticket Detail Reporting] The following sections provide more detail on the editing capabilities of
the “Smart Check” User Interface.
DiamondTouch, Inc.
Copyright 2007
DiamondTouch 5.5 Software Documentation
1.20
F.
Page 17
Order Entry (cont)
“Smart Check “ User Interface (cont)
Once any line item on the Smart Check is touched, the Order Entry screen is automatically
reconfigured to Editing Ticket mode. This initiates a number of changes to your screen:
•
The yellow Cancel button in the upper left portion of your screen is changed to the red Back
To Order button. Use this to return from Editing Ticket Mode to Order Entry Mode at any
time.
•
The Menu Selection Control Window automatically display the appropriate screen to facilitate
a quick replacement from within the category of the selected item, modifier or include list.
•
The Primary Control Bar at the bottom of the screen is replaced with the Edit Control Bar,
which provides the ability to perform all of the Editing Ticket functions.
“Editing Ticket” mode provides for a number of editing operations, all of which can be performed
with a minimum number of screen touches. These operations are discussed in more detail below.
1) Automatic Menu Item Replacement
To speed up your editing operation, the Smart Check “assumes” that you want to replace the
selected item, until you indicate otherwise, as soon as you touch any line item. This is why
the Menu Selection Control Window automatically finds the listing containing your selected
item. Whether it is a Menu Item from the Drinks Category, an Included item from the
Includes List, or a Cooking Instruction from an optional Modifier List, Smart Check finds that
list to facilitate a One-Touch Replacement.
This feature is particularly useful for operations that include Pizzas on their menu. For
example, let’s say your customer has ordered a Medium Pizza with New York Crust,
Tomatoes and Onions on the Whole Pizza, ½ Pepperoni , Sausage and Extra Cheese, and ½
Green Peppers and Meatball. Then, after completing the order, your customer has a sudden
change of heart and decides to make this a Large instead of a Medium. Simply touch the
Medium Pizza on the Smart Check, and the Menu Selection Control Window will display all
of your Pizza choices. Touch Large Pizza, and watch all of the modifiers and prices on the
check adjust to the Large Pizza selection automatically. Your Order Entry screen will return
to Order Entry mode automatically, because your change has been completed!
Of course, with any feature this powerful, there are a few ground rules. One Touch
Replacement of a Steak Dinner with a Large Pizza would not make a lot of sense, since the
“Medium Rare” and “Baked Potato” menu modifiers on the Steak Dinner would not make for
a very appetizing Large Pizza. This is why your Menu Designer has configured only certain
Menu Items within a given Menu Category with the “Allow Item Exchange” feature. [See
section 3.15 A for more information on Menu Configuration and Setup.] DiamondTouch will
not allow you to automatically replace any item that has not been configured to take
advantage of this powerful feature. Under the above scenario, it would probably be wiser to
add, or insert, the Large Pizza, and then simply Erase the Steak Dinner.
For Menu Categories with “like modifier lists” such as Soft Drinks, Desserts, Subs,
Sandwiches, Pizzas, Salads, etc., this single tool can provide a significant boost to your
productivity.
DiamondTouch, Inc.
Copyright 2007
DiamondTouch 5.5 Software Documentation
1.20
F.
Page 18
Order Entry (cont)
“Smart Check “ User Interface (cont)
2) Modifier Replacement
To replace any modifier with an alternate modifier from the same listing, follow these steps:
•
•
Touch the Menu Modifier you wish to replace on the Smart Check;
Touch the replacement Menu Modifier from the Menu Selection Control Window
Note that your Menu Modifier has been replaced, and any pricing adjustments have been
made automatically.
3) Includes Replacement
Some of your Menu Items may have been configured with a list of up to 16 normally included
ingredients or cooking instructions, called an “Includes List”. This list always pops up
automatically whenever these Menu Items are selected. “Includes” always appear on the
Smart Check in Green.
To edit an includes list selection, touch the “Include” line item on the Smart Check. The
complete list of includes will appear in place of the Menu Selection Control Window, and the
Includes that you have already selected for that item will be highlighted in Red. You may
select or de-select as many includes as you want, then press OK. Your Includes will all be
updated automatically, and you will be returned to normal Order Entry mode.
4)
Insert Item
To insert an item, touch a Menu Item or a Separator on the Smart Check. When your Edit
Control Bar appears, note that the Insert Item control caption is Black. This means that it is
enabled for operation. When other line items on the Smart Check are touched, such as Menu
Modifiers or Comments, the Insert Item control caption will be gray, which means that it has
been disabled. You cannot insert items into the middle of Menu Modifier Lists, or between
Comments and the Menu Items to which they have already been associated.
Once the Insert Item control has been enabled by touching either a Menu Item or a Separator
on the Smart Check, touching the Insert Item control once will move all of the line items
down one row to allow room for the new Menu Item to be inserted. The Edit Control Bar will
once again be replaced by the Primary Control Bar, since you will need your normal controls
to add the new item.
Use the Menu Selection Control Window to add the new item as you normally would. The
Smart Check will remain in Insert Mode until you have completed adding all of the includes,
Menu Modifiers, etc to the new Menu Item. Once you are finished, simply touch Back to
Order, or the Menu control, to return to normal Order Entry mode. You have now completed
the Insert Item Operation.
Of course, you can also use Insert Item to insert any of the Discount Types, Comments and
even Separators.
DiamondTouch, Inc.
Copyright 2007
DiamondTouch 5.5 Software Documentation
1.20
F.
Page 19
Order Entry (cont)
“Smart Check “ User Interface (cont)
5) Adding a Modifier
You may wish to add Menu Modifiers to a Menu Item on your order after you have completed
ordering the item. For example, you may wish to add Chives to a Backed Potato.
To use Add Modifier, the Menu Item must have been previously configured with either an
Optional Modifier List, or with a list with a Required count of zero (0). For more information
on configuring your Menu, please see section 3.15 – A.
To add a Menu Modifier, touch a Menu Item on the Smart Check and then touch Add
Modifier on the Edit Control Bar. The Menu Selection Control Window will automatically
find the first available modifier list for the selected Menu Item. The Edit Control Bar will
once again be replaced by the Primary Control Bar, since you will need your normal controls
to add the menu modifiers.
If the menu modifier list you see is not the list you need, you can use the Modifier control on
the primary control bar to cycle through the available lists. Remember, if a list contained a
required amount of modifiers, you will need to Replace the modifier since you cannot add
another modifier from this type of modifier list.
6) Quantity
To increase the overall speed of Order Entry, all Menu Items are automatically given a default
quantity of one (1). This is because in the vast majority of cases, one (1) will be the quantity
of almost every item ordered. To require the Order Taker specify a quantity of (1) for every
item ordered, manually, would slow down the order entry process unnecessarily
Changing the quantity of a Menu Item after it has been ordered is very simple process:
•
•
•
Touch the Menu Item on the Smart Check
Touch the Quantity Button on the Edit Control Bar at the bottom of the screen
Enter the New Quantity, and press Enter
The new quantity, along with any and all price changes, will automatically be reflected on the
Smart Check.
7) Erase
To erase any Menu Item on the order, simply touch the Menu Item and then touch the Erase
Control Button on the Edit Control Bar. The Menu Item, along with any Includes or Menu
Modifiers will be deleted from the Smart Check.
Erase can also be used to erase Includes, Comments, Separators and Discounts. Modifiers can
also be erased, provided that the modifier was not part of required modifier list. Required
modifiers can only be replaced, since the intent of your Menu designer was to force a fixed
number of required choices from that list.
DiamondTouch, Inc.
Copyright 2007
DiamondTouch 5.5 Software Documentation
1.20
F.
Page 20
Order Entry (cont)
“Smart Check “ User Interface (cont)
8) Table Number
To change the table number associated with an order, touch the Table box in the upper left hand
portion of the Smart Check User Interface. Enter the new Table Number and press Enter.
The new Table Number will now allow you to recall the ticket by touching the same table on the
integrated Table Management Screen [See section 1.50 for more information on Table
Management.]
9) Guest Count
To change the Guest count on an order, touch the Guests box located in the upper right hand
portion of the Smart Check User Interface. Enter the new guest count and press OK.
The new guest count will now be taken into account when tabulating various report totals and
sales averages within the Manager reports section, and on the Server Reports available from the
Server Status screen [Section 1.70].
DiamondTouch, Inc.
Copyright 2007
DiamondTouch 5.5 Software Documentation
1.25
Page 21
Ticket Recall
The Ticket Recall function is designed to allow the Order Taker to reload a previous order back
into the Order Entry Screen for review and possible editing, such as adding items or changing the
Service Type. DiamondTouch provides a variety of Ticket Recall options:
•
•
•
•
•
Recall By Ticket Number
Recall By Table Number
Recall By Customer Name
Recall By Customer Phone Number
Recall By Selecting from a list sorted by Order Taker, Driver, Service Types,
Open/Closed Status or by any combination using the Ticket Status Screen;
By learning how to use the Ticket Recall methods appropriate to your operation, your order taker
can recall and edit any order in just a few seconds.
A.
Recall by Ticket Number
If you already know the ticket number, one simple way to recall a ticket is to:
•
•
Touch Recall Ticket from the Main Menu
Enter the ticket number on the keypad that appears on your touch screen, and touch Enter
You will be immediately brought back into the Order Entry screen with the order you specified
displayed on the Smart Check interface.
Please note that once a ticket has been cashed out, or “closed”, the ticket can no longer be recalled
for editing, for obvious audit control reasons. You can always view and reprint any ticket, of
course, even if it has been closed out.
B.
Recall by Table Number
DiamondTouch includes a very flexible integrated Table Management module for your Dine In
operation. In fact, many users find that they can use the Table Management “Floor Plan” style
user interface as the main screen from which to run their operation. Table Management is
discussed in greater detail in Section 1.50.
To recall a ticket from the Table Management screen, simply touch the table. Any and all tickets
associated with that table during the shift will appear in a pop up box. If there is more than one
ticket, left and right indicators provide the means for you to browse through the available tickets.
Touching the Recall Ticket control will cause the selected ticket to be recalled, and you will find
yourself back at the Order Entry screen with the order you specified displayed on the Smart Check
interface.
NOTE: The Table Status Mode check box in the upper right hand corner of the screen must be
unchecked to allow for Recall Ticket by Table Number.
DiamondTouch, Inc.
Copyright 2007
DiamondTouch 5.5 Software Documentation
1.25
C.
Page 22
Ticket Recall (cont)
Recall by Customer Name
On occasion, it may be useful to recall a ticket by a customer’s last name, particularly for Pick Up
orders.
DiamondTouch provides a very convenient method for recalling tickets by customer name. From
the Main Menu, touch Recall Ticket, then touch the Names control at the bottom left of the pop up
keypad box. All non-dispatch type tickets found with customer names will appear alphabetically
in a scrolling list. Simply select the name and press recall ticket. The ticket will appear in the
Order Entry screen.
If you wish to recall the ticket by name in order to cash it out, then it may be preferable to first
touch Cash Out from the Main Menu. From the Cash Out screen, touch “Enter Ticket #”, then
touch “Names” from the keypad as noted above. After selecting your ticket, the items ordered and
total amount will load automatically into the Cash Out Screen. The Cash Out screen is discussed
in greater detail in Section 1.35.
To make the Ticket Recall by Name feature more useful for the applications most likely to use it,
DiamondTouch automatically filters out orders associated with “Dispatch” Service Types. This
way, the list of names is not lengthened unnecessarily with Delivery orders, for example, that are
best recalled by Phone Number. [See Section 3.25 A for information on setting the Dispatch
property for Service Types].
D.
Recall by Customer Phone Number
For Phone Orders, DiamondTouch offers a completely transparent method to recall a ticket by
phone number.
Each time a phone order is placed, either manually or with the optional Caller ID interface,
DiamondTouch scans the open orders for matching phone numbers. If one or more are found, a
pop up window appears displaying the tickets. If there is more than one ticket, left and right
indicators provide the means for you to browse through the available tickets. Touching the Recall
Ticket control will cause the selected ticket to be recalled [Phone Ordering is covered in greater
detail in Section 1.80.]
E.
Recall Using Ticket Status
The Ticket Status feature in DiamondTouch provides a number of useful features, including Ticket
Recall. To recall a ticket using Ticket Status, simply touch the ticket you wish to recall and then
touch the Recall Ticket control at the bottom of the screen. The ticket will then appear in the
Order Entry Screen.
Of course, the primary benefit in using Ticket Status to Recall a Ticket lies in the ability of the
Ticket Status module to customer sort groups of tickets together for selective browsing. For
example, if you do not know the Ticket Number, Table Number or the Customer Information
attached to a ticket, you can still search all tickets and “filter” the list by Server, Driver, Service
Type(s), etc to make your search more manageable. This is accomplished by adjusting the
Display Options located at the bottom of the Ticket Status screen. [The Ticket Status feature is
discussed in greater detail in section 1.60.]
DiamondTouch, Inc.
Copyright 2007
DiamondTouch 5.5 Software Documentation
1.30
Page 23
Ticket Reprint
Reprinting a ticket can be accomplished in a number of different ways, including
•
•
•
Reprinting from Ticket Status Screen
Reprinting from Table Management
Reprinting from Order Entry
Each of these options is discussed below:
A.
Reprinting from Ticket Status
To reprint a ticket from the Ticket Status Screen, select the ticket you wish to view by touching
one of the white fields - the ticket fields will turn blue once the ticket has been selected. Next,
touch View Ticket. A pop up box will appear displaying the basic details of the ticket you
selected. Touch the All Profiles button, select the ticket profile you want to reprint and touch
Reprint on the pop-up box.
B.
Reprinting from Table Management
To reprint a ticket from the Table Management screen, simply touch the Table Number associated
with the ticket. After selecting the correct ticket from the list that appears, touch the Reprint
Ticket control at the bottom left portion of the screen.
The ticket will be reprinted at the first “local” printer found on the list of printers for your current
terminal; if no “local” printer is found on your terminal, the ticket will be “spooled” to the first
system printer found. For more information on setting up local and system printers, please see
Section 3.20.
C.
Reprinting from Order Entry
Reprinting a complete ticket from the Order Entry Screen is possible as long as at least one (1) of
the eight (8) possible Ticket Profiles for the Service Type associated with that ticket was
configured with a Pattern that was set to print the “Full Ticket on Edit”. In this case, the reprint
will occur at the printer specified automatically, even if no changes are made to the ticket.
To reprint from Order Entry, recall the ticket and press Finished, then Finish. The ticket will
reprint at a selected station, as long as you’re print setup was configured to do so. For more
information on setting up local and system printers, please see Section 3.20.
DiamondTouch, Inc.
Copyright 2007
DiamondTouch 5.5 Software Documentation
1.35
Page 24
Ticket Cash Out
Ticket Cash Out provides an on-screen “Cash Register” from which you can settle payment for a
single ticket. Payments can be made to Cash, Check, or to any one of ten (10) alternate Tender
Methods (VISA, MasterCard, Coupons, Employee Comp, etc) that have been configured for your
system. Split tenders are also easy to perform, as are split tickets, where individual items on a
ticket can be highlighted one at a time, or in groups of items, for payment. And yes, you can even
do split tenders and a split ticket at the same time with the same ticket. Each tender operation is
stored as a separate transaction for reporting purposes. Transactions can even be exported to
Microsoft Excel for even more detailed reporting.
Before you can ring up a transaction, your DiamondTouch terminal must first be configured with a
Cash Drawer [Section 3.10-A] and the user must carry the proper security level [Section 3.40 B].
Physical cash drawers can be integrated, but are not required. DiamondTouch can easily be
configured with a “Virtual Cash Drawer” that simply tracks transactions without actually opening
a mechanical drawer.
The register must be opened, and each user must sign on to either Drawer 1 or Drawer 2 before
running the first transaction of the day. If either of these operations have not yet occurred,
DiamondTouch will guide you through the short process. [For more information on Signing On to
a Cash Drawer, see section 1.40 - A] When a Register is opened, DiamondTouch will prompt the
user for the starting cash amount. This is the amount of cash in the cash drawer before the first
transaction has occurred. Once signed on, it is not required that the user sign on again until the
following day.
The Cash Out screen can be accessed via the Main Menu, the Ticket Status screen, the Order
Entry Screen or the Table Management Screen.
A.
Standard Transaction
When a customer presents a check for payment, touch the Cash Out control button on the Main
Menu to access the Cash Out screen. Touch the Enter Ticket # button and enter the Ticket
Number from the customer’s ticket. The ticket order information will be loaded onto the display
on the left, and the amount due will be detailed in the upper right of the screen.
If the payment is offered in exact change, simply touch the appropriate tender key (for example:
Cash) and the transaction will be completed. If change is owed, key in the amount tendered on the
Register keypad, and then touch the appropriate tender key. The change due to the customer will
be displayed on the screen, the cash drawer will open, and a receipt will print, if your system has
been configured to do so. [See section 3.10 A for the Cash Drawer configuration options.]
B.
Split Tender Transaction
For a split tender transaction, remember to always key in the lowest tender amount first, so that the
tender will not finalize prematurely. For example, let’s say that a customer wishes to pay for a
$15.00 ticket with a $2.00 Coupon and a $20.00 bill. The proper tender operation would be to
first key in the $2.00 coupon, and allow the register to show $13.00 still due. Next, key in the
$20.00 cash so that the register will properly show the $ 7.00 change owed to the customer.
If the $20.00 is keyed in first, then the 15.00 amount of the ticket would be more than satisfied, the
transaction would be over, and the $2.00 Coupon could never be entered. Worse, the amount
owed the customer would incorrectly show $5.00, resulting in an under-ring condition. The
drawer would now be short $ 2.00 cash (and over $2.00 in coupons collected). It is therefore a
good habit to always key in the smaller amount first. Also, note that once a split tender operation
has started, you must complete the transaction before exiting the Cash Out form.
DiamondTouch, Inc.
Copyright 2007
DiamondTouch 5.5 Software Documentation
1.35
C.
Page 25
Ticket Cash Out (cont)
Split Ticket
To ring up a Split Ticket transaction, access the cash out screen and enter a ticket number for a
ticket that has at least two (2) items on it. Before ringing up the ticket, touch one of the items on
the ticket displayed on the left of the screen.
Note that the selected items have been highlighted in blue, and a new subtotal window has
appeared detailing the split amount due for the items selected. You can select and deselect items
simply by touching them.
Enter the amounts tendered for the highlighted items. Once the split amount due has been
satisfied, a receipt will print for the split amount and you may now select the items for the next
part of the check to be tendered. Complete each split operation until the entire ticket has been
highlighted and all amounts have been satisfied. When completed, the display in the upper part of
the screen will read “CASHED OUT”.
D.
No Sale
A No Sale transaction is designed to do only one thing: open the cash drawer. This action is
logged as a transaction, however, and the user name, time, date and other information is stored jut
as any other transaction would be. In addition, the No Sale function does have a dedicated
security level assigned to it - the user must have the proper security level before it is possible to
use this function.
To ring a No Sale transaction, touch Cash Out to bring up the Cash Out screen, then touch No
Sale. The cash drawer will open.
1.37
Voiding a Ticket
Voiding a ticket in DiamondTouch does not “erase” a ticket completely, although it does remove
all of the items and totals on the ticket from the primary report totals. Every Void Ticket
operation will be logged as an exception event, and will appear on the Exception Event Log
Report [ see section 2.25 B ] . In addition, the complete ticket history never actually disappears.
It can always be viewed using either the Event Log Report or the Ticket Detail Report via the
“drill down” Ticket History feature. Finally, the Void Ticket operation is protected with a
dedicated security level. An employee without the required security level cannot perform this
operation.
To void a ticket, touch Void Ticket from the Main Menu. Enter the ticket number and then an
explanation for the void operation when prompted. Press enter to complete the operation.
Tickets that have been cashed out can be voided, but, once again, the original tender transactions
are not erased; they are simply appended with matching entries to maintain the integrity of the
audit trail.
Note that all VOID tickets are highlighted as such on the Ticket Status screen, and in the Ticket
Detail Logs.
DiamondTouch, Inc.
Copyright 2007
Page 26
DiamondTouch 5.5 Software Documentation
1.40
Register Information
Register Information is accessed via the Main Menu Cash Out control button. The Register
Information screen will display the totals for the current drawer to which the user is signed on. In
addition to displaying totals for the various tender types, Register Information will display the
amount of Cash Pulls, Driver Reimbursements, No Sales, Pay Outs and provides a quick means to
display transaction data. Additionally, two (2) special types of transactions are actually performed
from the Register Information screen: Pay Outs and Cash Pulls. Finally, the Cash Drawers are
also closed from the Register Information Screen.
The following requirements must be met before you can access Register Information:
•
•
•
•
A.
At least one Cash Drawer must be set up for your terminal [Section 3.10 A]
Your user Security Level must permit Drawer Access [Section 3.40 B]
You must be signed on to a Cash Drawer - See Below;
The Cash Drawer must be opened - See Below;
Signing On to a Register
Signing On to a register is easy. The first time you attempt to view Register Information or run a
Cash Out Transaction, Diamond Touch will prompt you with “User is not signed on to a Register.
Do you wish to sign on to Drawer 1?” If you wish to use Drawer 1, simply touch “Yes”.
If your terminal operates with 2 Cash Drawers, and you wish to use Drawer 2, simply say “No”,
and then answer “Yes” when DiamondTouch asks if you want to sign on to Drawer 2. Once you
have signed on to a cash drawer, you will remain signed on until the drawer has been closed out you will not need to sign on again for every subsequent transaction.
B.
Opening a Cash Drawer
If the Cash Drawer to whom you wish to sign on has not yet been opened, DiamondTouch will
notify you with the Message : “Register is Closed. Would you like to open it?” Answer Yes,
and DiamondTouch will prompt you for the “Starting Register Amount”. Enter in the amount of
cash in the drawer and then press enter. Touch the Manager button in the upper left and the
Register Information screen for the Cash Drawer you just opened will be displayed.
DiamondTouch, Inc.
Copyright 2007
DiamondTouch 5.5 Software Documentation
1.40
C.
Page 27
Register Information (cont)
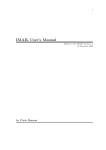
Register Information Display
1) Receipts
The column of figures located on the left side of the Register Information screen represent the
running subtotals of each tender method configured for your system. Each time a ticket is
cashed out, the total amount keyed in is added to the accumulator for that tender method.
For example, let’s say that 2 tickets are cashed out to VISA, one for $10.00 and the other for
$5.00. The VISA subtotal under the receipts column will therefore read $15.00, the sum of
the 2 totals.
All totals represent the gross amount of the transaction, with the exception of CASH. All
change issued is assumed to be cash, and change is always deducted from the CASH
accumulator, for all tender methods. For example, before ticket # 44 is cashed out, the
Register accumulators read as follows:
CASH
Checks
100.00
100.00
Total
200.00
When ticket # 44 is presented, the total amount due is $8.00. The customer pays with a
check, but writes the check for $10.00. When the transaction is rung up, the display on the
Cash Out screen reads $2.00 change. The new Register Receipt Totals will now read as
follows :
CASH
Checks
98.00
110.00
Total
208.00
Note that the Cash accumulator has actually been reduced by $2.00 to account for the $ 2.00
change issued for ticket #44. The check total has increased by 10.00, since there is now one
more check for that amount in the drawer. The Total Receipts properly reflects the increase in
net sales for the $8.00 ticket. CASH is therefore the net difference between Cash Receipts
and Change issued for all tender methods.
The Total Receipts will always reflect your total sales totals, once all tickets have been cashed
out. The yellow Total Receipts number at the bottom of the column is copied to the Total
Receipts reading in the upper right portion of the screen to reconcile cash in the drawer, as
explained below.
2) Starting Cash
Starting Cash is the amount that was keyed in by the user that opened the Cash Drawer. This
should normally be your “Opening Bank” for the drawer.
3) Total Receipts
Total Receipts is the total of all receipts from the left portion of the screen. This number will
always match the yellow “Total” under the Receipts detail.
DiamondTouch, Inc.
Copyright 2007
Page 28
DiamondTouch 5.5 Software Documentation
1.40
Register Information (cont)
F. Register Information Display (cont)
4) Cash Pulls
Periodically, you may wish to pull cash from the Cash Drawer to limit your exposure to theft.
This action can be performed and logged on the Register Information screen to maintain the
integrity of the Cash in Drawer totals [See 1.40 - G]. Each time a Cash Pull is performed on a
Drawer, the Cash Pulls accumulator will reflect the new subtotal.
5)
Pay Out
Pay Outs represent cash taken out of the drawer to pay Vendors or Employees for
miscellaneous goods or services. For example, you may have a cleaning service that you need
to pay on a cash basis. To maintain the integrity of the Cash in Drawer totals, these
transactions should be recorded on the Cash Drawer using the Pay Out function [See Section
1.40 H, below]. Each time a Pay Out is performed, the Pay Out accumulator will reflect the
new Subtotal.
6) Reimbursements
When cashing out delivery drivers, DiamondTouch allows you to key in a set amount per
ticket for Driver Reimbursements. [See section 1.90 G for more information on Delivery
Management]. If this feature is used, then the Reimbursements are reported as a separate line
item on the Register Information screen to maintain the relationship of the Receipts Totals to
Total Sales. For example, before a driver cashes out delivery ticket # 55, the totals read as
follows :
Starting Cash
100.00
Cash 200.00
Total Receipts +
200.00
Reimbursements 10.00
______
Total 200.00
Cash Subtotal
290.00
Delivery Ticket #55 was a $20.00 ticket, but during Cash Out the Cashier indicates that the
driver is to receive a $3.00 per ticket reimbursement for use of the driver’s vehicle.
Following the transaction, the Totals will read as follows :
Cash 220.00
Starting Cash
Total Receipts +
Reimbursements -
Total 220.00
Cash Subtotal
100.00
220.00
13.00
______
307.00
Note that the Cash Receipts and Total Receipts accumulators have increased by the $ 20.00
amount of the ticket to reflect the gross sales value of the ticket. Driver Reimbursements,
however, have also increased by $ 3.00, so the new Cash in Drawer Subtotal has only
increased by $ 17.00 - the difference between the amount collected from the customer and the
amount paid to the driver.
There are several options for setting reimbursements:
- Dollar amount per run
- Dollar amount per ticket
- Percentage of delivery charge
- Percentage of gross sales
- Force manual entry
DiamondTouch, Inc.
Copyright 2007
DiamondTouch 5.5 Software Documentation
1.40
Register Information (cont)
C.
Register Information Display (cont)
7)
Page 29
Total
As shown on the Register Display itself, Total represents the net total of the Starting Cash,
(+) All Receipts, (-) Cash Pulls, (-) Pay Outs and (-) Driver Reimbursements from this Cash
Drawer. This total does include all checks, credit cards etc from total receipts.
For a cash only total to perform quick cash audits on the drawer, use Sub Total Cash Only,
described below.
8) Sub Total Cash Only
The Sub Total Cash Only represents the actual Cash In Drawer total. This total should be
used to perform cash counts when closing the drawer, or for “X” totals during the day. The
following formula is used to achieve this total :
+
+
=
9)
Starting Cash
Cash Receipts
Cash Pulls
Pay Outs
Reimbursements
Subtotal Cash Only
No Sales
The No Sales accumulator reports the total number of times during the day that the NO
SALE button was used to open the cash drawer. Additional detail on which, what and when
the NO SALES activity occurred is available via the View Transactions feature. See Section
1.40 D below.
10) Void
The VOID accumulator reports the number of times during the day that cashed out tickets
were Voided. Additional detail on which, what and when the Void activity occurred is
available via the View Transactions feature. See Section 1.40 D below.
DiamondTouch, Inc.
Copyright 2007
DiamondTouch 5.5 Software Documentation
1.40
D.
Page 30
Register Information (cont)
View Transactions
The View Transactions control at the bottom left portion of the Register Information screen will
display all transactions for the currently open drawer. Transaction information detailed includes
the following:
•
•
•
•
•
•
•
E.
Time the Transaction Occurred in military time format
Ticket Number /Alternate Transaction Code. Alternate Transaction codes are :
SC = Starting Cash
[ See Section 1.40 B]
SB = Starting Driver Bank
[ See Section 1.90 B]
RB = Returning Driver Bank
[ See Section 1.90 G]
CP = Cash Pull
[ See Section 1.40 G]
PO = Paid Out
[ See Section 1.40 H]
NS = No Sale
[ See Section 1.35 D]
Description - Ticket Transactions will include the full Ticket Value under this
heading;
Cashier - this is the name of the employee that was signed on to the terminal when
the transaction occurred;
Amount - this is the amount that was keyed in for this transaction;
Tendered - Generally, this is the Tender Method (Cash, Check, Credit Card, etc). In
the case of a Driver Reimbursement transaction, the name of the driver is listed
instead.
Chg / Due - a running total of how much of the total value is still due, or the amount
of change that was issued for this transaction;
View Selected Transactions
The Register Information screen will also allow the user to view Selected Transaction Types only.
The following transaction types can be viewed as separate reports:
•
•
•
•
•
•
•
Cash Pulls
Pay Outs
No Sales
Voids
Alternate Tender Types (VISA, Etc) other than Cash or Check.
Reimbursements
Driver Banks
To view a report of alternate transaction types, simply touch the accumulator or descriptor field on
the Register Information Display. The indicator will turn Violet when it is selected. Next, touch
View Transactions. The Transaction detail report will only those transaction type that you have
highlighted.
For example, to view a list of NO SALE transactions, touch the NO SALE display to make it turn
Violet. Touch view transactions, and only the NO SALE transactions will be listed.
F.
Print Transaction Report
To print the current listing of transactions, first View the Transactions, then touch Print to Parallel
Printer. The current transaction listing will then print to your Windows Default Printer.
DiamondTouch, Inc.
Copyright 2007
DiamondTouch 5.5 Software Documentation
1.40
G.
Page 31
Register Information (cont)
Cash Pull Transaction
Periodically, you may wish to pull cash from the Cash Drawer to limit your exposure to theft.
This action can be performed and logged on the Register Information screen to maintain the
integrity of the Cash in Drawer totals.
To perform a Cash Pull transaction, touch the Register control button on the main menu to view
Register Information. Next, touch the Cash Pull control button. Enter the amount of the Cash
Pull, and press enter. Note that the total amount of the Cash Pull accumulator has increased by the
amount entered. If you have a local printer, a Cash Pull receipt will print. You may wish to save
the receipt in the drawer for accounting purposes, or attach it to the cash pull envelope, depending
on your particular cash handling procedures.
Each time a Cash Pull is performed on a Drawer, the Cash Pulls accumulator will reflect the new
subtotal, and a permanent transaction will be recorded logging the event. You may view the
transaction with the View Transactions feature (Section 1.40 D).
H.
Pay Out Transaction
Pay Outs represent cash taken out of the drawer to pay Vendors or Employees for miscellaneous
goods or services. For example, you may have a cleaning service that you need to pay on a cash
basis. To maintain the integrity of the Cash in Drawer totals, these transactions should be
recorded on the Cash Drawer using the Pay Out function.
To perform a Pay Out transaction, touch the Register control button on the main menu to view
Register Information. Next, touch the Pay Out control button. Enter the amount of the Pay Out
transaction and press enter.
Next, select the Pay Out Vendor from the list provided. [See section 3.30 C for more information
on setting up Pay Out Accounts.] Alternately, you may also choose “OTHER” if the correct
vendor is not displayed. There is also an option to select an employee as a vendor. Simply touch
“Employees” and the Vendor List will be replaced with a list of employees. Once the Pay Out
account has been selected, press Enter to complete the transaction. (You may cancel the
transaction at any time by pressing Cancel.) If you have a local printer, a Pay Out receipt will
print. You may wish to save the receipt in the drawer for accounting purposes.
Note that the Paid Out indicator has increased by the amount of the transaction. You may also
view the Pay Out transaction by pressing View Transactions [See Section 1.40 D].
I.
Detail
Detail represents the most recent activity at a selected cash drawer. To review a selected cash
drawer, select Cash Out on the main menu. Then touch the Manager button at the top left of the
screen and then touch the Detail button at the bottom of the screen.
J.
View All Drawers
View All Drawers provides you with a Cashier Summary Report of all cash drawer activity
throughout the day. To review the report, select Cash Out on the main menu. Then touch the
Manager button at the top left of the screen and then touch the View All Drawers button at the
bottom of the screen.
DiamondTouch, Inc.
Copyright 2007
DiamondTouch 5.5 Software Documentation
1.40
K.
Page 32
Register Information (cont)
Closing a Cash Drawer
Once all transactions for the currently open cash drawer have been processed, you may wish to
close the drawer to finalize reporting for a shift. You must close all cash drawers at least once - at
the end of the day just before closing the day.
To close a Cash Drawer, first touch the Cash Out control button on the Main Menu, then touch the
Manager button to access the Cash Drawer. Touch Close Register. Answer Yes to the “Are You
Sure” message, and a Closing Register Receipt will be printed on the first local printer found on
your system. If no local printer is found, then the receipt will print on the first system printer
found. See section 3.20 A for more information on setting up local and system printers.
The closing register receipt details the following information:
1)
2)
3)
4)
5)
6)
7)
8)
9)
10)
11)
12)
13)
Report Title & Drawer Number
Terminal Number
Date & Time Drawer was closed
List of all Users Signed on to the Drawer
Starting Cash Amount
Cash In (Receipts)
Checks In (Receipts)
Each Credit Card / Alternate Tender Amount
Cash Pull Amount
Pay Out Amount
Reimbursement Amount
Total
Sub Total Cash Only
All totals are saved, and can be viewed on the Closing Register Summary Report [Section 2.35 B].
All transactions are also saved, and can be viewed on the Transaction Detail Report [2.35 A].
DiamondTouch, Inc.
Copyright 2007
DiamondTouch 5.5 Software Documentation
1.50
Page 33
Table Management
DiamondTouch includes a very flexible integrated Table Management module for your Dine In
operation. In fact, many users find that they can use the Table Management “Floor Plan” style
user interface as the main screen from which to run their operation. Table Management provides 2
primary functions:
•
•
Ticket Access (New & Recall) via a Graphical Table Floor Plan Interface
Table Status Management
Before launching into Table Management, a few words about how DiamondTouch manages
Sections will assist you in understanding the Table Management interface.
A.
Table Sections
DiamondTouch allows for up to 26 different Sections of tables. For many operations with less
than 40-50 or so tables, a single section can represent the entire floor plan. There are, however,
some distinct advantages to “breaking up” an operation into sections :
•
•
•
Isolating Servers access to only those Tables to which they are assigned;
Allowing “Zoom In” capability for larger, or more complex floor plans;
Setting up smaller sub-sections for individual servers during peak periods, and then
“Zooming Out” to a larger scale when things slow down, allowing a single server to
handle larger areas;
When a user signs on to the system with a Job Code of 1,3 or 5 [See Section 1.10 B], the user will
be prompted to enter a “default” section, such as Section “B”. When the User touches Table
Management, DiamondTouch will always display this default section of tables for that user.
[Instructions on setting up Table Sections are discussed in greater detail in Section 3.35 A.]
To navigate through the various Sections, touch the top of the Table Management screen. This
action will always take you to the first Section set up for “ Zoom In” capability. To enter the
various Sub Sections, simply touch the desired area of the floor plan, and if it has been linked to a
Sub Section, then that section will be displayed, along with any active Table icons. Additional
Sections may have been Set Up for Zoom Capability from a Sub Section, since there is no limit to
the number of “levels” that can be set up. Actual navigation will depend upon the system
configuration that has been designed and configured for your operation.
B.
Accessing Tickets with Table Icons
Before starting a new ticket from a table icon on the Table Management screen, first make sure
that the “Table Status” check box in the upper right part of the Table Management screen is NOT
checked. To start a new ticket, simply touch a table icon.
As soon as you touch a table Icon, DiamondTouch first looks for any existing tickets for that table.
If none are found, DiamondTouch takes you directly to Order Entry to begin a new ticket. Note
that the table number of the table you touched has been filled into the “Smart Check” table box for
you.
If there are any tickets found for the table that you touched, DiamondTouch will display those
tickets in a pop up box before opening the Order Entry screen. This is so that you can have the
choice of adding to an existing order, or starting a new order. You may also simply wish to
review the tickets for a given table without opening Order Entry at all. DiamondTouch gives you
the choice. If more than one ticket exists, you can even browse through them using the left/right
indicators provided. [See Section 1.25 B for more information on Ticket Recall by Table
Number].
DiamondTouch, Inc.
Copyright 2007
Page 34
DiamondTouch 5.5 Software Documentation
1.50
C.
Table Management (cont)
Accessing Table Status w/ Table Icons
To access Table Status from Table the Management, simply touch the Table Status check box in
the upper right portion of the screen. When this box is checked, you are telling the Table
Management screen that you wish to use the table icons for Table Status, not Ticket Access. After
you have checked the Table Status checkbox, touch one of the active Table icons to bring up the
Table Status pop up box for that table.
The Table Status Pop-Up Box display 6 possible Table “States”:
Name
Color Code
Description
Ready
Seated
Order In
Served
Clearing
Reserved
Yellow
Green
Light Blue
Dark Blue
Red
Black
Table is cleared and set, but not yet seated;
Guest have been seated at this table
Order has been taken and sent to the kitchen
The Order has been served to the table
The guests have left the table;
The table is Reserved, or “blacked out”
Each time you touch one of the states for the table, you change the current status, and thereby the
color of the table number displayed on the table. By glancing at a particular section, your Hostess
can get a quick idea of the estimated wait time for a new table. Because each state change is time
stamped, you can also browse the various tables from a single workstation to get an idea of how
long each patron has been seated, waiting for an order to be placed, etc.
D.
Ticket Reprint
Ticket Reprint is used for just that - to reprint a ticket from Table Management.
From your Table Management screen , uncheck the Table Status check box and touch a table with
at least one open ticket associated with it. Once the ticket you wish to reprint is visible in the popup box, touch Print Ticket. The ticket will be re-printed at the first local printer found on your
terminal. If no local printer is found, DiamondTouch will spool the ticket to the first system
printer found. [For more information on setting up local and system printers, see section 3.20 A].
E.
Server Info
To gain access to Server Management from Table Management screen, simply touch Server Info
at any time. Server Management provides a quick summary of all server totals, server detail
reporting, and an express Server Cash Out Function. For more information on Server
Management, refer to Section 1.70.
F.
Server Tickets
Server Tickets provides a short cut to a “pre-set” Ticket Status Screen automatically configured to
display tickets as follows :
All Service Types
Only those tickets ordered by the current user;
Only those tickets that are currently Open (or, not Cashed Out);
For more information on the Ticket Status Screen, please see section 1.60.
DiamondTouch, Inc.
Copyright 2007
DiamondTouch 5.5 Software Documentation
1.50
G.
Page 35
Table Management (cont)
Cashing Out a Ticket
To Cash Out a Ticket from the Table Management Screen, first make sure that the Table Status
check box in the upper right hand portion of the screen is unchecked. Next, touch a table that
already has an open ticket associated with it. After selecting the ticket you wish to cash out from
the pop-up box, touch “Cash Out”. The Cash Out screen will be opened with the ticket you
selected loaded into the screen.
Please see section 1.35 for additional information on Cashing Out tickets.
1.60
Ticket Status
The Ticket Status screen provides the user with the ability to browse through the current day’s
tickets, to View, Reprint, Recall or Cash Out a particular Ticket, and to print a report of the current
day’s tickets to a printer. The Ticket Status screen also enables each user to customize the display
properties to sort only those tickets that match a certain Service Type (or Types) , Server Name,
Driver Name, Sort Order, or ticket status relative to the dispatched and/or open VS cashed out
status of the ticket.
For Delivery Operations, the Ticket Status Screen also displays the elapsed time since the order
was placed, with color coded alarms to graphically indicate the dispatch status. This way, a
Manager can quickly spot any orders that are slipping past the standard delivery times being
quoted to your customers. Animated red and yellow beacon alarms can assist in letting everyone
know where attention needs to be focused if orders start to slip during peak periods.
A.
User Display
The Ticket Status screen displays the following information, updated about every 15 seconds:
•
Tkt
Ticket Number
•
Time
The last time Items were added to the ticket
•
Ordered By
The Name of the Employee that took the order;
•
Total
The total current value of the ticket
•
Status
Open / Closed (Cashed Out) or VOID
•
Service Type
One of 8 Possible Types of Service (Dine In, Take Out, Delivery, etc)
•
Location
For Dine In, this will be the Section and Table Number. For Phone
Orders, this will either be the customer’s address or the last name of the
customer, if no address was given.
•
Elapsed
The amount of time between the last time items were added to the
ticket and the current system time.
DiamondTouch, Inc.
Copyright 2007
Page 36
DiamondTouch 5.5 Software Documentation
1.60
A.
Ticket Status (cont)
User Display (cont)
•
Driver
For Service Types set to “Allow Dispatch” [ See Section 3.25 A ], this
column will display the name of the Driver. If the ticket has not yet
been dispatched, then the column will display either:
Dispatch Due
Dispatch Over Due
Dispatch Late !!!
{ Green }
{ Yellow }
{ Red
}
If your Animated Controls function has been turned on [Section 3.10A]
, then any Over Due or Late tickets will also be accompanied by an
animated rotating beacon display.
•
Out
For Service Types set to “Allow Dispatch” [See Section 3.25 A],
this Column will display the time that the driver left with the order.
•
In
For Service Types set to “Allow Dispatch” [See Section 3.25 A], this
column will display the time that the driver returned.
To navigate through the lists of tickets, use the Up/Down arrow control buttons to move up or
down the list of tickets one at a time. To move up or down one page (about 8 tickets) at a time,
use the Page UP and Page DOWN control buttons, also located at the right of the screen
B.
Adjusting User Display Options w/ Screen Set Up
One of the more useful and powerful tools on the Ticket Status screen is the ability to set
individual Display Options for each user at each terminal. This allows an Order Taker or a
Manager to browse though only those tickets that satisfy a certain search criteria, like “Delivery
Tickets yet to be dispatched that were ordered by Suzy”, or “Dine In and Buffet tickets that are
still Open, sorted first to last”. These options can then be used to search for a single ticket, or to
print a customized report.
To adjust the Display Options, touch the “Screen Set Up” control at the bottom of the Ticket
Status Screen. [NOTE: You can only adjust the Display Options when you enter the Ticket Status
Screen via the Main Menu “Ticket Status” control button. Entering Ticket Status via the Server
Management or the Table Management areas will not allow the use of Screen Set Up, since the
Tickets have already been pre-sorted to a fixed criteria. [See Section 1.50 F and 1.70 B for more
information.]
Display Options provides the following search criteria options:
•
•
•
•
•
•
DiamondTouch, Inc.
Service Types
Order Taker
Driver
Display First-Last
Display Open Only
Tickets Not Yet
Dispatched
ALL, Single, or Multiple Service Types
ALL, or Selected Order Taker
ALL, or Selected Driver
Starts the top of display list with oldest ticket first;
Cashed Out (CLOSED) Tickets will not be shown
For those Service Types set for dispatch, will not show
dispatched tickets.
Copyright 2007
DiamondTouch 5.5 Software Documentation
Page 37
Before touching Finished to save the options, note that the current user’s name is also listed on the
top right portion of the Display Options Set Up box. This is a reminder that these options will be
saved under this user’s name, for this terminal only. Each time this user signs on and goes to
Ticket Status, DiamondTouch will search through the current day’s tickets according to these
search options. The search options can be changed at any time, of course.
If DiamondTouch cannot locate any tickets that meet the specified criteria, then the Ticket Status
screen will appear blank.
C.
Printing a Ticket Status Report
To print the Ticket Status report, touch the Print control Button at the lower left portion of the
Ticket Status Screen. All tickets found matching the selected sort criteria will be printed to that
station’s Windows default printer. The report was designed to be printed on an 80 column printer.
D.
View & Reprint Tickets
To view a ticket, select the ticket you wish to view by touching one of the white fields - the ticket
fields will turn blue once the ticket has been selected. Next, touch View Ticket. A pop up box
will appear displaying the basic details of the ticket you selected. Press Finished to return to the
Ticket Status screen.
If you wish to reprint the ticket, touch the All Profiles button, select the ticket profile you want to
reprint and touch Reprint on the pop-up box.
E.
Recalling Tickets
To recall a ticket, select the ticket you wish to recall by touching one of the white fields - the ticket
fields will turn blue once the ticket has been selected. Next, touch Recall Ticket. If the ticket can
be recalled, the Order Entry screen will appear with the ticket displayed in the Smart Check user
interface. Cashed Out (or, CLOSED) tickets cannot be recalled.
Note that the ability to recall a ticket is protected by a dedicated security level. A user must carry
a security level at least as high as the level set for recalling tickets to use this function. Please see
section 3.40 B for more information on setting up security levels.
F.
Cashing Out a Ticket
To cash out a ticket from the Ticket Status screen, select the ticket you wish to recall by touching
one of the white fields - the ticket fields will turn blue once the ticket has been selected. Next,
touch Cash Out. If the ticket can be cashed out, the Cash Out screen will appear with the ticket
that you selected displayed in the listing at the left of the screen. Tickets that have already been
cashed out cannot be cashed out again.
Note that the ability to cash out a ticket is protected by a dedicated security level. A user must
carry a security level at least as high as the level set for Cashing Out tickets to use this function.
Please see section 3.40 B for more information on setting up security levels.
If a cash drawer has not been configured for a terminal, then the cash out control will be disabled
on that terminal.
DiamondTouch, Inc.
Copyright 2007
DiamondTouch 5.5 Software Documentation
1.70
Page 38
Server Management
Server Management provides a quick overview of all Order Takers currently processing tickets on
the system. Listed for each Server are the server name, total dollars and total orders for each
section.
In addition, Server Management provides server detail report, a convenient short cut to Ticket
Status for a given server, and a method of cashing out multiple tickets at a time with the Server
Cash Out function.
A.
Server Detail Reports
To view a Server Detail Report, touch Server Management, select a server by touching the Server
Name and then touch Report.
The server detail report provides the following information:
1)
2)
3)
4)
5)
6)
7)
8)
9)
10)
Report Title
Server Name
Date and Time the Report was generated
Ticket Listing, including the Ticket Number, Section, Table Number, Total Value, Amount
Paid and Tender Method for each ticket
Subtotal of all tickets
Subtotal for each Tender Method
Subtotal of all Non-Cash Tenders
Balance Cash Due - (Total Ticket Value less Non-Cash Tenders)
Total Number and Value of all Open Tickets
Sales Breakdown by Service Type, including Service Type Description, Quantity, Total
Dollars, Total Covers (Guests) , average dollars per guest for each Service Type, and footed
totals for all of the above
Server Detail reports can be printed by touching the Print control button located at the bottom of
the detail report pop-up box. The Server Detail Report will print on the first local printer found on
the current terminal; if no local printer is found then the report will be spooled to the first system
printer found. For more information on setting up local and system printers, please see section
3.20 A. The server detail report was designed to print on a 40-column printer.
Current and historical Server Detail Reports can also be viewed from the Manager Reports
section. See section 2.15 A for more information on Server Reporting.
B.
Status List
The Status List control on the Server Management screen provides a short cut to a “pre-set” Ticket
Status Screen automatically configured to display tickets as follows :
All Service Types
Only those tickets ordered by the current user;
Only those tickets that are currently open, that is are not Cashed Out;
For more information on the Ticket Status Screen, see section 1.60.
DiamondTouch, Inc.
Copyright 2007
Page 39
DiamondTouch 5.5 Software Documentation
1.70
C.
Server Management (cont)
Server Cash Out
In addition to the standard Cash Out screen [See section 1.35] DiamondTouch also offers a Server
Cash Out function. The primary benefit of the Server Cash Out screen is its ability to cash out
multiple tickets in one operation, for cash or cash & check tenders only. The Server Cash Out
screen also offers the ability to use alternate tender keys and perform a split tenders on single
tickets, but it does not offer a split ticket capability - where multiple guests wish to split payment
for a single ticket. For this functionality, the standard Cash Out function is still recommended.
To use Server Cash Out, touch the Server Management control on the Main Menu, then select a
server by touching the Server Name. Next, touch Cash Out. DiamondTouch will load the Server
Cash Out screen and will display all open tickets for the selected server in the display box in the
upper left of the screen.
Before cashing out tickets, they must be selected. You may select tickets one at a time (touch the
Ticket and then touch Add Ticket) or you may select all tickets at once (touch All Tickets). The
total due amount will reflect the sum of all selected tickets. You may cancel the operation by
touching the Exit button, as long as you have not begun a partial tender, in which case you will be
prompted to complete the tender before exiting.
Tickets that are cashed out in a multiple Ticket Tender operation are logged with one of two
possible tender descriptions:
MTTCshOnly - Multiple Ticket Tender for Cash Only; and
MTTCsh&Chk - Multiple Ticket Tender with at least a partial Check Tender.
These descriptions will be attached to the ticket transactions when they are viewed in the various
register reports, to differentiate them from standard cash transactions.
Once each transaction has completed, a receipt will be printed [if your station has been configured
to print register receipts - see section 3.10 A]. The receipt will detail the following information:
1)
2)
3)
4)
5)
6)
7)
8)
9)
10)
Name of the Server, to whom the tickets are attached
Name of the Cashier - that is the current user that processed the payment transaction
Date & time of the transaction
“Server Cash Out” Receipt Header
A list of tickets cashed out, including the ticket number, Table No., and amount of each ticket
Subtotal of all tickets selected
Tender description and amount for each tender
Subtotal Paid amount, if more than one tender was made
Amount of change due
Ticket Total and Average Ticket Value for the transaction
There is no limit to the amount of tickets that can be processed in one transaction. This function is
therefore very useful for operations that run “Server Banking” until the end of the night. Servers
can balance their banks with the Server Detail Reports, then settle payments with management
using the Server Cash Out function for a speedy close out process at the end of the night.
DiamondTouch, Inc.
Copyright 2007
Page 40
DiamondTouch 5.5 Software Documentation
1.80
Phone Orders
DiamondTouch provides an extensive feature set for phone orders. Highlights include:
•
•
•
•
•
•
•
•
•
Customer Database in an open 32-Bit Microsoft Access compatible format
Instant customer look up by phone number, or by name
Complete order history, including capability of repeating any order with a single touch
Street database, with automatic street search function
Delivery areas, with automatic delivery charges by area, minimum order amounts, etc
Repeat customer “Points” feature
Priority messages tagged to “problem” or special consideration customers
Automatic coupons for new, “lazy” customers
Optional multi-line caller ID, with animated phone indicators - you could have your
customer’s order history on screen before you answer the phone!
By combining Caller ID with Repeat Any Order and a Default Service Type, a complete order for
a repeat customer calling in could by processed by touching the screen 5 times:
1)
2)
3)
4)
5)
Touch Line 1 on Caller ID Screen to access Customer Record
Answer phone, and ask the customer if they want to repeat the 2 Dinners & 1 Salad they
had last time: if the answer is yes, touch Repeat this Order
Touch NEXT - Order Entry will appear with the new ticket already filled out
Touch Finished - Delivery or Pick Up will be selected automatically
Touch Finish to print the order to all stations, and remember to thank the customer!
The above order could conceivably have been handled within 10-15 seconds or less!
Behind the scenes, automatic street search was used to locate a delivery area, an associated
delivery charge of $2.50 was added to the ticket based on the customer’s distance from the store,
the customer’s account was updated with 25 points towards a repeat customer award, a “Welcome
Back” Coupon was printed because the customer had not ordered within the last 45 days, and the
driver was reminded to deliver to the side of the house and beware of a neighbor’s dog thanks to a
priority message attached to the account.
By setting up a few parameters, and understanding how to use a few basic features, productivity
gains like the one above can be just a few touches away.
A.
Manual Phone Number Entry
For standard phone entry, without Caller ID enabled, a user must ask the customer for a phone
number and then enter the number into the system. To enter a phone number:
From the Main Menu touch Phone Order
Enter the number on the keypad, and press enter;
DiamondTouch will search the Customer database for a match, and will then display the customer
record on the Customer Information Screen. If no customer was found, the Customer Information
screen will read “New Customer”.
For additional information on the Customer Information screen, see section 1.85.
DiamondTouch, Inc.
Copyright 2007
Page 41
DiamondTouch 5.5 Software Documentation
1.80
B.
Phone Orders (cont)
Automated Phone Number Entry using Caller ID
For systems configured with Caller ID, touching the Phone Order control on the Main Menu will
bring up the Caller ID User Interface screen. To answer one of the eight (8) incoming lines,
simply touch the “Ringing” phone control associated with the line you wish to answer. The caller
ID Phone number displayed on your screen next to the “Ringing” Phone Control will be user to
automatically search the Customer Database, loading the Customer Information Screen with the
matching record.
If no customer was found, the Customer Information screen will read “New Customer”, and the
name returned by the Caller ID system will automatically be loaded into the Last Name field of
the Customer Information Screen.
If you wish to bypass the Caller ID information, you can enter a phone number in at any time by
pressing the Next control button on the Caller ID User Interface Screen.
Pressing Cancel at any time returns you to the Main Menu.
1.85
Customer Information Screen
The Customer Information screen is the main data entry screen used for Customer Information.
While this screen is generally used for phone orders, the Customer Information screen could also
be used for any customer that can be identified by a number - customers could even use frequent
customer cards to identify themselves.
From the Customer Information screen, you can search for customers by last name, search for
customers by phone number, perform an automatic or manual street search, browse through order
histories, view and edit customer points, directions, special comments, and many other useful
information - even your customer’s Birthdays!
To access the Customer Information screen, touch phone order and enter a phone number, or touch
the Customer Button under the Advanced button on the Order Entry screen. When the Customer
Information screen loads, it attempts to match the number you entered with an existing customer
record. If none is found, it displays a nearly blank form titled “New Customer”.
A.
Primary Data Entry Fields
The primary data entry fields on the Customer information screen are as are as follows:
1)
2)
3)
4)
5)
6)
Phone
Last Name
First Name
2nd Name
Address
Address 2
7) Zip
8) Map Grids
9) CR
DiamondTouch, Inc.
Customer Phone Number, up to 10 Digits long
This field will also be used to recall tickets by name
Primary Customer’s first name
Spouse / etc
Address Line 1
Address Line 2; this field will be appended to line 1 on the tickets, up to 20
characters total;
This field is used to look up City & State, which are read only fields in your
Zip Code Database [See Section 3.50 C for more information about Zip Code
Tables]
These fields can be used for Map Book Coordinates
Carrier Route - Used for mailing lists, etc.
Copyright 2007
DiamondTouch 5.5 Software Documentation
1.85
B.
Page 42
Customer Information Screen (cont)
Delivery Information
Delivery Information is determined by the Street Address of your customer. If the street for your
customer is found in the street database, and the street number falls within the specified range of
that street record, then the delivery area associated with that street record will be attached to your
customer and displayed just to the right of the Phone field. If not, then all customers are
considered to be in Delivery Area 1 as a default. The 3 lines will contain the following
information:
1) Area Description - Such as “Standard Area” or “Foot Hills”.
2) Minimum Order Amount - Highlighted in red if greater than 0.00.
3) Delivery Charge - Highlighted in red if greater than 0.00.
For more information on Delivery Areas, see section 3.50 E.
C.
Customer Information Windows
There are 3 different pop-up information windows (and 2 search result windows that are discussed
below) that provide additional information and functionality to the Customer Information Screen.
These windows will appear, one at a time, in the right hand portion of the Customer Information
Display.
Any 1 of the 3 information windows can be set to appear automatically each time the Customer
Information Screen is accessed by making that window the “Default Customer Window”. For
example, you may wish to see the Previous Orders window for every customer as soon as the
screen is opened. [See Section 3.10 A for more information on setting up a Default Customer
Window.]
You can view any of the three information windows at any time by touching the associated control
located on the lower control bar of the Customer Information Screen. The 3 information windows
are discussed in more detail as follows.
1) Customer Totals
The Customer Totals Window displays the following information:
•
•
•
•
•
•
Current Points - This is an editable field that can be used for automatic accumulation
and manual redemption of customer points for frequent diner awards programs, etc.
Points can be earned based on a preset dollar / points scale that can be adjusted by the
user. [See Section 3.50 D for more information about setting up Customer Point levels.]
The value in this field will increment automatically each time a ticket is saved. To
redeem point’s levels, recall this customer record and manually enter the new points total
in this field.
Total Points - This is a read only field that will record the total points earned for this
customer record. This is a non-resettable field from the Customer Information Screen.
Last Order - This is the date of the last order for this customer
Total Dollars - Total Dollars purchased by this customer.
Total Orders - Total Number of Orders (Tickets) for this customer.
Birthday - This is a miscellaneous field that can be used to store a customer’s Birthday,
for special marketing mailings, etc.
DiamondTouch, Inc.
Copyright 2007
DiamondTouch 5.5 Software Documentation
1.85
C.
Page 43
Customer Information Screen (cont)
Customer Information Windows (cont)
2) More Info
The More Info Window displays the following information:
•
Comments - This is basically a memo/scratch pad for noting any special issue or
concerns related to this customer. These comments will not appear on the customer’s
ticket, so this might be an excellent place to note the bad check you once received from
this patron!
If you want to insure that your people always see your comment, you can check the
Priority Comments checkbox in the upper right corner of this window. This way, the
More Info Window will always appear first whenever this customer calls in, over-riding
any “Default Customer Window” settings for your terminal. For example, let’s say that
you’ve set up your system to always display the Previous Orders Information Window
for every customer. When your “problem” customer calls in, however, your order taker
immediately sees an unfamiliar window - noting that this guy should be a cash only
delivery - or, is possibly not someone you want to deliver to at all. By checking Priority
Comments, you no longer have to require that your order takers check each and every
Phone Order customer against a Bad Check list.
•
Customer Status – You may activate a customer’s Account Receivable option and eight
other important notations of your choice by simply touching the Set Up button at the
bottom of the main screen. Next, touch Customers and then Customers again from the
pop up boxes that appear on the right of the screen. Finally, touch the Status button at the
bottom of the Customer Database screen.
•
Directions - For tickets set up to print Directions, the information in this window can be
transferred to the tickets automatically. Messages such as “Beware of Neighbor’s Dog”
can keep the same mistake from happening twice!
3) Previous Orders
Previous Orders is the most powerful of the 3 windows, and is generally the window that most
operations will set up as the “Customer Default Window”. All orders ever processed for this
customer are available via this intuitive display window. You can browse backwards and
forwards through the Customer’s Order History using the left & right browser buttons beneath
the ticket header. Note that orders will not appear in this window until the day’s business has
been closed; current orders will not be displayed here - they are available by recalling a ticket
by Phone Number [See Section 1.25 D].
You can repeat any previous order by checking the Repeat Previous Order button before
touching the NEXT button on the Customer Information Screen. The ticket currently in view
will be the ticket that is selected for duplication. When Order Entry loads, you will find an
identical order already keyed into the Order Entry Screen along with any updated pricing, of
course.
D.
Looking Up a Customer By Phone Number
To access a different customer by phone number, enter the new phone number in the “Phone” text
box at the top of the Customer Information Screen, then press the Enter key. If the customer
record is found, the new customer data will be displayed on the Customer Information Form. If
the record was not found, the Customer Information Screen will read “New Customer”.
DiamondTouch, Inc.
Copyright 2007
DiamondTouch 5.5 Software Documentation
1.85
E.
Page 44
Customer Information Screen (cont)
Looking Up a Customer by Name
To look up a customer by Last Name, type the new Last Name in the “Last Name” text box and
press then Enter key. A list of matching names will be displayed in an information box to the
right of the screen. To access the full record of one of the matching names, select the name by
touching it and then touch the small “Next” control in the Names Information Window. To close
the information window at any time, press cancel.
F.
Looking Up a Street Address
Matching customer street addresses to the Street Database is useful for assigning delivery areas, to
which you can assign different minimum orders and delivery charges, and for automatically
retrieving City, State and Map Grid information into your customer record. This can reduce data
entry time for new customers, since you would only need to request a name and an address to fill
in your Customer Information screen. For information on filling out your Street Database, please
see section 3.50 B.
If Automatic Street Search is turned on, the Customer Information screen will automatically try to
find a matching street for your customer record as soon as the screen is initialized. You can also
activate street search at any time by entering an address [example: 123 First Street] into the
Address text box on the Customer Information Screen, and by then pressing your Enter key.
If the street is not found, a Street Information Window will open automatically on the right side of
your screen. Street Search will attempt to match your street with the closing matching entries at
the top of the list. To select one of the displayed streets, touch the street and then touch the small
Next control within the street search information box. Before replacing your street name, Street
Search will evaluate the street address to make sure that it falls within the range of the street
selected. If the address matches, the street search box will disappear. If the address does not fall
within defined range of your selection, then the Street Search box will re-appear with a red “Street
Number is Out of Range” message. You can edit the street number in the address field and then
press enter to allow Street Search one more chance to match the record, or accept the entry “as is”
by touching the Cancel button on the Street Search Window.
DiamondTouch, Inc.
Copyright 2007
DiamondTouch 5.5 Software Documentation
1.90
Page 45
Delivery Management
For operations that provide delivery service to their customers, DiamondTouch provides a
comprehensive integrated Delivery Management System. From the Delivery Management screen,
you can view the status of drivers, both IN and OUT, add drivers to the IN list, dispatch drivers,
add tickets to drivers, remove tickets from drivers, cash out drivers, close driver accounts and view
summary and detail driver reports for the current period.
A.
Delivery Status Screen
The main delivery status screen is divided into 3 sections:
1) Drivers IN the store
2) Tickets scheduled for delivery
3) Drivers OUT of the store delivering orders
When a driver is added to the list by using the Add Driver control (see below) the driver is
automatically added to the end of the Drivers IN list. When a driver is dispatched using the Driver
Dispatch control (see below) the driver is moved to the Drivers OUT side, to signify that he is
OUT.
When a driver returns to the store, using the Driver IN control (see below) he is once again placed
at the end of the Drivers IN list. Drivers keep moving from the Drivers IN section to the Drivers
OUT section throughout the day as they delivery orders and return, until they are “Closed”.
The following information is displayed for each Driver IN:
1) Name- The Employee Name of the Driver
2) Driver $ - IN Driver $ is the sum of :
Outstanding amount of the Starting Bank
+ Full Value of all tickets not yet cashed out
+ Reimbursed amounts collected from tickets previously cashed out
3) Total $ - IN Total $ is the sum of:
Amount of the Starting Bank
+ Full Value of all tickets issued to the driver, both cashed out and open
4) Orders- The total number of tickets dispatched to this driver
5) Runs - Each time a driver is dispatched is considered one “run”. This field displays the total
runs for this driver for the day.
6) Avg Time - Average Time is the total amount of time OUT for all runs divided by the total
number of runs. For example, if a driver took 30 minutes for run # 1, and only 10 minutes for
run #2, then the average time per run would be 20 minutes.
DiamondTouch, Inc.
Copyright 2007
DiamondTouch 5.5 Software Documentation
1.90
A.
Page 46
Delivery Management (cont)
Delivery Status Screen (cont)
The following information is displayed for each Driver OUT:
1)
2)
3)
4)
Name- The Employee Name of the Driver
Order # - This field will list all of the ticket numbers for the current run only
Order $ - This is the dollar value of all tickets for the current run only
Driver $ - IN Driver $ is the sum of :
Outstanding amount of the Starting Bank
+ Full Value of all tickets not yet cashed out
+ Reimbursed amounts collected from tickets previously cashed out
5) Time Out - This is the elapsed time for the current run.
The driver display screen is also set to update automatically every few seconds when drivers are
dispatched or returned, even if they are using other terminals on the Network.
B.
Adding a Driver
To add a driver to the IN list, touch the Add Driver control on the lower part of the Driver
Management screen. Driver Management will prompt you to swipe the Driver’s ID Card on the
optional Wedge reader, or you may enter the Driver’s employee password with the keyboard.
Please note that the Driver must be clocked in before you can add him to the list. [See section
1.15 B for more information on clocking in an employee].
Once the password has been recognized, you will be prompted to enter a starting bank for the
driver. Note that the starting bank will be added to the driver bank, and will be deducted from the
cash drawer to which the current user is signed on. Therefore, if the amount of the driver’s
starting bank is greater than 0.00, you will need to have an active cash drawer on the system from
which to deduct the starting bank. If the drawer is not yet open, or the current user has not yet
signed onto a cash drawer, then you will be prompted to perform those functions before you can
assign a starting bank to a driver. Please see section 1.40 for more information on signing on to
and opening a Cash Drawer. If you do not wish to assign a starting bank to a driver, simply enter
zero (0.00).
If the current user does not have a password level sufficient to add drivers or to open a cash
drawer, the system will give you the opportunity to perform a “Manager Over-Ride” of these
functions. A Manager Over-Ride will allow a manager to swipe an ID card or enter a password to
perform a single function, without changing the identity of the current user.
Once the driver is added, note that the driver’s name has been added to the top ½ of the display,
indicating that this driver is in and is waiting to be dispatched. The amount of the starting bank
will be included in the Driver $ and Total $ fields.
DiamondTouch, Inc.
Copyright 2007
DiamondTouch 5.5 Software Documentation
1.90
C.
Page 47
Delivery Management (cont)
Dispatching a Driver
To dispatch a driver, first highlight one of the IN Drivers listed by touching the driver’s name.
Next, touch the ticket you want the selected driver to deliver and then touch the Driver Out button
at the bottom of the screen.
Tickets listed will be those that were saved with a Service Typeset to “Allow Dispatch”, such as a
Delivery Service Type. See section 3.25 - A for more information on setting up Service Types for
Dispatch.
The list of tickets shown includes the following information:
•
Elapsed
This is the amount of time that has passed since the ordered was placed. Note
that the color of this field will be Green, Yellow or Red. The color shown is based on minutes
elapsed, and the thresholds are settable by using the Colors control located at the bottom left
of the Open Delivery Orders screen.
•
Address
This is the Delivery Address for the ticket. This information was displayed in
the Customer Information Display in the fields labeled Address and Address 2 when the ticket
was saved. See section 1.85 for more information on the Customer Information screen.
•
Tkt #
•
Grid
This is the Map grid coordinate for the customer to which the ticket is to be
delivered. This information was displayed in the Customer Information Display in the fields
labeled Map Grids. See section 1.85 for more information on the Customer Information
screen.
•
Ordered
Ticket number
The time that the ticket was ordered, or was last updated.
In addition, the list of open tickets also includes a display of the current time, located in the upper
right hand corner of the screen. If more than 10 tickets are listed, MORE! Buttons located to the
right of the tickets allow browsing through the additional tickets. Tickets are listed with the oldest
ticket numbers first, so that the most urgent delivery orders should be the first ones you will see.
To issue tickets to the driver that you are dispatching, simply touch the ticket address fields. If
you wish to de-select the ticket, simply touch it a 2nd time. Selected tickets will be highlighted in
yellow, de-selected tickets will remain white. You may select and de-select as many tickets as you
wish.
Note that the driver has now been moved to the Drivers OUT section of the Delivery Status
display, and the tickets you selected will appear under the Order # fields for that driver.
DiamondTouch, Inc.
Copyright 2007
DiamondTouch 5.5 Software Documentation
1.90
D.
Page 48
Delivery Management (cont)
Removing a Ticket from a Driver
On some occasions, you may find it necessary to remove a ticket from a driver after the driver has
been dispatched. This could be because a driver has inadvertently selected the wrong ticket, or
because you decide to assign the ticket to another driver.
To remove a ticket from a driver, first touch Driver, then touch Driver Info. Next, select Ticket
Entry and then touch the Remove Ticket button located at the bottom of the Delivery Management
display.
Because this feature could represent an opportunity for abuse from an audit control stand point, a
dedicated security level protects this feature. [See section 3.40 B for more information on setting
up Security Levels.]. In addition, this event is logged as an exception event, similar to a voided
ticket, and will be highlighted on the Event Log Report for the current reporting period. [See
section 2.25 B for more information on Ticket Event Log reporting].
E.
Returning a Driver
When a driver returns to the store following a delivery run, the driver can be returned to the IN list
by simply touching the driver name, and then touching the “Driver In” control on the bottom right
side of the Delivery Management Screen
The driver information will move from the OUT list of the screen to the IN list of the screen.
F.
Cashing Out a Driver
Once a driver returns, it will be necessary at some point to account for the money collected by the
driver for each ticket. It is not necessary to cash out a driver after each run, but it is necessary to
cash out a driver before the driver account can be closed. The driver account must be closed for
all drivers before you can close the day, so this means that driver cash out is a mandatory
procedure.
To access the Driver Cash Out Screen, highlight one of the drivers in the IN list and touch the
Driver Info button at the bottom of the display. Touch the Cash Out button and DiamondTouch
will load the Driver Cash Out screen and will display all open tickets for the selected driver in the
display box in the upper left of the screen.
The user will be prompted to enter the Reimbursement Amount for each ticket. The
reimbursement amount will be issued to the driver as a cash disbursement from the currently open
cash drawer. The total amount due for each ticket will reflect the NET total due from the driver
(the ticket amount less the amount of reimbursement specified by the user). You may wish to
enter 0.00 as a reimbursement amount it you do not reimburse your drivers on a flat fee per ticket
basis.
Before cashing out tickets, they must be selected. You may select tickets one at a time (touch the
Ticket and then touch Add Ticket) or you may select all tickets at once (touch All Tickets). The
total due amount will reflect the sum of all selected tickets. You may cancel the operation by
touching the Exit button, as long as you have not begun a partial tender, in which case you will be
prompted to complete the tender before exiting.
DiamondTouch, Inc.
Copyright 2007
DiamondTouch 5.5 Software Documentation
1.90
Page 49
Delivery Management (cont)
G. Cashing Out a Driver (cont)
Tickets that are cashed out in a multiple Ticket Tender operation are logged with one of two
possible tender descriptions
• MTTCshOnly - Multiple Ticket Tender for Cash Only
• MTTCsh&Chk - Multiple Ticket Tender with at least a partial Check Tender.
These descriptions will be attached to the ticket transactions when they are viewed in the various
register reports, to differentiate them from standard cash transactions.
Once each transaction has completed, a receipt will be printed [if your station has been configured
to print register receipts - see section 3.10 A] which details the following information:
•
•
•
•
•
•
•
•
•
•
•
•
•
Name of the Driver, to whom the tickets are attached
Name of the Cashier - that is, the user that processed the payment transaction
Date & Time of the transaction
“Driver Cash Out” Receipt Header
An itemized listing of all tickets cashed out, including the ticket number, delivery address,
and amount of each ticket
Subtotal of all tickets selected
Amount of Returned Bank, if any
Amount of Reimbursements, if any
Balance Due Subtotal
Tender description and amount for each tender
Subtotal Paid amount, if more than one tender was made
Amount of change due, if any
Ticket Total and Average Ticket Value for this transaction
There is no limit to the amount of tickets that can be processed in one transaction. This function is
therefore very useful for operations that run “Driver Banking” until the end of the night. Drivers
can balance their banks with the Driver Detail Reports, then settle payments with management
using the Driver Cash Out function for a speedy close out process at the end of the night.
Before a driver’s account can be closed, you must return any outstanding driver banks to the
system. The driver bank can be returned using the Driver Cash Out Screen. Touch the “Bank To
Cashier” control on the Driver Cash Out screen, and the amount of any outstanding bank will
appear in the amount due window. Press a tender key, such as cash, and the bank will be returned.
Once the bank is returned, the display will read “Cashed Out”. The driver bank must be returned
as a separate transaction, for accuracy in accounting for and reporting tender methods and amounts
to tickets.
DiamondTouch, Inc.
Copyright 2007
DiamondTouch 5.5 Software Documentation
1.90
G.
Page 50
Delivery Management (cont)
Closing Out a Driver
Once all of the driver’s tickets have been cashed out, and any outstanding Driver Banks have been
returned, you are ready to close the driver’s account. From the delivery management screen, touch
the driver name from the list of drivers currently shown as IN. Select the Driver Info button at the
bottom of the page and then select Close Out on the Driver Detail pop up box. The driver’s
account will be closed automatically. A driver Check Out ticket will print detailing the following
information:
1) Driver Name
2) Date and Time that the driver account was closed
3) Amount of Bank Returned (labeled “Added Cash”)
4) Total of all tickets
5) Total Number of Tickets
6) Total Number of Runs
7) Average time per run
H.
Driver Summary Report
The Delivery Management screen also provides options for displaying and printing reports for the
current period. These reports are also available under Reports [See section 2.40]. To access the
reports, touch the Reports control on the lower left of the Delivery Management Screen.
The Driver Summary Report details the following information:
1)
2)
3)
4)
5)
6)
7)
Date & Time of Report
Name of Report
Driver Name, for each driver
Driver Status (Open / Closed) for each driver
Total # Runs for each Driver
Total # Tickets for each driver
Total $ for each driver
To print the Driver Detail Report, touch Print. The report will print to the first local printer found
on your terminal. If no local printer is found, the report will be spooled to the first system printer
found. For more information on setting up local and system printers, see section 3.20 A. Note:
This report is designed to print on a 40-column printer.
DiamondTouch, Inc.
Copyright 2007
DiamondTouch 5.5 Software Documentation
1.90
I.
Page 51
Delivery Management (cont)
Driver Detail Reports
To access a Driver Detail Report, first access the Driver Summary Reports detailed in the previous
section. Select a driver by touching the driver’s name, and then touch the Driver Info control on
the lower command bar. A pop up window will then display the Driver Detail Report.
The Driver Detail Report contains the following information:
1)
2)
3)
4)
5)
6)
7)
8)
9)
Date & Time of Report
Name of Report
Driver Name
A Ticket Detail Report, including the Run Number, Ticket Number, Delivery Address and
Dollar Amount for each ticket.
Total Ticket Dollars
Outstanding Bank
Total Driver Amount
A Run Detail Report, including the Run #, Time Out, Time In, Total Time, Total Tickets,
Average time Per Ticket and Total Ticket Amount for each Run
Footed Totals for the Run Detail Report.
DiamondTouch, Inc.
Copyright 2007
DiamondTouch 5.5 Software Documentation
Page 52
PART 2 Manager Features
2.10
A.
Sales Reporting
Daily Sales Reports
To view the Daily Sales Reports, touch the Reports control on the Main Menu screen. From the
Manager Reports main menu, touch Sales, then select Daily Sales from the Sub-Menu Selection
Window in the lower left quadrant of the Manager Reports screen. Select the desired report date
from the Report Date Selection Window in the Lower Right quadrant of the screen, and press
Next.
The Daily Sales Report is actually 5 summary reports compiled into a single Daily Sales
Summary. Each of these summary reports is discussed below. The five Summary reports are:
1)
2)
3)
4)
5)
Net Sales Summary by Service Type
Gross Sales Summary by Hour
Net Sales Summary By Category
Net Sales Summary by Patron Count
Discount Summary by Discount Type
1) Net Sales Summary by Service Type
The Net Sales Summary by Service Type Report can give you a quick snapshot of your
business day.
In addition to totals for
tickets and sales, the
breakdowns and %’s by
service type can let you
know how each “profit
center” within your
business is doing at a
glance. Keeping an eye
on average ticket values
can also let you know if
anything unusual is
taking place.
Detailed on this report you will find:
a)
b)
c)
d)
e)
f)
g)
h)
DiamondTouch, Inc.
Ticket Quantity for each Service Type
Ticket Dollars for each Service Type
Percentage of Total Dollars for each Service Type
Average Ticket Value for Each Service Type
Footed Sub-Totals for Ticket Quantity, Dollars, Percentage and Average Ticket
Value
Price Adjustment Quantity, Dollar Value and Percentage of Sales
Sales Tax
Gross Sales Total
Copyright 2007
Page 53
DiamondTouch 5.5 Software Documentation
2.10
A.
Sales Reporting (cont)
Daily Sales Reports (cont)
2)
Gross Sales Summary by Hour
The Gross Sales Summary by Hour Report gives you a fast overview of your sales
distribution throughout the business day.
Detailed on this report you will find:
a)
b)
c)
d)
Total Ticket Quantity for each Hour
Total Ticket Dollar Value for each Hour
A Self Scaling “Side Bar Text Graph” Displaying Dollar value by hour
Footed Totals
For this report, total ticket values are logged into the hour during which they were last
changed.
3) Net Sales Summary By Category
The Net Sales Summary by Category Report breaks down the Sales by your Menu Categories.
This allows you to tell at a glance how much each of the Menu Categories is contributing to
your total sales.
Detailed on this report you will find:
a)
b)
c)
d)
e)
f)
g)
h)
Category Name for each Category
Quantity of Items Ordered in each Category
Total Sales from Each Category
Percent of Sales Contribution from each Category
Footed sub-totals for sales and percentage of Total Sales
Total Quantity, Dollars, and Percentage of Sales for Discounts
Total Quantity and Dollars for Delivery Charges
Net Sales Total
Note that your Net Sales total in item h) above should always tie back to your Net Sales total
listed under the Net Sales Summary by Service Type report.
4) Net Sales Summary By Patron Count
The Net Sales Summary by Category Report breaks down the total sales yet another way - by
Patron Count for each of your Service Types.
The net sales summary by Patron Count includes the following information:
a)
b)
c)
d)
e)
DiamondTouch, Inc.
Ticket Quantity for each Service Type
Ticket Dollars for each Service Type
Patron Quantity for each Service Type
Average Dollars per Patron for each Service Type
Footed totals, including Average Dollars Per Patron Type for All Service Types
Combined
Copyright 2007
Page 54
DiamondTouch 5.5 Software Documentation
2.10
A.
Sales Reporting (cont)
Daily Sales Reports (cont)
5) Discount Summary By Discount Type
The Discount Summary by Discount Type report summarizes all discounts and price
adjustments for all tickets processed during the day. [See section 1.20 E for more information
on discounts and Price Adjustments].
The Discount Summary by Discount Type report includes the following information:
a)
b)
c)
d)
e)
f)
g)
d)
Quantity for each Discount Type
Dollars for each Discount Type
Percentage of Net Sales for each Discount Type
Footed Discount Subtotals for Quantity, Dollars and Percentage of Net Sales
Quantity for each Price Adjustment Type
Dollars for each Price Adjustment Type
Percentage of Net Sales for each Price Adjustment Type
Footed Price Adjustment Subtotals for Quantity, Dollars and Percentage of Net
Sales
To print all 5 of the reports bundled into the Daily Sales Report, touch the Print control at the
lower left of the report display screen. The report will print to your Windows default printer. This
report was designed to be printed on an 80 column printer.
B.
Daily Item Report
To view the Daily Item Report, touch the Reports control on the Main Menu screen. From the
Manager Reports main menu , touch Sales, then select Daily Item from the Sub-Menu Selection
Window in the lower left quadrant of the Manager Reports screen. Select the desired report date
from the Report Date Selection Window in the Lower Right quadrant of the screen, and press
Next.
The Daily Item Report provides an even more detailed view of the daily sales make up by menu
selection than does the Net Sales Summary by Category. The Daily Item Report includes the
following information, sorted by Menu Category and Menu Item number:
a)
b)
c)
d)
e)
Quantity for each Menu Item
Dollars for each Menu Item (includes value of ordered menu modifiers)
Percentage of Net Sales for Each Menu Item
Average Sales Value of each Menu Item
Footed totals for each category, including the Quantity Sold, Dollars, Percentage
of Net Sales and Average Value.
To make the report more readable, and to save paper, the Daily Item report will only print
information for defined menu items that were sold during the reporting period.
To print the report, touch the Print control at the lower left of the report display screen. The report
will print to your Windows default printer. This report was designed to print on an 80-column
printer.
DiamondTouch, Inc.
Copyright 2007
DiamondTouch 5.5 Software Documentation
2.10
Sales Reporting (cont)
C.
Daily Modifier Report
Page 55
To view the Daily Modifier Report, touch the Reports control on the Main Menu screen. From the
Manager Reports main menu , touch Sales, then select Daily Modifier from the Sub-Menu
Selection Window in the lower left quadrant of the Manager Reports screen. Select the desired
report date from the Report Date Selection Window in the Lower Right quadrant of the screen,
and press Next.
The Daily Item Report (see above) includes the cost of any Menu Modifiers ordered with the items
in the report totals. For example, if a Pizza has been ordered with extra cheese and onions, then
the price for those modifiers is included in the total Pizza pricing listed in the Daily Item Report.
To get a separate look at how many toppings were ordered, the Daily Modifier report provides the
required level of detail.
The Daily Modifier Report includes the following information, sorted by Modifier List and Menu
Modifier number:
a)
b)
c)
d)
e)
Quantity for each Menu Modifier
Dollars for each Menu Modifier
Percentage of Net Sales for Each Menu Modifier
Average Sales Value of each Menu Modifier
Footed totals for each Modifier List, including the Quantity Sold, Dollars, and
Percentage of Net Sales and Average Value.
To make the report more readable, and to save paper, the Daily Modifier report will only print
information for defined menu modifiers that were sold during the reporting period.
To print the report, touch the Print control at the lower left of the report display screen. The report
will print to your Windows default printer. This report was designed to print on an 80-column
printer.
D.
Period Sales Reports
The Period Sales Report is identical to that of the Daily Sales Report with one exception - the
reporting period is not limited to a single reporting day, but is user definable for any range of
dates.
To save a step when calling up reports, Reporting Periods are defined in advance using the
Reporting Period tool found under Custom Reports. This way, once the user has defined a week,
month, or other reporting period once, it does not have to be repeated each time a report is pulled.
[See section 2.50 A for more information on defining reporting periods.]
To view the Period Sales Reports, touch the Reports control on the Main Menu screen. From the
Manager Reports main menu , touch Sales, then select Period Sales from the Sub-Menu Selection
Window in the lower left quadrant of the Manager Reports screen. Select the desired reporting
period from the Report Period Selection Window in the Lower Right quadrant of the screen, and
press Next. DiamondTouch will display a progress bar while the report is built.
For more information on data detailed in the Period Sales Report, please refer to the Daily Sales
Report descriptions in Section 2.10 A.
To print the report, touch the Print control at the lower left of the report display screen. The report
will print to your Windows default printer. This report was designed to print on an 80-column
printer.
DiamondTouch, Inc.
Copyright 2007
DiamondTouch 5.5 Software Documentation
2.10
E.
Page 56
Sales Reporting (cont)
Period Item Reports
The Period Item Report is identical to that of the Daily Item Report with one exception - the
reporting period is not limited to a single reporting day, but is user definable for any range of
dates.
To save a step when calling up reports, Reporting Periods are defined in advance using the
Reporting Period tool found under Custom Reports. This way, once the user has defined a week,
month, or other reporting period once, it does not have to be repeated each time a report is pulled.
[See section 2.50 A for more information on defining reporting periods.]
To view the Period Item Reports, touch the Reports control on the Main Menu screen. From the
Manager Reports main menu, touch Sales, then select Period Item from the Sub-Menu Selection
Window in the lower left quadrant of the Manager Reports screen. Select the desired reporting
period from the Report Period Selection Window in the Lower Right quadrant of the screen, and
press Next. DiamondTouch will display a progress bar while the report is built.
For more information on data detailed in the Period Item Report, please refer to the Daily Item
Report descriptions in Section 2.10 B.
To print the report, touch the Print control at the lower left of the report display screen. The report
will print to your Windows default printer. This report was designed to print on an 80-column
printer.
F.
Period Modifier Reports
The Period Modifier Report is identical to that of the Daily Modifier Report with one exception the reporting period is not limited to a single reporting day, but is user definable for any range of
dates.
To save a step when calling up reports, Reporting Periods are defined in advance using the
Reporting Period tool found under Custom Reports. This way, once the user has defined a week,
month, or other reporting period once, it does not have to be repeated each time a report is pulled.
[See section 2.50 A for more information on defining reporting periods.]
To view the Period Modifier Reports, touch the Reports control on the Main Menu screen. From
the Manager Reports main menu , touch Sales, then select Period Modifier from the Sub-Menu
Selection Window in the lower left quadrant of the Manager Reports screen. Select the desired
reporting period from the Report Period Selection Window in the Lower Right quadrant of the
screen, and press Next. DiamondTouch will display a progress bar while the report is built.
For more information on data detailed in the Period Modifier Report, please refer to the Daily
Modifier Report descriptions in Section 2.10 C.
To print the report, touch the Print control at the lower left of the report display screen. The report
will print to your Windows default printer. This report was designed to print on an 80-column
printer.
DiamondTouch, Inc.
Copyright 2007
DiamondTouch 5.5 Software Documentation
G.
Page 57
Period Summary Reports
The Period Summary Report is a weekly summary sales breakdown. The report provides the
following data totals for each day of the week selected with a weekly total:
1)
2)
3)
4)
5)
6)
7)
8)
Access Date and Time
Week day
Ticket
Guest
Net Sales
Price Adjustments
Tax
Totals
To view the Period Summary Reports, touch the Reports control on the Main Menu screen. From
the Manager Reports main menu, touch Sales, then select Period Summary from the Sub-Menu
Selection Window in the lower left quadrant of the Manager Reports screen. Select the desired
reporting period from the Report Period Selection Window in the Lower Right quadrant of the
screen, and press Next. DiamondTouch will display a progress bar while the report is built.
2.15
Server Reporting
Server Reporting provides a store manager with a wealth of information for analyzing sales
information by individual Server. Server sales by Section, Guest Counts, breakdowns by Service
Type and Menu Category, and “Drill Down” detail reporting are described in greater detail below.
A.
Server Summary Report
To view the Server Summary Report, touch the Reports control on the Main Menu screen. From
the Manager Reports main menu, touch Servers, then select Server Summary from the Sub-Menu
Selection Window in the lower left quadrant of the Manager Reports screen. Select the desired
reporting day from the Selection Window in the Lower Right quadrant of the screen, and press
Next.
The Server Summary report actually includes 2 separate reports:
DiamondTouch, Inc.
Copyright 2007
Page 58
DiamondTouch 5.5 Software Documentation
2.15
A.
Server Reporting
Server Summary Report (cont)
1)
Server Summary Report includes the following information:
a)
b)
c)
d)
e)
f)
2)
Server Sales by Service Type Report includes the following information:
a)
b)
c)
B.
Server Name, for each server section
Server Section, for each server section
Total Tickets, for each server section
Total Patrons, or Guests, for each server section
Total Dollars for each Server Section
Footed totals for tickets, patrons and dollars for all server sections combined;
Server Name, for each server section
Total Server Sales for each Service Type
Footed totals for each Service Type
Server Detail Report
The Server Detail report is a “Drill Down” report option viewable only from the Server Summary
Report Screen. To view the Server Detail Report, select a server by touching the one of the Server
Names on the Server Summary Report. [To access the Server Summary Report, see section 2.15
A, above].
Once you have selected a server, touch Server Detail and Sales Category buttons that appears on
the control bar at the bottom of the Server summary report screen. A pop up box will detail the
server activity for the reporting period.
The server detail report provides the following information:
a)
b)
c)
d)
e)
f)
g)
h)
i)
j)
Report Title
Server Name
Date and Time the Report was generated
Ticket Listing, including the Ticket Number, Section, Table Number, Total
Value, Amount Paid and Tender Method for each ticket
Subtotal of all tickets
Subtotal for each Tender Method
Subtotal of all Non-Cash Tenders
Balance Cash Due - (Total Ticket Value less Non-Cash Tenders)
Total Number and Value of all Open Tickets
Sales Breakdown by Service Type, including Service Type Description,
Quantity, Total Dollars, Total Covers (Guests), average dollars per guest for
each Service Type, and footed totals for all of the above
Server Detail reports can be printed by touching the Print control button located at the bottom of
the detail report pop up box. The Server Detail Report will print on the first local printer found on
the current terminal; if no local printer is found then the report will be spooled to the first system
printer found. For more information on setting up local and system printers, please see section
3.20 A. The server detail report was designed to print on a 40-column printer.
DiamondTouch, Inc.
Copyright 2007
DiamondTouch 5.5 Software Documentation
2.15
C.
Page 59
Server Reporting (cont)
Server Sales By Category Reports
The Server Sales by Category Report is a “Drill Down” report option viewable only from the
Server Summary Report Screen. To view the Server Sales by Category Report, select a server by
touching the one of the Server Names on the Server Summary Report. [To access the Server
Summary Report, see section 2.15 A, above].
Once you have selected a server, touch the Server Sales by Category control that appears on the
control bar at the bottom of the Server summary report screen. A pop-up box will detail the server
sales by category activity for the reporting period.
The Server Sales by Category Report provides the following information:
a)
b)
c)
d)
e)
f)
g)
Report Title
Server Name
Date and Time the Report was generated
Reporting Period
Category Name, for each category with sales data
Quantity of items sold in each category with sales data
Total amount sold in each category with sales data
Server Sales by Category Reports can be printed by touching the Print control button located at the
bottom of the detail report pop up box. The Server Sales by Category Report will print on the first
local printer found on the current terminal; if no local printer is found then the report will be
spooled to the first system printer found. For more information on setting up local and system
printers, please see section 3.20 A. The Server Sales by Category Report was designed to print on
a 40-column printer.
D.
Server Tips
To view the Server Tips Report, touch the Reports control on the Main Menu screen. From the
Manager Reports main menu, touch Servers, then select Server Tips from the Sub-Menu Selection
Window in the lower left quadrant of the Manager Reports screen. Select the desired employee
from the Selection Window in the Lower Right quadrant of the screen, and press Next.
The Server Tips Report provides the following information:
1)
2)
3)
4)
5)
DiamondTouch, Inc.
Report Title
Server Name
Pay Period
Credit Card Tips
Declared Cash Tips
Copyright 2007
DiamondTouch 5.5 Software Documentation
2.15
Server Reporting (cont)
E.
Daily Items/Sales
Page 60
To view the Server Daily Items/Sales Report, touch the Reports button on the main menu screen.
From the Manager Reports main menu, touch Servers, then select Server Daily Items/Sales from
the Sub-Menu Selection Window in the lower left quadrant of the Manager Reports screen. Select
the desired period from the Selection Window in the Lower Right quadrant of the screen, and
press Next.
The Items by Server Report provides totals by employee for the various categories and items on
your menu. To select a different category or item, simply scroll left or right using the Category or
Item buttons at the bottom of the screen.
The Report provides the following information:
1)
2)
3)
4)
5)
6)
F.
Report Title
Report Date and Time
Server
Quantity
Sales
Number of Tickets
Period Item Sales
To view the Period Item Sales Report, touch the Reports control on the Main Menu screen. From
the Manager Reports main menu, touch Servers, then select Period Item Sales from the Sub-Menu
Selection Window in the lower left quadrant of the Manager Reports screen. Select the desired
weekly period from the Selection Window in the Lower Right quadrant of the screen, and press
Next. Scroll through the category and/or items button in the Lower Right quadrant of the screen.
Once the desired Category and Item have been selected, touch Next. The Processing Data bar will
appear while the information is being compiled.
The Period Item Sales Report provides the following information:
1)
2)
3)
4)
5)
6)
7)
DiamondTouch, Inc.
Report Title
Report Week
Sales for Category and Item
Server
Quantity
Sales
Number of Tickets
Copyright 2007
DiamondTouch 5.5 Software Documentation
2.20
A.
Page 61
Labor Reporting
Daily Labor Reports
The Daily Labor Report provides a detail listing of every employee/shift worked for the selected
date, and includes hours worked, labor dollars spent and sales generated.
To view the Daily Labor Report, touch the Reports control on the Main Menu screen. From the
Manager Reports main menu , touch Labor, then select Daily Labor from the Sub-Menu Selection
Window in the lower left quadrant of the Manager Reports screen.
The Daily Labor Report will be displayed for the current reporting date. If the report is being
viewed for the first time, then the default date will be the current date.
To change the reporting date, touch Report Date, then use the Calendar Selection Screen to select
a new reporting date. You may browse through the possible dates using the scroll bars next to the
month and year indicators. To select a new date, simply touch the date on the calendar, and press
OK.
The Daily Labor Report provides the following information for each employee that clocked in for
the selected report date:
1)
2)
3)
4)
5)
6)
7)
8)
Employee Name, Social Security Number & Record Number
SC - Service Code 1-5 declared by the employee during clock IN.
IN Time
OUT Time
Time - Total time worked, in hours and minutes.
RgHrs - Regular Hours. Hours are considered regular unless the employee has
exceeded 40 hours for the 7 day reporting period.
OTHrs - Overtime Hours. Any time worked past 40 hours for each 7 day
reporting period are counted as overtime hours.
RgLabor - Regular Labor. Regular labor is calculated according to the
following formula: Regular Hours X Employee Regular Pay Rate.
The employee Regular Pay Rate is the amount entered on the Employee Set Up
form for the indicated Service Code. See section 3.40 A for more information on
setting up employee pay rates.
OTLabor - Overtime Labor. Overtime Labor is calculated according to the
following formula: Overtime Hours X Employee Overtime Rate
The employee Overtime Pay Rate is the amount entered on the employee Set Up
form for the indicated Service Code. If no amount is entered under employee
Overtime Rate, then the Overtime Pay Rate is calculated to be the Regular Pay
Rate for the indicated service code multiplied by 1.5. See section 3.40 A for
more information on setting up employee pay rates.
Tips - Any tips declared by employee during Clock Out.
Sales - Line items on tickets that were ordered by this employee between the
time the employee clocked in and when the employee clocked out.
To print the report, touch the Print control at the lower left of the report display screen. The report
will print to your Windows default printer. This report was designed to print on an 80-column
printer.
DiamondTouch, Inc.
Copyright 2007
DiamondTouch 5.5 Software Documentation
2.20
B.
Page 62
Labor Reporting (cont)
Period Labor Reports
The Period Labor Report is identical to the Daily Labor Report described in the previous section,
with the exception that the Period Labor Report includes a detail listing for every employee/shift
worked for the entire Pay Period, not just a single day.
To view the Period Labor Report, touch the Reports control on the Main Menu screen. From the
Manager Reports main menu , touch Labor, then select Period Labor from the Sub-Menu
Selection Window in the lower left quadrant of the Manager Reports screen.
To change the reporting period, touch Pay Period, then use the Calendar Selection Screen to select
a new reporting period. You may browse through the possible dates using the scroll bars next to
the month and year indicators. To select a new reporting period, simply touch any date within the
reporting period, and the reporting period for that date will be highlighted. Press OK to select the
reporting period.
To print the report, touch the Print control at the lower left of the report display screen. The report
will print to your Windows default printer. This report was designed to print on a 80-column
printer.
DiamondTouch allows you to export your labor information in a format accessible by ADP. The
ADP Export button at the bottom of the Period Labor Reports screen can be saved on disk or
email directly to ADP for payroll processing.
C.
Productivity Reports
The Productivity Report provides a 3D Bar Graph displaying the average Sales Per Hour ratios for
each sales hour in the selected reporting date, as well as a cumulative average sales per hour ratio
for the selected reporting date. In addition to the 3D Bar Graph, the Productivity Report also
displays a Sales Per Hour breakdown that includes the back up data used to compute the averages.
The Productivity Report can be viewed for any employee, or for all employees combined.
To view the Productivity Report, touch the Reports button on the main menu screen. From the
Manager Reports main menu, touch Labor, then select Productivity from the Sub-Menu Selection
Window in the lower left quadrant of the Manager Reports screen. Next, select a specific
Employee Name, or All Employees, from the selection window that appears in the lower right
quadrant of the screen.
Like all other Labor Reports, the Productivity Report is based in part on employee time records.
Sales are only graphed if employee time has been recorded for the selected report date, since the
purpose of the report is to detail sales per actual hours worked.
To change the reporting date, touch Report Date, then use the Calendar Selection Screen to select
a new reporting date. You may browse through the possible dates using the scroll bars next to the
month and year indicators. To select a new date, simply touch the date on the calendar, and press
OK.
DiamondTouch, Inc.
Copyright 2007
DiamondTouch 5.5 Software Documentation
2.20
C.
Page 63
Labor Reporting (cont)
Productivity Reports (cont)
The Productivity Detail Report includes the following information:
1)
2)
3)
4)
5)
6)
7)
8)
Report Header, including Title of Report, Employee Name Selected, selected
date of report and the reporting Pay Period.
Hour identifier, for each hour in which sales were entered
Total Hourly Sales Amount, for each sales hour
Total Hours worked, for each sales hour
Average Sales Per Hour Worked, for each sales hour
Cumulative Sale Dollars for each sales hour
Cumulative Hours worked, for each sales hour
Cumulative Average Sales Per Hour, for each hour worked.
To print the report, touch the Print control at the lower left of the report display screen. The detail
report will print to your Windows default printer. This report was designed to print on a 80column printer.
D.
Sales VS Labor Reports
The Sales VS Labor report provides a 3D Bar Graph detailing the Sales Dollars Produced and
Labor Dollars expended for each hour in the selected report date. The Sales VS Labor report can
be viewed for any employee, or for all employees combined. In addition to the 3D Bar Graph, the
Sales VS Labor Report also provides a detail report that provides the back-up data used to create
the 3D Bar Graph.
To view the Sales VS Labor Report, touch the Reports control on the Main Menu screen. From
the Manager Reports main menu, touch Labor, then select Sales VS Labor from the Sub-Menu
Selection Window in the lower left quadrant of the Manager Reports screen. Next, select a
specific Employee Name, or All Employees, from the selection window that appears in the lower
right quadrant of the screen.
Like all other Labor Reports, the Sales VS Labor Report is based in part on employee time
records. Sales are only graphed if employee time has been recorded for the selected report date,
since the purpose of the report is to detail sales VS actual hours worked. In addition, the Labor
Dollars calculated are based upon the hourly rates keyed in for the employees. If no hourly rates
are entered for the employees, then the resulting labor costs will be reported as 0.00 for all hours.
Please see section 3.40 A for more information on setting up Employee Pay Rates.
To change the reporting date, touch Report Date, then use the Calendar Selection Screen to select
a new reporting date. You may browse through the possible dates using the scroll bars next to the
month and year indicators. To select a new date, simply touch the date on the calendar, and then
press OK.
DiamondTouch, Inc.
Copyright 2007
DiamondTouch 5.5 Software Documentation
2.20
D.
Page 64
Labor Reporting (cont)
Sales VS Labor Reports (cont)
The detail report includes the following information:
1)
2)
3)
4)
5)
6)
7)
8)
9)
10)
A report header, including the name of the report, the employee selected and the date
selected for the report.
Hour identifier, for each hour in which sales were entered
Total hourly sales amount, for each sales hour
Total hours worked, for each sales hour
Total Labor Dollars, for each hour worked
Total Labor as a Percentage of Sales, for each hour
Cumulative total hourly sales amount, for each sales hour
Cumulative total hours worked, for each sales hour
Cumulative total labor dollars, for each hour worked
Cumulative total labor as a percentage of sales, for each hour
To print the report, touch the Print control at the lower left of the report display screen. The detail
report will print to your Windows default printer. This report was designed to print on an 80column printer.
2.25
A.
Ticket Detail Reporting
Ticket Listing
To view the Ticket Listing, touch the Reports control on the main menu screen. From the
Manager Reports main menu, touch Ticket Detail, then select Ticket Listing from the Sub-Menu
Selection Window in the lower left quadrant of the Manager Reports screen. Next, select a report
date from the selection window that appears in the lower right quadrant of the screen and touch
next.
B.
Ticket Detail Reports
Thanks to a unique data compression methodology, DiamondTouch saves all raw ticket
information, even after the day has been closed, to provide management with detail reporting days,
weeks, months, or even years after the day was closed. Information on Menu Items ordered,
transaction detail and even driver information is saved for viewing at any time. In addition,
DiamondTouch even allows the user to view the ticket history, including any changes or deletions,
using the Ticket History “drill down” reporting feature. Finally, to allow Management the
capability of creating its own custom reports, DiamondTouch allows the user to export and view
the Ticket Detail in Microsoft Excel, without ever leaving DiamondTouch.
To view the Ticket Detail Report, touch the Reports control on the Main Menu screen. From the
Manager Reports main menu, touch Ticket Detail, then select Ticket Detail from the Sub-Menu
Selection Window in the lower left quadrant of the Manager Reports screen. Next, select a report
date from the selection window that appears in the lower right quadrant of the screen.
DiamondTouch, Inc.
Copyright 2007
DiamondTouch 5.5 Software Documentation
2.25
B.
Page 65
Ticket Detail Reporting (cont)
Ticket Detail Reports (cont)
The Ticket Detail report contains the following information:
1)
2)
3)
4)
5)
6)
7)
8)
9)
10)
11)
Report Header, including the name of the report, the reporting period, and the date and
time that the report was accessed.
Ticket number, for each ticket
Table Number, for each ticket
Guest Count, for each ticket
Server Name, for each ticket
Service Type for each ticket
Order Time, for each ticket
Quantity, Description and Price for every item on every ticket
Subtotal, Tax and Total for each ticket
Itemized register transaction detail for each ticket including the name of the cashier, the
tender method, amount tendered, change amount, the terminal number and cash drawer
number and the time each transaction occurred.
Itemized delivery detail for each ticket including the driver name, time out, customer’s
phone number, time in, and delivery address.
1. Ticket History Report
In addition to saving all of the final information for each and every ticket, DiamondTouch also
saves each previous version of each and every ticket. This allows management to review any
changes made to the tickets during the day, and to also view the earlier status of tickets edited to
lower value, voided, or re-assigned to different drivers.
To view the Ticket History report, touch the Reports control on the main menu. From the
Manager Reports main menu, touch Ticket Detail, then select Ticket Detail from the Sub-Menu in
the lower left quadrant. Next, select a report date and then select the ticket from the summary
report window that you wish to view. Touch the ticket number row on the report display and then
touch the Ticket History control that appears on the lower control.
DiamondTouch, Inc.
Copyright 2007
DiamondTouch 5.5 Software Documentation
2.25
B.
Page 66
Ticket Detail Reporting (cont)
Ticket Detail Reports (cont)
1. Ticket History Report (cont)
The ticket history report displays the following information:
a)
b)
c)
Report header, including title of report, date report is viewed, ticket number, and
the ticket date.
For each version of the ticket that was saved and/or printed, the ticket number,
time, service type and an itemized list of each line item including the quantity,
description and price
For each version of the ticket, the delivery history, including Driver, address,
time OUT and time IN.
To print the Ticket History report, touch the print control on the Ticket History Pop Up window.
The Ticket History Report will print to the first local printer found on the system. If no local
printer is found, then the report will be spooled to the first system printer found. For more
information on setting up local and system printers, see section 3.20 A.
The Ticket History Report was designed to print on 40 column printers.
DiamondTouch, Inc.
Copyright 2007
DiamondTouch 5.5 Software Documentation
2.25
B.
Page 67
Ticket Detail Reporting (cont)
Ticket Detail Reports (cont)
2. Exporting Ticket Detail to EXCEL
To export the Ticket Detail data to Microsoft Excel, you must first have a working copy of
Microsoft Excel 97 loaded on the terminal.
To export the Ticket Detail data to Microsoft Excel 97, first pull up the Ticket Detail Report by
touching the Reports control on the Main Menu. From the Manager Reports main menu, touch
Ticket Detail, then select Ticket Detail from the Sub-Menu Selection Window in the lower left
quadrant of the Manager Reports screen. Next, select a report date from the selection window that
appears in the lower right quadrant of the screen. Touch Export to Excel to initiate the data
conversion process.
After linking to Excel and exporting all data, DiamondTouch will prompt you to save the file (if
the file was viewed earlier), and will ask if you want to view the report in Excel. Answer yes to
both questions to view the report. Microsoft Excel 97 will appear on your screen with Worksheet
5 pre-loaded with the selected ticket line item data. For ticket summary data, touch Worksheet 4.
For more information on working within Microsoft Excel to create your own reports, macros, etc,
please refer to your Microsoft Excel 97 documentation package.
To return to DiamondTouch, select File, then Exit from within Microsoft Excel. You will be
returned to the Ticket Detail Report window. Of course, once it has been saved, your Excel
Spreadsheet can be viewed at anytime from within Microsoft Excel 97, with or without
DiamondTouch.
C.
Event Log Reports
Event Log Reporting provides the primary interface tool required to perform Management by
Exception auditing. By selecting specific exception events, you can use the drill down tool to
investigate only those tickets that fall “outside” the usual operational norms.
DiamondTouch logs the following events as exceptions, and itemizes each event as a line item on
the Event Log Summary Report:
1) Tickets Edited to a Lower Value details the following information:
a)
b)
c)
d)
e)
f)
g)
h)
Time
Terminal Number
Employee Name
Event Description “Edit to Lower Value”
Ticket Number
Beginning $ Value
Ending $ Value
Variance $ Value
The Ticket Edited to a Lower Value event is logged whenever a ticket is recalled, changed and
saved with a value lower than the original ticket value. Please see section 1.25 for more
information on recalling tickets.
DiamondTouch, Inc.
Copyright 2007
DiamondTouch 5.5 Software Documentation
2.25
C.
Page 68
Ticket Detail Reporting (cont)
Event Log Reports (cont)
2) Void Tickets details the following information:
a)
b)
c)
d)
e)
f)
g)
h)
Time
Terminal Number
Employee Name
Event Description “VOID Ticket”
Ticket Number
Beginning $ Value
Ending $ Value
Variance $ Value
See section 1.37 for more information on Voiding a Ticket.
3) Tickets Removed from a Driver (Delivery Operations) includes the following information:
a)
b)
c)
d)
e)
f)
Time
Terminal Number
Employee Name
Event Description “Removed Driver Tkt#”
Ticket Number
from : Driver Name
A “Tickets Removed from Driver” event is logged whenever the Remove Ticket function is
used from the Delivery Management screen [See section 1.90 - E for more information on
using this function.]
4) Late Dispatch (Delivery Operations) includes the following information:
a)
b)
c)
d)
e)
f)
g)
Time
Terminal Number
Employee Name
Event Description “Late Dispatch”
Ticket Number
Order Time
Elapsed Time
A Late Dispatch event is logged each time a ticket is dispatched with an elapsed time greater
than that specified by the user [ see section 1.90 D for more information on adjusting the
Elapsed Time for driver dispatching].
5) Ticket History Report
In addition to saving all of the final information for each and every ticket, DiamondTouch also
saves each and every previous version of each and every ticket. This allows management to
review any changes made to the tickets during the day, and to also view the earlier status of tickets
edited to lower value, voided, or re-assigned to different drivers.
To view the Ticket History report for the selected exception event, select the ticket from the
summary report window that you wish to view, and touch the ticket number row on the report
display. Touch the Ticket Detail control that appears on the lower control bar to view the Ticket
History Report.
DiamondTouch, Inc.
Copyright 2007
DiamondTouch 5.5 Software Documentation
2.25
C.
Page 69
Ticket Detail Reporting (cont)
Event Log Reports (cont)
5) Ticket History Report (cont)
The ticket history report displays the following information:
a)
b)
c)
Report header, including title of report, date report is viewed, ticket number, and
the ticket date.
For each version of the ticket that was saved and/or printed, the ticket number,
time, service type and an itemized list of each line item including the quantity,
description and price
For each version of the ticket, the delivery history, including Driver, address,
time OUT and time IN.
To print the Ticket History report, touch the print control on the Ticket History Pop Up window.
The Ticket History Report will print to the first local printer found on the system. If no local
printer is found, then the report will be spooled to the first system printer found. For more
information on setting up local and system printers, see section 3.20 A.
The Ticket History Report was designed to print on 40 column printers.
D.
Discount Detail - includes the following information:
1)
2)
3)
4)
5)
6)
Ticket Number
Time
Employee Name
Service Type
Amount
Description
To view the Discount Detail, touch the Reports control on the Main Menu screen. From the
Manager Reports main menu, touch Ticket Detail, then select Discount Detail from the Sub-Menu
Selection Window in the lower left quadrant of the Manager Reports screen. Next, select a report
date from the selection window that appears in the lower right quadrant of the screen and touch
next.
DiamondTouch, Inc.
Copyright 2007
DiamondTouch 5.5 Software Documentation
2.30
Page 70
Database Reporting
Database Reporting provides basic print out of selected data in specific database files. Users may
wish to use these print outs to assist in editing the various databases used in DiamondTouch.
A.
Employees
The employee listing is a report containing specific fields in the employee database. This report
may be useful in supplying generic data to your payroll processor, or in getting an overview all
employee records. For assistance in editing employee records, see section 3.40 A.
To view the Employee Database Report, touch the Reports control on the Main Menu screen.
From the Manager Reports main menu, touch Database, then select Employees from the SubMenu Selection Window in the lower left quadrant of the Manager Reports screen.
The employee database listing provides the following information:
1)
2)
3)
4)
5)
6)
7)
8)
9)
Employee Record Number
Last Name
First Name
Social Security Number
Date of Hire
Regular Hourly Rate
Overtime Hourly Rate
Phone Number
Street Address
The employee database listing does contain wage information. It is therefore protected with the
same security level required to gain access to the employee database edit windows under the Set
Up options. Please see section 3.40 B for more information on setting up security levels.
To print the report, touch the Print control at the lower left of the report display screen. The detail
report will print to your Windows default printer. This report was designed to print on an 80column printer.
B.
Menus
The menu report is a listing of all categories and items for the entire menu. The first 3 modifier
lists used are also listed for each item. Modifier lists can be viewed and printed separately under
the Modifier Lists report in the following section. Users may wish to use the Menu Report as a
guide while editing the Menu.
To view the Menu Report, touch the Reports control on the Main Menu screen. From the
Manager Reports main menu, touch Database, then select Menu from the Sub-Menu Selection
Window in the lower left quadrant of the Manager Reports screen.
DiamondTouch, Inc.
Copyright 2007
DiamondTouch 5.5 Software Documentation
2.30
B.
Page 71
Database Reporting (cont)
Menus (cont)
The Menu report lists the following information:
1)
2)
3)
Category Number for each Menu Category
Category Description for each Menu Category
Min Max Settings for Inventory Ingredient Usage Reporting for each Menu
Category
Item Number for each Menu Item
Item Description for each Menu Item
Item Price for each Menu Item
Referred to Modifier Lists for each Menu Item
PLU Reference Number for each Menu Item
4)
5)
6)
7)
8)
To print the report, touch the Print control at the lower left of the report display screen. The detail
report will print to your Windows default printer. This report was designed to print on an 80column printer.
C.
Modifier Lists
The Modifier List report is a listing of all modifiers defined in the system. For more information
on defining modifiers, see section 3.15 B. Users may wish to use the Modifier Report as a guide
while editing the Modifier Lists.
To view the Modifier Report, touch the Reports control on the Main Menu screen. From the
Manager Reports main menu, touch Database, then select Modifiers from the Sub-Menu Selection
Window in the lower left quadrant of the Manager Reports screen.
The modifier report contains the following information:
1)
2)
3)
4)
5)
6)
Modifier List Number, for each modifier
Modifier Number, for each modifier
Modifier Description for each modifier
Price for each modifier
Half Price for each modifier
PLU Reference Number for each Modifier
To print the report, touch the Print control at the lower left of the report display screen. The detail
report will print to your Windows default printer. This report was designed to print on a 80column printer.
D.
PLU Tables
The PLU Table report defines all PLU’s listed in the system. PLU’s are used with optional
Inventory packages to track the theoretical ingredient usage by food item ordered.
To view this report, you will need to have one of the optional inventory packages installed on the
system. To view the PLU Report, touch the Reports control on the Main Menu screen. From the
Manager Reports main menu, touch Database, then select PLU Table from the Sub-Menu
Selection Window in the lower left quadrant of the Manager Reports screen.
DiamondTouch, Inc.
Copyright 2007
DiamondTouch 5.5 Software Documentation
2.30
D.
Page 72
Database Reporting (cont)
PLU Tables (cont)
The PLU report contains the following information:
1)
2)
3)
4)
5)
6)
7)
PLU Number, for each PLU
Description, for each PLU Item
Price, for each PLU Item
Half Price, for each PLU Item
System Code, for each PLU Item
Address for each PLU Item
Current Usage flags, for each PLU Item
To print the report, touch the Print control at the lower left of the report display screen. The detail
report will print to your Windows default printer. This report was designed to print on an 80column printer.
2.35
A.
Revenue Reporting
Transaction by Ticket
The Transaction by Ticket Report will list all tickets on all terminals and drawers for the specified
reporting period.
To view the Transaction by ticket Report from the main menu screen, touch the Reports button,
select Revenue, and then select Transaction by Ticket from the Sub-Menu Selection Window in
the lower left quadrant of the Manager Reports screen. Select the desired reporting period from
the Report Period Selection Window in the Lower Right quadrant of the screen, and press Next.
The transaction by Ticket report contains the following information:
1)
2)
3)
4)
5)
6)
7)
8)
9)
Report name and access date
Individual ticket number
Time order was placed
Drawer
Cashier
Tender used
Amount paid
Ticket amount
Change amount
To print the report, touch the Print control at the lower left of the report display screen. The detail
report will print to your Windows default printer. This report was designed to print on an 80column printer.
DiamondTouch, Inc.
Copyright 2007
DiamondTouch 5.5 Software Documentation
2.35
B.
Page 73
Revenue Reporting (cont)
Transaction by Drawer
The Transaction by Drawer Report will list all transactions on all terminals and drawers for the
specified reporting period. To allow Management the capability of creating its own custom
reports, DiamondTouch allows the user to export and view the Transaction Detail in Microsoft
Excel, without ever leaving DiamondTouch.
To view the Transaction by Drawer Report, from the main menu screen, touch the Reports button,
select Revenue, and then select Transaction by Drawer from the Sub-Menu Selection Window in
the lower left quadrant of the Manager Reports screen. Select the desired reporting period from
the Report Period Selection Window in the Lower Right quadrant of the screen, and press Next.
Transaction information is sorted by each terminal and drawer “session”. At the top of each
terminal / drawer session, the report will list the terminal number, drawer number and the time the
session was closed for this drawer. Detailed for each session is the following information:
1) Time the transaction was processed in military time format
2) Ticket number / alternate transaction code. Alternate transaction codes are :
SC = Starting Cash
[See Section 1.40 B]
SB = Starting Driver Bank
[See Section 1.90 B]
RB = Returning Driver Bank
[See Section 1.90 G]
CP = Cash Pull
[See Section 1.40 G]
PO = Paid Out
[See Section 1.40 H]
PI = Paid In
NS = No Sale
[See Section 1.35 D]
3) Description - Ticket transactions will include the full ticket value under this heading
4) Cashier - this is the name of the employee that was signed on to the terminal when the
transaction was processed
5) Amount - this is the amount that was keyed in for this transaction
6) Tendered - This is the Tender Method (Cash, Check, Credit Card, etc). In the case of
a Driver Reimbursement transaction, the name of the driver is listed instead.
7) Chg / Due - a running total of how much of the total value is still due, or the amount
of change that was issued for this transaction; Driver bank transactions will list the
type of bank transaction under this column.
The Transaction by Drawer Report also includes footed totals for Total Transactions, Subtotal
Dollars, Less Change amount and the Total Amount.
To print the report, touch the Print control at the lower left of the report display screen. The detail
report will print to your Windows default printer. This report was designed to print on an 80column printer.
1.
Exporting Transaction by Drawer to EXCEL
To export the Transaction by Drawer data to Microsoft Excel, you must first have a working copy
of Microsoft Excel 97 or later loaded on the terminal.
To export the Transaction by Drawer data to Microsoft Excel 97 or later, first pull up the
Transaction Detail Report by touching the Reports control from the Main Menu. From the
Manager Reports main menu, touch Registers, then select Transaction by Drawer from the SubMenu Selection Window in the lower left quadrant of the Manager Reports screen. Next, select a
report date from the selection window that appears in the lower right quadrant of the screen.
Touch Export to Excel to initiate the data conversion process.
DiamondTouch, Inc.
Copyright 2007
DiamondTouch 5.5 Software Documentation
2.35
B.
Page 74
Revenue Reporting (cont)
Transaction by Drawer (cont)
After linking to Excel and exporting all data, DiamondTouch will prompt you to save the file, if
the file was viewed earlier, and then to view the report in Excel. Answer yes to both questions to
view the report. Microsoft Excel 97 will appear on your screen with Worksheet 4 pre-loaded with
the selected transaction data. For more information on working within Microsoft Excel to create
your own reports, macros, etc, please refer to your Microsoft Excel 97 documentation package.
To return to DiamondTouch, select File, then Exit from within Microsoft Excel. You will be
returned to the Transaction Detail Report window. Of course, once it has been saved, your Excel
Spreadsheet can be viewed at anytime from within Microsoft Excel 97, with or without
DiamondTouch.
C.
Daily A/R
The Daily Accounts Receivable Report will list all A/R activities on all terminals and drawers for
the specified reporting period.
To view the Daily A/R Report from the main menu screen, touch the Reports button, select
Revenue, and then select Daily A/R from the Sub-Menu Selection Window in the lower left
quadrant of the Manager Reports screen. Select the desired reporting period from the Report
Period Selection Window in the Lower Right quadrant of the screen, and press Next.
The transaction by Ticket report contains the following information:
1)
2)
3)
4)
5)
6)
7)
8)
9)
Report name and access date
Individual ticket number
Time
Terminal
Drawer
Tender Key
Amount paid
Ticket amount
Change amount
To print the report, touch the Print control at the lower left of the report display screen. The detail
report will print to your Windows default printer. This report was designed to print on an 80column printer.
DiamondTouch, Inc.
Copyright 2007
DiamondTouch 5.5 Software Documentation
2.35
D.
Page 75
Revenue Reporting (cont)
Integrated CC Raw Data
The Integrated Credit Card Transaction Report will list all credit card activities on all terminals
and drawers for the specified reporting period.
To view the Credit Card Transaction Report from the main menu screen, touch the Reports button,
select Revenue, and then select Integrated CC Raw Data from the Sub-Menu Selection Window in
the lower left quadrant of the Manager Reports screen. Select the desired reporting period from
the Report Period Selection Window in the Lower Right quadrant of the screen, and press Next.
The Integrated Credit Card Transaction Report contains the following information:
1)
2)
3)
4)
5)
6)
7)
8)
9)
10)
11)
12)
13)
Report name and access date
Individual ticket number
Time and date
Ticket amount
Change Amount
Name on credit card
Type of credit card
Credit card number and expiration date
Authorization number
Merchant number
Approval/Denial response
Terminal number
Server name
To print the report, touch the Print control at the lower left of the report display screen. The detail
report will print to your Windows default printer. This report was designed to print on an 80column printer.
E.
Integrated CC Report
The Integrated Credit Card Transaction Report will list all credit card activities on all terminals
and drawers for the specified reporting period.
To view the Credit Card Transaction Report from the main menu screen, touch the Reports button,
select Revenue, and then select Integrated CC Report from the Sub-Menu Selection Window in
the lower left quadrant of the Manager Reports screen. Select the desired reporting period from
the Report Period Selection Window in the Lower Right quadrant of the screen, and press Next.
DiamondTouch, Inc.
Copyright 2007
Page 76
DiamondTouch 5.5 Software Documentation
2.35
E.
Revenue Reporting (cont)
Integrated CC Report (cont)
The Integrated Credit Card – Settle Correct Report contains the following information:
14)
15)
16)
17)
18)
19)
20)
21)
22)
23)
Ticket Number
Time of Order
Status of the ticket (Sale, CC-Tip, Sale w/CC-Tip, or Void)
Type of credit card
Base amount of ticket
Tip Amount of ticket
Total Amount
Server Name
Card Number with encryption
Name of Card Member
To print the report, touch the Print control at the lower left of the report display screen. The detail
report will print to your Windows default printer. This report was designed to print on an 80column printer.
F.
Cashier Summary
The Cashier Summary Report is a breakdown of all cashier activity for the specified reporting
period. To view the Cashier Summary Report from the main menu screen, touch the Reports
button, select Revenue, and then select Cashier Summary from the Sub-Menu Selection Window
in the lower left quadrant of the Manager Reports screen. Select the desired reporting period from
the Report Period Selection Window in the Lower Right quadrant of the screen, and press Next.
The Cashier Summary Report contains the following information:
1) Report name and access date
2) Cashier name, terminal number and drawer
3) NS
4) Total cash
5) Total checks
6) Total A/R
7) Total other types of transactions
8) Total for all transactions
9) Pay outs
10) Pay ins
11) Reimbursements
12) Pull
13) Net cash
To print the report, touch the Print control at the lower left of the report display screen. The detail
report will print to your Windows default printer. This report was designed to print on an 80column printer.
DiamondTouch, Inc.
Copyright 2007
Page 77
DiamondTouch 5.5 Software Documentation
2.35
G.
Revenue Reporting (cont)
Summary by Drawer
The Summary by Drawer provides subtotal amounts for each terminal cash drawer session. Each
time a cash drawer is closed, totals for the drawer are stored in the Closing Summary Report. At
the end of the day, all closing summary totals can be viewed on one report by selecting the
Register Summary by Drawer Report.
To view the Register Summary by Drawer Report, from the main menu, touch the Reports control,
touch Registers, then select Summary by Drawer from the Sub-Menu Selection Window in the
lower left quadrant of the Manager Reports screen. Select the desired reporting period from the
Report Period Selection Window in the lower right quadrant of the screen, and press Next.
The Summary by Drawer Report is divided into three sections:
1) The Register Summary includes the following information:
a) For each cash Drawer Session :
• Trm
Terminal number for each session
• CD
Cash drawer for each Session
• Close Time
Time the register session was closed
• Cash Start
Amount of starting cash when the drawer was opened
• Cash Rcpts
Amount of cash receipts, less change issued
• Cash Debits
Paid Outs, Paid Ins, Cash Pulls, Reimbursements
• Cash SubTtl
Cash Start + Cash Rcpts - Cash Debits
• Check Rcpts
Total Check Receipts
• Other Receipts
Total Credit Card, Misc Tenders
b) Footed totals for each Cash Drawer, Terminal and Grand Total
c) Net Receipts Revenue Summary
d) Gross Revenue Summary
2) The Other Receipts detail breaks down each of the credit card totals for each session
3) The Cash Debits Detail breaks down the Paid Outs, Cash Pulls and Reimbursements for
each session.
To print the report, touch the Print control at the lower left of the report display screen. The detail
report will print to your Windows default printer. This report was designed to print on an 80column printer.
H.
Period A/R by Customer
The Period A/R by Customer Report is a list of all the A/R transactions for the specified reporting
period.
To view the Period A/R Report from the main menu screen, touch the Reports button, select
Revenue, and then select Period A/R by Customer from the Sub-Menu Selection Window in the
lower left quadrant of the Manager Reports screen. Select the desired reporting period from the
Report Period Selection Window in the Lower Right quadrant of the screen, and press Next.
DiamondTouch, Inc.
Copyright 2007
DiamondTouch 5.5 Software Documentation
2.35
H.
Page 78
Revenue Reporting (cont)
Period A/R by Customer (cont)
The Period A/R by Customer Report contains the following information:
14) Report name, period and access date
15) Customer name on the A/R account
16) A/R Account number
17) Date of transaction
18) Ticket Number
19) A/R Account address
20) Amount of ticket
21) Total for all A/R transactions for account
22) Tender type
23) Totals
To print the report, touch the Print control at the lower left of the report display screen. The detail
report will print to your Windows default printer. This report was designed to print on an 80column printer.
I.
Balance Cash
Each time the day is closed, a Balance Cash Report is saved. The balance cash report is the final
daily revenue report for the day, which reconciles cash and other revenues collected with the sales
total and final deposit slip. See section 2.60 for more information on closing the day.
To view the Balance Cash Report, touch the Reports control on the Main Menu screen. From the
Manager Reports main menu, touch Registers, then select Balance Cash from the Sub-Menu
Selection Window in the lower left quadrant of the Manager Reports screen. Select the desired
reporting period from the Report Period Selection Window in the lower right quadrant of the
screen, and press Next. The Balance cash report is a divided into three (3) sections:
1) The Revenue Reconciliation lists the final receipt totals for cash, checks, credit cards, etc.
These totals are loaded from the Register Summary Totals, and edited by the user that actually
closes the day to account for mis-rings and M.T.T’s. The receipts are totaled and balanced to
the Sales total for the day. The result is listed at the bottom of the Revenue Reconciliation as
“Balance Revenue Over/Short”. This number should always equal zero if the auto close
procedure is used correctly.
DiamondTouch, Inc.
Copyright 2007
Page 79
DiamondTouch 5.5 Software Documentation
2.35
I.
Revenue Reporting (cont)
Balance Cash (cont)
2) The Cash Reconciliation itemizes the cash activity for the day, and compares the reported
activity with actual cash counted. The cash reconciliation includes the following information:
Starting Cash Adj.+
Cash Receipts +
Pay Outs
Reimbursed
Previous Cash
Deposited
Subtotal Cash
In Drawers
Cash Count
=
+/-
Balance Cash
Over/Short
=
The user that closes the day enters the cash count. The balance cash over/short reports
the Cash Over or Cash Short for the day.
3) The Final Deposit Slip itemizes the cash and checks to be deposited. An allowance is made
to deduct the next day’s starting cash bank, as well as any checks that were already deposited.
These amounts (if any) are entered by the user that closes the day. The Final Deposit Slip
includes the following information:
Cash Count
Tomorrow’s
Starting Cash
+
-
Cash Deposit
Checks
Checks Prev
Deposited
=
+
Check Deposit
=
Total Deposit
=
-
The total Deposit is the sum of the Cash Deposit plus the Check Deposit.
To print the report, touch the Print control at the lower left of the report display screen. The detail
report will print to your Windows default printer. This report was designed to print on an 80column printer.
DiamondTouch, Inc.
Copyright 2007
DiamondTouch 5.5 Software Documentation
2.35
J.
Page 80
Revenue Reporting (cont)
Period Pay In/Out
The Period Pay In/Out Report is a weekly register transaction report for the specified reporting
period.
To view the Period Pay In/Out Report from the main menu screen, touch the Reports button, select
Revenue, and then select Period Pay In/Out from the Sub-Menu Selection Window in the lower
left quadrant of the Manager Reports screen. Select the desired reporting period from the Report
Period Selection Window in the Lower Right quadrant of the screen, and press Next.
The Period Pay In/Out Report contains the following information:
1)
2)
3)
4)
5)
Report name and access date
Description of transaction
Cashier
Amount of transaction
Tendered
To print the report, touch the Print control at the lower left of the report display screen. The detail report
will print to your Windows default printer. This report was designed to print on an 80-column printer.
DiamondTouch, Inc.
Copyright 2007
DiamondTouch 5.5 Software Documentation
2.40
A.
Page 81
Delivery Reporting
Delivery Summary Reports
The Delivery Summary Report provides a list of all driver activity for the reporting period,
including number of runs, tickets and dollars for each driver. The report can also be used to “Drill
Down” to the Driver Detail Reports described in section 2.40 B.
To view the Delivery Summary Report, touch the Reports control on the Main Menu screen.
From the Manager Reports main menu, touch Delivery, then select Summary Report from the
Sub-Menu Selection Window in the lower left quadrant of the Manager Reports screen. Select the
desired reporting period from the Report Period Selection Window in the lower right quadrant of
the screen, and press Next.
The Driver Summary Report details the following information:
1)
2)
3)
4)
5)
6)
7)
Date & Time of Report
Name of Report
Driver Name, for each driver
Driver Status (Open / Closed) for each driver
Total # Runs for each Driver
Total # Tickets for each driver
Total $ for each driver
To print the report, touch the Print control at the lower left of the report display screen. The detail
report will print to your Windows default printer. This report was designed to print on an 80column printer.
B.
Driver Detail Reports
The driver detail report allows the user to view the individual tickets and individual driver run data
that were used to compile the summary data. The driver detail report is available as a “Drill
Down” report from the Driver Summary Report display screen.
To access a Driver Detail Report, first access the Driver Summary Reports detailed in the previous
section. Select a driver by touching the driver’s name, and then touch Driver Detail control that
will appear on the lower command bar. A pop up window will display the Driver Detail Report.
The Driver Detail Report contains the following information:
1) Date & Time of Report
2) Name of Report
3) Driver Name
4) Ticket Detail Report, including the Run Number, Ticket Number, Delivery Address and
Dollar Amount for each ticket.
5) Total Ticket Dollars
6) Outstanding Bank
7) Total Driver Amount
8) Run Detail Report, including the Run #, Time Out, Time In, Total Time, Total Tickets,
Average time Per Ticket and Total Ticket Amount for each Run
9) Footed Totals for the Run Detail Report.
Driver Detail Reports can be printed by touching the Print control button located at the bottom of
the detail report pop up box. The Driver Detail Report will print on the first local printer found on
the current terminal; if no local printer is found then the report will be spooled to the first system
printer found. For more information on setting up local and system printers, please see section
3.20 A. The server detail report was designed to print on a 40-column printer.
DiamondTouch, Inc.
Copyright 2007
Page 82
DiamondTouch 5.5 Software Documentation
2.45
A.
Customer Reports
Daily Customer Sales by Ticket
The Daily Customer Sales by Ticket Report lists each customer that ordered during the business
day. To be entered on the Customer Sales by Ticket Report, the order must have been placed with
a customer record associated with the order.
To view the Daily Customer Sales by Ticket Report, touch the Reports control on the Main Menu
screen. From the Manager Reports main menu, touch Customers, then select Daily Customer
Sales by Ticket from the Sub-Menu Selection Window in the lower left quadrant of the Manager
Reports screen. Select the desired reporting period from the Report Period Selection Window in
the lower right quadrant of the screen, and press Next.
The Daily Customer Sales by Ticket Report includes the following information:
1)
2)
3)
4)
5)
6)
7)
8)
Report Title, Reporting Period, and the Date and Time the Report was accessed
Ticket Number
Time the order was placed
Customer Phone Number
Customer Name
Customer Address
Order Dollar Amount
Tender
To print the report, touch the Print control at the lower left of the report display screen. The detail
report will print to your Windows default printer. This report was designed to print on an 80column printer.
B.
Daily Customer Sales by Customer
The Daily Customer Sales by Customer Report lists each customer that ordered during the
business day. To be entered on the Customer Sales by Customer Report, the order must have been
placed with a customer record associated with the order.
To view the Daily Customer Sales by Customer Report, touch the Reports control on the Main
Menu screen. From the Manager Reports main menu, touch Customers, then select Daily
Customer Sales by Customer from the Sub-Menu Selection Window in the lower left quadrant of
the Manager Reports screen. Select the desired reporting period from the Report Period Selection
Window in the lower right quadrant of the screen, and press Next.
The Daily Customer Sales by Customer Report includes the following information:
1)
2)
3)
4)
5)
6)
7)
Report Title, Reporting Period, and the Date and Time the Report was accessed
Order Date
Ticket Number
Customer phone number, name and/or address
Order Dollar Amount
Accounts Receivable
Tender and Total
To print the report, touch the Print control at the lower left of the report display screen. The detail
report will print to your Windows default printer. This report was designed to print on an 80column printer.
DiamondTouch, Inc.
Copyright 2007
DiamondTouch 5.5 Software Documentation
2.45
C.
Page 83
Customer Reports (cont)
Daily Customer New VS. Repeat
The Daily Customer New vs. Repeat Report is a daily breakdown of new vs. repeat customers for
the selected period.
To view the Daily Customer New vs. Repeat Report, touch the Reports control on the Main Menu
screen. From the Manager Reports main menu, touch Customers, then select Daily Customer New
vs. Repeat from the Sub-Menu Selection Window in the lower left quadrant of the Manager
Reports screen. Select the desired reporting period from the Report Period Selection Window in
the lower right quadrant of the screen, and press Next.
The report is broken down into 2 sections – new customers and repeat customers.
The Daily Customer New vs. Repeat Report includes the following information for New
Customers:
1)
2)
3)
4)
5)
6)
Reporting Period, and the Date and Time the Report was accessed
Phone Number
Customer Name
Customer Address
Previous Orders
Current Orders
The Daily Customer New vs. Repeat Report information for Repeat Customers is listed at the
bottom of the report. It includes the following:
1)
2)
3)
4)
5)
6)
7)
8)
Reporting Period, and the Date and Time the Report was accessed
Phone Number
Customer Name
Customer Address
Previous Orders
Average Frequency
Days Since Last Order (SLO)
Current Orders
To print the report, touch the Print control at the lower left of the report display screen. The detail
report will print to your Windows default printer. This report was designed to print on an 80column printer.
DiamondTouch, Inc.
Copyright 2007
Page 84
DiamondTouch 5.5 Software Documentation
2.45
D.
Customer Reports (cont)
Create Report
The Create Report option under Customer Reports allows for set guidelines to be customized.
To view the Create Report, touch the Reports control on the Main Menu screen. From the
Manager Reports main menu, touch Customers, then select Create Report from the Sub-Menu
Selection Window in the lower left quadrant of the Manager Reports screen.
The report can be customized based on the following:
1) The Activity Filters Section allow Sales, Orders and Days Since Last Order to be broken
down by specific time/dollar amount or to group all together
2) The Sort Section allows the custom report to be sorted by the following:
a)
b)
c)
d)
Name
Sales
Orders
Zip
3) The Search Keys Section allows the custom report to be sorted by the following:
a)
b)
c)
d)
e)
f)
g)
h)
Last Name
First Name
Street
Comments
Zip Code
Carrier Route
Map Grid 1
Map Grid 2
To use the search keys correctly, you must always put an asterisk before and after the item
you will use to search. (example: *75019* when searching by zip code).
DiamondTouch, Inc.
Copyright 2007
Page 85
DiamondTouch 5.5 Software Documentation
2.45
E.
Customer Reports (cont)
Customer Period Sales Report
The Customer Period Sales Report option under Customer Reports provides weekly sales report
by customer.
To view the Customer Period Sales Report, touch the Reports control on the Main Menu screen.
From the Manager Reports main menu, touch Customers, then select Customer Period Sales from
the Sub-Menu Selection Window in the lower left quadrant of the Manager Reports screen. Select
the desired reporting period from the Report Period Selection Window in the lower right quadrant
of the screen, and press Next.
The report provides the following information:
1) Report Title
2) Weekly Sales Period
3) Date and time report was accessed
4) Date of Order
5) Ticket Number
6) Customer phone number, name, and address
7) Amount
8) Accounts Receivable
9) Tender and Total
To print the report, touch the Print control at the lower left of the report display screen. The detail
report will print to your Windows default printer. This report was designed to print on an 80column printer.
F.
Monthly Customer New VS. Repeat
The Monthly Customer New vs. Repeat Report provides a summary of new, repeat and total
customers for each day of the month. Also provided is an itemized listing of all new and repeat
customers. Finally, a 3-D line graph is provided to display the New VS Repeat business for each
day of the month.
To view the Monthly Customer Report, touch the Report control on the Main Menu screen. From
the Manager Reports main menu, touch Customers, then select Monthly Customer New vs. Repeat
from the Sub-Menu Selection Window in the lower left quadrant of the Manager Reports screen.
Select the desired reporting period from the Report Period Selection Window in the lower right
quadrant of the screen, and press Next.
To print the report, touch the Print control at the lower left of the report display screen. The detail
report will print to your Windows default printer. This report was designed to print on an 80column printer.
The Monthly Customer New vs. Repeat Report includes the following information:
1)
Daily Summary Totals
a)
b)
c)
d)
DiamondTouch, Inc.
Day of Week and Date for each day of the month
Total New Customers for each day of the month
Total Repeat Customers for each day of the month
Total All Customers for each day of the month
Copyright 2007
Page 86
DiamondTouch 5.5 Software Documentation
2.45
F.
Customer Reports (cont)
Monthly Customer New VS. Repeat (cont)
2)
New Customers
a)
Phone Number, for each new customer
b)
Last Name, First Name for each new customer
c)
Address for each new customer
d)
Total Previous Orders for each new customer - These are the total orders prior to
the reporting period
e)
Total Current Orders for each new customer - These are the total orders for the
reporting period
f)
Total Subsequent Orders for each New Customer - These are the total orders for
each customer placed after the reporting period.
3)
Repeat Customers
a) Phone Number for each previous customer
b) Last Name, First Name for each repeat customer
c) Address for each repeat customer
d) Total Previous Orders for each repeat customer
e) Average Frequency for each repeat customer. This is the total number of orders
divided by the number of days between the first order and the report period date.
Days SLO - Days Since Last Order. This is the number of days between the last
order date and the last date of the reporting period.
f) Total Current Orders for each repeat customer. These are the total orders placed
during the reporting period.
4)
Graphing New VS Repeat Customers
To display an Area Line Graph of New vs. Repeat Customers, touch the Display Chart
Control at the bottom of the Monthly Customer Report Screen. The graph will display
new customers in Red, Repeat Customers in Green.
Monthly Customer Report for October 2001
To view alternate angles of the graph, touch the View Next Control. To move the repeat
customer data to the foreground, touch Swap Columns. To print the graph, touch Print to
send the graph to the windows default printer.
The graph can also be sized and positioned dynamically, by holding down the control key
on the keyboard, and moving the graph by touching the touch screen. To return, touch
Finished.
DiamondTouch, Inc.
Copyright 2007
DiamondTouch 5.5 Software Documentation
2.45
G.
Page 87
Customer Reports (cont)
All Customers New VS. Repeat
The All Customers New vs. Repeat Report provides New and Repeat Customer data for all
customers in the system.
To view the All Customers Report, touch the Reports control on the Main Menu screen. From the
Manager Reports main menu, touch Customers, then select All Customers New vs. Repeat from
the Sub-Menu Selection Window in the lower left quadrant of the Manager Reports screen.
The All Customers Report includes the following information:
1)
New Customers
a) Phone Number, for each new customer
b) Last Name, First Name for each new customer
c) Address for each new customer
d) Total Previous Orders for each new customer - These are the total orders prior to
the reporting period
e) Total Current Orders for each new customer - These are the total orders for the
reporting period
2)
Repeat Customers
a)
b)
c)
d)
Phone Number, for each new customer
Last Name, First Name for each new customer
Address for each new customer
Total Previous Orders for each repeat customer
Avg Freq - Average Frequency for each repeat customer. This is the total number of
orders divided by the number of days between the first order and the report period
date.
Days SLO - Days Since Last Order. This is the number of days between the last
order date and the date of the reporting period.
e) Total Current Orders for each repeat customer. These are the total orders placed
during the reporting period.
To print the report, touch the Print control at the lower left of the report display screen. The detail
report will print to your Windows default printer. This report was designed to print on an 80column printer.
DiamondTouch, Inc.
Copyright 2007
DiamondTouch 5.5 Software Documentation
2.50
A.
Page 88
Report Periods
Defining Reporting Periods
Reporting Periods are used by the Period Sales [2.10 D], Period Item [2.10 E] Period Modifier
[2.10 F] and Period Server Sales By Item [2.50 C] reports to define the range of dates used to
create the reports. Reporting periods can be created for Weekly, Monthly, Period (example:
Quarterly) and Yearly Reports. Date ranges can be established for as many reporting periods are
required, and can even overlap if required.
To access the Reporting Period Module, touch the Reports control on the Main Menu screen.
From the Manager Reports main menu, touch Custom Reports, then select Set Report Periods
from the Sub-Menu Selection Window in the lower left quadrant of the Manager Reports screen.
Before creating a new reporting period, you may wish to review the list of reporting periods
already created. To do so, touch the Review Existing Reporting Periods control located at the
lower left portion of the lower control bar. A new window will open up with the list of currently
resident reporting periods, sorted within Weekly, Monthly, Period and Yearly columns.
To delete a reporting period, touch the reporting period and then touch Erase. Note that no actual
report data is deleted ... only the reporting period “From-To” dates. The Reporting Period can be
re-created in seconds from the Reporting Period screen. Press Finished to return to the Reporting
Period Screen.
To create a new reporting period, select the reporting period type from the four choices provided
in the upper left portion of the screen. Next, use the “From” date selection window to select the
first day of the new reporting period. Use the “To” selection window to select the last day of the
new reporting period. Note that the report description is displayed in the small window in the
middle left hand portion of the screen as selections are made. Once the report type and from / to
date ranges have been made, touch the Save button to save the new reporting period. You may
view the new period by touching the Review Existing Reporting Periods control. The new Report
Period will be listed in the appropriate window. When completed, press finished.
DiamondTouch, Inc.
Copyright 2007
DiamondTouch 5.5 Software Documentation
2.50
B.
Page 89
Custom Reports (cont)
Daily Server Sales By Item
The Daily Server Sales by Item Report is a report of sales for a selected Menu Item broken down
by Server. The Daily Server Sales by Item report is very useful for tracking performance on sales
contests for specials, etc. The report display also provides a scrollable control set to browse
through the various Menu Items and Categories for the selected reporting period.
To access the Reporting Period Module, touch the Reports control on the Main Menu screen.
From the Manager Reports main menu, touch Custom Reports, then select Item / Server Sales
from the Sub-Menu Selection Window in the lower left quadrant of the Manager Reports screen.
The Daily Server Sales Report initially displays sales for the Menu Item that was loaded into
Category 1, Item 1 on the last day of the reporting period. To view alternate sales breakdowns,
use the Category and Item scroll arrows to browse through the Menu. If any items have been sold
for the reporting period, then the name of the menu item will be displayed in the upper right corner
of the report window and the sales distribution will appear next to the server names.
The Daily Server Sales by Item report includes the following information:
1)
2)
3)
4)
5)
6)
7)
Title of the report, including the reporting period and date and time the report was
accessed
Category #, Item #, and Item Description (if sales are reported)
Server Name, for each server on duty during the reporting period
Total Items sold for each server
Total dollars sold for each server. Note that the value of Menu Modifiers associated with
the Menu Item on each ticket are included in the total dollars figure. This is why the unit
price may vary from server to server.
Total tickets for each server that included at least one of the selected items
Footed totals for item quantity, Sales and tickets for all servers combined
To print the report, touch the Print control at the lower left of the report display screen. The detail
report will print to your Windows default printer. This report was designed to print on an 80column printer.
C.
Period Server Sales By Item
The Period Server Sales by Item Report is a report of sales for a selected Menu Item broken down
by Server over the course of a selected reporting period. The Period Server Sales by Item report is
very useful for tracking performance on sales contests for specials, etc over a period of days,
weeks or month(s).
To access the Reporting Period Module, touch the Reports control on the Main Menu screen.
From the Manager Reports main menu, touch Custom Reports, then select Period Item / Server
Sales from the Sub-Menu Selection Window in the lower left quadrant of the Manager Reports
screen. Select a reporting period, then select the Category and Menu Item you wish to view.
Press Next, and a progress bar will appear as the report is being built.
DiamondTouch, Inc.
Copyright 2007
DiamondTouch 5.5 Software Documentation
2.50
C.
Page 90
Custom Reports (cont)
Period Server Sales By Item (cont)
The Period Server Sales by Item report includes the following information:
1)
2)
3)
4)
5)
6)
7)
Title of the report, including the reporting period and date and time the report was
accessed
Category #, Item #, and Item Description (if sales are reported)
Server Name, for each server on duty during the reporting period
Total Items sold for each server
Total dollars sold for each server. Note that the value of Menu Modifiers associated with
the Menu Item on each ticket are included in the total dollars figure. This is why the unit
price may vary from server to server
Total tickets for each server that included at least one of the selected items
Footed totals for item quantity, Sales and tickets for all servers combined.
To print the report, touch the Print control on the lower left of the report display screen. The detail
report will print to your Windows default printer. This report was designed to print on an 80column printer.
2.60
A.
Utilities
Run File Back Up
File Back Up is used to back up sales, menu, time clock data, customer database, DiamondTouch
settings, and employee information. DimaondTouch will automatically back up when you close a
station.
Rockland Technology recommends that you rotate the satellite stations from which you close
nightly. This will ensure that you have a recent back up for each station.
To access the Run File Back Up, touch the Reports control on the Main Menu screen. From the
Manager Reports main menu, touch Utilities, then select Run File Back Up from the Sub-Menu
Selection Window in the lower left quadrant of the Manager Reports screen.
B.
Launch ISI
ISI is a third party inventory software program that must be purchased and loaded on
DiamondTouch to use.
To access Launch ISI, touch the Reports control on the Main Menu screen. From the Manager
Reports main menu, touch Utilities, then select Launch ISI from the Sub-Menu Selection Window
in the lower left quadrant of the Manager Reports screen.
DiamondTouch, Inc.
Copyright 2007
DiamondTouch 5.5 Software Documentation
2.60
C.
Page 91
Utilities (cont)
Launch Chef Tec
Chef Tec is a third party inventory software program that must be purchased and loaded on
DiamondTouch to use.
To access Launch Chef Tec, touch the Reports control on the Main Menu screen. From the
Manager Reports main menu, touch Utilities, then select Launch Chef Tec from the Sub-Menu
Selection Window in the lower left quadrant of the Manager Reports screen.
D.
Launch Optimum Control 2001
Optimum Control 2001 is a third party inventory software program that must be purchased and
loaded on DiamondTouch to use.
To access Launch Optimum Control 2001, touch the Reports control on the Main Menu screen.
From the Manager Reports main menu, touch Utilities, then select Launch Optimum Control 2001
from the Sub-Menu Selection Window in the lower left quadrant of the Manager Reports screen.
2.70
A.
Options
Export Inventory
Export Inventory Report provides information on the inventory available. The report is used in
conjunction with your inventory system. The following information is provided on the Inventory
Report:
1)
2)
3)
4)
PLU number
Item sold
Quantity sold
Retail price before discount
To access Export Inventory, touch the Reports control on the Main Menu screen. From the
Manager Reports main menu, touch Utilities, then select Export Inventory from the Sub-Menu
Selection Window in the lower left quadrant of the Manager Reports screen. Select the desired
reporting period from the lower right quadrant and then touch Next.
DiamondTouch, Inc.
Copyright 2007
DiamondTouch 5.5 Software Documentation
2.80
Page 92
Close of Day
At the end of each business day, the day is closed to finalize totals and reset the system for the
next day’s business. The day must be closed either at the end of the business day, or just before
the next business day begins.
It is strongly recommended, although not required, that all tickets be cashed out before closing the
day [see section 1.35]. If the tickets are not cashed out, then many of the report totals will be out
of balance on the final reports.
Before the day can be closed, all drivers must be Closed Out [Section 1.90 H] and all Cash
Drawers must be closed [Section 1.40 I]. Always close the drivers out first, since you must be
signed on to an open drawer to close out the drivers.
To close the day, from the main menu, touch Reports and then select Close Day. Touching the
Close Day button will bring up the Balance Cash Worksheet.
A.
Auto Close
DiamondTouch has simplified the Close of Day procedure with the Auto close feature. Auto
Close will walk you through the process step by step.
To access Auto close from the main menu, touch Report, and then select Close Day. The Balance
Cash screen will appear and ask if you would like to begin the Auto Close procedure.
DiamondTouch, Inc.
Copyright 2007
Page 93
DiamondTouch 5.5 Software Documentation
2.80
A.
Close of Day (cont)
Auto Close (cont)
To continue, touch yes on the pop up box. Next, the Auto Close process will ask you if the totals
on the Revenue Reconciliation portion of the Balance Cash screen are correct. Always answer no
to this pop up box.
This will allow you to correctly enter all transaction totals in on the next pop up box. Now enter
all the correct amounts on hand in your cash drawer and then touch next.
Below is an example of why it is important to always select NO in the pop up box verifying if
totals are correct.
Ticket
#1
#2
#3
#4
Ticket Amount
$11.10
$13.26
$14.00
$21.56
Tender type used
Cash
Visa
Check
Visa
Tender type entered by employee
Check
Cash
Check
Cash
DiamondTouch has the following amounts recorded:
Cash
$34.82
Check
$25.10
Credit Card
$00.00
Actual amounts in cash drawer:
Cash
$11.10
Check
$14.00
Credit Card
$34.82
DiamondTouch, Inc.
Copyright 2007
DiamondTouch 5.5 Software Documentation
2.90
Page 94
Time Cards
To access the Employee Time Cards, touch the Reports control on the main menu, then touch
Time Cards. The Time Card function is protected by a dedicated security level, so the user must
have a security level at least as high as the level set for Time Cards before this function can be
accessed.
A.
Viewing Employee Time Cards
To view an employee’s time card for the current period, select the employee name from the list
provided in the upper right portion of the screen. Note that you can scroll through the list of
employee time cards by using the up / down arrows on your keyboard to move through the list of
employee names.
Each time card will list the employee name, record number and the pay period at the top of the
time card. For each Clock IN line, the day of the week, date and time IN and job code will be
listed. For each Clock OUT line, the day of the week, date and time OUT, total time worked and
declared tips are shown. At the bottom of the time card, the total hours for each job code are listed
and totaled. Total tips are shown at the very bottom of the Time Card.
B.
Printing Employee Time Cards
To print the employee time card currently displayed, touch the Print control at the bottom of the
screen. The time card will be printed to the first local printer found on the system. If no local
printer is found, then the time card will print on the first system printer found. See section 3.20 A
for more information on setting up local and system printers.
DiamondTouch, Inc.
Copyright 2007
DiamondTouch 5.5 Software Documentation
2.90
C.
Page 95
Time Cards (cont)
Viewing and Adjusting Pay Periods
To change the Pay Period, touch the Pay Period control at the bottom of the Time Card screen,
then use the Calendar Selection Screen to select a new Pay Period. You may browse through the
possible dates using the scroll bars next to the month and year indicators. To select a new Pay
Period, simply touch any date within the Pay Period, and the Pay Period for that date will be
highlighted. Press OK to select the reporting period.
If you wish to adjust your Pay Period, touch the Set Pay Period control on the Pay Period screen.
You may select either a weekly or a bi-weekly pay period, then touch any ending date of your Pay
Period as a sample. The highlighted dates will correspond to your weekly or biweekly pay period.
Touch the Create New Pay Period control and your new Pay Periods will have been set up.
DiamondTouch will automatically “find” all previous and subsequent Pay Periods when needed
based on the sample pay period you have provided.
DiamondTouch, Inc.
Copyright 2007
DiamondTouch 5.5 Software Documentation
2.90
D.
Page 96
Time Cards (cont)
Editing Employee Time Cards
Time Cards can be edited directly from the display screen. You may add, delete or replace time
card entries.
1) Adding a New Entry
To add a new entry to a time card, touch one of the dashed lines on the time card display as
shown below. This will bring up all of the controls needed to add a new entry.
First, select either Clock IN or OUT to indicate the type of entry you wish to make. If the
new Entry is a Clock IN, you are given the opportunity to select a Job Description 1,2,3,4 or
5. If the new Entry is a Clock OUT, then you are given the opportunity to enter the declared
Tips amount.
Select the New Date using the left & right arrow controls under the New Date display. You
may choose any date that falls within the defined Pay Period. Touch the Hour control, and
use the left & right arrow controls under New Time to select the hour of the new record, then
touch Min and use the same controls to select the minutes. (NOTE: You may hold the
controls in to allow the values to scroll, rather than touching the control for each new value).
Once you have selected the new date and time, touch Add to add the new record to the Time
Card. The Time Card will re-sort the Clock IN and OUT entries each time you add a new
entry.
2) Deleting an Entry
To delete an entry, touch the entry you wish to delete, and then touch the Delete control that
appears at the bottom of the screen.
3) Replacing an Entry
To replace, or edit, an existing entry, touch the entry you wish to edit and use the New Date
and New Time controls to select the new Date and Time. Note that you may not “cross over”
an existing entry. Once you have “dialed in” the new time, touch Replace to change the entry.
DiamondTouch, Inc.
Copyright 2007
DiamondTouch 5.5 Software Documentation
2.95
A.
Page 97
Back Office
Daily Sales Report
Daily Sales Report provides an overall look at sales. To access the Daily Sales Report from the
main menu, touch Reports, select Back Office, select the appropriate day from the calendar on the
screen and then select the Daily Sales button.
The Daily Sales Report provides the following information:
1) Service type (dine-in delivery, etc)
2) Number of orders
3) Number of patrons
4) Total amount for each service type
5) Percentage of Sales for each service type
6) Average sales amount
7) Net Sales
8) Adjustments
9) Sub Total
10) Sales tax
11) Gross sales
DiamondTouch, Inc.
Copyright 2007
DiamondTouch 5.5 Software Documentation
2.95
B.
Page 98
Back Office (cont)
Daily Performance Report
To access the Daily Performance report from the main menu, touch Report, select Back Office,
select the appropriate day for your report and then touch the Daily Performance button. The report
will appear on the left side of your screen. To enlarge your view of this report, touch the zoom
button at the bottom of the screen.
The Daily Performance Report provides the following information:
12) Sales by Category Group
13) Receipts Summary by Payment Method including all tenders
14) Revenue Summary including Pay Ins, Pay Outs, Reimbursements, and Delivery Charges.
15) Deposit Summary
16) Tax Summary including Taxable and Non-Taxable items
17) Sales by Order Type
18) Labor Summary by Employee Job Type
19) Adjustments & Discounts
20) PayIn/Pay Out Summary
To print the report, touch the Print control at the lower left of the report display screen. The detail
report will print to your Windows default printer. This report was designed to print on an 80column printer.
DiamondTouch, Inc.
Copyright 2007
DiamondTouch 5.5 Software Documentation
2.95
C.
Page 99
Back Office (cont)
Balance Sheet
To access the Balance Sheet from the main menu, touch Report, select Back Office, select the
appropriate day for your report and then touch the Balance Sheet button. The report will appear
on the left side of your screen. To enlarge your view of this report, touch the zoom button at the
bottom of the screen.
The Balance Sheet provides the following information:
1) Revenue for the day selected
2) Cash
3) Final amount
D.
Weekly Performance Report
The Weekly Performance Report take detailed data stored in DiamondTouch and provide a weekly
summary of sales, labor, and costs. To access the report from the main menu, touch Report, select
Back Office, select the appropriate date, and then touch the Weekly Performance button.
DiamondTouch, Inc.
Copyright 2007
DiamondTouch 5.5 Software Documentation
PART 3
Page 100
Set Up
The Set Up portion of the DiamondTouch Restaurant Management System is used to configure your
Terminal Settings, Order Entry Menu, Employee and Customer Files, Security Levels and other functions
within the system. Many of these settings, such as your Printers, Ticket Set Up, and Network settings,
may have been set up by your Rockland Technology representative, and may never need to adjusted. Other
settings, such as the Employee Set Up or your Menu, may need to be accessed from time to time to make
minor changes.
The following sections describe each of the Set Up options in your system. If you are unsure of how to use
any of these settings, please call your Rockland Technology representative for assistance before making
any changes to your Terminal, Ticket, Network or Printer settings.
To access the Set Up Main Menu screen, from the main menu touch Reports, then touch Set Up. The
DiamondTouch Setup program will read your terminal settings, and the Setup Main Menu will appear.
3.10
A.
Terminal
Terminal Configuration
The Terminal Configuration screen is used to set up the basic operating properties of each terminal
on the system. To access the terminal settings screen from the main menu, touch Set Up, select
Terminal and then touch the Terminal Configuration button on the right hand of the screen.
To print the Terminal Settings, touch the Print control at the lower left of the Terminal
Configuration screen. The report will be printed to the first local printer found on the system. If
no local printer is found, the report will spool to the first system printer found. For more
information on setting up Local and System printers, see section3.20 A.
To reset the Terminal Settings after making adjustments, but before exiting the Terminal
Configuration screen, touch Reset All. Once you exit the Terminal Configuration screen, the
currently displayed settings will be saved as the new settings.
DiamondTouch, Inc.
Copyright 2007
Page 101
DiamondTouch 5.5 Software Documentation
3.10
A.
Terminal (cont)
Terminal Configuration (cont)
1) Default Service Type
The Default Service Type is designed to save one touch at the end of Order Entry, for
terminals that will normally be using the same Service Type, order after order. If the default
service type is utilized, the default service type will be selected automatically for all new
tickets. The user can then simply touch Finish to complete the order. Of course, the user can
always change the service type for any ticket, simply by touching another service type
selection, for the odd ticket that may be processed for a service type other than the default
service type.
If you do wish to use the default service type feature, highlight the Default Service Type line
item, then touch the service type you wish to use. If you do not wish to use a default service
type, select “None”.
2)
Default Customer Window
The Customer Information Screen described in section 1.85 includes 3 different Customer
Information Windows. You may use the Default Customer Window feature to cause one of
these windows to appear automatically each time a customer record is retrieved.
For example, you may wish to see the Previous Orders window for each customer
automatically as soon as the Customer Information screen is seen. To set up your terminal to
do this, highlight the Default Customer Window line item on the Terminal Configuration
Screen and touch the Tickets option. The Default Customer Windows options available are as
follows:
Default Customer Window
Selects:
None
Previous Orders
More Info
Customer Totals
None
Tickets
Comments
Points
Note that if a particular customer record has been set up with a priority comment [See section
1.85, C, 2] then the More Info / Comments window will always appear for that customer,
over-riding the Default Customer Window.
3)
Automatic Street Search
The Customer Information screen includes a Street Address Look Up feature, which matches
a customer’s street address with a street database for selecting delivery areas, delivery
charges, etc. This feature is described in section 1.85 F.
Any terminal can be configured to perform the Street Search automatically, which allows the
user to verify each customer’s delivery area information as soon as the customer information
screen is loaded on that terminal. This will allow you to use a pre-loaded customer database
in conjunction with a customized street database and pre-determined delivery charges by area.
See section 3.50 for more information on setting up the Street Database and Delivery Areas.
To turn on Automatic Street Search, touch the Automatic Street Search line on the Terminal
Configuration screen, and then touch ON. Touch OFF to disable this feature.
DiamondTouch, Inc.
Copyright 2007
DiamondTouch 5.5 Software Documentation
3.10
A.
Page 102
Terminal (cont)
Terminal Configuration (cont)
4) Counter Service
The Counter Service feature is designed for operations that need to cash out each ticket as it is
ordered. Any terminal can be set to run in Counter Service mode, with is essentially an
“express” mode that eliminates a few keystrokes.
When taking an Order in Counter Service Mode, the Print & Cash Out button will be activated
as soon as a Service Type is selected. When used in conjunction with the Default Service
Type, the order taker will be taken to the cash out screen as soon as the Smart Check ticket is
finished, since the service type is selected automatically. Once the ticket is cashed out, the
Order Taker is returned to the Order Entry Screen for the next order.
To enable the Counter Service Mode of operation, touch the Counter Service line on the
Terminal Configuration screen, and select ON. To disable this feature, select OFF. Counter
Service will only operate for those service types that are checked for counter service [See
section 3.25 A for more information on setting up service types.]
5) Cash Drawer 1
DiamondTouch will operate with up to two (2) physical cash drawers per terminal. Cash
Drawers can be serial, or work with a local serial or a local parallel printer. DiamondTouch
supports both Epson and Star format Cash Drawers. DiamondTouch can also track Cash
Register transactions without a cash drawer at all - with a “Virtual” cash drawer, if you will.
To use the Cash Out functions on a terminal, you must first set up a Cash Drawer for that
terminal. To enable Cash Drawer 1, touch the Cash Drawer 1 line on the Terminal
Configuration screen. Select the port that your cash drawer is connected to by touching the
port name on the right side of the screen (Com1, LPT1, etc). If you do not have a physical
cash drawer connected to your terminal, but you still wish to use the Cash Out functions, select
No Port. If you want to disable the Cash Drawer on this terminal, select Off.
6) Cash Drawer 2
Cash Drawer 2 works the same way as Cash Drawer 1. If you are operating with more than 1
Cash Drawer, you may set Cash Drawer2 by touching the Cash Drawer2 line on the Terminal
Configuration screen and selecting the port, no port or off if you do not wish to use the 2nd
Cash Drawer feature.
7) Print Register Receipts
When a ticket is cashed out, a receipt will print automatically if you have set your terminal up
to print register receipts. See section 1.35 for more information on cashing out tickets.
To set your terminal up to print register receipts, select the Print Register Receipts line on the
Terminal Configuration screen and select Yes. If do not wish to print receipts, touch No.
DiamondTouch, Inc.
Copyright 2007
DiamondTouch 5.5 Software Documentation
3.10
A.
Page 103
Terminal (cont)
Terminal Configuration (cont)
8) Customer Display
DiamondTouch supports the EMAX format optional customer pole display, for displaying
greeting messages, amount due and change to the customer when taking orders across the
counter. Pole displays can be configured for any terminal in your system, and can generally
share a communications port with a serial printer and a cash drawer.
To set up your customer display, touch the Customer Display line on the Terminal
Configuration screen. Select the port that your display is connected to, and enter the top and
bottom greeting messages in the text boxes provided. Your greeting messages will be
displayed when your terminal is first turned on, and after cash out transactions have been
completed.
To turn off the pole display feature, touch the Customer Display line on the Terminal
Configuration screen, then select OFF.
9) Ticket Messages
The Smart Check user interface can display animated messages to your Order Takers while
the order is being processed. These messages can be used for suggestive selling, or simply to
remind your order takers to thank the customer for each order.
To setup ticket messages for a terminal, touch the Ticket Messages display line on the
Terminal Set Up screen. Select ON to turn this feature on, and enter the blinking and
scrolling messages you wish to display in the text entry boxes provided. The messages will
be displayed automatically whenever the order taker pauses during the order taking process.
To turn the feature off, select off.
10) Screen Saver
The DiamondTouch screen saver is used to increase monitor life, and enhance system security
by forcing users to sign on to the system. The screen saver has three modes of operation:
OFF
Screen Saver can only be enabled by touching the Diamond logo on the
Main Menu.
Main Only
Screen Saver will turn on automatically from the Main Screen only, if
no activity takes place within the amount of seconds specified in the
Time Out field.
All Screens
Screen Saver will turn on automatically from any screen if no activity
takes place within the amount of seconds specified in the Time Out
field.
Use the left and right scroll arrows to specify the amount of seconds before the screen saver
times out, following no activity.
DiamondTouch, Inc.
Copyright 2007
DiamondTouch 5.5 Software Documentation
Page 104
3.10 Terminal (cont)
B.
Utilities
The Utilities screen is generally used by factory service personnel only, to access various
functions within your system. There are 2 features that are designed for user access.
1) Initialize PLU Table
The PLU Table is used by the Food Inventory interface to assign meaningful inventory
numbers to all items ordered. The PLU table is designed to be perpetual - that is, if you change
the contents of Menu Category 3, Item 7 from Blueberry Muffins to a Scotch & Soda, the PLU
number for Blueberry Muffins will remain untouched, and a new PLU number will be assigned
to the Scotch & Soda. This is done to insure that the historical reporting of your inventory
system can keep up with the dynamic requirements of your Order Entry menu.
If you wish to automatically re-assign numbers to your PLU Table, essentially “starting from
scratch” with PLU # 1, then touch the Initialize PLU Table. It is recommended that this only
be done after closing the day, to insure that PLU items remain consistent throughout the
business day.
If you are not using the optional Food Inventory package, you may disregard this feature
entirely.
2) Reinitialize Ticket Tracker Database
The ticket tracker database is used by DiamondTouch to “remember” all previous orders for all
customers [See section 1.85, C]. Following a system upgrade from version 2.71 or earlier, it is
required that this database be re-initialized before using DiamondTouch. When the reinitialization is complete, a message box will appear detailing the number of files, tickets, etc
that were found.
C.
Network Settings
The information in Network Settings is used by DiamondTouch to “find” the Server and Terminal
Paths. It is also used to identify the terminal number used to interact with the rest of the system.
These settings are set at the factory and, generally, should not be changed.
The Network Path can be the driver letter and directory name (example: “E:\Diamond98\”)
mapped to the system, or the Network Path can be the actual server network name ( example
“\\Server\Diamond98\”). The second example is generally more reliable, since mapped driver
letters can sometimes be “lost” by the operating system.
The terminal path is the location of the Diamond98 program on the local terminal (example:
“C:\Diamond98\”).
A terminal number, starting with terminal 1 must also identify all terminals. If this number is not
set, the system will not operate properly. Note that the terminal number is used for Cash Drawers,
among other features. If 2 terminals with cash drawers use the same terminal number, then the
totals of the 2 drawers will be combined. Other conflicts will also result, so be sure to set
terminals with unique identifiers.
The store name setting is optional.
DiamondTouch, Inc.
Copyright 2007
DiamondTouch 5.5 Software Documentation
3.15
Page 105
Menu Set Up
The Order Entry Menu Selection Control Window displays graphical menu items from which the
user builds a ticket [See section 1.20 B]. The choices that appear and the sequence in which they
appear are set up in the Menu Set Up screens. This section details the various features available.
There are a total of 40 Menu Categories available in the DiamondTouch Menu. Each Menu
Category can contain up to 40 Menu Items, for a total of 1600 Menu Items. Each of the 1600
menu items can also utilize up to 10 modifier lists, each of which can contain 40 modifiers, for a
total of 400 possible modifiers for each of the 1600 Items. Finally, each Menu Item can also use
an “Includes List” containing up to 16 normally included, or not included, ingredients. Any single
modifier list or Includes list can be used for as many items in as many categories as desired.
An overview of a sample menu is shown below.
In the above diagram, Modifier List # 5 could be used by the Chocolate Sundae Item to force the
order taker to select toppings. Modifier list 6 could be used for Item # 2, Ice Cream, but could
also be used by the Choc Sundae to select the flavor of the Ice Cream used. Modifier list # 6
could be forced on the order taker for the Iced Cream, but might be set up as optional for the
sundae. Modifier lists can also contain pricing modifications to the menu item, or contain the full
price for the Item. It’s all in how you wish to set your menu up.
Once you fully understand the principles involved in setting up the menu, and all of the additional
features and functions available such as required and optional modifiers, pricing by topping, etc.,
just a little advance planning will greatly simplify the task of setting up your Order Entry System.
DiamondTouch, Inc.
Copyright 2007
DiamondTouch 5.5 Software Documentation
3.15
A.
Page 106
Menu Set Up (cont)
Category
To make Order Entry more convenient, Menu Items are divided into Categories. There are a total
of 40 Menu Categories available in the DiamondTouch Menu. To set up your Menu Categories,
from the main menu select Set up, touch Menu and then touch Category.
The category screen allows you to enter a category name, select a graphic from the
DiamondTouch Bitmap Library, set PLU thresholds for optional inventory management, and set
more advanced features. The category screen is also the “gateway” to the Menu Items Set Up
screen for each category.
Typing in a new name in the Name text entry box can change the Category name. To change the
picture, touch the square control button and the bitmap library will appear. Touch the picture you
wish to use, and the new picture will be displayed on the sample control. The left and right arrow
keys are used to scroll through the Menu Categories, and to return to the first or last category. For
most menus, this may be all you need to set up each of your Categories: a Name and a Picture.
Save -
Touch this control button to save your changes at any time.
Insert - Touch this control button to insert a blank category. Categories are displayed on the
Order Entry Menu Section Control Window, left to right, in the order that they are set up.
If you wish to add a category of drinks, and you wish to have it displayed next to the
appetizers, you can use the insert control to place the category where you want it, without
editing all of your other menu categories. Note that the last category, category # 40, will
be deleted if you insert a category.
Delete - Delete will not only erase the existing category, but it will also move all subsequent
categories down one number to fill the empty slot. If you simply wish to display a blank
Category without moving all of your subsequent categories, just erase the Category name,
and the category will effectively be invisible on the Order Entry screen.
Finished - When you are finished, touch this control to return to the Set Up Menu.
DiamondTouch, Inc.
Copyright 2007
Page 107
DiamondTouch 5.5 Software Documentation
3.15
A.
Menu Set Up (cont)
Category (cont)
1) Advanced - Allow Manual Skip of Required Modifiers
To fully understand this feature, a discussion of what required modifiers are and how they
work might be helpful. When a Menu Item utilizes a “Required” modifier list, the modifiers
will appear automatically once the order taker selects the Menu Item. The user will be
“forced” to select a required number of modifiers before continuing with the order. These
choices could be the type of bread to use on a sandwich, cooking instructions such as
rare/medium/well done, the type of dressing on a salad, etc. Once the required choices have
been satisfied, the order taker may then be taken to a subsequent modifier list, and again be
forced to select a required number of modifiers, and so on, until the item order has been
completed. These types of applications are straight forward, and will not require the use of
the “Manual Skip” feature discussed in this section.
Some other modifier lists may have been set up with required amounts purely for pricing
purposes. Pizza toppings are a good example. Some pizza menus charge less for each topping
as the pizza is built. After 8 or 9 toppings, additional toppings might even be no charge at all.
{NOTE: Another way to handle this type of pricing is with the Price by Topping feature,
discussed in section 3.15 B. Price By Topping cannot be used for all menus, however.} One
way to address this type of pricing structure is with multiple, incrementally priced modifier
lists that are identical in every way except for price. Consider the following example for a
Medium Pizza, which has a base price of 5.00:
Mod List # 1
Required = 1
_____________
Mod List # 2
Required = 2
_________________
Mod List # 3
Required = 2
_________________
Mod List # 4
Required = 0
______________
Pepperoni
Xtra Cheese
Onions
Green Pepr
Anchovies
Xtra Cheese
Pepperoni
Xtra Cheese
Onions
Green Pepr
Anchovies
Xtra Cheese
Pepperoni
Xtra Cheese
Onions
Green Pepr
Anchovies
Xtra Cheese
Pepperoni
Xtra Cheese
Onion
Green Pepr
Anchovies
Xtra Cheese
1.00
1.00
1.00
1.00
1.00
1.00
.75
.75
.75
.75
.75
.75
.50
.50
.50
.50
.50
.50
.00
.00
.00
.00
.00
.00
Note the required amount under each modifier list. In the above example, a Pizza ordered
with any one topping will be 6.00. (The 5.00 base Medium Pizza price plus the one (1)
topping from Modifier List # 1 at 1.00 each = 6.00)
Before the 2nd topping is ordered, the active modifier list will switch from list #1 to list #2
automatically, because the required=1 topping has been satisfied for list # 1. The order taker
will notice no change on the Menu Selection, other than that the 2nd and 3rd toppings are .75
each instead of 1.00 each. Once the 3rd topping is ordered, the required amount for list #1 and
list #2 have been satisfied, so the list will switch to Mod List # 3 for the next 2 toppings. All
toppings after the first 5 will be no charge, because the menu section control window will be
displaying choices for list # 4. The maximum Medium Pizza price is as follows:
Base Price
Mod List # 1 - 1 Req’d Topping
Mod List # 2 - 2 Req’d Toppings
Mod List # 3 - 2 Req’d Toppings
@ 1.00/ea =
@ .75/ea =
@ .50/ea =
Maximum Price for the above sample item
DiamondTouch, Inc.
=
5.00
1.00
1.50
1.00
____
8.50
Copyright 2007
DiamondTouch 5.5 Software Documentation
3.15
A.
Page 108
Menu Set Up (cont)
Category (cont)
1) Advanced - Allow Manual Skip of Required Modifiers (cont)
The method in the above example works very well, and provides a great deal of control over
modifier pricing, especially since you can define ½ pricing levels for individual modifiers.
There is only one problem. What if the customer orders a Thin Crust Style AFTER all of the
toppings have been ordered? If the customer has only ordered 3 toppings, then the order taker
is looking at modifier list # 3 which is another list of toppings.
You can provide for this scenario by adding what is called an “optional” modifier list to the
item for crust style and/or cooking instructions. To allow the order taker to “Skip” through
the rest of the required modifier lists, check the “Allow Manual Skip of Required Modifiers”
check box in the Category Set Up Window. This will allow the Order Taker to touch the
Modifier command button on the Order Entry screen and bypass all required lists to get to the
first list of non-required modifiers. The order taker will then be able to browse through all
non-required lists for the item by touching the Modifier control again until he sees the crust
selections. The order taker can then touch “Thin Crust” and continue with the order without
missing a beat.
This feature probably won’t be used for most of your Menu Categories. However, if you can
gain an understanding of how this feature works in conjunction with the other features
available in the menu, then you can maximize the capabilities of the DiamondTouch Order
Entry system to your best advantage.
2) Advanced - Sort Modifiers
This feature is used for operations that always wish to print modifiers in the same order on the
tickets, no matter what the sequence the order taker used to create the order. This is
particularly useful for a high volume Sandwich Make Line, where the ingredients sequence
has to match the order of the food bins on the table. For example, let’s say the modifier list
for a standard sub sandwich calls for the following sequence:
Lettuce
Onion
Tomato
Green Peppers
Black Olives
Jalepeno Peppers
The bins have been placed in the above sequence, but the customer orders the sandwich as
follows:
Jalepeno Peppers
Onion
Green Peppers and
Lettuce.
Without an automatic sort, the lettuce at the end or the Jalepeno at the top might not get
picked up by the make station. By checking the Sort Modifiers checkbox, all items ordered
within the Category will automatically sort the modifiers in the sequence that the list was
programmed, and the ticket will be printed with the lettuce at the top, and the Jalepeno at the
bottom. Note that this feature will only sort modifiers within a list. If a 2nd modifier list is
used, then those modifiers will also be sorted, but they will not be “merged” with the previous
list.
DiamondTouch, Inc.
Copyright 2007
DiamondTouch 5.5 Software Documentation
3.15
A.
Page 109
Menu Set Up (cont)
Category (cont)
3) Advanced - Item 1 Account #
For optional “back-office” reporting purposes, account numbers are used to report revenues
and expenses. DiamondTouch allows you to assign each menu item a unique account
number; however, most accounting systems might only use a few account numbers to report
all sales. To save time when setting up your menu, you can assign a single account number
on the category screen, and then touch the Copy to All Items control to send that number to all
items within the category.
4) Advanced - Group
In addition to reporting by Category, some users may wish to report sales by Groups of
Categories. To change the group field, touch the group text entry box and enter the new
group number. You may assign any number to this field from 1-127.
5) Advanced - Picture Filename
The path used to locate the picture for the Category is listed in this box. This name is
generated automatically when you select a new bitmap by touching the square sample control
on the Category screen. Generally, this field should not be edited without assistance from
your Rockland Technology Sales or Service Representative.
6) Show PLU
PLU numbers are used to report theoretical ingredient usage to an optional inventory
reporting package. If you are not using inventory, then you do not need to read this section.
To access the PLU Receipt Level screen from the Category Set Up screen, touch the Show
PLU control.
Recipe levels are set by touching the recipe level, then adjusting the scroll bar to set the
maximum amount. You should always set Recipe Level 1 first, then recipe level 2, etc.
Recipe level 4 is set automatically.
DiamondTouch, Inc.
Copyright 2007
Page 110
DiamondTouch 5.5 Software Documentation
3.15
A.
Menu Set Up (cont)
Category (cont)
6) Show PLU (cont)
Optional Inventory reporting uses the items and modifiers ordered on tickets to calculate a
“theoretical” usage of ingredients. These are then compared against an ”actual” ingredients
used table, which is calculated by subtracting an ending physical inventory from a starting
physical inventory. In general, determining the theoretical usage is a straight forward process
for your inventory program: it just compares items used against a recipe table you have set up
in your inventory program, and it does the math. If a New York Strip Steak was ordered with
a Baked Potato, it will subtract 1 strip steak and 1 baked potato from inventory.
For some menus, however, recipes can change dynamically for an item when the number of
modifiers changes. This is particularly true for a Pizza, where a Medium Cheese pizza with
just pepperoni might call for 24 slices of pepperoni, and the same Medium Cheese Pizza with
pepperoni, onion, peppers, mushrooms, extra cheese, black olives, sausage and meatball
might only use 12 slices of pepperoni - only half as much for the same topping on the same
item. In this situation, a standard menu look up table will never report ingredients properly.
To solve this problem, you can set up DiamondTouch to indicate to your inventory system
where the “thresholds” are for your recipe changes within a Category. DiamondTouch will
then automatically assign different PLU’s for reporting the usage of identical modifiers within
each threshold grouping. The actual recipe quantity is still set up in your inventory package,
but we can cause the reporting totals to “point” to the appropriate recipe automatically by
setting up these PLU thresholds.
For example, let’s say you have set up your Recipe for Medium Pizza as follows:
Ingredient
0 - 2 toppings
3-5 toppings
6-8 toppings
9 + toppings
Pepperoni
Black Olives
Onions
Extra Cheese
Meatballs
24 Slices
4 scoops
12 slices
8 oz
24 oz
20 Slices
3 scoops
10 slices
7 oz
18 oz
12 slices
2 scoops
8 slices
6 oz
12 oz
10 slices
1 scoop
6 slices
5 oz
8 oz
The ingredients, measures and quantities are handled by the inventory system. What is
important for DiamondTouch is the amount of toppings at the top of the chart. These are used
when compiling the inventory report to indicate, for example:
12 Medium Pizzas were ordered with 0-2 toppings
9 Medium Pizzas ordered with 6-8 toppings
1 of the Medium Pizzas with 0-2 toppings had Pepperoni
9 of the Medium Pizzas ordered with 6-8 toppings had Pepperoni
( 24 slices)
(108 slices)
The inventory system is thereby able to accurately report that 132 slices of pepperoni should
have been used. Had the system simply used 24 slices for all medium pizzas, then the
inventory system would have reported a total of 10 pizzas used 24 slices each, for 240 total,
almost doubling the actual amount used.
Note that recipe levels are set for a category, but actual ingredient amounts are set by your
inventory system. Therefore, as long as the levels are the same for small, medium, large
pizzas, your inventory system will be able to calculate ingredients accurately.
DiamondTouch, Inc.
Copyright 2007
DiamondTouch 5.5 Software Documentation
3.15
B.
Page 111
Menu Set Up (cont)
Items
Once you have set up your categories, the actual menu items can be entered into the system. To
access the Item set up screen, first select the category from the Category set up screen, then touch
the Go To Menu Items button beneath the left and right navigational arrows. [NOTE: If you do
not see the Menu Item control, touch Hide Advanced or Hide PLU].
Initially, the Menu Item set up screen looks very similar to the Category Set Up screen. The name
and the square picture selection button, the navigation arrows and the Save, Insert and Delete
controls all work the same as the Category screen described in Section A, above.
In addition to setting up a name for the button, however, you can also set up a different name for
the description that appears on the ticket. Depending on the number of capital letters used, you are
generally limited to 10 - 12 characters as captions to the pictures on the buttons, but you can print
up to 20 characters on tickets.
The price field is also provided to enter a base price for the item. As was the case for the Category
Set Up screen, for many menus, this is all the information you need to set up a simple menu. Of
course, there are many additional features available. These are discussed in the following
sections.
DiamondTouch, Inc.
Copyright 2007
DiamondTouch 5.5 Software Documentation
3.15
B.
Page 112
Menu Set Up (cont)
Items (cont)
Advanced Features
To view the Advanced Features touch the Advanced button on the left side of the screen. The
features will appear on the right of the screen.
Allow Manual Skip of Required Modifiers – allows you to override a required modifier.
Sort Modifiers – allows you to sort the modifiers in the order in which they were ordered.
Enable Make line Monitor – enables the item with a check in the designated box to appear
on a make line monitor.
Force Suggestive Selling –feature forces the order taker to ask if the customer needs to order
anything else from the menu. Note: To set up this feature go to the main menu, touch Set Up,
select Terminal and then touch Terminal Configuration.
Enable Items Default Page 2 – once a category has been selected, the screen will
automatically go to page 2 of the Item List.
Override Tax Exempt by Service Type – allows you to manually select a category to make
tax exempt by service type.
1) Show Modifiers
Modifiers are additional enhancements, descriptions, food toppings or even cooking
instructions that need to be available to the order taker to accurately describe the item being
ordered. Modifiers generally appear automatically during the order taking process, and the
Order Taker selects them in a sequence pre-defined by the menu designer on the Show
Modifiers screen. [NOTE: The Modifier Lists themselves are designed in the Modifier Set Up,
described in the following Section 3.15 C.] To set up the modifiers for a menu item, touch the
Show Modifiers button on the Menu Item Set Up screen.
As shown on the above screen, there are 10 rows on the Show Modifiers window, one for each
of the 10 possible modifier lists for the selected item. (For most items, 1 or 2 modifier lists
will be sufficient.) Each modifier list has a number, and an optional name. To attach a
modifier list to an item, touch the desired modifier row to access the modifier list selection
window, shown below:
DiamondTouch, Inc.
Copyright 2007
DiamondTouch 5.5 Software Documentation
3.15
Page 113
Menu Set Up (cont)
1) Show Modifiers (cont)
The small scroll bar on the upper left portion of the screen allows you to browse through the
available modifier lists. The large window below the scroll bar that lists the individual
modifiers within each list is for information only. This can assist the menu designer in making
sure that the right list is being selected. To select a list, highlight the list in the upper scroll bar
and touch Select. The first selection at the top of the modifier list is a NO Modifier selection use this to reset the modifier to 0. If you wish to close the Modifier List selection window
without making a selection, touch Cancel.
After selecting the modifier list, you can set various properties of the modifier list. These are
discussed below:
Req’d
Setting any required amount other than 0 will force the order taker to select a minimum
required amount of modifiers before the modifier selection window displays the next set of
choices. For example, with a Sub Sandwich, you may want to force the selection of white,
wheat, rye, sourdough or pumpernickel bread. You would first go to the modifier set up screen
[See section 3.15 C that follows] and set up a new modifier list called Sandwich Breads. Next,
attach the Sandwich Breads modifier list to each sub sandwich item, as shown in the previous
section, and set the Required box to 1. This will force the order taker to select just 1 type of
bread before moving on with the order. Another list could be set up for type of cheese,
toasted/not toasted, etc. NOTE: Keep in mind that every required list adds a touch to the order
entry process, so you only want to force required choices that are common to all orders.
Opt’l
An optional modifier list will not appear automatically. It will be available to an order taker
once the item is ordered, by touching the modifier control. This can be very useful if you have
special options for menu items that are not ordered by all customers.
For example, let’s say you have some menu modifier options for soft drinks like “No Ice” or
“With Lemon”. Most orders do not require that the order taker select these options, so you do
not want to slow down the process by displaying modifier lists for every drink ordered. Your
order taker could then enter drinks by select the Drinks category, touching Coke, Orange,
Coffee, and Water. To modify the Water menu item, the order taker would then touch the
Modifier control to bring up the optional modifier list for Water, and could then select No Ice
and With Lemon.
NO Inv
Checking the No Inventory box means you do not want to count this modifier list for purposes
of tracking PLU inventory items. This option is only important if you are using the optional
inventory package. As an example, cooking instructions should probably not be counted when
determining how many ingredients were ordered on a Pizza.
NO PBT
If you are using the Price by Topping feature discussed below, this checkbox is useful if you
do not want the toppings from this modifier list to be counted when pricing an item by number
of modifiers added to it. Again, cooking instructions should not be counted if the item is a
pizza and you are calculating the price by counting toppings.
DiamondTouch, Inc.
Copyright 2007
DiamondTouch 5.5 Software Documentation
3.15
Page 114
Menu Set Up (cont)
2) Advanced Features
To view Advanced Features, touch the Show Advanced control on the Menu Item set up
screen. Advanced Features provides access to additional menu set up capabilities. These
features are discussed in the sections that follow.
Show Includes
To access the Includes list for a menu item, touch Show Includes on the Menu Item Advanced
Features window. Includes lists are used to display normal ingredients included with a menu
item, and some common substitutions that do not affect the menu price. Includes lists will
appear automatically during order entry as soon as the item is selected by the Order Taker.
If the selection is normally included, touch the Included check box; if the item is not normally
included, leave the box unchecked. Unchecked items will appear during the order entry
process with a “No” preceding the name of the item.
New Includes Lists can be defined by scrolling to the bottom of the available includes lists
and selecting NEW List. You may then enter all of the included items and select the included
status for each Include. Once a list is saved, it can be re-used for as many items as necessary.
If do not wish to use an included list for an item, select 00 NONE. When you have completed
the Includes List, touch Finished. The number of the Includes list you have selected will
appear in the display box next to the Show Includes control on the Menu Item Setup
Advanced Features window.
DiamondTouch, Inc.
Copyright 2007
DiamondTouch 5.5 Software Documentation
3.15
B.
Page 115
Menu Set Up (cont)
Items (cont)
Show Taxes
To set up a tax rate for a menu item, touch the Show Taxes control on the Menu Item Advanced
features set up window. A selection box with up to 10 different tax rates will appear. Select the
tax rate you wish to use, and then touch Hide Taxes to close the tax rate selection window. See
section 3.15 D for more information on setting up your tax rate schedules.
Note that all items will default to tax rate # 1, unless you specify an alternate table. It is therefore
not necessary to select a tax rate for every item as it is created, unless you need to specify a tax
rate other than Tax Rate # 1.
Price By Topping
Price by Topping provides an alternate way to price items that are priced according to the number
of modifiers that are added to the items. This feature is particularly useful for operations that offer
a“ build your own” type of pizza on the menu. The item price will be calculated according to a
table that the menu designer sets up, which simply assigns a price to the item based on the quantity
of modifiers added.
To access the Price By Topping set up window, touch the Price By Toppings control on the Menu
Item Set Up Advanced Features window.
Price by Topping will only work if the Enable Price By Topping check box is checked. Fill in the
price structure for the item in the pricing matrix on the left of the screen. To fill in all prices
below a “maximum” set price, highlight the maximum price and touch the fill control. If the
modifier list you are using contains some “gourmet” toppings that are priced higher than a
standard topping, you may wish to check the Count 0.00 Price Toppings only check box. This
will cause the system to skip the priced modifier when counting the toppings, so the customer
won’t pay twice for the priced gourmet topping.
Half toppings are always rounded up to the next highest whole when counting ½ toppings. For
example, a pizza with half mushroom and pepperoni, and half extra cheese, would normally be
considered a 1½ topping pizza, and would be rounded up to the 2 topping price. Before
rounding, however, there are some alternate ways of counting half toppings. Consider a Pizza
with Mushrooms, Pepperoni and Onions on ½ and meatball only on the 2nd half. There are 3 ways
to count these toppings:
DiamondTouch, Inc.
Copyright 2007
Page 116
DiamondTouch 5.5 Software Documentation
Count as Half Topping:
Count as Whole Topping:
Count Highest Half Only:
4 ½ toppings = 2 Full Toppings. Price = 6.35
3 plus 1 =
4 Full Toppings. Price = 7.00
3 on 1st half =
3 Full Toppings Price = 6.70
Once Price by Topping is enabled, the window next to the Price By Topping control on the Menu
Item Advanced Set Up window will read ON. You can also disable certain modifier lists from
being counted at all when calculating the number of toppings by checking the NO PBT check box
on the modifier list set up window. See section 3.15 B,1 for more information on NO PBT.
Allow Item Exchange
The Smart Check user interface allows for automatic item replacement during edit of a ticket.
[See section 1.20 F] Before items can be replaced automatically, however, they must be
designated by the menu designer as interchangeable with other selected items within the same
category. This is done by checking the Allow Item Exchange check box in the Menu Item
Advanced Features set up window.
Before checking the Allow Item Exchange box, you should make sure that all includes, modifier
lists and other relevant information is truly interchangeable. Otherwise, some unpredictable things
could happen.
For example, consider a drinks Category both with Coke, Orange Juice, Water and Coffee. Let’s
say that a guest has ordered a coffee with cream and sugar, which are modifiers attached to the
coffee item. If you check allow item exchange for all drinks, then an order taker would be able to
touch the coffee on the smart check interface, and swap it with the Orange Juice. The customer
might then end up with an Orange Juice with Cream and Sugar, (or a coffee with a shot of vodka!)
if that was the modifier occupying the same slot on your modifier list.
When an item is exchanged automatically on the Smart Check interface, all modifiers are also
exchanged with those occupying the same relative position on the list. If an item is ordered with a
selection made of the 3rd , 5th and 9th modifiers on the first list and the 8th modifier on the 2nd list,
then those same modifier positions will be read for the replacement item and those modifiers will
appear on the ticket. Therefore, the makeup of the lists should be identical in terms of number of
modifier lists, and number of modifiers in each list.
Of course, if there are no modifier lists for all items within a category, then they are certainly good
candidates for the Allow Item Exchange feature.
Long Ticket Name on Button
As mentioned earlier, the ticket description for an item is 20 characters long, whereas the caption
designed for the button itself is on about 11 characters long; this is because the picture on the
button does most of the work for fast identification of the selection.
There are some situations, however, where a more descriptive text description is more appropriate
- specialty coupons are one example. If a longer description is absolutely required, you can select
the Long Ticket Name on Button option. This will cause the description you have entered for the
ticket to appear on the button during order entry - the wording will wrap on the button. Because
the word wrap will cause the letters to appear a bit higher on the button, use of any graphical cues
may obscure the text description - therefore you may wish to select a very simple graphic or no
graphic at all for this option.
Keep in mind that text only buttons will slow down your order taker - graphical cues can be
located much faster than reading through a series of buttons. This feature should therefore be used
very sparingly, if at all.
DiamondTouch, Inc.
Copyright 2007
DiamondTouch 5.5 Software Documentation
3.15
B.
Page 117
Menu Set Up (cont)
Items (cont)
2) Advanced Features (cont)
Lock PLU
This feature is only used in conjunction with the optional inventory program. To support an
optional inventory interface, DiamondTouch keeps track of a series of PLU numbers. These
numbers are used by the inventory program to link to a recipe database. To maintain
historical integrity of the PLU numbers, DiamondTouch will automatically assign a new PLU
number to an item if it sees that the menu designer has changed the item description. If you
wish to prevent DiamondTouch from assigning a new PLU number to an item, check the
LOCK PLU checkbox before editing the item description.
Misc Price Item
Some items may not have constant prices from day to day, or even from ticket to ticket. The
Daily Lunch Special, or the Catch of the Day might be two examples.
A miscellaneous price item will always prompt the order taker for a price each time the item
is ordered. The order taker can then manually enter a price. When an item is checked for
miscellaneous price, then the price amount keyed in by the menu designer in the Price edit
box becomes the maximum price allowable.
Account Number
For optional “back-office” reporting purposes, account numbers are used to report revenues
and expenses. DiamondTouch allows you to assign each menu item a unique account
number; however, most accounting systems might only use a few account numbers to report
all sales. To save time when setting up your menu, you can assign a single account number
on the category screen, and then touch the Copy to All Items control to send that number to all
items within the category.
Picture Filename
The path used to locate the picture for the Item is listed in this box. This name is generated
automatically when you select a new bitmap by touching the square sample control on the
Item Set Up screen. Generally, this field should not be edited without assistance from your
Rockland Technology Sales or Service Representative.
DiamondTouch, Inc.
Copyright 2007
DiamondTouch 5.5 Software Documentation
3.15
C.
Page 118
Menu Set Up (cont)
Modifiers
Menu Modifiers are used to add ingredients, cooking instructions, sides, and a variety of
information to a Menu Item on a ticket. A modifier could be an order of cream for a large coffee,
or an order of french fries or a coke with a cheeseburger. Modifiers can be used for just about
anything you need to fully describe an item ordered by a customer.
This section describes how to set up a modifier list. For more information on how to link a
modifier list to an item, and many other features available for controlling how modifiers will
work, see section 3.15 B. To access the modifier set up screen from the main menu, touch Set Up,
select Menu and then Modifiers.
The modifier set up screen will always begin at Modifier List # 1, Modifier # 1. There are a total
of 40 Modifiers available for each list; you may program up to 320 total modifiers lists, although
most restaurants can complete their entire menu with 15 - 30 lists, at the most. Once a list has
been created, it can be attached to multiple items. You do not need to create a list of steak dinner
sides for every steak on your menu. The baked potato, rice, steak fries and curly fries choices you
set up for a “Potato Sides” modifier list could probably be used for not only every steak dinner,
but perhaps many of your other entrees as well.
Most of the settings on the modifier list are self evident; the Name on Ticket, Name on Button and
Price fields work the same as the Item Set Up screen described in Section 3.15 B. The half price
field is for modifiers that might be used on only half of the item, such as a Pizza. This allows the
menu designer to charge something other than actual half price for a modifier. The Modifier List
Description field is optional, but can become very handy for the menu designer when the
modifiers are attached to the Menu Items, or when printing the menu report.
To assign a Picture to a Modifier, touch the square control next to the browse label and select a
picture from the Bitmap library that appears. The picture filename is loaded automatically; this
field should not be edited manually without assistance from your Rockland technical
representative.
DiamondTouch, Inc.
Copyright 2007
Page 119
DiamondTouch 5.5 Software Documentation
3.15
C.
Menu Set Up (cont)
Modifiers (cont)
Change List is used to access a different modifier list. Enter the number in the keypad that
appears and press next to access another modifier list.
Add New List is used to add a blank modifier list. The list number will be assigned automatically
using the next available list number.
Copy List will copy the existing list to a newly created list. This can be very useful if you are
using “required” modifier lists to adjust pricing. [See section 3.15 A].
Copy Price will copy the price of the current modifier to all other modifiers in the list.
Delete List will erase the modifier list entirely, and allow the modifier list number to be re-used
by the next new modifier list created. Be careful not delete a list still being used by an item.
Lock PLU is only used in conjunction with the optional inventory program. To support an
optional inventory interface, DiamondTouch keeps track of a series of PLU numbers. These
numbers are used by the inventory program to link to a recipe database. To maintain historical
integrity of the PLU numbers, DiamondTouch will automatically assign a new PLU number to a
modifier if it sees that the menu designer has changed the description. If you wish to prevent
DiamondTouch from assigning a new PLU number to a modifier, check the LOCK PLU checkbox
before editing the modifier description.
When you are finished editing or viewing your modifier lists, touch exit to return to the Set Up
menu.
DiamondTouch, Inc.
Copyright 2007
DiamondTouch 5.5 Software Documentation
3.15
D.
Page 120
Menu Set Up (cont)
Tax Rates
DiamondTouch allows for up to 10 different tax rates. Tax Rates are assigned to each Menu Item
individually. This section describes how to set up your tax rate schedules. For more information
on assigning tax rates to menu items, see section 3.15, B, 2.
To access the tax rate set up screen from the main menu, touch Set Up, select Menu and then Tax
Rates.
Enter your tax rates as a decimal number. If your tax rate is 7%, then enter .07 for the tax rate. If
your tax rate is 8 ¼ %, then enter .0825.
All items will default to Tax Rate 1 as the menu is entered, so this tax rate should always be set
with the most common tax rate. If you only use one tax rate, then set that rate to tax rate 1.
The last tax rate is the delivery charge tax rate. If you use delivery charges [See section 3.50 E for
more information on setting up delivery areas], then you will need to set the appropriate tax rate
for delivery charges in this field. If you set this field to 0, then the delivery charge portion of your
tickets will not be taxed.
When you have completed setting up your Tax Rates, press CONTINUE to exit the tax rate set up
screen.
DiamondTouch, Inc.
Copyright 2007
DiamondTouch 5.5 Software Documentation
3.20
Printers
A.
Printers
Page 121
DiamondTouch provides a very powerful array of printer configuration options. Before jumping
into your Printer Set Up screen, it would be a good idea to first gain an understanding of how your
individual local and system printers have been configured.
Local printers are those printers attached to a terminal that are only used by that terminal. A cash
drawer printer is a good example of a local printer. Local printers can only print information from
the terminal to which they are attached; a terminal cannot print to another terminal’s local printer.
System printers are those printers that are shared by the entire system, and they are typically
attached to the Server station via a Boca Board port expansion card, typically configured to access
serial ports 4,5,6,7,8 and 9. Kitchen and Bar printers are examples of system printers. All
terminals can print to system printers.
The most single most important concept that must be understood before setting up the system
printers is that all printer ports used by the system are defined for the system just once. To put it
another way, all stations operate with the same printer ports list. Any edits done to the list of
printers on any single station will be transferred to all other stations once those stations re-connect
to the system.
In the example below, the Server has been configured with a local printer on Com2, a System
Printer on Com 4 and another System Printer on COM 5. A local 80-column printer has also been
set up on LPT1. Sat 2 has a single local printer on COM2; Sat3 has a local printer on COM2 and
another on COM3
Note that all terminals will be using the same printer list. Printer number 1 will be COM2 on all
terminals; it will be checked local for the Server, Sat 2 and Sat 3. Sat 1 does not have a local
printer on COM2, so Printer 1 will not be checked local on Sat 1. All stations will have Printer 3
and Printer 4 checked as System printers, since these printers will be available to all terminals.
Before adjusting your printer settings, it is a good idea to sketch out your system diagram as
shown above.
DiamondTouch, Inc.
Copyright 2007
DiamondTouch 5.5 Software Documentation
3.20
A.
Page 122
Printers (cont)
Printers (cont)
To access the printer set up screen from the main menu, select Set up, touch System and then
Printers.
Although all terminals share the port descriptions, you must still use the printer set up screen to set
up the local/system and type printer settings type for each terminal individually.
The above printer set up screen shows the correct settings for the server terminal on the previous
page. The Sat 2 terminal on the previous page will be set up almost identically, except that the
LPT1 local check box will not be checked. Sat 1 will not have any local printers checked, and Sat
3 will have both Printer 1 (COM2) and Printer 2 (COM3) checked local.
Printer Type 1 is the default setting, and is also the setting used for Citizen 3551 printers with Star
emulation. If you are using an Epson or Epson compatible printer, select Type 3 or 4. [NOTE: If
your 40-column printer feeds 12” of blank paper when it should be cutting, you probably have an
Epson mode printer, and you should select Type 3 or 4]. Type 5 is to be used for the C.Itoh Label
and Barcode Blaster Label printers.
To add a printer to the printer set up screen, touch the Port/Name description field for the printer
you wish to add, select the port and type you wish to use, and touch ADD Printer. If you do not
select a port and type, the printer will not be added.
To delete a printer, touch the Port/Name description field and then REMOVE Printer. NOTE:
You should not remove any printers before removing them from your printer profiles first. [See
section 3.25 C for information about printer profiles.]
NOTE: Remember that when you add or delete printers from the Port/Name description
list, they will also be added or deleted to all other terminals in the system.
The Reset control will return all settings to the last saved version, before you entered the printer
set up screen.
For report printing, select the HP Printer button at the top right-hand of the Printer Set Up screen.
Note: You must exit DiamondTouch and restart the program for the changes to be saved.
DiamondTouch, Inc.
Copyright 2007
DiamondTouch 5.5 Software Documentation
3.25
Page 123
Tickets
DiamondTouch prints tickets to designated printers, according to user designed patterns. Profiles,
which link a printer and a pattern, are set up by the system designer for each defined Service Type.
Printer set up was covered in the previous section. This section will discuss how to set up Service
Types, Ticket Patterns and finally the 8 available Profiles for each of the 8 possible service types
(that’s 64 total) that tie it all together. While this can seem a bit confusing at first, once a system
is fully configured, a typical complete installation will end up looking very much like the example
below:
As shown above, the sample restaurant offers Dine In, Carry Out and Delivery service types. The
system printer on COM 4 is set up in the kitchen, while the system printer on COM 5 is set up to
print in the bar. When an order is completed and a Dine In or Carry Out service type has been
selected, 3 tickets will be printed. Delivery orders will print 4 tickets.
When the tickets are printed, the information on the tickets will be based on ticket layouts set up
by the system designer. These ticket layouts are called “Patterns”. For example, some tickets will
print server names and table numbers, others may print directions for delivery drivers from the
customer database. Some tickets may print pricing information. Others may print items in wide
print and some may not. Patterns can also contain instructions that tell a ticket not to print at all
unless certain menu categories, such as drinks, have been ordered. It’s all in how the system
designer sets up the patterns.
The Service Type and Patterns, like the Printer Ports in the previous section, are set up common to
the system as a whole. Profiles, such as the list shown above, are set up individually for each
terminal on the system.
The following sections will discuss the Service Types, Patterns and Profiles concepts in more
depth.
DiamondTouch, Inc.
Copyright 2007
DiamondTouch 5.5 Software Documentation
3.25
Tickets (cont)
A.
Service Types
Page 124
Service Types, such as Dine In, Take Out and Delivery, are used primarily to set up tickets with
appropriate information, and to report totals in separate categories. In addition, you can set up
your service types to operate in different ways, such as allowing Driver Dispatch or prompting for
a Ready Time automatically.
To access the Service Type set up screen from the main menu, touch Set Up, select Tickets and
then Service Types.
You may configure anywhere from 1 to 8 separate service types. To set up a service type, touch
the white description field and type in your service type description. To configure the service type
for one of the 8 service type features, touch the circle beneath the feature you wish to enable to
make the red check appear. To disable a feature, deselect the circle. The Service Type features
available are described as follows:
Ready Time - Service Types checked for ready time will automatically prompt the order taker for
the Ready Time in minutes before each order can be completed. This adds some extra touches to
every order, so this feature should only be checked if you need to print ready time at the bottom of
every ticket for a particular service type. In the above example, only Carry Out orders will prompt
the order taker for ready time.
Delivery Charge - If you are using automatic delivery charge by customer street/area, you will
see your delivery charge at the bottom of all phone orders for a particular area. However, you will
probably not want to charge your Carry Out phone orders for delivery, since the customer is doing
the driving! Therefore, the above example only shows a delivery charge for delivery orders only.
Allow Dispatch will cause all open tickets for a selected service type to appear on the delivery
dispatch screen [see section 1.90 C for more information on driver dispatch]. This designation
will also cause all tickets from the selected service type to appear on the ticket status screen with
delivery status information. [see section 1.60]. Generally, most operations will only check the
Delivery service type for Allow Dispatch.
Tax Exempt will remove all taxes from a ticket for the selected service type. This can be useful
for operations in States that do not charge sales tax for delivery, or for a Charity / Banquet service
type that may be tax exempt.
DiamondTouch, Inc.
Copyright 2007
DiamondTouch 5.5 Software Documentation
3.25
A.
Page 125
Tickets (cont)
Service Types (cont)
Allow Counter Service is used in conjunction with the Counter Service feature described in
section 3.10 A. Counter service is used to automatically enter the cash out screen once an order is
completed. This is typically used in over the counter operations where customers order and pay at
the same time. Once the order is cashed out, the order entry screen re-appears automatically to
allow the next order to be entered with a minimum of screen touches.
A terminal that is only used for Counter Service might also take advantage of the Default Service
Type feature described in 3.10 A, for even fewer screen touches. However, with both features
turned on you will not have the opportunity to easily ring up the odd Dine In or Delivery Order at
that station.
Force Prompt for Name will force the order taker to enter the customer name.
Force Table & Guest will force the order taker to enter the table number and the number of
guests at the table.
Force Prompt for Payment will force the order taker to enter the payment type.
B.
Patterns Layout
Tickets can include much more than just the items ordered. They can contain server names, table
numbers, delivery addresses and/or directions, special comments, pricing and even coupons. You
can use red or reverse print to highlight certain items, and even wide print to make sure the items
are seen by the kitchen staff. You can omit information also, to keep the tickets brief, and recalled
tickets can omit items previously ordered so that the kitchen does not make the same food twice.
The system designer on the Patterns set up screen sets up all of this information, and more.
To access the Pattern Set Up screen from the main menu, touch Set Up, select Tickets, and then
Pattern Layouts.
DiamondTouch, Inc.
Copyright 2007
Page 126
DiamondTouch 5.5 Software Documentation
3.25
B.
Tickets (cont)
Patterns Layout (cont)
There are a total of 12 patterns available. To view or edit a pattern, select the pattern by touching
one of the top 12 control buttons. You may change the name of the pattern at any time by typing
the new name in the Ticket Pattern Name box at the top of the screen.
The ticket set up display on the right side of the screen is divided into three sections.
•
•
•
The first section, the ticket “header”, allows up to 5 lines of text. To change the header
information, touch the line you wish to edit and type in the new text.
The next 4 lines are used to set the indentation and color of Items, Modifiers, Special Request
(comments) and Included Menu information. To change the indentation setting of one of
these lines, touch the line.
The last section, the ticket “footer”, allows up to 5 lines of text. Type in the information you
wish to see on the bottom of the ticket. Note that the header and footer information will be
centered automatically when the ticket is printed.
The Colors control allows you to set the colors (Red or Black) of various information on the
ticket. To change the color, highlight the line and touch the Colors control. Printers that support
red print will print those items shown in red; some other printers, such as thermal printers, will
print reverse print (white on black) instead.
The Format control is used to add additional information to the top of the ticket. Specific ticket
data, and user designed captions, can be added by setting up to 10 lines of format data. The
information will appear just below the 5 line ticket “header”.
To add a line of information, touch the next available field on the left side of the display. The long
field at the bottom of the screen is used to construct the line. To add a field to the line, touch one
of the available ticket fields and then ADD FIELD. Note that the field number appears
surrounded by brackets. You may also type a description before the field, if you wish. To add the
line to the ticket, touch ADD LINE. The line will be added to the selected ticket line. Note that
some fields, such as customer directions, can take up more than one line.
To clear a line, touch the line and then touch CLEAR.
DiamondTouch, Inc.
Copyright 2007
DiamondTouch 5.5 Software Documentation
3.25
Tickets (cont)
….B.
Patterns Layout (cont)
Page 127
Note that to keep the tickets from getting too cluttered, and to insure that all information appears
on the tickets, you should generally only add one field for each line. When you have completed
your format set up for this pattern, touch Exit. The Category control allows you to block selected
categories from printing on selected patterns. For example, if you are designing a pattern for a bar
printer, you probably do not need to print tickets at the bar unless the ticket includes drinks.
While setting up the pattern, touch the Category control and touch all categories that you do not
wish to print at the bar. Blocked categories will be displayed with “NO” preceding the category
name. Touch the category again to remove the block.
Tickets will generally only print those items that are not blocked. The one exception is when you
have also checked the “No Item Skip” checkbox described below. With this option checked,
tickets will still only print at the bar if drinks are included on the ticket, but No Item Skip will
cause all items on the ticket to be printed (no items will be skipped).
The Copy control allows you to copy a pattern to another pattern. To use the copy function, first
select the pattern you wish to copy by touching the pattern control 1 - 12. Next, touch copy, then
touch the pattern you wish to copy the pattern to. Blank Lines Preceding Ticket and Blank lines
After Ticket are used to adjust the number of lines (1-3) before and after the ticket.
There are 12 check boxes that are used to turn on or off specific features for each pattern. These
are described as follows:
• Full Ticket on Edit - Normally, when tickets are recalled and items are added to the ticket,
the ticket will only print the added items. This is to prevent the cook from making the same
food twice. There are some situations, such as guest checks or delivery tickets, where you will
need to see the complete ticket even if only one item was added. If you have checked Full
Ticket On Edit, the ticket will print with an “Updated Ticket” header, and will include all
items when items are added.
• Customer Separations on tickets - this option will cause the ticket to print subtotals and tax
amounts after each customer separation added to the ticket. See section 1.20 E for more
information about the customer separations.
• Pricing on Tickets will allow the pricing information to print on the tickets. If this checkbox
is unchecked, tickets will print with menu quantity and menu descriptions only.
• Box Label Format is used for the optional box label printers. Box Label patterns will print
one header label with delivery info, then one label for each item not blocked on the ticket.
The Barcode Blaster label printer must be set up as a Generic Text Windows printer. First
select it from the list of windows printers in the Printer Set up, and then select the Pricing On
Tickets in the Ticket Pattern Layout.
• Blank Lines between Items will put a space between each printed line.
• Skip 0 Price Modifiers - This is normally used for Guest Checks to eliminate cooking
instructions and other menu information that did not effect the price of the ticket.
• Wide Item Print will cause Menu Items to print in extra wide characters.
• No Item Skip will cause all items on a ticket to be printed, even if the category has been
blocked. However, the ticket itself will not print unless at least one item on the ticket is not
blocked. See Category description, above.
• Print Coupon will print either a New Customer Coupon or a Lazy Customer coupon
automatically for customers that qualify for a coupon. See section 2.35 D for more
information on Customer Coupons.
• Print Second Name will print last name on ticket.
• Sort by Category will sort items by category and print them in category order.
• Consolidated Item Pricing
DiamondTouch, Inc.
Copyright 2007
DiamondTouch 5.5 Software Documentation
3.25
C.
Page 128
Tickets (cont)
Profile Assignments
Profiles link a single pattern number to a single printer number, and are displayed to the order
taker just before each order is completed. Each profile can be thought of as an assignment to the
system to print the ticket to a designated printer according to a selected pattern.
To access the profile screen from the main menu, touch Set Up, select Tickets, and then Profile
Assignments.
In the above example, 4 Service Types have been set up: Dine IN, Carry Out, Delivery and
Waiting. To view the profiles for each service type, touch the desired service type control at the
top of the screen. The profiles are displayed on the lower left portion of the screen. To select a
profile, touch the profile printer icon. In the above example, the user has selected the Guest Check
Pattern.
Each profile contains 3 pieces of information:
•
•
•
A Ticket Profile Name - enter this in the text entry box beneath This Ticket Profile on the
right of the screen. Ticket profiles that do not have a name will not be activated during order
entry.
A Printer Number - Select the printer number by touching a printer description in the Printer
list in the upper right portion of the screen. Note that the printer number is not a port number;
it is the number of the printer on your printer list. [See section 3.20 A for more information on
setting up the printer list].
A Pattern Number - Select the Pattern number by touching a pattern description in the
Pattern list box in the upper right portion of the screen. [See section 3.20 B for more
information on setting up Patterns].
A summary report is available that will detail all profiles for all service types. To view this report,
touch Summary. You may print this report to your windows default printer. Note that this report
is designed to be printed on an 80-column printer.
When you have finished setting up your profiles, touch finished.
DiamondTouch, Inc.
Copyright 2007
DiamondTouch 5.5 Software Documentation
3.25
D.
Page 129
Tickets (cont)
Coupons
DiamondTouch provides 2 types of automatic coupons: New Customer and “Lazy” Customer.
New Customer coupons will print at the bottom of an order to selected printers for the first order
only of a new customer. New customers are those customers with phone numbers not previously
listed in the Customer Database. Lazy Customer coupons will print at the bottom of an order to
selected printers for customers that have not ordered within a user defined number of days. For
example, if you define the number of days at 45, all customer orders that are printed for customers
that have not ordered within the past 45 days will receive a coupon.
To access the Coupon set up screen from the main menu, touch Set Up, select Tickets and then
touch Coupons.
To view and/or edit the New Customer Coupon, touch the New Customer control. To view and/or
edit the Lazy Customer coupon, touch the Lazy Customer control.
Each coupon allows up to 7 lines of text. To edit the line of text, touch the text box and type in the
new line. Touch the Red Print, Wide Print and Center Text check boxes to enable those features
for each line. For printers that support red print, the checked lines will print in red. Other printers,
such as thermal printers, may print these lines in reverse (white on black) print.
For the Lazy Customer, use the list box in the upper right portion of the screen to set the minimum
number of days since the last order before the coupon will print.
Note that coupons will only print to profiles that used patterns with the Print Coupon check box
selected. This allows you to print coupons to only those printers that actually print the customer
tickets.
To print a sample coupon, touch the Print Coupon control button. The sample coupon will print to
the first local printer found. If no local printer is found, then the coupon will print to the first
system printer found. See section 3.20 A for more information on local and system printers.
When you have finished setting up your coupons, touch Finished.
DiamondTouch, Inc.
Copyright 2007
DiamondTouch 5.5 Software Documentation
3.25
E.
Page 130
Tickets (cont)
Price Adjustments
Price Adjustments are fixed percentage discounts or gratuities available to Order Takers during
order entry. Unlike the price and percentage discounts, Price Adjustments automatically
recalculate the amount of the adjustment as the order is edited.
To access the Price Adjustment set up screen from the main menu, touch Set Up, select Tickets
and then Price Adjustments.
DiamondTouch allows up to 10 fixed Price Adjustments. [Miscellaneous adjustments are also
available - see section 1.20 E for more information]. To set up a price adjustment, first indicate
whether the adjustment will be a gratuity (added amount) or a discount (subtracted amount) by
touching the Discount/Gratuity control in the far left column. Next, type in the Price Adjustment
description in the text box provided, and enter a percent amount between 1 and 100.
Dedicated security levels are also available for each Price Adjustment. Select the minimum
security level required to apply the price adjustment. Users with security level below the selected
level will not have the capability of applying the selected price adjustment. [See section 3.40 for
more information on setting up security levels.]
When you have completed setting up your Price Adjustments, touch Exit.
DiamondTouch, Inc.
Copyright 2007
DiamondTouch 5.5 Software Documentation
3.30
Cash Register
A.
Starting Cash
Page 131
Starting Cash is used to automatically enter a starting cash amount for the entire store onto the
Balance Cash report, based on the day of the week. The starting cash amount can be edited on the
balance cash report, so this feature is simply a handy time saver; it is not an enforced starting cash
amount.
To access the Starting Cash set up screen from the main menu, touch Set Up, select Cash Register,
and then Starting Cash. Enter the amount for each day in the next boxes provided. When you
have completed all of the starting cash amounts, touch Exit.
B.
Tender Options
Tender Options are any payment method used other than Cash or Check, during a Ticket Cash Out
transaction. [See section 1.35 for more information on cashing out a ticket]. Tender Options
could be MasterCard, Visa, a billable account, or even a coupon. Tender Options are simply ways
to track alternate methods used to satisfy the amount owed on each ticket. To access the Tender
Options set up screen from the main menu, touch Set Up, select Cash Register, and then Tender
Options.
To add a tender method, touch one of the 10 tender control buttons on the left side of the screen,
and type a Button Description and a Ticket Description in the text boxes provided in the top center
portion of the screen. Once the descriptions are added, the tender key will appear on the Cash Out
screen.
You may also wish to automatically print a credit card or memo slip for each transaction. Check
the Print Supplemental Receipts button for each tender method you wish to print a slip, and check
the Print CC slip check box. When the tender key is pressed during the transaction, the system
will also prompt the user to swipe their credit card.
When you have finished setting up your tender keys, touch Exit.
DiamondTouch, Inc.
Copyright 2007
Page 132
DiamondTouch 5.5 Software Documentation
3.30
C.
Cash Register (cont)
Paid Out Accounts
Paid Out accounts are used to track cash pay outs from a Cash Drawer. Paid Outs are typically set
up for vendors that are paid on a cash basis during the business day. To access the Paid Out Set
Up screen from the main menu, touch Set Up, touch Cash Register and then touch Paid Outs.
To set up or edit a Paid Out Account, touch one of the Paid Out control buttons and type in the
new description. Once entered, the paid out description will appear as an option during a paid out
transaction. [See section 1.40 H for more information on Paid Out transactions.]
D.
Paid In Accounts
Paid In Accounts are designed for payment on a customer’s account. To access the Paid In screen
from the main menu, touch Set Up, touch Cash Register and then touch Paid Ins.
E.
Reimbursement Plan
Reimbursement Plan allows you to determine how you will drivers for deliveries. To access the
Driver Reimbursement Plan screen from the main menu, touch Set Up, touch Cash Register and
then touch Reimbursement Plan.
There are five ways in which you can reimburse a driver:
•
•
•
•
•
Dollar amount per run
Dollar amount per ticket
Percentage of delivery charge
Percentage of gross sales
Print only: percentage of gross
Once you have determined the reimbursement type, highlight the type and enter the amount per
ticket.
F.
Paid In/Out Reporting Groups
For the Paid In/Out Report to be accurate, you must complete the following information:
•
•
•
Employee job types
Group number must be selected for each category
Reporting Groups
DiamondTouch, Inc.
Copyright 2007
DiamondTouch 5.5 Software Documentation
3.35
Page 133
Tables
DiamondTouch provides a floor plan interface to allow servers to access tickets and table status
simply by touching a table. [See section 1.50 for more information on Table Management.] The
floor plans, sections, table placement layouts and even the “Section Zoom” ability to view other
sections can be set up by the user in the Table Management Set Up screen.
To access the Table Management Set Up screen from the main menu screen, touch Set Up, select
Tables and then touch Sections.
To view Sections A through Z, use the left and right arrow keys directly beneath the Description
Text box in the upper right portion of the screen. You can name each section by typing in the
section name in the Description text box. This name will appear at the top of the screen when the
user views the Table Management Screen.
To view and select the various floor plans, use the scrolling list box in the lower left portion of the
screen. Floor plans are graphic files saved in the windows metafile (.wmf) format, and are stored
in the Diamond98\TblMgmt\ sub-directory. You can create your own floor plans in any windows
graphics program that can store files in the metafile format, such as Visio. You can also use the
“Blank” file provided to place tables on a generic floor plan without the floor plan “landmarks”.
For larger operations, you may wish to create an over-view of the entire operation from which
you can “Zoom In” to sub-sections, where the actual table icons will be presented to the user. To
allow section zoom from a master floor plan, check the Allow Section Zoom check box. A red
cross hair will appear which divides the floor plan into 4 sections. You can maneuver the cross
hair center point by touching the left-right and up-down arrows in the Allow Section Zoom Set Up
window. Each of the 4 quadrants can be set up to open a sub-section when the user touches that
portion of the screen. You determine which section will appear for each quadrant by selecting the
section letter in the 4 list boxes provided. The section letter you select will also be displayed in
each quadrant of the section display on the left portion of the screen. If you do not wish to allow a
quadrant to be displayed, select None.
You can set up a more complex “layered zoom” set of sections, where section A zooms in to
Section B, which Zooms into section C, which zooms into Section D, and so on. Keep in mind
that the first section found (searching Alphabetically) with section zoom enabled is the one the
user will see when the top of the Table Management screen is touched to “Zoom Out” back up to
the highest level.
DiamondTouch, Inc.
Copyright 2007
DiamondTouch 5.5 Software Documentation
3.35
Page 134
Tables
To place tables onto a section, touch the Table Placement button.
To add a table, touch the Add Table button, and the new table will be added to the upper left
portion of the floor plan. To position the table, touch the table as close to the center as you can,
and drag the table into position. To delete a table, touch the table and then touch Delete Table
button.
You can change the table number and table picture by selecting the table and then touching the
Table Features button. Use the list box in the lower left portion of the Table Features screen to
select a table. You can “stretch” the table to the Extra Wide or Extra Height state by checking the
appropriate check box. Use the list box on the right of the Table Features screen to select the
Table Number. When you have completed setting up the Table, press the Finished control in the
Table Features window.
When you have completed placing all of the desired tables onto a section, touch the Finished
button on the Table Placement set up screen.
DiamondTouch, Inc.
Copyright 2007
DiamondTouch 5.5 Software Documentation
3.40
A.
Page 135
Employees
Employee Set Up
The Employee database is used to store the names and password levels of all users. In addition,
pay rates, personal information, comments and even a photo can be stored as part of the employee
record. To access the employee set up screen from the main menu, touch Set Up, select
Employees and then touch Employees.
To move through the employee records, use the arrow scroll bars at the lower left portion of the
screen. The black left and right arrows will move one record at a time; the blue arrow button
controls will move to the first record (left arrow) or the first available record (right arrow). The
record number will always appear just to the right of the Last Name field at the top of the screen.
To activate a user, you must enter a last name, a first name, a password, and a security level. If
you wish to take advantage of the Sales VS Labor reporting capabilities of the system, then you
should also enter hourly pay rates as well.
The main form also provides fields for address, phone, date of birth, sex, driver’s license number
and State. Many of these fields will appear on the employee database report described in section
2.30 A.
The Security Window, shown above, will also allow edit of the security level, password/new
card, and comments. To access from the Employee Database screen, touch the Security button at
the bottom of the screen. A photo field is also available. To edit the photo field, touch the photo
to bring up the photo library. Photos are stored as .jpg files. You may wish to take your own
employee photos with a digital camera and store them as .jpg files in the Diamond98\Photos
directory. DiamondTouch can read only 6 photos at one time. We suggest that you place only 6
photos in one folder. To select a photo from the library, simply touch it and the photo will be
attached to the employee record.
To issue a new card, touch the Issue New Card button and swipe the new card. The new 4 digit
password will also be displayed in the password field. If you wish to enter the passwords
manually, simply touch the password text box and enter the new password.
The security level is selected by scrolling through the available security levels and touching the
desired number 1 - 10. Employees will be able to access all functions with security levels at or
below the employee security level. See section 3.40 B for more information on setting up security
levels for various functions.
DiamondTouch, Inc.
Copyright 2007
DiamondTouch 5.5 Software Documentation
3.40
A.
Page 136
Employees (cont)
Employee Set Up (cont)
The Payroll Window allows you to set the employee Social Security Number, Date of Hire, and
the regular and overtime rates for up to 5 different job classifications. If you do not enter an
overtime rate, overtime will be calculated at time and ½ automatically on the labor reports.
The job classifications correspond to the job code indicated by the employee during sign on. The
Job Descriptions field is reserved for future use. Costs for Salaried Employees will not be
included on the hourly labor reports.
To add a new employee, touch the Add button and the first available blank record will be
displayed. You can also use the right arrow button to scroll to the next available blank record and
add the employee. To erase an employee, touch the erase control to clear all information from the
record shown. Once you have finished editing the employee database, touch finished.
B.
Security Levels
Security levels in DiamondTouch are assigned to specific functions within the program. The more
secure you wish to make the function, the higher the security level will be. For example, you may
wish to make order entry of Tickets a relatively low level function, to allow any server to place an
order. Handling cash to cash out tickets might require a higher level, and opening and closing a
register drawer might require a higher level still.
To access the Security Set Up screen from main menu, touch Set Up, select Employees and then
touch Security Levels.
The security level functions are divided into three columns, which roughly correspond to User
Functions (Order Entry, Cash Out, Driver Dispatch), Manager Functions (Reports, Time Cards,
etc) and System Set Up Functions. To select a function, touch the description. The select function
will be highlighted in yellow, and will be displayed in the upper right portion of the form. A short
description of the function will appear in the help box, and the current security level will appear
just below. To change the security level of the function, use the left & right scroll arrows. When
you have completed setting the security levels, touch Finished.
NOTE: You must exit DiamondTouch to activate these changes.
DiamondTouch, Inc.
Copyright 2007
Page 137
DiamondTouch 5.5 Software Documentation
3.50
Customers
To process phone orders for take out, delivery, or any other service type, DiamondTouch utilizes a
Customer Database. The database was designed using the Microsoft Access97 compatible 32 bit
Jet Database Engine, and includes tables for Customers, Streets, Delivery Areas and Zip Codes.
There is also a “hidden” table that is used to track customer order history.
All tables in the customer database can be accessed and viewed directly from Microsoft Access97.
The active database is stored in the Diamond98\mdb\ sub directory.
A.
Customer Database
The customer database is normally viewed on record at a time, when placing orders. There are a
number of search utilities built into the customer screen, and these are discussed in section 1.85.
To view the entire table of all customers, sorted by phone number, from the main menu, touch Set
Up, select Customers and then touch Customers. The grid that displays customer data can also be
used to edit the individual customer fields. The key phone number field can be edited; however if
the phone number you are trying to enter has already been used, the Jet Engine will not allow you
to duplicate the field. This is because DiamondTouch relies upon the phone number as a unique
record for finding your customers; if the phone record was duplicated, then the 2nd record would
become “hidden” from the Order Taker.
The Customer Database includes the following fields:
Phone
Zip
Num
LastName
FirstName1
FirstName2
Add1
Phone Number
Zip Code
Internal Use
Customer Last Name
First Name
Spouse, etc
Street Address
Add2
Secondary Address
StreetNum
Internal Use
Directions
Driver Instructions
DOB
Date of Birth
CR
Carrier Route
Mg1
Map Grid Field 1
Mg2
Map Grid Field 2
Comment
User Comments
Fcard
Frequent Diner Card#
FCDate
Frequent Diner Date
TotPt
Total Points Earned
Points
Current Points Earned
DSLO
Date of Last Order
TO
Total Orders
ToDol
Total Dollars
CustRecordNum Internal Use
StreetRecordNumInternal Use
ZipRecordNum Internal Use
AreaRecordNum Internal Use
DiamondTouch, Inc.
Up to 10 characters
Up to 10 characters
“Long” Number
Up to 30 characters
Up to 20 characters
Up to 20 characters
Up to 30 characters; the first set of numeric
characters will be interpreted as the street address;
Up to 30 characters. This data could include
apartment numbers, company names, etc. Some of
this information is appended to printed tickets, to the
extent that the primary address is less than 20
characters.
“Long” Number
Memo Field - unlimited length
Up to 8 characters - for “Birthday” mailings
4 characters - mailing data
Map Book Coordinates
Map Book Coordinates
Memo Field - Unlimited Length
Up to 6 characters
Up to 8 characters
Double Precision Number
Double Precision Number
Up to 8 Characters
Integer to 32,768
Double Precision Number
Long
Long
Long
Long
Copyright 2007
DiamondTouch 5.5 Software Documentation
3.50
B.
Page 138
Customers (cont)
Street Database
The Street Table in the Customer Database is used to match and verify incoming customer calls to
appropriate addresses and delivery areas, and to automatically capture city, state and zip code
information. Use of the street database is an optional feature in DiamondTouch. See sections 1.85
F and 3.10 A, 3 for more information on Street Database features.
To access the street table from the set up main menu, touch Customers then Streets. Streets are
displayed in alphabetical order, and the display grid can also be used to edit and add to street
records.
The Street Table in the Customer Database includes the following fields:
Name
RgStart
Street Name
Range Start
Up to 50 characters
Integer to 32,000. This number is the starting address for this
record. To facilitate the mapping of delivery areas, a single
street can be divided by address ranges into as many records
as necessary, simply by grouping the starting and ending
address ranges into separate records. For example, Main
Street 100 - 499 could be one record, and Main Street 500-999
could be a second record. By assigning each record different
delivery areas, 255 Main Street could be charged a $2.00
delivery fee while 668 Main Street could be assessed a $3.00
charge because it is further away. See section 3.50 E for more
information on setting up Delivery Areas.
RgEnd
Range End
Integer to 32,000 - ending address range.
MapGrid1
Map Coordinate Up to 4 characters.
MapGrid2
Map Coordinate Up to 4 characters
CR
Carrier Route
Up to 4 characters
Zip
Zip Code
Up to 10 characters
StreetRecordNumInternal Use
Long
ZipRecordNum Internal Use
The record number of the Zip Code Record
AreaRecordNum Internal Use
The record Number of the Delivery Area Record (1 - 6) for
this street.
The street table can be initialized (erased and re-created) by allowing DiamondTouch to
automatically search a pre-loaded Customer Table and “Infer” a street table from the existing
customer records. A street table created in this manner would be a starting point only, since the
beginning and ending addresses would only represent the first and last addresses found in the
customer table; not the true beginning and ending ranges of the streets. In addition, different
spellings of the same street in the customer database would result in 2 records for the same street.
However, this method could save quite a bit of data entry time on the front end, if a pre-loaded
street database is not available. To enable this feature, you must place a file named
“MakStreet.RTC” in the Diamond98 directory. Once this file is present, the initialize control will
appear on the street table screen.
NOTE: Once initialized, you should destroy the
“MakStreet.RTC” file to insure that your street table is not erased accidentally by a subsequent
initialize command! There is no way to undo this operation once the initialize control is touched!
DiamondTouch, Inc.
Copyright 2007
Page 139
DiamondTouch 5.5 Software Documentation
3.50
C.
Customers (cont)
Zip Codes
The Zip Code table is used simply to automatically store City and State information for customer
and/or street records. By loading the zip code table, customer and street records can “look up” the
City and State fields for mailing purposes without having to enter these fields for every
customer/street record. You may wish to take advantage of this table when creating your own
reporting and mailing queries in Microsoft Access.
To access the Zip Code table from the Set Up main menu, touch Customers, then Zip Codes. The
Zip Code table includes the following fields:
ZipCodeNum
City
State
ZipRecordNum
D.
Zip Code
City Name
State Initials
Internal Use
Up to 10 characters
Up to 35 characters
Up to 2 characters
Long
Customer Points
Customer Points can be used to track and award customers based on the amount of sales volume,
over a period of time. Customer Points are automatically awarded at the end of each order and are
stored in the appropriate record in the Customer Table of the Customer Database. The number of
points awarded is based upon a look up table set up in the Customer Points set up screen, and is
based on the final amount of the ticket saved.
To access the Customer Points set up screen from the main menu, touch Set Up, select Customers
and then touch Points.
Enter the From - To dollar range and Points amount for each level of award you wish to set up.
When the ticket is printed, DiamondTouch will search each level for the first range that the total
ticket value fits between - therefore be sure to enter a very high dollar figure for your last point’s
level - otherwise a particularly high ticket will receive no points at all!
See section 1.85 C for more information on viewing and adjusting individual customer points.
DiamondTouch, Inc.
Copyright 2007
DiamondTouch 5.5 Software Documentation
3.50
E.
Page 140
Customers (cont)
Delivery Areas
Delivery Areas are used in conjunction with the customer and street database to automatically
assign minimum order amounts and delivery charges to phone orders. You may set a delivery area
to simply alert the order taker that there is a set minimum order amount, or you may wish to
automatically assess a delivery charge to all orders under a set minimum. You can also assess a
delivery charge to all orders, regardless of any minimum amount by area.
To access the delivery set up screen from the main menu, touch Set Up, select Customers and then
touch Delivery Areas.
You may scroll through the 6 available delivery areas by using the list box in the upper center
portion of the screen. Each area can be set up with a description, which will appear on the order
entry screen, an optional minimum order amount and a delivery charge amount. Under the
advanced window you may also set the Minimum Order Type and Delivery Charge method by
touching the option for each delivery area.
All customers will be assigned to delivery area 1 as default; therefore you should set up this
delivery area with the most common delivery information. If most customers are not charged a
delivery charge and there is no set minimum, then Delivery Area 1 should be set to 0.00 Minimum
and 0.00 Delivery Charge.
If you have set an amount for a Delivery Charge in an area, then you will need to set the Delivery
Charge method to “All” (all orders charged the set delivery charge amount) or “Orders Under
Minimum” (Delivery Charge will only be assessed to orders that fall below the minimum order
amount you have specified for this delivery area.)
If you have set a minimum order amount, and you are not using the minimum order in conjunction
with a delivery charge, then you will also need to select the Minimum Order method to
• Alert Message Only (a message box will appear if the order does not meet the minimum)
• Enforced Allow Over-Ride (Order Taker will be required to over-ride the error, and an override event will be logged by the system), or
• Enforced, No Over-Ride - The Order Taker will not be allowed to complete the order until the
minimum amount is reached.
DiamondTouch, Inc.
Copyright 2007
DiamondTouch 5.5 Software Documentation
3.50
E.
Page 141
Customers (cont)
Delivery Areas (cont)
If you have set a minimum order amount, and you are using the minimum order amount in
conjunction with a delivery charge, then you will need to set the Minimum Order method to one of
the following:
•
•
•
Alert Message Only - The delivery charge will not be set automatically, but a red warning box
will appear alerting the order taker that a minimum order and set delivery charge is
recommended. The order taker will have the option of attaching a Delivery Charge to the
Order manually [See section 1.20 E].
Enforced Allow Over-Ride - The delivery charge will be assessed at the end of the order
automatically. The order taker will still have the option of changing the delivery charge using
the manual delivery charge control [See section 1.20 E].
Enforced - No Over-ride - The Delivery Charge will be assessed and the Order Taker will not
be able to remove the delivery charge manually.
In all cases, Delivery Charges are only assessed to those service types that have been checked for
Allow Delivery Charge [See section 3.25 A.] This is done to prevent Pick Up customers that have
phoned in their orders, for example, from being assessed delivery charges.
DiamondTouch, Inc.
Copyright 2007