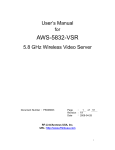
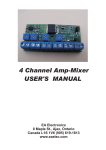
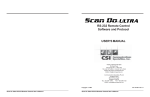
1
Contents
1. Package Content
INSTALLATION GUIDE
Model: APT-2000
PC-to-TV CONVERTER
2. Panel Control and Function
3. Setup Guide
4. Important Safety Information
Note:
Please power off both your PC and APT-2000 prior to setup.
General Specification:
Power
Input Voltage
Power consumption
Operation temperature & humidity
Storage temperature & humidity
DC 5V ±0.1V
450mA, (max)
0℃ ~ +50℃ less than 85%
-20℃~+70℃ less than 90%
Supported display graphics:
IBM PC
MAC
RF-Link/Araneus USA, Inc.
Tel: 510-413-5885
44845 Industrial Drive
Fax: 510-651-5995
Fremont, CA 94538 U.S.A.
www.rflinkusa.com
56Hz
60Hz
72Hz
75Hz
85Hz
640X480
X
O
O
O
O
800X600
O
O
O
O
O
1024X768
X
O
O
X
X
66Hz
75Hz
640X480
O
X
832X624
X
O
1. Package Content
7.
Accessories
1
Please make sure all accessories shown as below are enclosed, please contact
your dealer for any missing part.
1.
USA Standard
APT-2000 Unit x 1
2.
Audio Adapter Cable x 1
(1) Power Adapter (120V) x 1
(2) 3.5mm Stereo Jack to 2.5mm
Stereo Plug x 1
3.
USB to DC Plug Cable x 1
4.
Video RCA Cable x 1
European Standard:
(1) Power Adapter
Stereo Plug x 1
5.
S-Video Cable x 1
6.
VGA Cable x 1
(230V) x 1
(2) 3.5mm Stereo Jack To 2.5mm
2. Panel Control and Function
1
3. Setup Guide
2
3
12
6
7
11
10
4
5
8
9
1 –DC IN:DC power input.
1.
Please power off both PC and APT-2000 prior to set up.
2 –VGA OUT:D-SUB Jack, output to PC monitor.
2.
Connect either RCA cable to “Video-IN” port (yellow) or S-Video Cable
3 –VGA IN:D-SUB Jack, input from source PC.
to “S-Video” port on TV and connect the other end of either cable to
4 –S-VIDEO:S-Video Jack, output to AV Equipment.
APT-2000.
5 –VIDEO OUT:Video Jack, output to AV Equipment.
( APT-2000 not only support from PC to TV directly, but also work
6 –SIZE:Automatically fine tune the image and locate it at central point.
with RF-Link’s AVS-5811 to send AV signal wirelessly to any TV at
7 –UP:.Up position control or increment function
home )
8 –ZOOM:ZOOM and UN-ZOOM
3.
9 –LEFT:.Left position control
Connect VGA cable to “VGA-OUT” port on PC and the other end to
“VGA IN” port on APT-2000.
10 –MENU:ON/OFF OSD menu
4.
Connect PC monitor to “VGA-OUT” on APT-2000.
11 –DOWN:Down position or decrement function
5.
Plug in power adapter to “DC-IN” port on APT-2000 and the other end
12 –RIGHT:Right position control
into a power outlet.
The second power source can also be obtained by connecting an “USB to
4. Important Safety Information
DC Plug Cable” to “DC-IN” port on APT-2000 and the USB port on PC.
To prevent fire or shock hazard, do not expose this product to rain and
6.
Turn on PC power.
moisture. For example: do not use near a bathtub, washbowl, kitchen sink, or
7.
Push “MENU” button on top of APT-2000, the screen will show the OSD
laundry tub, in a wet basement, or nearby a swimming pool. To avoid electric
FUNCTION MENU below ( If adjusting the image quality is desired ).
shock, do not take apart this product, provided as an accessory. This product
should be operated only under power supply. Do not overload wall outlets and
extension outlets as this can result in the risk of fire or electric shock.
□ NOTE:
This equipment has been tested and found to comply with the limits regulated
by FCC and CE. These limits are designed to provide reasonable protection
against harmful interference in a residential installation. This equipment
generates, uses and can radiate radio frequency energy and, if not installed
and used in accordance with the instruction, may cause harmful interference
to radio communications. The change or modifications no expressly approved
by the party responsible for compliance could void the user’s authority to
operate the equipment. To comply with the FCC RF exposure compliance
7.1 OSD FUNCTION MENU INSTRUCTION
requirements, no change to the antenna or the device is permitted. Any
HSIZE:To adjust the width of screen
change to the antenna or the device could result in the device exceeding the
VSIZE:To adjust the height of screen
RF exposure requirements and void user’s authority to operate the device.
BRIGHTNESS:To adjust the brightness of screen
CONTRAST:To adjust the contrast of screen
HUE:To adjust the hue of screen
STURATION:To adjust the saturation of screen
FLICK:To adjust the twinkle of screen
SHARPNESS:To adjust the sharpness of screen
OSD BACKGROUND:To change the color of OSD background