1
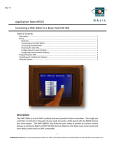
Dec-09
Application Note # 4414
Using LabVIEWTM with Galil Controllers
By combining the ease of use of Galil controllers with the simplicity of programming in
LabVIEWTM, a professional looking graphical user interface can be created in minutes.
Galil offers three methods of interfacing to Galil controllers in LabVIEW. The first one
uses the latest drivers included in the GalilTools and GalilTools-Lite software. The
second method uses the ActiveX toolkit that can be purchased from Galil. It takes
advantage of the ActiveX support offered in LabVIEW 5.0 or greater. This package
provides graphical tools to get up and running quickly saving costly programming time.
The last method uses direct function calls to Galil library files (dmc32.dll).
Note: The GalilTools method is the best option for new applications.
This application note will take the user through the basic setup of a sample VI, including
connecting to a Galil controller, sending commands, receiving responses, and closing
communication. Part 1 deals with using the GalilTools API, Part 2 is the ActiveX toolkit,
while Part 3 uses the old library function calls. Before you begin, make sure that you
have registered and communicated to the controller using the standard Galil software.
Table of Contents
Part 1: Using the GalilTools API with LabVIEW...............................................................2
Basic Example.................................................................................................................2
Handling Events with LabVIEW and the GalilTools Communication Library..............7
Part 2: Using the Active-X Tool Kit with LabVIEW........................................................14
Part 3: Using Library Function calls (dmc32.dll) with LabVIEW....................................22
-1Galil Motion Control, Inc. • 3750 Atherton Road • Rocklin, CA 95765 USA • 800-377-6329 • Ph: 916-626-0101 • Fax: 916-626-0102 • www.galilmc.com
Part 1: Using the GalilTools API with LabVIEW
Basic Example
Working vi’s of the below examples, as well as other vi’s can be found in the LabVIEW
Hello Galil example located here:
http://www.galilmc.com/learning/hellogalil.php
1
Make sure GalilTools version 1.3.0.0 or later is installed on the PC. The free
version of GalilTools contains the Communication Library, so no software purchase
is required.
http://www.galilmc.com/support/software-downloads.php
2
Open National Instruments LabVIEW Version 8.6. Versions 8.0, 8.2 and 8.5 were
also tested. Later versions should be compatible as well. Select “Blank VI”.
3
From the File menu choose “Save As” (’File/Save As’) and name the file Galil.
4
Choose ‘Window/Show Block Diagram’.
5
In the Functions Palette (’View/Functions Palette’), expand “Connectivity” then
“ActiveX”.
5a Drop the “Automation Open” function onto Galil.vi Block Diagram.
6
Right-clink on the Automation Open function and choose ‘Select ActiveX
Class/Browse’. (This may take a moment)
6a In the drop down box choose “Galil Version x.x” (n.n is the version number, ex
Galil Version 0.3). Highlight the Galil Object, click OK.
Recommended for beginners to LabVIEW Right click on the Automation Open function, choose
‘Visible Items/Label’. This can be done with most LabVIEW blocks/functions.
7
7a
7b
7c
Drop a “Property Node” (Functions Palette/Connectivity/ActiveX) onto the Block
Diagram to the right of the Automation Open function.
Connect the “Automation Refnum” terminal of the Automation Open funtion to the
“reference” terminal on the Property Node. (The text of the Property Node should
change to “IGalil” from “Automation”.)
Left-click on the Property element of the Property Node and choose ‘address’.
Right-clink on the Property element of the Property Node and choose ‘Change to
Write’.
-2Galil Motion Control, Inc. • 3750 Atherton Road • Rocklin, CA 95765 USA • 800-377-6329 • Ph: 916-626-0101 • Fax: 916-626-0102 • www.galilmc.com
8
8a
8b
Drop an “Invoke Node” (Functions Palette/Connectivity/ActiveX) onto the Block
Diagram to the right of the Property Node.
Connect the “reference out” terminal of the Property Node (top right terminal,
mouseover will show Galil.IGalil) to the “reference” terminal of the Invoke Node.
(The text of the Invoke Node should change to “IGalil” from “Automation”.)
Left-click on the Method element of the Invoke Node and choose ‘connection’.
9
Drop an “Invoke Node” (Functions Palette/Connectivity/ActiveX) onto the Block
Diagram to the right of the Invoke Node.
9a Connect the “reference out” terminal of the last Invoke Node (top right terminal,
mouseover will show Galil.IGalil) to the “reference” terminal of the Invoke Node.
(The text of the Invoke Node should change to “IGalil” from “Automation”.)
9b Left-click on the Method element of the Invoke Node and choose ‘libraryVersion’.
10 Drop an “Invoke Node” (Functions Palette/Connectivity/ActiveX) onto the Block
Diagram to the right of the Invoke Node.
10a Connect the “reference out” terminal of the last Invoke Node (top right terminal,
mouseover will show Galil.IGalil) to the “reference” terminal of the Invoke Node.
(The text of the Invoke Node should change to “IGalil” from “Automation”.)
10b Left-click on the Method element of the Invoke Node and choose ‘command’.
10c Drop a “String Constant” (Functions Palette/Programming/String) onto the Block
Diagram.
-3Galil Motion Control, Inc. • 3750 Atherton Road • Rocklin, CA 95765 USA • 800-377-6329 • Ph: 916-626-0101 • Fax: 916-626-0102 • www.galilmc.com
10d Insert the text “MG TIME” (quotes removed) into the String Constant
10e Connect the output of the string constant to the command input on the command
Propert Node.
11
11a
11b
11c
12
12a
12b
13
13a
13b
14
14a
15
Goto the Galil.vi Front Panel window. In the Controls Palette (’View/Controls
Palette’), expand “Modern” then “String&Path”.
Drop the “String Control” block onto Front Panel.
Rename “String” to “Connection String:”
Leave the string box empty. This can later be changed to the connection string of
the controller (192.168.1.100, GALILPCI1, COM 19200 etc). (See Note1)
Drop the “String Indicator” (Controls Palette/Modern/String&Path) onto the Front
Panel.
Rename “String” to “Connected To:”
Increase the size of the string box by ~double the length and width.
Drop the “String Indicator” (Controls Palette/Modern/String&Path) onto the Front
Panel.
Rename “String” to “Library Version:”
Increase the size of the string box by ~double the length.
Drop the “String Indicator” (Controls Palette/Modern/String&Path) onto the Front
Panel.
Rename “String” to “MG TIME”
Drop an “Error Out.ctl” control (Controls Palette/Classic/Classic Array, Matrix &
Cluster) onto the Front Panel.
-4Galil Motion Control, Inc. • 3750 Atherton Road • Rocklin, CA 95765 USA • 800-377-6329 • Ph: 916-626-0101 • Fax: 916-626-0102 • www.galilmc.com
16
17
17a
17b
17c
17c
18
18a
18b
18c
Goto the Galil.vi Block Diagram window.
Connect the “error out” terminal of the Automation Open function to the “error in”
terminal of the ‘address’ Property Node.
Connect the “error out” terminal of the ‘address’ Property Node to the “error in”
terminal of the ‘connection’ Invoke Node.
Connect the “error out” terminal of the ‘connection’ Invoke Node to the “error in”
terminal of the ‘libraryVersion’ Invoke Node.
Connect the “error out” terminal of the ‘libraryVersion’ Invoke Node to the “error
in” terminal of the ‘command’ Invoke Node.
Connect the “error out” terminal of the ‘command’ Invoke Node to the terminal on
the ‘error out’ block.
Connect the terminal of the ‘Connections String:’ block to the “address” terminal
on the Property Node.
Connect the terminal of the ‘Connected To:’ block to the “connection” terminal on
the connection Invoke Node.
Connect the terminal of the ‘Library Version:’ block to the “libraryVersion”
terminal on the libraryVerion Invoke Node.
Connect the terminal of the ‘MG TIME’ block to the “command” output terminal
on the command Invoke Node.
-5Galil Motion Control, Inc. • 3750 Atherton Road • Rocklin, CA 95765 USA • 800-377-6329 • Ph: 916-626-0101 • Fax: 916-626-0102 • www.galilmc.com
19
Goto the Front Panel window. Choose ‘Operate/Run’ to run the VI.
Note1: If the Connection String string control is left blank, the GalilTools connection dialog will be
displayed. If a valid connection string is specified (ex COM1 19200), the program will attempt this
connection directly.
-6Galil Motion Control, Inc. • 3750 Atherton Road • Rocklin, CA 95765 USA • 800-377-6329 • Ph: 916-626-0101 • Fax: 916-626-0102 • www.galilmc.com
Handling Events with LabVIEW and the GalilTools Communication Library
There are 3 type of events that can occur in the COM class: onMessage, onInterrupt,
onRecord.
onMessage handles unsolicited messages that are sent from the controller.
onInterrupt handles interrupts that are sent from the controller. Not all Galil
Controllers have this functionality, see UI and EI in your controllers
command reference for more information.
onRecord
handles the DR data record information sent from the controller.
This example will show how to set the onMessage event handler in LabVIEW.
1
Start with the above example.
2
Drop a Register Event Callback (REC) onto the Block Diagram.
(Connectivity/ActiveX).
3
Connect the output of the Automation Open to the Event of the REC.
4
Left-click on Event and choose onMessage.
5
6
Create a Sting Indicator on the Main panel, and name it “message”. Goto the Block
Diagram, right-click on the terminal for the string indicator ‘message’ and choose
Create/Refrence.
Connect the string indicator reference to the User Parameter of REC.
-7Galil Motion Control, Inc. • 3750 Atherton Road • Rocklin, CA 95765 USA • 800-377-6329 • Ph: 916-626-0101 • Fax: 916-626-0102 • www.galilmc.com
7
7a
8
8a
Right-click on the VI Ref of REC - choose Create Callback VI.
Save the created VI as event_onMessage.vi
Show the Block Diagram of event_onMessage.vi. Right-click on Event Data and
select ‘Cluster, Class, & Variant Palette/Unbundle by Name’.
Connect the Event Data terminal to the new Unbundle by name message.
-8Galil Motion Control, Inc. • 3750 Atherton Road • Rocklin, CA 95765 USA • 800-377-6329 • Ph: 916-626-0101 • Fax: 916-626-0102 • www.galilmc.com
9
9a
Drop a Property Node (Connectivity/ActiveX) onto the event_onMessage.vi Block
Diagram.
Connect the terminal of the message object (icon at the bottom) to the reference
terminal of the property node.
10 Left-click on the Property element on the property node and choose ‘value’.
10a Right-click on that same element and choose ‘Change To Write’.
10b Connect the output of the message bundle to the value terminal on the property
node.
-9Galil Motion Control, Inc. • 3750 Atherton Road • Rocklin, CA 95765 USA • 800-377-6329 • Ph: 916-626-0101 • Fax: 916-626-0102 • www.galilmc.com
11
On the main panel of event_onMessage, drop an Error out block (Classic/Classic
Array, Matrix & Cluster).
11a in the block diagram, connect the error out of the property node to the input of the
error out block.
12
Save event_onMessage.vi
- Create a program that will run in the controller and send out unsolicited messages
- 10 Galil Motion Control, Inc. • 3750 Atherton Road • Rocklin, CA 95765 USA • 800-377-6329 • Ph: 916-626-0101 • Fax: 916-626-0102 • www.galilmc.com
13
Add an Invoke node after the library version block, connect it up, and change it to
programDownload. Change the command block to XQ, from MG TIME. Add a
string constant that has the program:
#A
MG TIME
WT500
JP#A
When using events in LabVIEW, it is a requirement that OFFLINE be sent to address in
order to close the connection to the controller and the drivers. In this example, a stop
button is used in a event structure.
14
15
15a
15b
16
16a
16b
16c
16d
In the Galil.vi Front Panel, add a retangular stop button (Classic/Classic Boolean)
(other boolean buttons should work as well). Rename it from ’stop’ to ’stop_vi’.
In the Galil.vi Block Diagram, add an Event Structure (Programming/Structures)
Right click on ‘Timeout’ in the event structure and choose “Edit Events Handled by
This Case”.
Change the Event Sources to ’stop_vi’, and the Events to ‘Value Change’
Place a Unregister For Events (Connectivity/AvtiveX) block, a Property Node block
(Connectivity/ActiveX), a String Constant (Programming/String), and an Error out
(Front Panel - Classic/Classic Array, Matrix & Cluster)
Connect the ‘event callback refnum’ terminal output of the REC to the ‘event
registration refnum’ terminal input of the Unregister For Events block.
Connect the Error output of the REC to the error input of the Unregister For Events
block.
Connect the Property node to the end of the chain for the program download and
execution. Change the element to write and choose address. Connect a string
constant of OFFLINE to the address terminal.
Connect the error chain through Unregister For Events to the error out.
- 11 Galil Motion Control, Inc. • 3750 Atherton Road • Rocklin, CA 95765 USA • 800-377-6329 • Ph: 916-626-0101 • Fax: 916-626-0102 • www.galilmc.com
- 12 Galil Motion Control, Inc. • 3750 Atherton Road • Rocklin, CA 95765 USA • 800-377-6329 • Ph: 916-626-0101 • Fax: 916-626-0102 • www.galilmc.com
The VI should now be ready to run, make sure to use the Stop button in the vi to stop the
execution of the vi.
- 13 Galil Motion Control, Inc. • 3750 Atherton Road • Rocklin, CA 95765 USA • 800-377-6329 • Ph: 916-626-0101 • Fax: 916-626-0102 • www.galilmc.com
Part 2: Using the Active-X Tool Kit with LabVIEW
LabVIEW version 5.0 and greater supports ActiveX (OCX) controls. The standard Galil
tool kit can be used without modification. Please note that while properties and methods
are supported, ‘events’ are not. This does not effect the operation of the tools but it does
prevent writing code to respond to error events. The ActiveX tools that you plan to use
need to be installed and registered as outlined in the ActiveX User Manual.
This step by step example demonstrates connecting and communicating to the controller
using the DMCShell.ocx in a LabVIEW application:
1. Start with a new LabVIEW project.
2. Add an ActiveX container, found in the controls palette, to the project.
3. Select the ActiveX container with the right mouse button and select ‘Insert
ActiveX Object’. Select DMCShell from the menu.
4. Add one Boolean switch from the controls palette and draw it on the project.
5. Add one string control and one string indicator and draw it on the project.
6. Right mouse click on the string control to bring up a menu. Select ‘Limit to
single line’.
7. Create labels on the controls by right clicking the mouse on the control and
selecting ‘Show-Label’ then typing the label text.
8. Add a Numeric Control (Integer) labeled ‘Set Controller’
9. Add a Button and label it “SEND”. Right click on it and make sure the
Mechanical action is “Switch Until Released”.
10. The project should look something like this:
- 14 Galil Motion Control, Inc. • 3750 Atherton Road • Rocklin, CA 95765 USA • 800-377-6329 • Ph: 916-626-0101 • Fax: 916-626-0102 • www.galilmc.com
11. Show the project diagram by selecting ‘Show Diagram’ from the Windows Menu.
12. Create a “Sequence” block and create 3 different sequence blocks (0,1,2)
13. In Sequence Block 0, add an ActiveX property node by selecting the
Communications icon from the Function palette then ActiveX from the sub-menu.
14. Enlarge the icon by dragging a lower corner so that is shows 2 property boxes as
shown below:
Automation
Property
Property
15. Select the Connect Wire icon from the Tools palette.
16. Draw a wire from the DMCShell1 icon to the top left corner of the Automation
icon show above.
17. Click on the Automation icon (which now reads _DMCShell) by placing the
mouse pointer over a property box and right click to bring up a menu. Select
DMCController and DMCConnect from “Properties”.
18. Right mouse click over the DMCConnect box and select ‘Change to Write’. Do
the same for DMCController
19. Draw a line using the Connect Wire tool from the DMCController property to the
Numeric Control labeled ‘Set Controller’.
20. Create a Boolean Constant of “True” and wire it to the DMCConnect property.
21. The diagram should look like this:
- 15 Galil Motion Control, Inc. • 3750 Atherton Road • Rocklin, CA 95765 USA • 800-377-6329 • Ph: 916-626-0101 • Fax: 916-626-0102 • www.galilmc.com
22. Go to Sequence Block #1 and create the following:
- 16 Galil Motion Control, Inc. • 3750 Atherton Road • Rocklin, CA 95765 USA • 800-377-6329 • Ph: 916-626-0101 • Fax: 916-626-0102 • www.galilmc.com
23. To create the above diagram, use the “Structures” toolbar to make a While loop
and wire the “Run” button to the loop. Inside of that loop, create a True/False
Case. Wire the SEND button to it. Under “True”, create another Automation
Property block. Right Click on the DMCShell Container on the left hand side of
the screen and select Create – Local Variable. Change the variable to “Read” and
wire it into the Automation Property Node. Add DMCCommand and
DMCResponse properties to it (Command is a Write, Response is a Read). Add a
Timer with a 200msec delay (this adds a delay to prevent the same command
from being sent multiple times on a single click).
24. Go to Sequence Block #2, and add another Automation Property block. Select
the property DMCConnect. Wire a Boolean False to it as shown here:
- 17 Galil Motion Control, Inc. • 3750 Atherton Road • Rocklin, CA 95765 USA • 800-377-6329 • Ph: 916-626-0101 • Fax: 916-626-0102 • www.galilmc.com
25. From the panel window click the Run Arrow to start the program.
26. Type a valid Galil command in the Command string control and hit SEND. (You
can change the properties of the send button to be the default button when you
click Enter use the “Key Navigation…” option.)
27. The response should be displayed in the Response string indicator.
28. To stop the program either click on the Stop button or turn the Run switch to
Stop. Save your project at this point.
29. Adding other ActiveX controls
30. Add another ActiveX container to the project and place DMCTerminal2 in it.
31. The Front Panel should look something like this:
- 18 Galil Motion Control, Inc. • 3750 Atherton Road • Rocklin, CA 95765 USA • 800-377-6329 • Ph: 916-626-0101 • Fax: 916-626-0102 • www.galilmc.com
32. Add an ActiveX property node to Sequence Frame #0 in the Diagram and wire
up the DMCTerminal2 control to it.
Create three properties –
DMCController,Enabled, and FontSize. Wire them up as shown below.
- 19 Galil Motion Control, Inc. • 3750 Atherton Road • Rocklin, CA 95765 USA • 800-377-6329 • Ph: 916-626-0101 • Fax: 916-626-0102 • www.galilmc.com
33. Right Click on the DMCTerminalLib ActiveX container in the diagram view and
click “Create – Attribute Node”. Move this attribute node to Frame #1 inside of
the loop. Right click on it and choose “Select Item – Key Focus”. Wire up a
Boolean True to it so it looks like the code below. (Note: You will need to
change your Key Navigation so that the ENTER Key is no longer the default as
this will interfere with DMCTerminal2.ocx)
- 20 Galil Motion Control, Inc. • 3750 Atherton Road • Rocklin, CA 95765 USA • 800-377-6329 • Ph: 916-626-0101 • Fax: 916-626-0102 • www.galilmc.com
- 21 Galil Motion Control, Inc. • 3750 Atherton Road • Rocklin, CA 95765 USA • 800-377-6329 • Ph: 916-626-0101 • Fax: 916-626-0102 • www.galilmc.com
Part 3: Using Library Function calls (dmc32.dll) with LabVIEW
The other method of programming in the LabVIEW environment is to use sub-VI’s that
allow you to make function calls from your program directly to the dynamic link libraries
(.dlls). A common use for this is to create a custom user interface with buttons that send
specific code segments to the controller (ie: Home, Jog, Positional Move, etc…). Other
features include being able to quickly and easily graph the controller information to the
screen, or save it for comparison later. Here are the basic steps to creating a VI.
Download or copy the VIs included on the Galil CD to one of your directories. (**If you
would like to be able to access the Galil VI’s through the Functions toolbox in
LabVIEW, then create a directory called Galil inside the C:\Program Files\National
Instruments\LabVIEW\USER.LIB directory. Then place all the VI’s inside this directory
and re-start. It should now possible to place them on the program by selecting the User
Libraries button in the Functions toolbox. This eliminates the need to go through the
“Select a VI” procedure in the rest of this document.)
Start LabVIEW and open a new VI. Go to the Back Panel by selecting Window –>
“Show Diagram”. Create a Sequence (located under “Structures”) with three frames by
right clicking and selecting “Add Frame After”.
Go to the first frame and click on “Select a VI” from the Functions toolbox. Browse to
the directory with the Galil VIs and select “Open.vi” – place this on the first frame of the
sequence. Repeat this, but this now browse to Global1.vi and place in the diagram. Put a
Digital Control on the Front panel with integer representation (I8) and wire this into the
“Controller” Global Variable (Global1). (Leave the “Return” of DMCOpen.vi unwired
for now).
Go to the last (3rd) frame of the sequence and insert “close.vi” onto the frame. This
ensures that you close the communication channel before exiting the program. No wires
need to be attached to this VI.
In the middle frame, insert “command.vi”. This sub-VI allows commands to be sent to
the controller and receive responses.
On the front panel, create a String Control and label it “Command”. Also Create a String
Indicator and label it “Response”. Create 2 “STOP” Buttons. Label one “Disconnect”
and the other “Send”.
- 22 Galil Motion Control, Inc. • 3750 Atherton Road • Rocklin, CA 95765 USA • 800-377-6329 • Ph: 916-626-0101 • Fax: 916-626-0102 • www.galilmc.com
The Front Panel should look something like this:
On the diagram window, create a while loop inside the second frame encompassing
everything. Select a boolean “Not” and wire it in line between the Disconnect button and
the conditional terminal. This specifies to keep the loop running until the disconnect
switch is hit.
Next, create a “Case” structure and wire the Send Button into the question mark. Place
the command.vi and response inside the True case and put the “Command” string control
outside it. Wire the Command and Response strings into the appropriate terminals of the
command.vi. Leave the False case empty.
- 23 Galil Motion Control, Inc. • 3750 Atherton Road • Rocklin, CA 95765 USA • 800-377-6329 • Ph: 916-626-0101 • Fax: 916-626-0102 • www.galilmc.com
The Diagram should look like this:
The program is now ready to run. Select the Controller number that corresponds to the
number of the controller in the Galil Registry. Click on Run and type in (Upper–Case)
commands into the command window. The responses will be returned to your response
window. (Note: the ED command will not work in the LabVIEW environment. To
download a file, use the sub-VI downbuff.vi or downfile.vi.)
Error checking can be achieved by wiring digital indicators up to the “Return” terminal of
each sub-vi. Error codes as well as all possible function calls can be found in the
DMCWIN & C/C++ programmer’s toolkit. Although Galil only provides a few function
calls that have been converted to VI’s, the user may create their own by following the
same format as those provided.
- 24 Galil Motion Control, Inc. • 3750 Atherton Road • Rocklin, CA 95765 USA • 800-377-6329 • Ph: 916-626-0101 • Fax: 916-626-0102 • www.galilmc.com