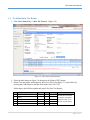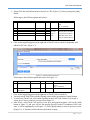
1
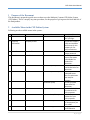
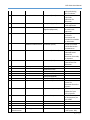
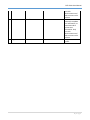
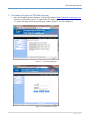
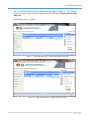
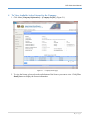
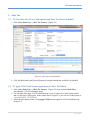
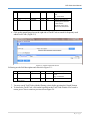
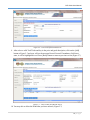
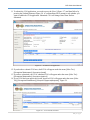
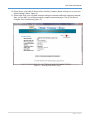
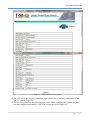
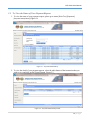
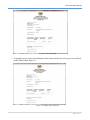
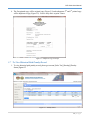
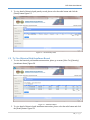
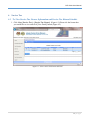
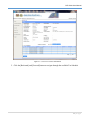
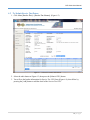
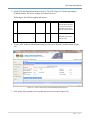
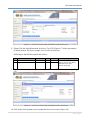
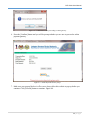
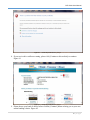
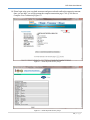
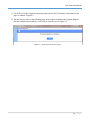
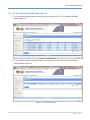
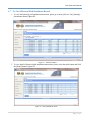
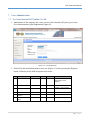
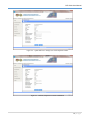
CJP Online User Manual
(Public Users)
Version 1.0
EKOM/NEC
January/2014
TABLE OF CONTENTS
1
2
3
4
5
Purpose of the Document.................................................................................................................. 1
Available Menu in the CJP Online System ...................................................................................... 1
Procedure to Login to CJP Online System ....................................................................................... 4
To View Available Active License for the Company ...................................................................... 6
Sales Tax ........................................................................................................................................... 7
5.1
To View Sales Tax License Information and Sales Tax Return Schedule ............................... 7
5.2
To Apply CJ10 Credit System Application for Sales Tax Return ............................................ 7
5.3
To Submit Sales Tax Return ................................................................................................... 12
5.4
To Pay the CJP1 Sales Tax Return Using Online Payment Gateway .................................... 19
5.5
To View the Status of Your Payment Request ....................................................................... 26
5.6
To Print Your Official Payment Receipt ................................................................................ 27
5.7
To View Historical Paid Penalty Record ................................................................................ 29
5.8
To View Historical Paid Installment Record .......................................................................... 30
6
Service Tax ..................................................................................................................................... 32
6.1
To View Service Tax License Information and Service Tax Return Schedule ...................... 32
6.2
To Submit Service Tax Return ............................................................................................... 34
6.3
To Pay the CJP1 Service Tax Return Using Online Payment Gateway ................................. 44
6.4
To View the Status of Your Payment Request ....................................................................... 50
6.5
To Print Your Official Payment Receipt ................................................................................ 51
6.6
To View Historical Paid Penalty Record ................................................................................ 54
6.7
To View Historical Paid Installment Record .......................................................................... 55
7
User Administration........................................................................................................................ 56
7.1
To Create Internal CJP Online User ID .................................................................................. 56
7.2
To Update Profile/Activate/Suspend/Reset Password of CJP Online User............................ 57
i
CJP Online User Manual
1
Purpose of the Document
This document is prepared to guide users on how to use the Malaysia Customs CJP Online System
(CJP Online). This is a step-by-step tour procedure, for the purpose of giving users the look and feel of
the final product.
2
Available Menu in the CJP Online System
Following are the available menu in the system:
No Menu Level 1
1 Home
Menu Level 2
2 Company
Information
Company Profile
3 User Information
User Profile
4 Sales Tax
Sales Tax License
Tax Return Maintenance
Menu Level 3
Tax Return (Draft)
Tax Return (Submitted)
Tax Return (Paid)
Payment
Payment Request
Payment Status/History
Payment Receipt
Exemption
CJ10 Credit Application
Description /Remark
First page you visited
after you login.
To view the company
profile and available
valid license for this
company for Tax
Return submission.
To allow user to
change password
To view your sales Tax
license information
and available Tax
schedule for
submission.
To view your saved
Draft Status Sales Tax
submission
To view your saved
Submitted Status
Sales Tax submission
that ready for
payment.
To view your Paid
Status Sales Tax
submission.
To select all the Sales
Tax submission for
online payment.
To view the status
and detail of your
online payment.
To print the receipt
for the payment you
have made.
To apply for CJ10
credit deduction
1|Page
CJP Online User Manual
Exemption Maintenance
Exemption (Saved)
Exemption (Applied)
Exemption
(Approved/Rejected)
5 Service Tax
Service Tax License
Tax Return Maintenance
Tax Return (Draft)
Tax Return (Submitted)
Tax Return (Paid)
Penalty
Exemption
Exemption Maintenance
Payment
6 User
Administration
User Registration
before submitting
Sales Tax Return.
To retrieve saved
CJ10 Credit
application for
submission
To view applied CJ10
Credit application
To view the status of
the CJ10 Credit
application.
To view your Service
Tax license
information and
available Tax schedule
for submission.
To view your saved
Draft Status Service
Tax submission
To view your saved
Submitted Status
Service Tax
submission that ready
for payment.
To view your Paid
Status Service Tax
submission.
Penalty Status
Installment Status
CJ10 Credit Application
Exemption(Saved)
Exemption(Applied)
Exemption(Approved/Reject)
Payment Request
To select all the
Service Tax
submission for online
payment.
Payment Status/History
To view the status
and detail of your
online payment.
Payment Receipt
To print the receipt
for the payment you
have made.
To register new user
in the system. Only
2|Page
CJP Online User Manual
List of Users
7 Logout
user with
Administrator Level
able to access to this
function.
To reset user
password, to update
user information, to
deactivate and to
activate user
information. Only
user with
Administrator Level
able to access to this
function.
To logout from the
system.
3|Page
CJP Online User Manual
3
Procedure to Login to CJP Online System
1. Open the Windows Internet Explorer, Type the URL address https://cjponline.customs.gov.my/
to access to CJP Online system. To login to the CJP Online system, click Login button (Figure
1.1) on the left hand side menu and a pop-up window (Figure 1.2) will be displayed.
Figure 1.1 - CJP Online Homepage
Figure 1.2 - CJP Online User Login
4|Page
CJP Online User Manual
2. The user will be directed to the CJP Online main page (https) (Figure 1.3 – 1.4) by key in
correct user name, password (Please obtain your User name from Jabatan Kastam Diraja
Malaysia).
Current Menu Level - > Home
Figure 1.3 - CJP Online Main page (Company administrator user only)
Figure 1.4 - CJP Online Main page (Company normal user only)
5|Page
CJP Online User Manual
4
To View Available Active License for the Company
1. Click Menu [Company Information]-> [Company Profile]. (Figure 2.1)
Figure 2.1 – Company Profile page
2. To view the license, please select the radio button of the licence you want to view. Click [View
Detail] button to display the license information.
6|Page
CJP Online User Manual
5
Sales Tax
5.1 To View Sales Tax License Information and Sales Tax Return Schedule
1. Click Menu [Sales Tax]-> [Sales Tax Licence]. (Figure 2.2)
Figure 2.2 – Sales Tax License Information
2. Click the [Backward] and [Forward] button to navigate through the available Tax Schedule
5.2 To Apply CJ10 Credit System Application for Sales Tax Return
1. Click Menu [Sales Tax]-> [Sales Tax Licence]. (Figure 2.2) or go to menu [Sales Tax]->
[Exemption]-> [CJ10 Credit Application].
2. You are allowed to apply CJ10 Credit Deduction if your Licence have Credit System enable
and it is still active (Not expire). In the sample above (Figure 2.2) you will see Credit System is
“Yes (01/01/2013 – 01/12/2014)”
3. Select the radio button of the. Click [Apply CJ10] button to apply for CJ10 Credit Deduction.
(Figure 2.3)
7|Page
CJP Online User Manual
Figure 2.3 – CJ10 Credit System Application Screen
4. Press the [Add] button to create the detail (Figure 2.3)
Figure 2.4 – CJ10 Credit System Detail Screen
5. Please fill in the detail information for CJ10 (Figure 2.4) before pressing the [Add] button.
Following are the field description and criteria:-
8|Page
CJP Online User Manual
No
1
Field Name
Tariff Code
Type
Numeric
Size
10
Mandatory
Yes
2
3
Goods Description
Price
Alphanumeric
Decimal
70
11,2
No
Yes
Condition (Example)
Must be a valid Tariff
code
Eg: 7318150020
With no more than two
decimal places and must
be more than 0.
Maximum value can be
entered: 999,999,999.99
6. Click on the magnifying glass on the right side of Tariff Code to search for frequently used
added Tariff Code. (Figure 2.5)
Figure 2.5–Tariff Code Search Screen
Following are the field description and criteria for Figure 2.5:No
1
Field Name
Tariff Code
Type
Numeric
Size
10
Mandatory
No
2
Product
Description
Alphanumeric
70
No
Remark (Example)
Must be a valid Tariff
code
Eg: 7318150020
7. You may search Tariff Code with the filtering criteria before pressing the [Search] button.
8. To choose the Tariff Code, click on the hyperlink at the Tariff Code column. If no result is
return, press Close to return to previous screen Figure 2.4.
9|Page
CJP Online User Manual
Figure 2.6 – CJ10 Credit System Detail Screen
9. After select a valid Tariff Code and key in the price and good description, click on the [Add]
button at Figure 2.5 and your will see the message Record Created. If mandatory field is not
enter, it will be highlighted in red. Press [Back] button to return to previous screen (Figure 2.7).
Figure 2.7 – CJ10 Credit System Header Screen
10. You may edit or delete the Detail that you have entered. (Figure 2.7)
10 | P a g e
CJP Online User Manual
11. To submit the CJ10 application, you need to press the [Save] (Figure 2.7) and then follow by
pressing the [Submit] button at Figure 2.8. A confirmation will be prompt to ask whether you
want to submit the CJ10 application. Submitted CJ10 will change status from Draft to
Submitted.
Figure 2.8 – To submit CJ10 Application.
12. If you decide to submit CJ10 later, draft CJ10 will appear under the menu [Sales Tax][Exemption Maintenance]-[Exemption (Saved)]
13. If you have submitted your CJ10, submitted CJ10 will appear under the menu [Sales Tax][Exemption Maintenance]-[Exemption (Applied)]
14. If your CJ10 has been approved/rejected, approved CJ10 will appear under the menu [Sales
Tax]-[Exemption Maintenance]-[Exemption (Approved/Rejected)]. Figure 2.9
Figure 2.9 – To view status of CJP10
11 | P a g e
CJP Online User Manual
5.3 To Submit Sales Tax Return
1. Click Menu [Sales Tax]-> [Sales Tax Licence]. (Figure 3.0)
Figure 3.0 – Sales Tax License Information
2. Select the radio button at Figure 3.0, then press the [Submit CJP1] button.
3. Please fill in the header information for Sales Tax CJP1 form (Figure 3.1), then follow by
pressing the [Add] button to add the detail of the Sales Tax CJP1.
Following are the field description and criteria for Sales Tax Header:No
1
2
3
4
5
Field Name
Export Sales
Local Sales (Exempted Goods)
CJP(2)
Exempted Sales
Sales to CJ5 Holder
Total Credit Notes
Type
Decimal
Decimal
Size
11,2
11,2
Mandatory
No
No
Decimal
Decimal
Decimal
11,2
11,2
11,2
No
No
No
Condition (Example)
With no more than two
decimal places and must
be equal or more than 0.
Maximum value can be
entered: 999,999,999.99
12 | P a g e
CJP Online User Manual
Figure 3.1 – Sales Tax License CJP1 Form header
4. Press the [Add] button to create the detail of Sales Tax Return at Figure 3.1.
Figure 3.2 – Sales Tax License CJP1 Form detail
13 | P a g e
CJP Online User Manual
5. Please fill in the detail information for Sales Tax CJP1 (Figure 3.2) before pressing the [Add]
button.
Following are the field description and criteria:No
1
Field Name
Tariff Code
Type
Numeric
Size
10
Mandatory
Yes
2
3
4
5
6
Goods Description
Good Sold Amount
Own Use Amount
Leased Amount
Work Done Amount
Alphanumeric
Decimal
Decimal
Decimal
Decimal
70
11,2
11,2
11,2
11,2
No
At least
one need
to have
value
Condition (Example)
Must be a valid Tariff
code
Eg: 7318150020
With no more than two
decimal places and must
be equal or more than 0.
Maximum value can be
entered: 999,999,999.99
6. Click on the magnifying glass on the right side of Tariff Code to search for frequently used
added Tariff Code. (Figure 3.3)
Figure 3.3–Tariff Code Search Screen
Following are the field description and criteria for Figure 3.3:No
1
Field Name
Tariff Code
Type
Numeric
Size
10
Mandatory
No
2
Product
Description
Alphanumeric
70
No
Remark (Example)
Must be a valid Tariff
code
Eg: 7318150020
7. Click on the magnifying glass on the right side of Tariff Code to search for
8. You may search Tariff Code with the filtering criteria before pressing the [Search] button.
9. To choose the Tariff Code, click on the hyperlink at the Tariff Code column. If no result is
return, press Close to return to previous screen Figure 3.3.
10. After select a valid Tariff Code and key in the price and good description, click on the [Add]
button at Figure 3.5 and your will see the message Record Created. If mandatory field is not
enter, it will be highlighted in red (Figure 3.4). Press [Back] button to return to previous screen.
(Figure 3.6). A Summary will be shown at the bottom of page.
14 | P a g e
CJP Online User Manual
Figure 3.4–Mandatory Field for Sales Tax Return Detail
Figure 3.5– After creation of Sales Tax Return Detail
15 | P a g e
CJP Online User Manual
Figure 3.6– CJP1 Header for Sales Tax
11. You may edit or delete the Detail that you have entered. (Figure 3.6)
12. To submit the CJP1 Form, you need to press the [Save] (Figure 3.6) and then follow by
pressing the [Submit] button at Figure 3.7. A confirmation will be prompt to ask whether you
want to submit the CJP1 Form. Submitted CJP1 Form for Sales Tax it will change status from
Draft to Submitted.
16 | P a g e
CJP Online User Manual
Figure 3.7– To submit CJP1 form for Sales Tax
13. If you decide to submit CJP1 later, draft CJP1 will appear under the menu [Sales Tax]-[Tax
Return Maintenance]-[ Tax Return (Draft)]
14. If you have submitted your CJP1, submitted CJP1 will appear under the menu [Sales Tax]-[Tax
Return Maintenance]-[Tax Return (Submitted)] Figure 3.8
15. If your CJP1 has been paid, it will appear under the menu [Sales Tax]-[Tax Return
Maintenance]-[Tax Return (Paid)].
Figure 3.8– Submitted CJP1 form for Sales Tax
17 | P a g e
CJP Online User Manual
16. To view the CJP1 form in pre-printed form, please click on the [Print CJP1] button. (Figure
3.9)
Figure 3.9–CJP1 form for Sales Tax
1. To print current page of CJP1 form, please click on the [Print Current Page] or click on [Print
All Pages] to print all. For Print All Pages, you will be prompted with instruction for each
pages that you need to be printed on top of the pre-printed form. System will automatically
adjust 5 record per page for you to fit in the form. Please remove the browser header and footer
manually, set margin to 0 and choose A4 paper size before printing the form.
18 | P a g e
CJP Online User Manual
5.4 To Pay the CJP1 Sales Tax Return Using Online Payment Gateway
1. If you have submitted your CJP1, submitted CJP1 will appear under the menu [Sales Tax]-[Tax
Return Maintenance]-[Tax Return (Submitted) Figure 3.8
2. Select the radio button of the CJP1 form that you would like to pay and click on [View CJP1]
button.
Figure 4.0 – CJP1 form ready for payment
3. Click on the [Pay Now] button. Make sure your CJ10 Application has been approved before
you submit your CJP1 form. If CJP1 form is submitted before the CJ10 approval, the pending
CJ10 application will be cancelled.
19 | P a g e
CJP Online User Manual
Figure 4.1 – Payment request selection
4. Tick the Form that you would like to make payment and click the [Continue] button. (Figure
4.1)
Figure 4.2 – Payment confirmation
5. Press the [Confirm] button and you will be prompt whether you are sure to proceed to online
payment gateway
20 | P a g e
CJP Online User Manual
Figure 4.3 – Confirmation before proceeding to online gateway
6. Press the [Confirm] button and you will be prompt whether you are sure to proceed to online
payment gateway
Figure 4.4 – Online Payment Gateway Step 1
7. Press the [Submit] button to continue.
Figure 4.5 – Online Payment Gateway Step 2
21 | P a g e
CJP Online User Manual
8. Make sure your pop up blocker is off or set to always allow this website to pop up before you
continue. Click [Proceed] button to continue. Figure 4.5
Figure 4.6 – Online Payment Gateway Step 3
9. If you receive this certificate warning, please click [Continue to this website] to continue.
Figure 4.6
Figure 4.7 – Online Payment Gateway Step 4
22 | P a g e
CJP Online User Manual
10. Please choose your bank of choice before click the [Continue] button to bring you to your own
online banking website. Figure 4.7
11. Please login using your own bank username and password and confirm the transaction amount.
Once you are done, you will be prompt the complete transaction page. Click [Click Here to
Complete Your Transaction] Figure 4.8
Figure 4.8 – Online Payment Gateway Step 5
23 | P a g e
CJP Online User Manual
Figure 4.9 – Online Payment Gateway Step 6
12. You will receive the complete transaction pages, please click [Continue] at the bottom of the
page to continue. Figure 4.9
13. The last step you will see the following page at our website to indicate the Payment Request
has been completed successfully. Click [OK] to close the screen. Figure 5.0
24 | P a g e
CJP Online User Manual
Figure 5.0 – Online Payment Gateway Step 7
25 | P a g e
CJP Online User Manual
5.5 To View the Status of Your Payment Request
1. To view the status of your payment request, please go to menu [Sales Tax]-[Payment][Payment Status/History] Figure 5.1
Figure 5.1 – Payment Status/History
2. To view the detail of your payment request, select the radio button of the transaction that you
wish to view and click on the [Detail] button. Figure 5.2
Figure 5.2 – Payment Status/History Detail
26 | P a g e
CJP Online User Manual
5.6 To Print Your Official Payment Receipt
1. To print official payment receipt, please go to menu [Sales Tax]-[Payment]-[ Payment Receipt]
Figure 5.3
Figure 5.3 – Payment Receipt
2. To Preview the receipt, select the radio button of the transaction that you wish to preview and
click on the [Preview] button. (Figure 5.3). You are require to turn off the pop up blocker
before printing or previewing the receipt. Preview receipt is not an official receipt. Figure 5.4.
To exit the preview, click on the cross button of the open window.
27 | P a g e
CJP Online User Manual
Figure 5.4 – Preview Receipt
3. To print the receipt, select the radio button of the transaction that you wish to preview and click
on the [Print] button. Figure 5.3
Figure 5.5 –Original Copy of Receipt
28 | P a g e
CJP Online User Manual
4. The first printed copy will be original copy (Figure 5.5) and subsequent 2nd and 3rd printed copy
will be duplicated copy (Figure 5.6). You are only allow to print 3 times.
Figure 5.6 –Duplicate Copy of Receipt
5.7 To View Historical Paid Penalty Record
1. To view historical paid penalty record, please go to menu [Sales Tax]-[Penalty]-[Penalty
Status] Figure 5.7
Figure 5.7 – Penalty Status
29 | P a g e
CJP Online User Manual
2. To view detail of historical paid penalty record, please select the radio button and click the
[Detail] button Figure 5.7
Figure 5.8 – Detail Penalty Status
5.8 To View Historical Paid Installment Record
1. To view the historical paid installment transaction, please go to menu [Sales Tax]-[Penalty][Installment Status] Figure 5.9
Figure 5.9 – Installment Status
2. To view detail of historical paid installment transaction, please select the radio button and click
the [Detail] button. Figure 5.9
30 | P a g e
CJP Online User Manual
Figure 6.0 – Detail Installment Status
31 | P a g e
CJP Online User Manual
6
Service Tax
6.1 To View Service Tax License Information and Service Tax Return Schedule
1. Click Menu [Service Tax]-> [Service Tax Licence]. (Figure 6.1) Please tick the license that
you would like to view and click [View Detail] button (Figure 6.2).
Figure 6.1 – Service Tax License Profile Selection
32 | P a g e
CJP Online User Manual
Figure 6.2 – Service Tax License Information
2. Click the [Backward] and [Forward] button to navigate through the available Tax Schedule
33 | P a g e
CJP Online User Manual
6.2 To Submit Service Tax Return
1. Click Menu [Service Tax]-> [Service Tax Licence]. (Figure 6.3)
Figure 6.3 – Service Tax License Information
2. Select the radio button at Figure 6.3, then press the [Submit CJP1] button.
3. You will see the header information for Service Tax CJP1 form (Figure 6.4), then follow by
pressing the [Add] button to add the detail of the Service Tax CJP1.
34 | P a g e
CJP Online User Manual
Figure 6.4 – Service Tax License CJP1 Form header
4. Press the [Add] button to create the detail of Service Tax Return at Figure 6.5.
Figure 6.5 – Service Tax License CJP1 Form detail (Hotel Services)
35 | P a g e
CJP Online User Manual
5. Please fill in the detail information for Service Tax CJP1 (Figure 6.5) before pressing the
[Confirm] button. The above example is for Hotel Services.
Following are the field description and criteria:No
1
Field Name
Services Provided (RM)
Type
Decimal
Size
11,2
Mandatory
No
Condition (Example)
With no more than two
decimal places and must
be equal or more than 0.
Maximum value can be
entered: 999,999,999.99
2
Complementary Room
Decimal
4,0
No
No decimal places.
Maximum value can be
entered: 9,999
6. To save, click on the [Confirm] button and you will receive Record Created message (Figure
6.6)
Figure 6.6 – Service Tax License CJP1 Form detail (Hotel Services)
7. Click on the [Next] button to move update the next services entry (Figure 6.6)
36 | P a g e
CJP Online User Manual
Figure 6.7 – Service Tax License CJP1 Form detail (Credit Card Services)
8. Please fill in the detail information for Service Tax CJP1 (Figure 6.7) before pressing the
[Confirm] button. The above example is for Credit Card Services.
Following are the field description and criteria:No
1
2
Field Name
Main
Supplementary
Type
Decimal
Decimal
Size
8,0
8,0
Mandatory
No
No
Condition (Example)
With no decimal places and
must be equal or more than 0.
Maximum value can be
entered: 99,999,999
9. To save, click on the [Confirm] button and you will receive Record Created message (Figure
6.8)
Figure 6.8 – Service Tax License CJP1 Form detail (Credit Card Services)
10. Click on the [Next] button to move update the next services entry (Figure 6.8)
37 | P a g e
CJP Online User Manual
Figure 6.9 – Service Tax License CJP1 Form detail (General Services)
11. Please fill in the detail information for Service Tax CJP1 (Figure 6.9) before pressing the
[Confirm] button. The above example is for General Services.
Following are the field description and criteria:No
1
Field Name
Services Provided (RM)
Type
Decimal
Size
11,2
Mandatory
No
Condition (Example)
With no more than two
decimal places and must
be equal or more than 0.
Maximum value can be
entered: 999,999,999.99
12. To save, click on the [Confirm] button and you will receive Record Created message (Figure
6.9)
13. Click on the [Next] button to move update the next services entry (Figure 6.9)
38 | P a g e
CJP Online User Manual
Figure 7.0– CJP1 Header for Service Tax
14. You may edit or delete the Detail that you have entered. (Figure 7.0)
15. To submit the CJP1 Form, you need to press the [Save] (Figure 7.0) and then follow by
pressing the [Submit] button at Figure 7.1. A confirmation will be prompt to ask whether you
want to submit the CJP1 Form. Submitted CJP1 Form for Service Tax it will change status
from Draft to Submitted.
39 | P a g e
CJP Online User Manual
Figure 7.1– To submit CJP1 form for Service Tax
Figure 7.2–CJP1 form for Service Tax submitted successfully
40 | P a g e
CJP Online User Manual
16. If you decide to submit CJP1 later, draft CJP1 will appear under the menu [Service Tax]-[Tax
Return Maintenance]-[ Tax Return (Draft)] Figure 7.3
Figure 7.3–CJP1 form for Service Tax (Draft)
17. If you have submitted your CJP1, submitted CJP1 will appear under the menu [Service Tax][Tax Return Maintenance]-[Tax Return (Submitted)] Figure 7.4
Figure 7.4– Submitted CJP1 form for Service Tax
18. If your CJP1 has been paid, it will appear under the menu [Service Tax]-[Tax Return
Maintenance]-[Tax Return (Paid)].
41 | P a g e
CJP Online User Manual
Figure 7.4a– Paid CJP1 form for Service Tax
19. To view the CJP1 form in pre-printed form, please click on the [Print CJP1] button. (Figure
7.5)
42 | P a g e
CJP Online User Manual
Figure 7.5–CJP1 form for Service Tax
20. To print current page of CJP1 form, please click on the [Print Current Page] or click on [Print
All Pages] to print all. For Print All Pages, you will be prompted with instruction for each
pages that you need to be printed on top of the pre-printed form. System will automatically
adjust 5 record per page for you to fit in the form. Please remove the browser header and footer
manually, set margin to 0 and choose A4 paper size before printing the form.
43 | P a g e
CJP Online User Manual
6.3 To Pay the CJP1 Service Tax Return Using Online Payment Gateway
1. If you have submitted your CJP1, submitted CJP1 will appear under the menu [Service Tax][Tax Return Maintenance]-[Tax Return (Submitted) Figure 7.4
2. Select the radio button of the CJP1 form that you would like to pay and click on [View CJP1]
button. Figure 7.6
Figure 7.6 – CJP1 form ready for payment
3. Click on the [Pay Now] button.
44 | P a g e
CJP Online User Manual
Figure 7.7 – Payment request selection
4. Tick the Form that you would like to make payment and click the [Continue] button. (Figure
7.7)
Figure 7.8 – Payment confirmation
5. Press the [Confirm] button and you will be prompt whether you are sure to proceed to online
payment gateway Figure 7.9.
Note: Please make sure your browser pop up blocker is off or set to always allow this website
to pop up before you continue.
45 | P a g e
CJP Online User Manual
Figure 7.9 – Confirmation before proceeding to online gateway
6. Press the [Confirm] button and you will be prompt whether you are sure to proceed to online
payment gateway
Figure 8.0 – Online Payment Gateway Step 1
7. Make sure your pop up blocker is off or set to always allow this website to pop up before you
continue. Click [Proceed] button to continue. Figure 8.0
46 | P a g e
CJP Online User Manual
Figure 8.1 – Online Payment Gateway Step 2
8. If you receive this certificate warning, please click [Continue to this website] to continue.
Figure 8.1
Figure 8.2 – Online Payment Gateway Step 3
9. Please choose your bank of choice before click the [Continue] button to bring you to your own
online banking website. Figure 8.2
47 | P a g e
CJP Online User Manual
10. Please login using your own bank username and password and confirm the transaction amount.
Once you are done, you will be prompt the complete transaction page. Click [Click Here to
Complete Your Transaction] Figure 8.3
Figure 8.3 – Online Payment Gateway Step 4
Figure 8.4 – Online Payment Gateway Step 5
48 | P a g e
CJP Online User Manual
11. You will receive the complete transaction pages, please click [Continue] at the bottom of the
page to continue. Figure 8.4
12. The last step you will see the following page at our website to indicate the Payment Request
has been completed successfully. Click [OK] to close the screen. Figure 8.5
Figure 8.5 – Online Payment Gateway Step 6
49 | P a g e
CJP Online User Manual
6.4 To View the Status of Your Payment Request
1. To view the status of your payment request, please go to menu [Service Tax]-[Payment][Payment Status/History] Figure 8.6
Figure 8.6 – Payment Status/History
2. To view the detail of your payment request, select the radio button of the transaction that you
wish to view and click on the [Detail] button. Figure 8.6
Figure 8.6 – Payment Status/History Detail
50 | P a g e
CJP Online User Manual
6.5 To Print Your Official Payment Receipt
1. To print official payment receipt, please go to menu [Service Tax]-[Payment]-[ Payment
Receipt] Figure 8.7
Figure 8.7 – Payment Receipt
2. To Preview the receipt, select the radio button of the transaction that you wish to preview and
click on the [Preview] button. (Figure 8.7). You are require to turn off the pop up blocker
before printing or previewing the receipt. Preview receipt is not an official receipt. Figure 8.8.
To exit the preview, click on the cross button of the open window.
51 | P a g e
CJP Online User Manual
Figure 8.8 – Preview Receipt
3. To print the receipt, select the radio button of the transaction that you wish to preview and click
on the [Print] button. Figure 8.9
52 | P a g e
CJP Online User Manual
Figure 8.9 –Original Copy of Receipt
4. The first printed copy will be original copy (Figure 8.9) and subsequent 2nd and 3rd printed copy
will be duplicated copy (Figure 9.0). You are only allow to print 3 times.
Figure 9.0 –Duplicate Copy of Receipt
53 | P a g e
CJP Online User Manual
6.6 To View Historical Paid Penalty Record
1. To view historical paid penalty record, please go to menu [Service Tax]-[Penalty]-[Penalty
Status] Figure 9.1
Figure 9.1 – Penalty Status
2. To view detail of historical paid penalty record, please select the radio button and click the
[Detail] button Figure 9.1
Figure 9.2 – Detail Penalty Status
54 | P a g e
CJP Online User Manual
6.7 To View Historical Paid Installment Record
1. To view the historical paid installment transaction, please go to menu [Service Tax]-[Penalty][Installment Status] Figure 9.3
Figure 9.3 – Installment Status
2. To view detail of historical paid installment transaction, please select the radio button and click
the [Detail] button. Figure 9.3
Figure 9.4 – Detail Installment Status
55 | P a g e
CJP Online User Manual
7
User Administration
7.1 To Create Internal CJP Online User ID
1. Administrator of the company may create own user id for internal staff, please go to menu
[User Administration]-[User Registration] Figure 9.5
Figure 9.5 – User Registration
2. Please fill in the detail information for new user (Figure 9.5) before pressing the [Register]
button. Following are the field description and criteria:No
1
Field Name
Level of User
Type
Size
Mandatory
Yes
Condition (Example)
Normal User or
Administrator of the
company.
2
IC No
Numeric
12
Yes
3
User Name
Alphanumeric
100
Yes
IC number of the user.
Example: 740214145596
Name of the user
4
5
Email address
Telephone No.
(Office)
Telephone No.
(H/P)
Alphanumeric
Numeric
50
12
Yes
No
Numeric
12
No
6
Must be valid email.
56 | P a g e
CJP Online User Manual
7.2 To Update Profile/Activate/Suspend/Reset Password of CJP Online User
1. Administrator of the company may update the user profile for internal staff, please go to menu
[User Administration]-[List of Users] Figure 9.6
Figure 9.6 – List of Users
2. User may reset password (Figure 9.7), update user profile (Figure 9.8), delete user ID, Suspend
account and activate the account using this function. (Figure 9.9),
Figure 9.7 – Detail button to Reset Password
57 | P a g e
CJP Online User Manual
Figure 9.8 – Update button is to change User email and phone number
Figure 9.9 – Deletion, Suspend or Activate confirmation
58 | P a g e