1
SNPlex™ Genotyping System 48-plex
Automating OLA Using the Biomek FX
Chapter 1
Getting Started Guide
Chapter 2
Chapter 3
G
C
Chapter 4
G
C
Chapter 5
G
G
C
Chapter 6
G
C
G
B
Chapter 7
© Copyright 2005, Applied Biosystems. All rights reserved.
For Research Use Only. Not for use in diagnostic procedures.
Information in this document is subject to change without notice. Applied Biosystems assumes no responsibility for any errors that may appear in this
document. This document is believed to be complete and accurate at the time of publication. In no event shall Applied Biosystems be liable for incidental,
special, multiple, or consequential damages in connection with or arising from the use of this document.
NOTICE TO PURCHASER
PLEASE REFER TO THE SNPlex™ GENOTYPING SYSTEM 48-PLEX USER GUIDE FOR LIMITED LICENSE OR DISCLAIMER INFORMATION
Your installation and/or use of the workspace and method files ("Method") may affect the service coverage of your instrument under warranty or service
contract. Prior to installing and/or using the Method, check the warranty or service coverage of your instrument, including limitations thereof, or check with
your service provider. APPLIED BIOSYSTEMS MAKES NO WARRANTIES OF ANY KIND WHATSOEVER, EXPRESS OR IMPLIED, WITH
RESPECT TO THE METHOD, INCLUDING BUT NOT LIMITED TO WARRANTIES OF FITNESS FOR A PARTICULAR PURPOSE OR
MERCHANTABILITY OR THAT THE METHOD IS NON-INFRINGING. ALL OTHER WARRANTIES ARE EXPRESSLY DISCLAIMED. YOUR USE
OF THE METHOD IS SOLELY AT YOUR OWN RISK, WITHOUT RECOURSE TO APPLIED BIOSYSTEMS.
TRADEMARKS:
Applied Biosystems, ABI PRISM, GeneMapper, and MicroAmp are registered trademarks and AB (Design), Applera, SNPlex, and ZipChute are trademarks of
Applera Corporation or its subsidiaries in the U.S. and/or certain other countries.
GeneAmp is a registered trademark of Roche Molecular Systems, Inc.
All other trademarks are the sole property of their respective owners.
Part Number 4360796 Rev. B
6/2005
Contents
Preface
v
How to Use This Guide . . . . . . . . . . . . . . . . . . . . . . . . . . . . . . . . . . . . . . . . . . . . . . . . v
How to Obtain More Information . . . . . . . . . . . . . . . . . . . . . . . . . . . . . . . . . . . . . . . . vi
How to Obtain Support . . . . . . . . . . . . . . . . . . . . . . . . . . . . . . . . . . . . . . . . . . . . . . . vi
Safety and EMC Compliance Information
vii
Safety Conventions Used in This Document . . . . . . . . . . . . . . . . . . . . . . . . . . . . . . . vii
Chemical Waste Safety . . . . . . . . . . . . . . . . . . . . . . . . . . . . . . . . . . . . . . . . . . . . . . . ix
Chapter 1
Introduction
1
Overview . . . . . . . . . . . . . . . . . . . . . . . . . . . . . . . . . . . . . . . . . . . . . . . . . . . . . . . . . . . 2
Laboratory Design . . . . . . . . . . . . . . . . . . . . . . . . . . . . . . . . . . . . . . . . . . . . . . . . . . . . 4
Required Equipment and Materials . . . . . . . . . . . . . . . . . . . . . . . . . . . . . . . . . . . . . . . 5
Designing the Sample Plate Layout . . . . . . . . . . . . . . . . . . . . . . . . . . . . . . . . . . . . . . 8
Chapter 2
Setting Up the Biomek FX for
Automating the SNPlex System Assay
9
Overview . . . . . . . . . . . . . . . . . . . . . . . . . . . . . . . . . . . . . . . . . . . . . . . . . . . . . . . . . . 10
Creating and Naming the Deck Layout . . . . . . . . . . . . . . . . . . . . . . . . . . . . . . . . . . . 12
Framing the Deck . . . . . . . . . . . . . . . . . . . . . . . . . . . . . . . . . . . . . . . . . . . . . . . . . . . 13
Importing the Workspace File . . . . . . . . . . . . . . . . . . . . . . . . . . . . . . . . . . . . . . . . . . 13
Copying the Method Files . . . . . . . . . . . . . . . . . . . . . . . . . . . . . . . . . . . . . . . . . . . . . 15
Reviewing the Supplied Methods . . . . . . . . . . . . . . . . . . . . . . . . . . . . . . . . . . . . . . . 16
Chapter 3
Performing OLA Using Dry gDNA
19
Overview . . . . . . . . . . . . . . . . . . . . . . . . . . . . . . . . . . . . . . . . . . . . . . . . . . . . . . . . . . 20
Plate Layouts and Methods for the OLA Protocol (Dry gDNA) . . . . . . . . . . . . . . . . . 21
Performing the OLA Reactions: Biomek FX Methods 1a_dry or 1b_dry . . . . . . . . . . 24
Performing the OLA Reactions: Biomek FX Method 1c_dry . . . . . . . . . . . . . . . . . . . 28
Performing the OLA Reactions: Biomek FX Method 1d_dry . . . . . . . . . . . . . . . . . . . 32
SNPlex™ Genotyping System 48-plex Automating OLA Using the Biomek FX
iii
Chapter 4
Performing OLA Using Wet gDNA
35
Overview . . . . . . . . . . . . . . . . . . . . . . . . . . . . . . . . . . . . . . . . . . . . . . . . . . . . . . . . . . 36
Plate Layouts and Methods for the OLA Protocol (Wet gDNA) . . . . . . . . . . . . . . . . . 37
Performing the OLA Reactions: Biomek FX Methods 1a_wet or 1b_wet . . . . . . . . . 40
Performing the OLA Reactions: Biomek FX Method 1c_wet . . . . . . . . . . . . . . . . . . 45
Performing the OLA Reactions: Method 1d_wet . . . . . . . . . . . . . . . . . . . . . . . . . . . 49
Chapter 5
Purifying OLA Products (Exonuclease)
53
Overview . . . . . . . . . . . . . . . . . . . . . . . . . . . . . . . . . . . . . . . . . . . . . . . . . . . . . . . . . . 54
Running Biomek FX Method 2 (Exo) . . . . . . . . . . . . . . . . . . . . . . . . . . . . . . . . . . . . . 55
Chapter 6
Diluting the Purified OLA Product
59
Overview . . . . . . . . . . . . . . . . . . . . . . . . . . . . . . . . . . . . . . . . . . . . . . . . . . . . . . . . . . 60
Running Biomek FX Method 3 (Dilution) . . . . . . . . . . . . . . . . . . . . . . . . . . . . . . . . . . 61
Chapter 7
Setting Up the PCR Reactions
63
Overview . . . . . . . . . . . . . . . . . . . . . . . . . . . . . . . . . . . . . . . . . . . . . . . . . . . . . . . . . . 64
Preparing the Reagents . . . . . . . . . . . . . . . . . . . . . . . . . . . . . . . . . . . . . . . . . . . . . . 65
Running Biomek FX Method 4 (PCR) . . . . . . . . . . . . . . . . . . . . . . . . . . . . . . . . . . . . 66
iv
SNPlex™ Genotyping System 48-plex Automating OLA Using the Biomek FX
Preface
How to Use This Guide
Purpose of This
Guide
This guide provides a representative workflow using the SNPlex™ Genotyping System
48-plex with the Biomek FX system. It provides information to assist you in automating
the Oligonucleotide ligation assay (OLA) using the Biomek FX instrument and is
intended to be used with the SNPlex™ Genotyping System 48-plex User Guide
(PN 4360856).
Audience
This guide is written for principal investigators and laboratory staff who intend to use the
SNPlex™ Genotyping System 48-plex with robotics.
Assumptions
This guide assumes that you have read the SNPlex™ Genotyping System 48-plex User
Guide and the SNPlex™ Genotyping System 48-plex General Automation Getting Started
Guide (PN 4363143) and that you have a working knowledge of the assays and methods
used for the SNPlex Genotyping System 48-plex.
Text Conventions
User Attention
Words
• Bold indicates user action. For example:
Type 0, then press Enter for each of the remaining fields.
• Italic text indicates new or important words and is also used for emphasis. For
example:
Before analyzing, always prepare fresh matrix.
• A right arrow bracket (>) separates successive commands you select from a dropdown or shortcut menu. For example:
Select File > Open > Spot Set.
Two user attention words appear in Applied Biosystems user documentation. Each word
implies a particular level of observation or action as described below:
Note: Provides information that may be of interest or help but is not critical to the use of
the product.
IMPORTANT! Provides information that is necessary for proper instrument operation,
accurate chemistry kit use, or safe use of a chemical.
SNPlexTM Genotyping System 48-plex Automating OLA Using the Biomek FX Getting Started Guide
v
Preface
How to Obtain More Information
Examples of the user attention words appear below:
Note: The size of the column affects the run time.
IMPORTANT! To verify your client connection to the database, you need a valid Oracle
user ID and password.
How to Obtain More Information
For more information about using the SNPlex Genotyping System 48-plex, refer to the:
• SNPlex™ Genotyping System 48-plex User Guide (PN 4360856)
• SNPlex™ Genotyping System 48-plex Quick Reference Card (PN 4360855)
• SNPlex™ Genotyping System 48-plex Assay Design and Ordering Guide
(PN 4357460)
• SNPlex™ Genotyping System 48-plex General Automation Getting Started Guide
(PN 4363143)
• SNPlex™ Genotyping System 48-plex Automating PCR Using the Tomtec Quadra 3
Getting Started Guide (PN 4358100)
Send Us Your
Comments
Applied Biosystems welcomes your comments and suggestions for improving its user
documents. You can e-mail your comments to:
[email protected]
How to Obtain Support
To contact Applied Biosystems Technical Support from North America by telephone,
call 1.800.899.5858.
For the latest services and support information for all locations, go to
http://www.appliedbiosystems.com, then click the link for Support.
At the Support page, you can:
• Search through frequently asked questions (FAQs)
• Submit a question directly to Technical Support
• Order Applied Biosystems user documents, MSDSs, certificates of analysis, and
other related documents
• Download PDF documents
• Obtain information about customer training
• Download software updates and patches
In addition, the Support page provides access to worldwide telephone and fax numbers
to contact Applied Biosystems Technical Support and Sales facilities.
vi
SNPlex™ Genotyping System 48-plex Automating OLA Using the Biomek FX
Safety and
EMC Compliance Information
Safety Conventions Used in This Document
Safety Alert
Words
Four safety alert words appear in Applied Biosystems user documentation at points in
the document where you need to be aware of relevant hazards. Each alert
word–IMPORTANT, CAUTION, WARNING, DANGER–implies a particular level
of observation or action, as defined below:
Definitions
IMPORTANT! – Indicates information that is necessary for proper instrument operation,
accurate chemistry kit use, or safe use of a chemical.
– Indicates a potentially hazardous situation that, if not avoided, may
result in minor or moderate injury. It may also be used to alert against unsafe practices.
– Indicates a potentially hazardous situation that, if not avoided,
could result in death or serious injury.
Chemical Hazard
Warning
About MSDSs
CHEMICAL HAZARD. Before handling any chemicals, refer to
the Material Safety Data Sheet (MSDS) provided by the manufacturer, and observe all
relevant precautions.
Chemical manufacturers supply current Material Safety Data Sheets (MSDSs) with
shipments of hazardous chemicals to new customers. They also provide MSDSs with the
first shipment of a hazardous chemical to a customer after an MSDS has been updated.
MSDSs provide the safety information you need to store, handle, transport, and dispose
of the chemicals safely.
Each time you receive a new MSDS packaged with a hazardous chemical, be sure to
replace the appropriate MSDS in your files.
SNPlexTM Genotyping System 48-plex Automating OLA Using the Biomek FX Getting Started Guide
vii
Safety and EMC Compliance Information
Safety Conventions Used in This Document
Obtaining
MSDSs
You can obtain from Applied Biosystems the MSDS for any chemical supplied by
Applied Biosystems. This service is free and available 24 hours a day.
To obtain MSDSs:
1. Go to https://docs.appliedbiosystems.com/msdssearch.html
2. In the Search field, type in the chemical name, part number, or other information
that appears in the MSDS of interest. Select the language of your choice, then click
Search.
3. Find the document of interest, right-click the document title, then select any of the
following:
• Open – To view the document
• Print Target – To print the document
• Save Target As – To download a PDF version of the document to a destination
that you choose
Chemical Safety
Guidelines
viii
To minimize the hazards of chemicals:
• Read and understand the Material Safety Data Sheets (MSDS) provided by the
chemical manufacturer before you store, handle, or work with any chemicals or
hazardous materials. (See “About MSDSs” on page vii.)
• Minimize contact with chemicals. Wear appropriate personal protective equipment
when handling chemicals (for example, safety glasses, gloves, or protective
clothing). For additional safety guidelines, consult the MSDS.
• Minimize the inhalation of chemicals. Do not leave chemical containers open. Use
only with adequate ventilation (for example, fume hood). For additional safety
guidelines, consult the MSDS.
• Check regularly for chemical leaks or spills. If a leak or spill occurs, follow the
manufacturer’s cleanup procedures as recommended on the MSDS.
• Comply with all local, state/provincial, or national laws and regulations related to
chemical storage, handling, and disposal.
SNPlexTM Genotyping System 48-plex Automating OLA Using the Biomek FX Getting Started Guide
Safety and EMC Compliance Information
Chemical Waste Safety
Chemical Waste Safety
Chemical Waste
Hazard
Chemical Waste
Safety Guidelines
HAZARDOUS WASTE. Refer to Material Safety Data Sheets
(MSDSs) and local regulations for handling and disposal.
To minimize the hazards of chemical waste:
• Read and understand the Material Safety Data Sheets (MSDSs) provided by the
manufacturers of the chemicals in the waste container before you store, handle, or
dispose of chemical waste.
• Provide primary and secondary waste containers. (A primary waste container holds
the immediate waste. A secondary container contains spills or leaks from the
primary container. Both containers must be compatible with the waste material and
meet federal, state, and local requirements for container storage.)
• Minimize contact with chemicals. Wear appropriate personal protective equipment
when handling chemicals (for example, safety glasses, gloves, or protective
clothing). For additional safety guidelines, consult the MSDS.
• Minimize the inhalation of chemicals. Do not leave chemical containers open. Use
only with adequate ventilation (for example, fume hood). For additional safety
guidelines, consult the MSDS.
• Handle chemical wastes in a fume hood.
• After emptying the waste container, seal it with the cap provided.
• Dispose of the contents of the waste tray and waste bottle in accordance with good
laboratory practices and local, state/provincial, or national environmental and
health regulations.
SNPlexTM Genotyping System 48-plex Automating OLA Using the Biomek FX Getting Started Guide
ix
Safety and EMC Compliance Information
Chemical Waste Safety
x
SNPlexTM Genotyping System 48-plex Automating OLA Using the Biomek FX Getting Started Guide
Chapter 1
Introduction
Introduction
Overview
See page 2
Setting Up the
Biomek FX for
Automating the
SNPlex System
Assay
Laboratory Design
G
C
Performing OLA
Using Dry DNA
Purifying OLA
Products
(Exonuclease)
G
Diluting the Purified
OLA Product
G
C
G
C
G
G
C
OR
B
Performing OLA
Using Wet DNA
See page 4
Required Equipment
and Materials
See page 5
Designing the
Sample Plate Layout
See page 8
Setting Up the
PCR Reactions
Notes
SNPlex™ Genotyping System 48-plex Automating OLA Using the Biomek FX
1
1
Chapter 1 Introduction
Overview
Overview
The SNPlex™ System assay consists of several protocols which involve manipulating
small volumes between 96- and 384-well plates and reservoirs. This guide contains the
protocols required to complete the oligonucleotide ligation assay (OLA) portion of
SNPlex System assays using the Biomek FX System.
About This Guide
The SNPlex™ Genotyping System 48-plex Automating OLA Using the Biomek FX
Getting Started Guide provides instructions for automating the OLA protocols using:
• The Biomek FX System. For information about automating the OLA procedures
using other instruments, refer to the appropriate guide. (See “Documentation” on
page 7.)
• The 384-well protocol. For information about the 96-well protocol, refer to the
SNPlex™ Genotyping System 48-plex User Guide (PN 4360856) for instructions.
• The Applied Biosystems 3730xl DNA Analyzer to collect data.
• GeneMapper® software v3.7 to analyze data.
Assumptions
This guide assumes that you have read the SNPlex™ Genotyping System 48-plex User
Guide and the SNPlex™ Genotyping System 48-plex General Automation Getting Started
Guide (PN 4363143) and that you have a working knowledge of the assays and methods
used for the SNPlex Genotyping System 48-plex.
This guide also assumes that you have a working knowledge of the operation of the
Biomek FX, including set up, framing, and building of the deck.
Notes
2
SNPlexTM Genotyping System 48-plex Automating OLA Using the Biomek FX Getting Started Guide
Chapter 1 Introduction
Overview
SNPlex System
Automation
Workflow
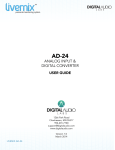
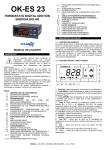
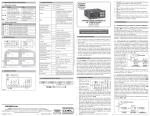
The following diagram illustrates the SNPlex System workflow.
1
Design sample plate layout
Purify OLA products
(Exonuclease)
Chapter 5
PCR Laboratory
Prepare hybridization plates
and bind PCR product
to plates
Add denaturant, isolating
biotinylated strand on
hybridization plate
Hybridize ZipChute™ probes
Elute ZipChute probes
Amplification
Kit
Dilute purified OLA product
Chapter 6
Prepare PCR reactions
Chapter 7
Hyridization Reagents and Kits
Phosphorylate and
ligate probes, linkers,
and gDNA (OLA wet)
Chapter 4
Run PCR
Dispense allelic ladders
Assay Standards Kit
Phosphorylate and
ligate probes, linkers,
and gDNA (OLA dry)
Chapter 3
Oligonucleotide
Ligation Kit
Set up liquid-handling
instrument
Chapter 2
Purification
Kit
OLA Laboratory
Prepare gDNA
Create results groups
and plate records
Load and run
sample plates
Analyze data in
GeneMapper software v3.7
Notes
SNPlexTM Genotyping System 48-plex Automating OLA Using the Biomek FX Getting Started Guide
3
Chapter 1 Introduction
Laboratory Design
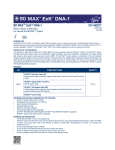
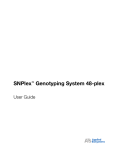
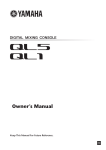
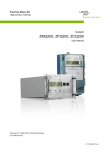
Laboratory Design
The protocols contained in this guide should be performed in an amplicon-free OLA lab,
such as that shown in the following figure.
OLA Lab Layout
*
F1
F2
F3
1
2
4
5
F4
F5
F1
POWER
3
STOP
F2
F3
1
2
4
5
F4
F5
3 ft.
POWER
3
STOP
GeneAmpÆ
PCR System 9700
6
7
8
9
ENTER
0
CE
GeneAmpÆ
PCR System 9700
6
7
8
9
ENTER
0
CE
Thermal Cyclers
Robot
Workstation
6 ft.
3.5 ft.
5 ft.
**
3 ft.
Centrifuge
*
Plate
Sealer
This is a vertical shelf unit, depending on the number
of shelves, can house 2 thermal cyclers per shelf.
** Optional
For additional information about laboratory design, refer to the SNPlex™ Genotyping
System 48-plex General Automation Getting Started Guide.
Plate Sealing
A plate sealer is recommended but not required.
Applied Biosystems has found that certain plate covers negatively affect the
performance of the SNPlex System assay. If you do not use a plate sealer, you may use
one of the recommended plate covers listed in Table 1-3 on page 1-9 of the SNPlex™
Genotyping System 48-plex User Guide. If you use covers other than the recommended
plate covers, test them using the SNPlex™ System Control Set (see Appendix A of the
SNPlex™ Genotyping System 48-plex User Guide).
Notes
4
SNPlexTM Genotyping System 48-plex Automating OLA Using the Biomek FX Getting Started Guide
Chapter 1 Introduction
Required Equipment and Materials
Required Equipment and Materials
1
Equipment
Item
Vendor
Part
Number
GeneAmp® PCR System 9700 Dual 384-Well Sample
Block Module
Contact your Applied Biosystems
representative for information.
Biomek FX Single Arm System with:
Contact your Beckman Coulter
Representative
• 96-channel 20 µL disposable tip pipetting head
• Disposable tip loader ALP
• 2 Standard single position ALPs
719367
Beckman Coulter
• 16-position (4✕4) high-density ALP
Centrifuge (equipped to accommodate reaction plates)
719356
719357
719360
Major Laboratory
Supplier (MLS)
–
Sealer for microtiter plates. Recommend:
AB-0950
• ALPS-300 Heat Sealer
• Air compressor with clean air package
ABGene
• Easy Peel Foil Sealing Film for ALPS-300
Consumables and
Small Equipment
CMP-950
AB-3739
Item
Vendor
Part
Number
15-mL centrifuge tubes
MLS
384-well plate adapters, eight
Acme Automation
50-µL Barrier, 96-channel disposable tip boxes
Axygen
Multichannel pipettor, 250-µL
MLS
–
Pipettors
MLS
–
Pipetting resevoirs, 25-mL
MLS
–
Pipetting resevoirs, 100-mL
MLS
–
Reaction
Plates
–
CR7019
FXF-50-LR-S
ABI PRISM® 384-Well Clear Optical
Reaction Plate, with Barcode,
50 plates
Applied Biosystems
4309849
ABI PRISM® 384-Well Optical Reaction
Plate with Barcode,
500 plates
Applied Biosystems
4326270
Notes
SNPlexTM Genotyping System 48-plex Automating OLA Using the Biomek FX Getting Started Guide
5
Chapter 1 Introduction
Required Equipment and Materials
Item (continued)
Vendor
Part
Number
Reaction
Plate
Covers †
MicroAmp® Full 96-Well Plate Cover
Applied Biosystems
N8010550
ABI PRISM™ Optical Cover Compression
Pad
Applied Biosystems
4312639
• Heat seals
and
sealers
Easy-Peel individual sheets
ABGene
AB-0745
Easy-Peel 610 meter roll
ABGene
AB-3739
UNISEAL AL
Whatman
7704-0002
ABGene
AVB-0384
Plate Sealer, ALPS 300
ABGene
AB-0950
384 Well Microplate Aluminum Sealing
Tape
Corning
6569
Adhesive PCR foil seal
ABGene
AB-0626
Greiner
676 090
Reagent reservoir
Axygen
RESSW96-HP
Skirted 96-well PCR plates
Axygen
PCR-96FS-C
Vortex
MLS
Thermosealer
™
• Adhesive
seals
™
SILVERseal
–
† IMPORTANT! Applied Biosystems has found that certain plate covers negatively affect the performance of
the SNPlex System assay. If you use covers other than the recommended plate covers, test them using the
SNPlex™ System Control Set (see Appendix A of the SNPlex™ Genotyping System 48-plex User Guide).
Kits and
Reagents
Item
Vendor
Part
Number
SNPlex System Kits Required for This Protocol
SNPlex™
System Oligonucleotide Ligation Kit
Applied Biosystems
4357460
SNPlex™ System Ligation Probes
Applied Biosystems
4346978
SNPlex™ System Purification Kit
Applied Biosystems
4349357
Applied Biosystems
4349358
™
• SNPlex OLA Master Mix
• SNPlex™ Universal Linkers, 48-plex
• SNPlex™ dATP, 100✕
• SNPlex™ Exonuclease Buffer, 10✕
• SNPLex™ Lamda Exonuclease
• SNPlex™ Exonuclease I
SNPlex™ System Amplification Kit
™
• SNPlex Amplification Master Mix, 2✕
• SNPlex™ Amplification Primers, 20✕
Other Reagents
Nuclease-free water
Promega
P119C
Notes
6
SNPlexTM Genotyping System 48-plex Automating OLA Using the Biomek FX Getting Started Guide
Chapter 1 Introduction
Required Equipment and Materials
Item
Vendor
Sterile 1X TE buffer (10 mM Tris-base, pH 8.0, and 1 mM
Na2EDTA)
Fluka
Part
Number
1
93283
Documentation
Document Name
Part
Number
SNPlex™ Genotyping System 48-plex Assay Ordering Guide
4357460
SNPlex™
4360856
Genotyping System 48-plex User Guide
™
SNPlex Genotyping System 48-plex Quick Reference Card
4360855
SNPlex™ Genotyping System 48-plex General Automation Getting Started Guide
4363143
Biomek FX User’s Manual
Beckman
Coulter
719452
SNPlex™ Genotyping System 48-plex Automating PCR Using the Tomtec
Quadra 3 Getting Started Guide
4358100
Notes
SNPlexTM Genotyping System 48-plex Automating OLA Using the Biomek FX Getting Started Guide
7
Chapter 1 Introduction
Designing the Sample Plate Layout
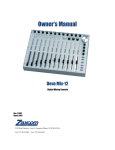
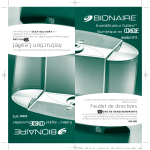
Designing the Sample Plate Layout
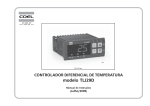
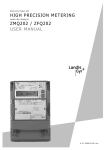
Each 384-well plate is divided into four quadrants, each with 96 wells. The convention
used in this document is that the first of 96 wells in quadrant 1 is well A1, well B1 for
quadrant 2, A2 for quadrant 3, and B2 for quadrant 4.
1
2
1 2 3 4 5 6 7 8 9 10 11 12 13 14 15 16 17 18 19 20 21 22 23 24
A
B
Control DNA
C
D
A
E
F
NTC
G
H
I
J
K
B
L
M
Allelic Ladder
N
O
P
A1 = Quadrant 1 A2 = Quadrant 3
B1 = Quadrant 2 B2 = Quadrant 4
A number of plate layouts are possible, assuming that each batch consists of four 384well plates [as illustrated in “Plate Layouts and Methods for the OLA Protocol (Dry
gDNA)” on page 21 and “Plate Layouts and Methods for the OLA Protocol (Wet
gDNA)” on page 37.]
The layout of a sample plate must be coordinated with the structure and naming of Data
Collection software run folders in order for GeneMapper® software to correctly analyze
the data. Each run must include an allellic ladder, control DNA, and no template control
(NTC).
For additional information about sample plate layout, refer to the SNPlex™ Genotyping
System 48-plex General Automation Getting Started Guide. Note that different robotics
manufacturers have differing conventions for the order and location of plate quadrants.
Be cognizant of these differences when programming robotics.
Notes
8
SNPlexTM Genotyping System 48-plex Automating OLA Using the Biomek FX Getting Started Guide
Chapter 2
Setting Up the Biomek FX for
Automating the SNPlex System Assay
2
Introduction
Setting Up the
Biomek FX for
Automating the
SNPlex System
Assay
G
C
Performing OLA
Using Dry DNA
G
See page 10
Creating and Naming
the Deck Layout
See page 12
Framing the Deck
See page 13
Importing the
Workspace File
See page 13
Copying the
Method Files
See page 15
Reviewing the Supplied
Methods
See page 16
Performing OLA
Using Wet DNA
Diluting the Purified
OLA Product
G
C
G
C
Purifying OLA
Products
(Exonuclease)
G
C
OR
Overview
G
B
Setting Up the
PCR Reactions
Notes
SNPlexTM Genotyping System 48-plex Automating OLA Using the Biomek FX Getting Started Guide
9
Chapter 2 Setting Up the Biomek FX for Automating the SNPlex System Assay
Overview
Overview
About Workspace
and Method Files
Instructions for automating the SNPlex System assay are contained in two types of files:
• workspace
• method
Workspace Files
Workspace files contain labware and tip definitions, pipetting templates, techniques, and
liquid types. They also contain settings needed by the Biomek FX software to run the
method files.
The workspace file for the Biomek FX, AB_SNPLEX_Workspace.imp, contains the
following settings:
Setting Type
Labware Definitions
Settings
snplex_OLA_ABI_384_in_ACME_Adapter
snplex_PCR_ABI_384_in_ACME_Adapter
snplex_VWR_96_PP_16posALP
snplex_VWR_96_PP_1posALP
snplex_Axygen_96_DiaBot_HP
Axygen96_50uL_Barrier
Pipetting Templates
Default Template
Low Volume
Techniques
snplex_AssayMix_3uL
snplex_AssayMix_5uL
snplex_DNA_2uL
snplex_ExoMix_5uL
snplex_ExoDil_5uL
snplex_PCRMix_7.92uL
snplex_OLARxn_2.08uL
Liquid Types
snplex_DNASample
snplex_ExoMix
snplex_AssayMix
snplex_OLARxn
snplex_PCRMix
Tips
AxyP50_Barrier
Notes
10
SNPlexTM Genotyping System 48-plex Automating OLA Using the Biomek FX Getting Started Guide
Chapter 2 Setting Up the Biomek FX for Automating the SNPlex System Assay
Overview
Method Files
Method files contain the instructions for a workflow activity on a robot. Method files are
specific for a given robot and can be read only by the software of that robot. For
example, the four methods provided for performing OLA using dry gDNA on the
Biomek FX can be read only by the Biomek FX software.
Applied Biosystems provides a total of 11 methods for automating the pre-PCR process:
• Eight methods for the OLA setup, four for using dry gDNA and four for using wet
DNA
• One method for the exonuclease purification step
• One method for the OLA dilution step
• One method for the PCR setup step
These methods are explained in succeeding chapters of this guide.
IMPORTANT! The sample plate layouts and methods provided in this document are
designed for experiments using batches of four 384-well plates.
Summary
Setting up the Biomek FX for automating the OLA lab process involves five tasks:
•
•
•
•
•
“Creating and Naming the Deck Layout” on page 12
“Framing the Deck” on page 13
“Importing the Workspace File” on page 13
“Copying the Method Files” on page 15
“Reviewing the Supplied Methods” on page 16
If you are using the Biomek FX instrument exclusively for the SNPlex System assay (or
if you are using the SNPlex System workspace for all other applications), setting up the
instrument is a one-time process. If you are using the instrument with other workspaces,
you may need to repeat some steps in the setup process (such as importing the workspace
file and reviewing the setup).
Notes
SNPlexTM Genotyping System 48-plex Automating OLA Using the Biomek FX Getting Started Guide
11
2
Chapter 2 Setting Up the Biomek FX for Automating the SNPlex System Assay
Creating and Naming the Deck Layout
Creating and Naming the Deck Layout
Building the deck layout includes both physically building the deck on the instrument
and modelling the physical deck in the Biomek FX software Deck Editor. In the Deck
Editor, name the deck layout file “ABI_SNPLEX_NC.”
IMPORTANT! Build the deck layout before the Installation and Operation Qualifications
(IQ/OQ) are performed.
The following illustration shows the positions on an empty deck for the Biomek FX:
TL1 = Tip Loader
P1 to p16 = 16-position ALP (4 x 4)
P17 to P18 = 2 single position ALPs
In the figure above
• Positions P1 through P16 comprise a single 4✕4 hardware component (the 16position ALP).
• Positions P17 and P18 are individual 1✕1 single-position ALPs.
• The tip loader ALP is at TL1.
Note: If you have a new Biomek FX instrument, a Beckman Coulter representative must
perform IQ/OQ, using the physical deck layout and virtual deck layout that you just
built.
Notes
12
SNPlexTM Genotyping System 48-plex Automating OLA Using the Biomek FX Getting Started Guide
Chapter 2 Setting Up the Biomek FX for Automating the SNPlex System Assay
Framing the Deck
Framing the Deck
Before you can use the Biomek FX instrument, you must calibrate the positions on the
deck. Biomek FX documentation refers to this process as “framing the deck.”
During this process, coordinates of each position on the deck are established, enabling
the instrument to move objects to and from various locations on the deck precisely.
IMPORTANT! Framing the deck ensures the correct transfer of materials, which is
essential to proper method operation. Do not use the Biomek FX instrument unless you
have completed the deck-framing process.
Refer to the Biomek FX documentation for more information about this process.
Importing the Workspace File
Downloading the
Zip Archive
Note: Because the zip archive contains both the workspace and method files, you need
only download it once.
1. Go to http://www.appliedbiosystems.com.
2. Click Support at the top of the page.
3. On the Support page, click Software Downloads.
4. From the Select Product Software menu, select SNPlex Genotyping System.
5. From the Software Type menu, select Main Page.
6. Download the appropriate zip archive for your robot.
Importing the
Workspace File
IMPORTANT! If you use the Biomek FX instrument for tasks other than automating the
SNPlex System assay, back up your workspace before importing the SNPlex System
workspace file. Workspace parameters for the SNPlex System assay may be different
than those for other configurations and may overwrite those parameters. Refer to the
Biomek FX software documentation for information on backing up a workspace.
1. Start the Biomek FX software.
2. Select Tools > Import/Export Utility.
Notes
SNPlexTM Genotyping System 48-plex Automating OLA Using the Biomek FX Getting Started Guide
13
2
Chapter 2 Setting Up the Biomek FX for Automating the SNPlex System Assay
Importing the Workspace File
3. In the Import/Export Utility window, click Open, then browse to the location to
which you unzipped the workspace file, and select
ABI_SNPLEX_Workspace.imp.
4. Click Open to display the SNPlex System workspace in the Import File pane.
5. Select ABI_SNPLEX_Workspace.imp, then click Import.
Notes
14
SNPlexTM Genotyping System 48-plex Automating OLA Using the Biomek FX Getting Started Guide
Chapter 2 Setting Up the Biomek FX for Automating the SNPlex System Assay
Copying the Method Files
Copying the Method Files
1. Start the Biomek FX software.
2. Select File > Open, browse to the location to which you unzipped the method files,
and select a method file.
3. Select File >Save to save the file to an appropriate location.
2
4. Repeat steps 3 to 5 until you have saved the following files:
1a_SNPLEXv5_OLA_PN_S4_D.bmt
1c_SNPLEXv5_OLA_P16_S1_W.bmt
1b_SNPLEXv5_OLA_P4_SN_D.bmt
1d_SNPLEXv5_OLA_P1_S16_W.bmt
1c_SNPLEXv5_OLA_P16_S1_D.bmt
2_SNPLEXv5_EXO.bmt
1d_SNPLEXv5_OLA_P1_S16_D.bmt
3_SNPLEXv5_EXO_DILUTION.bmt
1a_SNPLEXv5_OLA_PN_S4_W.bmt
4_SNPLEXv5_PCR.bmt
1b_SNPLEXv5_OLA_P4_SN_W.bmt
Note: You can also use Windows Explorer to copy the files from the location to which
you downloaded them to an appropriate location on the Biomek FX workstation
Notes
SNPlexTM Genotyping System 48-plex Automating OLA Using the Biomek FX Getting Started Guide
15
Chapter 2 Setting Up the Biomek FX for Automating the SNPlex System Assay
Reviewing the Supplied Methods
Reviewing the Supplied Methods
Verifying the
Method
Conditions
Method
Number
Because the proper operation of a method depends on the presence of specific conditions
(such as the number of 384-well reaction plates), you should verify that the methods you
copied have the specifications listed in the following table:
Method File Name
Number of
384-well
Reaction
Plates
Number of
96-well
Reagent
Source
Plates
Number of
Reagent
Reservoirs
Estimated
Time
(mm:ss)
Tip
Boxes
1a_dry
1a_SNPLEXv5_OLA_PN_S4_D.bmt
4
4
—
4:16
4
1b_dry
1b_SNPLEXv5_OLA_P4_SN_D.bmt
4
4
—
4:19
4
1c_dry
1c_SNPLEXv5_OLA_P16_S1_D.bmt
4
16
—
11:25
16
1d_dry
1d_SNPLEXv5_OLA_P1_S16_D.bmt
4
1
—
2:24
1
1a_wet
1a_SNPLEXv5_OLA_PN_S4_W.bmt
4
8
—
15:31
20
1b_wet
1b_SNPLEXv5_OLA_P4_SN_W.bmt
4
8
—
15:32
20
1c_wet
1c_SNPLEXv5_OLA_P16_S1_W.bmt
4
17
—
13:48
17
1d_wet
1d_SNPLEXv5_OLA_P1_S16_W.bmt
4
17
—
13:49
17
2_SNPLEXv5_EXO.bmt
4†
1
—
12:39
16
—
1
13:08
16
1
—
15:22
17
2
3
4
3_SNPLEXv5_EXO_DILUTION.bmt
4_SNPLEXv5_PCR.bmt
4
4†
†
+4
† Reaction plates are the output plates that are carried over from the previous method.
Note: Four methods are used to complete the OLA process. Select one of the eight OLA
setup methods (that is, 1a_dry, 1a_wet, 1b_dry, 1b_wet, and so forth). The four OLA
reaction plates are carried over into method 2 (Exo), then into method 3(Dilution), and
then into method 4(PCR). In method 4, aliquots from the original four reaction plates are
transferred into four new PCR reaction plates.
Notes
16
SNPlexTM Genotyping System 48-plex Automating OLA Using the Biomek FX Getting Started Guide
Chapter 2 Setting Up the Biomek FX for Automating the SNPlex System Assay
Reviewing the Supplied Methods
Verifying the
Labware
Description
384-well reaction plate
Methods also require the use of specific labware in order to function properly. The
following table lists the labware used to develop the Biomek FX methods.
Vendor
Title in Method
Applied Biosystems
4309849
OLA_ABI_384_in_ACME_Adapter
Axygen 50-µL barrier tips
Axygen
FXF-50-L-R-S
Axygen96_50uL_Barrier
Reagent reservoir
Axygen
RES-SW96-HP
Axygen_96_DiaBot_HP
Skirted 96-well PCR plate
Axygen
PCR-96-FS
VWR_96_PP_16posALP
PCR_ABI_384_in_ACME_Adapter
2
VWR_96_PP_1posALP
Once the setup is complete, you can start using the Biomek FX instrument for
automating the OLA lab protocols of the SNPlex System assay, as described in the
following chapters.
Notes
SNPlexTM Genotyping System 48-plex Automating OLA Using the Biomek FX Getting Started Guide
17
Chapter 2 Setting Up the Biomek FX for Automating the SNPlex System Assay
Reviewing the Supplied Methods
Notes
18
SNPlexTM Genotyping System 48-plex Automating OLA Using the Biomek FX Getting Started Guide
Chapter 3
Performing OLA Using Dry gDNA
G
C
Introduction
Setting Up the
Biomek FX for
Automating the
SNPlex System
Assay
3
Overview
G
C
Performing OLA
Using Dry DNA
Purifying OLA
Products
(Exonuclease)
G
G
C
G
C
Performing OLA
Using Wet DNA
Plate Layouts and
Methods for the OLA
Protocol (Dry gDNA)
Performing the OLA
Reactions: Biomek FX
Methods 1a_Dry or 1b_Dry
Diluting the Purified
OLA Product
G
G
See page 24
See page 28
or
Performing the OLA
Reactions: Biomek FX
Method 1d_Dry
B
See page 21
or
Performing the OLA
Reactions: Biomek FX
Method 1c_Dry
C
See page 20
See page 32
Setting Up the
PCR Reactions
Notes
SNPlexTM Genotyping System 48-plex Automating OLA Using the Biomek FX Getting Started Guide
19
Chapter 3 Performing OLA Using Dry gDNA
G
C
Overview
Overview
This chapter provides information about automating the OLA protocol with the Biomek
FX using disposable tips. The procedures in this chapter assume the use of a batch of
four SNPlex™ OLA reaction plates, each containing 37 ng/well of dried, fragmented
gDNA samples. If you are using wet gDNA, refer to Chapter 4, “Performing OLA Using
Wet gDNA.”
Where You Are In
the SNPlex
System Assay
Workflow
Phosphorylate and
ligate probes,
linkers, and
gDNA (OLA dry)
Phosphorylate and
ligate probes,
linkers, and
gDNA (OLA wet)
Purify OLA products
(Exonuclease)
Prepare hybridization plates
and bind PCR product
to plates
Add denaturant, isolating
biolinylated strand on
hybridization plate
Hybridize ZipChute™ probes
Elute ZipChute probes
Amplification
Kit
Dilute purified OLA product
Prepare PCR reactions
Hyridization Kit
Prepare gDNA
Run PCR
Prepare sample plates
for electrophoresis
Assay Standards Kit
PCR Laboratory
Design sample plate layout
Oligonucleotide
Ligase Kit
OLA Laboratory
Design and order
SNPlex ligation probes
Purification
Kit
About This
Chapter
Create results groups
and plate records
Load and run
sample plates
Analyze data in
GeneMapper software v3.7
Notes
20
SNPlexTM Genotyping System 48-plex Automating OLA Using the Biomek FX Getting Started Guide
Chapter 3 Performing OLA Using Dry gDNA
Plate Layouts and Methods for the OLA Protocol (Dry gDNA)
G
C
Plate Layouts and Methods for the OLA Protocol (Dry gDNA)
You can select from four Biomek FX methods depending on the number of samples and
probe pools assayed in a single run. The following table gives the plate layouts and the
associated file for each layout. The quadrant representation comes from the division of
the 384-well reaction plates into four 96-well quadrants.
Reaction Plate
Layouts
Although plate layouts are flexible, some layouts are more efficient with reagent usage
than others. The layout that assays 1472 samples with a single probe pool is most
efficient since reagent dead volume is limited to a single 96-well source container. The
layout that assays 92 samples with 16 probe pools is the most inefficient since reagent
dead volume is spread across sixteen 96-well source containers. For optimal use of
SNPlex System reagent kits, consider plate layouts, batch sizes, and “dried vs wet”
gDNA setup.
Method
Number †
1a_dry
Method File Name ‡
1a_SNPLEXv5_OLA_PN_S4_D.bmt
Number of
Probe Pools
Total Number
of Samples §
4
368
2
1 2 3 4 5 6 7 8 9 10 11 12 13 14 15 16 17 18 19 20 21 22 23 24
A
1
2
P3
P3
A
S1
S3
S1
S3
D
A
E
F
G
H
I
P1
P1
S4
L
B
N
O
P3
P3
S2
S4
A
P2
P2
S1
S3
1
2
P2
S4
N
O
1 2 3 4 5 6 7 8 9 10 11 12 13 14 15 16 17 18 19 20 21 22 23 24
A
B
C
C
D
E
F
A
G
H
P4
P4
S1
S3
L
N
O
P
Control DNA
D
E
F
NTC
G
H
I
J
K
M
S2
L
B
J
P2
K
Plate 4
1 2 3 4 5 6 7 8 9 10 11 12 13 14 15 16 17 18 19 20 21 22 23 24
A
I
B
H
P
Plate 2
2
G
M
P
1
E
F
J
K
M
S2
D
I
J
B
1 2 3 4 5 6 7 8 9 10 11 12 13 14 15 16 17 18 19 20 21 22 23 24
C
C
P1
A
B
B
P1
“Performing the OLA Reactions:
Biomek FX Methods 1a_dry or
1b_dry” on page 24
Plate 3
Plate 1
1
3
Reference
B
P4
P4
K
L
M
S2
S4
Allelic Ladder
N
O
P
Notes
SNPlexTM Genotyping System 48-plex Automating OLA Using the Biomek FX Getting Started Guide
21
Chapter 3 Performing OLA Using Dry gDNA
G
C
Plate Layouts and Methods for the OLA Protocol (Dry gDNA)
Method
Number †
Method File Name ‡
Number of
Probe Pools
Total Number
of Samples §
1b_dry
1b_SNPLEXv5_OLA_P4_SN_D.bmt
4
368
A
2
P1
P3
S1
S1
P2
P4
1 2 3 4 5 6 7 8 9 10 11 12 13 14 15 16 17 18 19 20 21 22 23 24
1
A
2
B
C
C
D
A
F
G
H
P1
P3
S3
S3
P2
P4
S1
S3
S3
L
B
N
O
A
P1
S2
P3
S2
P4
S2
1
2
C
D
A
E
F
G
H
P1
S4
P3
S4
L
B
N
O
P2
P4
S4
S4
A
S1
S1
16
P4
S1
1
2
P9
P11
A
E
F
G
H
S1
S1
A
B
P5
S1
P7
S1
P6
P8
S1
S1
1 2 3 4 5 6 7 8 9 10 11 12 13 14 15 16 17 18 19 20 21 22 23 24
A
D
E
F
G
H
J
K
L
B
N
O
P10
P12
S1
S1
K
L
M
N
O
P
Plate 4
1 2 3 4 5 6 7 8 9 10 11 12 13 14 15 16 17 18 19 20 21 22 23 24
1
A
2
1 2 3 4 5 6 7 8 9 10 11 12 13 14 15 16 17 18 19 20 21 22 23 24
A
B
B
C
C
D
E
F
A
G
H
P13
S1
P15
S1
E
H
I
J
M
N
O
P
B
P14
P16
S1
S1
NTC
G
J
K
Control DNA
D
F
I
L
“Performing the OLA Reactions:
Biomek FX Method 1c_dry” on
page 28
I
Plate 2
2
O
C
P
1
Allelic Ladder
N
B
D
M
S1
L
Plate 3
1 2 3 4 5 6 7 8 9 10 11 12 13 14 15 16 17 18 19 20 21 22 23 24
A
J
P2
K
92
I
B
H
P
C
P3
NTC
G
M
B
P1
E
J
K
Plate 1
2
Control DNA
D
F
I
1c_SNPLEXv5_OLA_P16_S1_D.bmt
1
1 2 3 4 5 6 7 8 9 10 11 12 13 14 15 16 17 18 19 20 21 22 23 24
A
B
P
1c_dry
O
C
M
S2
N
B
J
P2
L
Plate 4
1 2 3 4 5 6 7 8 9 10 11 12 13 14 15 16 17 18 19 20 21 22 23 24
A
I
B
K
P
Plate 2
2
H
M
P
1
E
G
J
J
K
M
S1
D
F
I
I
B
1 2 3 4 5 6 7 8 9 10 11 12 13 14 15 16 17 18 19 20 21 22 23 24
A
B
E
“Performing the OLA Reactions:
Biomek FX Methods 1a_dry or
1b_dry” on page 24
Plate 3
Plate 1
1
Reference
K
L
M
Allelic Ladder
N
O
P
Notes
22
SNPlexTM Genotyping System 48-plex Automating OLA Using the Biomek FX Getting Started Guide
Chapter 3 Performing OLA Using Dry gDNA
Plate Layouts and Methods for the OLA Protocol (Dry gDNA)
Method
Number †
Method File Name ‡
Number of
Probe Pools
Total Number
of Samples §
1d_dry
1d_SNPLEXv5_OLA_P1_S16_D.bmt
1
1472
A
2
P1
P1
S1
S3
P1
P1
1 2 3 4 5 6 7 8 9 10 11 12 13 14 15 16 17 18 19 20 21 22 23 24
1
A
2
C
D
A
G
H
P1
P1
S9
S11
P1
P1
S10
S12
I
S4
L
B
N
O
A
P1
S5
P1
S7
P1
S8
O
1
2
1 2 3 4 5 6 7 8 9 10 11 12 13 14 15 16 17 18 19 20 21 22 23 24
A
B
C
C
D
E
F
A
G
H
P1
S13
P1
S15
L
N
O
P
Control DNA
D
E
F
NTC
G
H
I
J
K
M
S6
N
B
J
P1
L
Plate 4
1 2 3 4 5 6 7 8 9 10 11 12 13 14 15 16 17 18 19 20 21 22 23 24
A
I
B
K
P
Plate 2
2
H
M
P
1
E
G
J
K
M
S2
D
F
I
J
B
1 2 3 4 5 6 7 8 9 10 11 12 13 14 15 16 17 18 19 20 21 22 23 24
B
C
F
“Performing the OLA Reactions:
Biomek FX Method 1d_dry” on
page 32
A
B
E
Reference
Plate 3
Plate 1
1
G
C
B
P1
P1
S14
S16
K
L
M
3
Allelic Ladder
N
O
P
† Method numbering reflects methods provided for other SNPlex System assay protocols.
‡ P = Probe Pool; S = Unique collection of 92 gDNA samples (4 positions of a 96-well quadrant are reserved for 1 control DNA, 1 NTC, and 2
allelic ladder wells).
§ Total number of samples in a batch containing four 384-well plates.
Notes
SNPlexTM Genotyping System 48-plex Automating OLA Using the Biomek FX Getting Started Guide
23
Chapter 3 Performing OLA Using Dry gDNA
G
C
Performing the OLA Reactions: Biomek FX Methods 1a_dry or 1b_dry
Performing the OLA Reactions: Biomek FX Methods 1a_dry
or 1b_dry
About These
Methods
Methods 1a_dry and 1b_dry were developed for setups that have 368 gDNA samples
and four probe pools.
These methods use a single identical deck layout. The difference between them is the
pattern in which the instrument dispenses the reagents into the wells of the OLA reaction
plates.
In Method 1a_dry:
Assay Mix from source plate Mix1 is transferred to all four quadrants of OLA
reaction plate OLA1, Mix 2 to OLA2, Mix 3 to OLA3, and Mix 4 to OLA4.
In Method 1b_dry:
Assay Mix from source plate Mix 1 is transferred to quadrant 1 of all four OLA
reaction plates (OLA1 to OLA4), Mix 2 to quadrant 2, Mix 3 to quadrant 3, and
Mix 4 to quadrant 4.
Preparing the
Reagents
1. Thaw the SNPlex Oligonucleotide Ligation Kit components and probe pools at
room temperature.
2. Label four skirted 96-well PCR plates Mix1 to Mix4.
3. Label four 15-mL centrifuge tubes Mix1 to Mix4.
Notes
24
SNPlexTM Genotyping System 48-plex Automating OLA Using the Biomek FX Getting Started Guide
Chapter 3 Performing OLA Using Dry gDNA
G
C
Performing the OLA Reactions: Biomek FX Methods 1a_dry or 1b_dry
4. For each of the four SNPlex Ligation Probe Pools, prepare an Assay Mix in a
15-mL centrifuge tube and mix thoroughly.
Automated
Manual
Automation Losses
Automation
Totals
Volume (µL) for
One Quadrant
Source Plate
Dead Volume †
Transfer Loss
Excess (µL) ‡
Total Volume (µL)
for Four
Quadrants §
216.2
432.4
110.4
1407.6
235.0
470.0
120.0
1530.0
SNPlex™ Universal Linkers, 48-plex
4.7
9.4
2.4
30.6
SNPlex™ dATP
4.7
9.4
2.4
30.6
9.4
18.8
4.8
61.2
470.0
940.0
240.0
3060.0
Reagent
Nuclease Free Water
™
SNPlex OLA Master Mix
™
SNPlex Probe Pool (500 nM)
Total
3
† 94 tips in source plate × 0µL per tip.
‡ Transfer losses for transferring bulk mixture into 96-well source plate.
§ Use the volumes in this column to prepare the reagents. Refer to the SNPlex™ Genotyping System 48-plex User Guide for per reaction
volumes. Volumes given in this table include allowances for dead volume and excess volume for pipetting losses. For more information about
calculating dead volumes, refer to the SNPlex™ Genotyping System 48-plex General Automation Getting Started Guide.
5. Add 30 µL of the Assay Mix into each well of a skirted 96-well PCR plate,
excluding wells G12 and H12, then centrifuge the plate briefly to collect the
contents at the bottom of the wells.
Mix 1
1
Mix 1
2
3
4
5
6
7
8
9
10
11
12
A
B
30 µL
C
D
E
F
G
H
Leave wells G12 and H12 empty
6. Label four 384-well plates, containing dried down gDNA samples, OLA1 to OLA4.
(For information on the layout of dry gDNA plates, see Method “1a_dry” on
page 21 or “1b_dry” on page 22.)
Notes
SNPlexTM Genotyping System 48-plex Automating OLA Using the Biomek FX Getting Started Guide
25
Chapter 3 Performing OLA Using Dry gDNA
G
C
Performing the OLA Reactions: Biomek FX Methods 1a_dry or 1b_dry
Running
Methods 1a_dry
and 1b_dry
1. Remove the tips corresponding to well positions G12 and H12 from every tip box.
1
2
3
4
5
6
7
8
9
10
11
12
A
B
C
D
E
F
G
H
Remove tips from wells G12 and H12
2. Place the uncovered tip boxes and plates on the deck as shown in the following
figure, placing an ACME adapter underneath each OLA plate.
Plate
Position
OLA1 to OLA4
P1 to P4
Mix1 to Mix4
P5 to P8
Uncovered tip
box
P9 to P12
Methods 1a_dry and 1b_dry Deck Layout 1
3. Start the method using either:
• 1a_SNPLEXv5_OLA_PN_S4_D.bmt for Method 1a_dry
or
• 1b_SNPLEXv5_OLA_P4_SN_D.bmt for Method 1b_dry
4. When the method pauses, verify that the deck layout corresponds to the figure
above and click OK to continue.
5. After the method run is complete, remove and discard the tip boxes and plates Mix1
to Mix4.
6. Remove, seal, and briefly centrifuge the OLA reaction plates (OLA1 to OLA4).
7. Proceed to “Thermal Cycling the OLA Reactions” on page 27.
Notes
26
SNPlexTM Genotyping System 48-plex Automating OLA Using the Biomek FX Getting Started Guide
Chapter 3 Performing OLA Using Dry gDNA
Performing the OLA Reactions: Biomek FX Methods 1a_dry or 1b_dry
Thermal Cycling
the OLA
Reactions
Next Steps
G
C
Thermal cycle the OLA plates using the following conditions:
Step
Step Type
Temperature ( °C)
Time
1
HOLD
48
30 min
2
HOLD
90
20 min
3
25 cycles
94
15 sec
60
30 sec
51, 3% ramp
30 sec
4
HOLD
99
10 min
5
HOLD
4
∞
At this point, the OLA reaction is complete. Proceed to Chapter 5, “Purifying OLA
Products (Exonuclease).”
3
Notes
SNPlexTM Genotyping System 48-plex Automating OLA Using the Biomek FX Getting Started Guide
27
Chapter 3 Performing OLA Using Dry gDNA
G
C
Performing the OLA Reactions: Biomek FX Method 1c_dry
Performing the OLA Reactions: Biomek FX Method 1c_dry
Method 1c_dry was developed for setups that have 92 gDNA samples and 16 ligation
probe pools.
About the Method
The method transfers Assay Mix from 16 plates into four OLA reaction plates in four
steps, each corresponding to a deck layout:
•
•
•
•
Assay Mix from source plates Mix1 to Mix4 is transferred to plate OLA1.
Assay Mix from source plates Mix5 to Mix8 is transferred to plate OLA2.
Assay Mix from source plates Mix9 to Mix12 is transferred to plate OLA3.
Assay Mix from source plates Mix13 to Mix16 is transferred to plate OLA4.
1. Thaw the SNPlex Oligonucleotide Ligation Kit components and probe pools at
Preparing the
Reagents
room temperature.
2. Label 16 skirted 96-well PCR plates Mix1 to Mix16.
3. Label 16 15-mL centrifuge tubes Mix1 to Mix16.
4. For each of the 16 SNPlex Ligation Probe Pools, prepare an Assay Mix in a 15-mL
centrifuge tube and mix thoroughly.
Automated
Manual
Automation Losses
Automation
Totals
Volume (µL) for
One Quadrant
Source Plate
Dead Volume †
Transfer Loss
Excess (µL) ‡
Total Volume
(µL) for One
Quadrant §
216.2
432.4
110.4
759.0
235.0
470.0
120.0
825.0
4.7
9.4
2.4
16.5
SNPlex™ dATP
4.7
9.4
2.4
16.5
SNPlex™Probe Pool (500 nM)
9.4
18.8
4.8
33.0
470.0
940.0
240.0
1650.0
Reagent
Nuclease Free Water
™
SNPlex OLA Master Mix
SNPlex™
Total
Universal Linkers, 48-plex
† 94 tips in source plate ✕ 10µL per tip.
‡ Transfer losses for transferring bulk mixture into 96-well source plate.
§ Use the volumes in this column to prepare the reagents. Refer to the SNPlex™ Genotyping System 48-plex User Guide for per reaction
volumes. Volumes given in this table include allowances for dead volume and excess volume for pipetting losses. For more information
about calculating dead volumes, refer to the SNPlex™ Genotyping System 48-plex General Automation Getting Started Guide.
Notes
28
SNPlexTM Genotyping System 48-plex Automating OLA Using the Biomek FX Getting Started Guide
Chapter 3 Performing OLA Using Dry gDNA
Performing the OLA Reactions: Biomek FX Method 1c_dry
G
C
5. Add 15 µL of the Assay Mix into each well of a skirted 96-well PCR plate,
excluding wells G12 and H12, then centrifuge the plate briefly to collect the
contents at the bottom of the wells.
Mix n
1
Mix n
2
3
4
5
6
7
8
9
10
11
12
A
B
C
15 µL
D
E
F
G
H
Leave wells G12 and H12 empty
6. Label four 384-well plates, containing dried gDNA, OLA1 to OLA4. (For
information on the layout of dry gDNA plates, see Method “1c_dry” on page 22.)
Running
Method 1c_dry
1. Remove the tips corresponding to well positions G12 and H12 from every tip box.
1
2
3
4
5
6
7
8
9
10
11
12
A
B
C
D
E
F
G
H
Remove tips from wells G12 and H12
2. Place the uncovered tip boxes and plates on the deck as shown in the following
figure, placing an ACME adapter underneath each OLA plate.
Plate
Position
OLA1 to OLA4
P1 to P4
Mix1 to Mix4
P5 to P8
Uncovered tip
box
P9 to P12
Method 1c_dry Deck Layout 1
Notes
SNPlexTM Genotyping System 48-plex Automating OLA Using the Biomek FX Getting Started Guide
29
3
Chapter 3 Performing OLA Using Dry gDNA
G
C
Performing the OLA Reactions: Biomek FX Method 1c_dry
3. Start the method using 1c_SNPLEXv5_OLA_P16_S1_D.bmt.
4. When the method pauses, verify that the deck layout corresponds to the deck layout
above and click OK to continue.
The Biomek FX instrument transfers OLA mix from plates Mix1 to Mix4 to plate
OLA1 and then pauses.
5. Remove the used tip boxes and plates Mix1 to Mix4, then replace the tip boxes and
plates, leaving the OLA reaction plates in place, as specified in the following table:
Plate
Position
OLA1 to OLA4
P1 to P4
Mix5 to Mix8
P5 to P8
Uncovered tip
box
P9 to P12
Method 1c_dry Deck Layout 2
6. Click OK to continue.
The Biomek FX instrument transfers OLA mix from plates Mix5 to Mix8 to plate
OLA2 and then pauses.
7. Remove the used tip boxes and plates Mix5 to Mix8, then replace the tip boxes and
plates, leaving the OLA reaction plates in place, as specified in the following table:
Plate
Position
OLA1 to OLA4
P1 to P4
Mix9 to Mix12
P5 to P8
Uncovered tip
box
P9 to P12
Method 1c_dry Deck Layout 3
8. Click OK to continue.
The Biomek FX instrument transfers OLA mix from plates Mix9 to Mix12 to plate
OLA3 and then pauses.
Notes
30
SNPlexTM Genotyping System 48-plex Automating OLA Using the Biomek FX Getting Started Guide
Chapter 3 Performing OLA Using Dry gDNA
Performing the OLA Reactions: Biomek FX Method 1c_dry
G
C
9. Remove the used tip boxes and plates Mix9 to Mix12, then replace the tip boxes
and plates, leaving the OLA reaction plates in place, as specified in the following
table:
Plate
Position
OLA1 to OLA4
P1 to P4
Mix13 to
Mix16
P5 to P8
Uncovered tip
box
P9 to P12
Method 1c_dry Deck Layout 4
3
10. Click OK to continue.
The Biomek FX instrument transfers OLA mix from plates Mix13 to Mix16 to plate
OLA4.
11. After the method run is complete, remove and discard the tip boxes and plates
(Mix13 to Mix16) and remove, seal, and briefly centrifuge the OLA reaction plates
(OLA1 to OLA4).
12. Proceed to “Thermal Cycling the OLA Reactions.”
Thermal Cycling
the OLA
Reactions
Next Steps
Thermal cycle the OLA plates using the following conditions:
Step
Step Type
Temperature ( °C)
Time
1
HOLD
48
30 min
2
HOLD
90
20 min
3
25 cycles
94
15 sec
60
30 sec
51, 3% ramp
30 sec
4
HOLD
99
10 min
5
HOLD
4
∞
At this point, the OLA reaction is complete. Proceed to Chapter 5, “Purifying OLA
Products (Exonuclease).”
Notes
SNPlexTM Genotyping System 48-plex Automating OLA Using the Biomek FX Getting Started Guide
31
Chapter 3 Performing OLA Using Dry gDNA
G
C
Performing the OLA Reactions: Biomek FX Method 1d_dry
Performing the OLA Reactions: Biomek FX Method 1d_dry
Method 1d_dry was developed for setups that have 1472 gDNA samples and 1 ligation
probe pool and uses use a single deck layout.
About These
Methods
To minimize tip usage and prevent carryover contamination between quadrants, these
methods are designed so that the tips are positioned above the liquid level in the plates
when dispensing reagents.
1. Thaw the SNPlex Oligonucleotide Ligation Kit components and probe pool at room
Preparing the
Reagents
temperature.
2. Label a skirted 96-well PCR plate Assay Mix.
3. Prepare the Assay Mix in a 15-mL centrifuge tube and mix thoroughly.
Automated
Manual
Automation Losses
Automation
Totals
Volume (µL) for
One Quadrant
Source Plate
Dead Volume †
Transfer Loss
Excess (µL) ‡
Total Volume
(µL) for 16
Quadrant §
Nuclease Free Water
216.2
432.4
110.4
4002.0
SNPlex™ OLA Master Mix
235.0
470.0
120.0
4350.0
4.7
9.4
2.4
87.0
SNPlex dATP
4.7
9.4
2.4
87.0
SNPlex™Probe Pool (500 nM)
9.4
18.8
4.8
174.0
470.0
940.0
240.0
8700.0
Reagent
SNPlex™
Universal Linkers, 48-plex
™
Total
† 94 tips in source plate × 10µL per tip.
‡ Transfer losses for transferring bulk mixture into 96-well source plate.
§ Use the volumes in this column to prepare the reagents. Refer to the SNPlex™ Genotyping System 48-plex User Guide for per reaction
volumes. Volumes given in this table include allowances for dead volume and excess volume for pipetting losses. For more information
about calculating dead volumes, refer to the SNPlex™ Genotyping System 48-plex General Automation Getting Started Guide.
Notes
32
SNPlexTM Genotyping System 48-plex Automating OLA Using the Biomek FX Getting Started Guide
Chapter 3 Performing OLA Using Dry gDNA
Performing the OLA Reactions: Biomek FX Method 1d_dry
G
C
4. Add 90 µL of the Assay Mix into each well of a skirted 96-well PCR plate,
excluding wells G12 and H12, then centrifuge the plate briefly to collect the
contents at the bottom of the wells.
Mix 1
1
Mix 1
2
3
4
5
6
7
8
9
10
11
12
A
B
C
90 µL
D
E
F
G
H
Leave wells G12 and H12 empty
5. Label four 384-well plates, containing dried DNA, OLA1 to OLA4. (For
information on the layout of dry gDNA plates, see Method “1d_dry” on page 23.)
Running
Method 1d_dry
1. Remove the tips corresponding to well positions G12 and H12 from every tip box.
1
2
3
4
5
6
7
8
9
10
11
12
A
B
C
D
E
F
G
H
Remove tips from wells G12 and H12
2. Place the uncovered tip boxes and plates on the deck as shown in the following
figure, placing an ACME adapter underneath each OLA plate.
Plate
Position
Uncovered tip
box
TL1
AssayMix
P18
OLA1 to OLA4
P1 to P4
Method1d_dry Deck Layout 1
3. Start the method using 1d_SNPLEXv5_OLA_P1_S16_D.bmt.
4. When the method pauses, verify that the deck layout corresponds to the deck layout
above and click OK to continue.
Notes
SNPlexTM Genotyping System 48-plex Automating OLA Using the Biomek FX Getting Started Guide
33
3
Chapter 3 Performing OLA Using Dry gDNA
G
C
Performing the OLA Reactions: Biomek FX Method 1d_dry
5. After the method run is complete, remove and discard the tip boxes and the Assay
Mix plate and remove, seal, and briefly centrifuge the OLA reaction plates (OLA1
to OLA4).
6. Proceed to “Thermal Cycling the OLA Reactions.”
Thermal Cycling
the OLA
Reactions
Next Steps
Thermal cycle the OLA plates using the following conditions:
Step
Step Type
Temperature ( °C)
Time
1
HOLD
48
30 min
2
HOLD
90
20 min
3
25 cycles
94
15 sec
60
30 sec
51, 3% ramp
30 sec
4
HOLD
99
10 min
5
HOLD
4
∞
At this point, the OLA reaction is complete. Proceed to Chapter 5, “Purifying OLA
Products (Exonuclease).”
Notes
34
SNPlexTM Genotyping System 48-plex Automating OLA Using the Biomek FX Getting Started Guide
Chapter 4
Performing OLA Using Wet gDNA
G
C
Introduction
Setting Up the
Biomek FX for
Automating the
SNPlex System
Assay
Overview
G
C
Performing OLA
Using Dry DNA
Purifying OLA
Products
(Exonuclease)
G
G
C
G
C
Performing OLA
Using Wet DNA
Plate Layouts and
Methods for the OLA
Protocol (Wet gDNA)
See page 37
Performing the OLA
Reactions: Biomek FX
Methods 1a_Wet or 1b_Wet
See page 40
Diluting the Purified
OLA Product
G
G
See page 45
or
Performing the OLA
Reactions: Biomek FX
Method 1d_Wet
B
4
or
Performing the OLA
Reactions: Biomek FX
Method 1c_Wet
C
See page 36
See page 49
Setting Up the
PCR Reactions
Notes
SNPlexTM Genotyping System 48-plex Automating OLA Using the Biomek FX Getting Started Guide
35
Chapter 4 Performing OLA Using Wet gDNA
G
C
Overview
Overview
This chapter provides information about automating the OLA protocol with the Biomek
FX with disposable tips. The procedures in this chapter assume the use of a batch of four
SNPlex™ OLA reaction plates, and that the gDNA samples have been quantified,
fragmented, and diluted to a concentration of 18.5 ng/µL before beginning this
procedure. If you are using dry gDNA, refer to Chapter 3, “Performing OLA Using Dry
gDNA.”
Where You Are In
the SNPlex
System Assay
Workflow
Phosphorylate and
ligate probes,
linkers, and
gDNA (OLA dry)
Phosphorylate and
ligate probes,
linkers, and
gDNA (OLA wet)
Purify OLA products
(Exonuclease)
Prepare hybridization plates
and bind PCR product
to plates
Add denaturant, isolating
biolinylated strand on
hybridization plate
Hybridize ZipChute™ probes
Elute ZipChute probes
Amplification
Kit
Dilute purified OLA product
Prepare PCR reactions
Hyridization Kit
Prepare gDNA
Run PCR
Prepare sample plates
for electrophoresis
Assay Standards Kit
PCR Laboratory
Design sample plate layout
Oligonucleotide
Ligase Kit
OLA Laboratory
Design and order
SNPlex ligation probes
Purification
Kit
About This
Chapter
Create results groups
and plate records
Load and run
sample plates
Analyze data in
GeneMapper software v3.7
Notes
36
SNPlexTM Genotyping System 48-plex Automating OLA Using the Biomek FX Getting Started Guide
Chapter 4 Performing OLA Using Wet gDNA
G
C
Plate Layouts and Methods for the OLA Protocol (Wet gDNA)
Plate Layouts and Methods for the OLA Protocol (Wet gDNA)
You can select from four Biomek FX methods depending on the number of samples and
probe pools assayed in a single run.
Arraying gDNA in
96-Well Plates
Array your gDNA samples in skirted 96-well PCR plates, 92 samples per plate. Reserve
well E12 for the SNPlex System kit control gDNA and well F12 for the No Template
Control (NTC). Leave wells G12 and H12 empty - these wells are used as Allelic Ladder
wells during analysis.
For example, you may array 368 gDNA samples among four 96-well plates as shown:
DNA Source Plate 1
DNA Source Plate 3
1
2
3
4
5
6
7
8
9
10
11
12
2
3
4
5
6
7
8
9
10
11
12
A
1
9
17
25
33
41
49
57
65
73
81
89
A 185
193
201
209
217
225
233
241
249
257
265
273
B
2
10
18
26
34
42
50
58
66
74
82
90
B 186
194
202
210
218
226
234
242
250
258
266
274
C
3
11
19
27
35
43
51
59
67
75
83
91
C 187
195
203
211
219
227
235
243
251
259
267
275
D
4
12
20
28
36
44
52
60
68
76
84
92
D 188
196
204
212
220
228
236
244
252
260
268
276
E
5
13
21
29
37
45
53
61
69
77
85
C
E 189
197
205
213
221
229
237
245
253
261
269
C
F
6
14
22
30
38
46
54
62
70
78
86
N
F 190
198
206
214
222
230
238
246
254
262
270
N
G
7
15
23
31
39
47
55
63
71
79
87
G 191
199
207
215
223
231
239
247
255
263
271
H
8
16
24
32
40
48
56
64
72
80
88
H 192
200
208
216
224
232
240
248
256
264
272
1
DNA Source Plate 4
DNA Source Plate 2
Volumes for
Source Plates
Method
Number
1
2
3
4
5
6
7
8
9
10
11
12
2
3
4
5
6
7
8
9
10
11
12
A
93
101
109
117
125
133
141
149
157
165
173
181
A 277
1
285
293
301
309
317
325
333
341
349
357
365
B
94
102
110
118
126
134
142
150
158
166
174
182
B 278
286
294
302
310
318
326
334
342
350
358
366
C 95
103
111
119
127
135
143
151
159
167
175
183
C 279
287
295
303
311
319
327
335
343
351
359
367
D 96
104
112
120
128
136
144
152
160
168
176
184
D 280
288
296
304
312
320
328
336
344
352
360
368
E
97
105
113
121
129
137
145
153
161
169
177
C
E 281
289
297
305
313
321
329
337
345
353
361
C
F
98
106
114
122
130
138
146
154
162
170
178
N
F 282
290
298
306
314
322
330
338
346
354
362
N
G 99
107
115
123
131
139
147
155
163
171
179
G 283
291
299
307
315
323
331
339
347
355
363
H 100
108
116
124
132
140
148
156
164
172
180
H 284
292
300
308
316
324
332
340
348
356
364
4
The volumes of the gDNA samples you use depend on your total number of samples and
the number of SNPlex Ligation Probe pools you are using. The volumes in the table
below include dead volumes to be sure the robotic tips remain submerged during
aspiration.
Method File Name
Number of
Probe Pools
Number of
gDNA Source
Plates
Total
Number of
gDNA
Samples
Required
Volume (µL)
of gDNA
Samples
1a_wet
1a_SNPLEXv5_OLA_PN_S4_W.bmt
4
4
368
20
1b_wet
1b_SNPLEXv5_OLA_P4_SN_W.bmt
4
4
368
20
1c_wet
1c_SNPLEXv5_OLA_P16_S1_W.bmt
16
1
92
40
1d_wet
1d_SNPLEXv5_OLA_P1_S16_W.bmt
1
16
1472
12
Notes
SNPlexTM Genotyping System 48-plex Automating OLA Using the Biomek FX Getting Started Guide
37
Chapter 4 Performing OLA Using Wet gDNA
G
C
Plate Layouts and Methods for the OLA Protocol (Wet gDNA)
You can select from four Biomek FX methods depending on the number of samples and
probe pools assayed in a single run. The following table gives the plate layouts and the
associated file for each layout. The quadrant representation comes from the division of
the 384-well reaction plates into four 96-well quadrants.
Reaction Plate
Layouts
Although plate layouts are flexible, some layouts are more efficient with reagent usage
than others. The layout that assays 1472 samples with a single probe pool is most
efficient since reagent dead volume is limited to a single 96-well source container. The
layout that assays 92 samples with 16 probe pools is the most inefficient since reagent
dead volume is spread across sixteen 96-well source containers. For optimal use of
SNPlex System reagent kits, consider plate layouts, batch sizes, and “dried vs wet”
gDNA setup.
Method
Number †
Method File Name ‡
Number of
Probe Pools
Total Number
of Samples §
1a_wet
1a_SNPLEXv5_OLA_PN_S4_W.bmt
4
368
A
2
P1
P1
S1
S3
P1
P1
1 2 3 4 5 6 7 8 9 10 11 12 13 14 15 16 17 18 19 20 21 22 23 24
1
A
2
B
C
C
D
A
F
G
H
P3
P3
S1
S3
P3
P3
S4
S2
S4
L
B
O
A
P2
S1
P2
S3
P2
S2
S4
1
2
P4
D
A
E
F
S1
G
H
P4
S3
L
B
S1
S1
P4
P4
S2
S4
O
P4
S1
1
2
A
B
P1
P3
S2
S2
P2
P4
S2
S2
O
P1
P3
S3
S3
1 2 3 4 5 6 7 8 9 10 11 12 13 14 15 16 17 18 19 20 21 22 23 24
A
C
A
E
F
G
H
D
E
F
G
H
I
J
K
L
B
N
O
P2
P4
S3
S3
K
L
M
N
O
P
Plate 4
1 2 3 4 5 6 7 8 9 10 11 12 13 14 15 16 17 18 19 20 21 22 23 24
1
A
2
1 2 3 4 5 6 7 8 9 10 11 12 13 14 15 16 17 18 19 20 21 22 23 24
A
B
B
C
C
D
E
F
A
G
H
P1
P3
S4
S4
E
F
H
I
J
M
N
O
P
B
P2
P4
S4
S4
NTC
G
J
K
Control DNA
D
I
L
“Performing the OLA Reactions:
Biomek FX Methods 1a_wet or
1b_wet” on page 40
B
D
Plate 2
2
Allelic Ladder
N
368
P
1
L
Plate 3
1 2 3 4 5 6 7 8 9 10 11 12 13 14 15 16 17 18 19 20 21 22 23 24
A
M
S1
K
4
J
P2
H
P
I
B
NTC
G
M
N
C
A
E
J
K
B
P3
Control DNA
D
F
I
Plate 1
P1
1 2 3 4 5 6 7 8 9 10 11 12 13 14 15 16 17 18 19 20 21 22 23 24
A
C
1b_SNPLEXv5_OLA_P4_SN_W.bmt
2
O
B
M
1
N
C
P
1b_wet
L
B
J
P2
K
Plate 4
1 2 3 4 5 6 7 8 9 10 11 12 13 14 15 16 17 18 19 20 21 22 23 24
A
I
B
H
P
Plate 2
2
G
M
N
P
1
E
F
J
J
K
M
S2
D
I
I
B
1 2 3 4 5 6 7 8 9 10 11 12 13 14 15 16 17 18 19 20 21 22 23 24
A
B
E
“Performing the OLA Reactions:
Biomek FX Methods 1a_wet or
1b_wet” on page 40
Plate 3
Plate 1
1
Reference
K
L
M
Allelic Ladder
N
O
P
Notes
38
SNPlexTM Genotyping System 48-plex Automating OLA Using the Biomek FX Getting Started Guide
Chapter 4 Performing OLA Using Wet gDNA
Plate Layouts and Methods for the OLA Protocol (Wet gDNA)
Method
Number †
Method File Name ‡
Number of
Probe Pools
Total Number
of Samples §
1c_wet
1c_SNPLEXv5_OLA_P16_S1_W.bmt
16
92
A
2
P1
P3
S1
S1
P2
P4
1 2 3 4 5 6 7 8 9 10 11 12 13 14 15 16 17 18 19 20 21 22 23 24
1
A
A
B
C
C
D
A
F
G
H
P9
P11
S1
S1
P10
P12
S1
S1
S1
H
I
J
L
B
O
O
P
Plate 4
1 2 3 4 5 6 7 8 9 10 11 12 13 14 15 16 17 18 19 20 21 22 23 24
A
1 2 3 4 5 6 7 8 9 10 11 12 13 14 15 16 17 18 19 20 21 22 23 24
1
2
P13
P15
S1
S1
B
C
A
B
P7
S1
S1
P6
P8
S1
S1
C
D
A
E
F
G
H
G
H
J
K
L
B
P14
P16
S1
S1
P1
P1
S1
S3
O
B
S2
S4
P
1
1472
1
2
B
C
C
D
A
F
G
H
P1
P1
S9
S11
A
B
P1
S5
S7
P1
P1
S6
S8
E
L
B
N
O
G
H
P1
P1
S10
S12
K
L
M
N
O
P
Plate 4
1 2 3 4 5 6 7 8 9 10 11 12 13 14 15 16 17 18 19 20 21 22 23 24
1
A
2
1 2 3 4 5 6 7 8 9 10 11 12 13 14 15 16 17 18 19 20 21 22 23 24
A
B
B
C
C
D
E
F
A
G
H
P1
P1
S13
S15
E
F
H
I
J
M
N
O
P
B
P1
P1
S14
S16
NTC
G
J
K
Control DNA
D
I
L
4
F
J
K
Plate 2
P1
D
I
P
2
1 2 3 4 5 6 7 8 9 10 11 12 13 14 15 16 17 18 19 20 21 22 23 24
A
B
E
“Performing the OLA Reactions:
Method 1d_wet” on page 49
Plate 3
1 2 3 4 5 6 7 8 9 10 11 12 13 14 15 16 17 18 19 20 21 22 23 24
A
M
1
Allelic Ladder
O
J
P1
L
N
I
P1
K
M
N
Plate 1
A
NTC
F
I
1d_SNPLEXv5_OLA_P1_S16_W.bmt
2
E
J
M
1
D
I
P
1d_wet
Control DNA
A
B
P5
L
N
Plate 2
2
K
M
N
P
1
E
G
J
K
M
S1
D
F
I
B
“Performing the OLA Reactions:
Biomek FX Method 1c_wet” on
page 45
1 2 3 4 5 6 7 8 9 10 11 12 13 14 15 16 17 18 19 20 21 22 23 24
2
B
E
Reference
Plate 3
Plate 1
1
G
C
K
L
M
Allelic Ladder
N
O
P
† Method numbering reflects methods provided for other SNPlex System assay protocols. Methods 1a_dry through 1d_dry in this Guide are
described in Chapter 3, “Performing OLA Using Dry gDNA.”.
‡ P = Probe Pool; S = Unique collection of 92 gDNA samples (4 positions of a 96-well DNA source plate are reserved for 1 control DNA, 1
NTC, and 2 allelic ladder wells)
§ Total number of samples in a batch containing four 384-well plates. Does not include control DNA or NTC.
Notes
SNPlexTM Genotyping System 48-plex Automating OLA Using the Biomek FX Getting Started Guide
39
Chapter 4 Performing OLA Using Wet gDNA
G
C
Performing the OLA Reactions: Biomek FX Methods 1a_wet or 1b_wet
Performing the OLA Reactions: Biomek FX Methods 1a_wet
or 1b_wet
About These
Methods
Methods 1a_wet and 1b_wet were developed for setups that have 368 gDNA samples
and four probe pools.
These methods use identical three-deck layouts. The difference between them is the
pattern in which the instrument dispenses the reagents and DNA samples into the wells
of the OLA reaction plates.
In Method 1a_wet:
• Assay Mix from source plate Mix1 is transferred to all four quadrants of OLA
reaction plate OLA1, Mix 2 to OLA2, Mix 3 to OLA3, and Mix 4 to OLA4.
• Samples from source plate DNA1 are transferred to quadrant 1 of all four OLA
plates (OLA1 to OLA4), DNA2 to quadrant 2, DNA3 to quadrant 3, and DNA4 to
quadrant 4.
In Method 1b_wet:
• Assay Mix from source plate Mix 1 is transferred to quadrant 1 of all four OLA
reaction plates (OLA1 to OLA4), Mix 2 to quadrant 2, Mix 3 to quadrant 3, and
Mix 4 to quadrant 4.
• Samples from source plate DNA1 are transferred to all wells of plate OLA1, DNA2
to OLA2, DNA3 to OLA3, and DNA4 to OLA4.
Preparing the
Reagents
1. Thaw the SNPlex Oligonucleotide Ligation Kit components and probe pools at
room temperature.
2. Label four skirted 96-well PCR plates Mix1 to Mix4.
3. Label four 15-mL centrifuge tubes Mix1 to Mix4.
4. Label four empty 96-well plates for use as DNA source plates DNA1 to DNA4.
(For more information on DNA source plate layouts, see “Plate Layouts and
Methods for the OLA Protocol (Wet gDNA)” on page 37).
Notes
40
SNPlexTM Genotyping System 48-plex Automating OLA Using the Biomek FX Getting Started Guide
Chapter 4 Performing OLA Using Wet gDNA
G
C
Performing the OLA Reactions: Biomek FX Methods 1a_wet or 1b_wet
5. For each of the four SNPlex Ligation Probe Pools, prepare an Assay Mix in a
15-mL centrifuge tube and mix thoroughly.
Automated
Manual
Automation Losses
Automation
Totals
Volume (µL) for
One Quadrant
Source Plate
Dead Volume †
Transfer Loss
Excess (µL) ‡
Total Volume (µL)
for Four
Quadrants §
28.2
94.0
21.8
228.6
235.0
783.3
181.7
1905.0
SNPlex™ Universal Linkers, 48-plex
4.7
15.7
3.6
38.1
SNPlex™ dATP
4.7
15.7
3.6
38.1
9.4
31.3
7.3
76.2
282.0
940.0
218.0
2286.0
Reagent
Nuclease Free Water
™
SNPlex OLA Master Mix
™
SNPlex Probe Pool (500 nM)
Total
† 94 tips in source plate × 10µL per tip.
‡ Transfer losses for transferring bulk mixture into 96-well source plate.
§ Use the volumes in this column to prepare the reagents. Refer to the SNPlex™ Genotyping System 48-plex User Guide for per reaction
volumes. Volumes given in this table include allowances for dead volume and excess volume for pipetting losses. For more information about
calculating dead volumes, refer to the SNPlex™ Genotyping System 48-plex General Automation Getting Started Guide.
6. Add 22 µL of the Assay Mix into each well of a skirted 96-well PCR plate,
excluding wells G12 and H12, then centrifuge the plate briefly to collect the
contents at the bottom of the wells.
4
Mix 1
1
Mix 1
2
3
4
5
6
7
8
9
10
11
12
A
B
22 µL
C
D
E
F
G
H
Leave wells G12 and H12 empty
7. Label four 384-well ABI clear optical reaction plates OLA1 to OLA4. (For
information on the layout of wet gDNA plates, see Method “1a_wet,” or “1b_wet”
on page 37.)
Notes
SNPlexTM Genotyping System 48-plex Automating OLA Using the Biomek FX Getting Started Guide
41
Chapter 4 Performing OLA Using Wet gDNA
G
C
Performing the OLA Reactions: Biomek FX Methods 1a_wet or 1b_wet
Running
Method 1a_wet or
1b_wet
1. Remove the tips corresponding to well positions G12 and H12 from every tip box.
1
2
3
4
5
6
7
8
9
10
11
12
A
B
C
D
E
F
G
H
Remove tips from wells G12 and H12
2. Place the uncovered tip boxes and plates on the deck as shown in the following
figure, placing an ACME adapter underneath each OLA plate.
Plate
Position
OLA1 to OLA4
P1 to P4
Mix1 to Mix4
P5 to P8
Uncovered tip
box
P9 to P12
Methods 1a_wet and 1b_wet, Deck Layout 1
3. Start the method using either:
• 1a_SNPLEXv5_OLA_PN_S4_W.bmt for Method 1a_wet
or
• 1b_SNPLEXv5_OLA_P4_SN_W.bmt for Method 1b_wet
When the method pauses, verify that the deck layout corresponds to the figure
above and select OK to continue.
Notes
42
SNPlexTM Genotyping System 48-plex Automating OLA Using the Biomek FX Getting Started Guide
Chapter 4 Performing OLA Using Wet gDNA
Performing the OLA Reactions: Biomek FX Methods 1a_wet or 1b_wet
G
C
4. When the method pauses, remove and discard the tip boxes and plates Mix1 to
Mix4. Remove the tips corresponding to well positons G12 and H12 from
eight new uncovered tip boxes and place them the DNA sample plates on the
deck as shown in the deck layout below
Plate
Position
OLA1 to OLA4
P1 to P4
DNA1 to DNA4
P5 to P8
Uncovered tip
box
P9 to P16
Methods 1a_wet and 1b_wet, Deck Layout 2 and 3
5. Click OK to continue the method.
6. When the method pauses, remove the tips corresponding to well positions G12 and
H12 from eight new uncovered tip boxes and replace the used tip boxes in positions
P9 to P16.
7. Click OK to continue the method.
4
8. After the method completes, remove, seal, and store (if necessary) the DNA sample
plates (DNA1 to DNA4).
9. Remove, seal and briefly centrifuge the OLA reaction plates (OLA1 to OLA4).
10. Proceed to “Thermal Cycling the OLA Reactions” on page 44.
Notes
SNPlexTM Genotyping System 48-plex Automating OLA Using the Biomek FX Getting Started Guide
43
Chapter 4 Performing OLA Using Wet gDNA
G
C
Performing the OLA Reactions: Biomek FX Methods 1a_wet or 1b_wet
Thermal Cycling
the OLA
Reactions
Next Steps
Thermal cycle the OLA plates using the following conditions:
Step
Step Type
Temperature ( °C)
Time
1
HOLD
48
30 min
2
HOLD
90
20 min
3
25 cycles
94
15 sec
60
30 sec
51, 3% ramp
30 sec
4
HOLD
99
10 min
5
HOLD
4
∞
At this point, the OLA reaction is complete. Proceed to Chapter 5, “Purifying OLA
Products (Exonuclease).”
Notes
44
SNPlexTM Genotyping System 48-plex Automating OLA Using the Biomek FX Getting Started Guide
Chapter 4 Performing OLA Using Wet gDNA
G
C
Performing the OLA Reactions: Biomek FX Method 1c_wet
Performing the OLA Reactions: Biomek FX Method 1c_wet
About the Method
Method 1c_wet was developed for setups that have 92 gDNA samples and 16 ligation
probe pools.
The method transfers DNA samples and 16 Assay Mixes into four OLA reaction plates
in four steps, each corresponding to a deck layout:
• DNA samples are transferred to all OLA plates, then Assay Mix from source plates
Mix1 to Mix4 is transferred to plate OLA1.
• Assay Mix from source plates Mix5 to Mix8 is transferred to plate OLA2.
• Assay Mix from source plates Mix9 to Mix12 is transferred to plate OLA3.
• Assay Mix from source plates Mix13 to Mix16 is transferred to plate OLA4.
Preparing the
Reagents
1. Label 16 skirted 96-well PCR plates Mix1 to Mix16.
2. Label 16 15-mL centrifuge tubes Mix1 to Mix16.
3. Label a DNA source plate DNA Sample. (For information on setting up DNA
source plates, see “Arraying gDNA in 96-Well Plates” on page 37.)
4. For each of the 16 SNPlex Ligation Probe Pools, prepare an Assay Mix in a 15-mL
centrifuge tube and mix thoroughly.
4
Automated
Manual
Automation Losses
Automation
Totals
Volume (µL) for
One Quadrant
Source Plate
Dead Volume †
Transfer Loss
Excess (µL) ‡
Total Volume
(µL) for One
Quadrant §
28.2
94.0
21.8
144.0
235.0
783.3
181.7
1200.0
SNPlex™ Universal Linkers, 48-plex
4.7
15.7
3.6
24.0
SNPlex™ dATP
4.7
15.7
3.6
24.0
9.4
31.3
7.3
48.0
282.0
940.0
218.0
1440.0
Reagent
Nuclease Free Water
™
SNPlex OLA Master Mix
™
SNPlex Probe Pool (500 nM)
Total
† 94 tips in source plate × 10µL per tip.
‡ Transfer losses for transferring bulk mixture into 96-well source plate.
§ Use the volumes in this column to prepare the reagents. Refer to the SNPlex™ Genotyping System 48-plex User Guide for per reaction
volumes. Volumes given in this table include allowances for dead volume and excess volume for pipetting losses. For more information
about calculating dead volumes, refer to the SNPlex™ Genotyping System 48-plex General Automation Getting Started Guide.
Notes
SNPlexTM Genotyping System 48-plex Automating OLA Using the Biomek FX Getting Started Guide
45
Chapter 4 Performing OLA Using Wet gDNA
G
C
Performing the OLA Reactions: Biomek FX Method 1c_wet
5. Add 13 µL of the Assay Mix into each well of a skirted 96-well PCR plate,
excluding wells G12 and H12, then centrifuge the plate briefly to collect the
contents at the bottom of the wells.
Mix n
1
Mix n
2
3
4
5
6
7
8
9
10
11
12
A
B
C
13 µL
D
E
F
G
H
Leave wells G12 and H12 empty
6. Label four 384-well clear optical reaction plates OLA1 to OLA4. (For information
on the layout of wet gDNA plates, see Method “1c_wet” on page 37.)
Running
Method 1c_wet
1. Remove the tips corresponding to well positions G12 and H12 from every tip box.
1
2
3
4
5
6
7
8
9
10
11
12
A
B
C
D
E
F
G
H
Remove tips from wells G12 and H12
2. Place the five uncovered tip boxes and plates on the deck as shown in the deck
layout below..
Plate
Position
OLA1 to OLA4
P1 to P4
DNA sample
P18
Mix1 to Mix4
P5 to P8
Uncovered tip
box
P9to P12,
P17
Method 1c_wet Deck Layout 1
3. Start the method using 1c_SNPLEXv5_OLA_P16_S1_W.bmt.
4. When the method pauses, remove and discard the four used tip boxes (from P9 to
P12) and plates Mix1 to Mix4 (from P5 to P8).
Notes
46
SNPlexTM Genotyping System 48-plex Automating OLA Using the Biomek FX Getting Started Guide
Chapter 4 Performing OLA Using Wet gDNA
Performing the OLA Reactions: Biomek FX Method 1c_wet
G
C
5. Remove the tips corresponding to well positions G12 and H12 from four new tip
boxes and place them and the plates as shown in the deck layout below.
Plate
Position
OLA1 to OLA4
P1 to P4
DNA sample
P18
Mix5 to Mix8
P5 to P8
Uncovered tip
box
P9 to P12
Method 1c_wet Deck Layout 2
6. Click OK to continue the method.
7. When the method pauses, remove the four used tip boxes in positions P9 to P12 and
the Assay Mix plates (Mix5 to Mix8) from positions P5 to P8.
8. Remove the tips corresponding to well positions G12 and H12 from four new tip
boxes and place them and the plates as shown in the deck layout below.
Plate
Position
OLA1 to OLA4
P1 to P4
DNA sample
P18
Mix9 to Mix12
P5 to P8
Uncovered tip
box
P9 to P12
4
Method 1c_wet Deck Layout 3
9. Click OK to continue the method.
10. When the method pauses, remove the four used tip boxes in positions P9 to P12 and
the Assay Mix plates (Mix9 to Mix12) from positions P5 to P8.
Notes
SNPlexTM Genotyping System 48-plex Automating OLA Using the Biomek FX Getting Started Guide
47
Chapter 4 Performing OLA Using Wet gDNA
G
C
Performing the OLA Reactions: Biomek FX Method 1c_wet
11. Remove the tips corresponding to well positions G12 and H12 from four new tip
boxes and place them and the plates as shown in the deck layout below.
Plate
Position
OLA1 to OLA4
P1 to P4
DNA sample
P18
Mix13 to
Mix16
P5 to P8
Uncovered tip
box
P9 to P12
Method 1c_wet Deck Layout 4
12. Click OK to continue the method.
13. After the method run is complete, remove and discard the tip boxes and plates
(Mix13 to Mix16) and remove, seal, and store (if necessary) the DNA Samples
plate.
14. Remove, seal, and briefly centrifuge the OLA reaction plates (OLA1 to OLA4).
15. Proceed to “Thermal Cycling the OLA Reactions.”
Thermal Cycling
the OLA
Reactions
Next Steps
Thermal cycle the OLA plates using the following conditions:
Step
Step Type
Temperature ( °C)
Time
1
HOLD
48
30 min
2
HOLD
90
20 min
3
25 cycles
94
15 sec
60
30 sec
51, 3% ramp
30 sec
4
HOLD
99
10 min
5
HOLD
4
∞
At this point, the OLA reaction is complete. Proceed to Chapter 5, “Purifying OLA
Products (Exonuclease).”
Notes
48
SNPlexTM Genotyping System 48-plex Automating OLA Using the Biomek FX Getting Started Guide
Chapter 4 Performing OLA Using Wet gDNA
G
C
Performing the OLA Reactions: Method 1d_wet
Performing the OLA Reactions: Method 1d_wet
About The
Method
Method 1d_wet was developed for setups that have 1472 gDNA samples and 1 ligation
probe pool and uses four deck layouts:
• Assay Mix is added to all OLA plates, then DNA samples from source plates DNA1
to DNA4) are transferred to plate OLA1.
• DNA samples from source plates DNA5 to DNA8 are transferred to plate OLA2.
• DNA samples from source plates DNA9 to DNA12 are transferred to plate OLA3.
• DNA samples from source plates DNA13 to DNA16 are transferred to OLA4.
Preparing the
Reagents
1. Label a skirted 96-well PCR plate Assay Mix.
2. Label 16 wet DNA source plates DNA1 to DNA16. (For information on setting up
DNA source plates, see “Arraying gDNA in 96-Well Plates” on page 37.)
3. Prepare the Assay Mix in a 15-mL centrifuge tube and mix thoroughly..
Automated
Manual
Automation Losses
Automation
Totals
Volume (µL) for
One Quadrant
Source Plate
Dead Volume †
Transfer Loss
Excess (µL) ‡
Total Volume
(µL) for Sixteen
Quadrants §
Nuclease Free Water
28.2
94.0
21.8
567.0
SNPlex™ OLA Master Mix
235.0
783.3
181.7
4725.0
4.7
15.7
3.6
94.5
4.7
15.7
3.6
94.5
9.4
31.3
7.3
189.0
282.0
940.0
218.0
5670.0
Reagent
SNPlex™ Universal Linkers, 48-plex
™
SNPlex dATP
SNPlex™Probe
Total
Pool (500 nM)
† 94 tips in source plate × 10µL per tip
‡ Transfer pipetting losses for transferring bulk mixture into 96-well source plate
§ Use the volumes in this column to prepare the reagents. Refer to the SNPlex™ Genotyping System 48-plex User Guide for per reaction
volumes. Volumes given in this table include allowances for dead volume and excess volume for pipetting losses. For more information
about calculating dead volumes, refer to the SNPlex™ Genotyping System 48-plex General Automation Getting Started Guide.
Notes
SNPlexTM Genotyping System 48-plex Automating OLA Using the Biomek FX Getting Started Guide
49
4
Chapter 4 Performing OLA Using Wet gDNA
G
C
Performing the OLA Reactions: Method 1d_wet
4. Add 58 µL of the Assay Mix into each well of a skirted 96-well PCR plate,
excluding wells G12 and H12, then centrifuge the plate briefly to collect the
contents at the bottom of the wells.
Assay
Mix
1
Assay Mix
2
3
4
5
6
7
8
9
10
11
12
A
B
C
58 µL
D
E
F
G
H
Leave wells G12 and H12 empty
5. Label four 384-well ABI PRISM® clear optical reaction plates OLA1 to OLA4. (For
information on the layout of wet gDNA plates, see Method “1d_wet” on page 37.)
Running
Method 1d_wet
1. Remove the tips corresponding to well positions G12 and H12 from five tip boxes.
1
2
3
4
5
6
7
8
9
10
11
12
A
B
C
D
E
F
G
H
Remove tips from wells G12 and H12
2. Place the five uncovered tip boxes and the plates on the deck as shown in the deck
layout below.
Plate
Position
OLA1 to OLA4
P1 to P4
Assay Mix
P18
DNA1 to DNA4
P5 to P8
Uncovered tip
box
P9to P12,
P17
Method 1d_wet Deck Layout 1
3. Start the method using 1d_SNPLEXv5_OLA_P1_S16_W.bmt.
Notes
50
SNPlexTM Genotyping System 48-plex Automating OLA Using the Biomek FX Getting Started Guide
Chapter 4 Performing OLA Using Wet gDNA
Performing the OLA Reactions: Method 1d_wet
G
C
4. When the method pauses, click OK to continue.
5. When the method pauses, remove and discard the four used tip boxes (from P9 to
P12).
6. Seal and store, if necessary, the DNA sample plates (DNA1 to DNA4) from
positions P5 to P8.
7. Remove the tips corresponding to well positions G12 and H12 from four new
uncovered tip boxes and place them and the plates on the deck as shown in the deck
layout below.
Plate
Position
OLA1 to OLA4
P1 to P4
Assay Mix
P18
DNA5 to DNA8
P5 to P8
Uncovered tip
box
P9 to P12
Method 1d_wet Deck Layout 2
4
8. When the method pauses, click OK to continue the method.
9. When the method pauses, remove the four used tip boxes in positions P9 to P12 and
the DNA sample plates (DNA5 to DNA8) from positions P5 to P8.
10. Remove the tips corresponding to well positions G12 and H12 from four new
uncovered tip boxes and place them and the plates on the deck as shown in the deck
layout below.
Plate
Position
OLA1 to OLA4
P1 to P4
Assay Mix
P18
DNA9 to
DNA12
P5 to P8
Uncovered tip
box
P9 to P12
Method 1d_wet Deck Layout 3
11. Click OK to continue the method.
Notes
SNPlexTM Genotyping System 48-plex Automating OLA Using the Biomek FX Getting Started Guide
51
Chapter 4 Performing OLA Using Wet gDNA
G
C
Performing the OLA Reactions: Method 1d_wet
12. When the method pauses, remove the four used tip boxes in positions P9 to P12 and
the DNA sample plates (DNA9 to DNA12) from positions P5 to P8.
13. Remove the tips corresponding to well positions G12 and H12 from four new
uncovered tip boxes and place them and the plates on the deck as shown in the deck
layout below.
Plate
Position
OLA1 to OLA4
P1 to P4
Assay Mix
P18
DNA13 to
DNA16
P5 to P8
Uncovered tip
box
P9 to P12
Method 1d_wet Deck Layout 4
14. Click OK to continue the method.
15. After the method run is complete, remove and discard the tip boxes.
– Seal and store plates DNA13 to DNA16, if necessary.
– Remove the Assay Mix plate and discard.
– Remove, seal, and briefly centrifuge the OLA reaction plates (OLA1 to OLA4).
16. Proceed to “Thermal Cycling the OLA Reactions.”
Thermal Cycling
the OLA
Reactions
Next Steps
Thermal cycle the OLA plates using the following conditions:
Step
Step Type
Temperature ( °C)
Time
1
HOLD
48
30 min
2
HOLD
90
20 min
3
25 cycles
94
15 sec
60
30 sec
51, 3% ramp
30 sec
4
HOLD
99
10 min
5
HOLD
4
∞
At this point, the OLA reaction is complete. Proceed to Chapter 5, “Purifying OLA
Products (Exonuclease).”
Notes
52
SNPlexTM Genotyping System 48-plex Automating OLA Using the Biomek FX Getting Started Guide
Chapter 5
Purifying OLA Products (Exonuclease)
G
C
G
Introduction
Setting Up the
Biomek FX for
Automating the
SNPlex System
Assay
G
C
Performing OLA
Using Dry DNA
G
Performing OLA
Using Wet DNA
5
Overview
See page 54
Running Biomek FX
Method 2 (Exo)
See page 55
Diluting the Purified
OLA Product
G
C
G
C
Purifying OLA
Products
(Exonuclease)
G
C
OR
G
B
Setting Up the
PCR Reactions
Notes
SNPlexTM Genotyping System 48-plex Automating OLA Using the Biomek FX Getting Started Guide
53
Chapter 5 Purifying OLA Products (Exonuclease)
G
C
G
Overview
Overview
This chapter provides information on automating the addition of the Exonuclease mix to
the OLA reactions using the Biomek FX Instrument. The procedures in this chapter
assume that you have completed the OLA preparation using either dry (“Performing
OLA Using Dry gDNA” on page 19) or wet (“Performing OLA Using Wet gDNA” on
page 35) gDNA.
Where You Are In
the SNPlex
System Assay
Workflow
Design and order
SNPlex ligation probes
Phosphorylate and
ligate probes,
linkers, and
gDNA (OLA wet)
Purify OLA products
(Exonuclease)
PCR Laboratory
Run PCR
Prepare hybridization plates
and bind PCR product
to plates
Add denaturant, isolating
biotinylated strand on
hybridization plate
Hybridize ZipChute™ probes
Elute ZipChute probes
Amplification
Kit
Dilute purified OLA product
Prepare PCR reactions
Hybridization Reagents and Kits
Phosphorylate and
ligate probes,
linkers, and
gDNA (OLA dry)
Oligonucleotide
Ligation Kit
Prepare gDNA
Purification
Kit
OLA Laboratory
Design sample plate layout
Prepare sample plates
for electrophoresis
Assay Standards Kit
About This
Chapter
Create results groups
and plate records
Load and run
sample plates
Analyze data in
GeneMapper software v3.7
Notes
54
SNPlexTM Genotyping System 48-plex Automating OLA Using the Biomek FX Getting Started Guide
Chapter 5 Purifying OLA Products (Exonuclease)
G
Running Biomek FX Method 2 (Exo)
G
C
Running Biomek FX Method 2 (Exo)
Assumptions
About this
Method
Preparing the
Exonuclease Mix
This method assumes that four 384-well OLA reaction plates (prepared in Chapter 3 or
Chapter 4) have been prepared and thermalcycled.
This method uses two deck layouts. The first deck layout adds Exonuclease mix to the
OLA reaction plates OLA1 and OLA2. The second deck layout adds Exonuclease mix to
OLA reaction plates OLA3 and OLA4. The well contents are mixed after each dispense
of the Exonuclease mix.
1. Prepare an Exonuclease mix in a 15-ml centrifuge tube and mix thoroughly.
Automated
Manual
Automation Losses
Automation Totals ††
Volume (µL) for
One 384-well
Plate †
Source Plate
Dead Volume
(µL) ‡
Transfer Loss
Excess (µL) §
Total Volume
(µL) for One
384-well
Plate
Total Volume
(µL) for Four
384-well
Plates
Nuclease Free Water
1579.2
789.6
453.6
2822.4
7560.0
SNPlex™Exonuclease Buffer
188.0
94.0
54.0
336.0
900.0
SNPlex™ Lamda Exonuclease
75.2
37.6
21.6
134.4
360.0
SNPlex™Exonuclease
37.6
18.8
10.8
67.2
180.0
1880.0
940.0
540.0
3360.0
9000.0
Reagent
Total
† 376 reactions per plate × volume for one reaction.
‡ 94 tips in source plate × 10µL per tip.
§ Transfer losses for transferring bulk mixture into 96-well source plate.
†† Use the volumes in this column to prepare the reagents. Refer to the SNPlex™ Genotyping System 48-plex User Guide for per reaction
volumes. Volumes given in this table include allowances for dead volume and excess volume for pipetting losses. For more information about
calculating dead volumes, refer to the SNPlex™ Genotyping System 48-plex General Automation Getting Started Guide .
2. Add 90 µL of the Exonuclease mix into each well of a skirted 96-well plate,
excluding G12 and H12, then centrifuge the plate briefly to collect the contents at
the bottom of the wells.
Mix 1
1
Mix 1
2
3
4
5
6
7
8
9
10
11
12
A
B
90 µL
C
D
E
F
G
H
Leave wells G12 and H12 empty
Notes
SNPlexTM Genotyping System 48-plex Automating OLA Using the Biomek FX Getting Started Guide
55
5
Chapter 5 Purifying OLA Products (Exonuclease)
G
C
G
Running Biomek FX Method 2 (Exo)
Running This
Method
1. Remove the tips corresponding to well positions G12 and H12 from every tip box.
1
2
3
4
5
6
7
8
9
10
11
12
A
B
C
D
E
F
G
H
Remove tips from wells G12 and H12
2. Place eight uncovered tip boxes and plates on the deck as shown in the following
figure, placing an ACME adapter for the Thermal Exchange ALP underneath each
OLA plate.
Plate
Position
OLA1 to OLA4
P5 to P8
Exo Mix
P18
Uncovered tip
box
P9 to P16
Deck Layout 1
3. Start the method using 2_SNPLEXv5_EXO.bmt.
4. When the method pauses, verify the deck layout and click OK to continue.
5. When the method pauses again, remove and discard the eight used tip boxes.
Notes
56
SNPlexTM Genotyping System 48-plex Automating OLA Using the Biomek FX Getting Started Guide
Chapter 5 Purifying OLA Products (Exonuclease)
G
Running Biomek FX Method 2 (Exo)
C
G
6. Remove the tips corresponding to well positions G12 and H12 from eight new
uncovered tip boxes and place them on the deck as shown in the deck layout below.
Plate
Position
OLA1 to OLA4
P5 to P8
Exo_Mix
P18
Uncovered tip
box
P9 to P16
Deck Layout 1
7. Click OK to continue the method.
8. After the method completes, remove all eight used tip boxes and the Exo_Mix plate.
9. Remove, seal, and briefly centrifuge the OLA reaction plates (OLA1 to OLA4).
10. Proceed to “Thermal Cycling the OLA Reactions.”
Thermal Cycling
the OLA
Reactions
Next Steps
Thermal cycle the OLA plates using the following conditions:
Step
Step Type
Temperature ( °C)
Time
1
HOLD
37
90 min
2
HOLD
80
10 min
3
HOLD
4
∞
5
At this point, the OLA purification reaction is complete. Proceed to Chapter 6, “Diluting
the Purified OLA Product.”
Notes
SNPlexTM Genotyping System 48-plex Automating OLA Using the Biomek FX Getting Started Guide
57
Chapter 5 Purifying OLA Products (Exonuclease)
G
C
G
Running Biomek FX Method 2 (Exo)
Notes
58
SNPlexTM Genotyping System 48-plex Automating OLA Using the Biomek FX Getting Started Guide
Chapter 6
Diluting the Purified OLA Product
G
C
G
Introduction
Setting Up the
Biomek FX for
Automating the
SNPlex System
Assay
G
C
Performing OLA
Using Dry DNA
G
C
Performing OLA
Using Wet DNA
Purifying OLA
Products
(Exonuclease)
G
G
C
OR
Overview
Diluting the Purified
OLA Product
G
C
See page 60
G
6
Running Biomek FX
Method 3 (Dilution)
B
See page 61
Setting Up the
PCR Reactions
Notes
SNPlexTM Genotyping System 48-plex Automating OLA Using the Biomek FX Getting Started Guide
59
Chapter 6 Diluting the Purified OLA Product
G
C
G
Overview
Overview
This chapter provides information on how to dilute SNPlex OLA reaction plates,
previously purified by exonuclease, using the Biomek FX liquid handling instrument to
dispense nuclease free water.
Where You Are In
the SNPlex
System Assay
Workflow
Design and order
SNPlex ligation probes
Phosphorylate and
ligate probes,
linkers, and
gDNA (OLA wet)
Purify OLA products
(Exonuclease)
PCR Laboratory
Run PCR
Prepare hybridization plates
and bind PCR product
to plates
Add denaturant, isolating
biotinylated strand on
hybridization plate
Hybridize ZipChute™ probes
Elute ZipChute probes
Amplification
Kit
Dilute purified OLA product
Prepare PCR reactions
Hybridization Reagents and Kits
Phosphorylate and
ligate probes,
linkers, and
gDNA (OLA dry)
Oligonucleotide
Ligation Kit
Prepare gDNA
Purification
Kit
OLA Laboratory
Design sample plate layout
Prepare sample plates
for electrophoresis
Assay Standards Kit
About this
Chapter
Create results groups
and plate records
Load and run
sample plates
Analyze data in
GeneMapper software v3.7
Notes
60
SNPlexTM Genotyping System 48-plex Automating OLA Using the Biomek FX Getting Started Guide
Chapter 6 Diluting the Purified OLA Product
G
Running Biomek FX Method 3 (Dilution)
G
C
Running Biomek FX Method 3 (Dilution)
About this
Method
Preparing the
Reagent
Running This
Method
This method uses two deck layouts. The first deck layout adds water to OLA reaction
plates OLA1 and OLA2. The second deck layout adds water to OLA reaction plates
OLA3 and OLA4. The well contents are mixed each time after the water is dispensed.
Add 50 mL of nuclease-free water to an Axygen reservoir.
1. Remove the tips corresponding to well positions G12 and H12 from eight tip boxes.
1
2
3
4
5
6
7
8
9
10
11
12
A
B
C
D
E
F
G
H
Remove tips from wells G12 and H12
2. Place the eight uncovered tip boxes, the water reservoir, and plates on the deck as
shown in the deck layout below.
Plate
Position
OLA1 to OLA4
P5 to P8
Water
P18
Uncovered tip
box
P9 to P16
Deck Layout 1
3. Start the method using 2_SNPLEXv5_EXO_DILUTION.bmt.
4. When the method pauses, click OK to continue.
6
5. When the method next pauses, remove and discard the eight used tip boxes.
Notes
SNPlexTM Genotyping System 48-plex Automating OLA Using the Biomek FX Getting Started Guide
61
Chapter 6 Diluting the Purified OLA Product
G
C
G
Running Biomek FX Method 3 (Dilution)
6. Remove tips corresponding to well positions G12 and H12 from eight new
uncovered tip boxes and place them and the plates on the deck as shown in the deck
layout below.
Plate
Position
OLA1 to OLA4
P5 to P8
Water
P18
Uncovered tip
box
P9 to P16
Deck Layout 2
7. Click OK to continue the method.
8. After the method completes, remove all eight used tip boxes and the water reservoir.
9. Remove, seal, and briefly centrifuge the OLA reaction plates (OLA1 to OLA4).
Next Steps
Store the plates if they will not be immediately used to prepare PCR reactions.
Otherwise, return the plates to their positions on the deck to prepare PCR reactions.
Proceed to Chapter 7, “Setting Up the PCR Reactions.”
Notes
62
SNPlexTM Genotyping System 48-plex Automating OLA Using the Biomek FX Getting Started Guide
Chapter 7
Setting Up the PCR Reactions
B
Introduction
Setting Up the
Biomek FX for
Automating the
SNPlex System
Assay
G
C
Performing OLA
Using Dry DNA
OR
G
C
Performing OLA
Using Wet DNA
Overview
G
G
C
Preparing the Reagents
G
C
G
See page 65
Diluting the Purified
OLA Product
Running Biomek FX
Method 4 (PCR)
B
See page 64
Purifying OLA
Products
(Exonuclease)
See page 66
Setting Up the
PCR Reactions
7
Notes
SNPlexTM Genotyping System 48-plex Automating OLA Using the Biomek FX Getting Started Guide
63
Chapter 7 Setting Up the PCR Reactions
B
Overview
Overview
About this
Chapter
This chapter provides information on how to prepare four SNPlex PCR reaction plates
from four SNPlex OLA reaction plates using the Biomek FX liquid handling instrument.
Assumptions
This protocol assumes that four 384-well SNPlex OLA reaction plates are available and
the contents previously exonuclease purified and diluted. One Biomek FX method is
available for assembling the SNPlex system-based PCR reactions.
Where You Are In
the SNPlex
System Assay
Workflow
Phosphorylate and
ligate primers to
gDNA (OLA wet)
Purify OLA products
(Exonuclease)
Prepare hybridization plates
and bind PCR product
to plates
Add denaturant, isolating
biolinylated strand on
hybridization plate
Hybridize ZipChute™ probes
Elute ZipChute probes
Amplification
Kit
Dilute purified OLA product
Prepare PCR reactions
Hyridization Kit
Phosphorylate and
ligate probes to
gDNA (OLA dry)
Oligonucleotide
Ligase Kit
Prepare gDNA
Run PCR
Prepare sample plates
for electrophoresis
Assay Standards Kit
PCR Laboratory
Design sample plate layout
Purification
Kit
OLA Laboratory
Design and order
SNPlex ligation probes
Create results groups
and plate records
Load and run
sample plates
Analyze data in
GeneMapper software v3.5.1
Notes
64
SNPlexTM Genotyping System 48-plex Automating OLA Using the Biomek FX Getting Started Guide
Chapter 7 Setting Up the PCR Reactions
Preparing the Reagents
B
Preparing the Reagents
Preparing the
PCR Mix
1. Thaw the SNPlex™ System Amplification Kit components at room temperature.
2. Label a skirted 96-deep well plate PCR Mix.
3. Label a 15-mL centrifuge tube.
4. Combine the following volumes of reagents in a 15-mL centrifuge tube and mix
thoroughly.
Automated
Manual
Automation Losses
Automation Totals
Volume (µL) for
One 384-well
Plate †
Source Plate
Dead Volume
(µL) ‡
Transfer Loss
Excess (µL) §
Total Volume
(µL) for One
384-well
Plate
Total Volume
(µL) for Four
384-well
Plates ††
Nuclease Free Water
909.9
287.2
198.1
1395.2
4125.0
SNPlex™
1880.0
593.4
409.3
2882.7
8522.7
SNPlex™ Amplification
Primers
188.0
59.3
40.9
288.3
852.3
Total
2977.9
940.0
648.3
4566.2
13500.0
Reagent
Amplification Master
Mix
† 376 reactions per plate × volume for one reaction.
‡ 94 tips in source plate × 10µL per tip.
§ Transfer losses for transferring bulk mixture into 96-well source plate.
†† Use the volumes in this column to prepare the reagents. Refer to the SNPlex™ Genotyping System 48-plex User Guide for per reaction
volumes. Volumes given in this table include allowances for dead volume and excess volume for pipetting losses. For more information about
calculating dead volumes, refer to the SNPlex™ Genotyping System 48-plex General Automation Getting Started Guide.
5. Add 140 µL of the PCR master Mix into each well of a skirted 96-well PCR plate,
excluding wells G12 and H12, then centrifuge the plate briefly to collect the
contents at the bottom of the wells.
Mix 1
1
Mix 1
2
3
4
5
6
7
8
9
10
11
12
A
B
140 µL
C
D
E
F
G
H
Leave wells G12 and H12 empty
6. Label four 384-well ABI PRISM® clear optical reaction plates PCR1 to PCR4.
7
Notes
SNPlexTM Genotyping System 48-plex Automating OLA Using the Biomek FX Getting Started Guide
65
Chapter 7 Setting Up the PCR Reactions
B
Running Biomek FX Method 4 (PCR)
Running Biomek FX Method 4 (PCR)
About this
Method
Running the
Method
This method uses two deck layouts. The first deck layout adds PCR mix to all PCR
reaction plates PCR1 to PCR4 and transfers aliquots from OLA1 and OLA2 to PCR1
and PCR 2, respectively. The second deck layout transfers aliquots from OLA3 and
OLA4 to PCR3 and PCR4, respectively.
1. Remove the tips corresponding to well positions G12 and H12 from nine tip boxes.
1
2
3
4
5
6
7
8
9
10
11
12
A
B
C
D
E
F
G
H
Remove tips from wells G12 and H12
2. Place an ACME adapter underneath each PCR plate, then place the nine uncovered
tip boxes and the plates on the deck as shown in the deck layout below.
Plate
Position
PCR1 to PCR4
P1 to P4
OLA1 to OLA4
P5 to P8
PCR Mix
P18
Uncovered tip
box
P17, P9 to
P16
Deck Layout 1
3. Start the method using 2_SNPLEXv5_PCR.bmt.
4. When the method pauses, click OK to continue.
5. When the method next pauses, remove and discard the eight used tip boxes.
Notes
66
SNPlexTM Genotyping System 48-plex Automating OLA Using the Biomek FX Getting Started Guide
Chapter 7 Setting Up the PCR Reactions
Running Biomek FX Method 4 (PCR)
B
6. Remove the tips corresponding to well positions G12 and H12 from eight new
uncovered tip boxes and place them on the deck as shown in the deck layout below.
Plate
Position
PCR1 to PCR4
P1 to P4
OLA1 to OLA4
P5 to P8
PCR Mix
P18
Uncovered tip
box
P17, P9 to
P16
Deck Layout 2
7. Click OK to continue the method.
8. After the method completes, remove the used tip boxes and discard the PCR Mix
plate.
9. Remove, seal, and store the OLA reaction plates.
10. Remove, seal, and briefly centrifuge the PCR plates (PCR1 to PCR4).
Next Steps
At this point, move the PCR plates to the PCR lab to complete thermal cycling and the
rest of the steps in the SNPlex System assay workflow.
IMPORTANT! Never move equipment, containers, or other items from the PCR
Laboratory or data collection area into the OLA Laboratory.
OLA
Lab
PCR
Lab
OLA
Lab
PCR
Lab
7
Notes
SNPlexTM Genotyping System 48-plex Automating OLA Using the Biomek FX Getting Started Guide
67
Chapter 7 Setting Up the PCR Reactions
B
Running Biomek FX Method 4 (PCR)
Notes
68
SNPlexTM Genotyping System 48-plex Automating OLA Using the Biomek FX Getting Started Guide
Worldwide Sales and Support
Applied Biosystems vast distribution and
service network, composed of highly trained
support and applications personnel,
reaches 150 countries on six continents.
For sales office locations and technical support,
please call our local office or refer to our
Web site at www.appliedbiosystems.com.
Applera is committed to providing the
world’s leading technology and information
for life scientists. Applera Corporation
consists of the Applied Biosystems and
Celera Genomics businesses.
Headquarters
850 Lincoln Centre Drive
Foster City, CA 94404 USA
Phone: +1 650.638.5800
Toll Free (In North America): +1 800.345.5224
Fax: +1 650.638.5884
06/2005
www.appliedbiosystems.com
Part Number 4360796 Rev. B