1
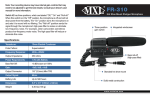
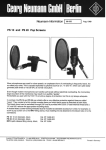
-150
DSLR/VIDEO
MICROPHONE
PRODUCT
MANUAL
1
THANK YOU FOR CHOOSING POLSEN.
The Polsen VM-150 DSLR-Video microphone is a sleek and
compact directional condenser microphone that is designed to
deliver professional-sounding audio to a DSLR, video camera, or
audio recorder. It is ideal for professionals recording in the field
or a studio, but it will also enhance home video recordings.
Unlike omnidirectional microphones built into most cameras,
the VM-150’s supercardioid polar pattern and shotgun design
offer great clarity and focus when recording voices or dialog.
The VM-150 is optimized to focus on the sound directly
in front of it while rejecting off-axis sound, making it an
ideal microphone for anyone recording speech or dialog
in noisy environments. Other features like adjustable gain
sensitivity and a high-pass filter further ensure clear and
natural sound with minimal background noise or rumble.
2
DSLR/VIDEO
MICROPHONE
VM-150
The VM-150 includes an integrated shock mount to minimize vibrations from the camera or
motion noise from a boom pole. The shoe-mount adapter fits any shoe-mount attachment
and includes a metal 1/4“-20 threaded socket for attaching to boom poles. The compact
and lightweight design assures that the VM-150 will never weigh down your rig or extend
out into the picture frame. It runs on a single AAA battery (included) and comes with a foam
windscreen for added protection against vocal plosives and wind noise.
Among the benefits you’ll enjoy:
• Compact and lightweight design
• Supercardioid polar pattern
• Adjustable gain sensitivity
• Low-cut filter
• Integrated shock mount with shoe-mount adapter
• 1/4”-20 metal threaded socket for boom pole attachment
• 3.5 mm audio connection
• LEDs indicating power on/off and signal overload
3
PREC AUTIONS
• Please read and follow these instructions, and refer to this manual in case of questions.
Keep this manual in a safe place.
• Keep this product away from water and any flammable gases or liquids.
• Do not attempt to disassemble or repair the equipment yourself.
• Handle this product with care.
• Clean the product with a soft dry cloth.
• Before use, make sure that this product is intact and that there are no missing parts.
• All photos are for illustrative purposes only.
• Do not leave the batteries in this product for long periods of non-use. Batteries can leak and
damage the microphone.
4
OVERVIEW
1. Sound overload indicator
2. Power indicator
3. Sensitivity switch
(-10 dB / 0 dB)
4. Power / Low-Cut switch
5. Battery compartment
6. Shock Mount
7. Mounting foot with 1/4”-20
threaded socket
8. Locking wheel
9. 3.5 mm mini plug connector
1. 2.
3.
4.
-10dB
OdB
OFF ON LOW CUT
5.
6.
8.
7.
9.
5
I N S TA L L I N G T H E B AT T E R Y
The VM-150 operates on one AAA battery (included). To install the battery, do the following:
1. Unlock the battery compartment by pushing the battery
compartment latch. The battery compartment swings open
from the back of the microphone.
Note: The battery compartment cover is attached by a
hinge. Do not try to detach the battery compartment cover
from the microphone.
2. Insert the battery with the orientation indicated by the diagram inside the compartment.
3. Close the battery compartment cover by snapping it into place.
Important: Battery life is approximately 100 hours of normal operation. If the overload
indicator glows a constant red even when not recording, the battery is low and should
be replaced.
6
M O U N T I N G T H E V M - 15 0
Shoe Mount
The VM-150 mounts onto a DSLR or video camera with
the shoe-mount adapter under the shock mount. To
attach the VM-150 to the shoe mount of a DSLR camera,
do the following:
1. Loosen the locking wheel by turning it
counterclockwise.
2. Securely hold the microphone and the camera.
3. Gently slide the microphone’s mounting foot into the
camera’s shoe mount so that it is fully seated.
4. Tighten the locking wheel by turning it clockwise until the microphone
is held securely in place.
7
Mic Boom Pole
The mounting foot adapter of the VM-150 comes with a
threaded 1/4”-20 socket for attaching to a boom pole.
To attach the microphone to a boom pole, do the following:
1. Position the microphone so that the threaded post at the
end of the boom pole is aligned with the threaded socket
of the VM-150.
2. Screw the boom pole into the threaded socket until the
microphone is secure.
Note: In some cases, a 1/4”-20 to 3/8” adapter
(sold separately) will be needed for boom pole
attachment.
8
Making the audio connection
The VM-150 must be connected to the audio input jack of your camera or audio recorder to
record sound.
1. Make sure the power button of the VM-150 is in the ON or LOW-CUT position.
2. Connect the VM-150 by plugging the 3.5 mm mini plug into the audio input/mic input jack
of your camera or recorder.
3. If using a boom pole, you will need an extension cable (sold separately).
9
R E C O R D I N G W I T H T H E V M - 15 0
Once the VM-150 is securely attached and connected to the camera or recorder, follow these
steps to begin recording.
Pro Tip: Before recording a complete take, it is always advisable to do a test recording and
listen to the playback. This will assure that the settings selected on the VM-150 will result in
optimal recording quality.
Turning on the power and selecting a filter
1. Turn the VM-150 microphone on by moving the power button to the ON or LOW-CUT
position. The power indicator will glow a constant blue to indicate normal operation.
2. At the ON position, the VM-150 will record with a flat response.
3. Selecting LOW CUT will roll off low-end frequencies.
The low-cut filter minimizes rumble, room noise, or machine sound from
the camera or recorder.
10
Using the Gain Button
The VM-150 offers two settings determining the microphone’s sensitivity. This button should
be used if normal audio is too loud and is causing distortion.
1. If the red indicator is blinking during recording, it indicates that the sound is overloading.
Select the -10 dB position.
2. If normal audio is not overloading the microphone, leave the button set to 0 dB.
Setting the level on the Camera or Recorder
You may have to set the input level on your camera or recorder. Some DSLR cameras,
camcorders, and audio recorders allow the user to access the recording level via the device’s
menus. If you are adjusting the input level manually, set the level so that the meter reads
slightly below maximum level at the loudest points (“peaks”) of your test audio. Consult the
manual of your camera or recorder for more information.
11
Using the Windscreen
The VM-150 should always be operated with the attached foam windscreen. It minimizes
vocal plosives and breath noise during up-close microphone placement and will also minimize
wind noise.
12
S P E C I F I C AT I O N S
P O L A R PAT T E R N Supercardioid
F R E Q U E N C Y R A N G E 50 Hz – 20 kHz
S E N S I T I V I T Y -42 dB (6.2m V/Pa)
H I G H - PA S S F I LT E R 80 Hz/12 dB/octave
M A X I M U M S O U N D P R E S S U R E L E V E L 110 dB
S I G N A L T O N O I S E R AT I O 74 dB SPL
O U T P U T I M P E DA N C E 10K Ω
P O W E R R E Q U I R E M E N T AAA Battery (1)
B AT T E R Y L I F E ( A P P R O X I M AT E ) 100 hours (normal use)
O U T P U T C O N N E C T O R 3.5 mm stereo mini plug
C A B L E L E N G T H ( C O I L E D T O E X T E N D E D ) 1’ (0.3 m) – 4’ (1.2 m)
O U T E R C A S E ABS construction
DIMENSIONS (WITH SHOCK MOUNT & WIND SCREEN) (L × W × H)
5.2” (13.2 cm) × 1.1” (2.8 cm) × 2.7” (6.9 cm)
W E I G H T ( W I T H B AT T E R Y ) 3.2 oz. (90.7 g)
13
TROUBLESHOOTING
Problem
Solution
No sound was
recorded
Make sure that a fresh AAA battery is installed and correctly oriented in the battery
compartment. (See “Installing the Battery” instructions on page 6.)
Make sure the power switch on the microphone is set to the ON or LOW-CUT position.
Make sure the 3.5 mm mini plug is connected to the correct audio input/mic input jack
on the device to which you are recording.
The sound is
distorted
Make sure the 3.5 mm mini plug is fully plugged into the audio input jack of your
camera or recorder.
Make sure the gain sensitivity switch is set to -10 dB.
If your camera or device has an input control, decrease the mic gain (audio input level)
on your camera until the meter reads below peak level at the loudest point of the
audio.
Reposition the VM-150 further away from the sound source. (See: “Pro Tip” under
Recording with the VM-150 on page 10.)
14
Problem
Solution
The recording
level is too low
Make sure the gain sensitivity switch is set to 0 dB.
If your camera or device has an input control, increase the mic gain (audio input level)
on your camera until the meter reads slightly below peak level at the loudest point of
the audio.
Reposition the VM-150 closer to the sound source. (See: “Pro Tip” under Recording with
the VM-150 on page 10.)
Overload indicator The battery is low and should be replaced.
won’t turn off
The microphone
is stuck in the
camera’s shoe
mount
Make sure the locking wheel is fully loosened.
Important: The microphone should easily mount and dismount. Do not apply force by
trying to pull the VM-150 off the camera. You could damage the microphone and the
camera.
15
O N E -Y E A R L I M I T E D WA R R A N T Y
This Polsen product is warranted to the original purchaser to be free from defects in materials and workmanship under
normal consumer use for a period of one (1) year from the original purchase date or thirty (30) days after replacement,
whichever occurs later. The warranty provider’s responsibility with respect to this limited warranty shall be limited solely
to repair or replacement, at the provider’s discretion, of any product that fails during normal use of this product in its
intended manner and in its intended environment. Inoperability of the product or part(s) shall be determined by the
warranty provider. If the product has been discontinued, the warranty provider reserves the right to replace it with a
model of equivalent quality and function.
This warranty does not cover damage or defect caused by misuse, neglect, accident, alteration, abuse, improper
installation or maintenance. EXCEPT AS PROVIDED HEREIN, THE WARRANTY PROVIDER MAKES NEITHER ANY EXPRESS
WARRANTIES NOR ANY IMPLIED WARRANTIES, INCLUDING BUT NOT LIMITED TO ANY IMPLIED WARRANTY OF
MERCHANTABILITY OR FITNESS FOR A PARTICULAR PURPOSE. This warranty provides you with specific legal rights, and
you may also have additional rights that vary from state to state.
To obtain warranty coverage, contact the Polsen Customer Service Department to obtain a return merchandise
authorization (“RMA”) number, and return the defective product to Polsen along with the RMA number and proof of
purchase. Shipment of the defective product is at the purchaser’s own risk and expense.
For more information or to arrange service, visit www.polsenaudio.com or call Customer Service at 212-594-2353.
Product warranty provided by the Gradus Group.
www.gradusgroup.com
Polsen is a registered trademark of the Gradus Group. © 2014 Gradus Group LLC. All Rights Reserved.
16
GG2