1
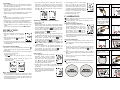
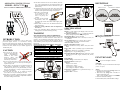
Step 11. Press Zero (▼)
or MAX/MIN (▲) to
adjust Display's values to
1006 um. See the Step 12.
Step 12. Display's values
to 1006 um.
Î
Step 13. Press “CAL”
again
Step 14. The 2-Pt will
disappear, this means that
the calibration is complete. And can start measuring
Î
OPERATION
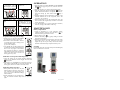
1. Keep the meter away any substrate or any magnetic
field. Pull the trigger to power on, and wait for “run”
sign.
and
2. Press the sensing tip to contact coated surface tightly.
sign will
3. Pull the trigger and release immediately.
appear when measurement is completed. DO NOT resign is
move the sensing tip from surface until
shown.
4. Substrate material will be indicated accordingly. If the
substrate material can not be recognized, “Ferr” and
“Non-Ferr” are not shown.
5. When the thickness is over the measurement range, the
LCD will show the original data, and there is one sound
“beep” announced.
6. Use “MAX/MIN” key to switch maximum, minimum,
max-min, average, and number of data log.
MAINTENANCE
Battery Replacement
Frequent Calibrating Point Setting:
1. When power is off, hold “MAX/MIN”
key and pull the trigger to power on.
2. LCD shows “SET” and “dFut”. Wait for
2 seconds until it shows reading of frequent calibrating point.
eg. 39.6 mils (1006µm).
3. Use ▲ or ▼ key to adjust reading until
it matches the frequent calibrating point.
Press “CAL” key again to exit calibration program and return to operation.
This thickness point will be saved to the
meter. Users do not have to set this calibrating point every time.
1. Power is supplied by a 9 volt “transistor” battery
(NEDA 1604, IEC 6F22). If the LCD shows “ ”, it
means the battery replacement is need.
2. Pull off battery cover “ ”.
3. Remove the battery cover by gently sliding it onwards
the bottom of the meter.
4. Remove and disconnect the old battery from the meter
and replace with a new unit. Wind the excess lead
length and put the top of battery beneath the battery
chamber. Install the battery and put the battery cover.
Cleaning
Periodically wipe the case with a damp cloth and detergent,
do not use abrasives or solvents.
Calibration on Frequent Calibrating Point:
1. Press the sensing tip to contact frequent calibrating
surface on the substrate. Pull the trigger and wait until
sign appears.
2. Hold “Zero” key for longer than 2 seconds. The meter
will calibrate automatically to match the frequent calibrating point, which was saved in the meter earlier.
Calibrating Point Clearance:
1. When power is off, hold “Zero” key and
pull the trigger to power on. LCD shows
“Clr” and “Set”. The zeroing point, one
point, or two point calibration readings
will be deleted.
2. When calibration is not operated properly, the clearance function helps users to start over
again.
Ä
Caution
Ver 1.7 02/14/11