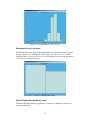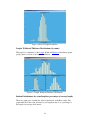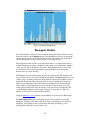
1
SeedCount User’s Guide
Digital Image Analysis System for Grain
Version 2.4.0
Weiss Enterprises
SeedCount Australasia Pty Ltd
SeedCount™
Trade Mark of Weiss Enterprises
United States Office
Marvin Weiss
Weiss Enterprises
Marvin Weiss
51 Turtle Bay Dr.
Branford, CT USA 06405
Ph 203 488 6930
Australian Office
Bruce Armstrong
SeedCount Australasia Pty Ltd
289 Stag Rd.
Kingston, Vic Australia 3364
Ph 03 5345 7367 Mobile 0428 457 363
[email protected]
Website:
http://www.seedcount.com.au
Please go to the Website for the contact details of our Distributors.
Copyright 1999 - 2008
The SeedCount system has been developed by Weiss Enterprises and SeedCount
Australasia in conjunction with:
The University of Ballarat
Mt Helen, Victoria, Australia
Wrightson Research
Christchurch, New Zealand
Sustainable Rice Cooperative Research Center
Yanco, New South Wales, Australia
SeedCount has been submitted for classification as a Registered Trademark.
SeedCount (US Patent 6,418,180) is based on ColonyCount. (US Patent 6,381,353).
SeedCount Tray US Patent 7,184,575.
2
Table of Contents
SeedCount User’s Guide ........................................................................................... 1
Table of Contents ...................................................................................................... 3
Introduction to SeedCount™ ..................................................................................... 6
Contents of this Chapter ........................................................................................ 6
What is SeedCount? .............................................................................................. 6
How Does SeedCount Work? ................................................................................ 6
What Does SeedCount Test?.................................................................................. 7
Unpacking and Installation ........................................................................................ 9
Contents of this Chapter ........................................................................................ 9
Hardware Package................................................................................................. 9
Software Provided ................................................................................................. 9
Accessories ........................................................................................................... 9
Installation........................................................................................................... 10
Pre-Configured Computer................................................................................ 10
Software Installation for User-Supplied Computers ......................................... 10
Scanner Cabinet (SC3 systems only)................................................................ 12
Scanner Cabinet (SC4 systems only)................................................................ 12
Operating Environment ....................................................................................... 13
Registration ......................................................................................................... 13
Authorised Modules ............................................................................................ 13
Basic Procedures ..................................................................................................... 15
Contents of this Chapter ...................................................................................... 15
Starting SeedCount.............................................................................................. 15
Options................................................................................................................ 16
Obtaining a Sample and Filling the Tray.............................................................. 24
Scanning Samples................................................................................................ 27
Opening Grain Images......................................................................................... 28
Multi-Tray Mode ............................................................................................. 28
Contents of the Data Analysis File....................................................................... 28
Wheat and Barley ............................................................................................ 28
Medium and Arborio Rice ............................................................................... 29
Long Grain Rice .............................................................................................. 29
Saving Data Files ................................................................................................ 29
Importing a Data File into Excel™ ...................................................................... 31
Results Summary Pages....................................................................................... 31
Maintenance ........................................................................................................ 32
How SeedCount Works ........................................................................................... 33
Introduction......................................................................................................... 33
Contents of this Chapter ...................................................................................... 33
Mini Test Weight (Hectoliter Weight) ................................................................. 33
Detection of Dockage .......................................................................................... 33
Counting Seeds.................................................................................................... 34
Calculating the Kernel Weight............................................................................. 34
Tray Design......................................................................................................... 34
Aspect Ratio........................................................................................................ 35
Roundness ........................................................................................................... 35
Screening Equivalents ......................................................................................... 36
3
Graphs................................................................................................................. 36
Thickness Distribution (by count) .................................................................... 36
Length Distribution (by count)......................................................................... 37
Area Distribution (Width section) .................................................................... 37
Blackpoint Severity (by count) ........................................................................ 38
Kernel Weight Distribution (by count)............................................................. 38
Length, Width and Thickness Distributions (by count)..................................... 39
Broken Distributions (by actual length or percentage of average length) .......... 39
Blackpoint Module .............................................................................................. 40
Bin-burn and Fungal Staining .............................................................................. 41
Manual Editing of Blackpoint Seeds.................................................................... 41
Kernel Brightness and White Seeds ..................................................................... 42
Chalk Module...................................................................................................... 42
Discoloured Kernels and Paddy Rice ................................................................... 42
Additional Procedures ............................................................................................. 45
Contents of this Chapter ...................................................................................... 45
Setting up the Scanner ......................................................................................... 45
Counting Out a Fixed Number of Seeds............................................................... 45
Analyzing Small Samples.................................................................................... 46
Navigating in the Scan Window .......................................................................... 46
Examining individual Seeds ................................................................................ 46
Varietal Identification.......................................................................................... 47
Displaying Ranges of Seed Measurements........................................................... 47
To display a range of object sizes .................................................................... 47
Display guidelines ........................................................................................... 47
To display overlapping clumps of two or more seeds ....................................... 48
To Display Dockage ........................................................................................ 48
Backing up Scanned Images and Data files.......................................................... 48
Glossary of Terms ................................................................................................... 49
Troubleshooting ...................................................................................................... 51
Contents of this Chapter ...................................................................................... 51
Can’t Communicate with Scanner........................................................................ 51
Accuracy seems to be Poor .................................................................................. 51
Data was Cleared from my Input Boxes............................................................... 52
Hull-less barley results seem wrong..................................................................... 52
Image won’t open in my Image Editor................................................................. 52
Image Format is Wrong ....................................................................................... 52
Opening the Image makes SeedCount crash......................................................... 52
Too Numerous to Count ...................................................................................... 53
This Tray has an Unbalanced Distribution of Grain ............................................. 53
Vertical Colored Stripes in the Image .................................................................. 53
Tray is too Tight to Fit into Cabinet Cradle.......................................................... 53
Error Not Listed Above ....................................................................................... 53
Analysis Accuracy................................................................................................... 54
SeedCount Precision Estimates............................................................................ 54
Getting Help............................................................................................................ 56
Contact Information............................................................................................. 56
Help Desk ........................................................................................................... 56
Online Help......................................................................................................... 56
Appendix A – Using the Sampling Tube ................................................................. 57
4
To use the Tube:.................................................................................................. 57
Appendix B - Standard Cup Volumes...................................................................... 59
Rice, Wheat and Barley Cup Sizes....................................................................... 59
Appendix C – Crease Detection and Virtual Seeds .................................................. 60
Detection of Seed Creases ................................................................................... 60
Generation of Virtual Seeds................................................................................. 60
Appendix D – Data Files ......................................................................................... 61
Long Grain Rice .................................................................................................. 61
Medium and Arborio Rice ................................................................................... 64
Wheat and Barley ................................................................................................ 66
Summary Page ........................................................................................................ 68
SeedCount - xxxx results ............................................................................. 68
Sample Details......................................................................................... 68
Date ......................................................................................................... 68
Time ........................................................................................................ 68
Appendix F – Typical Grain Images ........................................................................ 70
Barley.................................................................................................................. 70
Wheat.................................................................................................................. 71
Rice..................................................................................................................... 72
5
Introduction to SeedCount™
Contents of this Chapter
•
•
How Does SeedCount Work?
What Does SeedCount Test?
What is SeedCount?
SeedCount is a digital imaging system specifically designed for the grain industry. It
uses software and scanner technology to rapidly and accurately analyze a sample of
grain and determine its principal characteristics. It generates detailed data tables that
can be exported to any spreadsheet or database program. It provides this detailed
information without damaging the grain sample.
SeedCount is currently offered for barley, wheat, rice and corn analysis. Future
versions will include additional trays and calibrations for other grains and cereals.
SeedCount is essential for anyone who grows, sells, buys or uses grain and/or assesses
its quality. Potential users are breeders, brewers, dealers, growers, food processors,
maltsters, millers, etc.
NOTE: There is a separate Corn interface and manual, please refer to the manual for
more information.
WARNING: Before running the program users should read the user’s Guide supplied
on the installation CD.
How Does SeedCount Work?
This section presents a brief overview of how SeedCount works. More detailed
information is given in Chapter 4: How SeedCount Works.
SeedCount uses a modified flatbed desktop scanner and a Microsoft™ Windowsbased personal computer to create a digital image of a sample of grain, and then
analyse the image. The scanner operates facing down inside the instrument cabinet.
See Figure 1.
Figure 1: SeedCount Tray in Scanner Cabinet
6
A sub-sample of the grain is obtained with the sampling tube (See Appendix A) The
tube collects a sample "core" from all levels in a bucket or small bag of grain. The
tube contents are transferred to a volumetric cup. Up to 718 barley, 1000 wheat,1300
rice or 316 corn kernels can be analyzed at once.
The sample is placed on a special indented tray, visible in Figure 1 and shaken to
distribute the seeds into the shaped indents. The indents have varying shapes allowing
some seeds to fall into wide, shallow indents and lie on their back. In this position the
length, width and area of the seeds can be measured. Other seeds fall into narrower
indents and are held on their edge. When on their edge their thickness can be
measured. Some grains, e.g. corn, also use end-on indents for viewing the crown
directly.
The tray is placed in the scanner cabinet. SeedCount then scans the sample at 300 dpi
in 16.8 million colours. The image can be saved to the computer’s hard drive as a
lossless JPEG image file or as a BMP file for future reference.
The user must enter the clean weight of the sample and can also enter the initial as-is
weight, moisture percentage, protein percentage and the volume of the sample. The
user and site identification can also be entered.
The grain is not damaged by the scanning process and can be retained for retesting or
used for other purposes.
What Does SeedCount Test?
SeedCount analyses the image and calculates the following quantities:
•
•
•
•
•
•
•
•
•
•
•
•
Average Kernel Length (in mm using whole seeds in the Wide section of the
tray).
Average Kernel Width (using whole seeds in the Wide section of the tray).
Average Kernel Thickness (using whole seeds in the Narrow section of the
tray).
Average Area (area in sq. mm of whole seeds in the Wide section of the tray).
Aspect Ratio
Roundness
Number of whole seeds
Kernel Weight
o As-is basis – weight of 1000 seeds in grams
o Dry basis – weight of 1000 seeds in grams
Test Weight (in kilograms per hectoliter or pounds per bushel)
Dockage (Percentage)
Discolored Kernels.
o Seeds that are either generally dark or moldy
o Seeds that are red or marked with red
o Seeds that are green
o seeds that are yellow
Blackpoint or Blacktip (if enabled by the user)
o Number and percentage of seeds with the defect.
7
Blackpoint Manual Editing (The operator can manually edit the
automatic assessment)
Chalk (if enabled by the user)
o Percentage of seeds with the defect.
o Number of seeds with the defect.
o A score for each seed tested, to help determine its Chalkiness
White Seeds – generally due to exposed endosperm or fusarium infection
CIE L*a*b* – average L, a and b values (and standard deviation) for the
sample.
Screening Distribution (Percent mass corresponding to slotted screen sieving
measurements.)
Kernel classifications for medium, long grain, arborio rice. Some of the Rice
specific classifications include:
o Paddy
o Immature (green) grains
o Red seeds
o Red streaked seeds
o Red specked seeds
o Yellow seeds
o Black seeds
o Black specked seeds
o Discoloured seeds
o
•
•
•
•
•
The program can save all of this data (and more) in a convenient form for use in a
spreadsheet or database.
8
Unpacking and Installation
Contents of this Chapter
•
•
•
•
•
•
•
Hardware Package
Software Provided
Accessories
Installation
Operating Environment
Registration
Authorised Modules
Hardware Package
Your SeedCount hardware package contains the following:
•
•
•
•
•
IBM compatible computer with a minimum configuration of a Core 2 Duo
processor running at 1.86 GHz, 2 Gb of Memory, at least two USB2 ports, a
DVD/RW drive, and a 250 Gb hard drive
SeedCount Scanning Cabinet containing a scanner specially modified for
SeedCount operation
Power supply for the scanner
USB2 cable to connect the scanner to the computer
The corn module requires an additional desktop scanner and a separate tray for
transmitted light measurements.
Software Provided
Your SeedCount software package contains the following:
•
•
•
•
•
•
SeedCount program installed and ready for use
Scanner TWAIN drivers
Windows XP Pro
Tutorial program for getting started rapidly
PDF copy of the manual located in the installed directory
Scientific papers relating to DIA of grain are available on the CD
NOTE: The SeedCount program is copy protected. See the Registration section
below for important information.
Accessories
Your package comes with one of more of the following grain sampling trays,
depending on the grain modules purchased:
•
Barley tray with precision indents that position the barley kernels for digital
imaging measurements.
9
•
•
•
Wheat tray, with precision indents.
Rice tray,with precision indents. Long and medium grain rice trays are
available.
Corn Tray, transmitted and incident light versions.
Additional accessories supplied:
•
•
•
•
•
•
•
•
Printed Manual
Bucket Sampling Tube for obtaining a uniform sample of grain
Volumetric Cups and leveller
Collection tub
Lock Lever Tool (for SC3 systems)
Brush for tray
Duster for scanner
Bamboo Skewer to dislodge stuck kernels
The following are not provided:
•
•
•
•
•
Instrument for measuring moisture
Instrument for measuring protein
Balance accurate to 0.01 gram and able to weigh at least 1,000 grams
Standard 500 ml chondrometer
Fan
Installation
Pre-Configured Computer
The computer is supplied with all software loaded and ready to operate. Unpack the
computer, monitor, keyboard and mouse and connect them together. Connect the
computer power cord to a power outlet, but leave the computer off until the scanner
has been attached.
WARNING: Ensure that the computer's power supply (located in the top at the rear
of the case) and the Scanner Cabinet's power supply are both compatible with your
country's supply voltage.
Software Installation for User-Supplied Computers
WARNING: Install all software, including the scanner driver, and unlock the scanner
head (see for SC3 or SC4 for instructions) before plugging in the scanner cabinet.
You must use the following installation procedure:
The computer used must comply with the requirements given in the manual and have
Windows XP (32 bit version) installed.
1. If you already have a version of SeedCount (either the Full or Demo versions)
on your computer, please uninstall it/them first, using the uninstall option in
10
2.
3.
4.
5.
6.
Windows using the sequence Start, All Programs, SeedCount (and/or
SeedCount Demo), Uninstall.
Install the SeedCount program using the Run, Browse options in Windows.
Use browse to select the SeedCount installation CD and select
SeedCount_Full_Installer, then Run the file. This will install the full version
of SeedCount.
If an old version of SeedCount was already on your computer, replace the
SeedCount.dat file in your Windows directory (or WINNT for Win2000) with
the one in the SeedCount CD.
Install the drivers for the scanner by using the Run feature of Windows again.
This time go into the EpsonDriver directory on the SeedCount CD and select
the Setup file. When requested, choose the Epson Perfection 2480/2580
scanner for SC3 systems or the Epson Perfection 4490 for SC4 systems.
This will give you the software you need to run SeedCount. Registration is
addressed above.
The first time you scan an image, you will need to select your scanner driver
from a list, using File, Select Source from the main SeedCount screen. The
correct drivers using Windows XP are either:
o Epson Perfection 2480/2580 2.65 (32-32) [for SC3 systems]
o Epson Perfection 4490 2.73 (32-32) [for SC4 systems]
WARNING: Sometimes Windows adds its default scanner driver to your scanner list.
It will not produce useable scans and should never be used. It will have a WIA
prefix, looking like:
•
•
WIA-EPSON Perfection 2480/2580 1.0 (32-32)
WIA-EPSON Perfection 4490 1.0 (32-32)
Even if these drivers have not yet appeared in your Select Source list, you must follow
the procedure below to ensure that they will not appear later. The WIA drivers must
be disabled to prevent their use with SeedCount, as they produce discoloured and
unusable scans.
To Disable the WIA drivers in Windows XP:
1. Open the Control Panel
2. Open Administrative Tools (you will need to have administrator status to do
this, or get someone who has that status to set this up for you)
3. Open Services
4. Open Windows Image Aquisition (WIA)
5. Under the General tab, Click on the Stop Button
6. Change the Startup Type to Disabled.
7. Click the Log On tab
8. Click on the Profile(s) used (example Profile1)
9. Click on Disable
10. Click on Apply
11. Click on OK to save the changes
These changes will still allow you to use the genuine Epson scanner drivers, but will
prevent the WIA drivers from becoming available for use. If a new WIA device is
11
plugged into the computer, it may sometimes override these settings and you will
need to disable them again.
We have also supplied a Tutorial on the CD. The Tutorial is somewhat brief, but
comprehensive information is provided in the printed manual and in the online help
files.
Sample images are in the Grain Images folder on the CD, or can be downloaded from
our website.
Scanner Cabinet (SC3 systems only)
1. Remove the cabinet from its package. The scanner carriage is locked during
transport to prevent damage. The carriage must be unlocked before the scanner
can be used.
2. To unlock the scanner, loosen the two screws on the back of the cabinet by
about one full turn each and slide the cover plate across, allowing it to swing
down. Screw the lock lever tool into the hole in the lock lever about three full
turns, then pull the lever back. Unscrew the lever tool and replace the cover. If
the scanner system needs shipping at a later date, open the cover and push in
the lock lever to relock the scanner head before shipping.
3. If you are installing the computer software yourself, you must install the
Epson 2480 scanner driver from the SeedCount software CD before
connecting up the scanner cabinet.
4. Attach the scanner USB and power supply cables securely to the back of the
cabinet.
5. Attach the USB cable to the USB2 port on the back of the computer. Plug the
scanner cabinet power cable into a power outlet.
6. Turn the power on to use the SeedCount system.
NOTE: Retain the packaging, in case you need to return the Scanner Cabinet for
upgrades or servicing.
Scanner Cabinet (SC4 systems only)
1. Remove the cabinet from its package. The scanner carriage is locked during
transport to prevent damage. The carriage must be unlocked before the scanner
can be used.
2. Locate the lock lever through the opening in the end of the cabinet and slide it
to the open position. If the scanner system needs shipping at a later date,
unplug the USB cable and slide the lock lever across the USB socket to relock
the scanner head before shipping.
3. If you are installing the computer software yourself, you must install the
Epson 4490 scanner driver from the SeedCount software CD before
connecting up the scanner cabinet.
4. Attach the scanner USB and power supply cables securely to the connectors at
the end of the cabinet. Note that the USB cable is inserted with the USB
symbol facing down.
5. Attach the USB cable to the USB2 port on the back of the computer. Plug the
scanner cabinet power cable into a power outlet.
12
6. Turn the power on to use the SeedCount system.
NOTE: Retain the packaging, in case you need to return the Scanner Cabinet for
upgrades or servicing.
Operating Environment
To prevent malfunction of SeedCount the cabinet must be operated in the following
conditions:
Operating temperature 15°C (60°F) to 32°C (90°F)
Operating humidity
5% to 80% (non-condensing)
Storage temperature
-10°C (14°F) to 35°C (95°F)
Storage humidity
5% to 90% (non-condensing)
Registration
When you begin running SeedCount the Registration screen will appear, showing a
serial number that is unique for your computer. To register the program, email us at
[email protected] and provide us with your serial number. To ensure that it
is accurate we strongly recommend that you copy and paste the serial number into the
email. Once we have received your email we will provide you with a zipped
licence.zip file which contains your grain module licence file and an installation
procedure file containing your registration code. Unzip the licence.zip file and copy
the extracted SeedCount.lic file to the Windows directory of the new SeedCount
computer. Start SeedCount and copy the registration code from the RegoNum.txt file
and paste it into the registration window.
You will have a grace period of 30 days from the date that SeedCount was first
installed on your computer during which SeedCount will run without being registered.
After that time, SeedCount must be registered for it to continue working. We
recommend that you register SeedCount well before the the grace period ends to
avoid inactivation while waiting for the registration files. After the registration
process is completed, the program will run indefinitely.
The SeedCount software can be copied for backup and archival purposes, but the
registered copy will work only in the computer that it is registered for. SeedCount can
be transferred to another computer or reinstalled after reformatting the current
computer, but the new serial number must be sent to SeedCount and a new
registration number and licence file must be obtained to activate it.
Authorised Modules
SeedCount instruments come with one or more grain modules. The modules that can
be accessed with your installation are indicated by bold text in the grain selection
screen. The others are grayed-out and cannot be accessed. Contact your dealer to
activate additional modules for your SeedCount instrument.
13
14
Basic Procedures
Contents of this Chapter
•
•
•
•
•
•
•
•
•
•
•
Starting SeedCount
Options
Obtaining a Sample and Filling the Tray
Scanning Samples
Opening Grain Images
Multi-tray Mode
Contents of Data Analysis File
Saving Data Files
Importing a Data File into Excel
Results Summary Pages
Maintenance
Starting SeedCount
NOTE: It is recommended that you first view the tutorial that is included in the
SeedCount directory.
1. Open SeedCount and select the grain type you are testing from the Select
Grain Type screen (Figure 2). Grain types authorised for your SeedCount
instrument display in bold. Those not authorised are grayed out.
Figure 2: Grain Selection Screen
WARNING: If the wrong grain type is selected, SeedCount will produce
erroneous results. Please select the correct grain type.
15
2. The Main SeedCount screen (Figure 3) appears.
NOTE: This image shows its appearance after scanning and analyzing a
sample.
Figure 3: The Main SeedCount Screen
Options
The Options Screen can be shown by clicking Options on the Menu Bar at the top of
the main screen.
SeedCount has a number of choices. You can turn off some of the calculation or result
functions, select what happens when you analyze each tray, choose which Grain Type
is used when analyzing the scans and even tell SeedCount to automatically save the
sample data for each image.
16
Figure 4a: Main SeedCount Options Screen
Default Sample Volume: Each time you scan a new sample the Sample Volume will
be reset. To save time you can set the default sample volume to match your typical
cup size, eg "Q".
Background colour of tray: Click Pick to select the background colour of the tray.
This will allow you to select a colour that makes it easier to identify defects. When
you click the Show... buttons this colour will be used.
Multiple-Tray Mode: SeedCount allows you to aggregate more than one trayful of
grain when you need to test a larger sample of grain to increase the result accuracy for
a particular grain lot. Click the "Multiple Trays per Sample" check box.
Graphing: Display as a percentage of the largest value, instead of the percentage of
the entire sum.
17
Blackpoint/Blacktip: The blackpoint/blacktip function can be turned on or off by
selecting/deselecting the Blackpoint check box. You can also select to automatically
draw the coloured highlights around the seeds when you click the Show Blackpoint
button.
Chalk: The chalk function can be turned on or off by selecting/deselecting the Chalk
check box. You can also chose to automatically draw the coloured highlights around
the seeds when you click the Show Chalk button.
Screenings: Screening distributions can be turned on or off by selecting/deselecting
the Screenings check box.
Data File options
Figure 4b: Data Control options for SeedCount
18
SeedCount will automatically save a Data File each time you analyze a sample. You
can also select to automatically save (and if needed, print) a Summary Page. For more
information on how to setup the Data File saving see Saving Data Files.
Grain Standards
Figure 4c: SeedCount Grain Standards Screen
Select the correct grain standard for each grain type being analyzed.
Color Adjustments
19
Figure 4d: SeedCount Color Adjustments Options Screen
The user can manually adjust the number of seeds detected by SeedCount as having
color defects.
Increasing the value (for example Red) by moving the slider to the right will increase
the number of Seeds identified as Red.
Moving the slider left will reduce the number of Red seeds detected.
The biasing used in each analysis will be recorded in the Data and Summary files
under the Bias column. Often changing the bias of one color parameter will affect
other similar color assessments.
Note that the color adjustments will only affect subsequent analysis, not any analysis
that has already been completed. Prior images will need to be rerun to see the
changes.
20
Damaged Adjustments
Figure 4e: SeedCount Damaged Adjustments Options Screen
The user is able to manually adjust the number of seeds detected by SeedCount as
having damaged seed defects. Damaged seeds, particularly affecting brown rice, are
seeds that have a discoloration that is expected to go so deep into the kernel that it
cannot be removed by polishing.
Increasing the value (for example Damaged Red) by moving the slider to the right
will increase the number of Seeds marked as Damaged Red.
Moving the slider to the left will reduce the number of Damaged Red seeds detected.
Chalk
21
Figure 4f: SeedCount Chalk Options Screen
The number is the minimum score (approximately the percent of the seed identified as
chalk) required for a seed to be marked as Chalky.
Blackpoint Adjustments
22
Figure 4g: SeedCount Blackpoint/tip Options Screen
The user can manually adjust the number of seeds detected by SeedCount as having
blackpoint, and also the severity rating of the blackpoint.
Increasing the Minimum value (for the Wide Indent or Narrow Indent region) by
moving the slider to the right will increase the number of Seeds identified as having
Blackpoint.
Moving the slider left will reduce the number of Blackpoint seeds detected.
The user can also manually adjust the number of seeds detected by SeedCount as
having severe blackpoint by moving the Severity slider to the right (left to decrease
number).
The biasing used in each analysis will be recorded in the Data and Summary files
under the Bias column. Often changing the bias of one color parameter will affect
other similar color assessments.
23
Note that the color adjustments will only affect subsequent analysis, not any analysis
that has already been completed. Prior images will need to be rerun to see the
changes.
Options Security
Figure 4h: SeedCount Options Security Screen
If no Password is set, all users can access the Options menu. The master user can lock
the Options menu to prevent unauthorised changes in the various thresholds used.
Simply type in (and remember!) the Password that allows access.
SeedCount technicians may be able to recover lost Option menu passwords, but a fee
is required, so it is best to remember the password.
Obtaining a Sample and Filling the Tray
24
1. Select the appropriate tray for the grain that is being analyzed and weigh it
(while still empty) to the nearest 0.01g on a balance. If possible, tare the
balance to this weight.
2. Obtain a representative sub-sample of the grain using the sampling tube as
detailed in Appendix A. At least one-third of the tube should be full of seeds.
Please note that SeedCount requires at least 40% whole grains in the sample to
be able to identify whole kernels accurately. Samples of almost entirely
broken kernels will not analyse correctly.
3. Transfer the tube contents to a volumetric cup. The cup must initially be
overfilled.
4. Hold the leveller flat against the top of the cup and use a horizontal sawing
action to level the grain with the top lip of the cup, as shown in Figure 5.
NOTE: Select a cup that holds enough grain to fill eighty to ninety-five
percent of the tray indents. Each cup in the series is ten percent larger than the
previous cup.
Figure 5: Levelling the Cup
5. Distribute the sample from the cup as shown in Figure 6.
Figure 6: Filling the Tray
6. Shake the tray gently using a circular action while slowly lowering and raising
the bottom end of the tray to distribute the grain.
25
7. Brush the tray with your fingertips or with a one or two inch soft nylon brush
to separate most of the doubles and level kernels standing on their ends (see
Figure 7). No seeds can be left on the calibration strips or along the edges of
the tray outside of the indented areas. If you have excess seeds, you will need
to resample with a smaller volumetric cup. Figure 8 shows a rice tray filled
and ready for scanning. Various sample scans are shown in Appendix D.
Figure 7: Separating Doubles
Figure 8: Ready to Scan
8. SeedCount requires the tray to contain similar numbers of grain in both the
wide (left) and narrow (right) sections of the tray. This can be controlled while
emptying the cup into the tray and by tilting the tray while shaking it.
9. Weigh the tray and sample to 0.01 gm and enter the sample mass (minus the
tray mass) in the Initial Weight textbox.
NOTE: If the sample has been pre-cleaned, weights can be taken directly
from the cup rather than the tray. The sample weight can be entered as the
Clean Weight and the Initial Weight box can be left blank. SeedCount will
assume that the Initial and Clean weights are the same. The following handcleaning step can also be skipped.
10. Remove any large pieces of debris from the tray such as stalks, backbone,
sticks, intact heads, stones, etc. During analysis, SeedCount will identify
broken seeds and small items of dockage, such as small weed seeds and bits of
awn and will add this additional dockage to the total dockage. There is no
need to remove this fine material by hand. Hold the tray in front of a medium
sized fan to blow away any dust and loose husks. Reweigh the tray and sample
and enter the mass (minus the tray mass) as the Clean Weight.
11. Check the cup size, which is engraved underneath the cup, and enter its letter
code into the Sample Volume box. When you move to another entry box, the
cup volume will automatically be inserted. If this is the cup you usually
require, it's volume (or letter) can be entered in the Options, Cup Volume
setting and it will become the default cup volume. Standard Cup volumes are
given in Appendix B. If you are not using a standard cup, type the volume into
the Sample Volume box.
12. If available, the sample protein, moisture and standard test weight can be
entered at this time.
26
Scanning Samples
1. Holding the tray by its handle, slide it into the slot in the scanner cabinet.
Ensure that the tray is fully, but gently, pushed back into the slot (Figure 1
shows a partially inserted tray).
2. Click on the Scan button. The scanner will activate, scan the tray and transfer
the image to SeedCount. After a few seconds, a portion of the sample image
will appear in the SeedCount Main Screen.
WARNING: Ensure that SeedCount isn't using the WIA driver, because it
has been found to produce poor quality scans. See the Software Installation
section to remove the WIA drivers.
3. If you wish to save a copy of the scan, click the Save Image button or select
File > Save Image As and name and save the image to the directory you
choose. The image can be saved in a lossless JPEG format or in bmp format.
SeedCount will automatically place this name into the Sample ID text box. If
necessary, the Sample ID can be changed.
SHORTCUT: If you are using a common incremented scan file name or
Sample ID, you can click and drag to select the repeated portion of the ID,
right-click the selection and Copy it to the clipboard. Then you can paste this
section into the file name or sample ID for the following scans by clicking on
the File Name or Sample ID box and pressing Control-V (ie: hold down the
Control key and press V).
4. Click on the Analyse button or press the ENTER key. SeedCount will analyze
the image and display all the results possible with the data you have already
entered.
5. Empty the tray by tipping the tray contents into the supplied collection tub and
tapping the sample tray against it. A bamboo skewer can be used to dislodge
the occasional seed that becomes wedged into an indent.
6. When Analysis is completed, additional optional data can be entered, such as:
o Protein, obtained with an approved method (such as a calibrated NIR
spectrophotometer or LECO nitrogen analyser) if available. This value
is used only to save the sample protein with the other values as shown
below.
o Grain Moisture, obtained with an approved method (such as a
calibrated NIR spectrophotometer) if available. This will allow the dry
KW to be calculated and the moisture to be stored.
o Test Weight, if using a standard 500 ml chondrometer.
NOTE: The PageUp and PageDown keys can be used to move
through the text boxes and main command buttons.
7. Click Calculate to process the extra parameters and display the results
onscreen.
8. Save the data to a permanent data file as described below in Saving Data Files.
27
9. If you are moving to a new sample, the Grain Type can be changed when
required by clicking on the Grain button on the Menu Bar or by pressing AltG.
WARNING: Different grain types and standards produce different data. It is
therefore important to ensure that a new Data file is created for each grain type
and standard.
Opening Grain Images
Images previously made and saved with SeedCount can be reopened and analyzed. To
open an image, click on the Open Image button or the menu option File > Open
Image. You will need to re-enter that sample’s volume and mass to get accurate
results.
Multi-Tray Mode
The multi-tray mode allows the results of several subsets of a grain sample to be
aggregated to increase accuracy when required. Click the Multi-Tray mode button in
Options section to turn it on. The number of trays in the sample set will be indicated
on the main screen. When you are ready to begin a new sample set, make sure you
click on the Start New Sample Set button. You must also create or open a data file to
record the overall results of each sample set. The grain type cannot be changed
without starting a new sample set.
The Mass and Volume text boxes will not automatically clear so these values can be
retained if needed again.
When running SeedCount in single tray mode, no tray numbers will appear and you
will not be able to click the Start New Sample Set button as it will be grayed out. If
Multi-Tray mode is on and you wish to return to single tray mode, click the MultiTray checkbox in the Options menu again to unselect it.
Help can be accessed at any time by clicking on the Help menu bar button or typing
Alt-H. Additional help will be available at our Website or by phone or email as
detailed later in the manual.
Contents of the Data Analysis File
The data file contains a header line that identifies the various fields.
Some of the data saved includes average colour values of the seeds, average seed
sizes, screenings, blackpoint (or blacktip), chalk and the version of SeedCount used.
Wheat and Barley
For an explanation of the contents of the Wheat or Barley Data File see Appendix D Wheat and Barley.
28
NOTE: When analysing barley, blacktip substitutes for blackpoint.
Medium and Arborio Rice
Head rice is broken rice that is more than 75 percent of the length of the whole kernel.
For an explanation of the contents of the Medium and Arborio Rice Data File see
Appendix D - Medium and Arborio Rice.
Long Grain Rice
Long Grain rice reporting is similar to the Medium grain rice, but is more complex.
Current Long Rice Standards available (see the Options section to change the
Standard) are Thailand, ISO, United States of America, India and Australian.
For an explanation of the contents of the Long Grain Rice Data File see Appendix D Long Grain Rice.
When using the Thai standards, the whole kernels are classed by length as shown
below and reported as both the actual count and the percent by count of the total
counts for all whole kernels. Thai Head rice also needs to be greater than 80% of the
average kernel length.
Class Length (mm)
Class 1 >7.0
Class 2 7.0 to >6.6
Class 3 6.6 to >6.2
Shorts 6.2 or shorter
The entire sample is compared in various groups by percent of the total mass. These
groups are:
•
•
•
Whole grains, composed of all of the above classes
Head rice (>80% of the whole kernel length)
Brokens, composed of:
o Brokens (80% to >50% of the whole kernel length)
o Small Brokens (50% or less of the whole kernel length but too large to
fit through a 1.4 mm diameter screen hole)
o Chips (small enough to fit through 1.4 mm diameter screen holes)
o Paddy rice is reported separately as counts.
Various discolourations are also detected, including red, yellow, immature (green),
black and generally discoloured kernels. They are counted and their percentage by
mass is estimated.
Saving Data Files
29
1. SeedCount automatically saves the results of each analysis to a data file. You
will be prompted to create a new data file on the first run for each grain type.
SeedCount will open a Data File dialog box that will allow you to either select
an existing Data file or create a new file (and directory if needed) for your data
file. The extension (.txt) will be automatically added to your new file. The
Data file location and name will appear in the window just above the image
area of the main screen. This data file will remain active until a new data file
is specified, the grain type is changed or SeedCount is closed. If the Data File
window is empty, you do not have a valid data file open for use. Each analysis
is added as a separate line to the data file.
WARNING: If you give your data file the name of an existing data file, you
can either choose to select another file or add your new data to the end of the
existing data in the file. If you only want your current work in the file, you
will need a new filename.
WARNING: Different grain types and grain standards produce different data
output. It is essential that a valid Data file is used for each grain type and
standard.
2. Clicking OK will bring up the Identification window (Figure 9). Alter or
accept the Site and Operator information and click OK.
(This is required only once per session or when grain types or standards are
changed). The Identification Window can also be opened manually by clicking
on Identification to change operators, etc. If necessary, these text boxes can
also be used to store notes that will be saved with the data.
Figure 9: Identification Screen
3. When your analysis is complete, SeedCount will automatically save the
analysis results when you click on the Initial or Clean Weight data entry
boxes, or the or buttons, change grain types, grain standards or exit the
program. You can also click the Save Data button to force addition of the new
data to the data file. SeedCount will add a date and time stamp to the data and
confirm that the data has been saved with a beep and a message in the Status
Bar at the bottom of the screen. If Automatically create and save Summary
Page is turned on in the Options menu, an HTML summary page will be saved
30
in the same directory as the data file. If Automatically print Summary Page
is turned on as well SeedCount will automatically print the Summary Page.
4. To obtain, scan and analyze another sample, return to the top of the Obtaining
and Scanning a Sample procedure. In Multi-Tray mode, this will add another
trayful of seed to the current sample set. The on-screen display will show you
how many trayfuls are in your current sample set. Click on Start New Sample
when you are ready to begin a different sample set.
WARNING: In Multi-Tray mode most users will only want 2 to 4 trayfuls of seed in
each sample set. You must click Start New Sample Set for each different grain lot you
are analyzing. If you do not click Start New Sample Set, the results for all of your
runs will be aggregated together. This error will give you high tray numbers and only
one line of average values for your entire session s work, not a result for each grain
lot.
Importing a Data File into Excel™
SeedCount can produce two different text-based Data Files that can be imported into
Excel. The procedure below will work with them both. One of them is the standard
data file that generates a single-line summary of each sample analysed in a session.
The second text file is a large table with extensive data for every object in one image.
This file can be turned on (or off) in the Options menu. It is saved in the same
directory as the other data files, and uses a similar filename format to the HTML
summary file: it contains the image name, the date and time of the analysis, followed
by _objects.txt.
To import these files:
1. Open Excel and click on the Open File icon.
2. In the Files of type box at the bottom of the Open File window, select Text
files. Then select the directory and file you wish to import. The Text Import
Wizard window will then appear.
3. Ensure the Delimited fields and Tabs options are selected and click on
Finish.
4. The data can be saved as an Excel file if desired by selecting the File > Save
As option in Excel. Click on the Save as Type box and select Microsoft
Excel workbook from the dropdown list.
5. Essentially the same procedures are available in other spreadsheet programs
such as Quattro Pro™, etc.
Results Summary Pages
If enabled in the Options menu, a results summary page will be automatically created
by SeedCount. The information contained in the summary file is very similar to the
Data File except the data is stored and displayed in a manner suitable for viewing or
printing out as a single page summary for an individual sample. The summary pages
are in HTML format and can be displayed and printed with any Web Browser.
31
The result summary page can also be automatically printed, selectable under the
Options menu.
There is a sample Summary File in Appendix E
Maintenance
1. Tray Maintenance: The tray needs regular cleaning to produce good results.
Dust and debris needs to be brushed or blown out of the tray whenever it
accumulates. A 38 mm brush is supplied for this purpose. This applies
especially to the calibration strips across the top of the tray, as debris or seeds
on the strips will affect the color correction of the grain in the columns
beneath the artefact. The calibration strips should also be cleaned at least twice
a week with a nonabrasive glass cleaner and a soft, lint-free cloth. (Daily when
the system is under heavy use.) The tray should be handled with care to avoid
scratching of the indent surface and stored on a flat surface when not in use.
Damaged trays can be returned to SeedCount for assessment and where
possible the tray will be repaired and the calibration strips replaced.
2. System cleaning: The exterior of the scanner cabinet can be cleaned with a
soft cloth moistened with a mild detergent solution. The interior of the cabinet
should be cleaned fortnightly by turning the cabinet upside down and
removing the scanner access plate. The dust and debris that has accumulated
in this area can be brushed or blown out. The scanner glass should then be
cleaned with a nonabrasive glass cleaner and a soft, lint-free cloth and the
access plate replaced. In a high dust environment, it may be necessary to clean
the glass more frequently.
3. Scanner Maintenance: The scanner itself will need occasional specialist
maintenance to achieve excellent performance. We recommend that scanner
cabinets are returned to SeedCount or a SeedCount-authorised service center
for maintenance every 30,000 scans.
4. Software Maintenance: Software can be maintained by online updates that
will be posted to the SeedCount website. If you are having any SeedCount
software issues, please contact us.
5. Annual Calibration:Your regional distributor will provide annual calibration
testing and certification of your scanner, trays and cups.
32
How SeedCount Works
Introduction
This chapter explains how SeedCount performs its various tasks and provides further
information about tray design and the Blackpoint Module.
Contents of this Chapter
•
•
•
•
•
•
•
•
•
•
•
•
•
•
Mini Test Weight (Hectoliter Weight)
Detection of Dockage
Counting Seeds
Calculating the Kernel Weight
Tray Design
Aspect Ratio
Roundness
Screening Equivalents
Graphs
Blackpoint Module
Bin-burn and Fungal Staining
Manual_Editing
Kernel Brightness and White Seeds
Chalk
Mini Test Weight (Hectoliter Weight)
The Mini Test Weight is calculated from the volume and sample mass in the cups
supplied with your system. The cups are sized for preparation of SeedCount samples,
so the results are not as accurate as the standard 500 ml chondrometer results.
The Standard Test Weight can also be performed and the results entered into
SeedCount. Both the "Mini Test Weight" and the "Standard Test Weight" appear in
the data output file if both are entered into SeedCount.
Detection of Dockage
SeedCount automatically detects small dockage items including broken seeds*, awns,
and some weed and foreign seeds. The mass of this dockage material is calculated as a
percentage of the entire sample mass. If an Initial Weight is entered, the dockage
generated by the difference between the Initial and Clean masses is added to this
calculated dockage to give the total dockage. The dockage can be examined by
clicking on the button after the scan has been analysed.
* Broken kernels of rice are not included in the rice dockage, but instead are listed
separately in the data files.
33
Counting Seeds
SeedCount can recognize multiple seeds, using our patented counting method.
A few doubles will not affect SeedCount s accuracy. But combinations of more than
two seeds should not occur and indicate insufficient care in distributing the kernels in
the tray or overloading the tray. Rectify this by separating most of the multiples
present or reloading the tray with a smaller sample if it is overfilled and then rescan
the tray.
SeedCount can also detect and separate seeds joined by an awn.
SeedCount uses all of the above data to count the whole seeds. When counting whole
seeds, SeedCount ignores all of the broken seeds and dockage material. This Whole
Seed count is displayed onscreen and saved in the Number of Seeds column in the
Data File.
The Whole Seed count is not the sum of the counts displayed in the various
screenings groups as the screening counts are percentages of counts based on the
calculated virtual seeds and also include the broken seeds and dockage material.
Calculating the Kernel Weight
The kernel weight is calculated from the whole kernels only. The kernel weight is the
total whole kernel mass divided by the whole seed count. SeedCount removes the
mass of the broken and dockage material as well as not counting it. This procedure
conforms to the standard kernel weight methods. The As-is results are the kernel
weight on a wet-weight basis. If the sample's moisture content has been given, a dry
basis kernel weight is also calculated.
The kernel weight can, by merely changing the units, be regarded as being either the
average kernel mass in milligrams or the mass of a thousand kernels in grams.
Tray Design
The SeedCount trays (patent pending) have been designed to facilitate threedimensional measurements of the seeds. This information is essential for calculating
the screening equivalents and seed roundness data., and includes length, width, and
thickness.
The thickness is the smallest dimension of the seed, and affects the screen openings
that the seed can pass through. This process determines which screening group the
seed belongs to.
The tray is divided into two sections, a Width section and a Thickness section. The
Width section contains wide, shallow indents that allow the seeds to lie flat.
34
The Thickness (Narrow) section has narrow, deeper indents shaped to hold the seeds
on their edges to allow thickness measurements. The thickness measurements are used
to allocate the seeds to different screening groups. Within the Width and Thickness
sections, the indents are sometimes graduated in size, with the smallest indents near
the top of the tray and the largest indents near the bottom. The sample is initially
transferred onto the top of the tray. This filling method traps the smaller seeds first
and allows the larger seeds to be shaken down to the larger indents near the bottom of
the tray.
Two colour calibration strips near the top of the tray enable SeedCount to standardize
the colour and brightness of every pixel in every image from all of our scanner
systems. One of these is almost white and the other is dark gray. These corrections
permit excellent correlations between seeds in different locations and on different
scans. The corrected colours can be traced back to recognized international colour
standards. The corrected images can be viewed in SeedCount using the range
function.
Aspect Ratio
The Aspect Ratio is a measure of seed shape. The sample's Aspect Ratio is the
average of the seed length divided by the seed width for all of the single seeds in the
Wide-seed section of the tray.
A circular seed would have an Aspect Ratio of 1.0, while a long, thin grass seed may
have an Aspect Ratio of 5.0.
Roundness
SeedCount measures roundness, which is a more useful measure of kernel shape than
the 2D Aspect Ratio. Roundness is a three dimensional assessment of a seed's
sphericity, using our Virtual Seed function (see Appendix C).
Roundness is a useful measure of kernel quality. Kernel size and shape influence the
endosperm percentage of a kernel. More endosperm equates to a larger yield of white
flour or malt extract. Mathematical modelling shows that long, thin kernels have up to
25% more husk and bran than short, plump kernels of the same volume.
Because of this relationship, purchasers, maltsters and millers prefer plump kernels.
This encourages breeders and farmers to select for plumper varieties. But plumpness
determined by measuring only kernel length and width does not compensate for
kernel thickness differences between varieties.
The equation is simple and dimensionless:
35
The roundness of a perfect sphere is 1.0 and that of a grass seed is 4.9. Barley has an
average roundness of 2.5, with a standard deviation of 0.4. Wheat has an average
roundness of 1.93, with a standard deviation of 0.25.
Screening Equivalents
The screening equivalent results are created from the Virtual Seed data, but the
broken kernel and dockage material is added to this data in keeping with standard
screening protocols.
The calculated virtual seed’s thickness is used to assign the seed to a screening group.
Once all of the seeds are allocated to the various groups, the Percentage Mass for each
group is calculated.
These equivalents are useful for indicating the size distribution in a grain sample and
for comparisons between different cultivars and samples. However, at this time they
are not accurate enough to be used for commercial quality assessments such as
determining the percentage of a wheat sample in the less than 2.0 mm screen group.
The Analysis Accuracy section indicates how closely these equivalents match actual
mechanical screenings.
Graphs
The graphs are only available once the sample has been analyzed. The graphs are
displayed by selecting View from the Main Menu bar and then selecting the type of
graph you wish to view.
Graph data can be viewed by clicking the Display Data button above the graph. It can
also be saved by clicking the Save Data As button. The saved graph data can be
viewed in a spreadsheet or used to regenerate the graph.
You can find the value of each bar by positioning the cursor on it. Its value displays in
the bottom left of the window.
Examples of some of the available graphs follow:
Thickness Distribution (by count)
The Thickness Distribution graph is generated from the same data used to produce the
screening equivalents, but resolves the groupings down to 0.1 mm. Only seeds in the
Thickness (narrow indent) section of the tray are used in this graph.
36
Figure 10: Thickness Distribution
Length Distribution (by count)
The Length Distribution also resolves the groupings down to 0.1 mm.
The Width Distribution Graph is similar to this one but only uses seeds in the width
(Wide indent) section of the tray.
Figure 11: Length Distribution
Area Distribution (Width section)
The Wide Area Distribution graph has a resolution of 1 mm2. Only seeds in width
section of the tray are used in this graph. The Area Distribution (Thickness) Graph is
similar to this one but only uses seeds in the Thickness (narrow) section of the tray.
37
Figure 12: Area Distribution (wide section)
Blackpoint Severity (by count)
The Blackpoint Severity graph displays the number of seeds that have been classed as
having a specific level of blackpoint. At this stage a severity level of 1 is for mild
blackpoint and a severity level of 2 is for severe blackpoint. At a later date the number
of severity levels may be increased.
Figure 13: Blackpoint Severity
Kernel Weight Distribution (by count)
The Kernel Weight distribution graph has a resolution of 1 milligram. Virtual seeds
are used in this graph.
38
Figure 14: Kernel Weight Distribution
Length, Width and Thickness Distributions (by count)
This graph is a combination of the Length, Width and Thickness Distribution graphs,
giving a quick overview of the sample distributions.
Figure 15: Length, Width and Thickness Distributions
Broken Distributions (by actual length or percentage of average length)
These two graphs give a breakdown of the broken kernels in the Rice sample. The
graph either shows the count of kernels by raw length (in mm) or as a percentage of
the length of an average whole kernel.
39
Figure 16: Broken Distributions
Blackpoint Module
SeedCount includes a function for measuring the blackpoint defect in wheat or barley.
It must be turned on in the Options menu of the Main Menu bar before analysing the
sample. Once turned on, the blackpoint (Bp) module will remain active until turned
off. The Blackpoint test adds several seconds to your analysis time.
The blackpoint module searches for blackpoint in wheat, or its equivalent in barley –
blacktip. Blackpoint is usually a darkening of the embryo area of the kernel, which is
on the opposite side of the kernel to the crease. Thus blackpoint can be most easily
and accurately seen in seeds lying embryo-up in the Width section indents and
therefore have no crease showing.
The Blackpoint test finds dark patches near the end of the kernel. The blackness and
area of discoloration is assessed as the Blackpoint Impact. The BP Impact fits into one
of three groups, resulting in the kernel being marked as having None, Mild or Severe
blackpoint. SeedCount reports the percentage of tested seeds that have blackpoint.
This report is equivalent to the current subjective blackpoint tests. Positioning the
mouse pointer over the Blackpoint text box will show you how many seeds were
found to have blackpoint and also how many seeds were tested for blackpoint. The
overall Blackpoint Impact for the sample is displayed below that box. The total
number of tested seeds is included in the Data File.
Using the Multi-Tray mode will increase the number of seeds tested for Blackpoint.
The Show Blackpoint button on the Main Screen is also useful in assessing the
blackpoint. Clicking on this button will show all the seeds that have been tested for
blackpoint. Left-clicking on the seeds shown in the image will bring up a box
indicating the blackpoint severity on that seed.
40
If the Automatically Highlight option is turned on in the Blackpoint section of the
Options menu, all seeds assessed as having blackpoint will be highlighted. Seeds with
mild blackpoint will be circled with green and seeds assessed as having severe
blackpoint will be circled with red as shown in Figure 17.
Figure 17: Highlighted Defects of Wheat Kernels.
Bin-burn and Fungal Staining
Some seeds are dark for reasons other than blackpoint, such as mold or bin-burn.
SeedCount marks generally dark kernels as "Dark", and displays them with a white
border to indicate that they are not blackpoint but are overall discolored. These are
typically seeds that have been bin-burnt. Seeds that are extremely affected by
blackpoint will appear to be mostly dark and may fall into the generally discoloured
group.
Fungal staining and other kernel damage tend to produce dark patches on various
regions of the kernel. These seeds are marked with a Purple border and assessed as
being "Discoloured".
Examples of these seeds can be seen in Figure 17.
Manual Editing of Blackpoint Seeds
The operator can edit the computer’s automatic assessment of discoloured and
blackpoint-affected seeds when required. This can be performed quite simply by
right-clicking on a seed. The seed will cycle through the series of no blackpoint (no
highlight), mild (green), severe (red), dark (white) or discoloured (purple). This
method can be used to alter the assessment of a seed. SeedCount will automatically
alter its assessment for the seed and sample to reflect the operator’s assessment. Both
the original and the operator assessments will be saved in the data file.
While Show Blackpoint is selected, a Blackpoint Display button appears in the
menu bar. When clicked, the first selection in the drop-down window is Highlight
Blackpoint. This will turn the coloured highlighting on or off for the current image.
The next image viewed will use the settings in the Options menu.
41
If the operator decides to revert to the original SeedCount assessment, they can select
Blackpoint Display > Remove Manual BP Changes.
NOTE: At this time it is also possible to right-click on hidden seeds that have not
been assessed for blackpoint. The hidden seed will then be outlined in green or red.
Deselect such seeds by right-clicking the seed area until the highlighting disappears.
Kernel Brightness and White Seeds
NOTE: Clicking on a seed will show its kernel brightness in the data information
box. The brightness of all the seeds in an image will be averaged to produce the
overall sample brightness that is saved in the Data File.
When analysing barley or wheat, very bright seeds will be marked as white seeds, and
shown with a black border in the Show Blackpoint display. These seeds may either be
broken open and displaying some white endosperm, or they may be generally white,
which often signifies fusarium infection.
When analysing rice, very white seeds can often be glutinous rice, which is indicated
by a blue ring around the seed when in the Show Discoloured display mode.
Chalk Module
Chalk is a white patch in rice that is due to open packing of the starch granules in the
endosperm. It can be seen in both brown and white (polished) rice. The amount of
chalk is assessed on the basis of the whiteness and the area of chalk, producing a
Chalk Impact number, similar to the Blackpoint Impact number. Chalk with an Impact
greater than 50 is generally regarded as having chalk as it roughly corresponds with
50% of the kernel area being chalky.
The amount of chalk required to mark a seed as chalky can be varied from 30 to 100,
using the Chalk section of the Options menu. The value is use is shown in the data
files.
Chalk in rice is assessed on individual kernels using reflected light. Only kernels in
the wide area of the tray are assessed. The procedure and display is similar to
blackpoint. Click on the Show Chalk button to examine these seeds. Those assessed
as having a chalk impact above the minimium threshold selected have a red ring. The
Chalk graph shows a more detailed kernel-by-kernel assessment of the sample.
Discoloured Kernels and Paddy Rice
Various discoloured kernels are identified in different modules.
The barley and wheat modules identify red and immature (green) kernels. The red
kernels tend to be infected material in barley, but can often simply be red wheat
varieties in wheat. They can be viewed in the Show Discoloured window, where the
42
red kernels have a green ring and the immature kernels a red ring. Kernels identified
as white (mentioned above), also display on this screen with a black ring.
In the white rice modules, the red and immature kernels are displayed in a similar
manner to the wheat module. As white kernels in rice are usually chalky, they are not
displayed in the Show Discoloured window for rice. The rice modules also identify
yellow, black and generally discoloured kernels. The "discoloured" kernels are those
that are discoloured, but do not fit into the other categories of discolouration. Kernels
with Red streaks and red or black spots are also identified.
Brown rice has the groupings listed for white rice, but also has a number of
"Damaged" versions of these discolorations. The Damaged Red, for example, is a
kernel with a red discoloration that has characteristics which make it likely that the
endosperm will be affected, so the discoloration will not be polished off when
producing white rice.
SeedCount also identifies glutinous rice, marking it with a blue ring. As it is not a
discoloration, it is quantified separately to the discoloured rice. Likewise, white rice
kernels in a brown rice sample and brown rice kernels in a white rice sample are also
identified but quantified separately. Samples with large numbers of these "out of
type" kernels should be checked to ensure that they are being analysed under the
correct module (ie- is a white rice sample being analysed as a brown rice sample by
mistake).
The rice kernels have the following identification:
Discolouration
Red
Red Streaked
Red Specks
Yellow
Green
Black
Black Specks
Discoloured
(General)
Glutinous
White in Brown
Brown in White
White
Paddy
Identification Ring
Colour
Green
Light Green
Dark Green
Purple
Red
White
Darkest Grey
Darker Yellow
Blue
Yellow
Darkest Yellow
Black
Blue
Discolouration
Damaged Red
Spots
Damaged Red
Damaged Yellow
Damaged Black
Damaged Black
Spots
Damaged Brown
Identification Ring
Colour
Darker Green
Darkest Green
Dark Purple
Light Grey
Grey
Dark Yellow
Paddy is rice that still has the husk on the kernel. Paddy can occur often in brown
(cargo) rice, but is rare in polished rice. The husk is generally an opaque yellow
colour. The paddy is counted and its mass calculated. This information is presented in
both the data file and summary sheet. The paddy can be seen in Show Discoloured
window, where it is highlighted with a blue ring.
43
44
Additional Procedures
Contents of this Chapter
•
•
•
•
•
•
•
•
•
•
•
•
Setting up the Scanner
Counting Out a Fixed Number of Seeds
Analyzing Small Samples
Navigating in the Scan Window
Examining individual Seeds
Varietal Identification
Displaying Ranges of Seed Measurements
To display a range of object sizes
Display guidelines
To display overlapping clumps of two or more seeds
To Display Dockage
Backing up Scanned Images and Data Files
Setting up the Scanner
The scanner currently being used for SeedCount is a specially modified high-speed
USB2 commercial quality scanner. The scanner is controlled with our built-in
TWAIN software. This software controls the area, resolution, and output format
among other options. For SeedCount processing, the images must have a resolution of
300 pixels (or dots) per inch (dpi) and have 24 bits of color information per pixel. The
scanner is preconfigured for SeedCount use and none of the scanner settings should
be altered. The scan is cropped to include only the interior of the tray. If your scanner
configuration becomes corrupted, please contact us for assistance.
SeedCount can save the scanned images as either lossless JPEGs or bitmaps (bmp
files). Lossless JPEG files are about one-half the size of the bitmap files and are the
preferred save option. Bmp files can be viewed by most image editing software. JPEG
images can be made transferable by opening them in SeedCount and saving them as
bitmaps.
NOTE: The SeedCount scanner is modified for use with our trays and should only be
used for that purpose. It will not make "normal" scans.
Counting Out a Fixed Number of Seeds
Sometimes it is necessary to count out a fixed number of seeds. For example, a
germination test may require the use of exactly one hundred seeds. If the sample's asis Thousand Kernel Weight (TKW) is already known, weigh out one-tenth of the
TKW and distribute the kernels evenly in both sections of the tray, minimizing the
number of doubles and run SeedCount. If the sample is well distributed you will get
45
an accurate count. Then simply add or remove the small number of seeds needed to
give you the required one hundred seeds.
Analyzing Small Samples
SeedCount can analyse samples down to about 40 seeds. Such small samples must be
spread almost evenly in both the width and thickness sections of the tray to analyze
correctly. If all the seeds are placed in only one section of the tray, the analysis will
fail. Remember that as the sample size decreases, the accuracy of the SeedCount
results will also decrease, especially for complex calculations like Screening
Equivalents. For accurate blackpoint assessments most of the tray indents should be
filled.
Navigating in the Scan Window
Use the scroll bars and the zoom buttons to display any portion of the scan window.
You can also left click and hold in the scan window to drag the image.
SHORTCUT: Simultaneously press Alt-I or Alt-O (or Alt - or Alt +) to zoom in or
out.
Examining individual Seeds
Individual seeds can be examined in detail by zooming in to expand the seed. You can
display most of the data for a seed by clicking on it after the sample analysis is
complete. This data appears in a window at the right side of the Main Screen:
•
•
•
•
•
•
•
•
•
•
•
Object Number
Length (in mm)
Width (or Thickness) (mm)
Area (mm2)
X position (Horizontal center of the rectangle containing seed in pixels from
the left of the image)
Y position (Vertical center of the rectangle containing of seed in pixels from
the top of the image)
Type (e.g. Single, Double, Broken, Awn, etc)
Crease Position (zero (top of seed) to 100 (bottom of seed)
Blackpoint (N/A = not tested, else None, Mild or Severe)
Chalk (N/A = not tested, otherwise the Chalk Index score is displayed)
Discolorations (These only appear if the discoloration was detected or
manually set)
o White
o Dark
o Green
o Yellow
o Red
o Red Streaked
o Red Specked
46
Black
Black Specked
Brightness
o
o
•
Information on the pixel at the point of the mouse pointer is displayed in the top right
corner of the Main Screen. The X and Y position is in pixels measured from the upper
left corner of the scan. The red, green and blue colour values for that pixel are
displayed beneath the location details.
More detailed information on every object (seed or fragment) found in the image can
be stored as an objects.txt file for later study, as mentioned in the Options section.
Varietal Identification
SeedCount's high-resolution images and the Zoom buttons, explained in the individual
seed section above, can help with difficult task of visual varietal identification. At
high magnification, SeedCount functions like a magnifying glass.
Displaying Ranges of Seed Measurements
It is possible to display only the seeds that fall inside a selected range of
measurements. This can be done for seed area, seed length and seed width. To do this
set the minimum and maximum values and select the measurement of interest. Then
click the Show Range button. The seeds that fall within that range are displayed. You
can zoom in to examine a seed in greater detail and you can double click on it to
display its properties in a table as discussed above.
To display a range of object sizes
1. In the Minimum and Maximum fields, enter the numbers indicating the
minimum and maximum value in millimeters for length or width or square
millimeters for area.
NOTE: The default settings will display all objects against the current
background colour (initially a uniform blue background). You can choose a
custom background colour on the Options screen.
2.
3.
4.
5.
Click on the Area, Length or Width selection.
Click on Show Range.
The screen will display all those objects that fall inside these limits.
The Status Bar will display the parameters in pixels.
Display guidelines
•
•
At 300 dots per inch, there are 11.8 pixels per lineal millimeter and 133 pixels
per square millimeter.
By choosing a range from zero to a value below the minimum size of a whole
single seed, you can see small debris, split parts of seeds, grains of sand, etc.
47
•
By choosing a range above the average seed area, only the larger kernels and
clumps will be displayed.
To display overlapping clumps of two or more seeds
To determine the number of cases in which more than one seed occupy an indent, or
cases where one or more seeds are in a clump, use the Alt-M key combination to see
the Multiples as assessed by SeedCount. (The cursor must be in the scan image region
while doing this). The Multiples option helps determine if the tray has been overfilled
or if the seeds have been carefully loaded in the indents of the tray. A few multiples
are acceptable. Large numbers of multiples (more than ten clumps) indicates that the
sample needs redistribution. If there are too few empty indents to easily separate the
clumps, the tray has been overfilled and needs to be emptied and refilled using a
smaller sample cup. Large numbers of multiples (more than ten clumps) indicates that
the sample needs redistribution or that the tray has been overfilled and needs to be
refilled using a smaller sample. Sample reduction must be achieved by emptying the
tray and resampling with a smaller sample cup.
To Display Dockage
Dockage is objects that are outside the normal seed range of length, width, area, shape
or color. The dockage display includes broken kernels that are less than 80% to 70%
of a whole kernel, depending on the grain type and standard in use. Dust is not
displayed. Click on the Show Dockage button to see the dockage. Note that large
objects such as stems, twigs, leaves etc. should be removed manually in the cleaning
process.
Backing up Scanned Images and Data files
Scanned Images and the data files can be backed up by burning them onto a DVD-R
disk using the DVD-RW Burner in the computer. A 4.3 gigabyte DVD-R will hold
about 330 lossless JPEG images (A CD will hold about 65 images). DVDs should be
generated regularly. Exactly how often depends on the frequency of use, the
requirement for accountability in assessments and how much work you are willing to
lose if the hard drive fails. A busy lab or receivals depot should make a backup DVD
at the end of each workday.
After verifying the data on the DVD, the scans can be deleted from the SeedCount
computer when it seems unlikely they will need to be re-run or more storage space is
required.
The data files are small and can be copied to a DVD or CD. The data files should be
retained on the computer as an extra back-up.
48
Glossary of Terms
Aspect Ratio
The ratio of seed length to width for whole seeds in the Width section of the
tray only.
Blackpoint
Dark discoloration around the embryo of a kernel. In severe cases the
discoloration can also extend down the kernel crease.
BMP
Bitmap, A standard raster image file format
Cleaning
The removal of debris from a grain sample.
Dockage
Undesirable material such as leaves, stems, broken seeds, weed seeds, insects,
etc.
dpi
Dots per Inch, which is the linear number of pixels in an inch.
Hectoliter
One Hundred liters
Hectoliter Weight (HW)
Also known as Test Weight. This is a measure of grain density. It is the weight
of 100 liters of grain in kilograms. Test weight in the USA uses units of
pounds per bushel.
Head Rice
Rice that has been broken, but is at least 80% of the length of a whole kernel.
Hull-less Barley
Barley that has a loose outer hull like wheat. Most of the hulls are removed
during threshing. SeedCount is not calibrated for hull-less barley and will not
produce accurate results with it.
Initial Weight
Sample mass before cleaning.
JPEG
A method of compressing bitmap images. SeedCount uses loseless jpg images
that lose no information but require about 1/2 the storage space of the original
bitmap (.bmp)
KW (As-Is)
Kernel Weight in milligrams including moisture.
KW (Dry)
Kernel Weight in milligrams of dry matter only.
Mini Test Weight
This is a scaled down test weight method using our small volume sample cups.
It is of lower accuracy than the standard test weights due to the restricted
sample size.
Multi-Tray Mode
An option that allows the results of 2 or more trayfuls of seed taken from the
same grain lot to be aggregated together.
Malted Barley
49
Barley that has been germinated and kilned for use in brewing or producing
malt extract. SeedCount currently uses the standard barley module for malted
barley.
Pixel
A single image point. In SeedCount each pixel has a 24 bit value specifying up
to 16.8 million colors.
Roundness
Sphericity of the grain. Defined in the How SeedCount Works section.
Screening Distribution or Assortment
The separation of the grain by a series of screens of decreasing slot width
placed one beneath the other. The material retained on each screen is weighed
as well as the material that passes through all the screens. Results given as the
Percentage of the Total Mass retained on each screen.
Screening Equivalents
Screening Distribution calculated from Digital Image Analysis (i.e.,
SeedCount)
Screenings
The material that passes through a screen with slots of a stated width.
Single Tray Mode
Mode in which each trayful of seed represents the entire grain lot.
TKW (As is)
Thousand Kernel Weight: The weight of 1,000 whole seeds including
moisture, measured in grams.
TKW (Dry)
The dry matter weight of 1,000 whole seeds.
TWAIN
TWAIN is an acronym for a standard means for accessing devices such as
scanners and digital cameras from within applications that accept and process
digital images. Each manufacturer of an imaging device such as a scanner,
which is TWAIN enabled, supplies a driver that is installed into the computer.
50
Troubleshooting
Included below are some problems or error messages you may encounter and their
suggested solutions.
Contents of this Chapter
•
•
•
•
•
•
•
•
•
•
•
•
Can't Communicate with Scanner
Accuracy seems to be Poor
Data was Cleared from my Input Boxes
Hull-less Barley Results seem Wrong
Image won't open in my Image Editor
Image Format is Wrong
Opening the Image makes SeedCount Crash
Too Numerous to Count
This Tray has an Unbalanced Distribution of Grain
Colored Stripes in the Image
Tray too Tight to Fit into Cabinet Cradle
Error Not Listed Above
Can’t Communicate with Scanner
This error is usually due to the lock still being engaged on the scanner in SC3
systems. Refer to the instructions on the back of the scanner cabinet to release the
lock.
If the lock is not engaged, check that the USB cable to the scanner is securely plugged
in at both ends and that the power cable is plugged into the scanner and the mains
cable is plugged into the power pack fully and into a live power outlet. If this is all
correct and there is still a communication problem try restarting the scanner and
computer and/or replacing the USB cable.
Accuracy seems to be Poor
1. Use the correct grain type setting, grain standard and tray for the cereal you
are analysing. This also applies to brown and white rice: brown long grain rice
and white long grain rice are NOT interchangable, as their analysis settings are
completely different.
2. Make sure that the tray is fully but gently inserted into the slot. If the black
and white calibration strips do not run across the entire width of the image, the
tray has not been inserted correctly and must be reinserted. If the strips still do
not reach the right edge of the image, check inside the cabinet for grain or
other objects on the slides for the tray.
3. Ensure that you are not placing too much material in the tray. There should be
some empty indents even when all the seeds are separated.
51
4. The seeds should all be in the indents and all large clusters of seeds must be
separated.
5. No material should be on the calibration strips or outside the indented areas of
the tray. If the tray and calibration strips are covered in dust, the tray should be
emptied and brushed clean before refilling.
6. Ensure that an accurate mass and volume have been entered for the sample.
Wrong input data can only produce wrong output data.
Data was Cleared from my Input Boxes
SeedCount clears most of the input data boxes whenever a new image is scanned or
opened to make data entry easier and to prevent unwanted carry-over of data from
previous samples.
Remember to save the data before scanning or opening another image if you want it
for future reference. (SeedCount will automatically save your data, with as much
detail as you want, if you set it up in the Data Control section of the Options menu.)
Hull-less barley results seem wrong
The barley and malted barley selections are calibrated for the common hulled barley
kernels. If you are testing hull-less barley you will need to use the barley selection but
be aware that the results will not be as accurate as those for hulled barley.
Image won’t open in my Image Editor
SeedCount uses lossless Jpegs as its default image file format. Most editors do not
support that format. Reopen the image in SeedCount and save it as a bitmap. It can
then be opened in an editor.
Image Format is Wrong
This fault can occur if the scan is made independently of SeedCount and has been
saved in the wrong format. It is occasionally possible to reclaim the faulty image by
loading it into an image-editing program like Microsoft Photo Editor and re-saving
the image in the correct format (300 dpi, 24 bit (16.8 million) colors, saved as a
bitmap or highest-quality jpeg). If possible, it is much better to make a new scan using
SeedCount's inbuilt TWAIN. This fault can also occur within SeedCount if your
scanner settings have been altered. Contact us for replacement settings if this has
occurred.
Opening the Image makes SeedCount crash
This problem is usually due to using a WIA scanner driver. They must not be used.
Refer to the installation section to see which scanner drivers to use and how to
remove the WIA drivers.
52
Too Numerous to Count
There are too many seeds in your sample or your scanner settings are wrong. There
should only be a few doubles and all the seeds should be in an indent. (Samples with
mostly large grains will not fill many of the smallest indents). Empty the tray and use
a smaller sample cup to remove some of the kernels, reload the tray, reweigh the
sample, reset the sample volume and analyse it again. Occasionally faulty images due
to incorrect scanner settings , repaired as detailed above in Image Format is Wrong.
Selection of the wrong grain type can also cause this error: check that the correct
module is active (it is shown in the bottom status line).
This Tray has an Unbalanced Distribution of Grain
This error message is usually caused by an unbalanced distribution of seeds. This
means that there are too many seeds in either the width or Thickness sections of the
tray. This loading error has been found to greatly reduce SeedCount’s accuracy. The
only solution is to refill the tray more evenly and create another scan.
This error message can also be caused by the user selecting the wrong grain type. This
will cause SeedCount to analyze the seeds based on the wrong criteria, which will
give very inaccurate results. Check that you have selected the correct grain type and
are using the correct tray for the grain you are analysing (note that brown long rice
and white long rice, etc are NOT the same. If these details are correct check that the
tray kernel distribution isn’t unbalanced – as above).
Vertical Colored Stripes in the Image
This error is most likely caused by the scanner overheating. Ensure that the scanner
cabinet is being operated under suitable conditions.
If the fault continues to occur, even though the operating conditions are suitable, then
the scanner cabinet may need replacing. Contact Us for further information.
Tray is too Tight to Fit into Cabinet Cradle
Small variations in the cabinet and tray clearances can, on rare occasions, cause this
problem. It can be rectified by carefully using a file or sandpaper to remove enough
material along the sides of the tray to allow it to slide in smoothly.
Error Not Listed Above
Please contact us and we will try to solve your problem. Record the process you were
using and the error you had. If possible, restart SeedCount and save the image causing
the problem as that may be necessary for diagnosing the situation.
53
Analysis Accuracy
SeedCount’s accuracy and precision has been tested for the following modules and
grains and yielded the following estimates. It is expected that continuing
development of SeedCount and further testing will modify these figures. Unless
otherwise stated, the SeedCount results given are the Standard Errors for its
measurements compared to industry standard non-digital Image analysis methods,
such as the American Association of Cereal Chemists or the Institute of Brewing
methods. Standard SeedCount samples prepared according to the method outlined in
our User’s Manual were used for the DIA images. The minimum number of scan
images used to prepare these tables was 30. Note also that the Standard Errors are
expressed in the units used in the original data. Thus the wheat count error of 6.2
means that the user can be confident that 95% of the SeedCount counts will be within
six seeds of the correct seed count. As the average wheat sample used contained 750
error on a percentage
seeds, the 6.2 standard error converts to a
basis. That is, SeedCount is accurate to less than one seed in a hundred. This accuracy
compares well with hand counting.
SeedCount Precision Estimates
Average Values and Standard Errors of SeedCount Tests
Grain
Barley Avg
Count TKW (As-Is) TKW (Dry) Test Weight Blackpoint
484
43.7
38.8
67.6
2.8%
5.6
0.58
0.63
2.4
2.3
Malted Barley Avg 473
5.8
StdError
36.4
34.4
N/A
N/A
0.65
0.62
N/A
N/A
750
31.3
27.8
80.0
4.5%
6.2
0.30
0.34
2.6
1.3
StdError
Wheat Avg
StdError
Table 1: Average Values and Standard Errors of SeedCount Tests compared with
hand counting with trays and standard 500 ml test weight (hectoliter weight)
determinations. Blackpoint/Blacktip values were compared with visual
examination of blackpoint-affected samples.
The counts shown in Table 1 are for whole seeds only. Thus SeedCount’s accuracy
also shows that it can effectively isolate broken seeds and other dockage in the
sample. The counts are, of course, used in the kernel weight calculations. The microtest weight sampling in SeedCount is sufficiently accurate for use by breeders with
small samples. The SeedCount blackpoint module is under intense development and it
is expected that the accuracy of the blackpoint assessment will improve dramatically.
Table 2 deals with the match between SeedCount’s Screening Equivalents and actual
mechanical screening results. At this time there is insufficient data to include the
malted barley results, though they appear to be similar to the barley results.
54
SeedCount Screening Equivalent Tests compared with Mechanical Screenings
Grain
>2.8 2.8 to 2.5 2.5 to 2.2 2.2 to 2.0 2.0 to 1.6 < 1.6
58 19.1
10.6
6.1
6.2 (< 2.0) N/A
Barley Avg
6.9
StdError
5.2
6.2
4.8
4.6 (< 2.0) N/A
47.4 29.5
17.4
3.6
1.9
0.1
12.1 6.8
7.8
1.6
1.1
0.4
Malted Barley Avg
StdError
Wheat Avg
StdError
Table 2: SeedCount Screening Equivalent Tests compared with Mechanical
Screenings.
It is also useful to look at the Screening Equivalents from the perspective of various
commercial cut-off points for Screenings as shown in Table 3. For these values, the
various size distributions above or below the cut-off points are summed together and
compared with the equivalent mechanical screenings groups. The most useful increase
in accuracy is in the grouping for barley retained on a 2.5 mm screen (no 2.8 mm
screen used), which now has a standard error of 3.8.
SeedCount’s Standard Error for Various Aggregated Screenings Classifications
Grain
Barley Avg
StdError
>2.5
74.4
<2.5
25.7
<2.2
14.9
<2.0
8.1
3.8
3.9
7.1
4.6
77
23
5.6
2.0
7.5
7.5
2.4
1.3
Malted Barley Avg
StdError
Wheat Avg
StdError
Table 3: SeedCount’s Standard Error for Various Aggregated Screenings
Classifications
55
Getting Help
Contact Information
Marvin Weiss
Weiss Enterprises
Marvin Weiss
51 Turtle Bay Dr.
Branford, CT USA 06405
Ph 203.488.6930
Bruce Armstrong
SeedCount Australasia Pty Ltd
PO Box 236
Creswick, Vic Australia 3363
Ph 613 5345 7367 Mobile 0428 457 363
[email protected]
Help Desk
The Help Desk is available via email or phone. If you request information by email,
you should get a response within one working day.
Online Help
Our latest software updates, troubleshooting hints and information is always available
at http://www.seedcount.com.au
56
Appendix A – Using the Sampling Tube
The SeedCount Sampling Tube is designed for use with small samples, for example a
10-liter bucket containing pooled sample tube cores from a truckload of grain or a
small sack of grain from a cereal breeding trial. It produces representative subsamples that are ideal for filling a SeedCount sample cup (and thus a tray).
To use the Tube:
1. Open the bag or bucket from which the sample is to be taken.
2. Hold the Tube by the open, uncut end of the tube with the filling cutouts
facing down.
3. Push the tube diagonally down to the bottom of the bag or bucket.
4. Rotate the tube a half-turn so the cutouts now face up.
5. Shake the tube gently three or four times to fill the tube. (See Figure A-1)
6. The tube needs to be approximately half full when removed from the bag as
shown in Figure A-2.
7. Invert the tube and pour the contents into the Sample Cup as explained in the
Obtaining a Sample and Filling the Tray section of Common Procedures.
NOTE: Do NOT pour the tube contents directly into the tray. The Sample Cup must
be used to control the sub-sample volume.
Figure A-1: Filled Tube
57
Figure A-2: Tube Ready to Invert and Fill Sample Cup
58
Appendix B - Standard Cup Volumes
Rice, Wheat and Barley Cup Sizes
Size Volume (ml)
P
20.85
Q
22.98
R
25.39
S
28.03
T
30.92
U
34.22
V
37.81
59
Appendix C – Crease Detection and
Virtual Seeds
Detection of Seed Creases
SeedCount determines the crease position for each seed (except for rice grains as they
have no significant creases). When calculating screening equivalents, the seeds need
to lie flat in the width section and on-edge in the thickness sections. For seeds lying
flat in the width section, the crease should be either centrally located or not seen.
Conversely, kernels in the thickness section should be laying on-edge, so the crease
should be either unseen or near the edge of the seed image.
The crease information is used for the generation of the blackpoint, aspect ratio,
roundness and virtual seed data.
Generation of Virtual Seeds
Screening equivalent data is calculated on the basis of 3D virtual seeds. Virtual seeds
are generated by combining all of the whole single seeds that are properly orientated
in the width and thickness sections of the tray.
The seeds are matched by ascending area.
60
Appendix D – Data Files
Long Grain Rice
•
•
•
•
•
•
•
•
•
•
•
•
•
•
•
•
•
•
•
•
•
•
•
•
•
•
•
•
•
•
•
•
•
•
•
•
•
•
•
•
•
•
•
•
Sample ID
Tray Number (This will only be greater than one if the Multiple Trays option
has been selected)
Number of Whole Seeds
TKW As-Is (or wet)
TKW Dry
Standard Test Weight (The standard 500ml test weight)
Mini Test Weight (The test weight calculated from the small SeedCount cup)
Dockage pct
Average CIE L
Average CIE a
Average CIE b
Seeds Tested for Chalk
Chalky Seeds Count (of number tested)
Chalky Seeds % (of number tested)
Chalk Manual Total % (user adjusted % of total tested)
Chalk Impact
Chalk Threshold % (by Area)
Red Count
Red Streak Count
Red Speck Count
Immature (Green) Count
Yellow Count
Black Count
Black Speck Count
Other Discolored Count
Glutinous Count
Disc. Total
Red % (by mass of whole seeds)
Red Streak % (by mass of whole seeds)
Red Speck % (by mass of whole seeds)
Immature (Green) % (by mass of whole seeds)
Yellow Seeds % (by mass of whole seeds)
Black Seeds % (by mass of whole seeds)
Black Speck % (by mass of whole seeds)
Other Discolored Seeds % (by mass of whole seeds)
Glutinous Seeds % (by mass of whole seeds)
Disc. Total % (by mass of whole seeds)
Red Bias
Red Streak Bias
Red Speck Bias
Immature (Green) Bias
Yellow Bias
Black Bias
Black Speck Bias
61
•
•
•
•
•
•
•
•
•
•
•
•
•
•
•
•
•
•
•
•
•
•
•
•
•
•
•
•
•
•
•
Other Discolored Bias
Normal Bias
White in Brown Count
Brown in White Count
Undeveloped Count
Undeveloped % (by mass of whole seeds)
Aspect Ratio of the Wide Section (seed length to seed width ratio)
Average Seed Roundness of the Virtual Seeds (a measure of the average seed
sphericity)
Thai Standard only:
o C1 Kernels
o C2 Kernels
o C3 Kernels
o Short Kernels
o C1 Kernels % (by mass)
o C2 Kernels % (by mass)
o C3 Kernels % (by mass)
o Short Kernels % (by mass)
All Whole %
Paddy Count
Thai / ISO Standards only:
o Head Rice Count
o Large Brokens Count
o Medium Brokens Count
US and Australian Standards only:
o Brokens Count
Small Brokens Count
Thai / ISO Standards only:
o Chips Count
Paddy % by mass
Thai / ISO Standards only:
o Head Rice % by mass
o Large Brokens % by mass
o Medium Brokens % by mass
US and Australian Standards only:
o Brokens % by mass
Small Brokens % by mass
Thai / ISO Standards only:
o Chips % by mass
Moisture (Percentage, on wet weight basis)
Protein (Percentage)
Initial Sample weight (of 'dirty' initial sample)
Clean Sample weight (after cleaning or pre-cleaned)
Sample volume
Seed Length – Mean
Seed Length – Standard Deviation
Seed Width – Mean
Seed Width – Standard Deviation
Seed Thickness – Mean
Seed Thickness – Standard Deviation
62
•
•
•
•
•
•
•
•
•
•
•
•
•
•
•
•
•
•
•
•
•
Average Seed area (Wide Section)
Total area of all seeds
Screenings >2.8 mm (Percent by weight – the thickest grains)
Screenings <2.8 mm to 2.5 (Percent by weight)
Screenings <2.5 mm to 2.2 (Percent by weight)
Screenings <2.2 mm to 2.0 (Percent by weight)
Screenings <2.0 mm to 1.6 (Percent by weight)
Screenings <1.6 mm (Percent by weight)
Count of whole and broken seeds in the >2.8 mm Screenings group (Percent
of Total Count)
Count of whole and broken seeds in the <2.8 to 2.5 mm Screenings group
(Percent of Total Count)
Count of whole and broken seeds in the <2.5 to 2.2 mm Screenings group
(Percent of Total Count)
Count of whole and broken seeds in the <2.2 to 2.0 mm Screenings group
(Percent of Total Count)
Count of whole and broken seeds in the <2.0 to 1.6 mm Screenings group
(Percent of Total Count)
Count of whole and broken seeds in the <1.6 mm Screenings group (Percent
of Total Count)
Grain type
Grain standard used to analyse the sample
Site ID
Operator ID
Version of SeedCount that created the data file
Date
Time
63
Medium and Arborio Rice
•
•
•
•
•
•
•
•
•
•
•
•
•
•
•
•
•
•
•
•
•
•
•
•
•
•
•
•
•
•
•
•
•
•
•
•
•
•
•
•
•
•
•
•
•
•
•
•
SampleID
Tray No.
Whole Seeds
TKW_As-is
TKW_Dry
Std TW
Mini TW
Dockage %
Avg CIE L
Avg CIE a
Avg CIE b
Seeds Tested for Chalk
Chalky Seeds Count
Chalky Seeds %
Chalk Manual Total %
Chalk Impact
Chalk Threshold % (by Area)
Red Count
Red Streak Count
Red Speck Count
Green Count
Yellow Count
Black Count
Black Speck Count
Other Disc. Count
Glutinous Count
Disc. Total
Red % (by Mass)
Red Streak % (by Mass)
Red Speck % (by Mass)
Green % (by Mass)
Yellow % (by Mass)
Black % (by Mass)
Black Speck % (by Mass)
Other Disc. % (by Mass)
Glutinous % (by Mass)
Disc. Total % (by Mass)
Red Bias
Red Streak Bias
Red Speck Bias
Green Bias
Yellow Bias
Black Bias
Black Speck Bias
Other Disc. Bias
Normal Bias
Black Speck Bias
Other Disc. Bias
64
•
•
•
•
•
•
•
•
•
•
•
•
•
•
•
•
•
•
•
•
•
•
•
•
•
•
•
•
•
•
•
•
•
•
•
•
•
•
•
•
•
•
•
•
•
•
•
•
•
White in Brown Count
Brown in White Count
Aspect Ratio
Roundness
All Whole % (by Mass)
Paddy Count
Head Rice Count
Large Brokens Count
Medium Brokens Count
Small Brokens Count
Chips Count
Paddy % (by Mass)
Head Rice % (by Mass)
Large Brokens % (by Mass)
Medium Brokens % (by Mass)
Small Brokens % (by Mass)
Chips % (by Mass)
Moisture %
Protein %
Initial Wght
Clean Wght
Volume
Length Mean
Length StdDev
Width Mean
Width StdDev
Thickns Mean
Thickns StdDev
Avg Seed Area
Total Area sq mm
>2.8 Screen
2.8-2.5 Screen
2.5-2.2 Screen
2.2-2.0 Screen
2.0-1.6 Screen
<1.6 Screen
>2.8 Count
2.8-2.5 Count
2.5-2.2 Count
2.2-2.0 Count
2.0-1.6 Count
<1.6 Count
Grain Type
Grain Standard
SiteID
OperatorID
SeedCount ver.
Date
Time
65
Wheat and Barley
The list of data, in the order they appear in the record for wheat and barley is as
follows:
•
•
•
•
•
•
•
•
•
•
•
•
•
•
•
•
•
•
•
•
•
•
•
•
•
•
•
•
•
•
•
•
•
•
•
•
•
•
•
•
•
•
•
•
•
Sample ID
Tray No.
Whole Seeds
TKW_As-is
TKW_Dry
Std TW
Mini TW
Dockage %
Avg CIE L
Avg CIE a
Avg CIE b
BP Mild Count
BP Wid Scale Factor
BP Nar Scale Factor
BP Severe Count
BP Wid Severity Scale Factor
BP Nar Severity Scale Factor
BP Total Count
Discolored Count
Dark Count
White Count
BP Test Num
BP Impact
BP Mild % (by Count)
BP Severe % (by Count)
BP Total % (by Count)
BP Manl Total % (by Count)
Discolored % (by Count)
Dark % (by Count)
White % (by Count)
Red Seeds Count
Green Seeds Count
Red Seeds %
Green Seeds %
Red Bias
Green Bias
Normal Bias
Immature Seeds Count
Immature Seeds % (by Mass)
Aspect Ratio
Roundness
Brokens Count
Brokens % (by Mass)
Moisture %
Protein %
66
•
•
•
•
•
•
•
•
•
•
•
•
•
•
•
•
•
•
•
•
•
•
•
•
•
•
•
•
•
Initial Wght
Clean Wght
Volume
Length Mean
Length StdDev
Width Mean
Width StdDev
Thickns Mean
Thickns StdDev
Avg Seed Area
Total Area sq mm
>2.8 Screen
2.8-2.5 Screen
2.5-2.2 Screen
2.2-2.0 Screen
<2.0 Screen
>2.8 count
2.8-2.5 count
2.5-2.2 count
2.2-2.0 count
<2.0 count
<2.5 count
Grain Type
Grain Standard
SiteID
OperatorID
SeedCount ver.
Date
Time
67
Summary Page
Below is a sample summary file for a Rice sample.
SeedCount - xxxx results
Created with SeedCount v2.3.10
Sample Details
Date
25-Jan-08
Site ID
Site1
Sample ID
Xxxx
Grain Type Rice White Long
General Results
Whole Seeds
Kernel Weight
(As-is)
Kernel Weight
(Dry)
Standard Test
Weight
Mini Test
Weight
Dockage
Aspect Ratio
Roundness
Moisture
Protein
Initial Weight
Clean Weight
846
Time
Operator ID
Tray Number
Grain Standard
Whole Kernel Measurements
Length Mean
6.45 mm
Length StdDev
0.49
Width Mean
2.15 mm
Width StdDev
0.10
Thickns Mean
1.78 mm
Thickns StdDev 0.10
3:04:39 PM
Operator 1
1
Thai
Percent
Count by
Percent
Coloured
Mass
N/A
Bias
Count by
Kernels
C1 Kernels
105 13.1 %
Mass
C2 Kernels
214 26.7 %
N/A
Red
0
0.0 % 0
C3
Kernels
237 29.5 %
Red
0
0.0
%
0
81.1
Short Kernels 247 30.8 %
Streaked
Paddy
0
0.0%
0.0 % Red
3
0.3 % 0
Specked
Underdeveloped 21
1.8%
3.07
Immature
All
Whole
N/A
95.2
%
2.62
0
0.0 % 0
(Green)
Head Rice
26
2.6 %
N/A
Yellow
0
0.0 % 0
Large Brokens 26
2.2 %
N/A
Black
0
0.0 % 0
Medium
N/A
0
0.0 %
Black Brokens
0
0.0
%
0
16.51 g Specked
Small Brokens 0
0.0 %
20.77 Other
Volume
Chips
0
0.0 %
0
0.0 % 0
ml
Discolored
9.8
Normal N/A N/A 0
Avg Seed Area
mm2
Total
3
0.3 % N/A
Total Area sq 7596
Discolored
2
mm
mm
19.5
Sample
Distribution
Glutinous 0
0.0%
N/A
Brown in
1
White
0.1%
N/A
68
Average
CIE L
Average
CIE a
Average
CIE b
72.3
18.0
7.9
Percent
Count by
Percent Percent
Screening
Count
by
by
Distribution
Count Mass
Seeds
Tested 498
>2.8 Screen 0.0 % 0.0 %
for Chalk
2.8-2.5
0.0 % 0.0 %
Chalky
Screen
10
2.0%
Seeds
2.5-2.2
0.0 % 0.0 %
Screen
Chalk
2.2-2.0
1.8
0.4 % 0.6 %
Impact
Screen
2.0-1.6
98.0 % 98.3 %
Screen
Chalk
Threshold 50
<1.6 Screen 1.6 % 1.1 %
(Min)
Chalk
69
Appendix F – Typical Grain Images
Barley
70
Wheat
71
Rice
72