1
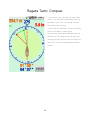
Regatta Tactic Compass
User Manual ver. 5.0
1
Regatta Tactic Compass
Regatta Tactic Compass is an instrument for
sail navigation.
Tactic Compass uses data from GPS like
position, speed and bearing.
Using GPS info Tactic Compass can
calculate and provide the optimal route to
the target.
In order to make optimal route calculation it
is necessary to have the following preset:
1) set the destination waypoint,
2) set the true wind direction,
3) switch the instrument in "route" mode
using the "route" option of context menu.
Waypoint handling and wind direction input
are described in the following sections.
2
Regatta Tactic Compass
Tactic Compass has 2 visualization ways:
in the first one all the relevant directions
are represented as angles,
in the second one the route and all
relevant distances are represented.
The picture shows the display in the first
mode.
The route angle and real speed are
displayed.
In order to switch between two modes
use the "display angles" and "display route"
options of context menu.
3
Regatta Tactic Compass
It is possible to display a bearing angle.
In the picture the red arrow reference has
been oriented to 332° and the angle
between bearing and route is 73°.
This display requires the "Compass mode"
preference of context menu to be set to
"magnetic compass" option.
4
Regatta Tactic Compass
It is possible to define the waypoint position
in many different ways we will see in the
following sections.
Waypoints are represented by an orange
point.
In this case the angle between route and
waypoint bearing is represented together
with the airline distance in nautical miles
from boat to waypoint.
Please notice the coherent usage of colors.
The distance from waypoint is orange like
waypoint, speed along route is yellow as
route.
This is a general rule that helps to correlate
numeric info to related objects.
5
Regatta Tactic Compass
It is possible to represent many angles in
the same display.
The angles to be displayed can be
selected using the option "settings" from
the context menu activated by the menu
button when using the navigation display.
6
Regatta Tactic Compass
The waypoints are represented in a list that
can be accessed by the "waypoint" option
of the context menu.
The list shows which is the currently
enabled waypoint (the one we are
navigating to).
The short selection of one "waypoint" list
element is used to change the active
waypoint selection.
7
Regatta Tactic Compass
The long selection of one waypoint list
element enables the menu with all the
possible action on the selected waypoint.
"Rename" and "Cancell" are self
explanatory.
"Show on map" enables the map and
moves near the position of the waypoint.
8
Regatta Tactic Compass
There are 3 ways to insert waypoints:
the first is manually using the form shown in
the picture.
The manual insertion of waypoint can be
accessed selecting the "Manual insert"
option
of the context menu activated by the menu
button when showing the waypoint list.
9
Regatta Tactic Compass
The second mode for creating waypoints is
using a couple of compass bearings of the
target from different places.
In order to get a bearing select the "New
bearing" option in the context menu
activated by the menu button
when navigate display is shown.
If no other bearing waiting to be
completed is available the display in
picture is immediately shown.
Place the red arrow in the target direction
and press "Get bearing" button.
10
Regatta Tactic Compass
Given the coarse accuracy of magnetic compass, GPS
Compass provides a second way to get bearings. The
second way is completely based on GPS.
The GPS based bearing is a 2 steps procedure. In the
first step a reference direction is acquired and
memorized, in the second step the reference is used.
The first step can be done once for many subsequent
bearings.
11
Regatta Tactic Compass
In order to get GPS bearing reference
select the "Bearing ref. GPS" option from
the context menu.
To take a consistent reference chose a
location without obstacles for GPS receiver
and far from disturbing magnetic fields.
Take the instrument straight in front of you
and move straight with a speed
greater than 5 km/h.
You can do this operation no matter which
is the compass mode selected.
If magnetic compass mode is selected you
get the display in the picture.
You will see that the compass direction (red
arrow) and your direction as
measured by GPS (yellow line) may differ. If
the difference is not stable it is due
to GPS. The speed is too low or receiving
is not optimal. If the difference is stable
it is due to systematic magnetic compass error.
When difference is stable (or null) press the "Get bearing reference" button.
The compass bearing and GPS bearing are both memorized as reference for
subsequent bearings.
12
Regatta Tactic Compass
In order to get GPS based bearings the
"GPS compass mode" must be selected in
preferences.
Select the "Get bearing" option from the
context menu.
To take the bearing you have to align the
instrument in the same direction it was
when reference was taken.
To accomplish this task rotate the instrument
until the number over the triangular marker
is 0.
The number represents the difference in
degrees between the current direction of
the instrument
and the reference direction.
To facilitate alignment the compass is white
when aligned, becomes red when rotated
counterclockwise
and becomes green when rotated
clockwise.
Once the compass is aligned to the reference direction, rotate the red arrow in the
direction of the target by dragging it on the display.
When both alignments are ok press the "Get bearing" button.
13
Regatta Tactic Compass
If other bearings waiting to be completed
are available the list to choose the bearing
to be associated
with the current one is shown.
There is also the option to create a new
waypoint for the bearing.
14
Regatta Tactic Compass
The map enables both visualization and
creation of waypoints.
The picture shows a waypoint created by a
couple of bearings.
The blue-white markers show the location
from where the bearings was taken.
The red-white marker shows the position of
the waypoint. It is also possible to create a
new waypointby touching a point in the
map.
15
Regatta Tactic Compass
The map can be shifted or zoomed by
dragging a touch.
Please take into account that a static touch
is always interpreted as request
to create a new waypoint.
By touching a waypoint marker the
contextual menu shown in picture is
displayed.
You can delete rename or navigate to the
selected waypoint.
16
Regatta Tactic Compass
Optimal route calculation.
The route calculation is based on the true
wind direction and on the boat route as
measured by GPS bearing.
Based on the above information the layline
(green line in the picture) position is
detected.
The lay line is defined as the line passing
over the waypoint and having with the wind
direction the same angle as the angle
between the current route and wind on the
opposite tack.
The layline is not the one for the optimal
route but the one corresponding to
the current angle between route and wind.
17
Regatta Tactic Compass
The display represents at a glance all the
information:
The route (yellow),
Wind direction (blue),
Layline (green),
Distance from boat to layline along the
route (yellow number at top left),
Distance along the layline to the waypoint
(green number at top left),
Airline distance to the waypoint (orange
number at top right),
Real speed (from GPS) along the route
(yellow number at top right).
18
Regatta Tactic Compass
In the bottom part of the display the
information that helps route optimization are
presented (in red color).
The number expressed in nautical miles (M)
is the distance along the path summing
distance to layline and distance along
layline (yellow+green).
The number expressed in knots (kn) is the
effective speed:
v_eff=v_real*dist/dist_tot
dist is the airline distance and dist_tot is the distance along the path.
19
Regatta Tactic Compass
Effective speed.
Effective speed is an indicator of the route
optimization.
It is convenient to keep the route which
maximizes the effective speed.
Polar diagram.
The polar diagram represents the history of
normalized values for effective speeds
registered for deviation angles from current
route between -30° and +30°.
The current route is optimal if the diagram
has the maximum value at center (0°).
If the maximum value is shifted in a side it is
convenient to approach this side.
20
Regatta Tactic Compass
The true wind direction is inserted by the
"wind dir." option of context menu.
The wind direction can be inserted in two
distinct ways.
The first one consists in using magnetic
compass, setting the lubber line (red arrow)
in the direction
from which wind originates.
The second way consists in setting wind
direction as related to route direction.
The second way is the preferred one when
wind instrument reading is available.
Wind direction related to route direction
can be inserted manually by setting the
angle value in degrees or graphically by
setting the read arrow in the direction from
which wind originates.
In the last case the red arrow should be
oriented by a touch on the display.
Note that the read arrows are always
oriented in the direction from which wind originates whereas the blue arrow
in the navigation display represents the true wind direction.
The first way is always available whereas the second one is available only if the GPS is
currently providing the route bearing.
If the GPS route is available it is possible to select the insert mode as you can see in the
figure.
If the GPS route is not available the magnetic compass mode is selected.
21
Regatta Tactic Compass
The bearing (route) and speed
measurements from GPS are reliable if
there are no obstacles to
satellite signals and the boat speed is over
4 kn.
The magnetic compass which equips most
of the smartphones and touchpads is not
reliable and gives only indicative
measurements.
In order to avoid the effect of not stable
compass reading the bearing represented
in the default mode
is the one reported by GPS.
The route is always drawn along the vertical
display axis and the the yellow number over
the triangular
marker displays the GPB bearing reading.
It is also possible the alternative display
represented in the figure. In this mode the
angle on the triangular marker is the one reported by magnetic compass.
In order to switch between two modes use the "preference" option of context menu
and select the preferred "compass mode".
When "compass mode" is set to "Automatic compass mode" the instrument switches
automatically between magnetic compass and GPS depending on the availability of GPS
bearing.
The compass is yellow when in GPS mode, white when in magnetic mode and grayed
when it is in GPS mode but GPS bearing is not available.
22
Regatta Tactic Compass
Start Line
Regatta provides you an instrument that
helps optimizing approach to start line.
The "start" mode can be selected with the
context menu.
In "start" mode Regatta provides many
relevant information about start line
distance and location together with a
programmable countdown timer.
In order to have start line information the
start line coordinates have to be defined
using
waypoints as described in the following of
the manual.
In the picture you can see the following information:
1) The start line is represented by a green arc. The arc is limited by a red point in the left
and a green point on the right.
2) The orange number in the top left of the display is the distance from the nearest point
of start line
3) The green number in the top left of the display is the distance from start line
intersection with boat route (if any).
4) The red number in the top right is the boat speed.
5) The green number in the bottom center is the time to start line calculated with current
route and speed.
6) The blue number in the bottom center is the down counter.
23
Regatta Tactic Compass
The button in the right bottom can be used
to start the countdown timer or to reset it
to the initial value.
The initial value can be configured in the
"preferences" option of context menu. The
unit for countdown initial value is minutes
and the default is 5.
In the case represented in the picture the
boat route is intersecting start line and start
line is in front of the boat.
In this case the start line is represented in
green color.
When the start line is crossed and it is
behind the boat the start line color is
changed to red.
24
Regatta Tactic Compass
In the picture you can see the case when
the start line is crossed.
Start line is behind boat and its color is
changed to red.
Please notice that the two numbers in the
top left have the same meaning as before
start line crossing.
The color of the timing field in the bottom
center is changed to orange indicating it is
no more the time to reach start line with
current route.
It now represents the time to reach the
nearest point of start line with current
speed.
25
Regatta Tactic Compass
In the picture you can see the case when
there is no intersection between start line
and boat route, this is a normal situation
during pre-start circling.
In this case the distance to start line along
boat route doesn't make sense
and the only information available are the
distance to the nearest point of start line
(orange top left) and the time to reach this
point with current speed (orange bottom
center).
26
Regatta Tactic Compass
In the picture you can see the case when
the boat speed is null or under the
minimum for a correct route estimation by
GPS.
In this case only the start line position and
minimum distance are represented.
Please notice that in any case is possible to
determine whether we are before or after
start line and the color of the start line
(green before and red after) represents this
information.
27
Regatta Tactic Compass
Start line position should be defined by a
couple of waypoints representing the left
and right ends.\n
As usual waypoint can be defined with the
"waypoint" option of context menu or using
the map.
The most practical mode is to mark the
current position using the "waypoint" menu
option "new waypoint" when passing near
start line ends.\n
Once the waypoints have been inserted
they can be assigned to start line ends
using the context menu of map or waypoint
list.
In the case of defining start line by map
keep pressed the waypoint marker and
select the correct "start line end option"
from the context menu.
In case of defining the start line using
waypoint list do the same by long selection of list item.
28