1
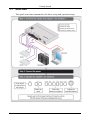
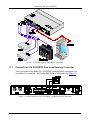
Connecting the 906 Amplifier # 18 Feature MID Adjustment Button 19 20 TREBLE Adjustment Button BALANCE Adjustment Button 21 VOLUME Adjustment Button 22 23 Adjustment Potentiometer Knob PROGRAM USB Connector 5 Function Press to select the mid range adjustment, adjust with the Level Knob Press to select the treble adjustment, adjust with the Level Knob Press to select the balance between right and left speakers, adjust with the Level Knob Press to select the volume adjustment, adjust with the Level Knob. Press and hold to disable local volume control and enable remote volume control. Press and hold again to activate local volume control (see section 6.1) Turn to raise or lower the selected audio feature For factory use only Connecting the 906 Amplifier To connect the 906, as illustrated in the example in Figure 2, do the following: 1. Connect an unbalanced stereo audio source (for example, the unbalanced stereo audio output of a DVD player) to the L and R INPUT 1 RCA connectors. 2. Connect a balanced stereo audio source (for example, the balanced stereo audio output of a DVD player) to the INPUT 2 terminal block connector. 3. Connect the OUTPUT terminal block to a pair of loudspeakers: Connect the “L+” and the “L-” terminal block connectors to the left loudspeaker, and the “R+” and the “R-” terminal block connectors to the right loudspeaker. Do not ground the loudspeakers. 4. Connect the 12V DC power adapter to the power socket and connect the adapter to the mains electricity (not shown in Figure 2). 5. If required connect: The 10V CONTROL terminal block connector to an external controller 1 (see section 5.1) The RS-232 port to a PC and/or serial controller (see section 5.2) The Ethernet port to a PC or a network hub or router (see section 5.3) 1 For example, the Kramer RC-63A 5