1
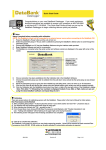
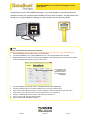
Quick Start Guide for use with Turner Designs C-sense pCO2 Sensor Congratulations on your new DataBank Datalogger. If you need assistance, technical specialists are available to answer your questions at 408-749-0994 or toll-free at 877-316-8049. This Quick Start Guide will help you set up the DataBank Datalogger to begin collecting data as quickly as possible. Setup Setup is required before proceeding with calibration. NOTE: The DataBank should not be connected to an external power source when connecting to the DataBank GUI. 1. 2. 3. Press the DataBank’s Power button to power on the instrument. Connect the DataBank to a PC running DataBank GUI Ver. 3.09 using the interface cable provided. Begin DataBank GUI and wait for a connection (the DataBank is connected when the serial number and software version are displayed in the upper left corner of the screen). Upon connection, the DataBank’s serial number and version of the operating system are displayed 4. 5. 6. 7. 8. 9. 10. Once the DataBank is connected, click the “CALIBRATION” tab in the DataBank GUI. Choose the parameter group you wish to calibrate from the “Group #” pull down menu. Click on the “AUTO-GAIN” tab and select 1 from the “Number of Auto-Gain Selections” drop-down menu. Confirm Gain 1 in the “Sensor Gains” box is active and Gains 2 – 4 are grayed out. Click the “CALIBRATION” tab and confirm “Gain Values” box contains “x1”. Type “C-sense” in the “Title” box and press enter. Click the “ADVANCED CALIBRATION” button. www.turnerdesigns.com 998-2906 Revision B Page 1 of 2 Quick Start Guide for use with Turner Designs C-sense pCO2 Sensor Advanced Calibration There are several options for calibrating sensors with the DataBank. Please refer to the User’s Manual for other options. Partial Pressure of CO2 in ppm 1) In the “Group Number” box, choose the parameter group from the pull down (same group number used in Setup step #5). 2) Type “ppm” in the “Units” box and press enter (output will be calculated in parts per million). 3) Confirm the “Title” box contains the title C-sense. 4) From the “Gain” pull down menu, select 1. 5) Obtain the calibration sheet that was sent with the C-sense instrument. 6) The slope value is in volts while the DataBank expects a slope value in millivolts, therefore you must divide the slope by 1000. The offset can be entered from the calibration sheet as is. You may now save these calibration values to the instrument following the steps below: In the “Interpretation Equation” box, 1) Select “mV”, for millivolt 2) Select “Dec.”, for decimal 3) Enter the y-intercept from the calibration sheet into the "Order 0 (Offset)" box and press enter. 4) Enter the calculated slope value from step #6 into the “Order 1 (Slope)” box and press enter. 5) Enter a “0” in the “Order 2” box and press enter, and a “0” in the “Order 3” box and press enter. The DataBank is now ready for use. You may shut down the GUI and begin measuring samples or go to the “Setup Options” tab and change settings. Values measured are stored in the DataBank’s memory as millivolt readings and converted to ppm concentrations. To log the data, press and hold the “STORE/LOG” button on the DataBank. The DataBank will display “LOGGING MODE ENTERED” and begin logging data to internal memory. www.turnerdesigns.com 998-2906 Revision B Page 2 of 2