1
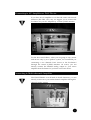
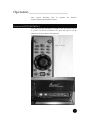
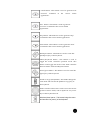
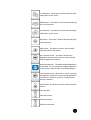
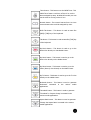
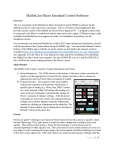
J
a
s
m
Jasmine Evolution-I
i
Home Media Center
n
e
H
O
M
Owner’s Manual
E
M
E
D
I
A
Safety Precautions _______________
To achieve the best performance from your Jasmine
Evolution-I Home Media Center, and for your own
safety, please read and follow these important safety
instructions:
Never place the Jasmine EVOLUTION-I near heat
sources such as radiators, fireplaces, stoves, or other
appliances that produce heat. Avoid placing the
Jasmine EVOLUTION-I where it will be subject to direct
sunlight or low temperatures.
AC extension cords are not recommended for use with
this product. If an extension cord must be used, be sure
it is an approved type and has sufficient current
carrying capacity for this product.
Before cleaning the Jasmine EVOLUTION-I, always
disconnect the power supply cord. Use a soft cloth and
if necessary, dampen with clean water or mild cleaning
agent. Never apply water, or any other cleaner, directly
to the chassis.
If you smell smoke or an abnormal smell, immediately
unplug the Jasmine EVOLUTION-I from the power
supply and contact your Jasmine dealer.
Never attempt to do service on the Jasmine
EVOLUTION-I beyond what is described in this
Owner’s Manual. Qualified service personnel should
perform all repairs.
Unplug unit if it becomes wet.
Do not open unit when attached to AC outlet;
dangerous voltages may be encountered.
Replace fuse only with the exact type originally
included.
Contents _______________________
Safety Precautions
Introduction
2
Brief of Jasmine
The Design Philosophy of Jasmine
Installation
4
5
Unpacking
The Accessory Kit
Choosing a Location for the Jasmine Evolution-I
Connections
6
Connecting to AC Power
Connecting to AV amplifier or DAC device
Connecting to Multi-channels amplifier
Connecting to Display device
Operation
9
Turn on/off Evolution-I
Using Remote Control
Setting Audio Output Model
Warranty
17
Specifications
18
Introduction _______________________
All of us at Jasmine would like to offer thanks and
congratulations to you for purchasing the Jasmine
EVOLUTION-I. We sincerely believe that your Jasmine
EVOLUTION-I is an intelligent purchase decision that will
bring you many years of entertainment pleasure and
satisfaction. While every new owner is anxious to begin trying,
we encourage you to take a few minutes to read this manual
and familiarize yourself with the full capabilities of the Jasmine
Evolution-I.
To reduce the risk of injury or damage to your Jasmine
EVOLUTION-I, please read the safety instructions on the first
page of this manual. In addition, please pay particular attention
to the sections of this manual where the symbol at left is shown.
A Brief History of Jasmine
Jasmine Audio was established by a group of professional
audiophile with the pure passion for the perfection of sound in
2001. The result of this passion is products with marvellous and
smooth dynamic sound combined with innovative design. No
detail on a Jasmine product is left unattended, and all
components are handpicked by experienced and qualified
engineers. Owning a Jasmine product should be seen as being
part of a very special “club”, created by enthusiasts for
enthusiasts.
The Design Philosophy of Jasmine
Pure,
Simple,
Natural !
Installation _______________________
This section includes information on how to unpack and
position your Jasmine EVOLUTION-I Home Media Center.
Unpacking
After carefully unpacking your Jasmine EVOLUTION-I, inspect
for any shipping damage and call your dealer immediately if
any is found. Do not plug your Jasmine EVOLUTION-I into any
outlet if you find shipping damage.
Please save all packing materials so the unit can be easily and
safely shipped if the need arises.
The Accessory Kit
Included in the carton, you will find an accessory kit that
contains the following:
Remote control
Integrated Wireless Keyboard&Mouse
USB Inductor for Keyboard&Mouse
Component video connecting cable.
Choosing a Location for the Jasmine Home Media Center
For best performance, place the Jasmine EVOLUTION-I on a
solid, non-resonant shelf. The 15cm height top space must be
leaved, and must have an open space at front and rear direction.
Notice: To put the machine in a airtight place will
result the thermal problem and cause the machine
shutdown!
Connections _______________________
This section provides instructions to connect the Jasmine
EVOLUTION-I to the rest of your Audio/Video system. Below
is an illustration of the Jasmine EVOLUTION-I rear panel,
showing all inputs and outputs.
Avoid allowing static shocks to be applied to the inputs or
outputs. To prevent static shocks, touch any grounded surface,
such as the chassis of a component that is plugged into an AC
socket, before connecting or removing a cable.
Inputs and outputs can be safely connected to the Jasmine
EVOLUTION-I when the AC power is switched off.
Connecting to AC Power
Check to make sure your Jasmine EVOLUTION-I has been
manufactured for operation at your AC line voltage.
Attempting to use your Jasmine EVOLUTION-I at any voltage
other than that specified on the rear of the unit may cause
damage that is not covered by Jasmine’s warranty.
Jasmine AC Power Mode:
The 220V mode is suitable for using in 220 ~ 240V voltage
environment.
The 110V mode is suitable for using in 110 ~ 120V voltage
environment.
Connecting to AV Amplifier or DAC Device
If you have an AV amplifier or AV decode center with decode
functions (like DTS, AC3, etc), we suggest you to connect the
Evolution-I to your AV amplifier by Coaxial S/PDIF interface.
For the best sound effects, when you are going to enjoy music
and movies only by two speakers system, we recommend you
connecting a two channels DAC device to the Evolution-I
through the coaxial S/PDIF interface. Of course, you can
directly connect the FRONT analog output to your stereo
amplifier from Evolution-I if you have not a DAC device.
Connecting to Multi-channels Amplifier
The EVOLUTION-I own all kind of decode functions, you can
directly connect it to your multi-channels amplifier through 5.1
channels analog output.
Connecting to Display Device
The Evolution-I support various display terminals. You can
choice the most suitable connecting port according to your
display device.
If your TV only supports component connection (RGB), you can
use the covert cable to connect it.
Operation _______________________
This section describes how to
EVOLUTION-I Home Media Center.
operate
the
Jasmine
Turn on/off EVOLUTION-I
You can press the red button on right corner of remote control
to power on/off the Evolution-I or press the power on/off
button on the front panel of Evolution-I.
Using Remote Control
Jasmine Evolution-I own all the features of normal computer.
It equipped with keyboard and remote control for easy
operation. You can finish most of entertainment operation in
Media Center Software just by remote control.
Power button : This button is used to turn On/Off PC.
App. Exit button: This button generates the keyboard
short cut command, [ALT]+[F4],which is used for
closing the active window.
REC button: This button is used to generate ‘Record’
command in the various media applications.
Play button: This button is used to generate ‘Play’
command in the various media applications.
Open button : This button is used to generate
‘File/Folder Open’ command in the various media
applications.
REW button : This button is used to generate
‘Rewind’ command in the various media applications
Pause button : This button is used to generate
‘Pause’ command in the various media applications.
F.Fwd button : This button is used to generate ‘Fast
Forward’
command
in
the
various
media
applications.
Prev. button : This button is used to generate
‘Previous’ command in the various media
applications.
Stop button : This button is used to generate ‘Stop’
command in the various media applications.
Next button : This button is used to generate ‘Next’
command in the various media applications.
BackSpace button : This button is used as same like
[BackSpace] key of the keyboard.
Mouse/Keyboard button : This button is used to
toggle the ‘PAD’ controller operation mode. This
button could toggle the mode of the PAD controller
between Mouse mode and Keyboard mode.
Select/Space button : This button is used as same like
[Space] key of the keyboard.
Windows Logo (Start) button : This button brings the
start menu and acts like the [Windows logo] key of
the keyboard.
PAD Controller: This PAD is used to move the mouse
pointer at mouse mode, and to input four way arrow
keys at the keyboard mode.
Windows Menu button : This button brings the menu
and acts like the [menu] of the keyboard.
L. Click button : This button is used as same like [Left
Click] button of the mouse.
ENTER button : This button is used as same like [Enter]
key of the keyboard.
R. Click button : This button is used as same like [Right
Click] button of the mouse.
ESC button : This button is used as same like [ESC] key
of the keyboard.
Eject button : This button is used to open the ODD
(CD/DVD) ROM on the system.
App. Launcher button : This button executes the
Application Launcher which could run many assigned
windows applications and files.
Quick Launch button : The default assigned application
is Vista MCE. You can change the assigned application
on the ‘Setup>Launcher’ menu of the iMON Manager, .
Task Switcher button: This button is used for choosing
the application among the current running applications.
This feature is similar to the [ALT]+[TAB] keyboard
shortcut command.
MUTE button: This button is used to mute/unmute the
volume.
VOL Up button
VOL Down button
Channel Up button
Channel Down button
Timer button : This button runs the iMON Timer. This
iMON Timer feature could turn off the PC or set the
alarm assigned by setup. At iMON VFD model, user can
set the time for turning on the PC too.
Numeric button : The numeric buttons from 0 to 9 are
custom buttons that could be assigned by users.
Shift+Tab button : This button is used as same like
[Shift]+[TAB] key of the keyboard.
Tab button : This button is used as same like [TAB] key
of the keyboard.
My Movie button : This button is used to go to the
Movie View directly on Vista Media Center.
My Music button : This button is used to go to the
Music View directly on the Media Center.
My Photo button : This button is used to go to the
Photo (Picture) View directly on the Media Center.
My TV button : This button is used to go to the TV View
directly on the Media Center.
Bookmark button : This button is used to generate
‘Bookmark’
command
in
the
various
media
applications.
Thumbnail button : This button is used to generate
‘Thumbnail’ or ‘Capture Image’ command in the
various media applications.
Aspect Ratio button : This button is used to generate
‘Change the Aspect Ratio’ command in the various
media applications.
Full Screen button : This button is used to generate
‘Full
Screen’
command
in
the
various
media
applications.
My DVD button : This button is used to go to the DVD
View directly on the Media Center.
Menu button : This button is used to generate ‘DVD
Menu’ command in the DVD applications.
Caption button : This button is used to generate
‘Change the Caption/Subtitle’ command in the DVD
applications.
Language button : This button is used to generate
‘Change the Language/Audio’ command in the DVD
applications.
Setting Audio Output Model
Step one. Set up your audio configuration in Vista System.
Step two. Set up your audio configuration in Vista Media Center.
Settings> General> Windows Media Center Setup> Set up Your
Speakers.
Step Three. Set up your audio configuration in Decode Center.
1. Run “SetCenter” as administrator
2. Use right mouse button to click on the audio decoder.
3. Use left mouse button to open audio configuration
menu.
Then, choose your corresponding speaker environment.
If you use AV amplifier or DAC to decode audio
stream, Please choose “USE SPDIF” option.
Warranty _______________________
Jasmine warrants that Jasmine products shall be free from
defects in materials and workmanship for:
One years for parts and labor
The warranty period begins at the date of retail sale by an
authorized Jasmine dealer and is subject to the following
requirements and understandings:
1.
2.
3.
4.
5.
6.
7.
8.
This is a non-transferable warranty applicable to the
original purchaser exclusively.
The product must not have been modified in any manner
whatsoever, or the warranty is immediately voided.
The product must not have been stored in humid
environment; nor subjected to weather, water, or salt spray.
During the warranty period Jasmine will repair the product
to working order, or, at Jasmine’s option, replace the
defective equipment with a similar available product, at no
cost to the owner for the labor, materials, and return
shipping from Jasmine.
Jasmine shall not, under any circumstances, be liable for
any incidental or consequential damages arising from the
loss of property or other damage or losses due to the failure
of a Jasmine product. Jasmine will not pay for loss of use or
inconvenience caused by the failure of a Jasmine product.
Jasmine will not pay for damage caused to other audio
components because of the failure of a Jasmine product
within the limits allowed by State Law.
All repairs performed after the warranty period has
expired will be billed to the owner and will carry a 90 day
warranty on parts and labor.
The customer is responsible for shipping the unit to
Jasmine.
Jasmine product is only warranted in the country of
original sale.
Specifications _______________________
CPU:
AMD Athlon64 AM2 X2 3800+ (65W)
Memory:
2x1GB DDR667 (double channel)
Hard disk :
320GB SATA ( User expandable)
Display:
ATI X1250 with Avivo
DVD-RW Drive :
Pioneer 112XL
Power Supply:
400W
Audio Interface:
Coaxial S/PDIF, 5.1 Channels, Mic in
Video Interface:
HDMI,DVI,VGA, Component, Analog video
Other Interface:
1394 firewire,
Ethernet
Accessories:
Wireless keyboard&Mouse, Remote control
Net Size
430(W) x 88.9 (H) x 440(D) mm
6xUSB
2.0,
Printer,Gigabit
@ 2005 Jasmine audio
Block B1-5C, Digital Tech. Park,
Southern Keji Rd.,
Shenzhen, GD,
China 518057
Subject to change without notice.