1
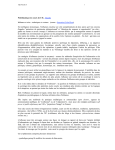
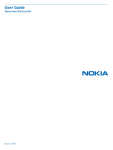
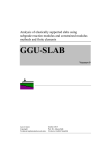
REACH. ENGAGE. MONETISE.
INFOBIP PUSH
CLIENT PANEL
USER MANUAL
REACH. ENGAGE. MONETISE.
Infobip Ltd
109 Farringdon Road, 1st Floor, London EC1R 3BW
Phone: +44 (0)20 7837 4180 / Email: [email protected]
Page 0
www.infobip.com
REACH. ENGAGE. MONETISE.
CONTENTS
Introduction ....................................................................................................................................... 2 Requirements ..................................................................................................................................... 3 1. Client panel .................................................................................................................................................................................. 3 Web interface ................................................................................................................................................................................... 3 Your application ................................................................................................................................................................................ 3 3. REST API ....................................................................................................................................................................................... 4 Web interface ..................................................................................................................................... 4 Registration ........................................................................................................................................................................................ 4 Create and register your application ............................................................................................................................................ 5 Notification overview ....................................................................................................................... 7 Notification history ........................................................................................................................................................................... 8 Sending notifications ........................................................................................................................ 9 Adding rich text ................................................................................................................................................................................ 11 Adding external links ...................................................................................................................................................................... 12 Customer segmentation (Channels) ........................................................................................... 19 Geo locations ................................................................................................................................... 22 Statistics ............................................................................................................................................ 25 Infobip Ltd
109 Farringdon Road, 1st Floor, London EC1R 3BW
Phone: +44 (0)20 7837 4180 / Email: [email protected]
Page 1
www.infobip.com
REACH. ENGAGE. MONETISE.
INTRODUCTION
Push notifications are messages that you send to customers who have previously installed
your application in order to provide them with information about your business. Account
balance, sport scores, results or notifications about discounts in certain stores can all be
used as examples. When a push notification appears on a mobile screen, the customer can
decide whether to read it or dismiss it.
In order to receive these notifications, your end user needs:
•
a smartphone
•
to register for the service, and
•
to have an active Internet connection.
Infobip Push service is intended for sending push notifications to consumers that are using your mobile application.
Currently, we have developed this service for Android, iOS and Windows Phone operating systems. There are two ways
of sending notifications:
•
Client Panel
A web panel with a user-friendly interface to customise and send push notifications
•
REST API
An application programming interface (HTTP requests for sending notifications)
Figure 1: Infobip Push system
Infobip Ltd
109 Farringdon Road, 1st Floor, London EC1R 3BW
Phone: +44 (0)20 7837 4180 / Email: [email protected]
Page 2
www.infobip.com
REACH. ENGAGE. MONETISE.
REQUIREMENTS
1. CLIENT PANEL
Client Panel is an intuitive interface for creating and sending notifications which provides
you with many different features. The requirements necessary to get started will be
explained in the following sections.
WEB INTERFACE
To access our platform use the following link:
http://push.infobip.com/
If you don’t have an account, you will need to fill in some basic information in order to use the platform. Required fields
for the registration are:
•
Name
•
Surname
•
Country
•
Time zone
•
E-mail
•
Mobile phone number
•
Username
•
Password
•
Confirm password
YOUR APPLICATION
Your application needs to be available for download on Google Play and/or App Store. Each Android application has its
own application key which is required to register your application in our system. In order to register an iOS application
you need to get an Apple push certificate (the instructions are available on our website: push.infobip.com). For Windows
Phone you will have to check the box “Activate Windows phone” in our Client Panel. That way we can connect
notifications you’re sending with your application.
Infobip Ltd
109 Farringdon Road, 1st Floor, London EC1R 3BW
Phone: +44 (0)20 7837 4180 / Email: [email protected]
Page 3
www.infobip.com
REACH. ENGAGE. MONETISE.
2. LIBRARIES You need to enable the push notifications service in your application. Please follow the
detailed instructions presented in the “Android Library” and “iOS Library” documents.
3. REST API
An alternative way of using Infobip’s Push service is over REST API which is the main
access point for developers. Our flexible API helps you integrate your application with our
service and send notifications using secure HTTP requests. Each request, along with its
parameters and responses, is explained in the API documentation. There you can also find
example requests.
WEB INTERFACE
REGISTRATION
After you fill in the registration form on the web interface, you can sign in with your credentials. There you can edit your
profile information, verify your account or change your password.
Figure 2: Registration form
Infobip Ltd
109 Farringdon Road, 1st Floor, London EC1R 3BW
Phone: +44 (0)20 7837 4180 / Email: [email protected]
Page 4
www.infobip.com
REACH. ENGAGE. MONETISE.
Figure 3: User profile information
CREATE AND REGISTER YOUR APPLICATION
After creating your account, you will need to create and register your application in our system. Upon clicking the “Add
new application” button in the Dashboard, a form will appear and you will need to fill in some information.
•
Application name
Enter the name of your application.
•
Description
Enter a brief description of your application.
•
Application image
Upload a picture you want displayed in the Client Panel, so you can easily differentiate between applications.
•
Application key
Obtain your application key for Android from the Google Cloud Messaging platform which we use for sending
notifications.
•
APNS certificate
Upload the certificate and the key obtained from the iOS Provisioning Portal (detailed instructions are on the site). By
filling in these fields you are “creating” your application in our system and, at the same time, enabling the creation of
notifications that will be displayed on your consumers’ devices.
Infobip Ltd
109 Farringdon Road, 1st Floor, London EC1R 3BW
Phone: +44 (0)20 7837 4180 / Email: [email protected]
Page 5
www.infobip.com
REACH. ENGAGE. MONETISE.
•
Activate Windows phone
Check this box if you want to use push service for Windows phone app
Figure 4: Creating new application
Infobip Ltd
109 Farringdon Road, 1st Floor, London EC1R 3BW
Phone: +44 (0)20 7837 4180 / Email: [email protected]
Page 6
www.infobip.com
REACH. ENGAGE. MONETISE.
NOTIFICATION OVERVIEW
PATH
Dashboard → Visit application → Notification overview
The Notifications section displays all notifications scheduled, but not yet sent, live geo
notifications, drafts, and all the notifications that have already been sent to the end users’
devices.
For each, the following info is shown:
•
Time
Time when a push notification has been sent (you can sort notifications by time sent). For scheduled notifications,
sending time is displayed. For live geo notifications, sending time is the point when a live geo campaign becomes active.
•
Message
Notification text; sort alphabetically
•
Sent to
Displays users that you sent notifications to (broadcast – all users / specific users); sort by user type
•
Action buttons:
•
Reuse notification
When you click this button, the “Send message” editor will appear, filled with the information you have previously
sent. This option allows you to resend this notification, or edit it if necessary.
•
Notification details
Here you can see all additional details about selected notifications not shown in the history table.
Figure 5: Notifications
Infobip Ltd
109 Farringdon Road, 1st Floor, London EC1R 3BW
Phone: +44 (0)20 7837 4180 / Email: [email protected]
Page 7
www.infobip.com
REACH. ENGAGE. MONETISE.
NOTIFICATION HISTORY
Notification history provides an overview of all notifications sent through our platform.
Clicking the “Message details” button displays statistics for each notification. Stats for each
notification are the number of devices to which the notification was sent (“Sent” box), the
number of successfully delivered notifications (“Received” box), and the number of
messages read by the end user (“Opened” box).
Other information displayed: type of operating system, notification text, time when the notification was sent, notification
type, target audience group, as well as the platform status of the notification.
Figure 6: Notification history
Infobip Ltd
109 Farringdon Road, 1st Floor, London EC1R 3BW
Phone: +44 (0)20 7837 4180 / Email: [email protected]
Page 8
www.infobip.com
REACH. ENGAGE. MONETISE.
SENDING NOTIFICATIONS
PATH
Dashboard → Visit application → Left sidebar menu “Notifications” → Send push
After creating your application and registering recipients, you are ready to send out your
notifications. Clicking the “Send notification” tab opens the editor where you can create
your push notification. Simply fill in all the required fields.
Our 5-step wizard will guide you through the process of creating notifications for a
wonderful marketing campaign.
1. CREATE YOUR MESSAGE
•
Message type
You can choose between using plain text, a text with an attached link, or JSON notifications. If you choose to use text
containing a link, an additional field for entering the URL will appear under the “Message text” box. JSON notifications
allow you to send customised notifications to your consumers (for more info, see the section “JSON notifications”).
•
Message text
Add information or content you want to send to your consumers.
Figure 7: Creating a push notification
Infobip Ltd
109 Farringdon Road, 1st Floor, London EC1R 3BW
Phone: +44 (0)20 7837 4180 / Email: [email protected]
Page 9
www.infobip.com
REACH. ENGAGE. MONETISE.
2. CREATE MEDIA PUSH
Media Push enables you to send rich multimedia content to clients and create a more
meaningful engagement with better customer experience. You can send pictures, audio or
video tracks, even create an HTML page which will be shown in your application. Creating
media content is seen as an optional step in the 5-step wizard.
To enable media push, check the box „Use Media Push“. Next, you will be shown a text editor where you can create your
media content. The content itself can be structured by using source code, or by simply adding content as with other web
editors.
Figure 8. Media push wizard step
Infobip Ltd
109 Farringdon Road, 1st Floor, London EC1R 3BW
Phone: +44 (0)20 7837 4180 / Email: [email protected]
Page 10
www.infobip.com
REACH. ENGAGE. MONETISE.
ADDING RICH TEXT
Enter text in the text editor and enrich it with:
•
Different sizes, fonts and styles
•
Font and font background colour
•
Text alignment
•
Bold, underline or italic
ADDING IMAGES
Images can be added by entering a URL source. Upon deciding which image you want to display in the
application, you can define borders, border colours, alignment and much more.
•
Add image by copy/pasting URL source of the image. The image will be shown immediately in the Preview
Window. Images cannot be uploaded.
•
Alternative text will be displayed in case the image doesn’t load.
•
The image can be resized by changing width or height.
•
Image border is measured in pixels. Enter border width for your image. Additionally, set up horizontal or
vertical space.
•
Alignment can be set to left or right. If you want to centre your image, you will have to do it in source code.
Figure 9. Adding picture
Infobip Ltd
109 Farringdon Road, 1st Floor, London EC1R 3BW
Phone: +44 (0)20 7837 4180 / Email: [email protected]
Page 11
www.infobip.com
REACH. ENGAGE. MONETISE.
ADDING VIDEOS
Videos can be embedded from a YouTube source and subsequently modified by changing their height and width.
•
Videos can be added by entering a link from YouTube source code.
•
Each video can be resized by entering width and size.
•
Additionally, you can tick the “Show suggested videos” box to display suggested videos (YouTube feature).
•
Use the old embed code – This code begins with "<object..." and supports only Flash.
•
Choose when do you want your video to start
Figure 10. Adding video
ADDING EXTERNAL LINKS
External links can be added from any type of source and displayed differently.
•
Add external links to your media push content to make your information more relevant
•
External links can be displayed in the body of media push content, or as anchor in text or e-mail.
•
By choosing Target, you can decide what kind of action you want to apply after clicking the link.
•
Not set
•
Frame
•
Popup window
•
New window
•
Topmost window
•
Same window
•
Parent window
Figure 11. Adding external link
Infobip Ltd
109 Farringdon Road, 1st Floor, London EC1R 3BW
Phone: +44 (0)20 7837 4180 / Email: [email protected]
Page 12
www.infobip.com
REACH. ENGAGE. MONETISE.
ADDING TABLES
Insert a table and modify it by using different outlines
•
By inserting a table. you can refer to statistics, or just use it to align your content for better presentation.
•
Define the number of rows and columns.
•
Additionally you can add a caption or summary, edit width and height of table, and define cell spacing and
padding.
Figure 12. Adding table
3. CHOOSE YOUR AUDIENCE
•
Send message to
When sending out push, you can select all subscribers, channels or just specific subscribers.
Infobip Ltd
109 Farringdon Road, 1st Floor, London EC1R 3BW
Phone: +44 (0)20 7837 4180 / Email: [email protected]
Page 13
www.infobip.com
REACH. ENGAGE. MONETISE.
Figure 13: Broadcast targeting
Figure 14: Target a specific channel
Infobip Ltd
109 Farringdon Road, 1st Floor, London EC1R 3BW
Phone: +44 (0)20 7837 4180 / Email: [email protected]
Page 14
www.infobip.com
REACH. ENGAGE. MONETISE.
Figure 15: Targeting specific users
Choose on which platform you want to send your notification
•
Android
Extra options for Android include multiple alert types, produced on the recipient’s mobile phone upon receiving the
notification (sound, vibrating, light), and the title of your push notification.
•
Apple iOS
Extra options for Apple iOS include alerts which will be displayed on a mobile device when a user receives a notification.
Also, you can define the sound by uploading a certain file, or setting up the default option. The badge number can be set
up manually or you can choose the “Autoincrement” badge option.
•
Windows phone
A toast appears at the top of the screen to notify the user of an event, such as a news or weather alert. You can define
the message for your notification and additional text that you want to be displayed when notification is arriving. You can
also send Raw - “Silent notification” which is stored in the users app. Tile is an image that represents your app on
the Start screen. You can define a Flip tile (flip app icon when notification is received) and Iconic tile (display additional
image on app icon when notification is received).
Infobip Ltd
109 Farringdon Road, 1st Floor, London EC1R 3BW
Phone: +44 (0)20 7837 4180 / Email: [email protected]
Page 15
www.infobip.com
REACH. ENGAGE. MONETISE.
Figure 16. Windows Phone options
Figure 17: Platform extras
4. EXTRAS
•
Instant Geo
You can choose from previously saved locations in the “Geo locations” tab, and you can choose as many locations as
Infobip Ltd
109 Farringdon Road, 1st Floor, London EC1R 3BW
Phone: +44 (0)20 7837 4180 / Email: [email protected]
Page 16
www.infobip.com
REACH. ENGAGE. MONETISE.
you want. Note: Only recipients that are located in the selected area will receive notifications. Location validation time
allows you to send geo notifications only to those customers who were in a specific location in a specific period of time.
•
Live Geo
You can choose the live geo option is you want to target all users which are entering or exiting certain area. You can
choose any location which is previously created in “Geo location” section, and is marked as a circle. In order to make
location live, you will have to specify the starting date and time (scheduling option) and the ending date and time (expiry
option). If you don’t specify any, the live geo area will be valid three weeks from the moment of sending notifications.
(Note: You can only select circle-shaped locations.)
•
Scheduling
Set a specific time when your users will receive notifications.
•
Notifications expiry time
Set expiry date and time for every notification.
• SMS fallback
Define message which will be sent to your end users if there is no Internet connection. Note: SMS will be charged
according to Infobip SMS pricing.
Figure 18: Setting instant geo, scheduling, expiry time options and SMS fallback
Infobip Ltd
109 Farringdon Road, 1st Floor, London EC1R 3BW
Phone: +44 (0)20 7837 4180 / Email: [email protected]
Page 17
www.infobip.com
REACH. ENGAGE. MONETISE.
Figure 19. Setting Live geo
Infobip Ltd
109 Farringdon Road, 1st Floor, London EC1R 3BW
Phone: +44 (0)20 7837 4180 / Email: [email protected]
Page 18
www.infobip.com
REACH. ENGAGE. MONETISE.
5. PREVIEW
On the last step of notification creation you will see the notification preview where you can change some of the
previously defined fields. Depending on the platform you have defined, you will be able to see a preview of the
notification on an iPhone and/or Android devices.
Figure 20. Message preview
CUSTOMER SEGMENTATION (CHANNELS)
PATH
Dashboard → Visit application → Channels
You can organise your application by dividing its content into smaller groups called
channels. Channels offer you the possibility to create categories so you can easily manage
the content you are sending to consumers.
In “Channels” you can create your channel structure. Consumers subscribed to a channel will receive all the information
sent to that channel through an application.
Infobip Ltd
109 Farringdon Road, 1st Floor, London EC1R 3BW
Phone: +44 (0)20 7837 4180 / Email: [email protected]
Page 19
www.infobip.com
REACH. ENGAGE. MONETISE.
Figure 21. Adding first channel
After defining the main channel, you can add as many sub-channels as you want. The names of all channels must be
unique. Choose a channel to add a sub-channel to, enter name and click “Create channel”. This way you are organising
your application and keeping consumers engaged with the content they are interested in.
Infobip Ltd
109 Farringdon Road, 1st Floor, London EC1R 3BW
Phone: +44 (0)20 7837 4180 / Email: [email protected]
Page 20
www.infobip.com
REACH. ENGAGE. MONETISE.
Figure 22. Creating a subchannel with parent channel "Sport"
Here is an example of a defined channel structure. Main channel “Sports” has its sub-channels “Latest news”, and “Game
results”. Each of these sub-channels has its own sub-channels “Football”, ,“Basketball”, “Individual results” etc., depending
on the type of channel they belong to. A user subscribed to the “NBA” channel will only receive notifications from that
channel. The same notification will be received by users subscribed to “Basketball”, “Latest news” and “Sports” channels.
You can also select a channel add a sub-channel to it or delete it. Once created, you can easily reorganise channels and
sub-channels with “drag & drop” actions.
Infobip Ltd
109 Farringdon Road, 1st Floor, London EC1R 3BW
Phone: +44 (0)20 7837 4180 / Email: [email protected]
Page 21
www.infobip.com
REACH. ENGAGE. MONETISE.
Figure 16: Channel list
GEO LOCATIONS
PATH
Dashboard → Visit application → Geo locations
To send location-based push notifications, you will first have to define an area on the map.
Navigate to the “Geo locations” section. A map where you can select the desired area will
be shown.
Zoom in to find the location, then choose the circle shape on the map to create a focus area for sending push
notifications.
You can also use a polygon shape to create a focus on the map. Click “Clear drawings” to restart drawing or save the
location you have drawn under a unique name. You will be able to choose the names for saved locations in the “Send
notification” panel, once you enable geo targeting for the notification you are creating.
Infobip Ltd
109 Farringdon Road, 1st Floor, London EC1R 3BW
Phone: +44 (0)20 7837 4180 / Email: [email protected]
Page 22
www.infobip.com
REACH. ENGAGE. MONETISE.
Figure 17: Geo locations
Figure 18: Circle shape
Note: Locations within the circle can be used only for Instant geo feature.
Infobip Ltd
109 Farringdon Road, 1st Floor, London EC1R 3BW
Phone: +44 (0)20 7837 4180 / Email: [email protected]
Page 23
www.infobip.com
REACH. ENGAGE. MONETISE.
Figure 19: Saving polygon shape
Note: Locations within the polygon shape can be used for both Instant geo and Live geo features.
You can also edit or delete locations. Just select one from the "Saved locations" drop down menu, edit the map, and
click "Update location".
Figure 20: Editing shape
Infobip Ltd
109 Farringdon Road, 1st Floor, London EC1R 3BW
Phone: +44 (0)20 7837 4180 / Email: [email protected]
Page 24
www.infobip.com
REACH. ENGAGE. MONETISE.
STATISTICS PATH
Dashboard → Visit application → Statistics
Here you can see statistics for all previously sent notifications. You can choose a custom
start date to view your statistics based on the selected timespan. For example, if you
choose the date “15.03.2014.” and select the “last week” timespan, you will see the
statistics for the selected week (Monday – Sunday). Statistics are shown by day, week,
month or year, depending on the date.
You can sort statistics by:
•
Push stats
Number of push notifications sent, received and opened.
•
Registrations
Number of registered, unregistered and currently active end users.
Available chart types for every stats report:
•
Spline graph
•
Bars graph
Infobip Ltd
109 Farringdon Road, 1st Floor, London EC1R 3BW
Phone: +44 (0)20 7837 4180 / Email: [email protected]
Page 25
www.infobip.com
REACH. ENGAGE. MONETISE.
Figure 21: Push statistics
Figure 22: Registration statistics
Infobip Ltd
109 Farringdon Road, 1st Floor, London EC1R 3BW
Phone: +44 (0)20 7837 4180 / Email: [email protected]
Page 26
www.infobip.com