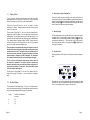
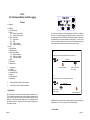
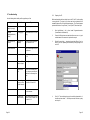
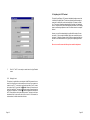
1
If you ―set‖ an unrealistic best lap by testing the system (in the pits for example) it will not be held providing the car has not been moved since the system has been turned on. To retrieve the real best lap, turn the system off and on again. If a false best lap has been recorded because of two beacons on the pit wall or in some other way after the car has moved from switch on, be sure to reset it before using the system on the track. If you need to preserve the data held in memory, up load the data before resetting the best lap. Lap Timer System 6. Your First Time Out with the Performance Monitor RCA40 If you do not want to bother with accurate speed or RPM readings to start with, use the Set Defaults option in Set Up, set Performance to Yes (this must be after setting defaults which sets Performance to No) and prepare to go onto the track. Turn the system ON just before going onto the track and press the top right hand button when prompted to Reset Best Lap. You will see your lap time each time you pass the beacon but after the second lap, the screen should change at the end of the Hold Time to show the Performance Monitor. Once you become used to using this very powerful facility, you should then adjust the settings to give you accurate speed and RPM readings. Good Luck! Instruction Manual Farringdon Instruments Limited Unit 9 Oriel Court – Omega Park – Alton – Hampshire GU34 2YT Telephone 01420 541591 – Facsimile 01420 587212 Page 40 Farringdon Instruments Limited Revision 2 Page 1 Part 1 Basic Lap Timer Contents 1. Introduction 2. Quick Installation 2.1 Mounting the System Components 2.2 Aligning and Positioning the Beacon 2.3 Setting Channel Numbers 2.4 Setting Hold and Blank Times 2.5 Timing Mode 2.6 Clearing Lap Count and Elapsed Time 2.7 Best lap Display 2.8 The IN Function 3. Detailed Instructions 3.1 Modes of Operation 3.2 Set Up Mode 3.2.1 Session Number 3.2.2 Driver Code 3.2.3 Track Code 3.2.4 Main Channel 3.2.5 IN Channel 3.2.6 Hold Time 3.2.7 Blank Time 3.2.8 Back Light 3.2.9 Back Light Hold 3.2.10 Clear Memory 3.2.11 Set Defaults 3.2.12 Hours Mins 3.2.13 Performance 3.3 Timing Mode 3.3.1 Lap Time 3.3.2 Lap Count 3.3.3 Elapsed Time 3.3.4 Best Lap 3.3.5 The IN Display 3.4 Recall Mode 3.4.1 Moving Through Stored Laps 3.4.2 Memory Wrap 3.5 Up Load Mode 3.5.1 Preparing Your PC 3.5.2 Starting Up Load 3.5.3 Processing the Data 4. Power Considerations 4.1 Battery Capacities and System Consumption 4.2 Rechargeable Battery Kit Page 2 4.3 Uninstalling Podium Podium can be removed from you PC by selecting Add and Remove Programs option from within the Control Panel. Find Podium in the list of installed software click on it and then click remove. This will remove the Podium software and its shortcuts but will leave all data in the C:\Podium folder. 4.4 Licences A licence is required to access certain features in Podium—such as downloading data from the data logger. To enter the licence code, select Help and then Licences from the menu bar. Click Add to display the Add Licence Dialog, enter the licence code and then click OK. 4.5 Using Online Help Once Podium is running you can view items in the Help menu at any time by pressing F1, clicking on Help then Topics or clicking on the ? Button on the main tool bar. 4.6 The User Manual The User Manual is included on the CDROM in Adobe PDF format if the one supplied is lost or misplaced. 5. New Track Procedure and Resetting the Best Lap To provide the data logging features described above, the system must know how long a lap is so that it can allocate memory to as many complete laps as possible. It does this by measuring the length of the first complete lap on a new track. Pressing the top round button when prompted ―To Reset Best Push ‖ after switching on the system will cause this ―New Track‖ procedure to run at the end of the first complete lap. The best lap time, as with all other data in the system, is preserved even when power is removed from the system so that it remains valid between test sessions or between qualifying and the race. It can only be reset to 9:59.99 by pressing the top round button after switch on and leaving the system on until a complete lap has been run. If this button is pressed by mistake – trying to enter set up mode for example, turn the system off and on and no New Track procedure will run and the best lap will not be reset Note that you cannot reset the best lap and keep the data logging data. You must up load the data to your PC if you wish to keep it before resetting the best lap. Page 39 the lap timer memory or manually by scrolling through the memory in Recall Mode. The second memory is the data logging memory which holds the samples of speed, time, RPM and two other parameters taken at intervals along the track. If you answer yes to this option, you will clear the lap times memory, and you will be given the option of running a diagnostic routine to check the system‘s data logging memory. This will completely erase the data logging memory and cause a New Track sequence (See Section 5) to be performed at the end of the next complete lap. 4. Data Logging 4.1 General The data logging function is fairly simple and is not to be compared with the sophisticated, expensive systems on the market with many channels, a large memory and high sample rates. The data stored by the RCA40 is speed, RPM and two other parameters. That said, the results are very useful in comparing driver performance as opposed to detailed car performance. The main features of the data logger are as follows: About 50 miles of data is held in memory – depends on sample distance. The memory is non–volatile – that is, it needs no power to hold the data The fastest lap is always kept The remainder of the memory holds the most recent laps completed Black Box facility – IN laps or uncompleted laps are recorded up until the power is turned off. Provides helpful hints in avoiding engine blow ups gravel traps and tyre walls! If the system is in Performance Mode – that is the Performance? setting is Yes, then the Up Load function will transfer the complete data logger memory to your PC. The data is in binary and requires the special Podium software to interpret it. This is included with the RCA40 on the CDROM. 4.2 Loading the Podium Data Analysis Software To load the Podium software, simply put the CDROM into your CD drive. It should automatically start, but if not click on the START button, then select Run and enter D:\setup in the run box. (Where D is the drive letter of your CDROM Drive. Podium should now install itself. Podium requires two other software items to be installed on your PC—the Microsoft .NET Framework and Internet Explorer 6. If a message appears saying that either of these is missing, simply click on My Computer or use Windows Explorer to display the contents of the CDROM. To install the .NET Framework, double click on dotnetfx.exe and to install Internet Explorer 6, double click on ie6setup.exe. Page 38 5 Beacon Settings and Siting 5.1 Understanding Infra Red Communications 5.2 Aligning Beacon and IR Detector 5.3 Beacon Conflicts 5.4 Beacon Battery Voltage and IN Channel Display 6. Specific Information for Karts and Bikes 6.1 Karts 6.2 Bikes 7. Changing Batteries 7.1 Junction Box 7.2 Beacon 8. Adjusting Contrast 9. Trouble Shooting 10. Technical Specification 1. Introduction Thank you for purchasing the Farringdon Instruments RCA40 Lap Timer System. It has been designed and developed by a group of keen club racers for cars, bikes and karts. We hope you will find the Lap Timer a helpful addition to your motor racing instrumentation. Please read these instructions carefully. The Quick Installation section will provide you with all the information you need to install the system and to use its basic facilities. However, we would recommend that you read section 5 before you try the system on the track. Section 3 provides you with the details that you will need to use all the facilities of the system. These instructions have been written for systems installed in cars but Section 6 gives specific information for Karts and Bikes. The RCA40 Lap Timer has been manufactured to the highest commercial quality standards but should be treated carefully. For example the liquid crystal display is rated at no more than 0.5g vibration and 3g shock in operation (2g vibration and 50g shock non operational) so please use the recommended mounting methods or better. Part 2 of this manual starts on Page 28 and covers the operation of the Performance Monitor licensed from STACK Limited. However, we strongly recommend that you try out the lap timer with the Performance Monitor switched off first (Section 3.2.13) and when you are confident that you understand how to operate the lap timing features, then try the Performance Monitor. Page 3 2. Quick Installation This section explains how to mount the Lap Timer and the Beacon and to set up the system for the track. 2.1 Mounting the System Components For example, for a wheel circumference of 150 cm and taking samples every 2 turns of the wheel, only 44.4 Km (28 miles) of data can be held in memory. With samples taken every 4 turns of the wheel, 88.8 Km (or 55 miles) of data can be held in memory. Even with greater sampling distance, this is equivalent to an average of 6.7 samples per second assuming a lap speed of 90 mph. 3.3.3 Wheel Circumference (cm) The Lap Timer consists of the following components: The Display Head The Junction Box The Infra Red Detector (IR Detector) The Beacon The first three in the list above are mounted in the car by means of the 3M Dual Lock tape. This tape is compliant and insulates the components from harsh vibration which may damage the system. WARNING The 3M VHB acrylic adhesive on the Dual Lock tape is very powerful and cannot be removed easily. 1 2 Fit the Display Head so that the driver will look at it square on, this will help minimise the reflections in the display window. Position it so that it will be seen against the car‘s interior. Fitting it on top of the dash so that it is seen against a background of the windscreen and sky will make it more difficult to read. Use the Dual Lock tape making sure that the back of the display and the mounting surface to be used on the car are free from grease. The Junction Box should be mounted by means of the Dual Lock tape in a position protected from the wet and excessive heat and where the ON - OFF switch can be reached easily. It will be necessary to remove the top of the Junction Box to fit a new battery if you do not have the Rechargeable Battery Kit and a 12 volt supply from the car. Make sure that the cables from the display and the IR Detector can reach it. WARNING Be sure that the Junction Box is securely fixed and cannot come loose and move around the floor of the car and interfere with the driver‘s controls. Do not attempt to extend either of the cables. Use an extension cable supplied by Farringdon Instruments. 3 Page 4 Now choose the position for the IR Detector. If possible try to find a position where the Detector can be changed round to face either side of the track (Left hand side at Donington, right hand side at Silverstone). Enter the wheel circumference in centimetres. Note that the hundreds are entered first, then the tens and finally the units. 3.4 RPM The RPM is measured by measuring the time between pulses from a sensor on the engine. DO NOT connect the RPM terminals to the vehicle’s coil – THIS WILL DESTROY THE SYSTEM. In order to read the engine speed in revs per minute (rpm), the system needs to know how many pulses it will receive per turn of the engine. Because the display only handles whole numbers, it asks for the number of trigger pulses it will receive every two full engine turns. If you have an HT pulse interface unit connected to a single spark plug lead on a 4 stroke engine, enter 1 . Enter this value to the set up item ― Eng. Pulses/2Rev?‖ The next setup item is the setting for the tacho pulse filter. ―Min Tacho Pulse?‖ The default figure for the minimum tacho pulse length is 50. If the RPM trace on your data logging shows spikes of unlikely RPM, then increase this figure to 100 or more. When using an HT lead sensor, try increasing this setting to 200. (The units are 2 microseconds.) 3.5 Set Defaults Enter Yes to set the system to the default settings. performance mode. 3.6 Note that this will turn off Clear Memory In the Lap Timer there are two main memories. The first is the Lap Times memory which holds the lap times, session, driver and track numbers and lap number for just over 1,500 laps. This memory can be accessed after up loading Page 37 Minimum No. of Wheel Turns per Sample The accuracy of positioning of the magnets is not critical provided they are Minimum Sample Distances all detected by the sensor one after the other. The detector should be mounted at a similar height as the Beacon of the pit wall. The detector has an acceptance angle of only about plus and minus 7.5 degrees and should be mounted so that the Beacon will be ―in view‖ when the car is on either side of the track. 12 4 10 Minimum No. of Wheel Turns per Sample 8 Minimum Sample Distances Plug the Display Head and IR Detector cables into the Junction Box and secure the cables. The plugs are not locked into the Junction Box but will stay in place providing the cables are secured close to the Junction Box. 6 12 2.2 Aligning and Positioning The Beacon 4 10 The Beacon beam diverges at about plus and minus 20 degrees (see section 5) although scattered infra red light from the front window will be sufficient to operate the system when the car is very close (less than a metre). Make sure that you position your beacon at least 5 metres from any other, including the permanently installed PI beacon. 2 0 8 6 4 50 2 100 0 50 150 200 Speed (miles per hour) 100 150 200 Speed (miles per hour) Wheel Circ = 50 cm 250 Wheel Circ = 100 cm Wheel Circ = 50 cm Wheel Circ = 100 cm Wheel Circ = 150 cm Wheel Circ = 200 cm Wheel Circ = 150 cm 250 Wheel Circ = 200 cm Wheel Circ cm Wheel Circ==250 250 cm WARNING The relatively small and light Beacon is easily moved or even knocked off the pit wall - secure it from accidental knocks - it is large enough to cause serious damage to the car and possible injury to the driver if it falls in the path of a car. 2.3 Setting Channel Numbers The Beacon has 4 channels and the IN channel. It transmits coded infra read signals corresponding to the setting of the Beacon Control Knob. For the Lap Timer to react to these codes, it must know the channels you are using. To set the channels: 1 Turn on the switch on the Junction Box. The display will show a running time. 2 Press the and the buttons on the display at the same time. The top level menu will be displayed. 3 Enter the number of wheel turns between samples. You may wish to make this figure greater when you are at longer circuits so that more laps are captured in memory. If you have two magnets on the wheel, the number of Wheel Revs. / Sample must be an even number. If you have four magnets fitted to the wheel (or axle) then any whole number is allowed for this setting. Move the highlighted area to SETUP by means of the and keys and then press the key. This causes the Set Up Mode to be entered and the first setting — the Session Number to be displayed. (Section 3.2 describes the full set up procedure) 4 Press the button repeatedly until ―Main Channel 001‖ is displayed. Switch the Beacon to the channel you wish to use and point it at the IR Detector. The number on the display will change to the channel number set on the Beacon. The data logging memory will hold just over 14,800 samples so the ―distance‖ that the memory can hold is 5 Move the Beacon away from the Detector and press the button again. ―IN Channel 002‖ will be displayed. Switch the Beacon to the IN position and point it at the Detector. Once the display shows the new IN channel number, move the Beacon away and press the button to leave Set Up mode and save the new settings. 3.3.1 Number of Magnets Enter the number of magnets (targets) that you have decided to fit to the wheel or axle. 3.3.2 Wheel Revs. / Sample (0.148 x (Wheel Circumference) x (Wheel Revs. / Sample) Km Page 36 Page 5 3 4 5 6 2.4 Setting Hold and Blank Times The Hold Time is the time that the display remains static after passing the Beacon. This should be set so that the display is still static at a point on the track where the driver can safely look at it. After the hold time has expired, the display will show the time into the current lap. If the Hold Time is set to a time longer than the lap time, then the display will show the last lap time until the beacon is seen again. The Blank Time is the time that the IR Detector is effectively switched off after seeing the correct beacon. This should be set to a time that would cover the length of the pit wall so any other beacons set to the same channel will not be taken as the end of the lap. 1 Press the and the buttons on the display at the same time. The top level menu should be displayed. 2 Move the highlighted area to SETUP by means of the and keys and then press the key. This causes the Session Number to be displayed. 3 Press the button repeatedly until ―Hold Time 030‖ is displayed. Change the time (which is in seconds) with the and buttons until the required is reached. 4 Press the button again which will display the Blank Time. Adjust this in the same way. 5 Press the button to leave Set Up Mode and save the new settings. 2.5 Timing Mode Timing mode is entered when the system is first switched on or from the top level menu by selecting Timing Mode. The display shows the number of laps completed, the elapsed time of the run, the best lap and the lap time as shown below. Lap Time Lap Count - laps done since switching on or pressing the n button. Elapsed Time - time since switching on or pressing the u button. Page 6 Best Lap - best lap time since switching on or pressing either the u or n button. 4.0 8.0 16.0 32.0 This will need to be changed depending on the length of circuit or when different drivers are comparing performances. Once the bar graph reaches its limit, it remains there until the end of the lap or the driver goes fast enough to bring the relative time back in range. 3.3 Wheel Sensor Settings There are three wheel sensor settings. The first is to tell the system how many targets are seen during a single wheel rotation, the second to set the distance on the track between time and data samples and the third is the circumference of the wheel. The distance between samples must not be too short or else the system will not have enough time to process and store the data and update the display or too long which will result in a jerky display and widely spaced data. Because it is the time between samples that matters, the maximum speed of the car needs to be taken into account. The chart on the next page can be used to select the numbers that you have to set in the system. First, the circumference of the wheel to which the sensor is attached must be measured. This is not a simple measurement. One of the easiest methods is to mark a point where the tyre touches the ground and roll the vehicle forward a number of full turns and measure the distance travelled. Make sure the tyre is at the pressure it will be when hot. Measure this in centimetres. This will not account for tyre expansion at high speeds but the tyre manufacturers may be able to give you this information. (If you are going to fit the wheel sensor to pick up the rotation of the prop shaft, measure the distance travelled when the prop shaft is rotated one turn and use this as the wheel circumference.) As an example, assume that the car has a wheel (or more precisely, a tyre) circumference of 185 cm and a maximum speed of 165 mph. The vertical line on the graph has been drawn at about 165 mph and the horizontal line from a point between the yellow line for 200 cm circumference wheels and the blue line for 150 cm circumference wheels. This horizontal line intersects the y axis at a point just above 2 turns per sample. It would be safe, therefore to choose to sample the data every 3 turns of the wheel. If the number of turns per sample is an odd number, 4 magnets must be fitted to the wheel. If the number of turns per sample is an even number, only 2 magnets need be fitted although fitting 4 magnets is allowed. Page 35 3.1 Display Options Turn on the system. Press both the round buttons on the front of the display head together and use the arrow keys to select Set Up. Press the top round button to enter set up mode. (See Part 1 of this Instruction Manual.) Following the ―Hours Mins‖ option in the Set Up settings, the option ―Performance?‖ is offered. Change the answer to Yes with the arrow keys and move on to the next option. The next option is ―Display Laps‖. If this is set to Yes, laps completed are displayed on the top left of the display, if set to No, elapsed time or another input is displayed there. (One for qualifying and the other for the race perhaps.) If you answer No, you will be asked successively whether you wish to display Elapsed Time, Analogue Channel 1, Analogue Channel 2 or RPM. These are options so as soon as you answer Yes, the menu will skip to the next item. (If you answer No to all of the options, the system will display Laps.) These last options are important as they change the read-out in the area of the elapsed time on the display that is shown after switching on the system until the beacon is first seen. The purpose of this is to allow the outputs of the sensors to be seen and tested. If the system is turned on, the selected channel (Analogue 1, Analogue 2 or RPM) is displayed. The units shown for the analogue channels is the 8-bit value measured by the data logger. 2.6 Clearing the Lap Count or Elapsed Time There may be some time between switching on the system and the start of a timed session on the track. Pressing the button on joining the track clears the elapsed time display so that it now shows the elapsed time of the track session. Similarly, pressing the button after parade and green flag laps clears the lap count so that the count now shows race laps completed. 2.7 Best Lap Display The Best lap display shows the lap number and lap time of the shortest lap time recorded in the run. The lap number is cleared on switch-on but the time is remembered and has to be deliberately cleared by pressing the button when prompted shortly after switch on. The first lap (the ―out‖ lap) is never counted that is the time between switch on (or pressing either the or buttons) and the first pass of the Beacon. 2.8 The IN Function Switching the Beacon Control Switch to the IN position will cause the display to flash: This is a very useful test facility and allows the range and zero values of the sensors to be determined. For example if you have a potentiometer attached to the throttle pedal, you are able to record the reading when it is fully released and that when it is fully open. These values will be needed when you analyse the data captured. The next option is ―Display Speed‖. If this is set to Yes, speed in mph is displayed on the top right of the display. If set to No, relative time is displayed there. 3.2 Bar Graph Range The display will return to Timing Mode when the next Beacon set to the Main Channel is seen. If the IN command from the Beacon is received during the Hold Time, it is not considered as an of lap beacon. (See section 5.) The next setting is the ―Bar Graph Range‖. This is set to a number between 0 and 6 inclusive and alters the range of the time difference between the best lap and the current lap represented by the bar graph at its extremities.: Setting Full Scale Time Difference (seconds) 0 1 2 0.5 1.0 2.0 Page 34 Page 7 3. Detailed Instructions 3.1 Modes of Operation will measure the speed of the engine every full or half revolution and will record the revs reached on missing a gear so that you can avoid those expensive engine rebuilds that are not necessary. A Farringdon wheel sensor will work well. A clip-on HT lead sensor is available from PI Research. Contact us for details on either. The RCA10 Lap Timer operates in one of the following modes: Timing Mode Set Up Mode Recall Mode Up Load Mode Apart from setting up the essential parameters (channel numbers and hold time for example) in Set Up Mode, and using the Timing Mode on the track, the system will prove very useful without ever entering the other two modes. However Recall Mode allows you to look back through the laps recorded and the Up Load mode provides a method of transferring the recorded lap times to a computer for logging and tabulating. The following sections describe each mode in detail. 3.2 Set Up Mode Set Up Mode allows the various parameters of the lap timing system to set according to your needs. To enter Set Up Mode, press both the and keys together to reach the top level menu. Move the highlighted area with the and keys to Set Up and press the key. 2.3.3 Analogue Sensors The word analogue just means that the voltage on these inputs is measured as opposed to the inputs being digitally encoded. These inputs are best connected to a ratiometric sensor. That is a sensor that provides a proportion of the voltage supplied to it as its output. The best example is a simple potentiometer. Contact Farringdon to help you choose sensors for steering, throttle etc. All sensors from Farringdon Instruments use one of the following colour codings: Four Wire Red +5V Blue GND Clear Output Screen should be connected to the GND terminal. Three Wire Blue Clear (thin) Clear (thick) or black +5V Output GND 2.3.4 Power for the System If you are going to use the car‘s 12 volt supply (negative earth only), connect the two terminals at one end of the screw terminal block in the Junction Box marked 12V and GND to a fused positive 12 volt supply and ground. If you are using the sensor loom, connect the 12 volts to the white wire and chassis to the black wire. Make sure that this supply will be interrupted by the master switch. All RCA40 Lap Timers have non-rechargeable alkaline batteries fitted in the Junction Box. Change the battery for the rechargeable version supplied if you are using the car’s 12 volt supply. Attempting to charge Alkaline Batteries may cause leakage or rupture of the alkaline battery. In Set Up Mode, the key enters the data shown and moves on to the next parameter. The and keys adjust the value displayed and the key causes all the parameters to be saved Set Up Mode to be terminated. 3.2.1 Session Number The Session Number is stored with each lap time. It does not affect the working of the system. The session number could relate to a different set-up of the car or a different test session. Page 8 3 Set Up Having installed the wheel sensor and the wiring, the display must be set up and calibrated for the wheel sensor and tyre rolling circumference. First set up the display. Page 33 3.2.2 Pin Colour Function Comments 1 Black Ground 2 3 4 5 Red Green Yellow Blue Serial Out Wheel Sensor Input Tacho in +5 volts Out 6 7 8 Violet Brown White Anal. Channel 1i/p Anal. Channel 2 I/p +12 volts in Connect to cable screen and chassis insulate Connect to wheel sensor output Connect to rpm sensor output Connect to wheel sensor 5 volts input Insulate if not used Insulate if not used Connect to car‘s 12 volt supply Driver Code As with Session Number, Driver Code does not alter the way the system operates and is simply a code stored with each lap. 3.2.3 Track Code The track code is another user parameter that is simply stored with each lap time and available for later processing. 3.2.4 Main Channel Analogue inputs must be from sensors that provide a 0 to + 5 volt output. Use the +5 volts output and Ground to power potentiometers. The Beacon transmits a beam of infra red light encoded with a channel number. This channel number depends on the Beacon Control Knob setting and can be from 1 to 4 inclusive. The Lap Timer will respond to the channel number set as its Main Channel Number. The wheel sensor should be connected to the black (GND), blue (+5V) and Green (wheel sensor input) wires. Set the main Channel Number to the channel number that you are going to use on the Beacon. Solder all connections carefully and insulate. The Lap Timer will set this channel automatically if you point the beacon (set to the channel you wish to use) at the IR Detector when the Main Channel is shown on the display in Set Up Mode. Once channel number is displayed on the Lap Timer, you will have to point the Beacon at the ground so that the IR Detector is not receiving the channel code before being able to move on to the next set up item. 2.3 Sensor Connections The following sections apply to both the later type of Junction Box and the earlier sensor loom. NOTE Setting the Main Channel number to 0 will allow the system to respond to PI System 1 beacons. These are installed at many Kart tracks and at motor racing circuits during some test days and meetings. 2.3.1 Wheel Sensor The wheel sensor cable has the following wires for connection: 3.2.5 Wheel Sensor Cable When the IN Channel position on the Beacon is selected, a special code is transmitted which causes the IN display to be triggered in the car. This special code is assigned to the Beacon during manufacture and is one of a set of 200. Although not impossible, it is very unlikely that your Beacon IN channel is the same as another Beacon being used at the same time. Brown Black Blue connect to +5 volts (NOT 12 volts) wheel sensor output ground Junction Box Terminal +5V Wheel GND 2.3.2 RPM DO NOT connect the RPM terminals to the vehicle’s coil – THIS WILL DESTROY THE SYSTEM. Use a separate sensor for RPM that is independent of the ignition system. This Page 32 IN Channel For the Lap Timer to respond to the IN code it must be set in its memory. You can find out what the IN channel of your beacon is by watching the visible LED when you switch it on (see Section 5), but the Lap Timer will set this code automatically if you point the Beacon, set to the IN channel, at the IR Detector when the IN Channel is shown on the display in Set Up Mode. Once the IN code is displayed on the Lap Timer, you will have to point the Beacon at the ground so that the IR Detector is not receiving the IN code before being able to move on to the next set up item. Page 9 3.2.6 Hold Time The lap time is frozen on the display from the time the Beacon is seen by the IR Detector for the Hold Time. If the Hold Time is set to longer than the lap time, the display will show the last lap time all the time, but if it is adjusted to hold the lap time until a convenient point on the circuit, the display will revert to the running time of the current lap so that the driver can see his time at other points on the circuit. 3.2.7 Blank Time The blank time is the time that the IR Detector is turned off after seeing a beacon set to the Lap Timer Main Channel setting. This prevents other beacons set to the same channel from ―ending‖ the lap just started. If interfering beacons are set around the circuit, this may have to be set to a time that will allow the car to pass all the beacons. More usually, 10 seconds will be adequate. 3.2.8 Back Light The Lap Timer display is fitted with an LED back light which illuminates the liquid crystal display from behind. It consumes between 5 and 10 times the current (> 50 mA) of the rest of the in-car electronics but does make the display easier to read in closed cars. It makes little difference in open cars (unless running in the dark!). This option in Set Up Mode allows you choose to have the Back Light on or off. 3.2.9 Back Light Hold A way to have the Back Light on but to minimise power consumption is to set this option which lights the Back Light for the Hold Time only. 3.2.10 Clear Memory The Lap Timer will hold over 1,500 lap times but when this is exceeded, the first laps are overwritten and only those laps from the start of memory can be Recalled or Up Loaded. It is sensible to clear the memory once the data stored in the lap timer has been up loaded or is no longer useful. Do not confuse the lap times memory with the data logging memory. The lap times memory is NOT cleared when the data logging memory is reset for a new track. Selecting Yes to this option sets the lap timer parameter to the default settings as shown below: Page 10 The wheel sensor, all other sensors and power from the vehicle 12 volt supply are all connected to the screw terminal blocks in the Junction Box. The screw terminal blocks are of very good quality and should provide reliable and easy-tomake connections. Please do use the correct size screw driver! The terminals are marked on the printed circuit board but may be rather difficult to read. They are as follows starting from the DIN connector: 12 volts Ground Ground AN1 +5 volts Ground AN2 Power in from the car Power in from the car For sensor attached to analogue channel 1 Analogue Channel 1 Input For sensor attached to analogue channel 1 For sensor attached to analogue channel 2 Analogue Channel 2 Input +5 volts Ground Wheel +5 volts For sensor attached to analogue channel 2 For wheel sensor Wheel sensor For wheel sensor—use this as the supply for the wheel sensor For RPM sensor RPM sensor For RPM sensor Ground RPM +5 volts After laying the cables around the car connect the wheel and other sensors to the Junction Box as shown below. Be sure that the Junction Box switch is in the OFF position and the car‘s master switch is OFF while making connections. Note that all inputs to the data logger / lap timer must be between 0 and 5 volts. Applying 12 volt any input except the 12 volt power input may destroy the lap timer / data logger. 2.2.2 Wiring to the Sensor Loom 3.2.11 Set Defaults Session Number Driver Code Track Code Main Channel IN Channel Hold Time Blank Time 2.2.1 Wiring to the Junction Box 000 000 000 001 002 030 010 Back Light On Back Light Hold Clear Memory Set Defaults Hours Mins Performance No No No No No No If your Junction Box does not have screw terminals in it, you must use the sensor loom for all connections to the sensors and to the vehicle power. (The sensor loom can be used with Junction Boxes of the later type. This may be more convenient if the system is to be used in more than one car, bike or kart.) The 8-way Sensor loom plugs into the Junction Box and connections from the sensors are made to the free end of this cable. The wires in the cable are colour coded as follows: Page 31 The data logging facility provides about 30 to 50 miles (depending on sample distance) of lap data which allows different drivers, set ups or lines to be analysed. See Section 4. 3.2.12 Hours Mins 2. Installation 3.2.13 Performance This section explains how to install the Performance Monitor Option. Three aspects are covered, first the wheel sensor, second the wiring and connection of other sensors and thirdly the set up procedure needed to provide sensible results. Set this to Yes if you want to use the Performance Monitor and/or Data Logging; otherwise set this to No. If you answer Yes, you will be given further options. These are described in Part 2. 2.1 The Wheel Sensor 3.3 Timing Mode The original RCA40 systems where supplied with Hall effect wheel sensors that detected magnets glued to a rotating part of the hub assembly. This is the reason for the reference to magnets in the setup menu and other places in this booklet. We have found the new proximity sensors more effective in most installations. Selecting Yes for this option changes the elapsed time display from minutes and seconds to hours and minutes which is more helpful for endurance races. In Timing Mode the display changes to: Lap Count - laps done since switching on or pressing the button. The new wheel sensor comprises a standard proximity sensor. This detects ferrous material when within a distance of about 1.5 mm. The usual position for the wheel sensor is on the left hand front upright so that it ―sees‖ the back of the wheel studs or some other rotating target. Try to mount the sensor as far away from the disc as possible. These sensors are rated at 70 degrees Celsius only. Ideally, there should be either 4 or 2 targets, however if you have 5 wheel studs you can fool the system by setting it up with 4 ―magnets‖ and declaring the wheel circumference as 4/5ths of its measured value. You may have to machine the backs of the wheel studs so that they give clean pulses from the detector. Connect the wheel sensor and switch on the system. The LED in the end of the sensor will indicate when the sensor detects the metal target. Make sure that the sensor is very rigidly mounted otherwise it will give false pulses caused by vibration. (Although 10—35 volts is the stated supply for this sensor, it works well with 5 volts which is regulated and is likely to give better results.) 2.2 Wiring The later version of the Junction Box has a cut out in the short side furthest from the power switch through which cables from the sensors can be passed to screw terminals in the Junction Box. If you have the earlier type of Junction Box without the cut out or screw terminals you will need a sensor loom. These are available from Farringdon Instruments free of charge. Page 30 Elapsed Time - time since switching on or pressing the but3.3.1 Lap Time Best Lap - changes to show best lap time after the out lap. Lap Time The large characters show the lap time. This time starts at zero and increments until the Lap Timer receives an infra red signal from a beacon set to the Main Channel number. The time is then frozen on the display for the Hold Time. The resolution of the display is to 1/100 second but the last digit may be on the point of changing, so the time should be taken as having a tolerance of plus or minus 1/100 seconds. Slight variations in lap times will occur because of the spreading of the infra red beam so that a quicker time may be recorded if the beam is crossed close to the beacon first and then on the far side of the track for the second time. The lap time rolls over from 9 minutes, 59.99 seconds back to zero. Page 11 3.3.2 Lap Count This display increments every time the correct code from a beacon is received. The number can be cleared by pressing the key. If the beacon has been crossed before the start of a race on the parade lap and again on the warm-up lap, pressing the button will clear the lap count in preparation for the start. The Laps Done count rolls over from 99 to 00. 3.3.3 Elapsed Time This display simply shows the driver the time that has passed since the system was switched on or since the button was pressed. Pressing the button on joining the track for qualification or practice makes this display the elapsed time of the session. This time changes from its maximum of 59.99 back to 00.00. Depending on the set up option, the time is displayed in minutes and seconds or hours and minutes. 3.3.4 Speed (in mph) Relative time (numerical version of the bar graph) And the figure on the left can be one of the following: Laps completed (for racing) Elapsed time (for qualifying) RPM (rpm) Analogue Channel 1 (0 – 255) Analogue Channel 2 (0 – 255) Best lap The area on the display for the best lap time starts by showing the text ―Best‖ followed by the remembered best lap time. The first or ―out lap‖ is ignored (as this is determined by the time between resetting the lap count or elapsed time and seeing the beacon for the first time) but subsequent lap times are compared and the fastest displayed in the area. The best lap display is relatively small and may be difficult to read while driving, so the display reverses to become white characters on a black background every time a new best lap is achieved. This change is easy to see and indicates that the current lap time shown on the lap time display in large numbers, is the new best time. The best lap time can be reset by switching the system OFF and then ON and pressing the button when prompted. The best lap time will be reset to 9 minutes, 59.99 seconds. As it is easy to press this button by mistake when trying to enter Recall or another mode, the best lap is only reset permanently when the beacon is next seen. So be sure to reset the best lap just before joining the track when the lap timer will not be switched off before seeing the beacon. If an unrealistic best lap has been set by testing the system (in the pits for example) remember to reset it afterwards. This is particularly important if you have the Performance Option. 3.3.5 If the performance mode is selected, the display changes after the end of the hold time to a different screen divided horizontally into two areas. The bottom area is a bar graph showing the current time relative to the best lap recorded, at the same point on the track. The graph is based about 0 at the centre and shows either longer (worse) times by extending to the left or shorter (better) times extending to the right. (see illustration on the next page) The top part of the screen shows two figures, one on the left and the other on the right. The figure on the right can be selected to be either: The IN Display The lap time area of the display changes to * IN * when the lap timer receives a signal from the beacon switched to its IN position. (See Section 3.2.5 for details on setting the IN channel in the lap timer.) The IN display alternates with the lap time to give a flashing display to attract the driver‘s attention. This screen shot shows laps completed in the top left and numerical relative time in the top right. The bar graph has a full scale range of 0.5 seconds in this example, but can be set up to be a full scale of 1 second, 2 seconds, 4 seconds or 8 seconds. The shot below shows a slower lap with the elapsed time in the top left and speed in the top right: As soon as a faster lap is recorded, this is then taken as new standard against which to compare the current lap. To allow driver training where an instructor sets the best lap for the pupil to works towards, the best lap is held in non volatile memory (memory that remembers even when there is no power) and has to be manually reset to be removed. So power can be removed from the system between sessions without loosing the instructor‗s ―target‖ lap. The technology of the Performance Monitor is licensed from STACK Limited of Bicester, England. Page 12 Page 29 Part 2 The Performance Monitor and Data Logging Contents 1. Introduction 2. Installation 2.1 The Wheel Sensor 2.2 Wiring 2.2.1 Wiring to the Junction Box 2.2.2 Wiring to the Sensor Loom 2.3 Sensor Connections 2.3.1 Wheel Sensor 2.3.2 RPM 2.3.3 Analogue Sensors 2.3.4 Power for the System 3 Set Up 3.1 Display Options 3.2 Bar Graph Range 3.3 Wheel Sensor Settings 3.3.1 Number of Magnets 3.3.2 Wheel Revs / Sample 3.3.3 Wheel Circumference 3.4 RPM 3.5 Set Defaults 3.6 Clear Memory 4. Data Logging 4.1 General 4.2 Installing Podium 4.3 Uninstalling Podium 4.4 Licences 4.5 Using Online Help 4.6 User Manual 5. Resetting the Best Lap and New Track Procedure 6. Your First Time Out with the Performance Monitor 1. Introduction New software and a wheel sensor have been developed to enhance the Lap Timer to include a performance monitor mode and simple but powerful data logging. Normally, the lap timer shows the lap time when the car (bike or Kart) passes the pit wall beacon and this remains static for an adjustable period of time called the ―hold time‖. After the hold time has expired, the running time of the current lap is shown. The Lap Timer will respond to an IN signal during the Hold Time but not during the Blank Time. It is important, therefore, when sharing a beacon, to position your beacon transmitting the IN code, BEFORE the beacon being shared, or far enough after the shared beacon to be sure that the Blank Time has expired. If you are the only team using a particular channel, then the IN code will be treated as an end of lap code as well and the correct lap time will be saved in the system memory. Case 1 Recorded lap time will be short and shared beacon will not be seen. Blank Time Position of IN Beacon Position of shared Beacon for timing. Case 2 Recorded lap time will be correct and IN beacon will be seen. Blank Time Position of shared Beacon for timing. Position of IN Beacon WARNING Before using the IN function during competition, make sure that the regulations allow you to do so. You may have to use a Pit Board after all! 3.4 Recall Mode Page 28 Page 13 Recall mode provides a means of looking back over the lap times saved in the Lap Timer memory. NOTE that the Lap Timer memory is non-volatile and will keep parameters set in Set Up Mode and all lap times when the power is switched off. 3.4.1 Moving Through Stored Laps To enter Recall Mode, press the and buttons at the same time to reach the top level menu. Use the and buttons to highlight Recall and select this mode by pressing the button. The screen should change to something similar to: 10. Technical Specification Optical Beacon Peak Infra Red wavelength Beacon Spectral half bandwidth IR Detector wavelength maximum sensitivity IR Carrier frequency 950 nm 50 nm 950 nm 56 KHz System Range 50 m min. 100 m typ. Electrical Battery Type for Junction Box Battery Type for Beacon PP3 PP3 8.4 or 9 volts 8.4 or 9 volts Car supply voltage (when rechargeable battery fitted) 12 volts nominal Note: Supply can vary from 0 volts to +24 volts without damage to the system. Current drain The display shows the last lap recorded. The button will select the previous lap and the button will retrieve the next lap. The display will not change if you try to display a lap after the last or one before the first. Note that the session number is displayed as well. To make the Recall (and the Up Load) mode more useful, it is worthwhile changing the session number every time the system is switched on and recording the details of the new session - car set up etc.. 3.4.2 Memory Wrap The memory in the Lap Timer has the capacity to store more than 1,500 laps so it is unlikely to be filled very often. If the memory is filled, the start of the memory will be overwritten and the Recall and Up Load functions will be able to access only those laps from the start of memory up to the last saved lap. To avoid this happening, use the clear memory function at the start of a test or race day so that the memory will then contain just that days lap times. 3.5 Up Load Mode Lap Timer without Back Light Lap Timer with Back Light On 15 mA 70 mA Beacon on Channels 1, 2, 3 or 4 15 mA Environmental Temperature Vibration (Lap Timer) operational Shock (Lap Timer) operational 0 to 70° Celsius 0.5 g 3g EMC Meets the requirements of 95/54/EC:1995 Annex VII, Annex VIII and Annex IX Appendices 2 and 4 Emissions and Immunity Incorporating ISO 7637-1: 1990 (Selected parts – includes ―Load Dump‖) Up Load Mode transfers the used memory of the Lap Timer via a serial interface to a personal computer (PC). Providing Performance Mode is not selected, the data is transferred in comma delimited field text format so that it can be imported to a spread sheet. The end of lap data can be accessed when the system is in Performance Mode using the Data Analysis software. See Section 4 in Part 2. Page 14 Page 27 9. Troubleshooting 3.5.1 Use the following table to identify and fix any problems you find. Symptom Possible Cause Try.... No Display (Battery only supply) Battery flat Replace battery No display (Rechargeable battery kit fitted) No charging supply Check connections to car 12 volt supply Battery lasts for very short time Back Light on constantly Use Set Up Mode to change settings - see section 3.2.8 Beacon not detected Preparing Your PC Before transferring the data from the lap timer to the PC, the PC must be waiting to accept the data. The data is in text format and can be collected with the standard Windows® 95 or 98 HyperTerminal® program. (The Terminal program provided with Windows 3 is very similar.) To set up the PC, follow these steps: 1 Start HyperTerminal - this is found under Programs-Accessories(Communications in Windows 98) 2 Choose the File drop down menu and select New Connection and type in a suitable name for the connection - laptimer for example. 3 Click the Connect Using .... drop down box and select Direct to Com1 or Direct to Com2 etc. depending on the interface you are proposing to use on the PC. 4 Click OK. The next dialogue box sets the serial line characteristics. It should be as shown below - 9600 bits per second, 8 bit data, no parity and 1 stop bit: First try at close range away from other beacons Beacon battery flat Check battery voltage - see section 5.3 Beacon or IR Detector not aligned Check alignment - see section 5 Beacon interference Check for other interfering beacons - make sure your beacon is further than 5 metres away from others Beacon and Lap Use Set Up Mode to set channels Timer set to differ- - see section 3.2.4 and 3.2.5 ent Main Channels IN Beacon not detected First check at close range away from other beacons IN Beacon positioned incorrectly Page 26 Make sure IN beacon is not seen while Lap Timer is in Blank Time see section 3.3.5 Page 15 8. Adjusting the LCD Contrast The Liquid Crystal Display (LCD) contrast is adjustable through an access hole in the back of the display head. This has been provided for manufacturing purposes and it is unlikely that you will need to adjust the LCD contrast in normal use. The contrast is temperature dependent and if the display is left standing in the sun, it may become very dark. Before adjusting the contrast, cool the display down to normal running temperature to see if the contrast returns to an acceptable level. However, you may find a clearer display is possible with fine tuning of the contrast control. If you are using the backlight, slightly more contrast may improve the display. To adjust the contrast, remove the sticker covering the access hole and use a 2 mm width screwdriver to very gently turn the adjusting potentiometer. Be sure to re-seal the access hole after you have made the adjustment. 5 Click OK. The PC is now ready to receive data to the HyperTerminal screen. 3.5.2 Starting Up Load The lap timer is supplied with a serial cable with a Mini DIN connector that connects to the Computer port on the Junction Box and a 9 way D type connector to connect into you PC. To start an Up Load from the lap timer to your PC connect the lap timer to the PC, press both the and buttons at the same time and choose Up Load Mode. The screen will show the number of frames of data that are going to be transmitted. Press the button and transmission will start and the PC screen will show the lap times being received. The data in each frame transmitted will be the lap number, the lap time in units of 1/100 seconds, the session number, the driver code and the track code. Page 16 Page 25 6. Specific Information for Karts and Bikes The data received by HyperTerminal will be displayed like this: In principle there is no difference in the operation of the Lap Timer on a kart or bike but there are some aspects that should be considered carefully to ensure reliable results. 6.1 Karts Problems can arise from the relatively compact and convoluted nature of kart tracks. The beacon may be able to be seen from more than place on the track. Remember the range of the system can be as much as 100 metres. If a position cannot be found where the kart sees the beacon just once, the power of the beacon will have to be reduced by putting filters over the IR Detector. These are available from Farringdon Instruments. Many kart circuits now have PI beacons permanently installed so these can be used by setting the Main Channel to 000. 6.2 Bikes Motor cycles are able to use the Lap Timer but the beacon must be positioned on a straight where the bike is near vertical. If this is not possible, special lenses can be supplied which increase the angle of reception in the vertical plane. Call for details. Some weather proofing of the Junction Box may be necessary – placing it in a small plastic bag is a simple and effective method. 7. Changing Batteries 7.1 Junction Box The battery that powers the in-car electronics is fitted in the Junction Box. To change this battery, first remove the four screws securing the top of the Junction Box. Carefully remove the battery, disconnect the contacts and re-fit the new battery. Make sure the wires from the contacts are not trapped under the lid of the Junction Box and refit the lid. WARNING Do not fit primary cell batteries in the Junction Box if you are using the car 12 volt supply. Always fit rechargeable batteries when you are using the vehicle 12 volt supply. 7.2 Beacon This shows 16 laps, most of which took about 30 seconds in session 0 with driver 2 and on track 3. 3.5.3 Processing the Data To be able to make more use of this data, it should be transferred to a file. It can then be processed by your own program or imported into a spread sheet such as Excel® where it can be reformatted, expanded and, if required printed. To change the battery in the beacon, remove the battery cover screw, remove the battery cover and change the battery. Make sure that the wires to the battery connector are neatly routed and re-fit the battery cover. Ensure that it is properly fitted at the edge secured with small plastic tongues. Any type of 8 to 9 volt battery can be fitted to the Beacon. Page 24 Page 17 To capture the data into a file, click on Transfer on the HyperTerminal screen and then select Capture Text: 5.4 Beacon Battery Voltage and IN Channel Display The visible red LED on the top of the beacon gives you information about itself as follows. When the beacon is first turned from OFF to Channel 1 three groups of LED flashes can be seen. The number of each group represents a digit of the IN Channel coded into the beacon during manufacture. As any of these digits could be zero, the number of flashes is the digit plus one. So for example, if the LED flashed twice, then after a short pause another three and finally after a further pause a single flash, the IN Channel code would be 120. (2-1=1, 3-1=2 and 1-1=0) After the IN code has been indicated, the beacon continually flashes the LED in bursts, where the number of flashes is the battery voltage - 7 flashes means 7 volts. The battery should be discarded or recharged once the voltage has fallen to 6 volts. Then specify the filename of the capture file in the dialogue box and click on Start. You must now re-enter Up Load mode and transfer the data to the file. (You can use the Up Load facility as many times as you like without changing the data held in the Lap Timer.) The resulting file can be imported into a spread sheet such as Excel® and processed to provide a neat record of the test or race session. Using the track code and by adding the circuit length, a log of the total mileage can be kept as shown on the opposite page. Page 18 Page 23 It is especially important to site the Beacon away from other beacons using large external batteries and having a large array of LEDs pointing over the track. These probably emit very strong IR signals which will saturate your Lap Timer. 5.3 Aligning The Beacon and IR Detector The Beacon Beam diverges at 40 degrees and the IR Detector acceptance cone angle is about 15 degrees. Ensure that the IR Detector will fall within the Beacon‘s beam and, just as important, be sure that the acceptance cone of the IR Detector includes the Beacon when the car passes it. IR Detector not aligned correctly 40º 15º IR Detector rotated and aligned correctly Page 22 Page 19 4. Power Considerations 5. Beacon Setting and Siting 4.1 System Consumption and Battery Capacities 5.1 Understanding Infra Red Communications The following table provides a guide to the running time you can expect from various types of battery. The capacity of batteries depends on their usage - for example several short sessions will use less capacity than one long session - so treat the table as a guide only. Further, the performance of the beacon will decrease with battery voltage so that the range will decrease to about 70% when the battery is close to discharged. Infra red light (IR) from light emitting diodes (LEDs) can be turned on and off very quickly and it is this property that makes infra red ideal for short range communications. To increase the sensitivity of the receivers, a ―carrier‖ frequency is used to turn on and off the LED. The receiver can then look for light that is being modulated at this frequency amongst other background light. To impose information on the infra red beam, this carrier frequency is itself turned on and off. The approximate current drain for the Lap Timer without Back Light is 12 mA. With Back Light it is approximately 62 mA. The Beacon consumes about 15 mA. Battery Type Typical Run Time for Beacon (Hrs) Typical Run Time (hours) for Lap Timer Back Light Off Back Light On for 50% Time Back Light On Alkaline 33 12 8 33 Lithium 80 30 20 80 Rechargeable NiMH 10 3 2 10 Carrier Frequency On Off Code 100101 transmitted There are two ways in which this form of communication can be interrupted, first, by any light source strong enough to saturate the receiver - for example - the sun or another more powerful IR source - and second, other transmissions using the same carrier frequency. The reason for the recessed lens and photodiode in the IR detector is to shield it from direct sunlight so providing the IR detector will not ―see‖ the setting sun behind the beacon, it will not be saturated by the sun. However, some other lap timer and data logging systems do use the same carrier frequency and others use much more powerful IR beams and it is for this reason that you must take care where the beacon is positioned. 4.2 Rechargeable Battery Kit (Part Number RCA15) If the Back Light is going to be used, by far the best way to power the Lap Timer is through a rechargeable battery and a power input from the car. The battery will support all the Set Up, Recall and Up Load functions and will protect the electronics from power dips when starting but the car supply will keep the battery fully charged. The charging current to the battery is about 6 mA which should be added to the lap timer consumption of 62 mA with Back Light on. If the Back Light is not used, Alkaline Batteries provide a reliable and simple way to power the system. Page 20 5.2 Beacon Conflicts From the explanation given in the previous section it is clear that reliable operation can only be guaranteed when the beacon is sited away from all others. A distance of 5 metres along the pit wall is probably safe. The Lap Timer will ignore all infra red signals on the same carrier frequency that do not contain the Main Channel or IN codes saved in its memory but if you find that lap times are obviously incorrect, look for another Beacon using your channel on the pit wall. With only four channels to choose from, it may be that more than four teams are using Beacons at the same track. In this case agree to use a single beacon and set all the Lap Timers to respond to this channel. Page 21