1
Megawin 8051 GNU Debugger
MEGAWIN
User Manual, v4.00
MAKE YOU WIN
Megawin 8051 GNU Debugger
User Manual
By Vincent Y. C. Yu
This document information is the intellectual property of Megawin Technology Co., Ltd.
© Megawin Technology Co., Ltd. 2007 All right reserved.
1
Megawin 8051 GNU Debugger
MEGAWIN
User Manual, v4.00
MAKE YOU WIN
Contents
1 Introduction and Features ............................................................................... 3
1-1 Introduction ............................................................................................................................... 3
1-2 Features.................................................................................................................................... 4
2 System Requirements..................................................................................... 5
2-1 Hardware .................................................................................................................................. 5
2-2 Firmware ................................................................................................................................... 5
3 Use the Debugger ........................................................................................... 6
3-1 Insert the Debug Agent ............................................................................................................. 6
3-1-1 Debug Agent Functions for a C-language Module ..........................................................................8
3-1-2 Debug Agent Functions for an Assembly Module .........................................................................10
3-2 Insert the Debug Agent for a Non-relocatable Project ............................................................ 12
4 Application Program on PC-site .................................................................... 13
5 Demonstration Examples .............................................................................. 14
Example-1:
Example-2:
Example-3:
Example-4:
Example-5:
Example-6:
Example-7:
Example-8:
Check the program flow .............................................................................................. 15
Modify contents of SFR and RAM............................................................................... 16
Continuously monitor the MCU’s internal status ......................................................... 17
Pseudo “Breakpoint” ................................................................................................... 18
Pseudo “Step-debugging” ........................................................................................... 19
Check the ADC result.................................................................................................. 20
Check a Timer’s counting value .................................................................................. 21
Check data in the IAP-memory ................................................................................... 22
6 Special Notes for the Debugger .................................................................... 23
This document information is the intellectual property of Megawin Technology Co., Ltd.
© Megawin Technology Co., Ltd. 2007 All right reserved.
2
MEGAWIN
MAKE YOU WIN
Megawin 8051 GNU Debugger
User Manual, v4.00
1 Introduction and Features
1-1 Introduction
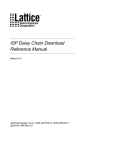
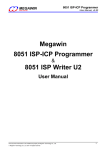
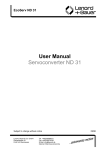
The “Megawin 8051 GNU Debugger” is a powerful and low-cost development kit, which is proprietarily designed
for Megawin 8051 MCU products. Like the traditional ICE (In-Circuit Emulator), this Debugger provides the
necessary functions for embedded firmware developing and debugging. Additionally, its compact hardware with
an LCD panel (as shown in the following picture) can work stand-alone. That is it doesn’t need the host
intervened, and thus also provides an off-line debugging.
The design concept of this Debugger is somewhat like the popular GNU Debugger, which is an extremely
powerful and flexible tool for embedded system development. The key point of the GNU Debugger is to
implement a Debug Agent, which is a small program running in the target’s hardware and helps the Debugger
carry out requests to monitor and control the target’s application code being debugged. So, the “Megawin 8051
GNU Debugger” consists of the Debugger and the Debug Agent (a library function code for developing and
debugging).
Picture of the “Megawin 8051 GNU Debugger”
Note:
There are three debug interface connectors (DBG1, DBG2 and DBG3, which are all the same) for user’s
convenience to connect this Debugger to the target system.
This document information is the intellectual property of Megawin Technology Co., Ltd.
© Megawin Technology Co., Ltd. 2007 All right reserved.
3
MEGAWIN
MAKE YOU WIN
Megawin 8051 GNU Debugger
User Manual, v4.00
1-2 Features
Six useful and powerful features help you develop your application code and catch the bugs in the application
code:
Feature-1:
Real chip debugging via a 1-pin serial interface. It means only one I/O pin of the Target is
needed for debugging.
Feature-2:
Run-time displaying any message you want to check, such as SFR value, RAM data, state of
input port, etc.
Feature-3:
Pseudo “Breakpoint”. It makes the application code stay anywhere you want, like “stop”, to
let you inspect what has happened in the system. And, pressing the “GO-key” makes CPU
continue to go ahead.
Feature-4:
Pseudo “Step-debugging”. By successive inserting the “Set Breakpoint” command in the
critical program section can emulate Step execution.
Feature-5:
While linked to PC, much more messages can be shown on the PC’s monitor or saved to
hard disk for later analysis.
Feature-6:
While linked to PC, the debugged Target can ask some arguments from PC for debugging or
specific developing purpose.
In addition:
Available for both 5V and 3.3V Target system.
This document information is the intellectual property of Megawin Technology Co., Ltd.
© Megawin Technology Co., Ltd. 2007 All right reserved.
4
Megawin 8051 GNU Debugger
MEGAWIN
User Manual, v4.00
MAKE YOU WIN
2 System Requirements
2-1 Hardware
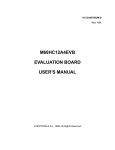
Just one pin of target MCU’s GPIO is reserved for communicating with the “Debugger”.
Target Sytem
Megawin 8051 GNU Debugger
Target
MCU
SDA
P1.7
GND
GND
DBG1/2/3
Note:
In this example, target MCU’s P1.7 is used for the debug interface.
2-2 Firmware
Less than 250 bytes of target MCU’s program memory are reserved for the “Debug Agent”.
Target MCU's
Program Memory
"Debug Agent"
Less than 250 bytes
Note:
The absolute memory address where the “Debug Agent” is located is determined by the Linker
after compiled or assembled.
This document information is the intellectual property of Megawin Technology Co., Ltd.
© Megawin Technology Co., Ltd. 2007 All right reserved.
5
MEGAWIN
Megawin 8051 GNU Debugger
MAKE YOU WIN
User Manual, v4.00
3 Use the Debugger
As described in Section 2-2, to use the Debugger, the user must insert the “Debug Agent” in his application code.
The following sections will demonstrate how to do it.
3-1 Insert the Debug Agent
Follow the steps:
Step1: Add the Debug Agent “DEBUG_Pxx.LIB” into the project.
Step2: Include the header file “DEBUG.H” or “DEBUG.INC” in the source modules which will call the
debug functions.
Where, “Pxx” stands for any GPIO pin which is assigned for the debug interface by user. For example,
“DEBUG_P16.LIB” means P1.6 is used as the debug interface. Of course, the Debug Agents which use different
GPIO pin are also provided. The “DEBUG.H” is used for C-language modules while the “DEBUG.INC” is used for
assembly modules. See the following examples.
Example-1: For a C-language Module
This document information is the intellectual property of Megawin Technology Co., Ltd.
© Megawin Technology Co., Ltd. 2007 All right reserved.
6
MEGAWIN
MAKE YOU WIN
Megawin 8051 GNU Debugger
User Manual, v4.00
Example-2: For an Assembly Module
This document information is the intellectual property of Megawin Technology Co., Ltd.
© Megawin Technology Co., Ltd. 2007 All right reserved.
7
MEGAWIN
Megawin 8051 GNU Debugger
MAKE YOU WIN
User Manual, v4.00
3-1-1 Debug Agent Functions for a C-language Module
“DEBUG.H” defines the debug functions for C-language modules, as listed below.
Function name
Debug_clear_LCD ();
Description
Clear the LCD panel of the Debugger
Argument
(N/A)
Function name
Debug_show_msg_to_LCD (unsigned char msg);
Description
Show a message on the LCD panel of the Debugger
Argument
msg, which is to be shown on the LCD panel
Function name
Debug_show_msg_to_7seg (unsigned char msg);
Description
Show a message on the 7-segment of the Debugger
Argument
msg, which is to be shown on the 7-segment
Function name
Argument
Debug_set_breakpoint (unsigned char BP_no);
Set a breakpoint in the application code, and pressing the "GO-key" on the Debugger will let
the application code continue to go
BP_no, which is the breakpoint number (assigned by user) to be shown on the 7-segment
Function name
Debug_show_msg_to_PC (unsigned char msg);
Description
Show a message to PC’s monitor
Argument
msg, which is to be shown on PC
Function name
unsigned char arg = Debug_get_argument_from_PC ();
Description
Get one byte data from PC, to be used in the application code
Argument
arg, which is the destination of the data from PC
Description
This document information is the intellectual property of Megawin Technology Co., Ltd.
© Megawin Technology Co., Ltd. 2007 All right reserved.
8
Megawin 8051 GNU Debugger
MEGAWIN
User Manual, v4.00
MAKE YOU WIN
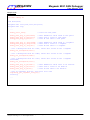
Sample Code
#include "debug.h"
void main(void)
{
unsigned char var1,var2,var3,var4,var5;
unsigned char arg;
...
Debug_clear_LCD();
//clear the LCD panel
Debug_show_msg_to_LCD(0x5A);
Debug_show_msg_to_LCD(var1);
Debug_show_msg_to_LCD(P1);
//show immediate value 0x5A to LCD panel
//show var1’s value to LCD panel
//read P1 and show to LCD panel
Debug_show_msg_to_7seg(0x5B); //show immediate value 0x5B to 7-segment
Debug_show_msg_to_7seg(var2); //show var2’s value to 7-segment
Debug_show_msg_to_7seg(P2);
//read P2 and show to 7-segment
//set a Breakpoint with No.=0x01, which will blink on the 7-segment
Debug_set_breakpoint(0x01);
//set a Breakpoint with No.=0xF2, which will blink on the 7-segment
Debug_set_breakpoint(0xF2);
//set a Breakpoint with No.=var5, which will blink on the 7-segment
var5=0xB1;
Debug_set_breakpoint(var5);
Debug_show_msg_to_PC(0x5C);
Debug_show_msg_to_PC(var3);
Debug_show_msg_to_PC(P3);
//show immediate value 0x5C to PC monitor
//show var3’s value to PC monitor
//read P3 and show to PC monitor
//get an argument from PC, and store into var4
arg=Debug_get_argument_from_PC();
var4=arg;
...
}
This document information is the intellectual property of Megawin Technology Co., Ltd.
© Megawin Technology Co., Ltd. 2007 All right reserved.
9
MEGAWIN
Megawin 8051 GNU Debugger
MAKE YOU WIN
User Manual, v4.00
3-1-2 Debug Agent Functions for an Assembly Module
“DEBUG.INC” defines the debug functions by MACRO-type for assembly modules, as listed below.
MACRO name
Debug_clear_LCD
Description
Clear the LCD panel of the Debugger
Argument
(N/A)
MACRO name
Debug_show_msg_to_LCD msg
Description
Show a message on the LCD panel of the Debugger
Argument
msg, which is to be shown on the LCD panel
MACRO name
Debug_show_msg_to_7seg msg
Description
Show a message on the 7-segment of the Debugger
Argument
msg, which is to be shown on the 7-segment
MACRO name
Argument
Debug_set_breakpoint BP_no
Set a breakpoint in the application code, and pressing the "GO-key" on the Debugger will let
the application code continue to go
BP_no, which is the breakpoint number (assigned by user) to be shown on the 7-segment
MACRO name
Debug_show_msg_to_PC msg
Description
Show a message to PC’s monitor
Argument
msg, which is to be shown on PC
MACRO name
Debug_get_argument_from_PC arg
Description
Get one byte data from PC, to be used in the application code
Argument
arg, which is the destination of the data from PC
Description
This document information is the intellectual property of Megawin Technology Co., Ltd.
© Megawin Technology Co., Ltd. 2007 All right reserved.
10
Megawin 8051 GNU Debugger
MEGAWIN
User Manual, v4.00
MAKE YOU WIN
Sample Code
$INCLUDE (debug.inc)
;==============================================================================
data_test SEGMENT DATA
RSEG
data_test
var1:
var2:
var3:
var4:
var5:
arg:
DS
DS
DS
DS
DS
DS
1
1
1
1
1
1
;==============================================================================
code_test SEGMENT CODE
RSEG
code_test
USING 0
;-----------------------------------------------------------------------------start:
...
Debug_clear_LCD
;clear the LCD panel
Debug_show_msg_to_LCD
Debug_show_msg_to_LCD
Debug_show_msg_to_LCD
Debug_show_msg_to_LCD
Debug_show_msg_to_LCD
Debug_show_msg_to_LCD
#5Ah
var1
ACC
B
P1
30h
Debug_show_msg_to_7seg
Debug_show_msg_to_7seg
Debug_show_msg_to_7seg
Debug_show_msg_to_7seg
Debug_show_msg_to_7seg
Debug_show_msg_to_7seg
#5Bh
var2
ACC
B
P2
31h
;show
;show
;show
;show
;read
;show
immediate value #5Ah to LCD panel
var1’s value to LCD panel
SFR ACC’s value to LCD panel
SFR B’s value to LCD panel
P1 and show to LCD panel
RAM addr. 30h’s value to LCD panel
;show
;show
;show
;show
;read
;show
immediate value 0x5B to 7-segment
var2’s value to 7-segment
SFR ACC’s value to 7-segment
SFR B’s value to 7-segment
P2 and show to 7-segment
RAM addr. 31h’s value to 7-segment
//set a Breakpoint with No.=0x01, which will blink on the 7-segment
Debug_set_breakpoint #01h
//set a Breakpoint with No.=0xF2, which will blink on the 7-segment
Debug_set_breakpoint #0F2h
//set a Breakpoint with No.=var5, which will blink on the 7-segment
MOV
var5,#0B1h
Debug_set_breakpoint var5
Debug_show_msg_to_PC
Debug_show_msg_to_PC
Debug_show_msg_to_PC
Debug_show_msg_to_PC
Debug_show_msg_to_PC
Debug_show_msg_to_PC
#5Ch
var3
ACC
B
P3
32h
;show
;show
;show
;show
;read
;show
immediate value 0x5C to PC monitor
var3’s value to PC monitor
SFR ACC to PC monitor
SFR B to PC monitor
P3 and show to PC monitor
RAM(addr=32h) content to PC monitor
;get an argument from PC, and store into var4
Debug_get_argument_from_PC arg
MOV
var4,arg
...
This document information is the intellectual property of Megawin Technology Co., Ltd.
© Megawin Technology Co., Ltd. 2007 All right reserved.
11
Megawin 8051 GNU Debugger
MEGAWIN
User Manual, v4.00
MAKE YOU WIN
3-2 Insert the Debug Agent for a Non-relocatable Project
If the user’s project consists of only one assembly program which has its code-segment and data-segment not relocatable (that is its code address and variable address are absolutely specified by the user rather than
automatically arranged by the Linker), then what Section 3-1 mentions can not be used.
The following example shows a non-relocatable assembly program. The user should open the file "DEBUG.PIN"
to edit the definition for 'SDA', which is one of the target’s I/O pin used as the interface to the Debugger, as
shown below.
SDA
BIT
P1.6 ;!!!!! the user may change P1.6 to the other wanted I/O pin
In this example, the user should notice where to include “DEBUG.PIN” and where to insert the Debug Agent
“DEBUG.A51”.
$INCLUDE (DEBUG.INC)
;include header file
var1
var2
var3
DATA
DATA
DATA
30h
31h
32h
flag1
flag2
flag3
BIT
BIT
BIT
20h.0
20h.1
20h.2
;Variables are absolutely assigned by
;“non-relocatable” definition.
;
;
;
;
;
;==============================================================================
CSEG
AT 0000h ;absolutely assign code address
JMP
start
ORG
0040h
MOV
SP,#7Fh
;absolutely assign code address
start:
;... (Instruction)
;... (Instruction)
JMP
Label_1
ORG
1000h
;absolutely assign code address
Label_1:
;... (Instruction)
;... (Instruction)
JMP
Label_2
ORG
2000h
;absolutely assign code address
Label_2:
;... (Instruction)
;... (Instruction)
;==============================================================================
$INCLUDE (DEBUG.A51)
END
;insert the Debug Agent
;end of program
This document information is the intellectual property of Megawin Technology Co., Ltd.
© Megawin Technology Co., Ltd. 2007 All right reserved.
12
MEGAWIN
MAKE YOU WIN
Megawin 8051 GNU Debugger
User Manual, v4.00
4 Application Program on PC-site
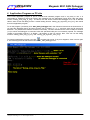
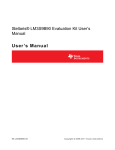
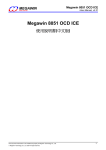
The PC-site application program is just a console-mode software program and is very easy to use. It is
responsible for displaying (and even saving) the message from the debugged Target which calls the debug
function “Debug_show_msg_to_PC();”. Of course, the user should connect the Debugger to PC via an RS-232
cable in order to use this debug function. Another debug function “Debug_get_argument_from_PC()” also needs
to run this application program.
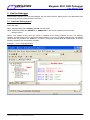
To run this program, just doubly click “8051_GNU_Debugger.exe”, then follow its instructions as shown below. If
you want the displayed data to be saved, answer yes by entering “Y” or “y”, and then enter the file name with
extension “.txt” (because the data are saved as text format). The user should enter the correct COM port number
(1~9) to which the Debugger is connected. After the specified COM port is successfully opened, the message
“COMx is successfully opened !” & “Ready..” will appear on the PC monitor. Now, user can use the debug
functions “Debug_show_msg_to_PC()” and “Debug_get_argument_from_PC()”.
” at upper-right corner. If any error happens, close it and re-open
To close this application program, just click “
it. The following picture shows the execution “8051_GNU_Debugger.exe”.
This document information is the intellectual property of Megawin Technology Co., Ltd.
© Megawin Technology Co., Ltd. 2007 All right reserved.
13
MEGAWIN
Megawin 8051 GNU Debugger
MAKE YOU WIN
User Manual, v4.00
5 Demonstration Examples
This Debugger provides versatile functions for embedded firmware developing and debugging. Several examples
are presented in this section. They are:
Example-1: Check the program flow
Example-2: Modify contents of SFR and RAM
Example-3: Continuously monitor the MCU’s internal status
Example-4: Pseudo “Breakpoint”
Example-5: Pseudo “Step-debugging”
Example-6: Check the ADC result
Example-7: Check a Timer’s counting value
Example-8: Check data in the IAP-memory
This document information is the intellectual property of Megawin Technology Co., Ltd.
© Megawin Technology Co., Ltd. 2007 All right reserved.
14
Megawin 8051 GNU Debugger
MEGAWIN
User Manual, v4.00
MAKE YOU WIN
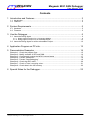
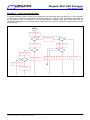
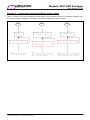
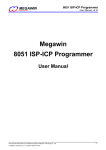
Example-1: Check the program flow
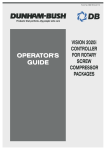
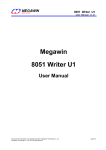
In program developing stage, checking the program flow and monitoring where the MCU runs is very important.
For this purpose, user can insert the debug function “Debug_show_msg_to_LCD()” with different arguments into
the key branch points, as illustrated in the following diagram. Suppose 0x00, 0xD0, 0xD1 and 0xF0 are
sequentially displayed on the LCD panel while the MCU start to run, then we can know the program flow is shown
as the blue line.
Start
Debug_show_msg
_to_LCD(0x00);
N
N
Debug_show_msg
_to_LCD(0xD0);
Y
Y
Debug_show_msg
_to_LCD(0xA0);
Debug_show_msg
_to_LCD(0xD1);
N
N
Y
Debug_show_msg
_to_LCD(0xB0);
Debug_show_msg
_to_LCD(0xA1);
N
Y
Debug_show_msg
_to_LCD(0xF0);
Debug_show_msg
_to_LCD(0xD2);
Debug_show_msg
_to_LCD(0xE0);
Y
Debug_show_msg
_to_LCD(0xC0);
Debug_show_msg
_to_LCD(0xB1);
This document information is the intellectual property of Megawin Technology Co., Ltd.
© Megawin Technology Co., Ltd. 2007 All right reserved.
15
Megawin 8051 GNU Debugger
MEGAWIN
User Manual, v4.00
MAKE YOU WIN
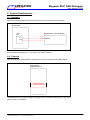
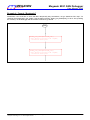
Example-2: Modify contents of SFR and RAM
Sometimes, user would like to modify the contents of some SFR or RAM while MCU is running. Use the debug
function “Debug_get_argument_from_PC()” to do it. Refer to the following diagram.
Start
unsigned char var1;
var1=Debug_get_argument_from_PC();
IE=Debug_get_argument_from_PC();
IP=Debug_get_argument_from_PC();
DPH=Debug_get_argument_from_PC();
DPL=Debug_get_argument_from_PC();
SCON=Debug_get_argument_from_PC();
TMOD=Debug_get_argument_from_PC();
P1=Debug_get_argument_from_PC();
...
This document information is the intellectual property of Megawin Technology Co., Ltd.
© Megawin Technology Co., Ltd. 2007 All right reserved.
16
Megawin 8051 GNU Debugger
MEGAWIN
User Manual, v4.00
MAKE YOU WIN
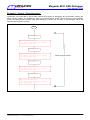
Example-3: Continuously monitor the MCU’s internal status
User can continuously monitor the MCU’s internal status, such as state of an input port, contents of RAM or SFR,
etc. See the following examples. The status is continuously displayed on the LCD panel.
Start
Start
TCON.0=1;
P1=0xFF;
Start
unsigned char var1;
//falling-edge triggered
Debug_show_msg_to_LCD(P1);
Debug_show_msg_to_LCD(TCON);
Debug_show_msg_to_LCD(var1);
//to monitor TCON.1,
the INT0 interrupt flag
Note:
In this case, P1's input is
continuously monitored.
Note:
In this case, if TCON.1 is changed
to 1, then we can know a falling
edge on INT0 had happened.
This document information is the intellectual property of Megawin Technology Co., Ltd.
© Megawin Technology Co., Ltd. 2007 All right reserved.
Note:
In this case, "var1" is continuously
monitored to check if it is updated
in some interrupt service routine.
17
Megawin 8051 GNU Debugger
MEGAWIN
User Manual, v4.00
MAKE YOU WIN
Example-4: Pseudo “Breakpoint”
Sometimes, user would like to have the MCU temporarily stay somewhere, not go ahead but like “stop”, for
checking what happened in the system. Use the debug function “Debug_set_breakpoint()” to do it. And, pressing
the "GO-key" on the Debugger will let the MCU continue to go ahead.
Start
Debug_set_breakpoint(BP_no1);
//Now, "BP_no1" will blink on the 7-segment,
and user can check system.
Debug_set_breakpoint(BP_no2);
//Now, "BP_no2" will blink on the 7-segment,
and user can check system.
This document information is the intellectual property of Megawin Technology Co., Ltd.
© Megawin Technology Co., Ltd. 2007 All right reserved.
18
Megawin 8051 GNU Debugger
MEGAWIN
User Manual, v4.00
MAKE YOU WIN
Example-5: Pseudo “Step-debugging”
Sometimes, user would like to step-by-step execute the program for debugging. By successively inserting the
debug function “Debug_set_breakpoint()” within the critical program section (where the bug is most probably
found), the Debugger can emulate quasi-Step debugging. Pressing the "GO-key" on the Debugger will let the
MCU execute the next instruction.
Start
Instruction 1
Debug_set_breakpoint(BP_no1);
//Now, "BP_no1" will blink on the 7-segment,
and user can check system.
Instruction 2
Debug_set_breakpoint(BP_no2);
//Now, "BP_no2" will blink on the 7-segment,
and user can check system.
Critical program section
Instruction 3
Debug_set_breakpoint(BP_no3);
//Now, "BP_no3" will blink on the 7-segment,
and user can check system.
Instruction 4
Debug_set_breakpoint(BP_no4);
//Now, "BP_no4" will blink on the 7-segment,
and user can check system.
This document information is the intellectual property of Megawin Technology Co., Ltd.
© Megawin Technology Co., Ltd. 2007 All right reserved.
19
Megawin 8051 GNU Debugger
MEGAWIN
User Manual, v4.00
MAKE YOU WIN
Example-6: Check the ADC result
There is an ADC function in Megawin MPC82-series MCU. To check the ADC result, user can insert the debug
function “Debug_show_msg_to_LCD()” after an A-to-D conversion is finished. As shown in the following diagram,
the ADC result will be displayed on the LCD panel.
Start
Start A-to-D
conversion
Check if
conversion
finished ?
N
Y
Debug_show_msg_to_LCD(ADC);
This document information is the intellectual property of Megawin Technology Co., Ltd.
© Megawin Technology Co., Ltd. 2007 All right reserved.
20
Megawin 8051 GNU Debugger
MEGAWIN
User Manual, v4.00
MAKE YOU WIN
Example-7: Check a Timer’s counting value
To check a Timer’s counting value whenever you want, please stop the Timer prior to inserting the debug
function “Debug_show_msg_to_LCD()” with argument “THx” or “TLx”. In this example, Timer1’s counting value is
to be checked.
Start
TR1=0;
Debug_show_msg_to_LCD(TH1);
Debug_show_msg_to_LCD(TL1);
This document information is the intellectual property of Megawin Technology Co., Ltd.
© Megawin Technology Co., Ltd. 2007 All right reserved.
21
Megawin 8051 GNU Debugger
MEGAWIN
User Manual, v4.00
MAKE YOU WIN
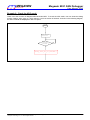
Example-8: Check data in the IAP-memory
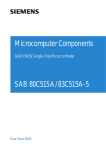
To check the IAP data, use the debug function “Debug_show_msg_to_LCD()”. See the following flow chart. If use
“Debug_show_msg_to_PC()”, it is necessary to connect the Debugger to PC’s COM port and execute the
“8051_GNU_Debugger.exe”. (See Section 4 for the Application Program on the PC-site.)
Start
ISPCR=0x83; //ISPCR.7(ISPEN)=1, enable ISP
IFMT=0x01; //select Read Mode
and,
initialize [addrH,addrL]
IFARDH=addrH; //High-byte address
IFADRL=addrL; //Low-byte address
SCMD=0x46; //trigger ISP processing
SCMD=0xB9; //
Debug_show_msg_to_LCD(IFD);
or
Debug_show_msg_to_PC(IFD);
Check if
end address ?
N
[addrH,addrL]=[addrH,addrL]+1;
Y
This document information is the intellectual property of Megawin Technology Co., Ltd.
© Megawin Technology Co., Ltd. 2007 All right reserved.
22
MEGAWIN
MAKE YOU WIN
Megawin 8051 GNU Debugger
User Manual, v4.00
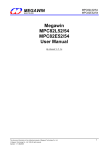
6 Special Notes for the Debugger
Normally, the LCD panel will show “Ready ..” whenever the Debugger is in its ready state, which means the
Debugger is ready to receive the debug commands from the debugged Target. However, if the Debugger is
connected to a powered-off Target system, the Debugger’s LCD panel & 7-segment LEDs will show “Timeout !”
(or “Command error !”) and “Er”, respectively. It is because the state of the SDA-pin scanned by the Debugger
is logic “0”, which means a START condition of a debug command is sent to the Debugger, but it is a fake
START caused by the powered-off Target system. Anyway, it does not matter for this condition. The LCD panel
will stably show “Ready ..” as long as the Target system is powered on.
This document information is the intellectual property of Megawin Technology Co., Ltd.
© Megawin Technology Co., Ltd. 2007 All right reserved.
23