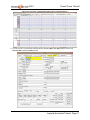
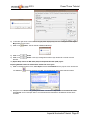
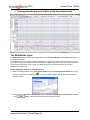
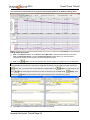
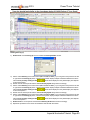
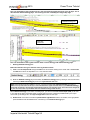
1
2015 Imperial Tutorial Suite 200, 638 – 11th Avenue S.W. Calgary, Alberta T2R-0E2 Phone: (403) 777-9454 Fax: (403) 777-9455 Website: www.powerlogger.com Email: [email protected] 2015 Power*Curve Tutorial Table of Contents Introduction ............................................................................................................................................................ 3 The Toolbar ............................................................................................................................................................ 3 The Selection bar… ................................................................................................................................................ 3 The Status bar… .................................................................................................................................................... 4 The Import toolbar .................................................................................................................................................. 4 The Export toolbar .................................................................................................................................................. 4 Connecting to the database .................................................................................................................................... 5 Creating a new log for an existing well. ................................................................................................................... 5 Importing the vertical tutorial well. .......................................................................................................................... 5 Creating a new log for an existing well. ................................................................................................................... 7 The System Options window: ............................................................................................................................... 12 Fonts tab .............................................................................................................................................................. 13 Display tab ........................................................................................................................................................... 14 Favorites tab ........................................................................................................................................................ 16 Fundamentals of the log configuration builder window: ......................................................................................... 18 Deleting the date track from the horizontal tutorial log… .............................................................................. 18 Moving the depth track… ............................................................................................................................. 19 Turning off a track….................................................................................................................................... 19 Resizing a track… ....................................................................................................................................... 19 Deleting the remarks layer from the detailed lithology track… ...................................................................... 19 Importing ascii file data into the drill rate & total gas curve layers: ......................................................................... 21 Changing curve scales from drill rate layer pop up menu. ..................................................................................... 23 Importing an LAS gamma ray curve data .............................................................................................................. 24 The slide/rotate layer: ........................................................................................................................................... 26 Importing ASCII file data into the slide rotate layer: ............................................................................................... 26 Import ASCII data to the proposed well path curve (right click method) ................................................................. 29 Importing directional surveys, minimum curvature calculations with well path ss and tvd curves. .......................... 30 Adding sample descriptions: ................................................................................................................................. 34 Printing out sample descriptions to MSword.......................................................................................................... 37 Printing out sample descriptions (crystal format)................................................................................................... 37 Curve fill layer automated lithology in the detailed lithology track .......................................................................... 38 Drawing Interpreted Lithology: .............................................................................................................................. 39 Inserting rock type between 2 exisitng lithology intervals….................................................................................... 40 Inserting rock type within an interval….................................................................................................................. 40 Resizing an interval… ........................................................................................................................................... 41 Drawing a rock type from the builder… ................................................................................................................. 41 Deleting a single rock type or bed ......................................................................................................................... 41 Deleting multiple rock types or beds ..................................................................................................................... 42 Layers Organizer for the detailed lithology track .................................................................................................... 42 Moving the lithology descriptions .......................................................................................................................... 43 Drawing Porosity (%) ............................................................................................................................................ 45 Drawing Grain Sizes ............................................................................................................................................. 46 Drawing Oil Shows ............................................................................................................................................... 48 Drawing Sorting.................................................................................................................................................... 49 Drawing Rounding ................................................................................................................................................ 49 The well path curve fill layer.................................................................................................................................. 51 The detailed lithology layer ................................................................................................................................... 53 Drawing Accessories: ........................................................................................................................................... 55 Deleting multiple accessories................................................................................................................................ 57 Adding Reservoir Qualities to the reservoir quality track ........................................................................................ 57 Adding an annotation to the drilling progress track ................................................................................................ 60 Adding a Formation Top ....................................................................................................................................... 61 Setting up the survey views .................................................................................................................................. 63 Isolating the individual survey views ..................................................................................................................... 65 Plan view (isolated) .............................................................................................................................................. 65 User defined view (isolated) .................................................................................................................................. 66 Print the log to a printer driver. ............................................................................................................................. 68 Print the log to a tiff (file format) ........................................................................................................................... 69 Adding a link (attachment) to your log................................................................................................................... 71 Imperial Horizontal Tutorial Page 2 2015 Power*Curve Tutorial Introduction Power*Curve™(Petrographical Office Wellsite Evaluation and Reporting) is a chip and core logging management program that utilizes single-entry data capturing to produce geological striplogs. The geological data is entered into the system through the use of intuitive data entry forms to ensure standardization of data. This data is stored in an RDBMS(Relational Database Management System) to allow data manipulation using SQL access tools. Power*Curve™ software consists of four (4) main parts: 1.) 2.) 3.) 4.) A horizontal log editor module that allows you to change the striplogs to suit your needs and preferences. A data transfer module. Report printing modules. An on-line help system that is designed to familiarize you with the commands and functions available in Power*Curve™ and lead you through many of the processes involved in creating welllogs. A note about navigating through Power*Curve™ Reports: When you are entering information into data forms, you may move between boxes/fields by pressing the Tab key to go forward and Shift +Tab keys to move backwards. To exit forms that do not have an Exit, OK, or Cancel button, press the Esc key on the keyboard. To access the On-line Help System in Power*Curve™: You can make use of the context sensitive help by pressing the F1 key when you are in a dialogue box. A pertinent help file will appear, opened to the topic relevant to the dialogue box you are in. Below are some examples of common features within Power*Curve™: The Toolbar The Selection Bar… Selection Bar Using the Default American Style Inches Screen Scale Selection Bar Using the Metric Style Selection Utilizing a Ratio for Screen Scale Imperial Horizontal Tutorial Page 3 2015 Power*Curve Tutorial The Status Bar… The Status Bar displays system status messages and any error message (associated with a field entry), in the far left corner. The KB elevation is displayed in the lower right corner of the Status Bar. The Import Toolbar This toolbar is dock able and can be moved to different places on the screen. The Power*Log / Core & Curve™ Import Toolbar… The Export Toolbar This toolbar is dock able and can be moved to different places on the screen. The Power*Log / Core & Curve™ Export Toolbar… Button, Check box and drop box types. The Four (4) Main On-line Help System Categories: Commands - Descriptions of each menu command within Power*Log / Core & Curve™. Toolbar - Shortcuts to common commands are explained. Database Table Operations - Commands or functions related to the Database Table are described. Quick Reference Guide - The portion of the On-line Help System that quickly refers you to some of the more commonly performed tasks Imperial Horizontal Tutorial Page 4 2015 Power*Curve Tutorial This tutorial will guide you through the process of creating and editing a new horizontal striplog (hereafter referred to simply as a log), with curves and interpreted lithology. Connecting to the Database 1.) Double click on the Icon. Acknowledge the Security Information window by clicking on the button. This will initiate the program and activate a Connect Database window. 2.) Highlight the PGEOLOGY 2015 IMPERIAL (Microsoft Access Driver [*mdb]) database by clicking on it once. 3.) Move your mouse pointer to the User ID field and click. This will activate a flashing cursor in the User ID field. Type “pgeology” in the User ID field. Press the Tab key on the keyboard to move to the Password field. 4.) Type “pgeology” in the Password field and then click on the load various dictionaries and then activate an Open Log window. 5.) Click on the button. The program will now button in the Open Log window to close the Open Log window. Creating a new Log for an Existing Well. The idea behind this tutorial is that you have already completed the Vertical Tutorial and that well exists in your database. The information that has been entered in the Vertical Tutorial will be shared and displayed on this horizontal tutorial. If you have not completed the Vertical Tutorial you can now import that log / well from the C:\PowerSuite_2015\system folder. The export file name is Imperial Vertical Tutorial Well.exp. If you have completed the Vertical tutorial then proceed to page 8. Importing the Vertical Tutorial Well. 1. Select Import, under the File menu selection, and then select Log/Well from the sub-menu. Or, you can use the Import button on the Import Toolbar. This will activate the Import window. Imperial Horizontal Tutorial Page 5 2015 Power*Curve Tutorial Importing the Tutrorial Vertical Log/Well… button. This will activate the Import From Window and browse to the 1. Click on the C:\PowerSuite_2015\system folder. Please make sure that the Imperial Vertical Tutorial Well.exp is button. This will fill in the Data Transfer Window highlighted (selected) and then click on the with the file name highlighted and the file's contents displayed in the File Header list field 2. Click on the the highlighted files?” 3. Click on the button to activate the following system message, “Do you really want to IMPORT button to proceed with the import. Note: If you click on the “Yes” button, and the file you are importing contains the information from an Entire Well, the following system message will be activated, “About to IMPORT ENTIRE WELL data. All information associated with this well in the database will be OVERWRITTEN. Continue?” 4. Click on the button and then click on the button again. 5. Upon completion of the import, the following system message will then be activated, “Data has been imported successfully.” 6. Click on the 7. Click on the button to confirm the successful import of the data. button to close the Window down. Imperial Horizontal Tutorial Page 6 2015 Power*Curve Tutorial Creating a new Log for an Existing Well. 1.) New Log button on the Toolbar or to select New The first step in creating a new log is to click on the under File on the Selection Bar. This will open the New Log window shown below. 2.) Click on the Button. This will activate a Well List window with a list of wells associated with your database 3.) Select the Tutorial Well by either double clicking the name in the list or clicking on the name once and clicking on the button. This will fill in the Well/Log Name and the UWI fields. 4.) The user must now modify the Well/Log Name as you cannot have 2 logs with the same name. In our case we will click the mouse button at the End of the Well/Log name field and type in HZ log after the Tutorial Well. 5.) The user must now modify the Well/Log Name as you cannot have 2 logs with the same name. In our case we will click the mouse button at the End of the Well/Log name field and type in HZ log after the Tutorial Well. Note: Because the Well / Log Name field is associated with the original UWI / API you are only changing the Log name. The well name that was created in the Vertical Tutorial remains as it was first entered. 6.) Click on the 7.) button to activate the Log Format List window. Click on “H SYSTEM HORZ [SYSTEM (I)]” to highlight it and then click on the may also double click on “H SYSTEM HORZ [SYSTEM(I)].” button. You Note: The H before the Log name represents a Horizontal Log Format and the V before the Log name represents a Vertical Log Format Imperial Horizontal Tutorial Page 7 2015 Power*Curve Tutorial 8.) Once you have been returned to the New Log window, double click in the Log Start Depth field. This will highlight the zero (0) and activate a flashing cursor. Type 8560 in the Log Start Depth field. 9.) Once the information is entered, click on the button. 10.) This will initiate a New Log. Because you have created a second log for an existing well you will be reminded with a System message. Click on the button. 11.) During this process, the curves associated with the selected log format will be added. You will now be prompted with the first Add Curve window for the Well Path (SS). The Well Path (SS) Curve allows the user to draw the actual well path that the well takes when being drilled. These depths should correspond to the last few meters of the build section and the proposed window for the horizontal or lateral section of the well bore. In our tutorial the KB is 82 ft. This curve will be updated with SS values. Note: The Left / Bottom Scale maps to the bottom on a horizontal curve and the Right / Top Scale maps to the top on a horizontal curve. 12.) Select “ft” for feet in the Curve Units field. Then, enter a value of “-7915” into the Left/Bottom Scale field and a value of “-7775” into the Right/Top Scale field. Finally, select “Linear” in the Grid Type field and then click on the button. Then the next Add curve window Well Path (TVD) window will then be displayed. Imperial Horizontal Tutorial Page 8 2015 Power*Curve Tutorial The Well Path (TVD) allows the user to draw the same well path as the SS but this time the curve will be displayed in TVD depth units 13.) Select “ft” for feet in the Curve Units field. Then, enter a value of “7997” into the Left/Bottom Scale field and a value of “7857” into the Right/Top Scale field. Finally, select “Linear” in the Grid Type field and then click on the button. The Proposed Well Path (TVD) add curve window will then be displayed The Proposed Well Path (TVD) allows the user to draw the proposed well path as first drawn by the directional drilling company. Typically, you would only show the horizontal portion of the well path and/or the last few meters of the build section. The Proposed Well Path Add Curve window should have the exact same scale values as the Well Path (TVD) window. 14.) Select “ft” for feet in the Curve Units field. Then, enter a value of “7997” into the Left/Bottom Scale field and a value of “7857” into the Right/Top Scale field. Finally, select “Linear” in the Grid Type field and then click on the button. The Detailed Lithology Scale [DETLITH1] window will then be displayed. The Detailed Lithology Scale [DETLITH] window allows the user to draw Lithology in the Detailed Lithology track with respect to a scale. This enables the user to change the scale to match the SS curve if there happens to be a scale change the represented lithology can also change so that the user will not have to redraw everything to fit the scale change on the curve. We will draw this layer with respect to the subsea units that were added with the Well Path subsea curve. Imperial Horizontal Tutorial Page 9 2015 Power*Curve Tutorial Note: The Display Depths associated with the Detailed Lithology layer in the Detailed Lithology track are determined by the values entered into either the Major or the Minor field in the Layer Configuration window for the Detailed Lithology layer. 15.) Enter a value of “-7775” into the Top Scale field and a value of “-7915” into the Bottom Scale field. Finally, select Straight Shift in the Backup Scale field. 16.) Click on the button, and exit from the ensuing Shortcut Options window by clicking once on the button. 17.) You will now be prompted with an Add Generic Category layer window named Reservoir Quality. Type Reservoir Quality into the field as shown in the proceeding window. 18.) Click on the Button. This will initiate the last Add Curve Window for Gamma Ray. 19.) The Curve Units, top an bottom scales should be fine. Click on button. You have just added four curves to the database, that will be displayed as layers in the Drilling Progress track and the Detailed Lithology track on your new horizontal log along with the Drill Rate and Total Gas Curves that were associated earlier with the Vertical Tutorial. Imperial Horizontal Tutorial Page 10 2015 Power*Curve Tutorial ** When your log opens, it should look similar to the log displayed below. ** 1.) You can now fill in your pertinent well information by selecting Well under Edit pull down menu on the Selection Bar to activate the Well window. Imperial Horizontal Tutorial Page 11 2015 Power*Curve Tutorial 2.) Fill in the information you feel is necessary (the Figure above, has been filled in to give you an idea of how to complete the fields. Please type in the KB elevation field with “82”. This is done so that when we add a formation top that a sub sea level (ssl) field will be filled in. Also when we Import the Survey data we will be avle to calculate the Subsea depths for the SS well path curve. Then click on the you have made to the well record. button to save any changes Note: Some of the fields in the Well window have character restrictions or mandatory requirements. Consequently, if any of these restrictions have been violated or if any requirements have not been met, the offending field will be highlighted, the nature of the problem will be displayed on the Status Bar (lower left hand corner of the screen). You will be prompted with a system error message window. Remember to save your work, after the problem has been fixed. 3.) If the record has been successfully saved, click on the Shortcut Options system window. button, when prompted with the The System Options window: To activate the System Options window click on System Options under the Options menu selection. General Tab Home Directory - This is the directory on your hard drive where Power*Log, Power*Core and Power*Curve is being executed. The user will not see any symbols on their log or print out any of our reports it you have the wrong home directory. This check box when activated will populate the Open Log window with all the wells in the database. If it is unchecked it may help our corporate users and the time it take to retrieve thousands of wells from the database and to populate the Open Log window with that information. If this check box is deactivated and you wish to see all your wells then simply click on the wells if this option is deactivated. button in the Open Log window to see all their Date Format - From this drop box, you can select the date format. This selection determines how every date in Power*Log / Core & Curve will be entered and displayed. If you import a log with different date formats, Power*Log / Core & Curve will change the dates to comply with the format you've chosen here. The user can change this at any time and all the Date formats will be changed in the database. Version Compatibility - Enables the user to achieve compatibility for Annotations in the older Versions of Power*Suite (V1.81 and before) and the Annotations in the newer Versions of Power*Suite (V1.9 and later). Data Buffer Lookahead - The number placed in this field determines how far ahead and behind the current top depth will be stored in the computers buffer. The larger the look ahead number, the longer it takes for Power*Log / Core & Curve to refresh the screen when you exceed the look ahead value. However, until you meet or exceed the look ahead value, scrolling will be much faster, because the database is not yet being accessed. Imperial Horizontal Tutorial Page 12 2015 Power*Curve Tutorial Fonts Tab This tab allows the user to set up most of the fonts used in Power*Log, Core and Curve. You can set it up to be used on the current log as well as using the fonts as your defaults when you are making new logs. Annotation Font - Allows you to determine the default font style, type, color and size of your annotations on your log, Also this is the default when you use any of the Sample Description Transfer options. Survey Font - Allows you to determine the font style, type, color and size of your survey data associated with the Survey Layer on your log. Bit Record Font - Allows you to determine the font style, type, color and size of your bit record data associated with the Bit Record Layer on your log. Generic Category Font - Allows you to determine the font style, type, color and size of your Long or Short Name display option in all the Generic Category Layers displayed on your log. Depth Font - This allows you to determine the font style, type, color and size of the depth markers in the Depth track of the log. - These radio buttons allows the user to change the orientation of the Depth Font on the Layer. Beware you may have to change the Track Width to accommodate the Font size and orientation. Refer to the Log Configuration Builder to do this. This check box when activated will display the depth units with the depth on the Depth Layer. ie. 1000 ft or 1000 m vs. 1000 Track Header Font - Allows you to determine the font style, type, color and size of your Track Headers on your log. All track headers use the same font across the entire log. Layer Header Font - Allows you to determine the font style, type, color and size of your Layer Headers on your log. All Layer headers use the same font across the entire log. Formation Tops Font - Allows you to determine the font style, type, color and size of your Formation Tops data associated with the Formation Tops Long and Expanded Layers on your log. Offscale Font - Allows you to determine the font style, type, color and size of your curve values displayed when the curve pegs off scale. Core Box Font - Allows you to determine the font style, type, color and size of your Core Box data entered in the Core Box layer. Casing String Font - Allows you to determine the font style, type, color and size of your Casing string data displayed on the Casing String layer. This data is entered through the Casing String Report. Date Font - Allows you to determine the font style, type, color and size of your Date data entered in the Date layer. Core Sample Code Font - Allows you to determine the font style, type, color and size of your Core Plug data entered through the Core Plug Report. This font is displayed on the Core Sample Code layer. Imperial Horizontal Tutorial Page 13 2015 Power*Curve Tutorial Sidewall Core Font - Allows you to determine the font style, type, color and size of your Sidewall Run and Sample Number data entered through the Sidewall Core Report. This font is displayed on the Sidewall Core layer. MDT Font - Allows you to determine the font style, type, color and size of your MDT Run and Test Number data entered through the MDT Report. This font is displayed on the MDT layer. This check box when activated will make the font setting in this window your defaults for any new log created regardless on the Fonts stored in the template. Display Tab Arrowed Subintervals - This check box when activated will indicate the top and bottom of your subintervals (portion of an interval) with an arrow rather than a set of symbols. An example is shown below. Normal Subintervals Arrowed Subintervals when activated, this function makes the background of the accessory symbols Transparent - This check box transparent, so that the bed in the background shows through. If deactivated, a white background surrounds the accessory symbols in order to separate them more from the beds. Use Global Symbols – With the ability to edit existing metafiles the user may have imported a well that has used metafiles or symbols that have been modified to look differently than the one existing within your system symbols. If you wish to use your symbol set instead of the revised imported ones you can select this check box to make that change. when activated will display the interbed data with a line display Interbed Line Display Type - This check box splitting the two lithology types or when unchecked will display the lithology in an interbed fashion as displayed below. Imperial Horizontal Tutorial Page 14 2015 Power*Curve Tutorial Curve Backup fill – This check box when activated will show a sideways hatching fill pattern when a curve goes off scale or in the backup mode. If unchecked there will be no hatching pattern when the curve goes off scale. Frequency @ 1:240 – This drop box determines how often symbols are drawn on a Lithology Layer, with the scale of 1:240. For example: 1 symbol every 1 meter at 1:240, 2 symbols every 1 meter at 1:120, 1 symbol every 2 meters at 1:480, and so on. These frequencies are only in effect if you utilize the entire interval in Oil Shows, Rounding, Sorting, Framework, or designated an interval in Sedimentary Structures, Traces Fossils and Rock Accessories. Lithology Profile - This check box when activated will fill in the Carbonate Texture and Grain Size layers with the interpretive lithology. It will draw the lithology to the maximum size filled in over the interval. Note: The user may wish to turn off the track borders when this option is selected. You will see an example of this shown below. Use Metric Style Scales: This option allows the Imperial Users to utilize a ratio 1:240 or 1:600 rather than 2” or 5” which would be standard selections in the United States. Grain Size Scale List box - You may choose between Wentworth, Canstrat or Amstrat scales, when using the Grain Size Builder. The Wentworth Grain size only allows full grain size while Canstrat / Amstrat allow half grain sizes when drafting in the Grain size and matrix layers. This radio button will display the Grain Size Track header with the equivalent verbal grain sizes such as such as C slt, VF snd, F snd, M snd, C snd etc. Verbal Scale MM Scale This radio button will display the Grain Size Track header with the equivalent numeric grain sizes (in mm) such as .0625, .125, .25, .5, 1, 2 etc. as shown above. This radio button will display the grain size with strait edges and right angles between the grain sizes. The illustration below is shown with Lithology Profile activated. Hard Edges This Soft Edges radio button will display the grain size with curved edges and rounded angles between the grain sizes. This drop box allows the user to select a hatching Grain Size pattern when using the Grain Size Layer with the Lithology Profile not activate. This color selector allows the user to pick the line color (foreground) when the fill Grain Size pattern option is used. The background color is found in the Layer configuration for the Grain Size. Imperial Horizontal Tutorial Page 15 2015 Power*Curve Tutorial Grain Size No Pattern Hard edges Grain Size Pattern Soft edges This drop box allows the user to select a Carbonate Texture hatching pattern when using the Carbonate Texture Layer with the Lithology Profile not activate. This color selector allows the user to pick the line color (foreground) when Carbonate Texture the fill pattern option is used. The background color is found in the Layer configuration for the Carbonate Texture Layer. Carbonate Textures This radio button will display the grain size with strait edges and right angles between the Carbonate Textures. The illustration below is shown with Lithology Profile activated. Carbonate Textures This angles between the Carbonate Textures. radio button will display the grain size with curved edges and rounded -When this check box is activated the bedding contacts (lines) between the drawn lithology types in the Interpretive Lithology Layer will be shown. When this check box is activated it will turn on the accessories in the Interpretive Lithology Layer. Monitor Height - This option allows you to scale your monitor for Power*Log / Core so you may correlate onscreen wells with hard copy logs that you may have. It is recommended that you take an opportunity to measure the vertical viewing area of your monitor in inches and then insert that value in the Monitor Height field. Be aware, however, that if you adjust the screen height knob on your monitor, this will affect the monitor height setting. Monitor Width - This option allows you to scale your monitor for Power*Curve so you may correlate on-screen wells with hard copy logs that you may have. It is recommended that you take an opportunity to measure the horizontal viewing area of your monitor in inches and then insert that value in the Monitor Width field. Be aware, however, that if you adjust the screen width knob on your monitor, this will affect the monitor width setting. Note: You must restart Power*Log / Core & Curve for the Monitor Width / Height changes to take effect. This drop box option will display your directional surveys on your log in either Quadrant format N 62 º W) or Azimuth format (AZ 298 º) when activated will display the survey with TVD values when activated will display the survey with SSL values This check box when activated will display the Sidewall Core Run & Core numbers above the core triangle indicator on the Sidewall Core layer. Display TVD check box Display SSL check box Favorites Tab This tab allows the user to define their System favorites for all the data categories that support these choices. This tab dialogue also allows the user to access the % Lithology Sort order for the % Lithology Track. Imperial Horizontal Tutorial Page 16 2015 Power*Curve Tutorial Rock Favorites - The button when activated allows the user to determine the number of the activation of the Rock Type Builder window in the Interpreted and Detailed Lithology tracks. 1.) Click on the button in the System Options window. 2.) Click on the button in the Rock Type Favorites list window to prepare it for the selection of your Rock Favorites. 3.) Select the following Rock Types from the Rock Type Favorites list window: Ls ms [Limestone (mud supported)] Sh m gy [Shale medium gray] Ss [Sandstone] Dol [Dolomite] Plus any other rock types you would use a lot. 4.) Click on the button to return to the System Options window. Accessory Favorites - Allows the user to determine their favorite Accessories and then displays them in a pop-up menu generated by the activation of the Accessory Builder window in the Interpretive Lithology track. 1.) Click on the button in the System Options window. 2.) Click on the button in the Accessory Favorites list window to prepare it for the selection of your Accessory Favorites. 3.) Select the following Accessories from the Thinbed, Components, and Cement headings in the Accessory Favorites list window: Note: You can navigate around these selections by typing in the first two characters of the accessory to get a lot closer to your selection. Thinbed cht dk pebbles [chert dark pebbles] sh gy stringers [shale gray stringers] sid nodules [siderite nodule] Component aren [arenaceous] calcs [calcareous] carb [carbonaceous] coal (carb) grs [coal (carbonaceous) grains] cht dk grs [chert (dark) grains] fld grs [feldspar grains] glau grs [glauconite grains] micmica [micromicaceous] pyric [pyritic] slty [silty] Cement sid [siderite] sils [siliceous] Plus other components that you would use a lot. 4.) Click on the button to return to the System Options window. 5.) Click on the button to return to the Main Power*Curve window. The Log Configuration Builder Window This is the heart of the Log/Track/Layer configurations and controls the way your well’s information is displayed on the log. The well may have a lot of information stored in the database, but that information cannot be shown graphically on the log, until the necessary layers have been created to illustrate that information. Click on Log Configuration Builder under the Options menu on the Selection Bar or click on the Log Configuration Builder button on the Toolbar to activate the Log Configuration Builder window. Imperial Horizontal Tutorial Page 17 2015 Power*Curve Tutorial Fundamentals of the Log Configuration Builder window: The left side of the Log Configuration Builder window: Available Logs The Available Logs section or left side of the Log Configuration Builder window allows you to take any track or layer from Available Logs and add it to the log you are currently creating/building. On the left side of the window, below the radio button is a list of the tracks available for adding to the Active Log. The Available Logs section or left side of the window contains the track and layer configuration of the SYSTEM [SYSTEM] log, when the window first opens. You have the option of using any of the existing Tracks and their associated layers or any of the existing Layers, that are associated with any of the system logs in the log database. The user can click on the button on the left side of the screen to activate a selection list of all log formats that are in your database. The list is comprised of two (2) names with the first name in the list being the system Log Name and the second name (in brackets), being the UWI of its primary well. Double click on the log format you wish to copy from. Below the radio button on the left side of the window, is a list of the layers available in the track highlighted above. They will be added all at once, if you add their parent track. However, they can also be added on an individual basis, if you only want to add one(1) layer to an existing Active Log track. The right side of the Log Configuration Builder window: Active Log The Active Log section or right side of the window displays the track and layer configuration of the Active Log (the log you are currently creating), in the main Power*CurveTM window. The name of the log is viewed in the Log field. In this case, it will be “Horizontal Tutorial Well.” Below the radio button on the right side of the window, is a list of the tracks that are currently found within the Active Log. The track at the top of this list is drawn on the left side of the log, while the track on the bottom of the list is drawn on the far right of the log with all of the other tracks drawn in between, respectively. Below the radio button on the right side of the window, is a list of the layers that are associated with the track highlighted above. The middle of the Log Configuration Builder window: Selection Buttons The selection buttons, found in the middle column of the window, are for adding layers or tracks from the Available Logs to the Active Log, activating/deactivating the Active Log’s tracks, deleting active log tracks or layers, and moving tracks or layers within the Active Log itself. Step-by-step instructions for accomplishing these tasks are provided on the following pages. Working with the Log Configuration Builder window: Deleting the Date track from the Horizontal Tutorial Log… 1.) On the right side of the Log Configuration Builder Window scroll down in the Tracks list and highlight or click on the Date track. Imperial Horizontal Tutorial Page 18 2015 2.) Click on the Power*Curve Tutorial button in the middle of the builder. This action will prompt you with a system button. The message, “Do you want to delete the selected track in your log?” Click on the Date track has now been removed from the log. Moving the Depth track… 1.) Click on the Depth track to highlight it on the right side of the Log Configuration Builder window. Note: Make sure you have clicked on the Depth track and NOT the Depth 1 track. 2.) Click on the button and it will change to button.” Then, click on the Detailed Lithology track. The Depth track will then be placed above the Detailed Lithology track. Turning off a track… 1.) On the right side of the Log Configuration Window Click on the Porosity Type track to highlight it on the right side of the Log Configuration Builder window. 2.) Click on the button to turn the “Y”(yes), to the left of the track name, to “N”(no), indicating that the track will not be shown on the log, until it is reactivated. 3.) Alternatively, you can simply double click on the Porosity Type track to turn the “Y”(yes) to “N”(no). Resizing a track… 1.) On the right side of the Log Configuration Builder window highlight or click on the Detailed Lithology track. 2.) Double click in the Track Width field (2.95”) and type in the value of 3.3 Then, press the Tab key and the Detailed Lithology Track with will change as well as the total width of the log itself will change to reflect the increase in the width of the Detailed Lithology track. Note: For paper 8.5” wide, 8.00” is the widest that you want your log to be, especially if you are printing out the log in the Landscape paper orientation. Deleting the Remarks layer from the Detailed Lithology track… 1.) On the right side of the Log Configuration Window Click on the Detailed Lithology track to highlight it. Notice that the layers associated with this track are displayed below, in the Layers list box in the lower right portion of the window. 2.) Click on the Remarks layer to highlight it in the layers list box. Notice that the automatically activated by highlighting a given layer. 3.) Click on the radio button is button. This action will prompt you with a system message, “Do you want to button. The Remarks layer has now DELETE the selected [layer] in your log?” Click on the been removed from the log. Configuring the Detailed Lithology track… 1.) On the right side of the Log Configuration Window Click on the Detailed Lithology track to highlight it. 2.) Click on the button (to the right of Tracks portion of the window), to activate the Track Configuration window for Detailed Lithology Imperial Horizontal Tutorial Page 19 2015 Power*Curve Tutorial 3.) The Track name is Detailed Lithology. To modify the Track Heading name type in “Surface location 35-139” in the first Heading field. In the second heading field, type in “Bottom Hole Location 34-138” and in the third heading field type in “-7775 to –7915 ft ssl”. These modifications are shown in Figure above. 4.) Click on the button to save the changes. 5.) A system message will appear asking the User. “Record saved successfully. Do you wish to exit?” Click on the button. This action will return you to the Log Configuration Builder window. When you exit from the Log Configuration Builder window, you will notice that the track headings have conformed to your changes. 6.) Click on the button or depress the Esc key on the keyboard to exit from the Log Configuration Builder window and you will be returned to the main log window, where you will see the changes you have made to the new log. Configuring the Well Path SS / TVD and Proposed Curve Layers… We will be doing this as the grid pattern is a little tight to show the curve scales on the header without being all meshed together. 1.) Click on the Detailed Lithology track to highlight it. 2.) Click on the Well Path (SS) layer to highlight it. 3.) Click on the button (just above and to the right of Layers portion of the window), to activate the Layer Configuration window for Well Path (SS). 4.) The defaults are fine but you may want to change the scale placements from every 200 feet to every 250 feet so that you have more room for you lithology descriptions that you have transferred over. 5.) Click on the Layer Scales Tab. It may activate a Confirmation Message asking you to Save? Click on the button. This will then activate the Layer Scales Tab portion of the Layer Configuration window. Imperial Horizontal Tutorial Page 20 2015 Power*Curve Tutorial 6.) In the lower right corner of the window is the grid pattern displayed by this curve. Change the Linear Cycle Major divisions from 6 to 4. 7.) Click on the 8.) Click on the button. This will activate a Database Message. button. 9.) Click on the button in the Layer Configuration window Layer Scales Tab. This will close the Window. 10.) Repeat Steps 2-8 for the Well Path (TVD) and Proposed Well Path (TVD) Layers Importing ASCII File Data into the Drill Rate & Total Gas curve layers: 1.) Click on the File pull down menu, select Import and then select ASCII from the pop out menu. OR the user can select the Icon from the Import Tool Bar. This will activate an Open ASCII Data File window. 2.) Navigate to the C:\Powersuite_2015\system folder and select the Imperial Horizontal ASCII TG & ROP curve.txt file. Click on the Open button. Once the file has been selected the Set delimiter window will be activated. Imperial Horizontal Tutorial Page 21 2015 Power*Curve Tutorial 3.) This file is a Space delimited file and the default on this window is space delimited. You will see <column break> between the data points. Click on the button. This will open the Import window. 4.) The default on the Depth column is Column 1 which is indicated by the purple X. In our case the depth is the first column so we do not have to change the depth column indicator. 5.) Click on the Column 2 on the left side and drag it to the Drill Rate Curve layer on the right side of the window. You will see Column 2 in the mapped Data field and an APPEND in the action field. 6.) Click on the Column 3 on the left side and drag it to the Total Gas Curve layer on the right side of the window. You will see Column 3 in the mapped Data field and an APPEND in the action field. 7.) Click on the Button. This will import the curve data and prompt you with a database message saying Imported successfully. 8.) Click on the button to close the window. button to close the ASCII Import window. 9.) Click on the Your log should now have both the total gas and drill rate curves updated. Imperial Horizontal Tutorial Page 22 2015 Power*Curve Tutorial Changing Curve Scales from Drill Rate Layer Pop Up Menu. 1.) Click anywhere in the Drilling Rate track. Depending on your screen resolution you may have to scroll down to see the Drilling Rate track 2.) Use the drop down arrow in the Layer Selection List field (located at the upper left side of the Selection bar), to display a list of the layers in this track. 3.) Click on Drill Rate to make it the active layer and the Layer Selection List will close automatically after you have made your selection. 4.) Right click on the Drill Rate layer. This will activate a Drill Rate Pop-up menu. 5.) Our last scale change on this curve was when we were in the vertical tutorial and we changed scales because of the coring time that we input into the drill rate data. We are again going to change scales. Select Scale from the menu. This will activate the Scale Window shown below with the first scale for the drill rate curve. 6.) Click on the button to move to the second scale. We will be changing this scale in our case at 6107ft. Type in a different from Depth Interval changing the 10000 to 6107 and then click on the will activate a System message stating Record Saved Successfully. 7.) Click on the button. This button. This will clear the window and add a 3rd scale to the drill arte curve. 8.) Type in 6107 in the from depth interval field, tab, type 14000 in the to depth interval field, tab, type in 0 in the left / bottom scale field, type in 20 in the right / top scale field, select strait shift from the Backup Scale drop box. 9.) Click on the button and then click on the Successfully message box. button from the ensuing Record Saved Imperial Horizontal Tutorial Page 23 2015 Power*Curve Tutorial Importing an LAS Gamma Ray Curve Data 1. Click on the File pull down menu selection and click on Import and then click on LAS from the pop out-menu or simply click on the LAS button, on the Import Toolbar, to activate the LAS Reader window. 2. This will then activate the Open window which allows the user to select the LAS file you wish to import the data from. You can find the file in the PowerSuite_2015\System\Imperial Horizontal Gamma Ray Curve.las and button. You will see the window shown highlight the file by clicking on it once and then click on the below. We default to the importing of Curve data. The user can Import other data types as well. Imperial Horizontal Tutorial Page 24 2015 Power*Curve Tutorial Overview of window The left hand side of the LAS Reader window (shown on the right) allows the user to see the tree view of the data file format including the different data, parameter and definition blocks. The tree enables the user to select different sets of data or definitions. We have the choice to import these data types into the predefined data sets such as curves, Inclinometry, Tests, Tops and Core Data within the Power*Suite application. We default the window to select the log data or curve data if it is available. The upper right hand side of the LAS Reader window (shown to the right) allows the user to see the data associated with the different data and parameters and definition blocks. The bottom left hand side of the LAS Reader window (Shown below left) displays the curve data sets that available to be imported. These can then be dragged to the import side of the LAS reader. The bottom right hand side of the LAS Reader window (shown above right) shows the Import side displaying the Curve Layers and Curve names associated with the log that is open and active at the time the LAS Reader window was invoked. Importing LAS Curve Data files 1. On the lower left side of the window Click and drag the Gamma Ray curve to the Gamma Ray layer on the lower right side and release it when the layer name becomes highlighted. N.B. The user can Right click on the Curve Layer ID to remove the mapping or switch the action from append to replace. The Symbol color will either be purple for replace or blue for append. 2. Click on the button. You will then be prompted with a system message after the import has finished. 3. button and then click on the Acknowledge the Finished Import message. Click on the to exit or click on the File menu and select the Exit option to close the LAS Reader Window. button Imperial Horizontal Tutorial Page 25 2015 Power*Curve Tutorial ** Your log should now look similar to the log shown below. ** The Slide/Rotate Layer: The Slide/Rotate layer provides a visual representation of the Drill String Rotation and Orientation throughout the progress of the well. The Rotate function of the window is shown as disabled, because rotation is represented as a blank space on the layer. The only thing you can physically draw on this layer is a Slide or Orientation of the Drill string as done when you are directionally drilling, which is shown as a black bar with an S covering the distance of the slide or orientation of the drill string. Importing ASCII File Data into the Slide Rotate layer: 1.) Click on the File pull down menu, select Import / Export and then select Import Slide Rotate from the pop out menu. OR the user can select the Data File window. Icon from the Import Tool Bar. This will activate an Open Slide 2.) Navigate to the C:\Powersuite_2015\System folder and select the Imperial Horizontal Slides.txt file. Click on the button. This will activate the Slide Import Options window. Imperial Horizontal Tutorial Page 26 2015 Power*Curve Tutorial 3.) The user must know how the toolface orientation fields are set up in the ASCII file. If the field for orientation have a +/- or a L/R and if they have a L/R then are the fields merged or not. Select the correct radio and check boxes and then click on the activate the Set Delimiter window. button. Follow the example above for this file. This will 4.) This file is a Space delimited file and the default on this window is space delimited. You will see <column break> between the data points. Click on the button. This will open the Import window. 5.) Click on the Column 1 on the left side and drag it to the Top Depth on the right side of the window. You will see Column 2 in the mapped Data field. 6.) Click on the Column 2 on the left side and drag it to the Base Depth on the right side of the window. You will see Column 2 in the mapped Data field. Imperial Horizontal Tutorial Page 27 2015 Power*Curve Tutorial 7.) Click on the Column 3 on the left side and drag it to the ToolFace on the right side of the window. You will see Column 3 in the mapped Data field. 8.) Click on the Column 4 on the left side and drag it to the Orientation on the right side of the window. You will see Column 3 in the mapped Data field. Button. This will import the curve data and prompt you with a database message saying 9.) Click on the Imported successfully. 10.) Click on the 11.) Click on the button to close the window. button to close the Slide Import window. Drawing a Slide… 1.) Double click on the Slide/Rotate layer where no data exists to activate the Slide/Rotate window. 2.) On the Slide/Rotate track, position your mouse pointer at 8630 ft., because this is where the Slide will begin. 3.) Hold down your left mouse button and drag the mouse pointer to 8640 ft. because this is the position where you want the Slide to end. 4.) Release the mouse button and the Slide will be drawn from 8630 – 8640 ft. It will have an S to indicate a random slide. 5.) Now click on the slide you just drew so that it refreshed the window. Type in 5 in the Toolface field and select the left radio button. 6.) .Click on the Button. This will redraw the slide with 5 L. Deleting a Slide… 1.) Right click your mouse button on an existing Slide. This will activate the pop-out menu. 2.) Click on the Delete Selection and your slide will be deleted. 3.) If you would like to delete multiple slides hold the SHIFT key down on your keypad and click and drag and area within the Slide / Rotate track. Then release your mouse button. This will activate a System Message. 4.) Click on the button to delete multiple slides Resizing a Slide… 1.) Hold down the Ctrl key on the keyboard and position the mouse pointer to the edge of the Slide you wish to resize. The mouse pointer will turn into a resize cursor. 2.) While continuing to hold down the Ctrl key and the mouse button, drag the mouse pointer to the left / right to resize the Slide. Notice that the yellow increment box displays the two depth limits of the Slide, as you move the mouse pointer. 3.) Release the left mouse button (before the Ctrl key) and the new Slide interval will be drawn. in the builder to exit from the Slide/Rotate window. 4.) Press the Esc key on the keyboard or click on the Imperial Horizontal Tutorial Page 28 2015 Power*Curve Tutorial Import ASCII data to the Proposed Well Path Curve (right click method) The following steps will show you how to add values to the Proposed Well Path curve layer. In an actual Wellsite situation the User could import the Proposed well path curve if the ASCII file for the drilling program is available form the directional drillers. We will make up proposed well path in this case. Ie where the well was designed to be drilled. 1.) Click anywhere in the Detailed Lithology track. Notice that a green border highlights or surrounds the track. This is used to indicate that the track is ACTIVE. 2.) Click on the down arrow on the right hand side of the Layer Selection List to activate the list. 3.) Click on the Proposed Well Path from the Layer Selection List. This will make the Proposed Well Path curve layer the active. 4.) Right click within the active Detailed Lithology track to activate the Pop out menu and then select. Import. This will activate another pop out and then select ASCII. This will activate a Choose ASCII file import window. 5.) Click on the Button. This will activate the Open Data file window 12.) Navigate to the C:\Powersuite_2015\System folder and select the Imperial Proposed Well Path ASCII button. This will fill in the ASCII Import window as shown above. file.txt file. Click on the 13.) Click on the first line of data in the Choose Start depth portion of the window. 14.) Select column 1 from the Measured Depth Column Drop box. 15.) Select column 2 from the Data Column Drop box. Imperial Horizontal Tutorial Page 29 2015 16.) Click on the Power*Curve Tutorial Button. This will import the curve data for the Proposed Well path. Importing Directional Surveys, Minimum Curvature Calculations with Well Path SS and TVD Curves. Before we can successfully import surveys, run the minimum survey calculations and update the well path curve at one time we have to fill in some necessary information in the Survey Report. Getting the Directional Survey Window prepared to accept and calculate the survey data. 1.) Click on the Report selection on the Menu bar and select the Directional Survey selection from the pull down menu. This will activate the Direction Survey Window. The steps below will fill in the necessary fields to run minimum curvature calculations, you can fill in the rest if you so desire. 2.) Select 100 from the Dog Leg Severity Characteristic Drop Box. 3.) Type in 110 in the Target Azimuth Field 4.) Type in 0 in the Tie in MD Field, tab, 0in the Tie in TVD Field, tab, 0 in the Inclination field, tab, 0 in the Azimuth Field, tab, 0 in the E/W field, -0 in the N/S field, tab,0 in the Section field, tab, and 0 in the Dog Leg Severity field. 5.) In the user defined portion of the window place a check in the box beside the calculate field, select minimum curvature from the calculation method drop box and select tie in from the calculate from drop box. Doing this will automate the calculation in survey points window. Imperial Horizontal Tutorial Page 30 2015 Power*Curve Tutorial 6.) Click on the button and then click on the button from the ensuing Record Saved Successfully System Message. This will put you back into the main Power*Curve window. 7.) Click on the File selection to activate the pull down menu and select Import / Export to activate the pop-out menu and Select Import Surveys… Then Select New Method… or you can click on the Import Surveys button on the toolbar to activate the Open Dir. Survey file window so you can pick the file you wish to Import. 8.) Select the “Imperial Horizontal Survey Points.txt” located in the Powersuite_2015 / System directory. If chosen correctly it will look like the Open Dir. Survey File Window. Click on the activate the Set Delimiter window. button. This will 10.) This file is a Space delimited file and the default on this window is space delimited. You will see <column break> between the data points. Click on the button. This will open the Import window. Imperial Horizontal Tutorial Page 31 2015 Power*Curve Tutorial 11.) Click on the Column 1 on the left side and drag it to the Measured Depth on the right side of the window. You will see Column 1 in the mapped Data field and an APPEND in the action field. 12.) Click on the Column 3 on the left side and drag it to the Deviation_Angle on the right side of the window. You will see Column 2 in the mapped Data field and an APPEND in the action field. 13.) Click on the Column 4 on the left side and drag it to the Deviation_Azimuth on the right side of the window. You will see Column 3 in the mapped Data field and an APPEND in the action field. Button. This will import the curve data and prompt you with a database message saying 14.) Click on the Imported successfully. 15.) Click on the button to close the window. button to close the ASCII Import window. 16.) Click on the 17.) This will activate a System Message will be activated asking the user “Do you wish to perform TVD / Well path Calcualtions?”. 18.) Click on the button. This will activate the TVD Calculations window. Imperial Horizontal Tutorial Page 32 2015 Power*Curve Tutorial Calcutate TVD Curve Calcutate SS Curve In the Directional Survey portion of this window the defaults should be set by the Directional survey report we filled in earlier. Make sure that the Calculate Directional Survey check box is checked, Survey Group One (1) is viewed, Minimum Curvature is selected in the Calculation Method drop box and tie in is selected from drop box 20.) In the Master Survey Group select the Minimum Curvature in the Calculation Method drop box and tie in is selected from drop box 21.) In the Well Path portion of the window select the Calculate Well path check box. Click on the 19.) 22.) button. This will activate a Curve List window. Double Click on the Well Path (TVD) curve or Click once on the Well Path (TVD) curve and click on the button. This will put you back into the TVD Calculations window and place the Well Path (TVD) curve name. Type in a Start Depth of 8580 in the Start Depth field and select the Units for the curve as TVD. Note: The reason why we will start this curve at 8580 is because of the TVD / SS scales we have picked for the horizontal display. This is the depth where the curves are on scale and will not wrap before getting on scale. Wrapping can cause lots of display issues with our curve fills. Once you have a number in this field it will stay for the duration of the well. 23.) In the Calculate TVD Attributes portion of the window deselect the check box. We do not have any of these fields to be updated at this point in time. 24.) Click on the Calculate Button. This will activate a Progress Window followed by a System message “Exit TVD Calculation Window?”. Click on the button. We will now update the Well Path SS curve with the new data from the survey points as well. 25.) In the Well Path portion of the window select the Calculate Well path check box. Click on the 26.) button. This will activate a Curve List window. Double Click on the Well Path (SS) curve or Click once on the Well Path (SS) curve and click on the button. This will put you back into the TVD Calculations window and place the Well Path (SS) curve name. Select the Units for the curve as SSL. 27.) Click on the Calculate Button. This will activate a Progress Window followed by a System message “Exit TVD Calculation Window?”. Click on the button. Imperial Horizontal Tutorial Page 33 2015 Power*Curve Tutorial You should now see the directional survey points and well paths plotted in the Detailed Lithology Track. Adding Sample Descriptions: 1.) Click on the Reports selection on the Power*CurveTM Menu Bar to activate the pull down menu and then Click on Sample Description to open the Sample Description window where if you have imported or completed the Vertical Tutorial you will view the last description entered. 2.) Click on the button. This will clear the data entry window and gets you ready to input a new description. N.B. The way the data entry windows work is that we will always open the data entry window with the deepest record entered for that record set. If you want to change that record then you can modify it and then click on the button. But, if you want a new record remember to always click on the on the click on the button. If you do forget to click button and change the record and you have not saved yet you can click on the button. Then button and proceed with entering the new data record for that data entry window. 2.) Type 8530 into the Interval (From) field and then depress the tab key. Imperial Horizontal Tutorial Page 34 2015 Power*Curve Tutorial 3.) Type 8602 into the Interval (To) field and then depress the tab key. 4.) Type Ls into the Rock Type field and then depress the tab key 4 times. This will move the cursor to the Short description field. Note: The rock types can be entered in a percentage format. This would generate a % description report as well as a % track or layer. For this exercise we will describe the samples interpretively. 5.) Type the following description into the Short Description field, exactly as it appears below: lt gy brn, rexld mdst (crpxl), arg, dns, ns. Note: The Short Description can be added to the Lithology Description layer in the main Power*CurveTM window and the Long Description will be printed out in the Sample Description Reports in the Well End Report window. 6.) In the transfer options portion of the window check mark the Automatic Description transfer, check mark the Transfer Depth Range, and check mark the Transfer Short Form and select the lithtext2 group from the Transfer to Annotation Group drop box because this is the second log using the lithology text layer. 7.) Click on the button and then click on the button from the ensuing Shortcut Options window. Note: This will automatically transfer your samples descriptions to the Horizontal Striplog on the Lithology Description layer. This layer is displaying Lithtext2 Annotation group. Adding another Sample Description… 1) button to advance the description interval from depth to 8602 ft and places the caret Click on the or highlight in the Interval to field. Type 8657 into the Interval (To) field and then depress the tab key Type Sh into the Rock Type field and then depress the tab key 4 times. This will move the cursor to the Short description field. Type the following description into the Short Description field, exactly as it appears below: m – dk gy, micmica, carb, occ tr glau grs, non calcs, fis. Tr Sid pels. 2) 3) 4) 5) Click on the button and then click on the Options window. Adding another Sample Description button from the ensuing Shortcut 1.) Click on the button to advance the description interval from depth to 8657 ft and places the caret or highlight in the Interval to field. 2.) Type 8684 into the Interval (To) field and then depress the tab key 3.) Type Ls into the Rock Type field and then depress the tab key 4 times. This will move the cursor to the Short description field. 4.) Type the following description into the Short Description field. lt gy brn, rexld mdst (crpxl), arg, dns, ns. 5.) Click on the button and then click on the Options window. button from the ensuing Shortcut Copying a Sample Description… Imperial Horizontal Tutorial Page 35 2015 Power*Curve Tutorial 1.) While still in the Sample Description window, click on the button to bring up a list of the descriptions you have already entered. 2.) Double click on 8602 - 8657 Sh and you will now see this description displayed in the Sample Description window. 3.) Highlight the text in the Short Description field by clicking and dragging the mouse pointer over the text. 4.) Once the text is highlighted, hold down the Ctrl key on the keyboard, press the letter “C” key on the keyboard, and then release the Ctrl key. This will copy the highlighted text to the computer’s clipboard. Alternatively, Windows 95 users can simply right click anywhere and then select the Copy function from the ensuing popup menu. 5.) Click on the button to clear the Sample Description window. 6.) Type in a new from depth of 8684 ft and press the tab key to place the caret or highlight in the Interval to field. 7.) Type 8700 into the Interval (To) field and then depress the tab key 8.) Type Sh into the Rock Type field and then depress the tab key 4 times. This will move the cursor to the Short description field. 9.) In the Short Description field hold down the Ctrl key on the keyboard, press the letter “V” key on the keyboard, and then release the Ctrl key. This will paste the contents of the clipboard into the Short Description field. Alternatively, users can simply right click anywhere and then select the Paste function from the ensuing pop-up menu. 10.) Click on the button and then click on the Options window. button from the ensuing Shortcut Adding more Sample Descriptions… 1.) Click on the button to advance the description interval from depth to 8700 ft and places the caret or highlight in the Interval to field. 2.) Type 8766 into the Interval (To) field and then depress the tab key 3.) Type Intbd Ss & Sh into the Rock Type field and then depress the tab key 4 times. This will move the cursor to the Short description field. 4.) Type the following description into the Short Description field, exactly as it appears below: Ss is predly m gy brn, m gred, modly w srt, rdd, qtz, com cht, occ glau & carb grs, sils cmt, fr - g intgran por (14-20%), com - abnt brn o stng, bri yel flor, g stmg mky yel cut flor. Sh is predly m gy, micmica, carb, non calcs, fis. 5.) Click on the window. button and then click on the button from the ensuing Shortcut Options Adding one last Sample Descriptions… button to advance the description interval from depth to 8766 ft and places the caret 1.) Click on the or highlight in the Interval to field. 2.) Type 9094 into the Interval (To) field and then depress the tab key 3.) Type Ss into the Rock Type field and then depress the tab key 4 times. This will move the cursor to the Short description field. 4.) Type the following description into the Short Description field, exactly as it appears below: wh, lt gy, m - c gred, modly w srt, sbang - sbrdd, qtz, tr wthrd fld grs, tr dk cht pbls, sils cmt, g - ex intgran por (20-22%), abnt even brn o stng, flor aa. 6.) Click on the button and then click on the button from the ensuing Shortcut Options window. You will now view all your sample descriptions on the upper third of the Lithology Description Layer in your Detailed Lithology Track. We will move these descriptions around to fit so that the reader can see all the descriptions on the log at a later time. This will be done when we are finished with the Detailed Lithology Layer. Imperial Horizontal Tutorial Page 36 2015 Power*Curve Tutorial Printing out Sample Descriptions to MSWord. 1.) Click on the Print Reports to Word button on the Toolbar or select Print Reports to Word Selection, under the File menu, on the Selection Bar to activate the Reporting Tool window. 2.) The Reporting Tool print window will automatically default to the active Well/Log Name. You will see Tutorial Well in the Choose a Well field If it is not the defaulted well then go to the Well list drop box and select it from the List. 3.) Highlight Sample Desc in the Reports field by clicking on it once. 4.) Leave the Depth Range field blank to print all the descriptions. 5.) Click on the check box 6.) Click on the button in the Well End Report window to printout the Sample Descriptions. This will activate you word program and you will get the Sample descriptions and Formation tops that were input through the Reports window. 7.) When you are finished, press the Esc key on the keyboard to exit from the Well End Report window and to activate the following system message, “Do you want to save the setup” Clicking on the button and the window selections you have just made will be remembered for the next time. Clicking on the button will remember the default selections that were set for this window. Printing out Sample Descriptions (Crystal Format) Print Well End Report button 1.) Click on the on the Toolbar or select Print Well End Report, under File, on the Selection Bar to activate the Power*Log Report: Well End Report window. 2.) The Well End Report print window will automatically default to the active Well/Log Name and its associated UWI: you will see Tutorial Well (100143206323W500) in the Well List field and it should be highlighted. If it is not highlighted, move the mouse pointer to the Well List field and click on the desired Well / Log Name to highlight the Well you wish to print information from. 3.) Highlight Sample Descriptions in the Reports field by clicking on it once. 4.) Select Printer from the Output drop box field list. 5.) Click on the button, in the upper right corner of the Well End Report window, to activate the Print Setup window. Notice that the currently selected printer is listed beneath the Default printer radio button , at the top left of the Print Setup window. Use the Printer section of the Print Setup window to specify the use of a printer other than the default printer. Imperial Horizontal Tutorial Page 37 2015 Power*Curve Tutorial Note: Power*Log™ automatically defaults to a Paper Orientation of Portrait and a Paper Size of 8 5 x 11, as specified in the Orientation and Paper sections, respectively, of the Print Setup window. Please do NOT change these default settings. 6.) Make sure that the All check box , in the Sample Description section at the lower right of the Well End Report window, is activated. 8.) Click on the button in the Well End Report window to printout the Sample Descriptions. 9.) When you are finished, press the Esc key on the keyboard to exit from the Well End Report window and to activate the following system message, “Do you want to save the setup configuration?” Click on the button and all of the printer selection/settings information utilized in the Well End Report window will be saved to the database for any future Well End Report print jobs. Curve Fill Layer automated Lithology in the Detailed Lithology Track Before we start drawing the Interpreted Lithology that we described in the Sample Descriptions we will set up the Curve fill layer in the detailed lithology track to replicate the Lithology in a two dimensional view entered into the interpretive lithology layer. This will then be filled in automatically when the interpretive lithology is entered. 1.) Click anywhere within the Detailed Lithology track to highlight the track with a green border and to get the layers in the layer selection list for this track. 2.) Click on the down arrow in the Layers Selector on the Selection Toolbar and select the Curve Fill layer. 3.) Double click on the Detailed Lithology track or button. This will activate the click on the Curve Fill options window. Click on the button. This will activate a list of curves associated with this well. 4.) Click on the Well Path (SS) so that it gets listed in the upper portion of the window and then click on the button or double click on the Well Path (SS). You will now view the curve name below the Set Main Curve button. Curve Options Portion of the Window. This information is pertaining to the Main Curve and its Curve attributes. 5.) Click on the Pattern Type down arrow and select PtoP (Point to Point). 6.) Click on the Grid Type down arrow and select the Linear. Fill Options Portion of the Window (One Curve) 7.) Click on the Fill Modes – 1 Curve down arrow and select Well Path. 8.) Type 1 in the Width field. Example If (1) one is typed into the width field then the fill will be ½” either side of the Well Path Curve. 9.) Select the radio button beside the SSL because we will be using the SS scales. 10.) Click on the Fill Patterns down arrow and select the Interpretive Lithology. 12.) Click on the button to close this window. 13.) Click on the window. button to exit the Curve fill options Imperial Horizontal Tutorial Page 38 2015 Power*Curve Tutorial Drawing Interpreted Lithology: Note: To work on any layer in any track, simply double click on the track in which you wish to work to activate the “builder” window for that particular layer. Once the “builder” window for a given layer is active, you are then able to access the right click pop-up menu(s) associated with that “builder” window and may proceed to enter any necessary intervals and graphical descriptions for the given layer. Drawing Rock Types… Note: The Rock Types are selected by the user in the System Options window (See System Options earlier in this tutorial). 1.) Select the Rock Type for Ls ms (limestone (mud supported)) from the Toolbox and it will automatically be displayed in the Rock Type field within the Rock Type Builder window. 2.) You may need to scroll to the left a bit by clicking on the bottom left arrow (scrolls ¼ page left). 3.) Define the left side of the interval by clicking and holding the left mouse button at 8530 ft on the Interpreted Lithology track. 4.) Define the right side of the interval by dragging the mouse pointer to 8602 ft. 5.) Finally, release the mouse button and the interval will be drawn accordingly. . Drawing another Rock Type… 1.) Select the Rock Type for Sh m gy (Shale (medium gray)) from the Toolbox and it will automatically be displayed in the Rock Type field within the Rock Type Builder window. 2.) Define the left side of the interval by clicking and holding the left mouse button at 8602’ on the Interpreted Lithology track. 3.) Define the right side of the interval by dragging the mouse pointer to 8657’ 4.) Release the mouse button and the interval will be drawn accordingly. Drawing another Rock Type… 1.) Select the Rock Type for Ls ms (limestone (mud supported)) from the Toolbox and it will automatically be displayed in the Rock Type field within the Rock Type Builder window. 2.) Define the left side of the interval by clicking and holding the left mouse button at 8657’ on the Interpreted Lithology track. Imperial Horizontal Tutorial Page 39 2015 Power*Curve Tutorial 3.) Define the right side of the interval by dragging the mouse pointer to 8684’ 4.) Release the mouse button and the interval will be drawn accordingly. Drawing another Rock Type… 1.) Select the Rock Type for Sh m gy (Shale (medium gray)) from the Toolbox and it will automatically be displayed in the Rock Type field within the Rock Type Builder window. 2.) Define the left side of the interval by clicking and holding the left mouse button at 8684’ on the Interpreted Lithology track. 3.) Define the right side of the interval by dragging the mouse pointer to 8700’ 4.) Release the mouse button and the interval will be drawn accordingly. Drawing another Rock Type multiple times… 1.) Before we draw the next set of lithology’s we will have to move the log to the right or deeper. Click on the space between the Thumb and the Right arrow to move the log a page deeper. 2.) Select the Rock Type for for ss (Sandstone) from the Toolbox and it will automatically be displayed in the Rock Type field within the Rock Type Builder window. 3.) Define the left side of the interval by clicking and holding the left mouse button at 8700’ on the Interpreted Lithology track. 4.) Define the right side of the interval by dragging the mouse pointer to 8707’ . 5.) Finally, release the mouse button and the interval will be drawn accordingly. 6.) Define the left and right of another sandstone bed by clicking and holding the left mouse button and dragging from 8710’ and then to 8717’ and finally release the mouse button and a sand will be drawn. 7.) Define the left and right of another sandstone bed by clicking and holding the left mouse button and dragging from 8724’ and then to 8842’ and finally release the mouse button and a sand will be drawn. Inserting Rock Type between 2 exisitng Lithology Intervals… 1.) Select the Rock Type for for Sh m gy (Shale (medium gray)) from the Toolbox and it will automatically be displayed in the Rock Type field within the Rock Type Builder window or the user can click on the exiting Shale that was drawn on the left to select that rock type. 2.) Double click the left mouse button between 8707’ and 8710’ on the Interpreted Lithology track and a shale will be drawn. 3.) Double click the left mouse button between 8717’ and 8723’ on the Interpreted Lithology track and a shale will be drawn. Inserting Rock Type within an interval… 1.) Select the Rock Type for Shale (medium gray) from the Toolbox and it will automatically be displayed in the Rock Type field within the Rock Type Builder window. 2.) Define the left side of the interval by clicking and holding the left mouse button at 8763’ on the Interpreted Lithology track. 3.) Define the right side of the interval by dragging the mouse pointer to 8766’. 4.) Release the mouse button and the user will be prompted with a system message “Do you want to ADD an interbedded interval?’ 5.) Click on the button and the Shale bed will be inserted within the Sandstone Interval. If you had any accessories, grain size, sorting, rounding etc. Within this interval they would have been deleted. Imperial Horizontal Tutorial Page 40 2015 Power*Curve Tutorial Resizing an interval… Note: The user can only resize either the top or the bottom of a particular bed at any one time. Accordingly, if you wish to resize both, you will have to repeat the steps. 1.) Press and hold the Ctrl key on the keyboard down, while hovering over the right border of the Sandstone bed drawn earlier @ 8842’ so that the mouse pointer turns into a resize cursor. 2.) Click and dragging the left mouse button from 8842’ to 8907’ on the Interpreted Lithology track. 3.) Release the mouse button at 8907’, followed by the release of the Ctrl key on the keyboard, and you will be prompted with the following system message. 4.) Click on the button to resize the Sandstone bed. Drawing a Rock Type from the builder… 1.) Before we draw the next set of lithology’s we will have to move the log to the right or deeper. Click on the space between the Thumb and the Right arrow to move the log a page deeper. 2.) Select the Rock Type for for sh m gy (Shale (medium gray)) from the Toolbox and it will automatically be displayed in the Rock Type field within the Rock Type Builder window. 3.) Type 8907 in the from field, depress the tab key, and then type 8923 in the to field. 4.) Click on the button. button 5.) Click on the 6.) Select the Rock Type for for ss (Sandstone) from the Toolbox and it will automatically be displayed in the Rock Type field within the Rock Type Builder window 7.) Type 8923 in the from field, depress the tab key, and then type 9223 in the to field. 8.) Click on the window. button and then press the Esc key on the keyboard to exit from the Rock Type Builder Deleting a Single Rock Type or Bed 1. 2. 3. Double click on the Interpreted Lithology track to activate the Rock Type Builder window. Right click anywhere within the Interpreted Lithology track to activate the pop-up menu. Click on Delete and the following system message will be activated, “Do you really want to DELETE _ to _ ?” Click on the button to confirm the deletion. Imperial Horizontal Tutorial Page 41 2015 Power*Curve Tutorial Note: When you delete a Rock Type, you will also delete its associated bed restricted rock description information, i.e. Grain Size, Porosity Grade, Type, Oil Show and all other bed restricted data. 4. Press the Esc key on the keyboard to exit from the Rock Type Builder window. Deleting Multiple Rock Types or Beds 1. Double click on the Interpreted Lithology track to activate the Rock Type Builder window. 2. Hold the SHIFT Key down and then click and drag anywhere within the Interpreted Lithology track and then let go of the Shift Key and left mouse button. This will activate a Delete Intervals message box. 3. Click on button and the Intervals dragged over will be deleted. Note: When you delete a Rock Type, you will also delete its associated bed restricted rock description information, i.e. Grain Size, Porosity Grade, Type, Oil Show and all other bed restricted data. 4. Press the Esc key on the keyboard to exit from the Rock Type Builder window. Layers Organizer for the Detailed Lithology track 1.) Click on the Detailed Lithology track to make it active (highlighted in green). 2.) Click on the View pull down menu and select Layers Organizer. You can also select the selection bar. This will activate the Layers Organizer window for the detailed Lithology Track. 3.) Click on the Directional Survey Points Layer so that it is highlighted. 4.) Click on the the layer name. button on the button. This will turn off the directional survey layer. You will notice and N beside 5.) Click on the Well Path (SS) Layer and then click on the this layer. This indicates it is the active layer. Imperial Horizontal Tutorial Page 42 button. This will put a > symbol beside 2015 Power*Curve Tutorial 6.) Because the Well Path SS layer is active it has a Movable grid associated with it which is defaulted to the bottom of the display. Every Curve has this option. In our case we will the moving the grid so that it overlays the Curve Fill and Detailed Lithology Layers. To do so Highlight the Movable Grid in the layers organizer. 7.) Click on the button. It will change to button. 8.) Click on the layer you want it to go above in our case the Detailed lithology layer and the moveable grid will go above it. As illustrated in the layers organizer above right. 9.) Click on the button. This will close the window and turn off the Directional Survey Points layers and make the Well Path (SS) layer active on the detailed lithology track. Moving the Lithology Descriptions The Descriptions when saved trough the Sample description window with the automatic transfer option checked will place the description at the top of the designated layer at the top depth of the described interval. You may want to move these around to make the other information on the track more readable. We will describe how to move and resize the annotations and the user should look at the log on page 49 to make yours look similar. 1.) Make the Lithology Descriptions layer active within the Detailed Lithology track by clicking on the Track and then selecting the Lithology Descriptions layer from the Layer Selection List field. 2.) Click anywhere within an Annotation to activate the RTF Toolbars for the Lithology Descriptions Layer and it will highlight that description. 3.) Place the mouse pointer on the outline surrounding the selected Sample Description on the Lithology Descriptions layer and the mouse pointer will turn into a cross-hairs cursor. 4.) Click and drag the mouse pointer to the Sample Description’s new position and then release the mouse button, and the Sample Description will be redrawn at its new location. 5.) Click anywhere outside the description to save and close the RTF builders. 6.) Repeat steps 2-5 to move all of the descriptions to where they best fit. Refer to the Log Example on Page 45 for our suggestions. Resizing Sample Descriptions 1.) Click anywhere within an Annotation to activate the RTF Toolbars for the Lithology Descriptions Layer and it will highlight that description and an outline will appear around the Sample Description. Note: You may only be able to activate the red dot associated with the uppermost Sample Description, because the Sample Descriptions created by you in the Sample Description window may overlap one another within the Lithology Descriptions layer. 2.) Place the mouse pointer overtop of the square boxes in the outline around the selected Sample Description on the Lithology Descriptions layer and the mouse pointer will turn into a resize cursor. 3.) Click and drag the mouse pointer to the Sample Description’s new size and then release the mouse button, and the Sample Description will be redrawn at its new size. 4.) Repeats steps 2-3 to change any of the sizes of the Sample Descriptions on your Log. 5.) Click anywhere outside the annotation to save and close the RTF builders. Resizing the font in a Sample Descriptions 1.) Click on the Intbd Ss & Sh description from 8700 to 8766’ to activate the RTF Toolbars for the Lithology Descriptions Layer and it will highlight that description 2.) Highlight the entire description by clicking and dragging the mouse pointer. 3.) Click on the selection in the RTF Font builder. This will activate the Font builder. Imperial Horizontal Tutorial Page 43 2015 Power*Curve Tutorial 4.) Drop the Size menu and select 8 point font. button in the Font builder, when you are finished. 5.) Click on the 6.) Click anywhere outside the description to save and close the RTF builders Deleting a Lithology Description 1.) Click anywhere within an Annotation to activate the RTF Toolbars for the Lithology Descriptions Layer and it will highlight that description and an outline will appear around the Sample Description. 2.) Right click inside the annotation to activate the pop-up menu and then click on the Delete selection. This will activate a System message 3.) Click on the button. Your annotation will be deleted Imperial Horizontal Tutorial Page 44 2015 Power*Curve Tutorial *Your log should look similar to the Log shown below @ 1:600 Ratio or 2” Log Scale* Drawing Porosity (%) 1.) Double click on the Porosity (%) track to activate the Porosity Builder window. 2.) Set the overall Porosity of the entire interval (Ss from 8700’ to 8707’), by moving the mouse pointer to the left or right within the Porosity (%) track, until the mouse pointer displays a depth somewhere between the above interval and a porosity reading of 18% which will be displayed in the yellow display box adjacent to the mouse pointer. 3.) Double click the mouse pointer and the desired Porosity Grade will be drawn accordingly. 4.) Set the overall Porosity of the entire interval (Ss from 8710’ to 8717’), by moving the mouse pointer to the left or right within the Porosity (%) track, until the mouse pointer displays a depth somewhere between the above interval and a porosity reading of 14% which will be displayed in the yellow display box adjacent to the mouse pointer. 5.) Double click the mouse pointer and the desired Porosity Grade will be drawn accordingly. 6.) Set the overall Porosity of the entire interval (Ss from 8724’ to 8763’), by moving the mouse pointer to the left or right within the Porosity (%) track, until the mouse pointer displays a depth somewhere between the above interval and a porosity reading of 18% which will be displayed in the yellow display box adjacent to the mouse pointer. 7.) Double click the mouse pointer and the desired Porosity Grade will be drawn accordingly. 8.) Repeat the procedure for the rest of the Sandstone intervals that were drawn. Imperial Horizontal Tutorial Page 45 2015 Power*Curve Tutorial N.B. The entire intervals when entered will be displayed in a purple color. On the next section we will define the subintervals and when they are entered they will be displayed in a green color. Drawing Porosity Grade sub-intervals… To draw Porosity (%) sub-intervals, as illustrated on Page 51, simply click and drag the mouse pointer from a desired Depth and Porosity (%) to another Depth on the Porosity Grade track and the sub-interval will be drawn in green accordingly. Deleting entire Porosity (%) intervals and sub-intervals… If you wish to delete an entire Porosity (%) interval or sub-interval, while the Porosity Builder window is open, right click within the interval or sub-interval slated for deletion to activate a pop-up menu, and then right click once on the appropriate selection. Drawing Grain Sizes 1.) Double click on the Grain Size track to activate the Grain Size Builder window. 2.) Set the overall Grain Size of the entire interval (Ss from 8700’ to 8707’), by moving the mouse pointer to the left or right within the Grain Size track, until the mouse pointer displays a depth somewhere between the above which will be displayed in the yellow display box adjacent to interval and a grain size of [m snd] the mouse pointer. 3.) Double click the mouse pointer and the desired Grain Size will be drawn in purple to represent an entire interval. 4.) Repeat steps 2-3 for the (Ss 8710’ to 8717’) and (Ss 8724’ to 8763’) To define another entire interval with a grain size range the user has two methods described below. You must be able to see the entire interval to do this first method. Use the horizontal scroll bar to position the interval on the screen 1.) Click and drag the mouse pointer from 8766’ [m snd] to 8907’ [c snd] on the Grain Size track. Note: Measured Depths and Grain Sizes, like 8770’ [m snd], can be viewed within the mouse pointer display box, situated just to the right of the mouse pointer. 2.) Release the mouse button and the entire Grain Size interval will be drawn in purple to represent an entire interval. The other method when the entire interval is larger than your screen view. Imperial Horizontal Tutorial Page 46 2015 Power*Curve Tutorial 3.) The other method for drawing larger intervals of Grain Size is to click the mouse pointer within the interval. In our case click the mouse in the grain size track between 8923’ and 9223’. You will notice the builder will show the entire interval for the bed. 5.) Click on the top Grain size from field drop box arrow and select m snd [medium sand] from the resulting choice list. 6.) Click on the top Grain size to field drop box arrow and select c snd [coarse sand] from the resulting choice list. 7.) Click on the button and the entire interval will be drawn. N.B. The entire intervals when entered will be displayed in a purple color. On the next section we will define the subintervals and when they are entered they will be displayed in green color. Drawing Grain Size sub-intervals... 1.) To draw subinterval without snapping to the top of the bed (depending on the mouse pointer accuracy) the user must first deselect the in the Grain Size Builder. 2.) Using the left mouse button, click and drag the mouse pointer from 8923’ [m snd] to 8957’ [vc snd] . 3.) Release the mouse button and the sub-interval will be drawn in green to represent a subinterval versus an entire interval which is drawn in purple. 4.) Repeat Steps 2 and 3 for 9022’ [m snd] to 9035’ [vc snd] . 5.) Repeat these steps where you see fit. 6.) To exit from the Grain Size Builder window press the Esc key on the keyboard once. Deleting entire Grain Size intervals and sub-intervals… If you wish to delete an entire Grain Size interval or sub-interval, while the Grain Size Builder window is open. Simply right click within the interval or sub-interval slated for deletion to activate a pop-up menu, and then right click once on the appropriate selection. Imperial Horizontal Tutorial Page 47 2015 Power*Curve Tutorial Drawing Oil Shows 1.) Double click on the Oil Show track to activate the Oil Show Builder window. 2.) Right click anywhere within the 8700’ to 8707’ interval in the Oil Show track to activate the pop-up menu. Note: The symbols utilized in the pop-up menu, represent a specific percentage (%) or amount of oil staining, as illustrated in the above diagram. 3.) Select 50-75% oil staining from the Entire Interval pop out menu and the entire bed will be populated with the Oil Show symbol ().indicating 50-75% oil staining. 4.) Right click anywhere within the 8710’ to 8717’ interval in the Oil Show track to activate the pop-up menu. 5.) Select 75-100% oil staining from the Entire Interval pop out menu and the entire bed will be populated with the Oil Show symbol indicating 50-75% oil staining. 6.) Right click anywhere within the 8724’ to 8763’ interval in the Oil Show track to activate the pop-up menu. 7.) Select 75-100% oil staining from the Entire Interval pop out menu and the entire bed will be populated with the Oil Show symbol indicating 50-75% oil staining. 8.) Right click anywhere within the 8766’ to 8907’ interval in the Oil Show track to activate the pop-up menu. 9.) Select 75-100% oil staining from the Entire Interval pop out menu and the entire bed will be populated with the Oil Show symbol indicating 75-100% oil staining. 10.) Continue on with the same process Note: The Symbol frequency or the number of symbols on a 5” scale is determined in the System Options / Display Tab located under the Option pull down men on the Power*Curve Menu Bar. Drawing Oil Show sub-intervals… N.B. The entire intervals when entered will be displayed coloress. On the next section we will define the subintervals and when they are entered they will be displayed in a red color. 1.) Right click anywhere Oil Show Track to activate the pop-up menu. 2.) Select 50-75% oil staining from the Sub Interval pop-up menu. 3.) Click and drag from 8861’-8907’ , 8957’-8990’ , and 9210’-9223’ and three sub-intervals (in red) will be populated with the 50-75% oil staining symbol. Deleting entire Oil Show intervals and sub-intervals… To delete an entire Oil Show interval or sub-interval, while the Oil Show Builder window is open, right click within the interval or sub-interval slated for deletion to activate the pop-up menu and then right click on the appropriate selection. Imperial Horizontal Tutorial Page 48 2015 Power*Curve Tutorial Drawing Sorting 1.) Double click on the Sorting track to activate the Sorting Builder window. 2.) Right click once anywhere within the 8700’ 8707’ interval the Sorting Track to activate the pop-up menu. 3.) Select modly w for the Entire Interval from the pop-up menu and the entire bed will be populated with the “mW” symbol. 4.) Right click once anywhere within the 8710’ – 8717’ interval the Sorting Track to activate the pop-up menu. 5.) Select modly w for the Entire Interval from the pop-up menu and the entire bed will be populated with the “mW” symbol. 6.) Right click once anywhere within the 8724’ – 8763’ interval the Sorting Track to activate the pop-up menu. 7.) Select modly w for the Entire Interval from the pop-up menu and the entire bed will be populated with the “mW” symbol. 8.) Right click once anywhere within the 8766’ – 8907’ interval the Sorting Track to activate the pop-up menu 9.) Select modly W for the Entire Interval from the pop-up menu and the entire bed will be populated with the “mW” symbol. 10.) Etc. Etc. Etc. N.B. The entire intervals when entered will be displayed colorless. On the next section we will define the subintervals and when they are entered they will be displayed in a red color. Drawing a Sorting sub-interval… 1.) Right click anywhere on the Sorting track to activate the pop-up menu. 2.) Select mod from the Sub Interval pop-up menu. and the specified sub-interval will be 3.) Click and drag from 8923’ – 8960’ populated with the “M” symbol. 4.) Repeat steps 2-3 where you previously put in subintervals for grain size. Deleting entire Sorting intervals and sub-intervals… To delete an entire Sorting interval or sub-interval, while the Sorting Builder window is open, right click within the interval or sub-interval slated for deletion to activate the popup menu and then right click once on the appropriate selection. Note: If you happen to do something wrong remember you have an UNDO under the Edit Menu selection. Also there is an button on the Toolbar. Drawing Rounding 1.) Double click on the Rounding track to activate the Rounding Builder window Imperial Horizontal Tutorial Page 49 2015 Power*Curve Tutorial 2.) Right click anywhere within the 8700’ to 8707’ interval in the Rounding Track to activate the pop-up menu shown below 2.) Select rdd for the Entire Interval from the pop-up menu and the entire bed will be populated with the “R” symbol. 3.) Right click anywhere within the 8710’ to 8717’ interval in the Rounding Track to activate the pop-up menu shown below 4.) Select rdd for the Entire Interval from the pop-up menu and the entire bed will be populated with the “R” symbol. 5.) Right click anywhere within the 8724’ to 8763’ interval in the Rounding Track to activate the pop-up menu shown below. 6.) Select sbrdd for the Entire Interval from the pop-up menu and the entire bed will be populated with the “r” symbol. 7.) Right click anywhere within the 8766’ to 8907’ interval in the Rounding Track to activate the pop-up menu shown below. 8.) Select sbrdd for the Entire Interval from the pop-up menu and the entire bed will be populated with the “r” symbol. 9.) Right click anywhere within the 8766’ to 8907 interval in the Rounding Track to activate the pop-up menu. 10.) Select sbang from the - Alternate pop-out menu and you will view alternating “a” and “r” symbols in this track. 11.) Repeat steps 9-11 within the 8923’ to 9223 interval in the Rounding Track and you will view alternating “a” and “r” symbols in this track. Deleting entire Rounding intervals and sub-intervals… If you wish to delete an entire Rounding interval or sub-interval, while the Rounding Builder window is open, right click within the interval or sub-interval slated for deletion to activate the pop-up menu and then right click once on the appropriate Delete selection. Imperial Horizontal Tutorial Page 50 2015 Power*Curve Tutorial ** Your log should now look similar to the Log shown below. ** The Well Path Curve Fill Layer 1.) Make the Curve Fill layer active within the Detailed Lithology track by clicking on the Detailed Lithology Track and then selecting the Curve Fill layer from the Layer Selection List field. 2.) Double click anywhere within the Curve Fill Layer in the Detailed Lithology track to activate the Choose Editor window shown below. 3.) Click on the page. button to activate the Bedding Contact Angles window shown on the next The Well Path Curve fill only works if the correct curve is identified. We complete that task in the Curve Fill Options selection. Also there is a width field that comes into play that defines the area surrounding the Curve and where the curve fill area is defined. The Well Path Options portion of the window defines the extents and dipping angles of the lithology drawn in the interpretive lithology. We default the extents to be 1000 feet before the bed was encountered and 1000 feet after the bed ended. If the interpretive lithology was drawn between 8000’ and 8050’ we would draw it on the curve fill from 7000’ and 9050’ as long as it fell within the width of the curve fill. The user can change an individual beds extents and bedding angles or multiple beds through the builder. Imperial Horizontal Tutorial Page 51 2015 Power*Curve Tutorial We will now modify the extents of an individual bed. To do so you can utilize the Mouse pointer or the keypad method of data entry. We will demonstrate both in this tutorial. 4.) Click on the SS Bed drawn from 8724’ to 8763’ on the curve fill layer to activate the blue highlight box around it. This will also activate it in the Bedding Contacts Angles window as well. 5.) Hold the CTRL Key down and move mouse over the right edge of the bed (departure extent) and click and drag the departure extend out to 9906’ as shown in the illustration below and let the mouse button go. This will revise the bed in the Bedding Contact Angles window and refresh on the screen with the Ss going to the end of the area. 6.) Click on the sh m gy bed drawn from 8763’ to 8766’ in the Bedding Contacts Angles builder and it will appear in the lower left hand portion of the window. Change the departure extent from 1000 to 1143’ and then click on the button. We will now demonstrate how to modify multiple beds at once. It is not necessary in our case but it is just to demonstrate how it is done. Imperial Horizontal Tutorial Page 52 2015 Power*Curve Tutorial 1.) Click in the from field in Change Range portion of the window and type 0 in the from field. Tab to the To Field. 2.) Type 9223 in the to field. This modification will change all the existing beds drawn to date. Tab to the Encounter Extent field. 3.) Type -1350 in the Encounter Extent field. Tab to the Departure Extent field. 4.) Type 1350 in the Departure Extent field. Tab to the Angle field. 5.) Type 1 in the Angle Field. 6.) Click on the button. This will change all the beds extents and departures to 1350 feet before and after with a bedding angle of 1 degree. N.B. Once this has been done the default will still remain -1000 and 1000 for the extents and departures with an angle of 0 degrees. The above procedure has to be done periodically to maintain a steady 1 degree bedding angle. 7.) Click on the button to close this window. The Detailed Lithology Layer In Power*Curve™, this layer allows you to create a visual representation of the Interpreted Lithology associated with your horizontal well path and gives you the ability to show Lithology above and below the well path curves or fill in areas where the Curve fill layer leaves a bit to be desired. Imperial Horizontal Tutorial Page 53 2015 Power*Curve Tutorial This is an illustration of the log before we fill in the erroneous lithology drawn by the curve fill layer. This is done with the detailed lithology layer. The resulting hole was created by the 1 degree dip angle. Detailed Lithology Fill After fill is performed This is an illustration of the log after we have drawn in some lithology with detailed lithology layer. Drawing Detailed Lithology Fill… Before we start this let us go to the area of the log we want to draw. 1.) Click in the Go to depth field and type in 8700 so we can view the drawing on the screen with a screen scale of 1:600 ratio scale or the equivalent is 2” = 100’ as shown below. 2.) Make the Detailed Lithology layer active within the Detailed Lithology track by clicking on the Track and then selecting the Detailed Lithology layer from the Layer Selection List field. Note: When this layer was first added to your log, you were prompted with a Measured Depth interval and a Scale for the top and bottom of the layer. This scale defines the upper and lower limits of your Detailed Lithology and should correspond to the top/right and bottom/left scales of your well path curves. The scale can be changed at any time and new scales may be added within the Detailed Lithology builder window. When Detailed Lithology is your active or working layer, you will have the True Vertical Depth (TVD) or SS level in our case are the same increments visible on the left side of the layer. These are predetermined by the major / minor linear cycle settings set in the Layer Configuration window for this layer. 3.) Double click on the track to activate the Detailed Rock Type Builder window, the Toolbox, and a grid pattern (both the MD and TVD are defaulted to 5’ increments), in the Detailed Lithology layer. Imperial Horizontal Tutorial Page 54 2015 Power*Curve Tutorial 4.) In our case we will need a little more accuracy in the TVD grid pattern and MD grid pattern. To change the grid pattern in the detailed lithology layer click on the MD Inc drop box arrow and select 1 and then click on the TVD Inc drop box arrow and select 1 from the subsequent list. This grid change will now be the default when you open this builder window the next time. 5.) Also turn off the check box as shown in the builder above. With the grid off the detailed lithology layer is not as busy as the MD and TVD Inc are quite close together. The Grid pattern is determined by the MD Inc and the TVD Inc drop boxes. This grid pattern is extremely helpful when the snap to grid option is activated. This makes the drawing of lithology a lot simpler when the user is attempting to join similar rock types together. The Show Grid option is a troggle for lack of better terms. It places the grid in front of the rock type, in back of the rock type and then it also turns the grid off entirely. As you click on this option you will notice the 3 different types of grid options. Drawing a Fill in the Detailed Lithology layer… 1.) Click once on the ss [sandstone] selection in the Rock Type Favorite toolbox to highlight it. This will fill in the rock type field in the builder. 2.) To define the top of the Sandstone bed move the mouse pointer to the detailed lithology layer so that you see in the yellow field that follows the mouse 8906’ [-7864]. To define the top left click and drag your mouse on in the lower portion of the yellow field that the Detailed Lithology layer until you see 9206 [-7864] follows the mouse pointer and then release the left mouse button. This will draw a line indicating the top of the Sandstone bed. Note: There is a bed length limitation of 300 ft. If you do not like the position of the line the user can right click on the layer and you can select Restart from the resulting pop-out menu and the line will disappear so that you can proceed with step 2 again. 3.) Move the mouse pointer to the detailed lithology layer so that you see in the yellow field that follows the mouse 8994’ [-7874]. To define the bottom of the Shale bed left click and drag your mouse on the Detailed Lithology layer until you see 9193[-7874] in the lower portion of the yellow field that follows the mouse pointer and then release the left mouse button. This will fill in the area between the two lines with Sandstone. Drawing Accessories: 1.) Make the Detailed Lithology layer active within the Detailed Lithology track by clicking on the Track and then selecting the Detailed Lithology layer from the Layer Selection List field. If your Detailed lithology builder is open move on to step 3. Imperial Horizontal Tutorial Page 55 2015 Power*Curve Tutorial 2.) Double click anywhere within the Detailed Lithology track to activate the Detailed Rock Type Builder window and it favorites toolbox. 3.) Right click once anywhere within the Detailed Lithology track to activate the pop-up menu. 4.) Select Acc Builder from the pop-up menu to activate the Detailed Rock Accessory Builder window along with the Accessory Favorite Toolbox. Note: The graphical images utilized in the Favorites Toolbox shown above represents the specific Accessories selected by the user in the System Options window (See System Options earlier in this tutorial). …Adding a Thinbed… 1.) Click on the symbol for Siderite Nodules from the Toolbox and the Thinbed field in the Detailed Rock Accessory Builder window will be filled in with sid nodules [siderite nodules]. 2.) Click anywhere within the existing Detailed Lithology layer to insert the desired symbol. 3.) Repeat Steps 1 to 2 for dark chert pebbles Adding a Cement… 1.) Click on the symbol for Siliceous Cement from the Toolbox and the Cement field in the Detailed Rock Accessory Builder window will be filled in with sils [siliceous]. 2.) Click anywhere within the existing Detailed Lithology layer to insert the desired Symbol. Adding an Accessory… 1.) Click on the symbol for Carbonaceous from the Toolbox and the Accessories field in the Detailed Rock Accessory Builder window will be filled in with carb [carbonaceous]. 2.) Click anywhere within the existing Detailed Lithology layer to insert the desired Symbol. Note: When placing Accessories on the log, you may wish to increase the mouse accuracy from the default of 1 to 0.1. This selection is located to the far left on the Selection Toolbar. Adding more Accessories, Grains and Textures… 1.) Right Click on the Detailed lithology layer to activate the pop out menu. 2.) Click on the Accessories selection to activate the favorites list. 3.) Click on the symbol for Micromicaceous from the pop-out menu and the component field in the Detailed Rock Accessory Builder window will be filled in with micmica [micromicaceous]. 4.) Click anywhere within the existing Detailed Lithology layer to insert the desired Symbol. Imperial Horizontal Tutorial Page 56 2015 Power*Curve Tutorial 5.) Repeat Steps 1 and 4 for the following grains and textures: argillaceous chert grains feldspar grains cryptocrystalline glauconite grains. Moving an Accessory 1. 2. With the Rock Accessory Builder window activated click and hold the mouse button on the Accessory symbol you wish to move and drag it to another location. Release the mouse button and the accessory will be redrawn at the position. Deleting a single Accessory 3. 4. 5. With the Rock Accessory Builder window activated right click (in the upper right corner) of the Accessory symbol you wish to delete and the pop-out menu will be activated. Click on the Delete selection from the pop-out menu and the selected Accessory symbol will be deleted. Press the Esc key on the keyboard to exit from the Rock Accessory Builder window. Deleting Multiple Accessories 1. 2. With the Rock Accessory Builder window activated Press and Hold the SHIFT Key and then click and drag an area where the symbols are that you want to delete. Release the mouse button and this will activate a message. 3. Click on the button. The accessories that were covered by your drag will be deleted. ** Your log should now look similar to the Log below ** Adding Reservoir Qualities to the Reservoir Quality Track 1.) Double click anywhere within the Reservoir Quality track to activate the Fills for Reservoir Quality window. Imperial Horizontal Tutorial Page 57 2015 Power*Curve Tutorial 2.) Type Barren into the Description field. 3.) Type B into the Short name field. 4.) Click on the button and select a blue color from the palette and then click on the button. button and then select from the ensuing Shortcut Options window. 5.) Click on the This will clear the window and allow the user to enter a new record. Adding more environments to the Environment fill category… 1.) Type Good into the Description field. 2.) Type G into the Short name field. 3.) Click on the button and select an orange color from the palette and then click on the button. 4.) Click on the button and then select from the ensuing Shortcut Options window. This will clear the window and allow the user to enter a new record. 5.) Type Excellent into the Description field. 6.) Type Ex into the Short name field. 7.) Click on the button and select a yellow color from the palette and then click on the button. Imperial Horizontal Tutorial Page 58 2015 8.) Click on the button and then select close the window. Power*Curve Tutorial from the ensuing Shortcut Options window. This will Drawing Reservoir Quality onto the Reservoir Quality Track… Before you commence this exercise you will want to change the mouse pointer accuracy back to 1’ from 1”. 1.) Double click on the Reservoir Quality to activate the window. 2.) Right click in the Reservoir Quality track to activate the pop out window, select fills and click on the B selection. Or click on the builder drop box and select Barren [B]. 3.) Define the interval by clicking and dragging within the Reservoir Quality track from 8530’ to 8700’ . The Barren Reservoir Quality will be displayed in that interval. 4.) Right Click on the fill just drawn and select or click on the Opaque Text selection to turn off the background around the text. 5.) Right Click on the fill just drawn and select or click on the Vertical Orientation selection turn the orientation of the text. Note: Once you have done this once this will be the default for this layer until you change something. 6.) Define an entire interval by double clicking within the Reservoir Quality track between the depths of 8707’ and 8710’. The Barren Reservoir Quality will be displayed in that interval. This is capturing the rock interval data entry and utilizing it to draw an entire interval 7.) We will double click the next 3 barren intervals between 8717’ and 8724’, then between 8763’ and 8766’, then between 8907’ and 8923’ 8.) Right click in the Reservoir Quality track to activate the pop out window, select fills and click on the G selection. Or click on the builder drop box and select Good [G]. 9.) We will double click the next 3 good intervals between 8700’ and 8707’, then between 8710’ and 8717’, then between 8724’ and 8767’. 10.) Right click in the Reservoir Quality track to activate the pop out window, select fills and click on the Ex selection. Or click on the builder drop box and select Excellent [Ex]. 11.) We will double click the next 2 excellent intervals between 8766’ and 8907’, then between 8923’ and 8223’. To resize an existing fill hold your Ctrl Key down on your keypad and move mouse pointer over the end part of the interval until it turns into a resize cursor cannot overwrite existing intervals. and then click and drag to a new depth. Remember you To delete an exiting interval right click on the interval and select delete from the pop out menu. The User can also delete multiple Reservoir Qualities by holding down the Shift Key and dragging an area within the Reservoir quality track Imperial Horizontal Tutorial Page 59 2015 Power*Curve Tutorial 12.) Click on the close button in the upper right hand corner of the builder. This will close down the Environment builder window. ** Your log should now look similar to the log shown below. ** Adding an Annotation to the Drilling Progress Track There are a number of annotations layers associated with this track. These are represented with Engineering Parameters, Mud Parameters and Gas Annotations. You could one annotation layer for all three types of annotations. We will deal with making an annotation in the Engineering Parameters layer. 1.) Click on the Drilling Progress track to make it active (highlighted in green). 2.) Select Engineering Parameters, as your active layer, from the Layer Selection List field. 3.) Define the area on the layer where the Annotation will appear by: a) placing the mouse pointer at the desired depth; b) clicking and dragging the left mouse button from the upper left corner to the lower right corner of the desired area to form a rectangular shape c) releasing the left mouse button. This will activate the RTF Toolbars. Imperial Horizontal Tutorial Page 60 2015 Power*Curve Tutorial 4.) Type the following into the text field in the annotation layer: FOB: 4.5-6000 RPM: 50-70 SPP: 1750 VOL: 0.5 5.) To change the Font Color Highlight the Text you want to change by dragging the Mouse over the text to highlight the letters. 6.) Click on the button in the RFT Font toolbar. This will activate the color palette. 7.) Click on the new color and then click on the button. This will close the Color Palette and make your changes. 8.) Click anywhere outside the text box to save your annotation and close the Toolbars. 9.) The user would probably want a Grid Pattern on this Track for printing purposes. Select a Curve layer (Gamma Ray, Drill Rate or Total Gas) from the layer selection list on the Selection Bar. Adding a Formation Top 1.) Click on the Reports selection on the Power*CurveTM Menu Bar to activate the pull down menu and then Click on Formation to open the Formation window shown on the next page. This will open up with the Albuquerque Top. 2.) Click on the button to clear the window and get the window ready to accept another record. 3.) Click in the Formation Short Name field to activate a flashing caret and type in rs. Press the Tab Key. This will advance the user to the Formation Long Name field. The rs will be drawn in the Formation Tops (Short Name) layer which is associated with the Measured Depth Tracks. 4.) Type in the Red Sky in the Formation Long name field. Red Sky will be drawn in the Formation Tops (Long Name) layer which is associated with the Detailed Lithology Track. Imperial Horizontal Tutorial Page 61 2015 Power*Curve Tutorial 5.) Select Mesozoic from the Era drop down box. 6.) Select Lower from the Series drop down box. 7.) Select K (Cretaceous) from the Period drop down box. The K will be drawn in the Formation Tops (Short Name) layer which is associated with the Measured Depth Tracks. 8.) Select Santorian from the Stage drop down box. 9.) Select Center from the Alignment drop down box. Red Sky will be drawn in the center of the Formation Tops (Long Name) layer which is associated with the Detailed Lithology Track along with its Subsea and TVD values Note: The subsea values are calculated from the K.B. elevations entered into the Well window which can be edited. The Well window can be found by clicking on Edit on the Power*Curve men bar and select Well from the resulting pull down menu. 10.) Select Conformable from the Boundary Type drop down box. 11.) Select from the Display portion of the Window. 12.) Type 8700 into the Sample Top MD field. You will notice that the TVD Sample top field will be calculated for you. Then depress the tab key four times. This will place the flashing caret in the Evaluation field. 13.) The user can then type in the Evaluation short form or the user can go to the Annotations or Samples button and search the samples to copy and paste the relevant description. Once done click on the button to expand the description. Then depress the tab key. This will advance the flashing caret to the Conclusion field. 14.) Type the Conclusion into the Conclusion field. Click on the description. Imperial Horizontal Tutorial Page 62 button to expand the 2015 Power*Curve Tutorial 14.) Click on the button and then select Exit from the ensuing Shortcut Options window. You will notice the both the Short Name and Long Name formation tops layers filled in with the appropriate Red Sky tops information. Move the Formation Top If the centre is not the best display, you may want to move the Formation name around to another spot on the Layer. You can also follow these procedures for 3 other types of Data. You can also move Survey points, Bit Record Data and Casing Data with this method. 1.) 2.) 3.) 4.) Click on the Detailed Lithology track to make it active (highlighted in green). Select the Formation Tops (Long Name) layer, as your active layer, from the Layer Selection List field. Double click on the track / layer. This will activate the formation Tops data Entry window. Hold the CTRL Key down and clicking and dragging the Red Sky to a neutral position on the log and releasing the mouse button. The long name should snap to the new position as shown on the log below. ** Your log should now look similar to log shown below. ** Setting up the Survey Views The Survey View module allows the user to view a well in multi view angles. We give the user the ability to zoom in or out as well as up or down and view the well path in four (4) separate views. The views are Plan view (from the top), Vertical Section view (parallel to the target azimuth), Cross Section view (right angles to the target azimuth) and a User Defined view where the user can spin the view to any angle they wish. Each view can be captured separately or the capture can be taken of all four views at once. The screenshots taken in this module can then be printed with the striplog. 1. Click on the Survey View Icon on the Toolbar OR go under the File Menu and select the Survey Viewer. This will activate the Survey View Module. Imperial Horizontal Tutorial Page 63 2015 Power*Curve Tutorial Note: It is important to know some of the well location information before you proceeds with step 2. If you are in the DLS land survey system you should know your metes and bounds surface hole coordinate values and if you are in the NTS survey system you should know your surface hole location identification. This information would have been entered into the Well Record at the beginning of the Tutorial. This information is also located on the Survey plat for the Well. If you are in neither the DLS or NTS survey system then you do not have to know any of the well locations and we place you well in the middle of the Grid System. 1. Click on the New Survey button on the toolbar or click on New Survey from the File menu selection to activate the Open survey window. 2. Click on the + beside the Surveys to expand the list of surveys that are in the database and then select the Tutorial Well HZ by highlighting it with the mouse pointer. 3. Click on the button to activate the survey view window with your surveys from this well. Imperial Horizontal Tutorial Page 64 2015 Power*Curve Tutorial Isolating the individual Survey Views Plan view (isolated) 1. 2. 3. Click on the Plan View selection under the View pull down menu or click on icon on the tool bar. This will Isolate the the plan view and make it bigger. The user can then use the scroll button on the mouse to zoom in or out of the image (up scroll to zoom out and down scroll to zoom in). The user can also use the up / down arrows on the keypad to move the image up or down or the left / right arrows on the keypad to move the image left or right. Click on the properties selection under the Edit pull down menu or right click on the image and select properties this would activate the properties window where the user can change what is shown on the view but will be applicable to all views. If you were to go into the properties of the Survey view application you can change numerous displays. F1 key when the properties window is open will get you an overview of this window. An important note is that if you change something on the plan view it will change on all the views. 4. Once the view is set up the way you want you can save this by Clicking on Icon on the tool bar or the the Save Screen Selection under the File pull down menu. This will save the screen capture and give you the ability to print it out on your striplog in all of our applications. Imperial Horizontal Tutorial Page 65 2015 User defined view (isolated) 1. Power*Curve Tutorial Click on the User Defined View selection under the View pull down menu or click on the icon on the tool bar. This will Isolate the User Defined view and make it bigger. 2. The user can then use the scroll button on the mouse to zoom in or out of the image (up scroll to zoom out and down scroll to zoom in). The user can also use the up / down arrows on the keypad to move the image up or down. The user can use their mouse to rotate the view by clicking and dragging within the view to rotate the view. 3. Click on the properties selection under the Edit pull down menu or right click on the image and select properties this would activate the properties window where the user can change what is shown on the view but will be applicable to all views. 4. Once the view is set up the way you want you can save this by Clicking on the Icon on the tool bar or the Save Screen Selection under the File pull down menu. This will save the Imperial Horizontal Tutorial Page 66 2015 Power*Curve Tutorial screen capture and give you the ability to print it out on your striplog in all of our applications. These Screen captures will then be printed in the Striplog. The user has the ability to take a screen capture every view available as well as the compilation of all 4. The can also print these in the Print Log portion of the application Imperial Horizontal Tutorial Page 67 2015 Power*Curve Tutorial Print the Log to a printer driver. Before you start printing the Log it must look the way you want it to print. If it looks the way you want continue on. 1.) Under the File menu, click on Print Log or click on the Log window. Note: The Title bar and all depths associated with the Print Log window are defaulted to the Depth View that Power*Curve are in at the time of the activation of the Print Log window. Print button on the Toolbar to activate the Print 2.) Select the letter landscape paper orientation from the Page Orientation drop box field and the Title Page, Legend, and Formation Tops will automatically conform to the selected orientation. 3.) Activate the Plan View and the User Defined View check boxes , These were the screen captures we did in the Survey View Module. Note: The letter or legal landscape or portrait settings selected from within the Print Log window will NOT override the paper orientation settings selected in the printer's Properties window. Therefore, you must also modify the paper orientation settings in your printer's Properties window to letter or legal landscape. 4.) Activate the Use Dynamic Legend check box , if you wish to have the legend reflect only the symbols printed on the log or core portions of the printed intervals defined in the log and core portions of the print log window. Leave the Dynamic Legend unchecked if you wish to print out the entire list of symbols. In the Log portion of the Print Log window 5.) Select 1:500 from the scale drop box for the log to be printed out at. 6.) Click to activate the Header and Footer check boxes to print the track headers on the log. 7.) Click on User Defined Section and type in 8670 to 9400 in the appropriate fields to highlight it in the printing options selection box. Note: The log itself must be displayed in whatever depth view you wish to print before you activate the print log window. To change the log to the desired format refer to depth view under the view pull down menu. Page Margin The page margin field is available, primarily, when you are printing to Adobe Acrobat writer. When a numerical value in inches is typed into this field it will initiate a top and left margin for the templates (Title Page, Legend and Formation Tops) as well as a left margin for the main log. Page Overlap Activate the Page Overlap check box if you are printing on single sheets. This will force the printer to include an additional 1/4 inch of the log at the top and bottom of each page, so that you can cut-and-paste pages manually, if you so desire. Print Methods… Default Activating the Default radio button forces Power*Log / Curve / Core to use a raster or bitmap graphic printing method. This printing method is generally used with Laser printers but not exclusively so. Meta File Activating the Meta File radio button forces Power*Log / Curve / Core to use the meta file technology printing method. This printing method was developed for the newer models of printers on the market today as well as using the Adobe Acrobat Distiller or pdf printing technology. Color Options… Imperial Horizontal Tutorial Page 68 2015 Power*Curve Tutorial Auto Activating the Auto radio button forces Power*Log / Curve / Core to use the settings from the printer driver to printout the log. forces Power*Log / Curve / Core to override the printer driver settings Color Activating the Color radio button and consequently Power*Log / Curve / Core assumes that you are using a color printer. forces Power*Log / Curve / Core to override the printer driver settings Mono Activating the Mono radio button and consequently Power*Log / Curve / Core assumes that you are using a monochrome (black and white) printer. Interval per page field indicates how many meters of log will fit on a page of selected paper size and orientation selected in the setup as well as what log scale you are printing at. This will help indicate to the user how many pages will be required by the print job. 8.) Click on the are in effect. button to activate the Print Setup window and confirm that the correct printer settings 9.) When you are ready to print your log, click on the button. Note: If you do exit from the Print Log window, you will be asked if you wish to save the print settings. If you click on Yes, the program will remember every setting that you made to the Print Log window and then will default to those settings the next time you enter the Print Log window. How to Print the Log to a TIFF (file format) Prints all or part of your log/well along with the Title page, location map, legends, survey views, Cores will not be printed in the Horizontal Log, and formation tops on a continuous basis in a tiff file format. 1. Under the File menu selection, click on Print to TIFF or click on the to activate the Print to TIFF window shown below: Print to TIFF button on the Toolbar Note: The depth views associated with the Print TIFF window are defaulted to the Depth View that Power*Log / Curve / Core is in at the time of the activation of the Print to TIFF window. 2. Select letter landscape from the drop box field for the Title Page, Legend, Tops, Survey Views and they will automatically conform to the selected orientation. There are four (6) types of paper orientation to choose from. But your log is 8” wide so letter portrait is the page orientation. Imperial Horizontal Tutorial Page 69 2015 3. 4. 5. Power*Curve Tutorial Select this check box , to printout a Title Page. The Type (Title Page) drop box displayed on the right allow you to pick the appropriate title page format to print. Select standard to prints out our full blown title page with most of the Wells data. DeSelect the AER UWI format for the Title page as the well is not in Alberta. N.B. This format changes our UWI printout from 100121605812W500 to 00/12-16-058-12W5/0 only on the Striplog Title page. All other UWI formats (DLS and NAME) remain the same. 6. Activate this check box drop box field. , if you wish to printout a logo, and then select a logo from the Logo Note: The logo file format must be a bitmap image file (*.bmp) if you want a logo printed out on the title page. Also, it is recommended that the bitmap image should be a square image, because Power*Suite will shrink or expand the image to fit the logo space on the Title Page. This bitmap must be placed in the Powersuite_2015\logo directory for the application to find it. 7. Type any pertinent comments into the Title Page Remarks field and they will be displayed accordingly on the Strip Log Title Page only. 8. Deselect the check box. In our Case we do not have a location map so deactivate this check box . If you wish to printout a location map following the title page, and then the user select a location map from your computers drives by clicking on the want to print out as a location map. and finding the file you Note: The location map file format must be a bitmap image file (*.bmp) if you want a location map to be printed out. Also, the bitmap image must be a square image, because Power*Suite will shrink or expand the image to fit the location map space following the Title Page. This bitmap can be placed anywhere as the file location is saved within the Power*Suite ini file. 9. 10. 11. 12. 13. 14. 15. Select the Survey views check box. Select the Survey views check box. Deselect the Survey views check box. Deselect the Survey views check box. Deselect the Survey check box. Select the to activate this check box . Select the to activate this check box , because we want the legend reflect only the symbols printed on the log or core portions of the printed intervals defined in the log and core portions of the print log window. In the Log portion of the Print Log window 16. Select 1:500 or type in the Scale for the main log to be printed out at, in the Scale drop box field. 17. Select to activate this check box to have the track headers /footers printed out with the main log. 18. Select to activate this check box to have the core accessories printed out on the main log. 19. Select the defined interval. Type in 2600 and 2825 in the from and to fields. Note: The log itself must be displayed in whatever depth view you wish to print before you activate the print log window. To change the log to the desired format, refer to depth view under the view pull down menu. Note: A separate Header Information Box is automatically printed out with every Core and includes the Core Scale, Core Date, Core Number, Cored Interval, Amount Cut, Amount Recovered, and Percentage. 20. Activate the Formation Tops check box if you wish to printout Formation Tops and the Formation Tops will be included on a separate page at the end of the log printout. The page margin field is available, primarily, when you are printing to Adobe Acrobat writer. This is not necessary for printing to tiff file format Imperial Horizontal Tutorial Page 70 2015 Power*Curve Tutorial 21. When you are ready to print your log, click on the button. 22. This will activate a message box indicating the size of your printout. Click on the button. 23. This will activate a file name window to be filled in with a file name and location to where you can locate it for further reference. Note: If you do exit from the Print to TIFF window, you will be asked if you wish to save the print settings. If you click on Yes, the program will remember every setting that you made to the Print to TIFF window and then will default to those settings the next time you enter the Print to TIFF window Adding a Link (Attachment) to your Log 1.) In our case Right Click on the Well Path SS layer at 9100’ to activate the pop out menu. 2.) Select Add / Edit / Open Link from the pop out menu. This will activate a blank Links window with the depth you right clicked at. 3.) Click on the button in the Links window and you can now pick any windows compatible file. In our case I am linking the printed well file from the next section of the tutorial printed to my backup folder and then click on the button. This will fill in in the details of the File Name and location in this window. 4.) Now the user can Type in some remarks to tell the viewer what the file is (if the user wishes to identify the file they have attached) and then click on the Window. button. This will activate the Shortcut Options Imperial Horizontal Tutorial Page 71 2015 5.) Click on the link the file to the log. button. This will insert the paperclip symbol Power*Curve Tutorial where you originally right clicked and This concludes the Power*Curve™ Tutorial. If you need help with specific functions or operations, please use the Table of Contents in the Power*Suite™ User Manual to find the desired topic or use the Search function built into the Power*Curve™ On-line Help System. Imperial Horizontal Tutorial Page 72