1
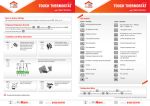
teachWELD INSTRUCTOR SERVER:
TeachWELD INSTRUCTOR SERVER LOGIN:
Quick Start Guide
1. Login to the system with your server domain (given to you in the registration email
upon purchase – your domain will replace the xxxxxx’s in the example below)
Hardware Included:
EXAMPLE: https://xxxxxx.teachweld123.com
2. Use the administration menu, and click on the user management link.
The teachWELD instructor server allows for instructors and administrators of the
teachWELD welding simulation to add new users to the welding simulation. Based on
the number of user accounts that you have purchased, it allows you to create up to that
number of user names and account files.
USE THE URL ADDRESS YOU HAVE BEEN PROVIDED TO ACCESS THE
INSTRUCTOR SERVER
1 welding workstation and GMAW gun
3 welding coupons (T-joint, lap joint, butt joint)
1 teachWELD installation CD
1 teachWELD curriculum CD
1 welding helmet
1 set of welding gloves
3. Click the “add new user” button in the user management screen.
Software:
teachWELD Instructor Server:
The teachWELD instructor server allows
for instructors and administrators of the
teachWELD welding simulation to add new
users to the welding simulation. Based on
the number of user accounts that you have
purchased, it allows you to create up to that
number of user names and account files.
4. Enter the student’s information and save the new user.
(Located in the registration email sent to purchaser of product)
The server allows an instructor to do the following things:
1. Add new student accounts to the teachWELD system
2. Have access to each user’s diagnostic report from every weld they have saved
ALTERNATIVE WORKSTATION CALIBRATION OPTION :
*Monitor not included
NOTE: The Factory Default workstation calibration should work in most circumstances. This calibration should only be attempted if you are
experiencing interference from metal, electronics, or magnetism in your environment.
STEP 1: If you need to calibrate the workstation first click on the “More Calibration Options in the teachWELD startup window.
MAINTAIN AT LEAST 2.5 FEET BETWEEN teachWELD AND LARGE METAL OBJECTS/SURFACES!
STEP 2: If you need to recalibrate the workstation you may want to “Reset to Factory Defaults” or go to the teachWELD user manual for
more indepth instruction.
teachWELD WORKSTATION SETUP:
STEP 1: To access the teachWELD welding simulation software, you must first install the Installer CD
and run through the installation program. A teachWELD icon should show up on your desktop (
programs folder of your menu after the installation is complete.
1. For first time setup you will need to click on the “Add a New Workstation” button located on the teachWELD startup
window. Once you have done this, you will be prompted to “Add Workstation,” when you have done this you can click on
the back button to select your workstation.
MAINTAIN AT LEAST 2.5 FEET BETWEEN teachWELD AND LARGE METAL OBJECTS/SURFACES!
2. Select the workstation number that corresponds with the workstation serial number that is located on the workstation
box (this can be located at the back of the
workstation box below the USB cord port).
For more information please call Realityworks at +1.715.830.2040 or toll free at 800.262.3806.
Contact us through email at [email protected].
Or visit us on-line at www.realityworks.com/welding/simulation.asp
www.realityworks.com
© 2013 Realityworks, Inc. All rights reserved.
teachWELD™ is a trademark of Realityworks, Inc.
RealCareer™ is a trademark of Realityworks, Inc.
1025760-04A | 9/2013
) or in the
3. A new screen will show up after you have clicked on the
workstation serial number that corresponds with the workstation
being used. You now have two options to choose from:
• Student Log-in
• Calibration
teachWELD WORKSTATION SETUP (continued):
STEP 2: Calibration
For instructions on calibration please see page 3 and 4 of this Quick Start Guide.
STEP 3: Student Log-in
1. Click on the Student Log-in button and you
will be directed to the following page.
2. Type in the Authentication information that
was given to you in your registration and press
“connect” This will take you to the teachWELD
Welding Simulation Software!
STEP 4: Student Diagnostic Reports
Access - on the Instructor Server Website
1. Login to the teachWELD Instructor Server
through the internet by using your domain
address (see example below).
EXAMPLE: https://xxxxxx.teachweld123.com
2. Click on the “teachWELD”
link in the top left corner.
WELDING OPTIONS MENU:
MAIN MENU:
This will show up in the Practice and the Exercise section of the teachWELD simulation
software.
The Main Menu button at the lower right will reveal an additional menu at
the bottom of the screen. The main menu is where you will find less-used
commands of the simulation or commands that could not be accessed on the
main screen. It is divided into several submenus to better categorize the options (see user
manual for more details).
SELECT A BASE METAL: The first window shows the choices of base metal.
SELECT A WELDING PROCESS: Depending on the selected metal, the GMAW process
appears.
SELECT A GUN TYPE: The welding simulation allows for three different types of welding
guns to choose from.
SELECT AN ASSEMBLY TYPE: The type of assembly refers to the disposition of the plates
that form the assembly. (tee joint, lap joint, v-groove)
SELECT A PLATE THICKNESS: In cases where there are plates of different thickness, the
plate thickness refers to the main plate of the assembly. These vary based on metal type
(stainless steel, aluminum, mild steel)
PRACTICE MODE:
This is the main mode of the simulator. It is possible to weld without any constraint in this
particular mode. The toolbar at the bottom of the screen is always present and contains the
main “welding world” commands.
WELDING TOOLBAR OPTIONS:
RETURN: The Return button allows you to go back to the main screen of the
teachWELD simulation. You will return to the Mode Selection Menu.
3. Click on the “Diagnostics”
link at one of the two
locations shown.
4. The Diagnostics will show up with “Id” as a link. Click on the linked “Id” file of interest.
MODE SELECTION MENU:
In this mode, everything can be
activated with a simple click.
•To Practice, select the Practice
icon. By choosing this mode, you
will be directed immediately to the
practice mode of the teachWELD
software.
•To Replay or view a previous saved
weld, select the Replay icon. By
choosing this mode, you will be
directed to the replay calendar. Choose a beginning and end date for your welding history
and click on the “okay” button. This will direct you to the replays of saved welds.
•To start Exercises or resume exercises, select Exercises. You will be directed to the
exercise mode of the teachWELD software.
START: The Start button is used from the Mode Selection Mode. When you have
picked all your welding information, you can click on the start button to begin
practice welding.
END: The End button allows you to save your weld. When you save your weld it
will then save to the Replay mode of the teachWELD simulation. You will also
be able to see the diagnostic report. The Diagnostic button will not be clickable
until a weld has been done.
This mode allows you to practice certain
particular aspects of the simulator
containing manual dexterity. There are
17 separate tests or exercises that a
welder will be graded on based on metal
type, coupon type, and difficulty level.
To help the user, each exercise is based
on one or more elemets hat are assessed.
The selection of exercises is similar to
the practice mode, the displays will
correspond with the beginner, intermediate, and advanced states of each exercise. When a
weld is finished in this mode, a diagnostic and a replay is saved, just like in the practice mode
settings. Each exercise can be attempted an unlimited number of times, whether successful
or not.
REPLAY OF EXERCISE: Only the highest score will be saved into memory. So if at least one
attempt has been maide on an exercise, a replay is saved and available for viewing.
CALIBRATION INSTRUCTIONS:
1
POSITION
STEP 5: Place the tip of the gun on the weld line on
the far RIGHT edge fo the coupon. This is position 2.
Hold the gun at a 45o work angle and a 0o travel
angle. Pull and release the trigger.
2
3
STEP 6: Place the tip fo the gun on the front far right corner of the coupon. This is position 3.
Hold the gun at a 45o work angle and a 0o travel angle. Pull and release the trigger.
STEP 7: The calibration data window will direct you to “Press any key to continue.” NOTE: if
you do not exit from this window, the main program will remain on the desktop screen. If this
happens, please return to this window and press any key to resolve this potential problem.
CALIBRATE WORKSTATION –
SOFTWARE WORKSTATION ADJUSTMENT:
Once you have logged into the teachWELD simulation software, you are ready
to weld. If the physical coupon has some discrepancy with accuracy to what is
being shown on the software or “virtual” coupon, you can adjust the coupon on
your computer screen to align with the physical welding coupon.
STEP 1: Put your physical welding gun onto the
left hand side of the coupon.
STEP 2: Check to see if the virtual welding gun
lines up with the physical welding gun. If not,
use the adjustment keys (picture below) to
adjust your virtual coupon to match that of the
physical coupon.
DIAGNOSTIC: The Diagnostic button is available after the first pass has been
completed. When activated, it will display the current welding score in a
web browser.
STEP 1: You will need to click on the teachWELD icon ( ) located on your desktop or in the
programs file. Make sure you have added your workstation into the teachWELD software. If
you have not, you will need to go to the “Workstation Setup” portion of the Quick Start Guide
and proceed in setting up a workstation before you can calibrate your workstation.
PROCEDURE: The Procedure button will display the operational welding mode
or datasheets in a browser. Like the diagnostics button, it will appear after at
least one pass is complete.
1
4
STEP 2: Click on the Calibrate button and you will
be sent to the “calibration” page.
2
5
3
6
INSPECTION: The Inspection button will toggle the simulator into inspection
mode. This mode is used to inspect the welding area and move the virtual
welding world to your desired welding perspective.
RETRY: The Retry button removes all passes made and returns to the original
welding status. If the welding has not been saved, a window will appear to
confirm this selection.
ADJUST: The Adjust button shows additional controls to further modify the
spatial position of the welding coupon in the virtual world. This is an important
tool to use when making sure the physical welding coupon (on teachWELD
workstation) matches with the virtual welding coupon (on teachWELD
software). You can change the position of the coupon inside the software to help reduce any
calibration error. (we are always looking to be below 1% error within our welding accuracy)
Once saved, these changes are fixed for that account, so repeated adjustment may be needed
from usage to usage. NOTE: An instructor has the account access to save and adjust the adjust
setting, however their adjustment will become the default setting for all students under the
instructor’s administration.
QUIT: The Quit button returns to the Mode Selection Menu.
Page 2
EXERCISE MODE:
STEP 4: Place the tip of the gun on the weld line on
the far LEFT edge of the coupon. This is position 1.
Hold the gun at a 45o work angle and a 0o travel
angle. Pull and release the trigger.
STEP 3: Click on the “Calibrate Coupons” button.
NOTE: If there are issues with the workstation and
the software not working properly, you may need to
click on the “More Calibration Options” link below
the “Calibrate Coupons” button.
NOTE: You will need to Calibrate the Coupon every
time you start up the teachWELD welding simulator
software or you switch coupon guides.
CALIBRATE COUPONS:
STEP 1: Click on the Calibrate Coupons button.
STEP 2: After clicking on the Calibrate Coupons
button, a new data screen will pop up. The next
steps are performed with the welding gun.
STEP 3: Place the t-joint coupon on the
workstation. Make sure it is fastened properly and
seated securely.
1: Moves coupon from side to side (left to
right or vice versa)
4: Tilts coupon forward or backward on
the red axis line
2: Moves coupon up (toward ceiling) and
down (toward table)
5: Tilts coupon around on the green
axis line
3: Moves coupon forward (closer) and
backwards (farther)
6: Tilts coupon sideways on the blue
axis
NOTE: The digital readout above each column displays the adjustments you have made.
ALTERNATIVE WORKSTATION CALIBRATION OPTION on page 4 >
Page 3
teachWELD INSTRUCTOR SERVER:
TeachWELD INSTRUCTOR SERVER LOGIN:
Quick Start Guide
1. Login to the system with your server domain (given to you in the registration email
upon purchase – your domain will replace the xxxxxx’s in the example below)
Hardware Included:
EXAMPLE: https://xxxxxx.teachweld123.com
2. Use the administration menu, and click on the user management link.
The teachWELD instructor server allows for instructors and administrators of the
teachWELD welding simulation to add new users to the welding simulation. Based on
the number of user accounts that you have purchased, it allows you to create up to that
number of user names and account files.
USE THE URL ADDRESS YOU HAVE BEEN PROVIDED TO ACCESS THE
INSTRUCTOR SERVER
1 welding workstation and GMAW gun
3 welding coupons (T-joint, lap joint, butt joint)
1 teachWELD installation CD
1 teachWELD curriculum CD
1 welding helmet
1 set of welding gloves
3. Click the “add new user” button in the user management screen.
Software:
teachWELD Instructor Server:
The teachWELD instructor server allows
for instructors and administrators of the
teachWELD welding simulation to add new
users to the welding simulation. Based on
the number of user accounts that you have
purchased, it allows you to create up to that
number of user names and account files.
4. Enter the student’s information and save the new user.
(Located in the registration email sent to purchaser of product)
The server allows an instructor to do the following things:
1. Add new student accounts to the teachWELD system
2. Have access to each user’s diagnostic report from every weld they have saved
ALTERNATIVE WORKSTATION CALIBRATION OPTION :
*Monitor not included
NOTE: The Factory Default workstation calibration should work in most circumstances. This calibration should only be attempted if you are
experiencing interference from metal, electronics, or magnetism in your environment.
STEP 1: If you need to calibrate the workstation first click on the “More Calibration Options in the teachWELD startup window.
MAINTAIN AT LEAST 2.5 FEET BETWEEN teachWELD AND LARGE METAL OBJECTS/SURFACES!
STEP 2: If you need to recalibrate the workstation you may want to “Reset to Factory Defaults” or go to the teachWELD user manual for
more indepth instruction.
teachWELD WORKSTATION SETUP:
STEP 1: To access the teachWELD welding simulation software, you must first install the Installer CD
and run through the installation program. A teachWELD icon should show up on your desktop (
programs folder of your menu after the installation is complete.
1. For first time setup you will need to click on the “Add a New Workstation” button located on the teachWELD startup
window. Once you have done this, you will be prompted to “Add Workstation,” when you have done this you can click on
the back button to select your workstation.
MAINTAIN AT LEAST 2.5 FEET BETWEEN teachWELD AND LARGE METAL OBJECTS/SURFACES!
2. Select the workstation number that corresponds with the workstation serial number that is located on the workstation
box (this can be located at the back of the
workstation box below the USB cord port).
For more information please call Realityworks at +1.715.830.2040 or toll free at 800.262.3806.
Contact us through email at [email protected].
Or visit us on-line at www.realityworks.com/welding/simulation.asp
www.realityworks.com
© 2013 Realityworks, Inc. All rights reserved.
teachWELD™ is a trademark of Realityworks, Inc.
RealCareer™ is a trademark of Realityworks, Inc.
1025760-04A | 9/2013
) or in the
3. A new screen will show up after you have clicked on the
workstation serial number that corresponds with the workstation
being used. You now have two options to choose from:
• Student Log-in
• Calibration