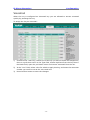
1
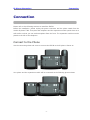
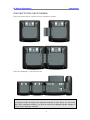
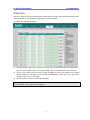
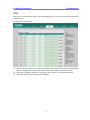
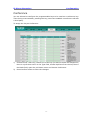
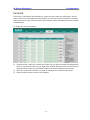
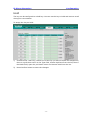
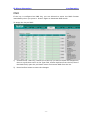
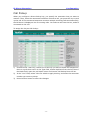
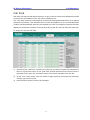
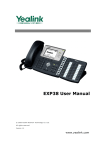
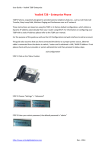
EXP38 User Manual
© 2009 Yealink Network Technology Co. Ltd.
All rights reserved.
Version 1.0
www.yealink.com
About This Guide
This Expansion Module EXP38 is designed for connection of the Yealink Enterprise IP Phone
T28P/T26P VoIP phone. In the following sections, we will take T28P to make a brief description.
© 2009 Yealink Network Technology Co. Ltd.
All Rights reserved. This document is supplied by Yealink Network Technology Co. Ltd. No
part of this document may be reproduced, republished or retransmitted in any form or by any
means whatsoever, whether electronically or mechanically, including, but not limited to, by
way of photocopying, recording, information recording or through retrieval systems, without
the express written permission of Yealink Network Technology Co. Ltd.
Yealink Network Technology Co. Ltd reserves the right to revise this document and make
changes at any time and without the obligation to notify any person and/or entity of such
revisions and/or changes.
Tables of Contents
Connection..................................................................................- 1 Connect to the Phone ........................................................................................................ - 1 Connect to the next module............................................................................................ - 2 Connect the cords ............................................................................................................... - 3 -
Configuration ............................................................................- 4 BLF ............................................................................................................................................ - 5 Speed Dial .............................................................................................................................. - 6 Intercom ................................................................................................................................. - 7 URL............................................................................................................................................ - 8 Conference ............................................................................................................................. - 9 Forward ................................................................................................................................. - 10 Transfer ..................................................................................................................................- 11 Hold ........................................................................................................................................ - 12 DND ........................................................................................................................................ - 13 Redial ..................................................................................................................................... - 14 Call Return ........................................................................................................................... - 15 Call Pickup............................................................................................................................ - 16 Call Park ................................................................................................................................ - 17 Group Listening .................................................................................................................. - 18 SMS......................................................................................................................................... - 19 Voicemail............................................................................................................................... - 20 Custom .................................................................................................................................. - 21 -
IP Phone Expansion
Connection
Connection
Please refer to the following sections to install the EXP38.
Before the installation,please unplug the power connector and the phone stand from the
Yealink IP phone T28P. Then place the telephone and the expansion module upside down on a
soft surface so that you can read nameplates from the front. The expansion module must be
placed to the left of the telephone.
Connect to the Phone
Use the connecting sheet and screw to connect the EXP38 to the IP phone. Shown as:
Your phone and the expansion module will be connected as the following picture shows:
-1-
IP Phone Expansion
Connection
Connect to the next module
Follow the same step to connect the next expansion module:
After the installation, it will be shown as:
Note:
Our IP phone T28P can support six expansion modules at most. But if you use more
than three expansion modules, you need to connect an additional power adapter to
anyone of the expansion modules.
-2-
IP Phone Expansion
Connection
Connect the cords
Plug the connecting cord into the Ext jack of the IP phone, the next port to the Ext in jack of the
first module; If you want to connect more than one module, then go on to plug another cord
into the Ext out jack, and the other port to the Ext in jack of the second module. Shown as the
following picture:
Note:
Users can connect six modules at most. Connect the Ext in port of the previous module
and the Ext out port of the next module with an connecting cord will be ok.
Then attach the stand and the power adapter, connect handset and headset to use.
-3-
IP Phone Expansion
Configuration
Configuration
The expansion module EXP38 has 38 programmable keys which are able to set up to 17
functions per key. You can use the web interface or the IP phone user interface to
configure key functions. Pressing the special key of the EXP38 you want to set for about 5
seconds, the IP phone will turn out the user setting interface of this key, then you can
make desired configuration to this key by the IP phone interface. In the following
sections, we will make detail description of setting by the web interface.
The following list shows the functions you can set on the programmable keys and
provides a description for each function. The default configuration for each key is N/A
which means the key hasn’t been set for any functions.
z
N/A
z
BLF(Busy Lamp Field)
z
Speed Dial
z
Intercom
z
URL
z
Conference
z
Forward
z
Transfer
z
Hold
z
DND
z
Redial
z
Call Return
z
Call Pickup
z
Call Park
z
Group Listening
z
SMS
z
Voicemail
z
Custom
Note:
Quick access features like Intercom and Voicemail must first be configured on your PBX
in order to work on your phone. See your system administrator for more information.
-4-
IP Phone Expansion
Configuration
BLF
You can configure the key for Busy Lamp Field (BLF) use which allows you to monitor
the status (idle, ringing, or busy) of other SIP accounts. User can dial out on a BLF
configured key on the expansion module EXP38.
To assign the key as BLF:
1)
Choose Phone->EXT Key, choose one of the key you want to make the assignment,
there is a pull-down menu in the Type field, and choose BLF from the list.
2)
In the "Line" field, select a line for which to apply this key, and enter the extension
number you want to monitor.
3)
Press Confirm button to save the changes.
Please refer to “LED Instruction” in the IP phone user manual for more details about the
LED status in different situation.
Note:
In the Web interface, you can also set the pickup number to active the pickup
function. For example, if you set the BLF number as 212, and the pickup number is
*83, then when there is an incoming call to 212, press the BLF key, it will call out the
*83 automatically to pickup the incoming call on 212.
-5-
IP Phone Expansion
Configuration
Speed Dial
You can configure the key as a simplified speed dial key. This key function allows you to
speed up dialing the most used or hard to remember numbers.
To assign the key as Speed Dial:
1)
Choose Phone->EXT Key, choose one of the key you want to make the assignment,
there is a pull-down menu in the Type field, choose Speed Dial from the list.
2)
In the "Line" field, select a line for which to apply this key, in the “Number” filed
enter the extension number you want to perform Speed Dial.
3)
Press Confirm button to save the changes.
-6-
IP Phone Expansion
Configuration
Intercom
You can configure the key for Intercom mode and it is useful in an office environment as
a quick access to connect to the operator or the secretary.
To assign the key as Intercom:
1)
Choose Phone->EXT Key, choose one of the key you want to make the assignment,
there is a pull-down menu in the Type field, and choose Intercom from the list.
2)
In the "Line" field, select a line for which to apply this key, the default one is Auto
which means it will match the account automatically. And enter the extension
number you want to intercom.
3)
Press Confirm button to save the changes.
Note:
Your VoIP PBX must support this feature.
-7-
IP Phone Expansion
Configuration
URL
If the key is configured as URL, then pressing this key, you can send HTTP requests to
a web server.
To assign the key as URL:
1)
Choose Phone->EXT Key, choose one of the key you want to make the assignment,
there is a pull-down menu in the Type field, and choose URL from the list.
2)
Enter the extension number you want to set as URL in the Extension field.
3)
Press Confirm button to save the changes.
-8-
IP Phone Expansion
Configuration
Conference
You are allowed to configure the programmable keys to be used as a conference key.
Then during a conversation, pressing this key, users can establish a conference call with
a third party.
To assign the key as Conference:
1)
Choose Phone->EXT Key, choose one of the key you want to make the assignment,
there is a pull-down menu in the Type field, choose KeyEvent from the list, then in
the Mode field, open the pull-down menu and choose Conference.
2)
Press Confirm button to save the changes.
-9-
IP Phone Expansion
Configuration
Forward
If the key is configured as Forward key, press this key under the idle status, the IP
phone will turn to the Always Forward page, and you can set the Forward to number,
then when there is any call to the extension number will be forwarded to the set number
automatically.
To assign the key as Forward:
1)
Choose Phone->EXT Key, choose one of the key you want to make the assignment,
there is a pull-down menu in the Type field, choose KeyEvent from the list, then in
the Mode field, open the pull-down menu and choose Forward from the list.
2)
Enter the extension number you want to forward to in the Extension field.
3)
Press Confirm button to save the changes.
- 10 -
IP Phone Expansion
Configuration
Transfer
You are able to configure the key as a transfer key to perform the Blind/Attended
Transfer.
To assign the key as Transfer:
1)
Choose Phone->EXT Key, choose one of the key you want to make the assignment,
there is a pull-down menu in the Type field, choose KeyEvent from the list, then in
the Mode field, open the pull-down menu and choose Transfer from the list.
2)
Press Confirm button to save the changes.
- 11 -
IP Phone Expansion
Configuration
Hold
The key can be configured as a hold key. You can use this key to hold and retrieve a call
during the conversation.
To assign the key as Hold:
1)
Choose Phone->EXT Key, choose one of the key you want to make the assignment,
there is a pull-down menu in the Type field, choose KeyEvent from the list, then in
the Mode field, open the pull-down menu and choose Hold from the list.
2)
Press Confirm button to save the changes.
- 12 -
IP Phone Expansion
Configuration
DND
If the key is configured as DND key, you are allowed to active the DND function
immediately when you press it. Press it again to deactivate DND mode.
To assign the key as DND:
1)
Choose Phone->EXT Key, choose one of the key you want to make the assignment,
there is a pull-down menu in the Type field, choose KeyEvent from the list, then in
the Mode field, open the pull-down menu and choose DND from the list.
2)
Press Confirm button to save the changes.
- 13 -
IP Phone Expansion
Configuration
Redial
If the key is configured as Redial key, press this key under the idle status, it will fetch
the last dialed number, then you can choose a special line to call out by pressing the line
keys.
To assign the key as redial:
1)
Choose Phone->EXT Key, choose one of the key you want to make the assignment,
there is a pull-down menu in the Type field, choose KeyEvent from the list, then in
the Mode field, open the pull-down menu and choose Redial from the list.
2)
Press Confirm button to save the changes.
- 14 -
IP Phone Expansion
Configuration
Call Return
When the key is configured as Call Return key you are allowed to dial out the last phone
call you received.
To assign the key as Call Return:
1)
Choose Phone->EXT Key, choose one of the key you want to make the assignment,
there is a pull-down menu in the Type field, choose KeyEvent from the list, then in
the Mode field, open the pull-down menu and choose Call Return from the list.
2)
Press Confirm button to save the changes.
- 15 -
IP Phone Expansion
Configuration
Call Pickup
When you configure a Direct Pickup key, you specify the extension that you want to
monitor. Then, when the monitored extension receives a call, you press the key to pick
up the call. If the monitored extension receives multiple incoming calls simultaneously,
the IP Phone UI displays a list of incoming calls. You select a call from this list, and are
connected to the call.
To assign the key as Call Pickup:
1)
Choose Phone->EXT Key, choose one of the key you want to make the assignment,
there is a pull-down menu in the Type field, choose KeyEvent from the list, then in
the Mode field, open the pull-down menu and choose Call Pickup from the list.
2)
In the "Line" field, select a line for which to apply this key, and enter the extension
number you want to pickup.
3)
Press Confirm button to save the changes.
- 16 -
IP Phone Expansion
Configuration
Call Park
Call Park is a feature that allows a person to put a call on hold at one telephone set and
continue the conversation from any other telephone set.
The “call park” feature is activated by pressing a preprogrammed button or a special
sequence of buttons. This transfers the current conversation to an unused extension
number and immediately puts the conversation on hold. The telephone system will then
display the extension number of the parked call so that the call can later be retrieved.
To assign the key as Call Park:
1)
Choose Phone->EXT Key, choose one of the key you want to make the assignment,
there is a pull-down menu in the Type field, choose KeyEvent from the list, then in
the Mode field, open the pull-down menu and choose Call Park from the list.
2)
In the "Line" field, select a line for which to apply this key, and enter the extension
number you want to park.
3)
Press Confirm button to save the changes.
- 17 -
IP Phone Expansion
Configuration
Group Listening
When the key is configured as Group Listening key, you are allowed to enable the
Speakerphone and Handset/Headset mode at the same time. It is suitable for the group
conversation which has more than one person at one side. You are able to listen using
handset/headset; meanwhile the others near by can speak and listen using
speakerphone. You can get back to the previous mode by pressing the key again.
To assign the key as Group Listening:
1)
Choose Phone->EXT Key, choose one of the key you want to make the assignment,
there is a pull-down menu in the Type field, choose KeyEvent from the list, then in
the Mode field, open the pull-down menu and choose Group Listening from the list.
2)
Press Confirm button to save the changes.
- 18 -
IP Phone Expansion
Configuration
SMS
When the key is configured as SMS key you are allowed to access SMS quickly by
pressing this key.
To assign the key as SMS:
1)
Choose Phone->EXT Key, choose one of the key you want to make the assignment,
there is a pull-down menu in the Type field, choose KeyEvent from the list, then in
the Mode field, open the pull-down menu and choose SMS from the list.
2)
Press Confirm button to save the changes.
- 19 -
IP Phone Expansion
Configuration
Voicemail
When the key is configured as Voicemail key you are allowed to access voicemail
quickly by pressing this key.
To assign the key as Voicemail:
1)
Choose Phone->EXT Key, choose one of the key you want to make the assignment,
there is a pull-down menu in the Type field, choose KeyEvent from the list, then in
the Mode field, open the pull-down menu and choose Voicemail from the list.
2)
In the "Line" field, select a line for which to apply this key, and enter the extension
number you want to set as the voice mail box.
3)
Press Confirm button to save the changes.
- 20 -
IP Phone Expansion
Configuration
Custom
You are allowed to send out the desired DTMF number during the conversation. The
number needs to be set in advance.
To assign the key as Custom:
1)
Choose Phone->EXT Key, choose one of the key you want to make the assignment,
there is a pull-down menu in the Type field, choose KeyEvent from the list, then in
the Mode field, open the pull-down menu and choose Custom from the list.
2)
In the “Extension” filed, enter the specific number.
3)
Press Confirm button to save the changes.
Note:
If you connect more than one expansion module EXP38, then you can choose the
Extension number in the Extension Key field to set the special one via the web interface.
- 21 -