1
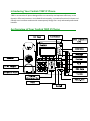
Yealink T28P User Guide
Introducing Your Yealink T28P IP Phone
T28P is an executive IP phone designed for true versatility and optimum efficiency in the
dynamic office environment. Unrivalled HD voice quality, innovative functional richness and
friendly user interface combine with contemporary design for a truly advanced professional
handset
An Overview of Your Yealink T28P IP Phone
Tips for Using Your Yealink T28P IP Phone
Making a Call
Users can make a call by pressing the Hands – free/ Line key or picking up the handset
- Dial number directly: Dial the number directly, and press Send soft key/button
- Dial from Pool: In dial – up interface, press Pool hot key, enter the highlighted
options, select a record, then press Send to dial out.
- Re-dial: Press RD button to enter the Dialled Calls interface then select a record to
dial out.
- During a conversation you can alternate between Headset, Handset and Hands-free
by pressing Headset/Hands-free or picking up the handset – Headset mode required
connected headset
Answering a Call
Answering an incoming call in the following ways:
- If there are no active calls, lift the handsets or press the Hands-free button/ Answer
hot key/ Headset to answer the incoming call
- If there are active calls, press the answer hot key to answer the incoming call or
press the Reject hot key to refuse
Muting a Call
-
Press Mute button to mute the call during the conversation, the LCD will display
Press Mute button again to turn on the microphone
Volume Adjustment
-
During the call, you can press the volume adjustment bars to adjust the volume
Putting a Call on Hold
-
-
Press the hold button or hold hot key to put an active call on hold and then the
corresponding Line Key LED will blind.
If there is only one call on hold, press the Resume hot key or Hold button to retrieve
the call
If there is more than one call on hold, press the corresponding Line Key or UP/Down
navigation keys to highlight the call, then press the Resume hot key or hold button to
retrieve the call
Speed Dial
-
Speed Dial numbers should be configured in advanced. Please refer to the
corresponding content in the User Manual for more details.
Press the DSS Keys configure as Speed Dial, the configure number will be dialled out
automatically
Conference Call
-
Press the Conf button or the Conf hot key during and active call
The first call is placed on hold. There will be a dial tone. Enter the number to
conference in, then press the Send hot key
When the call is answered, press the Conf button or the Conf hot key. The
conference now is established. All parties can hear and talk with each other.
Voice Mail
-
The presence of new voice mail messages is indicated in the idle screen. The
message LED will be on.
Press voicemail hot key or the message button, and then enter the desired password
to retrieve the voicemails
Call Transfer
If And B are on a conversation, A want to transfer the call to C, three ways can be used to
transfer the call: Blind Transfer, Attended Transfer and Semi-Attended Transfer.
-
Blind Transfer:
A and B is on a conversation, A press TRAN button to put B on hold, then A can dial
the third number C and press TRAN button to call out. Then A will turn to idle status
After C answered it, B can talk to C
Announced Transfer:
A and B is on a conversation, A press TRAN Button to put B on hold, then A can dial
the third number C and press the # button to call out
After C answered it, A and C can have a private conversation without B hearing it,
then A hung up or press the TRAN button to complete the transfer
A will be disconnected from the call, B can talk to C
Semi – Announced Transfer:
A and B is on a conversation, A press TRAN button to put B on hold, then A can dial
the third number C and press the # button to call out
White C is ringing, A hang up or press the TRAN button to complete the transfer
A will be disconnected from the call when C pick up, B can talk to C
Call Forward
-
Menu > Features>Call Forward
There are 3 options: Always Forward, Busy Forward and No Answer Forward
Select one of them and enter the number to forward to. If No Answer Forward is
selected, after ring times should also be configured. Then press the save hot key to
save the changes.
Menu Instructions on your Yealink T28P IP Phone
Sub – Menu
Description
Status
Features
Users can check the status of the phone: IP address, MAC, firmware etc.
It includes some call feature settings, such as Forward, Call Waiting, DSS
Keys, Key as Send, Hot Line, Anonymous Call, AUTO Redial, DNS etc.
It includes the basic phone settings like Language, Time and Date, Ring
Tone, Phone Volume and some advanced settings like Accounts, Network,
Keypad Lock, Reset Factory, Set Password, Set AES Key, etc.
It allows the users to check the voicemail on the server
You can check the call history here: All calls, Dial Calls, Received Calls,
Missed Calls, and Forward Calls. Local history and Network Call Log
It shows the Local Directory, Blacklist, Remote Phonebook and Broadsoft
Settings
Messages
History
Directory
Power Indication LED on your Yealink T28P IP Phone
DSS Keys set to BLF
LED Status
Steady Green
Blinking Red
Steady Red
Off
Line Keys
LED Status
Steady Green
Slow Blinking
Off
Power Indication LED
LED Status
Steady Green
Blinking Green
Off
Line Keys set to BLF
LED Status
Steady Green
Fast Blinking Green
Slow Blinking Green
Off
Description
The monitored account is in the idle status
There is an incoming call to the monitored account
The monitored account is on an conversation
It is inactive as BLF
Description
The account is active
There is an incoming call to the account, or there is a call on hold
The phone is under DND/Forward Status
Description
Power On
There is an incoming call to the account, or there is a call on mute
Power Off
Description
The monitored account is in idle status
There is an incoming call to the monitored account
The monitored account is on a conversation
It is inactive as BLF
Phone Diverts and Pickups
Phone Divert On
* 72 press Dial and destination number
Remove Phone Divert
* 73 press Dial
Phone Divert On Busy
* 90 press Dial
Remove Divert On Busy
* 91 press Dial
Phone Divert No Answer
* 92 press Dial
Remove Divert No Answer
* 93 press Dial
Call Pick up
* 98 press Dial
DND Activate
* 78 press Dial
DND De-activate
* 79 press Dial
Star Codes
Automatic Call Back Deactivation
#8
Call Forwarding Always To Voice Mail Activation
*21
Call Forwarding Always To Voice Mail Deactivation
#21
Call Forwarding Busy To Voice Mail Activation
*40
Call Forwarding Busy To Voice Mail Deactivation
#40
Call Forwarding No Answer Activation
*92
Call Forwarding No Answer Deactivation
*93
Call Forwarding No Answer To Voice Mail Activation
*41
Call Forwarding No Answer To Voice Mail Deactivation
#41
Call Forwarding Not Reachable Activation
*94
Call Forwarding Not Reachable Deactivation
*95
Calling Line ID Delivery Blocking per Call
*67
Calling Line ID Delivery per Call
*65
Call Return
*69
Call Waiting Persistent Activation
*43
Call Waiting Persistent Deactivation
#43
Cancel Call Waiting
*70
Clear Voice Message Waiting Indicator
*99
Customer Originated Trace
*57
Directed Call Pickup
*97
Directed Call Pickup with Barge-in
*33
Direct Voice Mail Transfer
*55
Last Number Redial
*66
Per Call Account Code
*71
Push to Talk
*50
Speed Dial 100
*75
Speed Dial 8
*74
Operating Instructions
Notice
1. If the WAN (wide area network) connection fails to a site for any reason,
including a fault on the circuit or a power cut, then the ability to make and
receive calls from the IP phones utilising that WAN circuit will be restricted.
These failures may be caused for reasons outside our control. Other services
will be fully maintained including voice mail and the ability to divert calls to
other numbers including mobiles. If another working WAN circuit is available
at that site then this can be used to fully restore service to all phones.
2. The EOS service allows for calls to 999 and 112, however these services will
be affected if there is a power cut or your WAN circuit fails
3. With regard 999 services no location information is passed to the emergency
services operator this will mean that you will have to state the address that
you wish the emergency service to attend.
4. EOS does not offer a paper based telephone directory service
5. If you require a PDF that allows you to print off stickers to attach to the
phone device explaining the above please contact us.