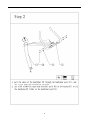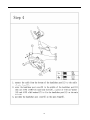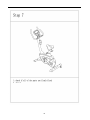
1
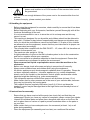
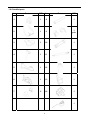
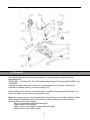
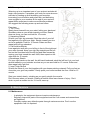
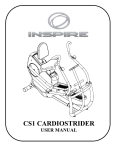
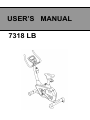
USER’S MANUAL
7318 LB
Index
Page
1. Assembly Instructions
----------------------------1.1 For your safety - - - - - - - - - - - - - - - - - - - - - - - - - - - - - - 1.2 Handling the equipment
----------------------1.3 Instructions of assembly
----------------------1.4 Order of spare parts
-------------------------1.5 Checklist hardware
-------------------------1.6 Checklist parts
-----------------------------1.7 Assembly drawing
---------------------------
2
2
3
3
4
4
5
6
2. General - - - - - - - - - - - - - - - - - - - - - - - - - - - - - - - - - - - - - - - - 2.1 Packing
----------------------------------2.2 Disposal - - - - - - - - - - - - - - - - - - - - - - - - - - - - - - - - - - 2.3 Explanation of symbols
------------------------
6
7
7
7
3. Assembly
--------------------------------------3.1 Remove all parts from the carton
----------------3.2 Take the exercise bike out of the carton
-----------3.3 Assembly steps
----------------------------3.4 Adjusting the saddle position - - - - - - - - - - - - - - - - - - - -
7
7
7
8
15
4. Placing the exercise bike
--------------------------4.1 Aligning the exercise bike - - - - - - - - - - - - - - - - - - - - - - 4.2 Power supply
------------------------------4.3 Moving the exercise bike - - - - - - - - - - - - - - - - - - - - - - 4.4 Store the exercise bike - - - - - - - - - - - - - - - - - - - - - - - - -
15
15
15
15
16
5. Preparing the start
-------------------------------5.1 Power supply
------------------------------5.2 Enter and leave the exercise bike
----------------
16
16
16
6. Computer handling
6.1 Computer display and functions - - - - - - - - - - - - - - - - - 6.2 Assembly batteries - - - - - - - - - - - - - - - - - - - - - - - - - - -
16
23
7. Training manual - - - - - - - - - - - - - - - - - - - - - - - - - - - - - - - - - 7.1 Types of training - - - - - - - - - - - - - - - - - - - - - - - - - - - - 7.2 Training frequency - - - - - - - - - - - - - - - - - - - - - - - - - - 7.3 Training intensity - - - - - - - - - - - - - - - - - - - - - - - - - - - 7.4 Heart rate training - - - - - - - - - - - - - - - - - - - - - - - - - - 7.5 Training control - - - - - - - - - - - - - - - - - - - - - - - - - - - - 7.6 Warm up and cool down - - - - - - - - - - - - - - - - - - - - - - -
23
23
23
24
24
25
26
8. Maintenance
-----------------------------------8.1 Maintenance - - - - - - - - - - - - - - - - - - - - - - - - - - - - - - 8.2 Care
------------------------------------
26
26
27
9. Troubleshooting
-------------------------------10. Explosion drawing - - - - - - - - - - - - - - - - - - - - - - - - - - - - - 11. Parts list - - - - - - - - - - - - - - - - - - - - - - - - - - - - - - - - - - - - -
27
28
30
1
1. Assembly Instructions
Before assembling or using this exercise bike, please read the following
instructions carefully. They contain important information for use and
maintenance of the equipment as well as for your personal safety. Keep these
instructions in a safe place for maintenance purposes or for ordering spare parts.
1.1
For your safety
-
-
-
-
-
-
-
-
-
-
Before beginning your program of exercise, consult your doctor to ensure that you
are fit enough to use this equipment. Base your program of exercise on the
advice given by your doctor. Incorrect or excessive exercise may damage
your health.
The exercise bike should be used only for its intended purpose, i.e. for physical
exercise by adult persons.
Any other use of the equipment is prohibited and may be dangerous. The
manufacturer cannot be held liable for damage or injury caused by improper use
of the equipment.
This exercise bike has been designed in accordance with the latest standards of
safety. Any features which may have been a possible cause of injury have been
avoided or made as safe as possible.
Incorrect repairs and structural modifications (e.g. removal or replacement of
original parts) may endanger the safety of the user.
Damaged components may endanger your safety or reduce the lifetime of the
equipment. For this reason, worn or damaged parts should be replaced
immediately and the equipment taken out of use until this has been done. Use
only original spare parts.
If the equipment is in regular use, check all its components thoroughly every
1 – 2 months. Pay particular attention to the tightness of bolts and nuts. This
is particularly true for all attached parts.
To ensure that the safety level is kept to the highest possible standard, determined
by its construction, this product should be serviced regularly (once a year) by
specialist retailers.
Instruct persons using the equipment (in particular children) on possible sources of
danger during exercise.
Any interference with parts of the product that are not described within the
manual may cause damage or endanger the person using this machine.
Extensive repair must only be carried out by specialist retailers or qualified
personnel trained by manufacturer.
Use only the supplied power cord.
Your exercise bike is an electric product. Therefore it must be guaranteed during
use that it is grounded. Please make sure that the power cord is connected with a
suitable power outlet. This guarantees a reduced risk of electric shock caused by
malfunction.
A malfunction can cause an electric shock if the grounding has an
improper connection. If you are not sure if your power outlet is
suitable, please contact a qualified electrician.
Never leave your exercise bike without supervision. If you leave the room, please
disconnect the power cord from the power outlet.
2
-
Never use the exercise bike if it is standing on a wet surface, if the
power cord is defect or a 100% function of the exercise bike cannot
be guaranteed.
-
Pay attention on enough distance of the power cord or the exercise bike from hot
sources.
In case of enquiry, please contact your dealer.
-
1.2 Handling the equipment
-
-
-
Before using the equipment for exercise, check carefully to ensure that it has been
correctly assembled.
Before beginning with your first session, familiarize yourself thoroughly with all the
functions and settings of the unit.
It is not recommended to use or to store the unit in a damp room as this may
cause it to rust.
This machine is designed for use by adults and children should not be allowed to
play with it. Children at play behave unpredictably and dangerous situations may
occur for which the manufacturer cannot be held liable. If, in spite of this, children
are allowed to use the equipment, ensure that they are instructed in its proper use
and supervised accordingly.
The exercise bike complies with the DIN EN 957 – 1/5, class HB. It is therefore not
suitable for therapeutic use.
The maximum user weight is 130 kg.
A slight production of noise on the belt or brake system is due to the construction
and has no negative effects upon operation.
Do not use corrosive or abrasive materials to clean the equipment. Ensure that
such materials are not allowed to pollute the environment.
Please ensure that liquids or perspiration never enter the machine or the
electronics.
Before use, always check all screws and plug-in connections fit correctly.
Always wear suitable shoes and clothes when using the equipment.
All electric appliances emit electromagnetic radiation when in operation. Please do
not leave especially radiation – intensive appliances (e.g. mobile telephones)
directly next to the cockpit or the electronic control system as otherwise values
displayed might be distorted (e.g. pulse measurement).
The equipment requires sufficient free space in all directions (at least 1.5 m)
Make certain that no other persons are in the area of your exercise bike, because
they may be injured by the moving parts.
The treadmill requires regularly lubrication (see 8.4). If this is not done the
treadmill / motor may be damaged due to the high friction and thereby the lost of
the warranty.
1.3 Instructions for assembly
-
-
Ensure that you have received all the parts (see check list) and that they are
undamaged. Should you have any cause for complaint, please contact your dealer.
Unpack all individual parts and place them alongside each other on the floor. Be
sure to place them on carton or a pad to prevent scratches either on the parts or
on your floor.
Make certain that you have adequate room for movement (at least 1 m) on all
sides during assembly.
Place the equipment (for assembly and use later) on a solid and flat surface.
3
-
-
-
-
Before assembling the equipment, study the drawings carefully and carry out the
operations in the order shown by the diagrams. The correct sequence is given in
capital letters if necessary.
The equipment must be assembled with due care by an adult person. If in doubt
call upon help of a second person, if possible technically talented.
Please note that there is always a danger of injury when working with tools or
doing manual work. Therefore please be careful when assembling this machine.
Ensure that your working area is free of possible sources of danger, for example
don’t leave any tools lying around. Always dispose packing material in such a way
that it may not cause any danger. There is always a risk of suffocation if children
play with plastic bags!
The fastening material required for each assembly step is shown on the diagram
inset. Use the fastening material exactly as instructed. The required tools are
supplied with the equipment.
Bolt all the parts together loosely at first, and check that they have been
assembled correctly.
Then use the Allen wrench to finally tighten the bolts completely. Then check
that all screw connections have been tightened firmly.
For technical reasons, we reserve the right to carry out preliminary assembly work
(e.g. addition of tubing plugs)
Please keep original packing of this article, so that it may be used for transport at
a later date, if necessary.
1.4 Order of spare parts se
- When ordering spare parts, always state the full article number, spare part number,
description and quantity required.
- Example order: Art. No. 7318 LB / spare part no. 12 / description / 2 pieces.
- Important: spare part prices do not include fastening material ; if fastening
material (bolts, nuts, washers etc.) is required, this should be clearly stated on the
order by adding the words “with fastening material”
1.5 Checklist hardware
No.
15
Hardware
Spec.
QT
Y
18
M8X15
14
4
1
Spec.
QT
Y
No
.
Φ10
(arc)
6
Hardware
16
M5x10
2
19
M5X10
(supplied by
computer)
17
φ8
8
20
S5 wrench
4
1.6 Checklist parts
No.
Parts
QTY
No.
Parts
QTY
1
1
8
1
2
1
9
1
pair
3
1
10
1
4
1
11
1
5
1
12
1
6
1
13
1
7
2
14
1
1
5
1.7 Assembly drawing
2. General
This training equipment is for use at home only. The equipment complies with the
requirements of
DIN EN 957 – 1/5 Class HB. The CE marking refers to the EU Directive 89/336/EEC and
73/23/EEC.
Damage to health cannot be ruled out if this equipment is not used as intended (for
example, excessive training, incorrect settings, etc.)
Before starting your training, you should have a complete physical examination by your
doctor, in order to rule out any existing health risks.
Make the training on your new exercise bike an essential part of a healthy lifestyle, which
also includes a healthy diet and motion training. Strictly adherence of this will have
following effects from your training:
- Muscle development and tightened thighs.
- Improvement of the mobility.
- Higher calorie consumption means reduced weight.
- Improvement of your body shape.
6
-
Invigoration of heart and lungs.
Reduced stress and ageing.
Increased stamina
Increased capability
Fortification of body’s defenses
2.1 Packing
The packing consists out of environment – friendly and recyclable materials:
- External packing made of cardboard
- Protection layers inside made of cardboard
- Moulded parts made from CFS – free polystyrol (PS)
- Sheeting and bags made of polyethylene (PE)
- Wrapping straps made of polypropylene (PE)
2.2 Disposal
Please be sure to keep the packing for the event of repairs / warranty
matters.
At the end of the life cycle of the item it should not be disposed of in
the normal household rubbish, it must be delivered to a special place
for the recycling of electric and electronic items. All the parts are
recyclable according their markings. Please ask your municipal
administration where to deliver in such case.
2.3 Explanation of symbols
Contains important information for prevention of serious injuries or
damage to the equipment.
3. Assembly
Before you start assembling, the exercise bike must have room
temperature.
For assembling please pay attention to the following steps.
3.1 Remove all parts from the carton except the exercise bike.
Unpack all individual parts and place them alongside each other on the floor. Be sure to
place them on carton or a pad to prevent scratches either on the parts or on your floor.
3.2 Take the mainframe out of the carton
The mainframe is very heavy, so don’t try it alone to take it out of the carton. Please ask
one person to help to move it out of the carton. Then place the mainframe on a pad to
protect the floor, as without assembled foot tubes it can damage/scratch your floor. The
pad should be flat and not very think, so the mainframe has a stable stand.
7
3.3 Assembly steps.
8
9
10
11
12
13
14
3.4 Adjusting the saddle position
3.4.1 Height of the saddle:
Most important is the correct height of the saddle. Please fix the saddle in such a height,
that, during sitting on the bike and holding the handlebar, both toes can touch the floor.
The saddle tube may only be pulled out to the max. position as indicated! If
you pull it out higher, the saddle tube cannot be fixed safe and you risk
injuries when pedaling.
3.4.2 Horizontal saddle adjustment
Adjust the height of the saddle first as described in 3.4.1. Unfasten the adjusting knob
under the saddle and move the saddle slider forward or backward. Adjust it to a position,
that when the pedals are in the horizontal position, your knees should be at a 90 degree
angle.
3.4.3 Saddle incline adjustment
Open the 2 nuts at the saddle frame work until the saddle can be turned easily. Push or
pull the saddle on the tip until you reach a comfortable position. Tight both nuts again.
4. Placing the exercise bike
For a pleasant feeling during exercise we recommend to place the exercise bike on a
comfortable and attractive place.
- Never use the exercise bike outdoors
- Never place the exercise bike near open water or in rooms with high humidity.
- Ensure that the power cables don’t cross walkways. If there is some carpet in your
chosen room, please make sure that there is enough space between the carpet
and the exercise bike. In case not then please use some pad.
- Place the exercise bike with a distance of at least 1.5 m to each wall.
- After long time of use you will probably find some black abrasion under your
exercise bike. This is a normal wear out and doesn’t mean there is a defect. This
abrasion can be removed with every standard vacuum cleaner. To prevent dirt on
your carpet, please use a pad.
4.1 Aligning the exercise bike
- Please take care that the floor, on which you place the equipment, must be flat
and solid and should have no unevenness.
- If the exercise bike doesn’t stand safe try to adjust the bike with the rear height
adjustments. If the height adjustment cannot equal the floor unevenness, please
position it to a different place.
4.2 Power supply
- Please take care not to use a multiple power outlet in which already other
appliances are connected
4.3 Moving the exercise bike
To move the exercise bike to a different location please do as following
- Disconnect the power cord from the power outlet.
- Stand in front of the exercise bike and hold the handlebar.
- Tip over the exercise bike carefully in your direction and move it on the transport
rollers to your desired new location.
15
4.4 Store the exercise bike
As safety measures, especially when you have children, you should take care on the
following points.
- Disconnect the power cord from the power outlet.
- If the equipment will be long-term stored, please take off the batteries from the
batteries box.
5. Preparing the start
5.1 Power supply
You can drive your system from 2 power sources: External power or batteries.
For external power:
- Connect the power cord with the proper power outlet.
o Voltage
:
220V ± 10% (50 Hz or 60 Hz)
The standard of voltage and the power supply are different in different
countries. For your safety, please use the appropriate power adapters
according standards in your country.
For batteries:
- Insert 4 batteries in the battery case on the back side of the computer.
o Please use following type: R14C(B) Size C/1.5V
Please don’t use both power supplies at once. Use either the external power
supply or the batteries.
5.2 Enter and leave the exercise bike
- To prevent injuries due to unbalance, please always hold the fixed handlebar
when enter or leaving the exercise bike. Never step on the cover, please only use
the pedals.
6. Computer handling
6.1 Computer display and functions
The monitor is designed for programmable magnetic bikes and introduced with the
following categories:
- Key Functions
- About Displays
16
- Operating Ranges
- Things You Should Know Before Exercising
- Operation Instructions
AUTO ON /OFF:
The monitor will wake up automatically if the exercise machine is in motion or you press
one of the button ENTER 、 START/STOP and MODE ‧ If stop exercising over 256
seconds, monitor will turn off ‧
z
Key Functions
There are total 6 keys including START/STOP, ENTER, MODE, UP, DOWN, and
RECOVERY.
A. START/STOP: Starts or stops the program chosen. And, resets the monitor by
pressing and holding for 2 seconds.
B. ENTER: Chooses the functions from PROGRAMS, GENDER, TIME, HEIGHT,
WEIGHT, DISTANCE, TARGET HEART RATE, AGE, and 10 columns. The
chosen function shall flash. Please note that not all the functions can be selected
in every program according to the types of each program.
C. MODE: Changes the displays of the values between RPM or SPEED, and
KJOULE/CAL or WATT. The values of RPM show at the same time, or the values
of SPEED and KJOULE/CAL do by pressing it.
D. UP (▲): Selects or increases the values of PROGRAMS, GENDER, TIME,
HEIGHT, WEIGHT, DISTANCE, TARGET HEART RATE, AGE, and 10 columns.
E. DOWN (▼): Selects or decreases the values of PROGRAMS, GENDER, TIME,
HEIGHT, WEIGHT, DISTANCE, WATT, TARGET HEART RATE, AGE, and 10
columns.
F. RECOVERY: Starts the function of PULSE RECOVERY.
z
About Display
A. START: Indicates the program selected has started.
B. STOP: Indicates the program selected has stopped. And, users are free to
change the programs and the value of functions applied.
C. PROGRAM n: Indicates the programs selected from PROGRAM 1 to PROGRAM
15 (or 17).
D. LEVELn: Indicates the level of loading selected from LEVEL 1 to LEVEL 16.
E. GENDER: Indicates the gender (Male or Female) selected.
F. TIME/HEIGHT/WEIGHT Display: Indicates only 1 value of TIME, HEIGHT, or
WEIGHT displayed depending on the programs.
17
G. RPM/SPEED/KMH (MPH) Display: Indicates only 1 value of RPM, SPEED, or
KMH (MPH) displayed depending on the programs.
H. DISTANCE/FAT% Display: Indicates only 1 value of DISTANCE or FAT%
displayed depending on the programs.
I. CAL/BMR Display: Indicates only one value of CAL, or BMR displayed depending
on the programs.
J. TARGET H.R./BMI/AGE Display: Indicates only one value of TARGET HEART
RATE, BMI, or AGE displayed depending on the programs.
K. HEART RATE/BODY TYPE Display: Indicates only one value of HEART RATE or
BODY TYPE displayed depending on the programs.
L. LOADING Profiles: There are 10 columns of loading bars, and 8 bars in each
column. Each column represents 3 minutes workout (without the change of TIME
value), and each bar represents 2 levels of loading.
18
z
Operating Ranges
Values
PROGRAM
LEVEL
GENDER
TIME
HEIGHT (cm)
WEIGHT (kg)
DISTANCE
TARGET H.R.
AGE
z
Range (Count Count down
up)
1 ~ 17
17 ~ 1
1 ~ 16
16 ~ 1
Male, Female
N/A
0:00 ~ 99:59
99:00 ~ 5:00
110.0 ~ 199.5 199.5 ~ 110.0
10.0 ~ 199.8
199.8 ~ 10.0
0.0 ~ 999.0
999.0 ~ 1.0
60 ~ 220
220 ~ 60
10 ~ 99
99 ~ 10
Preset
1
N/A
Male
0:00
175.0
70.0
0.0
90
30
Increment
(Decrement)
1
1
N/A
1:00
0.5
0.2
1.0
1
1
Things You Should Know Before Exercising
A. The values calculated or measured by the computer are for exercise purpose only,
not for medical purpose.
B. The Variables May Need To Change In The Programs:
Programs
Variables
P1 ~ P7
TIME, DISTANCE, AGE
P8
GENDER, HEIGHT, WEIGHT, AGE
P9
TIME, DISTANCE, TARGET H.R.
P10 ~ P12
TIME, DISTANCE, AGE
P13 ~ P16
TIME, DISTANCE, AGE, 10 Intervals
Please note that only 1 value of TIME or DISTANCE can be adjusted. Both
adjustments do not exist at the same time. For example, the value of DISTANCE
is “0.0” while the value of TIME is adjusted to be any number except “00:00”.
C. Programs Selection:
There are 16 programs with 1 Recovery including 1 Manual Program, 6 Preset
Programs, 1 Body Fat Program, 4 Heart Rate Control Programs, 4 User Setting
Programs, 1 Speed Independent Program, and 1 Pulse Recovery Measuring.
D. Program Graph:
Each graph shown is the profile of the loading in each interval (column). With the
value of TIME counting up, each interval is 3 minutes that all the columns make up
30 minutes. With the value of TIME counting down, each interval is the value of
setup TIME divided by 10. For example, if the time value is setup to 40 minutes,
19
each interval will be 40 minutes divided by 10 intervals (40/10=4). Then, each
interval will be 4 minutes. The following graphs are all the profiles in the monitor.
Program 1 (Manual)
Program 2 (Polling)
Program 3 ( Valley )
Program (Fat Burn )
Program 5 (Ramp)
Program 6 (Mountain)
Program 7 (Random)
Program 8 (Body Fat)
Program 9 (Target H.R.)
Program 10 (60% H.R.C.)
Program 11 (75% H.R.C.)
Program 12 (85% H.R.C.)
20
Program 13 (User Setting)
Program 14 (User Setting)
Program 15 (User Setting)
Program 16 (User Setting)
E. Body Types:
There are 9 body types divided according to the FAT% calculated. Type 1 (super
thinner)is from 5% to 9%. Type 2(sporting and ideal) is from 10% to 14%. Type
3(super sporting) is from 15% to 19%. Type 4(sporting) is from 20% to 24%.
Type 5(healthy and ideal) is from 25% to 29%. Type 6(thin) is from 30% to 34%.
Type 7 (fat)is from 35% to 39%. Type 8(fatter) is from 40% to 44%. Type 9(much
fatter) is from 45% to 50%.
F. BMR: Basal Metabolism Ratio
G. BMI: Body Mass Index
z
Operation Instructions
A. Exercising With a Specific Goal:
1. TIME Control: Sets up a period of time to exercise. (Except in Program 8)
2. DISTANCE Control: Sets up a certain distance to exercise. (Except in Program
8)
3. BODY FAT Control: Computer designs various programs for different people
with different body fat ratio.
4. WATT Control: Keeps different bodies burning in desire WATT consumed.
5. Heart Rate Control: Keeps users to exercise under a safe heart-beating
condition
B. Pulse Rate:
The whole set of heart rate detector include 2 sensors each side. Each sensor
has 2 pieces of metal parts. The correct way to get detected is to gently hold both
metal parts each hand. With the good signals picked up by the computer, the
heart mark in the HEART RATE/BODY TYPE Display shall flash.
C. Manual Program:
PROGRAM 1 is a manual program. Press “ENTER” key to select TIME,
DISTANCE, and AGE. Then, press ▲ or ▼ key to adjust the values. The default
level of loading is 6. After pressing “START/STOP” key to exercise, please also
apply the heart rate detector appropriately. Users may exercise in any desire
level (by pressing ▲ or ▼ during the workout) with a period of time or a certain
distance. With the input of age, the computer may suggest a target heart rate to
exercise. The suggested heart rate is 85%(220 – age). So, if the heart rate
detected equals to or greater than the TARGET H.R., the value of HEART RATE
will keep flashing. Please note that it is a warning for users to slow down or
to lower the level of loading.
21
D. Preset Programs:
PROGRAM 2 to PROGRAM 7 are the preset programs. Press “ENTER” key to
select TIME, DISTANCE, and AGE. Then, press ▲ or ▼ key to adjust the values.
Users may exercise with different level of loading in different intervals as the
profiles show. After pressing “START/STOP” key to exercise, please also apply
the heart rate detector appropriately. Users may also exercise in any desire level
(by pressing ▲ or ▼ during the workout) with a period of time or a certain
distance. With the input of age, the computer may suggest a target heart rate to
exercise. The suggested heart rate is 85%(220 – age). So, if the heart rate
detected equals to or greater than the TARGET H.R., the value of HEART RATE
will keep flashing. Please note that it is a warning for users to speed down or
to lower the level of loading.
E. Body Fat Program:
Program 8 is a special program designed to calculate users’ body fat ratio and to
design a specific loading profile for users. With 9 different body types, the
computer can generate 9 different profiles for each. Press “ENTER” key to select
GENDER, HEIGHT, WEIGHT, and AGE. Then, press ▲ or ▼ key to adjust the
values. After pressing “START/STOP” key to calculate body fat, please also
apply the heart rate detector appropriately. If the detector cannot pick up any
signals, an error message “E3” will show up in the profile display. If it happens,
press “START/STOP” key to calculate again. Then, the calculation values of
FAT%, BMR, BMI, BODY TYPE, and a designed profile will show up shortly.
Press “START/STOP” key to exercise. The profile shown in the display is
specially designed for your body type.
F. Heart Rate Control Programs:
Program 9 to Program 12 are the Heart Rate Control Programs. In program 9,
press “Enter” key to select TIME, DISTANCE, and TARGET H.R. Users may
setup a target heart rate to exercise in a period of time or a certain distance. In
Program 10 to Program 12, press “Enter” key to select TIME, DISTANCE, and
AGE. Then, press ▲ or ▼ key to adjust the values. Users may exercise in a
period of time or a certain distance with 60% Max Heart Rate in Program10, 75%
Max Heart Rate in Program 11, and 85% Max Heart Rate in Program 12. After
pressing “START/STOP” key to exercise, please also apply the heart rate
detector appropriately. In these programs, the computer will adjust the level of
loading according to the heart rate detected. For example, the level of loading
may increase while the heart rate detected is lower than TARGET H.R. Also, the
level of loading may decrease while the heart rate detected is higher than
TARGET H.R. As a result, the user’s heart rate will be adjusted to close the
TARGET H.R. in the range of TARGET H.R. –5 and TARGET H.R. +5.
G. User Setting Programs:
Program 13 to Program 16 are the user-setting programs. Users are free to edit
the values in the order of TIME, DISTANCE, AGE, and the level of loading in 10
intervals. The values and profiles will be stored in the memory after setup. After
pressing “START/STOP” key to exercise, please also apply the heart rate
detector appropriately. Users may also change the ongoing loading in each
interval by pressing ▲ or ▼ key, and they will not change the level of loading
stored in the memory. With the input of age, the computer may suggest a target
heart rate to exercise. The suggested heart rate is 85%(220 – age). So, if the
heart rate detected equals to or greater than the TARGET H.R., the value of
HEART RATE will keep flashing. Please note that it is a warning for users to
speed down or to lower the level of loading.
22
H. Pulse Recovery:
It is a function to check the condition of pulse recovery that is scaled from 1.0 to 6.0
while 1.0 means the best and 6.0 means the worst and the increment is 0.1. In order
to get rated correctly, users must test it right after the workout finished by pressing
“RECOVERY” key and then stop exercising. After the key is pressed, please also
apply the heart rate detector appropriately. The test will last for 1 minute and the
result will show in the display.
6.2 Assembly of batteries box
Firstly take off the cover of batteries box which on the back of computer.
Secondly, please assemble the batteries according the symbol in the batteries box
(as following picture). Pay attention to the anode and cathode.
Finally, check if all of batteries assemble in right position, then cover the batteries box.
After cut down the external power supply, please pull out the power
adapter from the mainframe, otherwise the computer could not work
when you use the batteries.
7. Training manual
Training with an exercise bike is ideal movement training for strengthening important
muscle groups and the cardio – circulatory system.
General notes for training
- Never do exercise immediately after a meal
- If possible, orient your training to pulse rate
- Do muscle warm – ups before starting by loosening or stretching exercises
- When finish your training, please reduce speed. Never abruptly end your training.
- Do some stretching exercises when finished with your training.
7.1 Training frequency
To improve your physical fitness and to enhance your stamina over the long term, we
recommend training at least three times a week. This is the average training frequency
for adults in order to obtain long time stamina success or high fat burning. As your fitness
level increases, you also can train daily. It is particularly important to train at regular
intervals.
7.2 Training intensity
Carefully structure your training. The intensity should be increased gradually, so that no
fatigue of the musculature or the locomotors system occurs.
23
RPM
In terms of a targeted endurance training in principle it is recommended to select rather a
lower resistance and to exercise at a higher rpm (revolutions per minute). Ensure that the
rpm is higher than 80 RPM but does not exceed 100 RPM.
7.3 Heart rate training
For your personal pulse zone it is recommended that an aerobic training range is chosen.
Performance increases in the endurance range are principally achieved by long training
units in the aerobic range.
Find this zone in the target pulse diagram or orient yourself on the pulse program. You
should complete 80% of your training in this aerobic range (up to 75% of your maximum
pulse).
In the remaining 20% of the time, you can integrate load peaks, in order to shift your
aerobic threshold value upwards. With the resulting training success you can later
produce higher performance at the same pulse: this means an improvement in your
physical shape.
If you already have some experience in pulse – controlled training you can match your
desired pulse zone to your special training plan or fitness status.
Note:
Because there are persons which have “high” and “low” pulses, the individual optimum
pulse zones (aerobic zone, anaerobic zone) may differ from those of the general public
(target pulse diagram).
In these cases, training must be configured according to individual experience. If
beginners are confronted with this phenomenon, it is important to consult a doctor before
start training, in order to check your health capacity for training. Generally we
recommend that everyone first consults a doctor, before doing any fitness training.
7.4 Training control
Both medically and in terms of training physiology, pulse – controlled training makes
most sense and is oriented on the individual maximum pulse.
This rule applies to beginners, ambitious recreational athletes and to professionals.
Depending on the goal of training and performance status, training is done at a specific
intensity of individual maximum pulse (expressed in percentage points).
In order to effectively configure cardio – circulatory training according to sports – medical
aspects, we recommend a training pulse rate of 70% - 85% of maximum pulse. Please
refer to the following target pulse diagram.
Measure your pulse rate at the following points in time:
1. Before training
= resting pulse
2. 10 minutes after training start
= training / working pulse
3. 1 minute after training
= recovery pulse
-
-
During the first weeks, it is recommended that training is done at a pulse rate at
the lower limit of the training pulse zone (approximately 70% or lower)
During the next 2 – 4 months, intensify your training stepwise until you reach the
upper end of the training pulse zone (approximately 85%) but without overexerting
yourself.
Although you are in a good condition, disperse easier units in the lower aerobic
range time and again in your training program, so that you regenerate sufficiently.
24
A “good” training always means intelligent training, which includes regeneration at
the right time. Otherwise overtraining results and your condition worsen
- Every loading training unit in the upper pulse range of your individual performance
should always be followed in subsequent training by a regenerative training unit in
the lower pulse range (up to 75% of the maximum pulse).
When your condition has improved, higher intensity of training is required for the pulse
rate in order to reach the “training zone”, that is, that the organism is capable of higher
performance.
Calculation of the training / working pulse
220 pulse beats per minute minus age = personal, maximum heart rate (100%)
Training pulse
Lower limit:
(220 – age) x 0.70
Upper limit:
(220 – age) x 0.85
7.5 Training duration
Every training unit should ideally consist a warm – up phase, a training phase and finally
a cool – down phase in order to prevent injuries.
Warm up:
5 – 10 minutes of calisthenics or stretching (also slow cycling).
Training:
15 – 40 minutes of intensive but not overextended training at the intensity mentioned
above.
Cool – down:
5 – 10 minutes of slow cycling, followed by calisthenics or stretching, in order lo loosen
the muscles.
Stop training immediately if you feel unwell or if any signs of exhaustion occur!
Alterations of metabolic activity during training:
- In the first 10 minutes of endurance performance our bodies consumes the sugar
stored in our muscles: Glycogen.
- After about 10 minutes additionally fat will be burned.
- After 30 – 40 minutes fat metabolism is activated, and then the body’s fat is the
main source of energy.
-
25
7.6 Warm up and cool down
Warming up is an important part of your workout and should
begin every session. It prepares your body for more strenous
exercise by heating up and stretching your muscles,
increasing your circulation and pulse rate, and delivering
more oxygen to your muscles.At the end of your workout,
repeat these exercises to reduce sore Muscle problems.
We suggest the following warm-up and cool-down
Exercises:
1. Toe Touch
Slowly bend forward from your waist, letting your back and
Shoulders relax as you stretch toward your toes. Reach
down as far as you can and hold for 15 counts.
2. Hamstring Stretch
Sit with your right leg extended. Rest the sole of your left
foot against your right inner thigh. Stretch toward your toe
as far as possible. Hold for 15 counts. Relax and then
repeat with left leg extended.
3. Calf-Achilles Stretch
Lean against a wall with your left leg in front of the right and
your arms forward. Keep your right leg straight and the left
foot on the floor;then bend the left leg and lean forward by
moving your hips toward the wall. Hold, then repeat on the
other side for 15 counts.
4.Quadriceps Stretch
Put your right hands on the wall, the left hand backward catch the left foot. Let your heel
stretch toward to your buttocks as close as you can and hold for 15 counts. Relax and
then repeat with right foot.
5. Inner Thigh Stretch
Sit with the soles of your feet together with your knees pointing outward. Pull your feet as
close into your groin as possible. Gently push your knees towards the floor. Hold for 15
counts.
Start your stretch slowly, exhaling as you gently stretch the muscle.
Don’t bounce when you stretch. Holding a stretch offers less chance of injury.. Don’t
strain or push a muscle too far. If it hurts, ease up.
8. Maintenance
8.1 Maintenance
-
In principle, the equipment does not require maintenance.
Regularly inspect all parts of the equipment and the if all screws and connections
are tightened.
Promptly replace any defective parts through customer service. Don’t use the
equipment until it is repaired.
26
8.2 Care
- When cleaning use only a moist cloth and avoid harsh cleaning agents. Ensure
that no moisture penetrates the computer.
- Components (handlebar, saddle) that come in contact with perspiration, need
cleaning only with a damp cloth.
Please ensure that liquids never enter the machine or the electronics!
9. Troubleshooting
Display shows no values:
- Remove the power cord from the power outlet.
- Check the cable connections you assembled before.
- Check if the cables have been damaged during assembly.
- If cables have been damaged please order new ones from the customer service
and replace the defect ones.
Display shows incorrect or no pulse rate:
- The hand pulse sensors are only working if you hold both sensors at the same
time.
- Make sure that you have a firm grip on both hand pulse sensors.
- If the contact is interrupted during exercise, the computer needs a few seconds to
get the new measures from the sensors.
27
10. Explosion drawing
28
29
11. Partslist
Pos. #
1
2
3*
4
5
6
7*
8
Description
computer
Handlebar frame
Seat cushion
Support frame of seat cushion
Handlebar post cover
Mainframe
Rear foot cap
Rear foot tube
Specification / Remarks
SD-16V
ABS
PVC
1/2″axes
Quantity
1
1
1
1
1
1
2
1
9*
10
11
12*
13*
14*
Pedal
Front foot tube frame
Handlebar post
Bottle
Bottle holder
Adjusting knob
BLA01
1
1
1
1
1
1
15
Arc-washer
φ10
6
16
Bolt, round head
M5×10
2
17
washer
φ8
8
18
Bolt, round head
M8×15
14
19
20
21
Philips screw
nut
Sensor fixed plate
M5×10
M3
zincification
2
2
1
22
Philips screw, round head
ST3.5×13
6
23
24*
washer
motor
φ5
2
1
25
26
27
Bolt, round head
sensor
Inducive magnet
M3×10
2
1
1
28
29
30
31
32
33*
34*
35*
36
37
Philips screw, round head
Crank cover
Maiframe cover(L)
Ball bearing locknut
Ball bearing washer
Ball bearing holder cover
Ball bearing
Balll bearing holder
Fixed cable plug of external power supply
Mainframe structure
ST4.2×16
11
2
1
1
1
2
2
2
1
1
700ml argentate
Computer system
30
PVC
ABS
38
Locknut of external power supply
1
39*
Even ellipse hollow tube cap
PT80×40
1
40*
41
Motor belt
Single crank
420J6(1073mm)
1
1
42*
43
44
45*
46
47
48
49
Belt wheel
Mainframe cover(R)
Bearing circlip
Bearing
Bearing washer
Pressure wheel bracket
Pressure wheel bearing
spring
φ260(hexangular)
50
51
washer
Locknut
φ10
52
53
54
55
Magnetism control freewheel
Ball bearing washer
Lock washer of inductive cable
Lock bolt of inductive cable
φ274×37(unilateralism)
1
1
1
1
56
57
58
Philips screw, round head
handlebar
Hand pulse sensor
ST4.2×19
2
1
2
59*
60
Sponge bushing
Seat cushion support tube
φ24.5×3×620(sealed)
2
1
61
62
Tube cap
Seat cushion transverse adjusting tube
PVC38×38×2 black
2
1
63
64
65
66*
Adjusting knob
Transverse tighten plate of seat cushion
Front foot tube
Moveable tube cover
φ60×M10 通孔
1
1
1
2
Distance 195mm
ABS
17
6000
12
M10
PE16
Parts marked with * are wear out parts which are subject to natural wear out and which
must be replaced after intensive or long use. In this case please contact your customer
service. There you can request the parts and be charged for them.
31
1
1
1
2
1
1
1
1
4
2