1
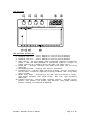
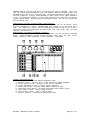
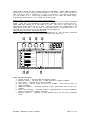
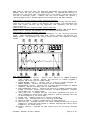
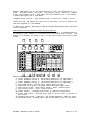
PSP Rhythm User’s Manual
Introduction
Main Menu
Button Icon Legend
User Interface
Pattern View
Track View
Wave View
Effects View
Song View
Menus
pg.
pg.
pg.
pg.
pg.
pg.
pg.
pg.
pg.
pg.
02
03
03
04
05
07
09
11
14
16
Document: RHYTHM V.8 User’s Manual
Page 1 of 16
RHYTHM is an audio sequencer for the Sony PSP (Playstation Portable).
RHYTHM was created to entertain and inspire the end user (“producer”) by allowing
the user to create music with a high level of artistic freedom.
RHYTHM is a single player game where the user organizes sounds into rhythmic and
melodic patterns, and then organizes the patterns into complete, exportable
songs. Up to 16 sounds can be simultaneously sequenced with a precise degree of
control in up to 64 patterns.
These patterns can then be arranged into a song
which can consist of up to 999 song steps.
The user can then export the
completed song as CD quality PCM wave files and/or MP3.
The heart of RHYTHM is its sample based audio engine aptly named the “RHYTHM
ENGINE.” The RHYTHM ENGINE enables the user to chop, pitch-shift, time-stretch,
and effect digital audio files.
The graphic user interface (“GUI”) is designed to be a highly efficient visual
aid to the creative process of producing electronic music.
RHYTHM clearly
displays the basic building blocks of audio sequencing, musical notation, sound
editing, effects processing, and song arrangement in a well defined and organized
manner.
The GUI is easy to navigate while still providing detailed information
and control over the user’s music.
RHYTHM uses four pattern mode views (PATTERN, TRACK, WAVE, & EFFECTS) and one
song mode view (SONG) to display all song information.
Each view has similar
control and data input.
Each view displays a specific type of information.
PATTERN VIEW displays an overview of each pattern.
TRACK VIEW displays sound
specific
pitch
information.
WAVE
VIEW
displays
sound
specific
sample
information. EFFECTS VIEW displays an overview of the effects applied to each
sound.
The control scheme and button implementation is designed to be simple and easy to
understand. Button functions are intuitive and require little guidance to learn.
Control functionality is consistent throughout each view.
RHYTHM’s simple and intuitive interface gives the user access to an otherwise
complex music process. Producing music is streamlined which keeps creative ideas
flowing instead of being interrupted by a bombardment of programming features and
a cascade of menus and sub-menus. With beat templates and instrument sequences,
RHYTHM will instantly bring out the music producer in everyone.
Document: RHYTHM V.8 User’s Manual
Page 2 of 16
MAIN MENU
The main menu consists of:
NEW
Launches blank song template
LOAD
Launches “Load Song” menu
SAVE
Option is grayed out and not available at the main menu
OPTIONS
Option is grayed out and not available at the main menu
(see options menu page 16)
EXIT
Exits application and returns user back to XMD
BUTTON ICON LEGEND
- Triangle button
- Square button
- Circle button
- Cross button
- Digital directional buttons (D-pad)
- Analog stick (A-pad)
- Left trigger button
- Right trigger button
- Select button
- Start button
Document: RHYTHM V.8 User’s Manual
Page 3 of 16
USER INTERFACE
USER INTERFACE DESCRIPTIONS
1. Parameter control 1 – control depends on view currently displayed.
2. Parameter control 2 – control depends on view currently displayed.
3. Parameter control 3 – control depends on view currently displayed.
4. Parameter control 4 – control depends on view currently displayed.
5. Tempo control – adjusts playback speed of sequencer (measured in beats per
minute.)
When the tempo parameter is highlighted, pressing ‘triangle’ at
steady intervals will manually adjust the tempo (tap tempo input).
6. Scroll bar – displays reference that shows which sound rows are being
displayed.
7. Main display window – displays view specific information.
8. Information bar – (Pattern mode) area which displays ‘tooltip’ information
and pertinent information regarding currently selected item. (Song mode)
song file name.
9. Master level meters - displays both left and right level meters on screen.
Level meters represent final volume output.
Each ‘LED’ light represents
10% volume.
10. Transport position – (Pattern mode) Transport position – displays current
pattern, next pattern, and pattern step selected. (Song mode) displays
minutes, seconds, milliseconds as MM:SS.DD.
Document: RHYTHM V.8 User’s Manual
Page 4 of 16
PATTERN VIEW is the starting point to creating any song in RHYTHM.
Here, the
user can create patterns based on a 32 step pattern timeline and modify the sound
parameters with the control knob displays. Each step represents a 32nd note at a
4/4 time signature. Every 8 steps represent 1 beat, while all 32 steps represent
1 bar.
By activating sounds on the 32 step timeline grid, the user can create
rhythms and melodies. By modifying the parameter values, the user can change the
way the sounds play.
Understanding the main display window (sound matrix):
The grid is a graphical representation of the sequence for all 16 sounds.
Each
grid row represents 1 sound.
PATTERN VIEW will display up to 10 sounds at a
time.
The remaining 6 sounds can be accessed by either scrolling up or down.
The grid columns are categorized by sound name, clip icon, mute, solo, 32 step
timeline, and scroll bar.
Understanding the pattern parameter controls:
The parameter controls display the main parameters for the currently selected
sound.
These parameters include volume, balance, start time, end time, filter
cutoff frequency / **EQ frequency, filter resonance / **EQ gain.
PATTERN VIEW DESCRIPTIONS
1. Volume control – adjusts sample playback volume
2. Balance control – adjusts left / right balance of sample playback
3. Filter cutoff control – adjusts filter cutoff frequency
4. Filter resonance control – adjusts filter resonance
5. Sound name column – displays sound names loaded into song
6. Individual level meters – displays individual sound output levels
7. Mute control column – mutes / unmutes sound
8. Solo control column – solos / unsolos sound
9. Pattern timeline – displays 32 step pattern grid
Document: RHYTHM V.8 User’s Manual
Page 5 of 16
PATTERN VIEW BUTTON CONFIGURATION:
- navigate the cursor over the pattern timeline, the mute and solo buttons,
the sound names. The cursor will be a pulsing box around selected item.
,
- scroll through the editable pattern parameters
(Holding will scroll through pattern views)
-
adjust the selected parameter by moving the a-pad in a clockwise or
counter-clockwise direction.
The parameter will track the a-pad visibly
with the position of the knob.
- start and stop pattern playback
- change pattern mode to song mode. Hold down select to open the Options
Menu.
-
(while sequencer is playing) cues ‘next’ pattern
(while sequencer is stopped) changes current pattern
(while tempo is highlighted) inputs tap tempo
When cursor has highlighted:
Sound name
- launches the load sound menu
Mute or solo
- toggles mute and solo both on and off
- deactivates mute or solo setting
Pattern step on the timeline
-
-
activates note on selected step
(sample playback: red = forward, blue = press twice for reverse)
(synth playback: yellow = on, press twice for sustain)
(while sequencer is playing) activates note on current step (realtime
input. Samples only)
(while sequencer is stopped and cursor is on a pattern step) previews
sound
- erases note on selected step.
Hold down to erase entire sound sequence.
COMBO BUTTONS:
+
= (While VOL, BAL, CUT, RES, or TEMPO are selected) Press and hold the
Triangle button, then sweep the a-pad in a clockwise or counter-clockwise
direction to fine-tune parameters in smaller increments.
Document: RHYTHM V.8 User’s Manual
Page 6 of 16
TRACK VIEW is where the user creates rhythms and melodies. TRACK VIEW represents
a piano roll for the currently selected sound. The sound can be pitch shifted in
real-time up or down 3 octaves for a total of 6 octaves.
The starting position
for all sounds is C3.
Activating pitches below C3 will make the sound lower,
activating pitches above C3 will make the sound higher.
Understanding the main display window (piano matrix):
The grid is a graphical representation of the sequence for the currently selected
sound.
Each grid row represents a different semitone note on the piano roll.
TRACK VIEW will display up to 10 notes at a time. The rest of the notes can be
accessed by either scrolling up or down. The grid columns are categorized by 32
steps and a scroll bar. To the left of the piano matrix is the piano roll. To
the left of the piano roll is the semitone note designation.
Understanding the track parameter controls:
The parameter controls display the track parameters for the currently selected
sound. These parameters include volume, balance, key, and tune.
TRACK
1.
2.
3.
4.
VIEW DESCRIPTIONS
Volume control - adjusts sample playback volume.
Balance control - adjusts left / right balance of sample playback.
Key control – adjusts key origin of sample.
Tune control – adjust pitch of sound (+/- 5.00%).
Pitch can be tuned in
.01% increments.
5. Semitone display – displays semitone value associated with piano roll
display.
6. Piano roll display – displays graphic representation of piano keyboard.
Keys are lined up to pattern timeline.
7. Pattern timeline - displays 32 step pattern grid for currently selected
sound.
Document: RHYTHM V.8 User’s Manual
Page 7 of 16
TRACK VIEW BUTTON CONFIGURATION:
- navigate the cursor over
pulsing box on selected step.
,
the
pattern
timeline.
The
cursor
will
be
a
- scroll through the editable track parameters
(Holding will scroll through pattern views)
-
adjust the selected parameter by moving the a-pad in a clockwise or
counter-clockwise direction.
The parameter will track the a-pad visibly
with the position of the knob.
- start and stop pattern playback
- change pattern mode to song mode. Hold down select to open the Options
Menu.
- (while tempo is highlighted) inputs tap tempo
When cursor has highlighted:
Pattern step on the timeline
-
activates note on selected step
(sample playback: red = forward, blue = press twice for reverse)
(synth playback: yellow = on, press twice for sustain)
- (while sequencer is stopped) previews sound at currently selected pitch.
- erases note on selected step.
Hold down to erase entire sound sequence.
COMBO BUTTONS:
+
+
+
- Press and hold the triangle button, then press left or right to shift
the track sequence left or right.
- Press and hold the triangle button, then
transposes the track sequence up or down.
press
up
or
down
to
= (While VOL, BAL, CUT, RES, or TEMPO are selected) Press and hold the
Triangle button, then sweep the a-pad in a clockwise or counterclockwise direction to fine-tune parameters in smaller increments.
Document: RHYTHM V.8 User’s Manual
Page 8 of 16
WAVE VIEW is where the user can precisely manipulate the sounds loaded into
RHYTHM. Here, the user can adjust sample playback. If advanced mode editing is
activated for the sound, each activated note on the pattern timeline can start
and end at different times.
Combine this with pitch changes and forward /
reverse playback and it becomes apparent how manipulative the audio becomes.
Understanding the main display window (waveform display):
The waveform display is a graphic representation of the currently selected sound.
There are two vertical lines on the display, the left-most line represents the
start time control position and the right-most line represents the end time
control position.
Understanding the main display window (sound timeline):
The sound timeline is similar to the one row of the PATTERN VIEW sound matrix
except that it displays the sequence for the currently selected sound.
Understanding the wave parameter controls:
The parameter controls display the wave parameters for the currently selected
sound.
These parameters include start time, attack, release, and end-time for
SAMPLE sounds. The parameters are attack, decay, sustain, and release for SYNTH
sounds.
WAVE VIEW DESCRIPTIONS
1. Start-time/Attack control - adjusts start position of SAMPLE playback
(when played in reverse, adjusts end position of sample playback.)
Adjusts the attack rate for SYNTH sounds.
2. Attack/Release control – adjusts rate of starting volume envelope for
SAMPLE playback. Adjusts the release rate for SYNTH sounds.
3. Release/Decay control – adjusts rate of ending volume envelope for SAMPLE
playback. Adjusts the decay rate for SYNTH sounds.
4. End-time/Release control - adjusts end position of SAMPLE playback (when
played in reverse, adjusts start position of sample playback.)
Adjusts
the release rate for SYNTH sounds.
5. Start-time line – displays vertical line which represents the point at
which playback of sound starts (when played in reverse, displays the time
at which playback of the sound ends.)
6. Attack line – displays position of starting volume 0%
7. Release line – displays position of starting volume 100%
8. Waveform display – graphic representation of sound waveform.
9. End-time line - displays vertical line which represents the point at which
playback of sound ends (when played in reverse, displays the time at which
playback of the sound starts).
10. Pattern timeline - displays 32 step pattern grid for currently selected
sound.
Document: RHYTHM V.8 User’s Manual
Page 9 of 16
WAVE VIEW BUTTON CONFIGURATION:
-
,
pressing left or right navigates the cursor over current sound timeline.
The cursor will be a pulsing box on selected step.
By pressing up or
down, you can access other sounds loaded into the song.
- scroll through the editable wave parameters
(Holding will scroll through pattern views)
- adjust the selected parameter by moving the a-pad in a clockwise or
counter-clockwise direction.
The parameter will track the a-pad visibly
with the position of the knob.
- start and stop pattern playback
- change pattern mode to song mode. Hold down select to open the Options
Menu.
When cursor has highlighted:
Pattern step on the timeline
-
activates note on selected step
(sample playback: red = forward, blue = press twice for reverse)
(synth playback: yellow = on, press twice for sustain)
- (while sequencer is playing) activates note on current step
(while sequencer is stopped and cursor is on a pattern step) previews
sound
- erases note on selected step.
Hold down to erase entire sound sequence.
COMBO BUTTONS:
+
= (While VOL, BAL, CUT, RES, or TEMPO are selected) Press and hold the
Triangle button, then sweep the a-pad in a clockwise or counterclockwise direction to fine-tune parameters in smaller increments.
Document: RHYTHM V.8 User’s Manual
Page 10 of 16
EFFECTS VIEW enable you to use audio effects to alter the characteristic of a
sound.
Included effects are slicer, time-stretch, delay, distortion, lowpass
filter, and highpass filter.
Each sound can be processed by up to two effects.
A simplified signal path is show below.
Triggered sound Æ Filter Æ time-stretch/slicer Æ distortion Æ delay Æ output
Please note that the effects can use a lot of CPU power, so lots of effects can
slow down playback or crash RHYTHM.
In addition to effects, Sample/Synth mode and Standard/Advanced pattern edit mode
is also displayed.
Understanding the main display window (effects matrix):
The effects matrix is organized similar to the sound matrix in PATTERN VIEW with
the exception that instead of a timeline grid, an effects grid is shown.
The
effects grid displays FX column 1 and 2, Filter type column, and the Edit mode
column.
EFFECTS VIEW DESCRIPTIONS
1. Effect parameter control 1 – see effects description (if applicable.)
2. Effect parameter control 2 – see effects description (if applicable.)
3. Effect parameter control 3 – see effects description (if applicable.)
4. Effect parameter control 4 – see effects description (if applicable.)
5. Sound name column - displays sound names loaded into song.
6. Individual level meters – displays individual sound output levels.
7. Mute control column - Mute control column – mutes / unmutes sound.
8. Solo control column - solos / unsolos sound.
9. effect column 1 - displays which effect is inserted to each sound.
10. effect column 2 - displays which effect is inserted to each sound.
11. Filter type column – displays which type of filter effect is applied to
each sound.
12. Playback type column – displays if the sounds playback is sample or synth.
13. Edit mode column – displays which type of edit mode is use for each sound.
Document: RHYTHM V.8 User’s Manual
Page 11 of 16
EFFECTS
Slicer – the slicer is a volume gate effect where the sound runs through a square
wave LFO which controls the volume.
The sound will play, become silent,
then play, become silent, etc.
Controls:
On – on is the length of time the sound plays.
Off – off is the length of time the sound is silent.
Mod – mod is a modifier to the off time where instead of being silent, a
percentage of volume is output.
Time-Stretch – the time-stretch effect will expand or compress the time it takes
for a sound to play without altering the sound’s pitch.
The time
expansions or compression is very mechanical sounding.
Controls:
Length – determines time-stretch slice length (100% = step time)
Return – determines time-stretch return length (+/- 100% step time)
Delay – the delay effect creates a digital echo of the original sound playing.
This can be used to create a spacious distant area in which the sound
seems to be in.
Controls:
Rate – determines how fast the delayed echo plays back (100% = 1 second)
Feedback – determines how much of the delayed echo is sent back into the
delay effect to create multiple decaying echoes.
Distortion – the distortion effect overdrives the sound input which causes the
waveform to resemble a square wave as opposed to a sine wave.
Controls:
Send – determines how much of the original signal is processed through the
distortion effect and how much bypasses the distortion unit.
Threshold – determines the amplitude point at which the distortion unit
starts to process the sound.
Amount – determines how much signal is distorted past the threshold point.
Gain – adjusts the final distortion output volume.
Fuzz – adjusts additive noise beyond the threshold.
Lowpass or highpass filter – there is always a filter running for each sound in
RHYTHM. Lowpass is default, highpass is optional.
A lowpass filter
removes all frequencies above the frequency cutoff point.
A highpass
filter removes all frequencies below the frequency cutoff point.
Controls: (controls are only accessible in pattern view)
Cutoff – determines the frequency cutoff point.
Resonance – determines how much boost is added to the cutoff frequency.
PLAYBACK MODES
There are three types of playback modes.
The first and default mode is SAMPLE,
the second is LOOP, and the third is SYNTH.
SAMPLE audio
recorded.
playback
mode
–
plays
back
audio
sample
as
it
was
originally
LOOP audio playback mode – plays back audio sample as a repeating loop.
This
enables the user to create a synthesizer type sound with the sound sample.
The
user can select a sound, use the start and end points to select a portion of the
sound to loop, and add an attack or release envelope to the sound.
Document: RHYTHM V.8 User’s Manual
Page 12 of 16
SYNTH audio playback mode – plays oscillator wave files.
This enables the user
to play the sounds as if it was a wavetable style synth.
There is a standard
ASDR envelope as well as a non-adjustable filter envelope applied to the sound.
Parameters which apply to LOOP or SYNTH playback modes are:
Reverse sample playback is replaced with a sustain or tie function.
When a
sustain trigger is activated, it continues the synth playback without re-applying
the volume envelope. The sustained notes can be of different pitches.
EDIT MODES
There are two types of edit modes.
second is ADVANCED.
The first and default mode is STANDARD, the
STANDARD edit mode – standard edit mode applies all sound parameters to the every
triggered sound.
ADVANCED edit mode – advanced edit mode enables the user to change certain sound
parameters on each triggered sound.
Parameters which apply to ADVANCED edit mode are:
Volume – volume enables the user to change the volume of the sound per triggered
step. Example use is creating a crescendo by applying rising volume settings to
each consecutive sound triggered step.
Balance – balance enables the user to move the sound left and right per sound
triggered step.
Example use is a ping-pong effect making every other sound
trigger hit maximum left and maximum right.
Cutoff – cutoff enables the user to change the filter frequency of the sound per
triggered step. Example use is creating a filter sweep.
Resonance – resonance enables the user to modify the filter feedback of the sound
per triggered step. Example use is creating tonal textures within the sound.
Start-time – start-time enables the user to change the sample start position of
the sound per triggered step.
Example use is chopping up a vocal sample and
replaying the chopped pieces in a different order.
End-time – end-time enables the user to change the sample end position of the
sound per triggered step.
Document: RHYTHM V.8 User’s Manual
Page 13 of 16
SONG VIEW is the final stage of the song creation process in RHYTHM.
user arranges all of the patterns created in PATTERN MODE into a song.
Here, the
Understanding the main display window (song matrix):
The grid is a graphical representation of the total song sequence for all 16
sounds.
Each grid row represents 1 sound.
Song mode will display up to 10
sounds at a time. The remaining 6 sounds can be accessed by either scrolling up
or down. The grid columns are categorized by sound name and song step.
Each sound is represented individually on each song step. This enables the user
to activate different sounds of the same pattern per song step.
In addition to
individual pattern sound activation, the volume level of each activation can also
be controlled. This enables the user to mix each sound element together and even
vary the volume of each sound over time.
The grid has a maximum of 999 song steps.
A 300.0 BPM song can be up to 13 minutes 18.03 seconds long.
A 30.0 BPM song can be up to 133 minutes 4.00 seconds long.
Understanding the song steps:
The songs steps display two numbers.
The first number represents the song step
number. The second number represents the pattern number.
SONG VIEW DESCRIPTIONS
1. Song name – displays currently loaded song file name.
2. Sound name column – displays sound names loaded into song.
3. Song step column – displays song step timeline in song step – pattern
number format.
4. Song timeline – displays 999 step song grid. (5) steps are visible at any
one moment.
5. example activated note – representation of what an activated sound will
look like on the song timeline. A number indicates the percent of volume
which is played back.
This percent is based off of the sound volume in
pattern mode.
Document: RHYTHM V.8 User’s Manual
Page 14 of 16
SONG MODE BUTTON CONFIGURATION:
When song sequencer is playing, all controls are disabled except for:
- start and stop pattern playback.
- change song mode to pattern mode. Hold down select to open the Options
Menu.
When song sequencer is stopped, these controls are enabled:
,
navigate the cursor over the song timeline.
- scroll through the song timeline.
- start and stop pattern playback.
- change song mode to pattern mode. Hold down select to open the Options
Menu.
To copy and paste steps:
- copies current song step
- inserts copied song step and shifts song sequence to the right of inserted
step.
- pastes copied song step and replaces any sequence on current step.
- clears copy memory and exits copy/paste/insert command.
When cursor has highlighted:
Song step on the timeline
- activates single sound on selected song step.
all sounds on selected songs step.
- erases single sound on selected song step.
sounds on selected song step.
-
Press and hold to activate
Press and hold to activate all
adjust the volume of track on selected song step.
clockwise or counter clockwise.
A number will be
activate sounds step.
Sweep the a-pad
displayed on the
COMBO BUTTONS:
+
-changes pattern number for current step.
Document: RHYTHM V.8 User’s Manual
Page 15 of 16
MENUS
MAIN MENU
NEW - Launches default blank song.
LOAD - Loads user made songs in file browsing window.
- loads selected song file.
or
- exits menu.
SAVE
Save Song
screen.
File
–
saves
song
sequence
file.
Launches
text
input
Save Pattern as Wave Audio File – exports selected pattern as wave
audio. Press left or right to change which pattern will be saved.
Save Song as wave audio file – exports song sequence as wave audio.
- loads selected song file.
or
- exits menu.
OPTIONS – Launches options menu (see below).
EXIT – Exits RHYTHM.
OPTIONS
PATTERN
Copy track – copy selected track to track X
Copy pattern – copy current pattern to pattern X
Erase pattern
SONG
Swing time - 50/50 – 90/10
Pattern scale – (2) 16 step patterns or (1) 32 step pattern
Change Pattern Steps – 2-32 selectable in increments of 2
Master Gain – range 50-150.0%
Erase song – erases song sequence of currently loaded song
SYSTEM
Tap input Quantization – 8, 16, 32 step resolution
Free RAM – displays free RAM memory available
Free memorystick – displays free memorystick memory available
SAMPLE LOADING MENU:
You can load a sound in PATTERN VIEW, WAVE VIEW, or EFFECTS VIEW.
Move the
cursor over the sound name to highlight it.
Press the X button to open the
sample folders.
-
(if folder is selected) opens folder.
(if sample is selected) activates selected sample for track.
- previews selected sound.
- (if view is inside sample folder) exits to current folder and returns to
the folder containing the current folder.
(if the view is in the root sample folder) exits back to the pattern mode
view.
- exits the sample loading menu and clears any selected sound on the current
track.
Document: RHYTHM V.8 User’s Manual
Page 16 of 16