1
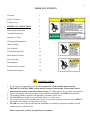
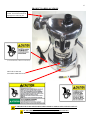
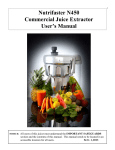
1
Nutrifaster N450
Commercial Juice Extractor
User’s Manual
NOTICE: All users of this juicer must understand the IMPORTANT SAFEGUARDS
section and the contents of this manual. This manual needs to be located in an
accessible location for all users.
JULY 31, 2004
NUTRIFASTER COMMERCIAL JUICE EXTRACTOR
2
OWNER'S MANUAL
WELCOME
Congratulations on your purchase of a Nutrifaster® Commercial Juice Extractor! Now you can serve highquality, great-tasting juices that your customers will love and ask for again and again. Nutrifaster's
technological and engineering expertise has made Nutrifaster® juice extractors the best-designed, most
powerful and most frequently used juicers in the world. Your Nutrifaster® Commercial Juice Extractor has
been crafted with the finest materials available to provide you with the top of the line machine. Again,
congratulations and welcome!
Inspect your Nutrifaster for shipping damages.
When you receive your juicer, inspect the shipping carton for damage, after opening the carton from the top,
check for any visible damage to the machine that may have occurred during shipment. If any obvious or
concealed damage is noted, file a claim immediately with the carrier. Nutrifaster cannot be responsible for
products damaged in shipment if the customer has failed to initiate a claim with the shipping company.
Check box contents.
Ensure that the following items are present. If anything is missing, contact Nutrifaster, Inc. immediately at
1-800-800-2641.
1. User’s Manual
2. Machine
ON/OFF switch cover guard attached (see photo on page 17)
Product information labels attached (see photo on page 17)
3. Wrench with label attached (see photo on page 17)
4. Food Pusher
5. Pulp Tube
6. Sample of “Clean Cut” Cleaner
Disassemble and clean before use.
Before using your juicer, follow the disassembly and cleaning instructions in this manual. In addition, wash
the cover thoroughly in hot, soapy water and sponge of the rest of the juicer to remove any dust or particles
that may have settled during manufacture or shipping.
If, after reading this manual, you still have questions about the use of your Nutrifaster Commercial Juice
Extractor, we’ll be glad to help you. Please contact us at:
Nutrifaster, Inc.
209 South Bennett St.
Seattle, WA 98108
Phone 1-800-800-2641
Fax: 1-206-762-2209
3
TABLE OF CONTENTS
Welcome
2
Table of Contents
3
Training Users
3
IMPORTANT SAFEGUARDS!
4
Disassembly Instructions
5
Assembly Instructions
6
Operation of Juicer
7
Cleaning and Maintenance
8
Initial Cleaning
8
How It Works
11
Troubleshooting Guide
12
Motor Reset Procedure
13
Tips on Juicing
14
Parts Diagram
16
Product Label Locations
17
Warranty Information
18
TRAINING USERS
1. It is the owner’s responsibility to ensure that all operators of this machine understand the
IMPORTANT SAFEGUARDS section and the contents of this manual. Ensure that all users
understand the content of the labels shown on page 17. Please contact us if you have any questions.
2. Before removing the top of the machine, always turn the switch OFF, and UNPLUG the machine.
3. The machine should be located at a height that is ergonomic for the users.
4. The ON/OFF power switch is to be located in direct view of the users.
5. The electrical outlet for this machine must always be accessible so that the users can easily UNPLUG
the machine for cleaning, moving, and/or servicing.
6. NEVER leave the wrench on the blade nut unattended, nor attempt to operate the machine with the
wrench in place on the blade nut.
Please contact us if you have any questions or comments.
4
IMPORTANT SAFEGUARDS
When using electrical appliances, basic safety precautions should always be followed including the
following:
READ ALL INSTRUCTIONS.
Close supervision is necessary when any appliance is used by or near children.
Avoid contacting moving parts.
The use of attachments not recommended or sold by the manufacturer may cause fire, electric shock
or injury.
Do not use outdoors.
NEVER Remove, Destroy, or Alter any of the Product Warnings or Guards. Do not operate the
machine if the switch guard (see photo on page 17) is not in place protecting the power switch.
Always turn OFF and UNPLUG your juicer before disassembly. Make sure the motor and cutter
plate has completely stopped moving before assembling, disassembling or cleaning your juicer.
The motor and electrical parts of the machine are not waterproof. To protect against risk of electrical
shock, do not put the motor base into water or other liquids. Water contact will seriously damage the
motor, bearings and electrical system.
Be sure to turn switch to OFF position after each use of your juicer. Make sure the motor stops
completely before disassembling.
Use a dedicated 20 AMP circuit. If your outlet has no ground provision, replace the socket portion of
the outlet to provide a safety ground.
Never alter or defeat the interlock switch.
Never attempt to remove the blade nut with the power cord plugged in. Never leave the wrench on
the blade nut unattended. Never attempt to switch ON the machine with the wrench placed on the
blade nut.
Use the power cord carefully. Do not let the power cord hand over the edge of a counter or table.
Never operate any machine with a damaged cord. Do not alter the power cord by clipping off the
ground lead.
Always make sure juicer cover is latched securely in place before motor is turned on. Do not
unfasten the latches while the juicer is in operation, or when the cutter plate is turning.
Never use a damaged machine. Do not continue operation if your juicer malfunctions or is dropped
or damaged in any manner. Call Nutrifaster, Inc. at 1-800-800-2641 for assistance. Never return
your juicer without authorization from a Nutrifaster representative.
Do not put your fingers or other objects into the juicer opening while it is in operation. If food
becomes lodged in the opening, use the good pusher or another piece of fruit or vegetable to push it
down. When this method is not possible, turn the machine OFF, UNPLUG, and disassemble the
juicer. Remove remaining produce and clean the cutter plate and basket.
SAVE THESE INSTRUCTIONS.
5
DISASSEMBLING YOUR NUTRIFASTER® COMMERCIAL JUICER EXTRACTOR
1. TURN OFF AND UNPLUG JUICER. Make sure the motor and cutter plate have
completely stopped before disassembling. Disconnect the pulp ejection tube and
remove the food pusher.
2. UNLATCH AND REMOVE TOP. Release the top latches by pulling them away from the machine.
Make sure to release both latches at the same time to maintain equal tension. Carefully lift the top
straight up. Be sure it does not touch the screen basket. Place the top upside-down on a flat, stable
countertop.
3. STABILIZE THE BASKET. Place your left arm across the top of the basket, and grip the far side of the
basket rim with your fingers. Hold the basket steady by applying equal pressure with your forearm and
hand.
4. UNSCREW AND REMOVE THE BLADE NUT. With your right hand, place the head of the wrench on
the blade nut. Turn the blade nut counter-clockwise while holding the basket steady with your left arm.
To remove the blade nut, use only the special wrench provided with your unit. Always wash the wrench
between uses. NEVER leave the wrench on the blade nut unattended.
5. REMOVE JUICING PARTS. With both hands, carefully lift the basket and cutter plate from the juice
pan. Carefully insert your index finger into the center hole of the cutter plate, and lift it out of the basket.
The cutter plate blades are sharp, so handle carefully. EXTRA CARE MUST BE TAKEN SO THE
BASKET IS NOT DAMAGED WHEN DISASSEMBLING OR REASSEMBLING THE MACHINE.
6. REMOVE THE JUICE PAN. With both hands, lift the juice pan out of the castle and set it upside-down
on a flat, stable countertop.
6
ASSEMBLING YOUR NUTRIFASTER COMMERCIAL JUICE EXTRACTOR
DO NOT PLUG MACHINE INTO AN ELECTRICAL OUTLET UNTIL ASSEMBLY
IS COMPLETE. Wear vinyl gloves (as used in food handling) during operation.
1. Pre-mix 1 level teaspoon of sanitizing powder in a glass of hot water, and mix with cold water to make 1
gallon of 100 ppm chlorine sanitizing solution. If you are using a liquid sanitizing solution follow the
directions on the container.
2. Install the Juice Pan by placing the spout through an opening in the castle. Point the spout in the
direction you wish your juice to be served. Do not touch the inside of the juice pan.
3. Install the Basket and Cutter Plate. Place the cutter plate inside the basket. Align the center hole over
the center hub, and lower the parts into the juice pan. Make sure both parts are seated properly on the
hub.
4. Make sure the motor shaft is dry, and hand tighten the blade nut on the motor shaft. Hold the screen
basket and use the wrench to tighten the blade nut an additional ¼ turn clockwise, securing the
blade/basket assembly. Do not store the blade nut on a wet motor shaft over night.
5. Store the Wrench. Clean the wrench and return it to its storage place near the juicer. This wrench is
specially designed to be used with your Nutrifaster.
6. Wrap a dry dishtowel around the base to cover the Power Switch and Power Cord. Set a waste container
under the juice pan spout. Spray approximately 1 pint of the sanitizing solution around the perimeter of
the basket screen, inside the basket screen, and onto the cutter plate and blade nut. Once done, remove
the dishtowel and thoroughly dry the base.
7. Replace the Top. Hold the top over the basket and align the latch strikes with the latches on the castle of
the juicer. Carefully lower the top onto the juicer body until it is resting on the castle.
8. Lock the Latches. Hook the inner latch attached to the castle over the latch strike on the top. Assure
proper alignment of the latch to latch strike. Lift both the outer latch arms together until the latches lock
in place. Ensure even tension on both latches. You should hear an audible SNAP sound when properly
adjusted.
9. Insert the Pulp Tube into the pulp spout of the lid. (The pulp tube is designed to penetrate the counter
top or hang over the edge of the counter. It may also be cut to length if you choose to put a pulp
receptacle on top of the counter.) The pulp tube is held in by a thumb screw. Use your hand to adjust the
screw, it should be adjusted so that the tube can stay in firmly in place.
10. With receptacles under the juice spout and pulp tube, spray 1 quart of sanitizing solution down the feed
chute while the juicer is running. Follow by rinsing the sanitizing solution from the juicer by spraying
one-quart tap or distilled water into the feed chute while the motor is running. Allow the juice pan to
drain. Dispose of the waste solution.
11. Clean the Pusher with sanitizing solution and rinse thoroughly. The juicer is now ready for operation.
12. Test Before Use. Before use, check to make sure all parts are in proper alignment. Plug your juicer into
a grounded electrical outlet and test before use.
7
OPERATION OF YOUR NUTRIFASTER COMMERCIAL JUICE EXTRACTOR
1. Ensure the machine is fully assembled.
2. Plug it in.
3. Place the juicing container below the juice pan spout.
4. Make sure there is a receptacle for pulp waste under pulp tube.
5. Turn ON the machine.
6. Insert prepared produce in the feed tube.
7. Use the Food Pusher to guide produce through the feed tube. Do not force. While juicing, make sure
pulp is being ejected through the pulp tube.
8. Turn OFF the machine when not in use. (If the juicer runs continuously for 45 minutes -not typicalturn the machine OFF and allow 15 minutes for the switches to cool-down.)
9. If not in use for more than 30 minutes, UNPLUG, disassemble and rinse the basket under hot water to
remove any pulp residue.
8
CLEANING AND MAINTENANCE
INITIAL CLEANING. To remove miscellaneous residue, disassemble and wash juicer prior to initial use.
The machine must be disconnected from the power source and disassembled following the disassembly
instructions on page 5. Wash the juice pan, screen basket, cutter plate, blade nut, wrench, and food pusher in
Clean Cut per instructions and rinse thoroughly.
DAILY SANITIZING PROCEDURE
THIS PROCEDURE SHOULD BE CARRIED OUT AT THE START OF EACH DAY. BE SURE TO
WEAR VINYL GLOVES, AS USED FOR FOOD HANDLING, DURING THIS OPERATION.
1. ALWAYS TURN OFF AND UNPLUG YOUR JUICER BEFORE SANITIZING.
2. Pre-mix 1 level teaspoon of sanitizing powder in a glass of hot water, and mix with cold water to make 1
gallon of 100 ppm sanitizing solution. If your are using a liquid sanitizing solution follow the directions
on the bottle.
3. Assemble the machine, leaving the top off. Make sure the blade nut is tightened.
4. Wrap a dishtowel around the base to cover the Power Switch and Power Cord. Set waste container under
the juice pan spout. Spray approximately 1 pint of the sanitizing solution around the perimeter of the
basket screen, inside the basket screen, and onto the cutter plate and blade nut. Once done, remove the
dishtowel and thoroughly dry the base.
5. Thoroughly clean latch assembly, with particular attention to the adjustment thread.
6. Replace the Top. Lock latches. You should hear an audible SNAP sound when properly adjusted.
7. Insert the Pulp Tube into the pulp spout of the lid.
8. With receptacles under the juice spout and pulp tube, spray 1 quart of sanitizing solution down the feed
chute while the juicer is running. Follow by rinsing the sanitizing solution from the juicer by spraying
one quart of clean water into the feed chute while the motor is running. Allow the juice pan to drain.
Dispose of the waste solution.
9. Clean the Pusher with sanitizing solution and rinse thoroughly.
10. Test Before Use. Before use, check to make sure all the parts are in proper alignment. Plug your juicer
into an electrical outlet and test before use. The juicer is now ready for operation.
NIGHTLY CLEANING WITH A DISHWASHER. All juicing parts (cutter plate, blade nut, juice pan,
basket, pusher, and wrench) may be cleaned in the dishwasher. Scrub the basket with steel wool to remove
any loose pulp before putting the parts through the dishwasher. Use a detergent suitable for automatic
dishwashers. Make sure the screen holes in the basket are clear before assembly, if not, scrub again with
soap steel wool pad, rinse and assemble as instructed on page 6.
9
ATTENTION: IMMERSING, SPRAYING, OR HOSING THE POWER UNIT WILL VOID YOUR
WARRANTY. Do not immerse or spray the base and castle sections of the unit with water or other liquids.
The base, motor housing, and castle sections should only be cleaned with a damp cloth or sponge. It is
important that the rims of the castle and top be wiped thoroughly before assembly. Never spray or wash the
exposed shaft of the machine. The motor and electrical parts of the machine are not waterproof. Contact
with water or other liquids will damage the motor, bearings, and electrical system.
NIGHTLY CLEANING WITH “CLEAN CUT” CLEANING PRODUCT (recommended)
* Mix 1/3 cup Clean Cut powder in a plastic bucket large enough to hold the juice pan with enough hot
water to dissolve it.
* Put the cutter plate, blade nut, and pusher in the bottom of the bucket.
* Scrub the basket with steel wool to remove any loose pulp. Place it (upside-down) over the cutter plate.
* Place the juice pan (upside-down) over the basket.
* Add enough hot water to cover the parts by two inches. Let the parts soak overnight.
* In the morning, remove the parts from the solution, scrub the basket with steel wool to remove any
remaining pulp or stains. Rinse basket thoroughly.
* Clean the juice pan thoroughly to remove all stains. Use a bottlebrush to clean the juice pan spout. Rinse
thoroughly.
* Use a scrub brush to clean the cutter plate. Rinse thoroughly.
* Thoroughly clean latch assembly, with particular attention to the adjustment thread.
* Assemble machine as instructed on page 6.
(Clean Cut is a product available through Nutrifaster, Inc. only. Please feel free to call with any
questions regarding this product.)
10
MAINTENANCE CLEANING DURING THE DAY. If you are using the juicer intermittently, pulp
residue may collect and dry on the basket. This may cause vibration during use. To prevent this vibration,
remove the basket after more than one half-hour of idle time, and rinse it under hot water. Before
reassembling, make sure all holes are free of any pulp residue.
PROPER CARE OF YOUR BASKET IS ESSENTIAL. Your basket is engineered to provide the finest juice
possible. It is constructed with very fine stainless steel, and has been precisely balanced to provide vibrationfree operation. Proper cleaning and handling are necessary to ensure the best possible operation of your
juicer.
LATCH ADJUSTMENT. The threaded latches on your machine may need future adjustment. The latches
should require some pressure when putting the lid on the machine. You should hear an audible SNAP when
properly adjusted. To adjust the latch tension, follow these steps:
1. Loosen the hex head nut (7/16” wrench) on the threaded part of the latch several turns.
2. To tighten the latch, turn the hook part of the latch clockwise.
3. To loosen the latch, turn the hook part of the latch counter-clockwise.
4. Check the tension. Re-adjust, if necessary.
5. Retighten the hex head nut.
THE 16 BLADE CUTTER PLATE CAN BE RESHARPENED. The cutter plate in your juicer is designed
to be resharpened. The 16 cutting blades on the cutter plate should be resharpened when dull. Nutrifaster
offers a sharpening service and recommends that the cutter plate be resharpened every 2-4 months under
regular use. Please feel free to call Nutrifaster if you have any questions about when to have your cutter
plate sharpened.
11
HOW IT WORKS
The N450® juicer works by centrifugal force. The motor turns the basket and cutter plate at 3,450
revolutions per minute. This causes air to be drawn through the holes in the top and bottom of the machine,
forcing air out of the pulp ejection tube.
When the produce is pushed through the hopper, the cutter plate works with the mating plate to shred the
produce. The rotation forces the shredded pulp onto the basket screen; then the airflow and rotation passes
the pulp across the screen. While the pulp is moving across the screen, the juice is being forced through the
holes of the basket into the juice pan and out of the spout. At the same time, the waste pulp is blown out of
the pulp ejection tube.
The basket and cutter plate are the critical components in the operation and efficiency of your machine.
Therefore, great care must be taken in the handling and cleaning of these parts. A dented or badly stained
basket will cause a drop in efficiency of the machine, and if problems aren't corrected promptly, more
damage could occur.
The 16 blade cutter plate needs sharpening periodically. The indications of a dull cutter plate are:
1.
Reduction in juice yield (more produce than usual to make a drink).
2.
Vibration during juicing (if basket is clean).
3.
Pulp that is much wetter than usual.
Nutrifaster offers a resharpening service, please feel free to call if you have any questions about when
and how to get your cutter plate sharpened.
A common question is, "Why isn't the pulp completely dry?” A centrifugal pulp extraction juicers will not
extract 100% of the juice. The only way to extract 100% is by not extracting the pulp - but then you'd have
to clean out the basket between every juice extraction. This isn't practical in busy juice bars!
YIELD
Juice yield is governed by a number of things:
1.
Freshness of produce
2.
Produce in or out of season
3.
Organic vs. non-organic produce
If you start noticing drops in yield or performance of the machine, ask yourself the following questions:
1.
Have I changed my produce supplier?
2.
Is the produce in or out of season?
3.
Is produce as fresh as usual?
12
TROUBLESHOOTING GUIDE
Don't Panic....
Many potential problems can be avoided through proper care and maintenance. If you do experience
machine vibration or other problems, consult this guide before calling for service.
TROUBLE
Machine won’t start
POSSIBLE CAUSE
• No power to machine.
• Manual overload protection
tripped.
•
Damaged electrical cord.
SOLUTIONS
Turn OFF and UNPLUG.
Check circuit breaker.
Check plug at outlet (Check the
outlet by plugging something else
into it.).
Turn OFF and UNPLUG. Let
machine cool down.
Reset manual overload button. See
page 13 for instructions.
Turn OFF and UNPLUG. Check
electrical cord for any breaks in the
insulation or open circuits. If
problem found call Nutrifaster.
Motor Stops While Juicing
•
Loose electrical wires at
switch or switch damaged (if
switch is in the ON position
and light is off).
Turn OFF and UNPLUG.
•
Loss of power to machine.
Turn OFF and UNPLUG.
Check circuit breaker.
Check plug at outlet.
(Check the outlet by plugging
something else into it.)
•
Overheating (if switch is in the
ON position and light is on).
Turn OFF and UNPLUG. Reset
manual overload button after machine
cools. See page 13 for instructions.
•
Switch damaged.
Turn OFF and UNPLUG.
Check wiring at switch. Call
Nutrifaster.
Call Nutrifaster for
replacement switch.
13
TROUBLE
POSSIBLE CAUSE
SOLUTIONS
Excessive Vibration
• Pulp sticking to basket.
Basket dented or damaged, replace
basket. Basket Discolored (brown
color), clean basket thoroughly, soak
overnight in Clean Cut solution (See
directions on page 9).
Latches loose, tighten latches by
turning clockwise. Ensure even
tension on both sides.
Latch tension uneven; adjust to ensure
even tension on both sides.
Dull cutter plate, needs sharpening.
Cover rattles or latches come
undone.
•
Loose latches.
Adjust and or tighten latch arms.
Pulp is too wet.
•
Holes in basket are clogged.
•
Dull cutter plate.
Clean basket (see instructions for Clean
Cut).
Sharpen cutter plate.
•
Clogged discharge opening.
Clean out pulp discharge tube.
Pulp does not exhaust, but no
vibration problems.
MOTOR RESET PROCEDURE
The motor has an automatic safety shut-off to avoid overheating. When it detects an overload, it
automatically cuts off the power. It will not reset itself. There is a manual reset push button on the base of
the motor.
If your machine turns off while in use, allow the machine 15 minutes to cool.
To reset, switch OFF the machine and UNPLUG cord from outlet. Disassemble machine per instructions on
page 5. Turn the machine upside down so it is sitting on the castle. The red reset switch on the bottom of
the motor is accessible through the hatch on the base screen. Loosen the phillips screw and slide the hatch to
expose the switch. Firmly push on the red switch (you may hear an audible CLICK sound). Slide the hatch
door back into position and tighten the phillips screw. Turn the machine upright and reassemble per
instructions on page 6. If the machine stalls again, contact Nutrifaster at 1-800-800-2641.
14
TIPS ON JUICING
THE SAFE HANDLING, CLEANING, AND PROCESSING OF FRUIT/VEGETABLE, AND THE PROPER CLEANING AND
SANITIZING OF EQUIPMENT ARE ESSENTIAL TO HELP REDUCE THE RISK OF FOOD BORNE ILLNESS. CONSULT
YOUR LOCAL HEALTH DEPARTMENT TO DETERMINE THE ADEQUATE METHODS OF CLEANING AND
STORING THE PRODUCE PRIOR TO JUICING, AND STORING YOUR JUICES AFTER JUICING. FOLLOWING
ARE SOME RECOMMENDATIONS TO REDUCE RISK.
1.
2.
3.
4.
5.
6.
YOU NEED TO WASH ALL FRUIT/VEGETABLES IN CLEAN FRESH WATER. YOU MAY WISH TO DIP FRUITS
AND VEGETABLES IN A CHLORINE BLEACH SOLUTION FOR 3-5 MINUTES AND THEN RINSE THEM OFF.
USE ON TEASPOONFUL OF BLEACH PER GALLON OF COOL WATER. RINSE OFF FRUIT/VEGETABLES AFTER
DIPPING IN BLEACH. ITEMS SUCH AS CARROTS AND OTHER ROOT VEGETABLES CAN BE PEELED AS A
PRECAUTIONARY MEASURE.
WASH YOU HANDS THOROUGHLY BEFORE HANDLING CLEAN FRUIT/VEGETABLES
YOU NEED TO WASH, RINSE, AND SANITIZE UTENSILS/KNIVES BEFORE CUTTING FRUIT/VEGETABLES.
SEPARATE CUTTING BOARDS FOR FRUITS AND VEGETABLES ARE NEEDED UNLESS
CLEANING/SANITIZING OCCURS BETWEEN EACH USE.
IF YOU DO NOT DRINK THE JUICE IMMEDIATELY, PUT IT IN THE REFRIGERATOR OR IN ICE.
THOROUGHLY CLEAN JUICE MACHINES ACCORDING TO THE INSTRUCTIONS IN THIS MANUAL.
STORE JUICE AT 45 DEGREES F. OR BELOW DURING REFRIGERATED STORAGE OR ICED STORAGE.
REPLENISH ICE AS IT MELTS. TO KEEP THE PRODUCE COLD THE LEVEL OF ICE MUST BE WITHIN 1 INCH
OF THE TOP OF THE CONTAINER.
*
WEAR GLOVES SUITABLE FOR PRODUCE HANDLING DURING PREPARATION AND JUICING.
*
CITRUS FRUIT SHOULD BE CUT JUST A LITTLE LARGER THAN THE FEED HOLE SO FOOD CAN BE
WEDGED IN AND THEN PUSHED THROUGH WITH A PLUNGER.
*
ALL OTHER PRODUCE SHOULD BE CLEANED AND CUT TO FIT THE HOPPER. THE LARGER THE
BETTER; LESS PREP = HIGHER EFFICIENCY.
*
ON MIXED DRINKS, ALTERNATE PRODUCE GOING THROUGH THE HOPPER. FIRMER VEGETABLES
SHOULD FOLLOW LEAFY GREENS, APPLES, AND STRINGY VEGETABLES SUCH AS CELERY.
*
ALWAYS END WITH FIRMEST PRODUCE, AND PUSH THROUGH FAST AND HARD. THIS HELPS IN THE
PULP EXTRACTION.
*
THE MOTOR IN THE N450® IS A HEAVY-DUTY INDUSTRIAL MOTOR. IT IS DIFFICULT TO OVERLOAD IT
IN THE JUICING APPLICATION, SO PUSH FOOD THROUGH FAST. NOT ONLY DOES THIS HELP IN
EXTRACTION, IT INCREASES EFFICIENCY.
*
BUNCH UP LEAFY GREENS AND PUSH THROUGH USING A CARROT OR OTHER HARD VEGETABLE.
THIS HELPS TO INCREASE THE YIELD.
*
LIMES ARE VERY BITTER, SO WE SUGGEST YOU SQUEEZE LIME INTO YOUR DRINKS, RATHER THAN
JUICING IT WHOLE.
*
ORANGES AND GRAPEFRUIT: PEEL OFF THE BITTER TASTING ZEST, LEAVING THE WHITE PITHY PART
ON. THE PITH CONTAINS BIOFLAVONOIDS AND VITAMIN C.
*
TROPICAL FRUITS SUCH AS KIWI AND PAPAYA SHOULD BE PEELED. THEY ARE OFTEN GROWN IN
FOREIGN COUNTRIES WHERE CERTAIN FERTILIZERS, ILLEGAL IN THE US, ARE STILL BEING USED.
*
PINEAPPLES - JUST SCREW OFF TOP, SLICE REMAINDER INTO LONG STRIPS, LEAVING HUSK ON.
ALWAYS JUICE THE HARDER CORE OF THE PINEAPPLE LAST. THIS HELPS IN THE PULP EJECTION.
THE SKIN OF PINEAPPLE CONTAINS THE ENZYME BROMELAIN, WHICH IS REPORTED TO HELP IN THE
DIGESTION OF PROTEIN (GOOD FOR PEOPLE WHO OVERINDULGE IN MEAT AND DAIRY FOODS), AND
MAY ALSO HELP TO REDUCE SWELLING AND JOINT PAIN.
15
*
THE MOST FREQUENTLY ASKED QUESTION IS: DO WE NEED TO CLEAN MACHINE OUT AFTER
EVERY USE WHEN SWITCHING FROM ONE DRINK TO ANOTHER?
THE SIMPLE ANSWER IS NO. THERE ARE THREE WAYS TO AVOID TAINTING:
1.
2.
3.
PUSH THROUGH A QUARTER OF AN APPLE BETWEEN DRINKS. APPLE HAS A VERY SUBTLE
TASTE AND WILL NOT BE TASTED IN THE NEXT JUICE.
BEFORE MAKING THE NEXT JUICE, PUSH A PIECE OF THE MAIN INGREDIENT THROUGH FIRST,
CATCHING JUICE IN A WASTE CUP OR CONTAINER.
POUR WATER SLOWLY THROUGH THE FOOD CHUTE BEFORE MAKING THE JUICE. THE
MOTOR IS SEALED SO NO HARM CAN BE DONE. THIS IS THE MOST COST-EFFICIENT METHOD.
IF YOU HAVE ANY QUESTIONS, PLEASE CALL NUTRIFASTER, INC. AT 1-800-800-2641.
16
PARTS DIAGRAM
FOOD PUSHER
TOP
LATCH STRIKE
THUMB SCREW
MATING PLATE
PULP TUBE
BLADE NUT
CUTTER, SHREDDER
(OPTIONAL)
CUTTER, 16 BLADES
BASKET
JUICE PAN
CASTLE
HUB
INTERLOCK SWITCH
LATCH
POWER CORD
BASE
POWER SWITCH
RUBBER FOOT
WRENCH FOR NUT
NUTRIFASTER COMMERCIAL JUICE EXTRACTOR – MODEL N450
17
PRODUCT LABEL LOCATIONS
CAUTION – Sharp moving parts
within. Turn off the machine an
unplug before removing lid.
(Located underneath, on Base Screen Enclosure)
SWITCH GUARD and
SPLASHGUARD IN PLACE
IF THE SWITCH GUARD OR SPLASHGUARD IS MISSING OR DAMAGED, PLEASE CONTACT
NUTRIFASTER FOR REPLACEMENT.
IF ANY LABELS ARE MISSING OR ILLEGIBLE, PLEASE CONTACT
NUTRIFASTER FOR REPLACEMENT LABELS.
18
ONE YEAR LIMITED WARRANTY
Call Us for Help, Repair or Replacement
1-800-800-2641
Nutrifaster, Inc.'s warranty policy for the N450® Commercial Juice Extractor covers one
year on parts, and 90 days on labor. For one year from the date of purchase, Nutrifaster
warrants your machine against defects in parts and workmanship, and will, at its option,
replace parts at no charge.
During the first three months of this limited warranty period, Nutrifaster, Inc. will, at its
option, repair or replace this product with no charge for labor or parts. Cost of round trip
shipping to Nutrifaster, Inc. is not included. This limited warranty excludes normal wear and
tear on the cutter plate and pulp tube. This warranty extends only to the original
purchaser, and is not valid outside the United States.
Most often, operational questions can be addressed over the telephone; please call
Commercial Operations for assistance. If appropriate, we may authorize you to return the
machine for our review. You must receive a Return Authorization Number before returning
the juicer, postage-paid and insured, to Nutrifaster, Inc. Upon review, we may repair your
used machine or replace it with a comparable, reconditioned juicer. Please note: You must
pay the shipping costs to return the juicer to Nutrifaster, Inc. We will cover the expense for
returning the repaired or replaced juicer to you.
THE FINE PRINT (LIMITATIONS)
Follow Directions and Use the Juicer Properly - Failure to do so will void your Warranty.
Your warranties do not apply if your juicer is found to have been abused, mishandled,
damaged from service by non-authorized repair services, tampered with, or damaged by your
negligence, accident or misuse. Your warranty does not cover damages incurred in transit to
us; please use adequate packaging and insure your shipment to protect against loss.
Under no circumstances shall Nutrifaster, Inc. be liable for any loss or damage (direct,
indirect, incidental, special, consequential, or punitive) arising out of or in connection with
the use of this product. Nutrifaster, Inc.'s liability shall not exceed the purchase price paid.
The warranty terms and remedies are in lieu of any and all other warranties, express or
implied, including warranties of merchantability and fitness for a particular purpose. (Some
states do not allow the limitation or exclusion of incidental or consequential damages, so the
above limitation or exclusion may not apply to you.)