1
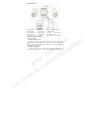
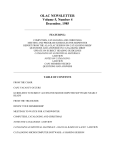
High Definition DVR
User Manual
m
m
o
e
t
c
.
s
g sy
b
s ia
v
d ed
.
w
m
i
w
t
l
w
u
m
&
o
i
d
Ver:
Ver:12.1
12.1
r
ca
u
a
Diagram on Buttons
1. MIC interface
2. TF slot
3. Knob
4. USB interface
5. GPS interface
6. AV interface
7. MIC indicator
8. Power indicator
9. REC indicator 10. Screen 11. MIC button
12. REC button
13. <OK> button 14. <Menu> button
15. <Power> button 16. Pedestal
17. Reset button 18. Cable slot
Description of Button Functions
1. <Power> Button
Function 1: Power on/off
In power-off state, press the <Power> button to power on this DVR. Then,
the DVR begins to work automatically. In power-on state, press and hold the
<Power> button for five seconds. Then, the DVR saves the video-recording file
automatically and is powered off.
Function 2: Backlight
In power-on state, press the <Power> button to disable the backlight of the
screen, and press any button to resume the backlight of the screen (This
r
ca
u
a
m
m
o
e
t
c
.
s
g sy
b
s ia
v
d ed
.
w
m
i
w
t
l
w
u
m
&
o
i
d
function only acts upon the backlight of the screen without affecting the
videorecording function).
2. <Menu> Button
Function 1: Menu button
In standby state, press the <Menu> button to enter the function setting
table of the main menu. Press the <REC> or <MIC> button to select the desired
option, and press the <OK> button to confirm the selected option. After
completing the setting, press the <Menu> button to exit the menu setting
function.
3. <OK> Button
Function 1: Locking
During the video-recording process, press the <OK> button to save the
video-recording data into a separate folder in the memory card. The files in the
folder will not be overwritten cyclically.
[Note] In playback mode, a key-shaped icon in the miniature icon list indicates
that the audio recording is locked.
Function 2: Photograph
In photograph mode, press the <Record> button to take photos.
Function 3: Confirmation
During the menu setting process, press the <OK> to confirm the settings.
Function 4: Play
In playback mode, press the <OK> button to play video data and press the
<OK> button again to suspend the playing of video data.
Function 5: Escape
In playback mode, press and hold the <OK> button for five minutes to
switch the current interface to the recording interface.
4. <REC> Button
Function 1: Page up
In the menu setting and playback modes, you can press <Up>to page up.
Function 2: Fast Backward
In playback state, press the <REC> button to enter the fast backward mode.
Function 3: Video-recording
In standby state, press the <REC> button to begin to record, and press the
<REC> button again to stop recording.
r
ca
u
a
m
m
o
e
t
c
.
s
g sy
b
s ia
v
d ed
.
w
m
i
w
t
l
w
u
m
&
o
i
d
5. <MIC> Button
Function 1: Page down
In the menu setting and playback modes, you can press the <Down> button
to page down.
Function 2: Fast Forward
In playback state, press the <MIC> button to enter the fast forward mode.
Function 3: Mode switching
In standby state, press the <MIC> to enter the photographing mode, and
press the <MIC> again to enter the playback mode. On the playback interface,
you can page up/down and press the <OK> to select the desired file.
Function 2: Disable the audio-recording function
In recording mode, press the <MIC> button to disable the audio-recording
function. Then, the MIC indicator is turned off. Press the <MIC> button again
to enable the audio-recording function. Then, the MIC indicator is turned on.
6. <Reset> Button
If the DVR is crashed, press the <Reset> button to power off the DVR.
Operation Guide
I.
Installing the DVR
1. Power off the automobile engine.
2. Insert the TF card into the TF slot.
[Note]
a. The 1080P format is adopted for the video-recording function, and
a large amount of data is generated for the video-recording function. To prevent
system crash, you are recommended to use a well-branded high-speed TF card
(Class 6 or above) with a capacity of at least 4 GB. The TF card supports a
maximum capacity of 32 GB.
b. The data recorder does not support hot plugging of the TF card. Be
sure to remove the TF card after powering off the data recorder.
3. Secure the DVR to the front windshield of the automobile.
[Note] You must mount the DVR in a safe place with ample light.
Preferably, the DVR should be mounted on both sides of the rearview mirror.
Before pasting and mounting the DVR, clear the impurities and moisture in the
pasting position by using a clean and soft cloth.
r
ca
u
a
m
m
o
e
t
c
.
s
g sy
b
s ia
v
d ed
.
w
m
i
w
t
l
w
u
m
&
o
i
d
4. Fix the power cable properly by using the cable slot and cable clip,
preventing the line of sight from being affected.
5. Insert the in-vehicle charger into the cigar lighter of the automobile.
6. Insert the charging interface of the in-vehicle charger into the USB
interface of the data recorder.
7. Adjust the angle of the data recorder, ensuring that the camera lens keeps
level with the ground.
8. Start up the engine and check whether the DVR is mounted properly.
II. Function Description
1. Automatic Recording
After you start up the automobile engine, the DVR is automatically
started and the recording function is enabled. In addition, the system indicator
and power indicator are turned on, and the REC indicator on the screen blinks.
After you turn off the automobile engine, the DVR saves the recorded content
automatically and is powered off. The recorded images are saved segment by
segment in the TF card. When the TF card saves recorded images at full
capacity, the data recorder overwrites the early recorded images.
[Note] a. You can set the time period of recording in a menu. The time
period can be set to 1 minute, 3 minutes, and 5 minutes. The default time
period is 3 minutes.
2. Manual Recording
Press the <Power> button, and then the DVR is powered on and begins to
record data automatically. Press and hold the <Power> button for 5 seconds, and
then the DVR saves the recording data automatically and is powered off.
3. Photographing Function
In standby state, press the <MIC> button to enter the photographing mode.
Then, the icon in the upper left of the screen is changed from a video camera to
a still camera. You can press the <OK> button to take photos. To switch back to
the video-recording mode, press the <MIC> button and press and hold the
<OK> button for five minutes.
4. Motion Detection Function
In standby sate, press the <Menu> button to enter the setting menu. Press
the <Down> button to move the cursor to the <Motion Detection> option, and
set its state to <On>. Press the <REC> button to enter the motion detection
r
ca
u
a
m
m
o
e
t
c
.
s
g sy
b
s ia
v
d ed
.
w
m
i
w
t
l
w
u
m
&
o
i
d
mode. If the lens senses a moving object peripherally, the data recorder enters
the video recording state. If the lens does not sense any moving object within 60
seconds, the data recorder stops video recording. To exit the motion detection
mode, enter the menu again, and set the state of the <Motion Detection> option
to <Off>.
[Prompt] If you need to use the motion detection function for a long period,
purchase portable power supply separately.
5. Collision Sensing
The DVR is fitted with a built-in collision sensor (G-sensor). In case of
severe vehicle collision, the DVR locks the image data generated at the time of
the accident, and displays a lock icon in the middle of the screen.
[Prompt] The collision sensor (G-sensor) supports sensitivity adjustment.
By default, sensitivity adjustment is <Off>. You can change the sensitivity
settings as needed in the setting menu.
6. Date and Time Setting
In standby state, press the <Menu> button twice to enter the system setting
menu. Press the <Down> button to move the cursor to the <Set the date> option.
Press the <OK> button to confirm it, and enter the <Setting> menu.
[Prompt] Press the <Up> and <Down> buttons to select values, press the
<Menu> button to proceed to the next option, and press the <OK> button to
confirm the option and then exit.
[Note] To effectively record the date and time of obtaining the evidence of
the traffic accident, set a correct date and time before using the DVR.
7. USB Mode
Connect the data recorder to the USB interface of a PC by using a data
cable. Then, the screen displays two modes: memory and camera. Press the
<Up> or <Down> button to select the <Memory> option. Press the <OK>
button to enter the USB flash disk mode.
[Prompt] When you use a PC to copy a video-recording file, it is
recommended that you use a card reader to copy the video-recording file in the
TF card to the PC.
8. Playback of Recording File
In power-on state, press the <MIC> button twice to enter the playback
mode. Press the <Up> or <Down> button to find the desired type of file, and
r
ca
u
a
m
m
o
e
t
c
.
s
g sy
b
s ia
v
d ed
.
w
m
i
w
t
l
w
u
m
&
o
i
d
press the <OK> button to play back the file.
9. PC Camera
Connect the data recorder to the USB interface of a PC by using a data
cable. Then, the screen displays two modes: memory and camera. Press the
<Up> or <Down> button to select the <Camera> option. Press the <OK> button
to enter the PC camera mode.
After a driver is installed in the PC, <My Computer> displays the camera
icon. Double-click the camera icon to turn on the camera.
10. GPS tracking(Optional)
When the car DVR open up, the screen will show “NO GPS” if there is no external
GPS module connected to the gps port. And the GPS module connect to the device, it will
show red GPS icon. When the icon turns white, it means positioning successfully. From now
on, as long as you use the recorder function, the treading track will be recorded in the video
files. It will also show the temporal longitude and latitude, speed, and driving track if you
use the dedicated video player.
Note:
Please select the “GPS” to open from the setting of menu before you use GPS;
This function will be only worked with the dedicated external GPS module & video player.
Technical Specifications
Built-in Imaging Sensor
Angle of View
Shooting Resolution Rate
Frame Rate
Video Compression Format
Video Output Mode
Screen Size
Storage Temperature
Operating Temperature:
Operating Humidity
Capacity of Memory Card
Standard Voltage
r
ca
3 Megapixel
170° wide angle
FHD1920×1080 and HD1280×720
30FPS@HD1080P and 60FPS@HD720P
H.264
NTSC/PAL
1.5-inch
-20°C to 70°C
-10°C to 60°C
15% to 65% (RH)
4 GB to 32 GB
DC5V
u
a
m
m
o
e
t
c
.
s
g sy
b
s ia
v
d ed
.
w
m
i
w
t
l
w
u
m
&
o
i
d
r
ca
u
a
m
m
o
e
t
c
.
s
g sy
b
s ia
v
d ed
.
w
m
i
w
t
l
w
u
m
&
o
i
d