1
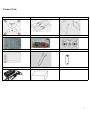
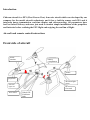
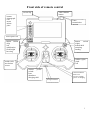
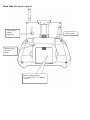
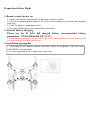
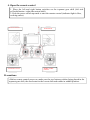
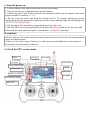
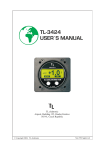
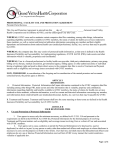
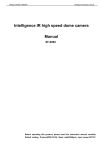
QW Four-Axis Aircraft
Operation Instruction
Operation Instruction
Content
Disclaimer:..................................................................................................................................................................3
Precautions for Product Use..................................................................................................................................... 4
Precautions for Battery Use and Charging............................................................................................................. 5
Product List:...............................................................................................................................................................6
Introduction................................................................................................................................................................7
Aircraft and remote control instructions.................................................................................................................7
Preparation Before Flight....................................................................................................................................... 12
Test Flight................................................................................................................................................................. 11
Loss of control and one key return.........................................................................................................................15
Low voltage protection............................................................................................................................................ 17
Description of indicator lights.................................................................................................................................17
Intellectual Property Rights....................................................................................................................................19
5
Disclaimer:
Any user should read the statement carefully before using QW four-axis aircraft, once using this
product, you are deemed to have approved and accepted the overall content of the statement.
QW aircraft is an excellent multiaxis aircraft, in the circumstance that the power supply is normal
and the components are not broken, the aircraft can supply remarkable flight experience. Although
the aircraft has been equipped with intelligent control system which can make it stay in the safest
operating state when being powered up, we still intensely advise you to take down the paddle when
correcting and setting up the parameters to ensure that the plug wires of the power supply system
and other function modules are correct, and keep the aircraft away from the crowd and vulnerable,
fragile and dangerous goods. Chitwan does not assume the liabilities for damages of the personal
injury and property loss, etc. (including the direct or indirect damages) arising from the following
causes when using the product:
1. The damage is caused under the circumstance that the operator drinks alcohol, takes drugs or
narcotic drugs, the operator is light in the head, feeble and sick, or has other poor physical
conditions or poor mental conditions.
2. The personal injury and property damage are caused by the operator’s subject intent.
3. Any compensation relevant to mental impairment is caused by the occurrence of the incident.
4. Assemble or control the product without complying with the correct instruction of the manual.
5. Other damages are caused by the poor running of the aircraft because of voluntarily refitting or
changing the components and accessories which are not produced by Chitwan.
6. Damages are caused by using the products which are not produced by Chitwan or using the
counterfeit of Chitwan product.
7. Damage is caused by the misoperation or fault subjective judgment of the operator.
8. The poor running of the aircraft itself due to the natural abrasion (the flight time is over 100
hours), decay and the burn-in circuit of the aircraft.
9. Air crash is caused due to the failure of landing the aircraft when it sends out low voltage
warning.
10.Know perfectly well that the aircraft is in an abnormal state, for example, there is water, oil, soil,
sand and other unknown things entering into the aircraft.
11.Damage is caused by the constraint flight regardless of the obvious malfunction of the aircraft.
12.Damage is caused by the flight in the magnetic field interference range, radio jamming district
and other no-fly zones specified by the government, or damage is caused because of the
backlight of the operator’s sight line, the operator’s blurred vision, poor sight and other
circumstances not fit for the operation.
13. Operate in harsh natural hazards such as intense fall, thunder and lighting, snow and hail, etc.
14. Damage is caused by the infringements arising from any data, audio or video fetched by the
operator by using the aircraft.
15. Damage is caused by the battery, such as the misuse of the match between protective circuit,
battery pack and the charger.
16. Other damages which do not belong to the range of responsibilities of Chitwan.
Precautions for Product Use
1. Before using the product, please accept the flight training or flight practice (for example:
conduct flight exercise by using simulator)
2. Please carefully check whether all the components are in good condition, if some components
are burn-in or broken, please do not fly.
3. Check whether the propeller and the electrical machine are correctly installed and whether they
are fixed, and make sure that the installation sites of the propeller’s forward spinning and
antidromy are correct. Pay attention not to adjoin to or touch the revolving electrical machine
and propeller to avoid being injured by them.
4. The safe take-off weight of the aircraft is less than 1.2kg to avoid the dangers.
5. Avoid the mutual interference between the remote control and other wireless devices.
6. Check whether the power supplies of the remote control, battery and all the components are
adequate.
7. Pay attention that open the remote control first, start the aircraft then. (after the flight, disconnect
the power supply of the aircraft first, then close the remote control)
8. The whole set of the aircraft should be placed in the area the child cannot touch, if the child
carelessly swallows the components of the aircraft, please immediately turn to medical
institutions.
9. The aircraft should not be close to the magnet materials, or the inner compass chip will be
destroyed, and make the flight abnormal.
10.The built-in voltage of the aircraft only supports 3S-11.1V power supply, therefore, battery with
higher voltage cannot be used.
11.Please use the original electrical machine of Chitwan and the paddle of 8 inches, please do not
use other electrical machine and paddle.
12.If you use your own electronic equipment, please close its wireless function not to make the
remote control and video transmission disturbed.
5
Precautions for Battery Use and Charging
1. The battery should not be placed in water, the battery should be kept in cool and dry area if it will
not be used for a long time.
2. Forbid the mixed use of the battery of other type and variety.
3. Please use the charger conforming to the specification when charging, and check the correct
connection of the positive and negative electrodes of the battery.
4. Please do not put the battery into the fire or heat the battery, and forbid to hit the battery by using
the hard things.
5. The battery should not be kept or used in extremely hot environment, or the battery will be
overheating and may ignite itself.
6. Forbid to use the battery in strong static area, or the electronic protection chip will be broken and
result in the peril.
7. If the battery fluid is carelessly adhered to the eyes, please do not wipe, instead, wash the eyes by
water and turn to the medical institutions.
8. If the battery gives out peculiar smell and emits heat, is out of shape and discolored, and other
abnormal phenomenon appears, please do not use; if the battery is being used or being charged,
please stop using it immediately.
9. The battery should not be discarded at will, it is necessary to discharge all the electricity of the
battery and use the insulated rubber tape to insulate the outgoing end of the battery.
Product List:
Fuselage
Paddle
Foot stool
3S charger
3S lithium battery
Remote control
Viewing screen
Wrench of the paddle
Battery of the remote control 1×4
Charger of the remote control
Bag of the materials
5
Introduction
Chitwan aircraft is a FPV (First Person View) four-axis aicraft which was developed by our
company for the model aircraft enthusiasts, and it has a built-in camera and GPS and it
integrates image transmission, real-time display and videorecording. All parameters have
been set before delivery and users just need to conduct simple installations of the propellers
and batteries before realizing the FPV flight and enjoying the real fun of flight.
Aircraft and remote control instructions
Front side of aircraft
motor
rotation
battery
compartmen
motor
propellers
direction light:
green
direction
light: red
FPV camera
foot rack
Unlock/GP
S indicator
light
Front side of remote control
screen clip
video channel
button
button:
photograph
exit
menu
minusplus+
video
transmission
antenna
screen power on
button
switch
(right)
neutral shift
returning
landing
button switch
(left)
self
stabilization
fixed height
hovering
rudder (right)
pitch
roll
rudder (left)
accelerator
course
control
power
switch:
boot
shutdown
charging shift
charger interface
control indicator:
blue: boot
red: low voltage
green: in charging
5
Back side of remote control
5.8G channel
number
indication
433M antenna
lithium battery
activation
button
battery compartment:
4 of 14500 (5#) 3.7V lithium
batteries
Preparation Before Flight
1. Remote control power on
1. Open up the battery compartment on the back of remote control.
2. Put into 4 standard lithium batteries of 14500 (5#) according to the positive and negative
pole logo.
3. Close the battery compartment cover.
4. Press the lithium battery activation button (necessary)
2. Aircraft battery charging
Please use the 3S LiPo full charged battery (recommended battery
parameters: 733496-2500mAH-30C-11.1V)
The maximum design input voltage is 16V and it is strictly prohibited to use the battery pack
of higher voltage for charge the aircraft.
3. Installation of propeller
1. According to the marked rotation direction, install the propellers. (the side with
8045/8045R words upwards)
2. Use the supporting tools to tighten the screw caps
4. Open the remote control
1. Place the left and right button switches on the topmost gear shift (left side
self-stabilization+ right side neutral shift).
2. Push the power switch upwards to start the remote control (indicator light is blue,
working status).
STAB self-stabilization
Accelerator lowest
Neutral shift
Rudder middle
position
Precautions
• Before remote control power on, make sure the two button switches being placed in the
topmost gear shift, the accelerator in the lowest shift and rudder in middle position.
5. Aircraft power on
1. Find an outdoor open space and put the aircraft horizontally.
2. Open up the battery compartment and put in batteries.
3. Connect the power line of the batteries to the aircraft and make sure the sound of electronic
speed controller is normal (1---3---)
4. Do not touch the rocker and keep the aircraft still for 10 seconds, waiting for system
initialization and self-inspection completion with the status indicator light slowly flashing red.
(〇〇〇〇〇〇●〇●〇●〇)
5. Put the power line into battery compartment and close the cover.
6. Wait for GPS star search positioning which takes about 30 seconds for the first time and
afterwards the status indicator light is constant blue. (●〇●〇●〇●●●●●●)
Precautions
• Before delivery, the remote control (emission) and aircraft (receiver) have been matched and
please use them in pairs.
• Please use the correct type of battery to avoid explosion and handle the useless batteries
according to the instructions of battery.
6. Check the FPV screen status
name
accelerat
roll angle
pitch angle
power on time
remote control signal
horizontal line
number of satellites
aircraft battery voltage
flight mode
warning
flight height
yaw angle
Precautions
• In order to avoid accidents, every time before unlocking except for ensuring the two button
switches in the topmost shift, check the screen to ensure it is in STAB mode and DISARMED
status and the accelerator is in the lowest shift.
• When the screen battery voltage displays lower than 11.1V, please as soon as possible land
the aircraft to avoid damage due to excessive battery discharge.
Test Flight
1. Find an outdoor open space, horizontally place the aircraft more than 3 m from you,
especially the children to avoid accidental injury.
2. Starting sequence:
(1) Check and make sure the two button switches on remote controllers in the topmost
shift, the left rocker accelerator in the lowest position and the right rocker in the middle
position.
(2) Check whether the remote signal quality on the screen is normal.
(3) Check whether the GPS searching stars are more than 6 and after positioning, the status
indicator light is constant blue.
(4) Pull the accelerator rocker to ↘ the lower right direction and hold it, waiting for
unlocking. (after unlocking the status indicator is constant red and DISARMED
disappears from the screen)
(5) Slowly push the rocker, and when the accelerator is about 20% the motor begins to
rotate and pull the rocker back to 0% to stop the motor, ensuring the accelerator working
normally.
(6) When the accelerator exceeds the middle position, the aircraft can fly and rapidly push
the accelerator to about 65% to make it fly above the ground.
(7) Pay attention to the status of the aircraft and when it flies to the appropriate height, it
can be switched to fixed-height mode (the screen shows ALTH), and under fixed-height
mode, the aircraft can be sensitively operated and controlled to fly around; at this time the
accelerator controls the flying height and try to keep it in the middle position in order to
maintain the flying height.
(8) When the flying height is stable, it can be switched into hovering mode (screen shows
LOIT), and the aircraft has a high wind resistant performance, but the flying control is not
as sensitive as that under fixed-height mode.
3. Under fixed-height or hovering mode, lower the accelerator will slowly descend the aircraft
and after pulling the accelerator to the lowest position, the mode will be switched to STAB
and the motor stops.
4. Pull the accelerator rocker to ↙the lower left and hold it, and the aircraft will be locked
(screen shows DISARMED)
5. Disconnect the power of the aircraft at first and close the remote control to complete the test
flight.
Precautions
• The built-in compass of the aircraft has a comparatively high sensitivity and is the sensor
easy to get interference; therefore, please keep it flying away from the position with much
ferromagnetic materials, otherwise the internal magnetoresistive sensor will be affected by the
ferromagnetic materials and work abnormally.
• Hovering mode is essentially constant height pressure + compass orientation + GPS
positioning, therefore, the compass cannot be disturbed to correctly keep the direction of head,
and if the direction reported by the aircraft is inconsistent with the geographic direction, it is
needed to re-calibrate the compass, please see the advanced user manual.
• Control the speed when the aircraft is landing and pay attention to the propeller ground
effect; it is better to slowly land the aircraft to avoid the aircraft landing impact which may
damage the aircraft.
• When the red indicator on the remote control lights on, it means low remote control voltage,
and in order to ensure the safety of the aircraft, please as soon as possible land the aircraft to
avoid the loss of control or crash caused by remote control abnormality.
• When put the Flying Tiger inside a car, please keep it away from the loudspeaker to avoid the
compass being affected.
Loss of control and one key return
The aircraft has built-in compass and GPS, and for every flight mission, the
unlocking position is the returning location.
Loss of control protection mechanism:
1. If remote control signal loss is more than 5 seconds, the aircraft will automatically enter into
the automatic landing mode.
2. When the battery voltage is lower than 10.5V, he aircraft will automatically enter into the
automatic landing mode.
* above is the default setting, and advanced users can make modifications on the host
machine.
Trigger conditions for returning:
1. Manually switch to the returning shift to trigger the returning.
2. Advanced users set the trigger conditions of returning on the host machine and the specific
conditions are reached.
Returning process:
back to
middle/hovering
recording returning
point
returning
point
switch to returning
aircraft
ground
returning ready
returning
returning
height difference from returning
point>3 meters
Going Up first
landing at a speed of 0.5 m/s
height difference from returning
point≤3 meters
Precautions
• Advanced users can set trigger conditions for returning on the host machine, such as loss of
remote control signal, battery voltage too low as well as setting the returning movement and
landing speed, etc. Please see the advanced users manual for details.
• During returning, the aircraft will reach the specific height (default is 3 meters) at first, and
after stabilizing the attitude, it will directly fly to the returning location and then landing at a
speed of 0.5 m/s until successful landing.
• Any time during returing, users can take over the control of the aircraft with the remote control
to switch the flying mode and interrupt the returning.
• The error of civil GPS is within 2 meters circle and experienced pilots shall ensure the
returning location is open without obstacles.
• In order to ensure correct returning, ensure the GPS satellites are more than 6 before
unlocking, and more than 10 is better.
Low voltage protection
Aircraft three-level voltage alarm protection mechanism:
1. When the aircraft voltage is lower than 11.1V, the remote control screen will give warning
“Battery Low!”, and it is necessary to return and land the aircraft as soon as possible to
replace the batteries.
2. When the battery voltage is lower than 10.8V, the four-axis electronic speed controller
red/green indicator lights of the aircraft will slowly flash, and it is necessary to return and
land the aircraft as soon as possible to replace the batteries.
3. When the battery voltage is lower than 10.5V, the aircraft will be forced to land for
replacing the batteries.
Remote control two-level voltage alarm protection mechanism:
1. When the remote control voltage is lower than 14.8V, the indicator light is constant red,
meaning the voltage is low and only 5 minutes may be left for endurance and it is
necessary to recharge the remote control as soon as possible.
2. When the remote control voltage is lower than 13.8V, the buzzer will send out “BB” alarm,
meaning the current voltage is extreme low and continuous use may lead to loss of control
and it shall immediately stop the aircraft and replace the batteries.
Precautions
• Wireless video transmission is a part of large power consumption,and if the aircraft voltage
is too low, the batteries shall be replaced as soon as possible to avoid over discharging.
Description of indicator lights
Aircraft Unlock/GPS status indicator lights
●Red : Slow flash--- not unlocked
Constant light--- unlocked
●Blue : Slow flash--- in positioning Constant light--- positioning OK
●Green : Constant light--- returning or landing
The indicator lights are composed of three R/B/G independent lights to make separate
indicating, therefore, sometimes there will be a color overlap phenomenon such as red plus
blue looks like purple●+●=●, and make the judgement according the actual slow flash or
constant light.
Remote control indicator light
●Red : Constant light---normal working status, sufficient voltage.
●Blue : Constant light---remote control battery pack voltage is lower than 14.8V, and it is
necessary to connect it with adapter for recharging.
●Green : Quick flash---abnormal recharging (please check whether the switch is in the
recharging shift or certain battery is damaged).
Constant light---normal recharging and after charging, the green light goes out.
Intellectual Property Rights
The intellectual property rights of this product and manual belongs to Chitwan,
and without the written authorization any organization or individual shall not
make any form of reprint, copy or publication. In case of reference and
publication, the source of Chitwan shall be indicated and no reference,
abridgement or modification which is contrary to the Operation Manual shall be
made.
If you encounter any problem that cannot be solved during installation, please
get in touch with the duly authorized agents by Chitwan.