1
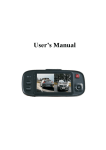
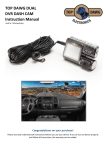
HD Review Mirror Recorder
User manual
Contents
Chapter I:Appearance and Installment .........................................................................................................................................................................................
1.1 Host drawing ...............................................................................................................................................................................................................................
1.2 Power line drawing ....................................................................................................................................................................................................................
1.3 Remote control drawing ............................................................................................................................................................................................................
1.4 Installation ..................................................................................................................................................................................................................................
Chapter II:Functional Description ...............................................................................................................................................................................................
2.1 The power key .............................................................................................................................................................................................................................
2.2 Turn on/off screen ........................................................................................................................................................................................................................
2.3 The locking function ......................................................................................................................................................................................................................
2.4 MODE ...........................................................................................................................................................................................................................................
2.5MENU............................................................................................................................................................................................................................................
2.6 Page up / Motion detecting.............................................................................................................................................................................................................
2.7 Page down//MUTE ........................................................................................................................................................................................................................
2.8 Video/ OK ...................................................................................................................................................................................................................................
2.9 RES
.........................................................................................................................................................................................................................................
Chapter III:Operation Instruction ............................................................................................................................................................................................
3.1
Automatic Recording ..................................................................................................................................................................................................................
3.2 Manual Recording .........................................................................................................................................................................................................................
3.3 Photograph ...................................................................................................................................................................................................................................
3.4 Motion Detection ...........................................................................................................................................................................................................................
3.5 Collision Induction
...................................................................................................................................................................................................................
3.6 Locked...........................................................................................................................................................................................................................................
3.7 Date and Time Setting....................................................................................................................................................................................................................
3.8 MUTE ...........................................................................................................................................................................................................................................
3.9 USB Flash Disk .............................................................................................................................................................................................................................
3.10 Video File Playbackl ....................................................................................................................................................................................................................
3.11 GPS (optional) ...........................................................................................................................................................................................................................
3.12 Review video/ Reversing Visual..................................................................................................................................................................................................
Chapter IV : Product Specification ...........................................................................................................................................................................................
Chapter V:Warranty Card
.......................................................................................................................................................................................................
Chapter I: Appearance & Installation
1.1 Host
0.BMW power interface
1. Display
2. Forward camera
3. Rear-view mirror
4. Bluetooth earphone
5.Screen switch
6. .Power switch
7.Lock
8. Headset charger
9.MODE
10.MENU
11. Page up
12.Page down
13. OK
14.Remote control receiver
15.Earphone jack
16.TFcard slot
17.Recorder
18. Radar USB interface
19.GSM slot
22.MIC
23.Reset
USB interface
20. Stretch clamp
21.Speaker
24.Speaker
25.MIC
1.2 power line
26. Power interface
27.Power line
28. Video detection
29.Back camera
30.camera line male
31. Extension female
32. Extension female
33.Car charger switch
34.Car charger female
35.Yellow ACC
36 camera line female
37.Fuse box
38.Red power positive
39.Blackpower negative
40. Video detection
41.AV in
42. .Car charger male
1.3 Remote control keypad (optional)
41. Power key
42. Video mode
43. Left key
44.OK
45.Fill flash
46.Fast forward
47.MENU
48. Photographs
49. Motion detection
50. Mute
51. Video playback
52.Up/lock
53.Right
54.Down
55.Fast rewind
56. Camera switching
57.Esc
1.4
Installation instructions
1.4.1 Installation method I ( no time-lapse REC)
1.
Test all function before you install, confirm that no further problems.
【Warming】Please use the higher class TF card (Class6 above), the capacity of the card is not less than 512
MB and maximum capacity is 64GB.
2.
Fixed the recorder in the rearview mirror of the car. Connect graph 0 with graph 26,then follow with graph 58,
When connect Visual extension, please connect graph 32 with graph 36 and connect graph 31 with graph 30.
Connect graph 28 with positive of reversing lamp, then connect car charger graph 34 with graph 42. Insert the
car charger to the car cigarette lighter turn on graph 33.
【Warming】The charging extension cord can be run up along the edge of the windscreen.
【Warming】our review mirror power on will power on and cut off will shut down.
【Warming】When the machine is installed correctly, the recorder enter into recording state, please check if the
display screen is normal, such as display images of inverted image, please do not hesitate to contact us.
1.4.2 Installation method II
(time-lapse REC)
Cut off graph 35 ACC yellow line then connect with car ACC+, cut off graph 39 GND black line to connect with car
power negative, then cut off graph 38 red line connect with battery positive .the follow will same with method I
【Warming】Not be charged in the installation process
Graph 58
Chapter II:Functional Description
2.1 The power key 6
Switch function
press the power button for 3 seconds to start the machine, the machine will start to work automatically. When power
on press
the power button for 3 seconds then the machine will save the video file and turn it off automatically
2.2 Turn on/off screen 5
In the boot state, press one time closed screen, press again will be restart
2.3 The locking function 7
In video mode, if happed accident , short press the key then the time of the accident in the first 10 seconds and after
20 seconds will be saved to a special file, and the file will be not covered circularly.
2.4 MODE 9
Press the mode button to switch the camera /Photograph / playback
2.5 MENU 10
In standby mode,,press the MENU button to enter into the main menu for setting,press the
PAGE UP/PAGE
DOWN button to choose the option you need to set,then press the OK button to confirm. Press the MENU button
after setting until it exits the setting menu interface
2.6 Page up / /Motion detecting 11
A. Page up
It is capable of page-up capability in menu..
B. Motion Detection
In standby mode, press the PAGE DOWN button for a moment to switch to the motion detecting mode. Press the
PAGE DOWN button to exit the motion detecting mode when not recording.
2.7. Page down/MUTE 12
A. Page down
It is capable of page-down capability in menu.
B. MUTE
In standby mode, press the PAGE DOWN button will in Silent Mode press again will recovered
2.8 Video/ OK 13
A .Start recording
In standby mode, press the VIDEO button shortly to enter into video mode, press again the VIDEO button to stop
videoing.
B.OK
In standby mode/photograph mode /playback mode, touch the MODE for 3 seconds to enter into the main menu
mode, touch the PAGE UP or PAGE DOWN to browse, touch the VIDEO button to make sure your choice.
2.9 RES 23
If the machine crashed, press the RES button shortly to restart the machine.
Chapter III:Operation Instruction
3.1 Automatic Recording
Start the car engine, the recorder will start and record automatically, turn off the car engine, the recorder will save
recorded contents and turn off automatically .the video file save on the TF card partly. When the TF card is full, it will
cover the earlier video file automatically.
【Warming】
a. Recorded time can be set in menu settings, you can set1/2/5 minutes duration for videoing.
b. The former and back camera video files are saved in folder DCIMA and DCIMB apart in the TF card. Normal folder
is for NORMAL, locked folder is for LOCK.
3.2 Manual Recording
Press the POWER button for 3 seconds to start the machine and it will start to video automatically. When power on
press the POWER button for 3 seconds again then the machine will save the video file and turn it off automatically.
3.3 Photograph
When power on press the MODE button shortly to enter into the photograph mode,then the video icon will transform
into the camera icon. Press the OK button and you can take a picture .Press the MODE button twice you can video
again.
3.4 Motion Detection
In standby mode, press the PAGE DOWN button for a moment to switch to the motion detecting mode. When the
camera would not feel the object moving for 5 seconds, the system will stop videoing. If you want
detecting mode when not recording, press the PAGE DOWN button for 3 seconds.
. 【Warming】
This setting will not be saved, it will restore to the video mode next time you start.
3.5 Collision Induction
to exit the motion
In video mode, if it takes place the vehicle collision, short press the menu button to start the emergency locked
function. Then the time of the accident in the first 10 seconds and after 20 seconds will be saved to a special file, and
the file will not be covered circularly.
G–sensor is built in the machine. If it takes place the serious vehicle collision the recorder will save the video of the
accident in the first 10 seconds and after 20 seconds to a special file and the file will not covered circularly. At the
same time the bottom left of the screen will appear the locked icon.
【Warming】
The locked video file was begun with ZW and the common file was begun with AW.
G-sensor can support sensitivity adjustment; you can set your option according to your actual needs.
3.6 Locked
The machine have the locked function, you can lock the video file you need to keep without be covered circularly .In
video mode, press the MODE button the recorder will lock the video of the time in the first 10 seconds and after 20
seconds.
3.7 Date and Time Setting
In standby mode, press the MODE button to enter into the system menu for setting. Settings menu short according to
turn down/set the cursor movement to date options short press OK key to confirm, enter the Settings menu settings.
【Warming】
In order to record the date and time of the safety accident of forensics effectively, please set the correct time before
using this machine.
3.8 MUTE
In video mode, press the MUTE button to close the recording when videoing and the bottom left of the screen will
appear the forbidden Microphone icon. At this time the recorder is just videoing without recording Press again, it
recovers recording and the forbidden icon will disappear.
3.9 USB Flash Disk
Use the data cable to connect the recorder to the computer USB then the screen will appear three
Modes that are Disk、Camera and Charging. Press the PAGE UP/PAGE DOWN button to choose disk options, press
the OK button to enter into USB mode.
【Warming】
When using computer to copy video file, it is recommended to use card reader to copy.
3.10 Video File Playback
When power on, press the MODE button twice to enter into the file playback mode. Press the PAGE UP or PAGE
DOWN button shortly you can choose the file you need to playback, then press OK and the recorded file will play. If
you want to exit press the MODE button again.
3.11 GPS ( optional )
Power on, when the GPS module didn't insert to the AV port, the GPS icon is forbidden. Insert GPS module to the
AV port manually, the forbidden icon will disappear and the icon is glimmering. It will position to the track outdoor in
a minute. The GPS indicator icon stop glimmering means GPS positioning success. Open video recording, walking
track will generate GPS files automatically.
【Warming】The format of GPS file is MAP.
3.12 Review video/Reversing Visual
Firstly, it is necessary to connect the car charger with the recorder then connect the RVB of back drawing camera with
the car light.
When connect the car charger with the recorder, the machine will start videoing automatically. In any state switch R
gears the screen will switch to the rearview mirror automatically and shows reverse images .after reversing visual
machine automatically. It will return to video mode after backing up.
【Warming】Backing up in the photo mode, it will return to photo mode automatically after backing up.
Chapter IV:Product Specifications
Image
Sensor (Built in)
Back Camera Resolution
Camera Angle
Video resolution
Photo resolution
Storage Compression Way
GPS Trajectory Format
Video Format
Picture Format
Storage Temperature
Operating Temperature
Operating Humidity
Memory card Capacity
Standard Voltage
Chapter V:Warranty Card
Date:
120Wor500W
D1,720×480/ VGA640×480
120。
HD1280×720、VGA640×480 S/30 帧
1080P(1920*1080) S/20 帧
2048×1536
2560*1920
H.264
MAP
MOV
JPEG
-30℃~70℃
0℃~50℃
15-65%RH
Highly support 64GB
DC5V
Name
Sex
Age
Address
Telephone
Zip code
Purchase place
General
Specifications
Price
Sale No.
Serial No.
Guarantee Clause:
1. The goods can be exchanged in one months from the date of sale (product packaging is in good condition or no
scratches), one year warranty.
2. The warranty service will only be effective under normal use, not including artificial damage.
3. We will charge material cost when incorrect operation results in damage to the machine
4. Teardown、 damaged labels and violation of national warranty regulations, do not belong to the scope of warranty,
our company have the right to reject process after sale service.
5. Provide the card when warranty, not provide the card r or unilateral amendment our company have the right to
reject process after sale service.