1
5.
5.1.
Quick Start
Powering Up
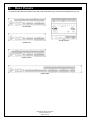
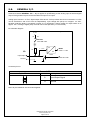
Every ipCUE controller requires a power from an external power supply. The standard CUEadapter /30W or
CUEadapter /65W is delivered with the unit. Attach the 2-pin connector of the power supply unit to the PWR
IN connector located on the rear panel of ipCUE controller and attach power cable to a power outlet. The
LED labeled PWR will light up when the unit is powered on.
5.2.
PC Connection
Using LAN Directly to PC
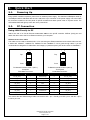
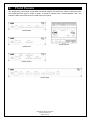
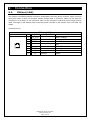
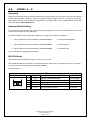
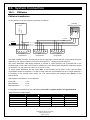
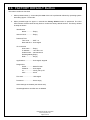
Attach one end of an RJ-45 Ethernet cross-over cable to the ipCUE controller CUEnet (LAN) port and
attach the other end to the RJ-45 Ethernet cable to your computer.
Ethernet Cross-Over Cable
This cable can be used to cascade hubs, or for connecting two Ethernet stations back-to-back without a hub.
It works with 10Base-T, 100Base-TX, 100Base-T4 and 1000Base-T. Use a good enough cable, if you are
confused about categories of cables then use Category 5 (enhanced) and you'll be fine even at 1000Base-T.
1
8
Top
1
8
1
8
Top
Front
Front
1
8
To Network Interface Card 2 (NIC 2)
Touch panel
RJ45 Male Connector
To Network Interface Card 1 (NIC 1)
Computer
RJ45 Male Connector
Name
NIC 1
Color
NIC 2
Name
TX+ (BI_DA+)
1
White/Orange
3
RX+ (BI_DB+)
TX- (BI_DA-)
2
Orange
6
RX- (BI_DB-)
RX+ (BI_DB+)
3
White/Green
1
TX+ (BI_DA+)
- (BI_DC+)
4
Blue
7
- (BI_DD+)
- (BI_DC-)
5
White/Blue
8
- (BI_DD-)
RX- (BI_DB-)
6
Green
2
TX- (BI_DA-)
- (BI_DD+)
7
White/Brown
4
- (BI_DC+)
- (BI_DD-)
8
Brown
5
- (BI_DC-)
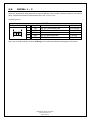
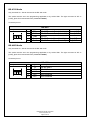
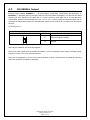
That means that the White/Orange cable connected to NIC 1 pin 1 should go to NIC 2 pin 3 and NIC 1 pin 2
to NIC 2 pin 6 etc.
User Manual ipCUE Controllers
www.cuesystem.com
Page 8 of 48