1
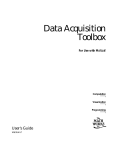
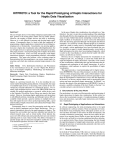
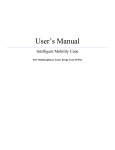
User’s Manual
MIT Touch Lab
Copyright 2001, S. James Biggs, Ph.D. and Neil Narayan, all rights reserved
Last revised: 23 October 2001
Table of Contents
Component List
Setup Instructions – Software and Relay Board
Setup Instructions – Vibrator Bus, Power, and Vibrators
Manual Override for Hardware
Design Notes
Sample Code
Contacts
1
2
3
5
7
8
11
13
Component List
PCIDISO16
Ribbon Cables
(2)
Vibrator Bus
Vibrators (8)
Documentation List
Vibrotactile Display User’s Manual
PCI-PDISO16 User’s Manual
Extended Software Installation Manual
Universal Library User’s Guide
Universal Library Function Reference
Software List
2 CDs (One with InstaCal and the other with Universal Library)
1 floppy disk with 3 sample programs for running device
2
Setup Instructions – Software and Relay Board
Before installing any hardware, it is best to install the software that will run the PCI
board. The appropriate software and installation procedure depends on your operating
system.
TO SAVE YOU TIME:
• Read the PCI-PDISO16 User’s Manual and the Extended Software Installation
Manual (so that you can install the board correctly). The software included on the
enclosed CDs covers nearly all operating systems (that is, DOS up to Windows
NT). If you are installing on a DOS only system with no CD drive, you may need
to purchase specialized installation software from Measurement Computing Inc.,
as described on page 3 of the Extended Software Installation Manual. Follow the
instructions appropriate for your computer, and also review the following sections
in other documents:
• Universal Library Function Reference: pg. 48-49
• Universal Library User’s Guide: skim through
SETTINGS:
• After installing the board in the PCI slot, and using InstaCal to configure it, set
the Board Number to 1 and the variable BoardNum* to 2.
TO TEST YOUR INSTALLATION OF THE BOARD
• Copy the folder labeled “Motor Strobe” from the enclosed floppy disk to the hard
drive of your computer.
• Run the program “MotorStrobe.exe”, and enter convenient values at the prompts
(e.g., 500 ms per motor for 5 seconds).
• Listen for an obvious “clicking” sound coming from the relay board, like
someone hitting a computer keyboard every 500 ms. This is the sound of the
relays on the PCI board. If you can hear them, proceed to the Hardware Setup
section. If not, go to the section labeled “Troubleshooting.”
TROUBLESHOOTING THE PCI-PDISO16:
After installing the PCI-PDISO16 and configuring it using InstaCal (and reading the
“Official” Manuals), you might find that the programs don’t work. If so, try the
following:
•
•
•
First of all: make sure that you have installed Universal Library. All of the
programs are useless without it.
Check to make sure that the board is in securely.
If this is not the problem then follow this procedure:
3
1) Notice that the variable “BoardNum” in all of the programs is set to 2.
This is the variable that controls where the program writes.
2) To check the Board’s Number go to:
3) Start=>Programs=>ComputerBoards=>InstaCal and right click on the
board that says PCI-PDISO16.
4) Select Change Board #… from the menu and experiment with different
board numbers (I set BoardNum (the program variable) to 2 and the Board
Number (in InstaCal) to 1 and the program executed correctly).
•
If the MotorStrobe program doesn’t execute correctly:
1) Open the workspace labeled “MotorStrob.dsw” in Microsoft Visual C++
6.0.
2) Recompile the source code and try executing the application again
3) If it doesn’t compile properly, make sure that cbw32.lib is included in the
project (it should already be there). If it isn’t in the project add it using this
procedure:
• Right click on the Source Code Folder in Microsoft Visual Basic
and select Add Files to Folder…
• In the Dialogue Box: Go to c:\cb\cwin\cbw32.lib and select OK.
• The cbw library is now added to the project and the code should
execute correctly.
***NOTE: The sample code programs that come with the Universal Library don’t
work correctly. You will have to change the BoardNum variable to get them to work
(follow the same procedures as above). You will also probably have to make a new
Win32 Console Application and add the cbw32 library
4
Setup Instructions – Vibrator Bus, Power, and Vibrators
1) Once the software to run the PCI card has been installed, and the board itself has been
successfully installed and tested, work on this part of the installation. Use the enclosed
50-conductor ribbon cables to connect the PCI card to the Vibrator Bus. Check to make
sure that the cables are routed to the correct port (A versus B), and to make sure that they
are properly oriented (Figure below). Pins marked by yellow ovals must be connected
(PCI bottom to Vibrator Bus right).
2) Connect the Vibrator Bus to an external DC power supply, via the Banana Jacks on the
back. Make sure that power supply connection is properly made (Supply GND to
Vibrator Bus GND). Never apply more than +8V DC to the Vibrator Bus! Doing so will
trip a resettable fuse in the device. Power to the unit must be interrupted before it will
work again.
5
3) Plug the enclosed Vibrators into the receptacles on the front of the Vibrator Bus. The
unit may be safely operated with any number of Vibrators attached. The illustration
below shows the correspondence between receptacles on the front of the Vibrator Bus
and relay numbers in software.
4) Attach the Vibrators to the human subject or test animal.
5) Adjust the external DC power supply voltage in order to set the desired vibrator
frequency, as shown below. Vibrator frequency increases at 9.375 Hz/Volt. Below 0.5
V, the vibrators may remain stalled due to normal friction in the mechanism. Above 8V,
a resettable fuse will be tripped. Power must be temporarily interrupted before the unit
will work normally again.
6
Manual Override for Hardware
A manual override for the vibrotactile display hardware is provided. Remove the 4
screws that retain the top of the Vibrator Bus, and remove the top of the Vibrator Bus
enclosure. On the PC board inside, a row of DIP switches (yellow arrow in figure) can
be used to bypass the relays on the PCI card. Rocking a given DIP switch to the “ON”
position allows current to flow through the corresponding vibrator connected to
receptacle “0” through “7”. This feature is useful for verifying that the Vibrator bus is
receiving the proper voltage, and that the vibrators are connected properly to the front of
the bus.
Important: The DIP switches are labeled 1-8, whereas the receptacles are labeled 0-7.
Also note: DIP switch #5 is broken. The motor attached to receptacle 4 can only be
activated through software.
7
Design Notes
D1 protects against hooking up external power supply backward. Rest of circuit is a
crowbar. If supply voltage exceeds Zener voltage of D2 (8.2 V) D2 goes into forward
conduction, tripping SCR gate. SCR draws enough current to trip resettable fuse (P). R1,
C1 make low pass filter so small spikes don’t trip crowbar. P was chosen to allow
simultaneous start-up of all 16 motors at 8 V, (drawing 1.04 A), but to trip in < 10
seconds when SCR goes active, drawing 6A.
8
PIN NUMBERS for PCIDISO16:
Relay Number:
Pin (Common):
Relay 0 (8)
36
Relay 1 (9)
33
Relay 2 (10)
30
Relay 3 (11)
27
Relay 4 (12)
24
Relay 5 (13)
21
Relay 6 (14)
19
Relay 7 (15)
17
Pin (NC):
35
32
29
26
23
39
40
38
9
Pin (NO):
37
34
31
28
25
22
20
18
Connector, Cable, and Vibrator Detail
Shielded microphone cable
Digi-Key Part #: C1228-X-ND, 100ft.
$29.59
Conductor:
fully annealed stranded tinned copper, AWG 24 *
Insulation:
Polypropylene
Shield: Conductive tape over core, + tinned copper drain wire
*AWG24 = 0.0201” = 0.51 mm diameter, 30 Amp fusing current
This is approximately 2x diameter of leads on pager motors (~0.012” = 28 GAGE), which carry 70 mA
fine
Total DigiKey part # Description
(16)
275-1100-ND
Panel-mount mini-DIN receptacles, 3-Pos, w 6” leads
$ 1.49 each
(16)
275-1028-ND
3-Pos In-Line Plug
$ 0.81 each
(1)
HM338-ND
Low profile instrument case (8x8x3”)
$34.61 each
10
Sample Code
Sample code written by Neil Narayan is provided on an enclosed floppy disk. To begin
incorporating portions of the sample code into your own project, transfer the following
files to the hard drive of a machine running Microsoft Visual Studio 6.0.
Linear Motor Program (Program 1)
Name of file: MotorStrobe.cpp(found in the Motor Strobe folder on the floppy)
Program 1 allows the user to make the motors run in a line for any amount of time. When
using this program the user should keep in mind that some of the prompts are in seconds
and others in milliseconds. The program is written this way because I thought that some
of the prompts might be more convenient in seconds. This is a fairly easy to understand
program. If you experience any problems, please refer to the troubleshooting section at
the back of this Read Me. (There shouldn’t be anything wrong with any of the code
because all of the programs worked on this computer).
Random Motor (Program 2)
Name of file: RoboticArm.cpp (found in the Random Motor folder on the floppy)
Program 2 allows the user to type in how many motors he wants to be turned on/off for
random intervals of time (the first prompt). After this, the program runs the motors and
prints to the screen what motor it ran and for how long. The length of time will always be
between 1/50 second and 5 seconds. This program is also fairly simple, but if there are
any problems please refer to the troubleshooting section at the back.
Motor List Program (Program 3):
Name of file: motors.cpp (found in Motor List folder on the floppy)
While the first two programs (random and linear motor) are fairly simple programs, this
third program is a little bit more complicated. The first thing the program will ask is if
you would like to run the motors from a pre-made text (.txt) file. The default file that the
program inputs from and outputs to is called “savedlist.txt” (this makes it easier to create
a list, save it, and run it again without changing anything). If you do choose to save your
list, make sure that you have moved your last list to a new location or it will be
overwritten. If you would like to make your own motor list (written without the
program’s help but can still be run in the program) format it like this:
motor number (0-15) pos (0 [NC*] or 1 [NO*]) time when to perform action (in
milliseconds)
To facilitate reading this, motor number is italicized, position bolded and time
underlined and put bar “|” characters between each new task. In the actual program,
putting these bar characters will probably cause the program to malfunction. You will
encounter problems if the text file is not in the same directory as the .cpp file.
15 1 0 | 5 1 900 | 0 1 950 | 15 0 1000 | 5 0 1050 | 0 0 2000 |
NO END OF FILE MARKER IS NEEDED.
In the actual text version of the same list the number will appear like this:
11
15 1 0 5 1 900 0 1 950 15 0 1000 5 0 1050 0 0 2000
To facilitate entering numbers in this fashion, I have made the program so that if you
select option 2, there is another prompt that asks if you would like to save your list (after
it has run the motors) write all the numbers you enter into the program’s default text file
(savedlist.txt). If this file does not exist in the same directory as the program when the
code is run, the code will generate a new text file by this name with all the entered
information in it.
The list of actions is somewhat like a number line in the way it is organized. The user has
to input the amount of time that must elapse (since the time the program started) before
doing a certain action. For example if you put in the time numbers 50, 100, and 250 with
0 as the start of the program, the timeline would look like this:
0 (start) 50 ms lag action1(50) 50 ms lag action2(100) 150 ms lag action3(250).
(total time is 250ms)
The time line would NOT look like this:
0 (start) 50 ms lag action1(50) 100 ms lag action2(150) 250 ms lag action3(400)
(total time is 400ms)
This model allows the user to more accurately plan when the motors are going to go off.
This program is most useful for when you don’t want to have the motors run linearly or
randomly (programs 1 and 2).
**You must put the actions in chronological order (like a number line).**
Another thing to keep in mind is that everything is in milliseconds (unless it says “in
seconds” next to the prompt). Everything in list program is in milliseconds.
12
Contacts
For help installing and configuring relay board:
Computer Boards Technical Support (508) 906-5100
Neil Narayan: [email protected].
For help with other hardware:
James Biggs at MIT Touch Lab (617) 253-4485
13