1
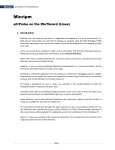
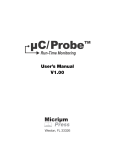
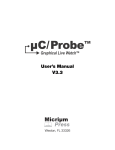
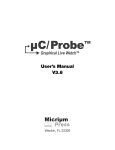
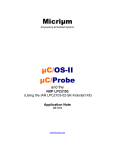
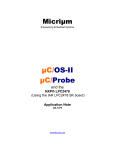
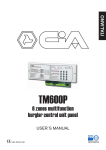
Micriµm IoT Demo User’s Manual IoT Demo on the Connected LaunchPad TM4C products Smart Home Gateway There are countless resources in the IoT world today. Embedded system engineers are faced with a large variety of protocols, cloud services, platforms, techniques and solutions to choose from. Because most of these resources seem disjointed, we have tried most of them and put together a complete set of resources that you will need to develop an IoT device in less time. The purpose of this demo is to introduce you to the following resources of choice for the IoT: The Texas Instruments Connected LaunchPad TM4C platform. The IAR Systems Embedded Workbench for ARM. The 2lemetry ThingFabric™ IoT platform. Micriµm embedded software and tools. The following IoT demo simulates a series of home appliances that you can control and monitor from the web. The minimum hardware requirements include the following components: Windows PC Texas Instruments Connected LaunchPad (TM4C1294) Ethernet Cable Micro USB Cable IAR Systems Embedded Workbench for ARM Micriµm µC/Probe Page 1 Micriµm IoT Demo User’s Manual Step 1 Installing IAR Systems Embedded Workbench for ARM The IAR Systems Embedded Workbench for ARM incorporates a compiler, an assembler, a linker and a debugger into one single integrated development environment (IDE). In this step you will install the 32K Kickstart edition of IAR Systems Embedded Workbench for ARM by downloading the installer from the following link: http://supp.iar.com/Download/SW/?item=EWARM-EVAL The same installer is used for both the 30-day time-limited and the Kickstart (size-limited) evaluation edition. Step 2 Installing Micriµm Software 2.1. Installing Micriµm Embedded Software The Micriµm Embedded Software includes µC/OS-III and µC/TCP-IP in pre-compiled linkable library form. The application level code is provided for free and solely as a reference to help engineers use Micriμm, Texas Instruments and 2lemetry products. There are no express or implied copyright licenses granted hereunder to design or fabricate any IoT devices based on the information in this guide. Micriμm, Texas Instruments and 2lemetry make no warranty, representation or guarantee regarding the suitability of this example for any particular purpose, nor does Micriμm, TI and 2lemetry assume any liability arising out of the application or use of any example design, and specifically disclaims any and all liability, including without limitation consequential or incidental damages. You can download the Micriµm embedded software from the following link: http://micrium.com/download/iot-tm4c1294-smarthomegateway Simply extract the contents in your PC. This guide will make reference to this embedded software by calling it the Micrium folder at $\Micrium\*. 2.2. Installing Micriµm µC/Probe Micriµm µC/Probe is a Windows application designed to read and write the memory of any embedded target processor during run-time. Memory locations are mapped to a set of virtual controls and indicators placed on a dashboard. We will use µC/Probe to monitor and control the IoT device. Page 2 Micriµm IoT Demo User’s Manual In this step you will install de Educational Edition of µC/Probe by downloading the µC/Probe Windows Installer from the following link: http://micrium.com/tools/ucprobe/software-and-docs/ The Educational Edition of µC/Probe is available for free evaluation with a few limitations such as a limited amount of features and a limited amount of continuous run-time. This license can be upgraded to the Basic or Professional Editions at any time. For more information go to the following address: http://micrium.com/tools/ucprobe/features/ Step 3 Connecting the Texas Instruments TM4C1294 The TM4C1294 shown below is an evaluation and demonstration board for the Connected LaunchPad TM4C microcontrollers. Power and Programming Ethernet All the jumpers should be connected except for JP1 which should be configured for ICDI. Page 3 Micriµm IoT Demo User’s Manual Step 4 Installing the Windows Drivers for the Connected LaunchPad TM4C products The first time you connect the board as described in the previous step, depending on your version of Windows and IAR Systems, Windows may not recognize the USB device. You have to actually install the drivers manually by opening the Device Manager in the Control Panel as shown below: Unrecognized USB devices Page 4 Micriµm IoT Demo User’s Manual Right-click over the unrecognized device Select Update Driver Software Page 5 Micriµm IoT Demo User’s Manual Select the option Browse my computer for driver software Browse to the path where you have your IAR Systems installation: C:\Program Files (x86)\IAR Systems\Embedded Workbench\arm\drivers\StellarisICDI Page 6 Micriµm IoT Demo User’s Manual Select the option Install this driver software anyway Wait for the success message Repeat the same process for the remaining two unrecognized USB devices until you get the following two success messages: Page 7 Micriµm IoT Demo User’s Manual Page 8 Micriµm IoT Demo User’s Manual Step 5 Working with IAR Systems Embedded Workbench for ARM 5-1. The easiest way to open the IAR Systems Embedded Workbench for ARM is by either launching the shortcut on your desktop or by typing in the keyword IAR in the search box shown below: 3. Launch IAR 1. Click the Windows Start button 2. Search for IAR 5-2. Click File → Open → Workspace… and browse to the workspace uC-MQTT-SmartHomeGwy-Ether.eww located at the following path in your Windows PC: file └───Micrium └───Examples └───TI └───EK-TM4C1294XL └───uC-MQTT-SmartHomeGwy-Ether └───EW_IAR Depending on the version of IAR Embedded Workbench installed in your Windows PC, you may be asked to let the tool update your project to your version’s format. You can safely accept and let the tool bring up your project to the correct format. The workspace will open in a window similar to the one shown in the image below: Page 9 Micriµm IoT Demo User’s Manual Starts a Debugging Session Application-level Code Micriµm µC/ Software Executable File (ELF) Page 10 Micriµm IoT Demo User’s Manual Step 6 Executing the IoT Example In this step you will download the example code into Flash memory and start a debugging session using IAR Systems Embedded Workbench. 6-1. Click Project → Download and Debug to execute the example. 6-2. The project will be compiled and a debugging session will be launched. 6-3. The debugger will start by halting the CPU at the main entry point as shown below. Simply press the Go button to start execution. Go 6-4. The example will start µC/OS-III and µC/TCP-IP. The µC/DHCPc will negotiate an IP Address with the network’s DHCP server in a process that can take between 1-30 seconds depending on network traffic. 6-5. Use the IAR’s Live Watch window to inspect the IP address that your IoT device was able to negotiate with the DHCP server. Click View → Live Watch and enter the variable name AppTcpIpAddr as shown below: Page 11 Micriµm IoT Demo User’s Manual Board’s IP address IoT device unique ID Similarly, inspect the value of the string AppMQTT_ThingID as illustrated in the image above. This is your board’s unique ID in the cloud and you are going to need this information later. Page 12 Micriµm IoT Demo User’s Manual Step 7 Monitoring and Controlling the IoT Device from µC/Probe The IoT example featured in this demo runs a simulator to create data for a Smart Home Gateway. The theory of operation can be described as follows: The sun shines on the solar panels and they generate DC electricity. This DC current is routed into an inverter that converts it to 120 volts AC, the same as the house’s main supply. Any surplus electricity generated by the system not used by the appliances is used to charge the battery bank or fed back into the mains electricity supply grid; for which a credit is received in the electric bill. In this step you will use µC/Probe to control and monitor the simulation through a dashboard that contains controls to modify the sunlight intensity and the state of the electrical loads among others. At the same time, the dashboard will display the current output values (amps) calculated by the simulation algorithm as shown in the following image. 7-1. Open µC/Probe in your Windows PC and click File → Open to open the dashboard example file SmartHomeGateway.wspx located at the following path in your Windows PC: └───Micrium └───Software └───uC-Probe └───Workspaces Page 13 Micriµm IoT Demo User’s Manual 7-2. The first time you open the workspace an error message will report that µC/Probe was unable to find the ELF file in your file system. You can update the path to the file depending on where you have your Micrium folder in your file system: └───Micrium └───Examples └───TI └───EK-TM4C1294XL └───uC-MQTT-SmartHomeGwy └───EW-IAR └───FLASH └───Exe └───uC-MQTT-SmartHomeGwy-Ether.out 7-3. Click the Settings button located in the top toolbar of µC/Probe and configure the Communication Settings to TCP/IP and your IoT device’s IP address as shown in the previous step 5-5. Page 14 Micriµm IoT Demo User’s Manual TCP/IP IP Address 7-4. Click the Run button located in the top toolbar of µC/Probe. 7-5. Click on the Dashboard tab of µC/Probe to go to the Smart Home Gateway dashboard screen. Press the buttons above each appliance to turn the household loads on and off. You can also increase or decrease the sunlight intensity with the vertical slider next to the solar panel. Page 15 Micriµm IoT Demo User’s Manual Step 8 Monitoring and Controlling the IoT Device remotely from the Web 2lemetry’s ThingFabric™ is the IoT platform where all the data generated by the embedded target is stored. The IoT device connects to this platform using MQTT; a simple publish/subscribe protocol. For more information about MQTT please visit http://mqtt.org Your IoT device is periodically publishing the latest simulation data values to the MQTT broker at 2lemetry via MQTT. At the same time, the IoT device subscribes to a topic to receive any requests from a remote MQTT client to control the Smart Home Gateway. In this step you will use your internet browser to control and monitor the simulation through a web page that contains controls to modify the sunlight intensity and the state of the electrical loads. At the same time, the webpage will display the current output values (amps) calculated by the simulation algorithm. 8-1. Open an internet browser such as Google Chrome and go to the following address: http://micrium.com/iotdemos/smarthomegateway 8-2. The TM4C1294 board’s MAC address will be used as a unique ID in the 2lemetry IoT platform. This unique ID is known as the Thing ID and it is displayed on previous step 5-5. Type in the Thing ID (e.g. 00305508….) in the text box to connect to your IoT device as shown below: 8-3. Once connected to your IoT device you can turn On and Off the household loads as shown in the image below: Page 16 Micriµm IoT Demo User’s Manual Use the navigation bar at the bottom of the web page to go to other views that will display the state of the Solar Panel and Battery Bank. There is also other view labeled as Net Meter, that displays your power meter and how much of that demand is coming from the power company and your solar system. Page 17