1
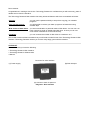
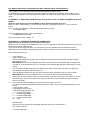
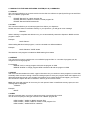
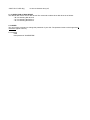
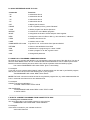
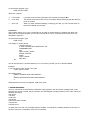
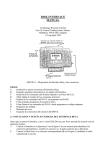
DISK INTERFACE Manual
Technology Research Limited
USER MANUAL FOR DISK INTERFACE
Technology Research Ltd
Unit 18, Central Trading Estate, Staines,
Middlesex TW18 4XE, England
Copyright 1984
Typed and cleaned by:
Moffa Roger
Copyright
© 1984 Technology Research Ltd. Statues. Middlese, England.
All rights reserved. This manual contains proprietary information which is protected under copyright.
No part of this manual may be reproduced, transcribed, stored in a retrieval system, translaled into any
language or computer language, or transmitted in any form whatsoever without the prior consent of the
publisher. For information write to:
TECHNOLOGY RESEARCH LTD.
UNIT 18. CENTRAL TRADING ESTATE.
STAINES. MIDDLESEX TW184XE
ENGLAND
Notice
TECHNOLOGY RESEARCH LTD makes no representations or warranties of any kind whatsoever with
respect to the contents here of and specifically disclaims any implied warranties of merchantability or fitness
for any particular purpose. TECHNOLOGY RESEARCH LTD shall not be liable for errors contained herein or
for incidental or consequential damages in connection with the furnishing, performance, or use of this
material.
TECHNOLOGY RESEARCH LTD reserves the right to revise this publication from time to time and to make
changes in the content hereof withoul obligation to notify any person of such revision or changes.
First TECHNOLOGY RESEARCH LTD printing May 1984
PART NUMBER
11734/5/84
Dear customer
Congratulations in making a wise choice. Technology Research is confident that you will have many years of
reliable service from the Interface.
The Technology Research Disk Interface has many advanced features which are summarised as follows:
Security:
you can use the password facility to stop others copying your valuable
programs.
Easy and fast access:
you will be able to retrieve your data / program a lot faster than using
cassette tape.
Wide choice of disk drives: you are not restricted to a particular make of disk drives. You can use a 40
track or 80 track, single or double sided disk drive. In short you can use
most makes of disk drives on the market today.
Flexibility:
you can increase the number of disk drives to a maximum of 4.
This booklet contains all the information that you will need to make full use of the Technology Research Disk
Interface. Technology Research wishes you to have many happy years with the Interface.
CHECKLIST
Please check Ihat you have the following:
1 Technology Research Disk Interlace.
1 Technology Research Software disk.
1 Manual.
Connector for other interface
(C) Power supply
(B) Disk driveport
(A) Connect to back of spectrum
Diagram 1: Disk interface
CONTENTS
PAGE
Checklist
Diagram 1 : Disk Interface
A
Installation Procedure.
B
A simple guide (or those who are not familiar with the Interface.
C
Manual for the Disk Operating System (D.O.S.) commands.
D
Quick reference guide to D.O.S. commands.
E
Using D O S . commands in BASIC programs.
F
How lo convert programs from cassette to disk.
G
To call D.O.S. commands from Machine Code programs.
H
Utility programs.
I
Error Messages.
J
Pin connection of the disk drive connector
Diagram 2: Pin connection of the disk drive connector
K
Guarantee,
Reader's comment form.
A. INSTALLATION PROCEDURE
Now that you have the Interface and a disk drive or a number of disk drives, please proceed according to the
following steps.
1
Connect the Interface to your Spectrum; please use Diagram 1 on the inside cover of this booklet to
identify the connectors on the Interface, and plug the Interface directly into your Spectrum (labelled A
in diagram)
2
Plug your disk drive into the disk drive port (labelled B in diagram) in your Interface using the cable
that comes with your disk drive.
3
Switch on your disk drive and leave your Spectrum switched off If the drive on" indicator of your disk
drive is on. then the disk drive socket is upside down Turn the socket through 180 degrees and try
again. You will find that the drive on light should go out.
4
Plug the power socket from your Spectrum power supply into the power socket (labelled C in
diagram) on your Interface When you switch on. you will notice your disk drive engaged momentarily
This is normal
5
On your monitor (TV), you will see the current version of the software in your Interface and the name
of Technology Research at the top of the monitor This means that your Interface is working.
6
Insert the Technology Research software disk that comes with fhe Interface into your disk drive.
7
You will have to put in a password in order to access the software stored on your disk. The password
that is used in all Software disks is "tr". You can always change it later if you wish.
On the monitor (TV), you will find the symbol "A > " This prompt is issued by the Interface program
and is a reminder that you are NOT in Sinclair BASIC.
You are connected to disk drive A which is always the default disk drive
IMPORTANT
NEVER disconnect the Interface from the Spectrum whilst the power is still applied.
NEVER leave your disk in the disk drive while power is switched on or off
B. A SIMPLE GUIDE FOR THOSE WHO ARE NOT FAMILIAR WITH THE INTERFACE
In this section, you will be introduced to various Disk Operating System (DOS.)
Commands through simple examples. They are probably something you are likely to do the first time you
come to use the Interface. The examples are arranged in an order a complete beginner is recommended to
follow
B.1 EXAMPLE 1: SWITCHING FROM Disk Operating System (D.O.S.) TO SPECTRUM BASIC AND VICE
VERSA.
(How do I know when to use Sinclair BASIC or Disk Operating System (D.O.S.)?)
When you are in Sinclair BASIC, you do NOT get a prompt. If you get the prompt "A > ", then you are in
D.O.S.
To go from D O S to Spectrum, press the following sequence of keys
RETURN ENTER
To go from Spectrum to DOS., type in the following:
RANDOMIZE USR 15360
and you will get the DOS. Prompt A>
B.2 EXAMPLE 2: PREPARING A NEW DISK (FORMATTING)
(What do I have to do before I can use a brand new disk?)
Before you can use a disk, track markers have to be out on to the disk All subsequent data that you put in will
be stored into these marked tracks.
If you only have one single disk drive, you will need to put in the Software disk into the disk drive first
(assuming you have already switched the Spectrum and the disk drive on) and to have a new disk ready.
Here is what you have to do:
1
Type in the line
RUN "format" CODE
(this command loads the program into the Spectrum Now you will receive further prompts to advise
you what to type in).
IMPORTANT: If you have one SINGLE disk drive, then please take the Software disk out and put the
new disk in. If you DO NOT do this, you will format your Software disk and all the information on it will
be lost.
2
You will need to tell the computer which disk drive you will be using If you only have one disk drive,
then logically you have to call it disk drive "A".
3
Then decide the password for the new disk and write it down somewhere you can refer to easily
IMPORTANT: If you lose the password, then you will not be able to access the data again.
4
Please type in the information when you are prompted. If the disk is good, then you will get no error. If
the disk is faulty, then you will get an error prompt In this case, you are advised to return the faulty
disk to your dealer
5
Let us do one example Suppose you have a disk drive which you call "A",
you name the disk "BLUEPETER" and the password "PETER" Then you will see the following on the
screen.
A RUN "format" CODE
* Mini-floppy Formal Ver 2.3 *
' 1984 Technology Research Ltd
1 ----- 40 track single sided
2 ----- 80 track single sided
3 ----- 40 track double sided
4 ----- 80 track double sided
Q ----- Quit
Which tormat?
Assuming you are using a 40 track single sided disk drive, then you will select 1
The screen will show
* 40 track single side *
Which drive? (A, B, C. D, Menu) A (your input is required here)
Please insert disk in drive A
When you are ready, type
F for format
V for verify
Q for quit
F
Please type in a password. PETER
Please type a name for this disk. BLUEPETER
formatting track 00
reading track 00
formatting track 01
reading track 01
...
(and so on until it reaches track 39)
0 Error(s)
Which Drive' (A. B, C, D, Menu)
If you wish to proceed to format more than one disk, then you type in the name of the disk drive and
repeat the above procedure.
B.3 EXAMPLE 3: CHANGE DISK PASSWORD
(I do not like the Software disk password, how do I change it?)
You have to know the password before you can change it to another word of your preference Let us assume
that you have already typed in the required password and you are in D.O.S environment. To change the
password to say JENNY, type;
USR
and type in the new password after you receive the prompt
New password: "JENNY"
The password of the disk is now JENNY.
B.4 EXAMPLE 4: FILE TABLE
(How do I find out what is on the disk and how much space I have got left?)
To find out what is on the disk, you want a CATALOGUE of the items on the disk
The command for this is CAT It you use this command on the Software disk, you wil[ get the following:
Title: Utility
3 Filets)
0 Del.File(s)
A: format <C> 10
:
copy <B> 2
A: copy <C> 14
364 Free
The first three lines indicate the title of the disk is called "Utility". And there are 3 accessible files and there is
no deleted file
The next line informs you that there are three programs called format <C> .copy <B> and copy <C> in disk
drive A. Take the format <C> as example the letter code C within the bracket means that it is a machine code
program. In other words, the file type is CODE For a BASIC program, the code is <B> and for datafile, the
code is <D>. The number following the file code is the length of the program. In this case the length of the
program is 10 sectors
The last line shows you that you have 364 sectors left on the disk
(NOTE: there are 4 sectors in 1 K byte.)
C. MANUAL FOR THE DISK OPERATING SYSTEM (D.O.S.) COMMANDS
C.1 ERASE
This command will allow you to remove a tile from the disk You will have to specify the file type as well if the
file is not a BASIC program file.
e.g.
ERASE "filename" for a basic program file
ERASE "filename" CODE for a machine coded program file
ERASE "filename"DATA fora data file
C.2 LOAD
This command will allow you to load a program from disk to your Spectrum
Please note that if there is insufficient memory m your Spectrum, you will get an error message
*ERROR*
When LOADing is complete and without error, you are automatically returned to Spectrum BASIC and the
program is listed.
Example:
LOAD "fileone"
When loading Machine Code program, it can be relocated to a different address
Example:
LOAD "filename" CODE 36000
The Machine Code program is loaded into RAM starting from 36000
C.3 MERGE
This command is used to combine two or more BASIC program files i.e. a number of programs can be
merged to form a large program.
For example:
MERGE "OLD" to merge program OLD with the program in RAM
MERGE "B:NEW" to merge program NEW in disk drive B with the program in RAM
C.4 MOVE
After a file has been deleted from disk, a gap is left behind. As you continue to store programs on to the disk,
eventually there will not be enough continuous storage space to store your program When this happens, the
retrieval and storage time for your program will increase. So fo ensure this does not happen, you can use
this command to repack the files on the disk in order to get rid of these "holes".
Note: this command requires 4K ol memory for work space If there is insufficient memory space, an error
message will be displayed:
*ERROR*
Example:
MOVE
C.5 NEW
Use this command when you wish to change the name ol an existing file on disk
You will have to specify the file type if the file is not a BASIC program file
NEW "newfile", "oldfile" for BASIC program files
NEW "newfile", "oldfile" CODE for machine code program f.ies
NEW "newfile", "oldfile"DATA for a data file
C.6 PEEK
This command allows you to read any part of a file on disk and transfer the data into RAM. You can only read
a sector at a time and transfer the data to any location within the Buffer RAM.
The command is in the form:
PEEK "filename" Buffer address, Record number
For example:
PEEK ''RECORD" 30023, 1
The first sector of the file RECORD is read and its content is written lo
RAM from the buffer address 30023.
PEEK "B:OLD" 30024. 10
The 10th sector ol the file OLD" on disk drive B is read and its content is
written in RAM from the buffer address 30024.
C.7 POKE
The command allows you to write a sector of data from RAM to any location in a file on disk. The command
takes similar form as PEEK. i.e.
POKE "FILENAME" Buffer address. Record Number
For example:
POKE "RECORD" 30023, 1
POKE "B:OLD" 30024, 10
A sector length of data starting from RAM address 30023 is written to the
first sector of the file RECORD
A sector length of data starting from RAM address 30024 is written to the
10th sector ol the file "OLD" in disk drive B.
C.8 RANDOMIZE USR 1 5 3 60
Use this command when you wish to return to DO S from Spectrum BASIC
C.9 RUN
This command will load a file from disk and run the program.
You can either run BASIC program or a machine code program
For example:
RUN ''filel"
for running a BASIC program
RUN "filel"CODE
for running a machine code program.
C.10 SAVE
This command will save a program in your Spectrum onto disk and the name of that program will be called
"filename". You will also need to specify the file type if the program is not a BASIC program file.
When saving a BASIC program, a line number can be specified for auto-run If the line number is not
specified then line one is used
For a machine code program, there are three extra inputs: you will have to specily where the code is stored
in the Spectrum by putting down the start address and length The third parameter which is optional, is the
address tor autorun The format is:
SAVE "filename" CODE starting address, length, auto-run. address
For example:
SAVE ''file1''
to save a BASIC program
SAVE ''file1'' LINE 1000
to save a BASIC program run trom line 1000
SAVE ''file1'' CODE 10, 200
to save a machine code program
SAVE ''file1'' DATA a()
to save a variable array a
SAVE ''file1'' DATA a$()
to save a character array a$
C. 11 SELECTION OF DISK DRIVE
The default disk drive is set for disk drive A The command to select other disk drives is as follows:
*"B:" for selecting disk drive B.
*"C:" for selecting disk drive C.
*"D:" for selecting disk drive D
C.12 USER
You can use this command to change the password of your disk. The password must not be longer than 9
characters (alpha-numeric).
For example:
USR
New password: ''BLUEPETER''.
D. QUICK REFERENCE GUIDE TO D.O.S.
Commands
Functions
*"A:"
to select disk drive A
*"B:"
to select disk drive B
*"C:"
to select disk drive C
*'D:''
to select disk drive D
CAT
to display the file names
ERASE
to rub out (delete) a file e.g erase "filename"
LOAD
to load a program from disk to Spectrum
MERGE
to combine 2 or more BASIC programs
MOVE
to reorganise the location of files and pack them together
NEW
to change the name of a file on disk e.g. new newname", "oldname"
PEEK
to random read Irom a file
POKE
to random write to a file
RANDOMIZE USR 15360
to go into D O S . environment from Spectrum BASIC
RETURN
to return to Sinclair BASIC from DOS
RUN
to toad and run a program eg run "name" CODE
SAVE
to save a program on to disk, eg save name"
USR
to change disk password
E. USING D.O.S. PROGRAMS COMMANDS IN BASIC
No doubt as your program skill develops, you will exploit the fast access time of the disk drive. You can do
this from within BASIC. All the D.O.S. commands that are described above can be called up from within
BASIC line with the following structure and the line can be anywhere within the BASIC program;
line number RANDOMIZE USR 15363: REM : [D.O.S. commands].
For example:
If you wish to run a program called "sketch" which is stored on disk trom line 300 in your BASIC program,
then all you have to do is to have the following line in your program:
300 RANDOMIZE USR 15363: REM : RUN ''sketch"
NOTE: The DOS. command must be the last in every BASIC program line, any other statements after the
D.O.S. command must Start from a new statement line.
For example:
A BASIC line before modification: —
10 LOAD "TEST"CODE: GOTO USR R
After modification:
1O RANDOMISE USR 15363: REM: LOAD "TEST'' CODE
11 GOTO USR R
F. HOW TO CONVERT PROGRAMS FROM CASSETTE TO DISK
F.1 Loading from cassette to disk.
You can achieve this in your BASIC program by using the line:
RANDOMIZE USR 15363 REM : LOAD "filename".
For example:
If the LOAD command in your cassette version is:
200 LOAD "filename"
Then it can be replaced by:
200 RANDOMIZE USR 15363: REM: LOAD ''filename''
F.2 Saving from cassette to disk.
The process is similar to the LOADING process described in F.1
For example:
If the SAVE command in your cassette version is
200 SAVE "filename"
Then it can be replaced by:
200 RANDOMIZE USR 15363: REM: SAVE ''filename"
G. TO CALL D.O.S. COMMANDS FROM MACHINE CODE PROGRAM
When calling D.O.S. commands from BASIC program, e.g.
RANDS USR 15363: REM : LOAD "example1''
To run above command in Machine code, all you have io do, is lo "fool" the system by altering the BASIC
variable CHADD to point to an address line buffer, created by your machine code program.
For example:
If you use a buffer address 40000. then the above command will be set to:
address
code
comment
40000
234
REM
40001
58
:
40002
239
LOAD
40003
34
''
40004
101
e
40005
120
x
40006
97
a
40007
109
m
40008
112
p
40009
108
l
40010
101
e
40011
34
''
40012
13
ENTER
BASIC REM code
BASIC LOAD code
file name "example''
always end with ENTER
Once the above line is finalized you can call the following example:
LD
HL, (CHADD)
WHERE CHADD IS 23645
LD
(TEMP), HL
SAVE IT IN SOME PLACE
LD
(CHADD), 40000
SET CH ADD to 40000
CALL
15363
CALL TR-DOS AS FROM BASIC
LD
HL, (TEMP)
LD
(CHADD). HL
RET
RESTORE CHADD CONTENTS
H. UTILITY PROGRAMS
H.1 BACKUP
II is necessary, in many cases, that your tiles neerf to be duplicated to another disk lor security reason This
program allows you to duplicate all the files (including the disk password) in a disk to another disk for a
SINGLE drive user.
You will need a (newly) tormatted disk with no tiles on it Any files on this disk will be overwritten when this
program is executed.
Assuming that the password is BLUEPETER on the disk where there are a number of files
To execute this program, type
RUN ''backup"
You will get the following display
*BACKUP 2.3*
© 1964 TECHNOLOGY RESEARCH LTD
PASSWORD FOR SOURCE DISK:
BLUEPETER
INSERT SOURCE DISK THEN PRESS Y
Y
INSERT DESTINATION DISK THEN PRESS Y
Y
Because of the RAM capacity of the Spectrum, only approximately 24 Kbytes of data can be duplicated at
one time. That is to say, for a disk with more than 24 Kbytes of data to be duplicated, it will require several
operations of the above process.
NOTE: If you wish to abandon the program before it is executed, press EDIT key
H.2 COPY
This facility allows you to duplicate programs/data from one disk drive (source) to another disk drive
(destination). While you are using this program you can also execute other D.O.S commands (see below)
which are described in Section C
To execute this program, type
RUN "copy"
The display on screen will be:
*COPY VER 2.3 *
© 1984 TECHNOLOGY RESEARCH LTD
COMMANDS ARE
CAT
NEW "newfile ", ''oldfile''
ERASE "filename"
MOVE
COPY "newfile", "oldfile''
RETURN
A*
You will notice that A* is issued rather than A> It is to remind you that you are in COPY MODE.
If you are copying a file called "Jenny" from disk drive A (source) to disk drive B (destination) and you would
like to give a new file name "Jacky" to it. then type
A* COPY "B:Jacky", "A:Jenny"
Example 2
If you are copying all the files from disk drive A (source) to disk drive B (destination). then type
A* COPY "B:*", "A:*"
If there is a file with the same name existing on disk B already, you will have the following options.
OVERWRITE EXISTING FILE (Y/N)
H.3 FORMAT
As described in B.2, this Ulilily program allows you to format a new disk and to check for any disk errors (i.e.
bad disk).
To execute this program, type
RUN "format" CODE
There are 3 options:
a
F for format
It you like to see a working example, turn to section B example B.2
b
V for verify
This option will check for disk error (i.e bad disk) without destroying the data that you
have on the disk.
c
Q for quit
When you have finished formatting or verifying your disk, you can use this option to
leave the FORMAT environment.
H.4 SCOPY
This program allows you to copy a single file from one disk to another disk for a SINGLE disk drive user.
While you are using this program you can also execute other D.O.S. commands (see below) which are
described in Section C
To execute the program, type
RUN ''scopy"
The display on screen will be;
*SCOPY VER 2.3*
© 1984 TECHNOLOGY RESEARCH LTD.
COMMANDS ARE:
CAT
NEW ''newfile'',''oldfile''
ERASE ''filename''
MOVE
COPY ''newfile''
RETURN
A#
You will notice that A» is issued instead of A > It is to remind you that you are in SCOPY MODE.
Example:
It you are copying a file "format", then type
COPY ''format'' CODE
The display will be:
INSERT SOURCE DISK THEN PRESS Y
Y
INSERT DESTINATION DISK THEN PRESS Y
Y
When the above process is completed, it will return to A#
I. ERROR MESSAGES
If D.O.S. commands are from BASIC or Machine Code programs, then D OS error messages will nol be
issued on fhe screen. Instead, they are stored in the Z80 Register Pair (BC) and they are in code The key to
decipher the code is
0 No errors
1 No files
2 File exist
3 No space
5 Record number overflow
7 Dish errors
8 Syntax errors
To obtain the error code, set a variable equal to the DOS. commands The variable will take on the value of
the error code on the completion of the D O S command.
Example t :
LET A = USR 15363 REM: CAT
Example 2;
A simple program illustrating the use of this error code
10 CLEAR 65367
20 LET ERR=USR 1 5363: REM: LOAD "COPY" CODE
25 REM ERROR CODE IS RETURN IN THE VARIABLE ERR
30 IF ERR - 1 THEN GOTO 100
35 REM IF ERROR CODE NOT = 1 THEN THE FILE CODE IS NOT ON THE DISK
40 RANDOMIZE USR 32768
50 RANDOMIZE USR 15360
100 CLS
110 PRINT AT 1 0: 1 ''''''COPY" "CODE NOT ON DISK"
120 STOP
J. PIN CONNECTIONS OF THE DISK DRIVE CONNECTOR
The disk drive connector (see Diagram 2) is designed to be Shugart compatible, and the pin connections are
detailed as below;
OV -- 1
2 --
OV -- 3
4 --
OV -- 5
6 -- Disk drive D
OV -- 7
8 -- Index
OV -- 9
10 -- Disk drive A
OV -- 11
12 -- Disk drive B
OV -- 13
14 -- Disk drive C
OV -- 15
16 -- Head Load (Motor on)
OV -- 17
18 -- Direction
OV -- 19
20 -- Step
OV -- 21
22 -- Write Data
OV -- 23
24 -- Write Gate
OV -- 25
26 -- Track 00
OV -- 27
28 -- Write Protected
OV -- 29
30 -- Read Data
OV -- 31
32 -- Side 1
OV -- 33
34 --
DIAGRAM 2
Pin connections of the disk drive connector (Front View).
24
34
oooooooooo
oooooooooo
13
33