1
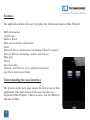
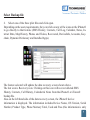
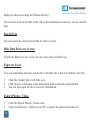
SmartPhone Recovery Pro™ for Windows User Guide Rev 2.6 Contents Introduction System Requirements Installation / Check for Updates Features Understanding the User Interface Data Recovery Recovering Data from your iPhone® Recovering Data from iTunes® Backup Files Select Backup File Search Text Hide Data Recovery Screen Export to Excel Troubleshooting Help and Support Page 2-3 3 3 4 4 5 5 6 6-8 8 8 8 9 10 Introduction The SmartPhoneRecoveryPro™ is a Windows based application for the AppleTM iPhone® that allows the user to view data and recover deleted data from the iPhone®. The data can be viewed and recovered directly from the iPhone® or from the iPhone® backup files. All iPhone® OS versions are supported by this application, including the latest v5.x OS. 2 System Requirements Hardware requirements • Pentium 233 Mhz or higher • iPhone® data transfer cable (included) Software requirements • iTunes® software must be installed prior to using this application. • Supports 32 bit and 64 bit versions of Windows XP, Windows Vista, and Windows 7. • If recovering data without an iPhone®, an iTunes® backup file is required. Installation / Check for Updates There is no installation required for this application as the software will run directly from the flash drive. You start the application by clicking on START.EXE to run the application. This application will open a menu from which you can select the version you wish to run. You can also check for any updates to the software which have been made in the period between manufacture and delivery to your retailer using the check for updates button. It is advisable to check for updates periodically as we will continue to update and enhance the software to ensure it works smoothly. 3 Features The application allows the user to explore the following features of the iPhone®. SMS Information Call History Address Book Mail and Calendar information Notes iPhone® Device Information including iPhone® capacity Internet History (including cookies and history) Map data Photos Keychain data Dynamic Text History (User defined dictionary) App Store Application Data Understanding the user interface The picture on the next page shows the first screen in this application. The main screen of the user interface is a facsimile of the iPhone®. It has two icons - one for iPhone® and one for PC. 4 iPhone® icon. The user is able to explore the data directly from the backup stored on the iPhone® by clicking on the iPhone® icon. PC icon. The user is able to explore the data from the last computer backup made by iTunes® by clicking on the PC icon. The data which is recovered by this application can be viewed in the data recovery screen which appears once you have selected the iPhone® icon or selected the backup from your PC. Data Recovery The SmartPhoneRecoveryPro™ retrieves data and recovers the deleted data from iPhone® devices. This section explains how to recover data from your iPhone®. 1. 2. 3. 4. 5. 6. 7. 8. Before recovery can begin, you must take the following steps. Turn on your iPhone® handset. Ensure that the battery is fully charged. Put your iPhone into Flight mode Ensure “Encrypt Backup” option is NOT selected in iTunes® Ensure Auto Sync is disabled in iTunes iPhone auto lock is set to “NEVER” Ensure that iTunes® is installed on your PC. 5 9. This software can not continue without iTunes® installed. 10. Connect your iPhone® to the PC using the data cable supplied with this product Data Recovery - Recovering data from the iPhone®. Click on the iPhone® icon from the main screen. The application will check for the iPhone® connection. If detected, it will open the data recovery screen. For extra security and peace of mind, the data in your iTunes® backup folder is not used. The SmartPhoneRecoveryPro™ creates a snapshot (a duplicate copy of your iTunes backup folder). It is this snapshot folder that the iPhone® uses to display the data from your iPhone®. Recovering data from iTunes® backup file 1. Click on the PC icon from the main screen. In the next screen, the user will see icons for each version of iPhone®. This screen is only displayed if the PC option is selected from the first screen 2. The user must choose and click on the icon which describes their version. (Selecting the wrong version will display error messages stating it was unable to retrieve the data from the backup file). 6 Click on the back icon to return to the first screen. Click on the help icon to display the help file for this application. Select Backup file Once the user has selected PC from the main screen, and selected their version of iPhone® they must then navigate to the backup folder. 3. Select one of the three plist files and click open. Depending on the users requirements, they can click on any of the icons on the iPhone® to go directly to that feature (SMS History, Contacts, Call Log, Calendar, Notes, Internet Data, Map History, Photos and Videos, Recovered, DeviceInfo, Accounts, Keychain, Dynamic Dictionary and Installed Apps). Please note that the time taken to display the photos will depend on the number of photos you have stored on your iPhone®. The more photos you have, the longer it will take to retrieve them. Please be patient 7 The feature selected will update the data recovery screen shown above. The last icon is Recovery icon. Clicking on this icon will recover deleted SMS History, Contacts, Call History, Calendar & Notes from the iPhone® or iTunes® backup file. Also on the left hand side of the data recovery screen, the iPhone® device information is displayed. The information includes Device Name, OS Version, Serial Number, Product Type, Phone Memory Total, Used and Free (this information is only displayed when acccessing the iPhone directly) You can also click on the tabs at the side of the information screen to view the desired data. 8 Search Text You can search the all text based tabs by letter or word. Hide Data Recovery Screen To hide the data recovery screen, the user must click on Hide icon. Export to Excel You can export data from the current tab or All tabs into a Excel workbook (.xls file) 1. 2. 3. Click the Current Tab or All Tabs icon Click browse to navigate to the destination folder, name the exported file. You can then open the file to view the information. Export Photos / Video 1. 2. 3. 4. Click the Export Photos / Videos icon Select the directory / folder on your PC to export the photos and videos to You can then open the folder to view the photos and videos If you are updating a folder from a previous export, please check the box “Replace if exists” 9 Troubleshooting The following section provides answers for some common issues that you may encounter when using the SmartPhoneRecoveryPro™. Problem: The iPhone® has stopped working. What do I do? Solution: Reset the iPhone® by holding down the sleep/wake icon at the top right of the device and the home icon at the bottom center of the face at the same time. Problem: The iPhone® doesn’t connect to the computer. What do I do? Solution: Please try one of the following: • • • • • The iPhone® battery might need to be recharged If that doesn’t work, disconnect other USB devices from your computer and connect the iPhone® to a different USB 2.0 port on your computer. If that doesn’t work, turn the iPhone® off and turn it on again. Press and hold the Sleep/Wake icon on the top of the iPhone® for a few seconds until a red slider appears and then slide the slider. Then press and hold the Sleep/Wake icon until the Apple™ logo appears. If that doesn’t work, restart your computer and reconnect the iPhone® to your computer. If that doesn’t work, download and install (or reinstall) the latest version of iTunes® from www.apple.com/iTunes Problem: The SmartPhoneRecoveryPro™ will not read my backup file on my PC? Solution:Please ensure “Encrypt Backup” is NOT selected in iTunes® Help and Support If you have not found a solution by visiting our website page, http://www.lm-ce.com/home/support LM Technologies does provide technical support via email - please send your query complete with the serial number by completing the online support ticket also available from the support web page (you will need to have registered your product first). We will endeavour to reply to your query as quickly as possible (usually within 48 hours of receiving the ticket). Please take a moment to register your product! Either use the enclosed warranty card or register by visiting our website and completing the registration form online. This will entitle you to FREE technical support for 1 year from date of purchase (please ensure you have kept evidence of your purchase - your receipt or invoice from the retailer). Failure to register will void any technical support you may require. © 2012 www.lm-ce.com 027-1055 SmartPhone Recovery Pro™ for Mac OS X User Guide Rev 2.6 Contents Introduction System Requirements Installation / Check for Updates Features Understanding the User Interface Data Recovery Recovering Data from your iPhone® Recovering Data from iTunes® Backup Files Select Backup File Search SMS Hide Data Recovery Screen Export to Excel Troubleshooting Help and Support Page 2-3 3 3 4 4 5 5 6 6-8 8 8 8 9 10 Introduction The SmartPhoneRecoveryPro™ is a Mac OS X based application for the AppleTM iPhone® that allows the user to view data and recover deleted data from the iPhone®. The data can be viewed and recovered directly from the iPhone® or from the iPhone® backup files. All iPhone® OS versions are supported by this application, including the latest v5.x OS. 2 System Requirements Hardware requirements • Intel based Mac system • iPhone® data transfer cable (included) Software requirements • iTunes® software must be installed prior to using this application. • Supports Mac OS X 10.5 - 10.7 • If recovering data without an iPhone®, an iTunes® backup file is required. Installation / Check for Updates There is no installation required for this application as the software will run directly from the flash drive. You start the application by clicking on start.exe to run the application. This application will open a menu from which you can select the version you wish to run. You can also check for any updates to the software which have been made in the period between manufacture and delivery to your retailer using the check for updates button. It is advisable to check for updates periodically as we will continue to update and enhance the software to ensure it works smoothly. 3 Features The application allows the user to explore the following features of the iPhone®. SMS Information Call History Address Book Mail and Calendar information Notes iPhone® Device Information including iPhone® capacity Internet History (including cookies and history) Map data Photos Keychain data Dynamic Text History (User defined dictionary) App Store Application Data Understanding the user interface The picture on the next page shows the first screen in this application. The main screen of the user interface is a facsimile of the iPhone®. It has two icons - one for iPhone® and one for Mac. 4 iPhone® icon. The user is able to explore the data directly from the backup stored on the iPhone® by clicking on the iPhone® icon. Mac icon. The user is able to explore the data from the last computer backup made by iTunes® by clicking on the Mac icon. The data which is recovered by this application can be viewed in the data recovery screen which appears once you have selected the iPhone® icon or selected the backup from your Mac. Data Recovery The SmartPhoneRecoveryPro™ retrieves data and recovers the deleted data from iPhone® devices. This section explains how to recover data from your iPhone®. 1. 2. 3. 4. 5. 6. 7. Before recovery can begin, you must take the following steps. Turn on your iPhone® handset. Ensure that the battery is fully charged. Put your iPhone into Flight mode Ensure “Encrypt Backup” option is NOT selected in iTunes® Ensure Auto Sync is disabled in iTunes iPhone auto lock is set to “NEVER” 5 8. Ensure that iTunes® is installed on your PC. 9. This software can not continue without iTunes® installed. 10. Connect your iPhone® to the PC using the data cable supplied with this product Data Recovery - Recovering data from the iPhone®. Click on the iPhone® icon from the main screen. The application will check for the iPhone® connection. If detected, it will open the data recovery screen. For extra security and peace of mind, the data in your iTunes® backup folder is not used. The SmartPhoneRecoveryPro™ creates a snapshot (a duplicate copy of your iTunes backup folder). It is this snapshot folder that the iPhone® uses to display the data from your iPhone®. Recovering data from iTunes® backup file 1. Click on the Mac icon from the main screen. Click on the back icon to return to the first screen. 6 Select Backup file 2. Select one of the three plist files and click open. Depending on the users requirements, they can click on any of the icons on the iPhone® to go directly to that feature (SMS History, Contacts, Call Log, Calendar, Notes, Internet Data, Map History, Photos and Videos, Recovered, DeviceInfo, Accounts, Keychain, Dynamic Dictionary and Installed Apps). The feature selected will update the data recovery screen shown above. The last icon is Recovery icon. Clicking on this icon will recover deleted SMS History, Contacts, Call History, Calendar & Notes from the iPhone® or iTunes® backup file. Also on the left hand side of the data recovery screen, the iPhone® device information is displayed. The information includes Device Name, OS Version, Serial Number, Product Type, Phone Memory Total, Used and Free (this information is only 7 displayed when acccessing the iPhone directly) You can also click on the tabs at the side of the information screen to view the desired data. Search Text You can search the all text based tabs by letter or word. Hide Data Recovery Screen To hide the data recovery screen, the user must click on Hide icon. Export to Excel You can export data from the current tab or All tabs into a Excel workbook (.xls file) 1. 2. 3. Click the Current Tab or All Tabs icon Click browse to navigate to the destination folder, name the exported file. You can then open the file to view the information. Export Photos / Video 1. 2. 8 Click the Export Photos / Videos icon Select the directory / folder on your PC to export the photos and videos to 3. 4. You can then open the folder to view the photos and videos If you are updating a folder from a previous export, please check the box “Replace if exists” Troubleshooting The following section provides answers for some common issues that you may encounter when using the Smart Phone Data Recovery Stick. Problem: The iPhone® has stopped working. What do I do? Solution: Reset the iPhone® by holding down the sleep/wake icon at the top right of the device and the home icon at the bottom center of the face at the same time. Problem: The iPhone® doesn’t connect to the computer. What do I do? Solution: Please try one of the following: • • • The iPhone® battery might need to be recharged If that doesn’t work, disconnect other USB devices from your computer and connect the iPhone® to a different USB 2.0 port on your computer. If that doesn’t work, turn the iPhone® off and turn it on again. Press and hold the Sleep/Wake icon on the top of the iPhone® for a few seconds until a red slider 9 • • appears and then slide the slider. Then press and hold the Sleep/Wake icon until the Apple™ logo appears. If that doesn’t work, restart your computer and reconnect the iPhone® to your computer. If that doesn’t work, download and install (or reinstall) the latest version of iTunes® from www.apple.com/iTunes Problem: The SmartPhoneRecoveryPro™ will not read my backup file on my Mac? Solution:Please ensure “Encrypt Backup” is NOT selected in iTunes® Help and Support Help is available through the normal help menu within the software. This guide and other documentation including the most up to date Frequently Asked Question’s (FAQ’s) are available from the support page of the LM Technologies website. You may need to install a version of Acrobat reader, which is free to download, to access this material. If you have not found a solution by visiting our website page, http://www.lm-ce.com/home/support LM Technologies does provide technical support via email - please send your query complete with the serial number by completing the online support ticket also available from the support web page (you will need to have registered your product first). We will endeavour to reply to your query as quickly as possible (usually within 48 hours of receiving the ticket). Please take a moment to register your product! Either use the enclosed warranty card or register by visiting our website and completing the registration form online. This will entitle you to FREE technical support for 1 year from date of purchase (please ensure you have kept evidence of your purchase - your receipt or invoice from the retailer). Failure to register will void any technical support you may require. © 2012 www.lm-ce.com 027-1055 LM Technologies 12 months Limited Warranty What does this limited warranty cover? This limited warranty covers any defects in material or workmanship in the new LM Technologies product accompanied by this limited warranty statement. Only consumers purchasing this product from an authorised LM Technologies distributor, retailer or re-seller may obtain coverage under this limited warranty. How long does the coverage last? The warranty period is twelve (12) months from the documented date of your purchase. What does this limited warranty not cover? This limited warranty does not cover any problem that is caused by (a) accident, abuse, neglect, shock, electrostatic discharge, heat or humidity beyond product specification; or (b) any misuse contrary to the instructions in the user manual; or (c) lost passwords; or (d) malfunctions caused by other equipment. This limited warranty is void if a product is returned with removed, damaged or tampered labels or any alterations (including removal of any component or external cover). This limited warranty does not cover data loss - backup any data to a separate medium where appropriate on a regular basis. Also, consequential damages; incidental damages; and costs related to data recovery, removal and installation are not recoverable under this warranty. What do you have to do to activate warranty? LM Technologies will not provide any warranty coverage unless your claim is in compliance with all terms of this limited warranty statement and you follow the proper return procedure. Product registration is a standard requirement before customer support can be given. You will be asked for your name, address, phone number, email address and product serial number when registering a product either online at : www.lm-ce.com/home/product_registration or via the attached warranty card. If the product is deemed to be within warranty and coverage is agreed, the product must be returned, properly packaged in its original packaging (or packaging providing the product with equivalent protection to the original packaging) and shipped, with the shipping charges prepaid, to the address supplied by your retailer or re-seller. Back up your data before sending the product back to LM Technologies because the product you send will not be returned to you. What LM Technologies will do? If LM Technologies and/or the retailer/re-seller authorises you to return your product, a replacement product will be issued to you without charge. By sending the product back to an LM Technologies authorised retailer / online seller, you agree to transfer ownership of the original product to LM Technologies. Data recovery (where appropriate) is not covered under this limited warranty and is not part of the refund / replacement process. LM Technologies warrants that replacement products are covered for the greater of either the remainder of the original product warranty or 90 days. This warranty statement does not affect your statutory rights. The Warranty Card at the end of this statement can be used to send your product registration back to LM Technologies Product Registration form Title First Name Last Name Email Address Address 1 Address 2 Address 3 Postcode Country Product Code Date of Purchase Serial Number Name of Retailer Nature of Use Mr / Miss / Mrs ______________________________ ______________________________ ______________________________ ______________________________ ______________________________ ______________________________ _________________ _________________ _________________ (This will start with LM) _____ / ______/ ______ ____________________ ______________________________ Business / Home Return the completed form to LM Technologies Ltd., Unit 10, Caroline Point, 62 Caroline Street, Birmingham, B3 1UF, United Kingdom