1
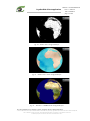
reference VT-P202-SUM-001-E issue 1 revision 9 date 24/02/2015 VisioTerra page 1 of 49 CryoSat Web Client application User's Manual name function company prepared by Guillaume AUREL Engineer VisioTerra [email protected] checked by Grégory MAZABRAUD Engineer VisioTerra [email protected] approved by Serge RIAZANOFF Director VisioTerra [email protected] date signature " This document discloses subject matter in which VisioTerra has proprietary rights. Recipient of this document shall not duplicate, use or disclose in whole or in part, information disclosed here on except for or on behalf of VisioTerra to fulfil the purpose for which the document was delivered to him. ” reference VT-P202-SUM-001-E CryoSat Web Client application VisioTerra issue 1 revision 9 User's Manual date 24/02/2015 page 2 of 49 DOCUMENT STATUS SHEET Issue Date Comments Author 1.0 14/04/2014 Draft 01 - Creation of the document G. Aurel 1.0 08/04/2014 Draft 02 - Modifications according to updated user interface G. Aurel 1.0 14/04/2014 Draft 03 - Modifications according to updated VtWeb user manual G. Aurel 1.0 14/04/2014 First release delivered to T. Parrinello G. Aurel 1.1 15/04/2014 Draft 01 - Logo changed and some figures added G. Aurel 1.1 23/04/2014 Draft 02 - Review of the document S. Riazanoff 1.1 25/05/2014 Draft 03 - Modifications made according to the review comments. G. Aurel 1.1 26/05/2014 Second release delivered to T. Parrinello G. Aurel 1.2 17/06/2014 Draft 01 - Modifications made according to T. Parrinello's comments G. Aurel 1.2 24/06/2014 Draft 02 - Some parts have been rewritten for an easier reading H. Charbit 1.2 24/06/2014 Draft 03 - Review of the modifications. G. Aurel 1.2 25/06/2014 Third release delivered to T. Parrinello G. Aurel 1.3 01/07/2014 Draft 01 - Addition of real screen captures G. Aurel 1.3 01/07/2014 Fourth release delivered to T. Parrinello G. Aurel 1.4 15/07/2014 Draft 01 - Sections relative to VtWeb rather than VtCryoSat moved in annex as asked by T. Parrinello. G. Aurel 1.4 19/09/2014 Fifth release delivered to T. Parrinello. G. Aurel 1.5 26/09/2014 Draft 01 - Screen captures updated with the new interface, background layers updated, download capabilities updated, kml edition added, reset capabilities added. G. Aurel 1.5 26/09/2014 Sixth release delivered to T. Parrinello. G. Aurel 1.6 05/12/2014 Draft 01 - Added a section showing how to enable WebGl on Safari in 2.4.1 Setting the 2D/3D view, more detailed nomenclature of products in 3.2 List of CryoSat products. G. Aurel 1.6 05/12/2014 Seventh release delivered to T. Parrinello. G. Aurel 1.7 29/01/2015 Draft 01 - Update for VtCryoSat 1.3. G. Aurel 1.7 29/01/2015 Eighth release delivered to T. Parrinello. G. Aurel 1.8 13/02/2015 Ninth release delivered to T. Parrinello, updated for VtCryoSat 1.4. G. Aurel 1.9 24/02/2015 Tenth release delivered to T. Parrinello, modified according to his comments received on the 24/02/2015. G. Aurel " This document discloses subject matter in which VisioTerra has proprietary rights. Recipient of this document shall not duplicate, use or disclose in whole or in part, information disclosed here on except for or on behalf of VisioTerra to fulfil the purpose for which the document was delivered to him. ” reference VT-P202-SUM-001-E CryoSat Web Client application VisioTerra User's Manual issue 1 revision 9 date 24/02/2015 page 3 of 49 TABLE OF CONTENTS 1 PURPOSE ............................................................................................................................................................ 7 2 THE VTWEB PLATFORM ................................................................................................................................... 8 2.1 VTWEB CLIENT-SERVER ARCHITECTURE ................................................................................................. 8 2.2 SERVICE PANEL(S)................................................................................................................................. 10 2.3 LAYER STACK........................................................................................................................................ 10 2.3.1 Temporary / Voluntary display.................................................................................................. 10 2.3.1.1 2.3.1.2 Temporary display......................................................................................................................10 Voluntary display .......................................................................................................................11 2.3.2 Structure.................................................................................................................................... 12 2.3.2.1 2.3.2.2 2.3.2.3 2.3.2.4 Creating folders ..........................................................................................................................12 Moving items in the layer stack..................................................................................................12 Renaming items..........................................................................................................................12 Deleting items ............................................................................................................................13 2.3.3 Display capabilities................................................................................................................... 14 2.3.3.1 2.3.3.2 2.3.3.3 Setting the display on / off..........................................................................................................14 Selecting a style..........................................................................................................................14 Applying a style to a layer..........................................................................................................15 Creating a style...........................................................................................................................15 Default style ...............................................................................................................................16 Style of an uploaded kml ............................................................................................................16 2.3.4 Export capabilities .................................................................................................................... 16 2.3.5 Product data download ............................................................................................................. 18 2.4 DISPLAY PANEL ..................................................................................................................................... 19 2.4.1 Setting the 2D/3D views ............................................................................................................ 19 2.4.2 Navigating across the world...................................................................................................... 21 2.4.3 Resetting the camera view......................................................................................................... 21 2.4.4 Setting background layer........................................................................................................... 22 3 VTCRYOSAT FUNCTIONNALITIES ................................................................................................................... 28 3.1 DATA SEARCH ....................................................................................................................................... 28 3.1.1 Geographic criteria, choice of an Area of Interest ................................................................... 28 3.1.1.1 3.1.1.2 3.2 3.3 Getting the AOI from a KML file...............................................................................................28 Getting an AOI from the display panel.......................................................................................29 AOI designed as a bounding box................................................................................................29 AOI designed as a circle.............................................................................................................30 AOI designed as a polygon.........................................................................................................30 AOI designed as a corridor.........................................................................................................30 3.1.2 Temporal criteria, choice of a time period................................................................................ 31 3.1.3 Choice of allowed CryoSat datasets.......................................................................................... 32 LIST OF CRYOSAT PRODUCTS ................................................................................................................ 32 MANAGING SEARCH RESULTS (CRYOSAT PRODUCTS) ........................................................................... 32 3.3.1 Display product......................................................................................................................... 32 3.3.1.1 3.3.1.2 3.3.1.3 3.3.1.4 3.3.1.5 3.3.1.6 3.3.1.7 3.3.1.8 Choosing the measure to display ................................................................................................33 Choosing the scale factor of the display .....................................................................................34 Choosing the colour of the display .............................................................................................34 Choosing the opacity of the display............................................................................................35 Applying the style ......................................................................................................................36 Saving the style ..........................................................................................................................36 Cancelling the style creation / edition ........................................................................................37 Default styles..............................................................................................................................37 3.3.2 Export product .......................................................................................................................... 37 3.3.3 Download data .......................................................................................................................... 37 3.3.3.1 3.3.3.2 3.3.3.3 ANNEX A Restricted access.........................................................................................................................38 Product levels .............................................................................................................................38 Download path ...........................................................................................................................38 OTHER FUNCTIONALITIES OF THE VTWEB PLATFORM .......................................................... 40 " This document discloses subject matter in which VisioTerra has proprietary rights. Recipient of this document shall not duplicate, use or disclose in whole or in part, information disclosed here on except for or on behalf of VisioTerra to fulfil the purpose for which the document was delivered to him. ” reference VT-P202-SUM-001-E CryoSat Web Client application VisioTerra A.1 A.2 User's Manual issue 1 revision 9 date 24/02/2015 page 4 of 49 GETTING ASSOCIATED METEOROLOGICAL DATA ................................................................................... 40 ON-THE-FLY PROCESSING AND DATASET RENDERING ............................................................................ 41 A.2.1 Multiscale display - The VtQuadtree organisation ................................................................... 41 A.2.2 On-the-fly processing pipe ........................................................................................................ 42 A.2.2.1 Step 1 – RGB mapping...............................................................................................................42 A.2.2.2 Step 2 – Radiometry processing by “Histogram transform”.......................................................43 A.2.2.3 Step 3 – Radiometry processing by “Filtering” ..........................................................................45 A.2.3 Dataset rendering...................................................................................................................... 46 A.2.3.1 Standard greyscale rendering......................................................................................................46 A.2.3.2 Standard RGB rendering ............................................................................................................48 A.2.3.3 Standard complex field rendering...............................................................................................49 " This document discloses subject matter in which VisioTerra has proprietary rights. Recipient of this document shall not duplicate, use or disclose in whole or in part, information disclosed here on except for or on behalf of VisioTerra to fulfil the purpose for which the document was delivered to him. ” reference VT-P202-SUM-001-E CryoSat Web Client application VisioTerra User's Manual issue 1 revision 9 date 24/02/2015 page 5 of 49 LIST OF FIGURES fig. 1 - CryoSat client-server architecture................................................................................................................ 7 fig. 2 - The “VtWeb client” main interface. ............................................................................................................ 8 fig. 3 - “VtWeb client” shown using Firefox, Chrome, Opera and Internet Explorer. ............................................ 9 fig. 4 - Layer stack – Temporary display............................................................................................................... 10 fig. 5 - Layer stack – Voluntary display. ............................................................................................................... 11 fig. 6 - Layer stack – Creating folders. .................................................................................................................. 12 fig. 7 - Layer Stack – Edit a layer’s label. ............................................................................................................. 13 fig. 8 - Layer Stack – Deleting an object from the layer stack. ............................................................................. 13 fig. 9 - Layer stack – Setting display on / off. ....................................................................................................... 14 fig. 10 - Layer stack – Selecting a style................................................................................................................. 15 fig. 11 - Layer stack – Changing default style....................................................................................................... 16 fig. 12 - Layer stack – Changing an uploaded kml style. ...................................................................................... 16 fig. 13 - Layer stack – Download menu in the layer stack’s context menu. .......................................................... 17 fig. 14 - Layer Stack – Example of export “as KML” seen in Google Earth (bottom).......................................... 18 fig. 15 - Switching from 2D (top) to 3D (bottom) displays. .................................................................................. 19 fig. 16 - VtCryoSat appearance with WebGl disabled........................................................................................... 20 fig. 17 - Enabling WebGl. ..................................................................................................................................... 21 fig. 18 - Effect of resetting controls on the camera. .............................................................................................. 22 fig. 19 - Background layer selection menu in 2D (left) and 3D (right) view......................................................... 23 fig. 20 - OSGeo – Vmap0 background layer. ........................................................................................................ 23 fig. 21 - Demis.nl – coastlines background layer. ................................................................................................. 24 fig. 22 - NASA – Blue Marble background layer.................................................................................................. 24 fig. 23 - NASA – Landsat-7 background layer...................................................................................................... 24 fig. 24 - Terrestris Open Street Map background layer. ........................................................................................ 25 fig. 25 - Open Street Map background layer. ........................................................................................................ 25 fig. 26 - Microsoft Bing Map background layer.................................................................................................... 25 fig. 27 - NASA – MODIS mosaic background layer............................................................................................. 26 fig. 28 - NASA – Earth at night background layer. ............................................................................................... 26 fig. 29 - NASA – MODIS watermask background layer....................................................................................... 26 fig. 30 - Stamen toner background layer. .............................................................................................................. 27 fig. 31 - Stamen water colour background layer.................................................................................................... 27 fig. 32 - VisioTerra - MERIS mosaic background layer........................................................................................ 27 fig. 33 - The VtCryoSat search interface. .............................................................................................................. 28 fig. 34 - Bounding box AOI on Iceland................................................................................................................. 29 fig. 35 - Circle AOI on Svalbard. .......................................................................................................................... 30 fig. 36 - Polygon AOI on South Georgia............................................................................................................... 30 fig. 37 - Corridor AOI on Greenland's East coast.................................................................................................. 31 fig. 38 - Date choice tools...................................................................................................................................... 31 fig. 39 - Dataset choice tools. ................................................................................................................................ 32 fig. 40 - List of matching CryoSat products. ......................................................................................................... 32 fig. 41 - The new style window. ............................................................................................................................ 33 fig. 42 - Selection of the measure to display. ........................................................................................................ 34 fig. 43 - The colour picking window. .................................................................................................................... 34 fig. 44 - Use of the last colours menu.................................................................................................................... 35 fig. 45 - Setting the style opacity........................................................................................................................... 35 fig. 46 - Layer stack – Opacity set around 30% (left) 70% (centre) and 100% (right).......................................... 36 fig. 47 - Applying the style.................................................................................................................................... 36 fig. 48 - Applying the style.................................................................................................................................... 36 fig. 49 - Cancelling the style edition...................................................................................................................... 37 fig. 50 - Exporting a product. ................................................................................................................................ 37 fig. 51 - The download product data window........................................................................................................ 39 fig. 52 - Layer Stack – Getting associated data. .................................................................................................... 40 fig. 53 - VtQuadtree example – Level 4 (top left), Level 2 (top right) and Level 0 (bottom). .............................. 41 " This document discloses subject matter in which VisioTerra has proprietary rights. Recipient of this document shall not duplicate, use or disclose in whole or in part, information disclosed here on except for or on behalf of VisioTerra to fulfil the purpose for which the document was delivered to him. ” reference VT-P202-SUM-001-E CryoSat Web Client application VisioTerra User's Manual issue 1 revision 9 date 24/02/2015 page 6 of 49 fig. 54 - Landsat-8 CC 4 3 2. ................................................................................................................................. 42 fig. 55 - Landsat-8 CC 7 6 5. ................................................................................................................................. 43 fig. 56 - Landsat-8 CC 9 6 1. ................................................................................................................................. 43 fig. 57 - Default histogram transform. ................................................................................................................... 44 fig. 58 - Automatic stretching 2%. ........................................................................................................................ 44 fig. 59 - Automatic stretching 14%. ...................................................................................................................... 45 fig. 60 - No filtering. ............................................................................................................................................. 45 fig. 61 - Sharpening. .............................................................................................................................................. 46 " This document discloses subject matter in which VisioTerra has proprietary rights. Recipient of this document shall not duplicate, use or disclose in whole or in part, information disclosed here on except for or on behalf of VisioTerra to fulfil the purpose for which the document was delivered to him. ” reference VT-P202-SUM-001-E CryoSat Web Client application VisioTerra User's Manual issue 1 revision 9 date 24/02/2015 page 7 of 49 1 PURPOSE VtCryoSat is an application designed to filter CryoSat data, display them on a virtual globe, easily download them as a KML file and download products directly from the CryoSat dissemination server. VtCryoSat is intended to work with the use of a recent web browser and doesn’t require any software or plug-in installation. In order to search data, the user needs to specify an Area Of Interest (AOI), a time interval, and a dataset. Once CryoSat products have been listed, they can be displayed on the layer stack. The physical measure, its scale and the display colour of the selected data can be set according to the user’s needs and will then appear on the VtWeb virtual globe. Following the same criteria, a KML export of the same measure can also be downloaded. Afterwards, ESA-allowed users can download the product data in the Level 1b (L1b), Level 2 (L2) and Geophysical Data Record (GDR) product levels by using their login password which will give VtCryoSat access to the ESA CryoSat dissemination server ftp://science-pds.cryosat.esa.int. FTP CryoSat server CryoSat wrapper VtCryoSat archive ESA DB CryoSat dissemination server data processing display service export service download service CryoSat client L1 & L2 CryoSat products Earth Explorer format fig. 1 - CryoSat client-server architecture. " This document discloses subject matter in which VisioTerra has proprietary rights. Recipient of this document shall not duplicate, use or disclose in whole or in part, information disclosed here on except for or on behalf of VisioTerra to fulfil the purpose for which the document was delivered to him. ” reference VT-P202-SUM-001-E CryoSat Web Client application VisioTerra User's Manual issue 1 revision 9 date 24/02/2015 page 8 of 49 2 THE VTWEB PLATFORM 2.1 VtWeb client-server architecture The application can be accessed via a recent Web-browser such as Internet Explorer (MicrosoftTM), Chrome (GoogleTM), Firefox (MozillaTM), Opera (Opera SoftwareTM) or Safari (AppleTM). It can also be accessed through a KML file exported by the “VtWeb client” (see section 2.3.3.3). The “VtWeb client” main window is composed of the panels shown in below. Each panel is described in the sub-sections hereafter. service panels: i.e. VtCryosat display panel A “service” acts as a “data provider” from which selected data are selected and/or dragged to the “layer stack” layer stack During the session, the “layer stack” stores the data the user is interested in. Products in the layer stack may be selected to be displayed. fig. 2 - The “VtWeb client” main interface. " This document discloses subject matter in which VisioTerra has proprietary rights. Recipient of this document shall not duplicate, use or disclose in whole or in part, information disclosed here on except for or on behalf of VisioTerra to fulfil the purpose for which the document was delivered to him. ” reference VT-P202-SUM-001-E CryoSat Web Client application VisioTerra User's Manual issue 1 revision 9 date 24/02/2015 page 9 of 49 fig. 3 - “VtWeb client” shown using Firefox, Chrome, Opera and Internet Explorer. " This document discloses subject matter in which VisioTerra has proprietary rights. Recipient of this document shall not duplicate, use or disclose in whole or in part, information disclosed here on except for or on behalf of VisioTerra to fulfil the purpose for which the document was delivered to him. ” reference VT-P202-SUM-001-E CryoSat Web Client application VisioTerra 2.2 User's Manual issue 1 revision 9 date 24/02/2015 page 10 of 49 Service panel(s) This panel depends on the service(s) available for this application and may contain the interface for these different services. VtCryoSat is the service object of the present document and is detailed in section 3 but examples may use the VtAoiWatcher which is already running. 2.3 Layer stack The layer stack contains the list of all the items that can be displayed in the display panel. Items in the layer stack will be processed in the order they are organized: the one at the top of the list will be the last to be drawn. 2.3.1 Temporary / Voluntary display 2.3.1.1 Temporary display When items of the list are browsed in the VtCryoSat service panel, they are temporarily displayed in the layer stack and therefore they shall appear in the display area. fig. 4 - Layer stack – Temporary display. " This document discloses subject matter in which VisioTerra has proprietary rights. Recipient of this document shall not duplicate, use or disclose in whole or in part, information disclosed here on except for or on behalf of VisioTerra to fulfil the purpose for which the document was delivered to him. ” reference VT-P202-SUM-001-E CryoSat Web Client application VisioTerra 2.3.1.2 User's Manual issue 1 revision 9 date 24/02/2015 page 11 of 49 Voluntary display When items are selected to be displayed in the VtCryosat service panel, they are added to the layer stack (to display an item, click on “Add to layer stack” in the context menu or double-click on the item). fig. 5 - Layer stack – Voluntary display. " This document discloses subject matter in which VisioTerra has proprietary rights. Recipient of this document shall not duplicate, use or disclose in whole or in part, information disclosed here on except for or on behalf of VisioTerra to fulfil the purpose for which the document was delivered to him. ” reference VT-P202-SUM-001-E CryoSat Web Client application VisioTerra User's Manual issue 1 revision 9 date 24/02/2015 page 12 of 49 2.3.2 Structure 2.3.2.1 Creating folders The layer stack can be organized with folders that can be created in two different ways: Right-click on an existing folder and select “Create folder” option. Right-click on a layer and select “Add to a new folder” option. This way directly moves the selected layer in the new folder. Right-click on a layer and select the “Add to a new folder” option. In that way, the layer is directly moved to the new folder. In the example here below, the “SAR” folder has been added. fig. 6 - Layer stack – Creating folders. 2.3.2.2 Moving items in the layer stack Any items or group of items can be moved across the layer stack by “drag-and-drop”. In the example here attached, the CryoSat SAR layer has been stored in the “SAR” folder, created in the previous section. Note that the display order will change according to the order of the layers in the stack. 2.3.2.3 Renaming items To rename folders, click on them and select the “Edit label” option. " This document discloses subject matter in which VisioTerra has proprietary rights. Recipient of this document shall not duplicate, use or disclose in whole or in part, information disclosed here on except for or on behalf of VisioTerra to fulfil the purpose for which the document was delivered to him. ” reference VT-P202-SUM-001-E CryoSat Web Client application VisioTerra User's Manual issue 1 revision 9 date 24/02/2015 page 13 of 49 fig. 7 - Layer Stack – Edit a layer’s label. 2.3.2.4 Deleting items Any items or group of items can be deleted from the layer stack by selecting the “Delete from layer stack” option of the context menu. fig. 8 - Layer Stack – Deleting an object from the layer stack. " This document discloses subject matter in which VisioTerra has proprietary rights. Recipient of this document shall not duplicate, use or disclose in whole or in part, information disclosed here on except for or on behalf of VisioTerra to fulfil the purpose for which the document was delivered to him. ” reference VT-P202-SUM-001-E CryoSat Web Client application VisioTerra User's Manual issue 1 revision 9 date 24/02/2015 page 14 of 49 2.3.3 Display capabilities 2.3.3.1 Setting the display on / off The display of the items, or group of items if the node represents a folder, is controlled by square checkboxes ( or ). In order to have items displayed, check the corresponding boxes. fig. 9 - Layer stack – Setting display on / off. 2.3.3.2 Selecting a style Users can select a style for a layer. Styles are defined by rendering parameters explained in section A.2.3 and are valid for a dataset. A set of styles is predefined for each dataset. For each dataset, one can create a new style, view or edit an existing style, copy an existing style, change the default style. " This document discloses subject matter in which VisioTerra has proprietary rights. Recipient of this document shall not duplicate, use or disclose in whole or in part, information disclosed here on except for or on behalf of VisioTerra to fulfil the purpose for which the document was delivered to him. ” reference VT-P202-SUM-001-E CryoSat Web Client application VisioTerra User's Manual issue 1 revision 9 date 24/02/2015 page 15 of 49 Applying a style to a layer From the layer stack, users may apply a style to a layer by right-clicking on this layer and selecting a style in the “Style” menu. Please, note that the style is processed “on the fly” (see section A.2.2). fig. 10 - Layer stack – Selecting a style. Creating a style For all datasets, there exists at least one predefined style which cannot be changed by the user. To set custom rendering parameters, the user has to create a new style or edit a copy of a predefined style. The new style will be available for the layer’s dataset. " This document discloses subject matter in which VisioTerra has proprietary rights. Recipient of this document shall not duplicate, use or disclose in whole or in part, information disclosed here on except for or on behalf of VisioTerra to fulfil the purpose for which the document was delivered to him. ” reference VT-P202-SUM-001-E CryoSat Web Client application VisioTerra User's Manual issue 1 revision 9 date 24/02/2015 page 16 of 49 Default style A default style is a pointer to an existing style (predefined or user defined). Users can change the default style by selecting another radio-button in the list of style as can be seen below. fig. 11 - Layer stack – Changing default style. 2.3.3.3 Style of an uploaded kml The style of an uploaded kml can be edited using by right-clicking the kml name in the layerstack. Then one has to select "Edit style" which opens a specific window. The user can edit the colour and the opacity of the rendering using the controls. fig. 12 - Layer stack – Changing an uploaded kml style. 2.3.4 Export capabilities It is possible to export any layer that is in the layer stack by right-clicking on it to open the context menu and by selecting the “Save as” option. " This document discloses subject matter in which VisioTerra has proprietary rights. Recipient of this document shall not duplicate, use or disclose in whole or in part, information disclosed here on except for or on behalf of VisioTerra to fulfil the purpose for which the document was delivered to him. ” reference VT-P202-SUM-001-E CryoSat Web Client application VisioTerra User's Manual issue 1 revision 9 date 24/02/2015 page 17 of 49 Note that the layer is downloaded with the style associated to it. fig. 13 - Layer stack – Download menu in the layer stack’s context menu. There are two ways of exporting layers: KML - By pressing “as KML” option, a light KML file is produced with dynamic links to display the layer in Google Earth. Such a display requires a connection to the server. KMZ - By pressing “as KMZ” option, a heavy KMZ file is produced that contains all the data to be displayed on Google Earth without any connection to the server. " This document discloses subject matter in which VisioTerra has proprietary rights. Recipient of this document shall not duplicate, use or disclose in whole or in part, information disclosed here on except for or on behalf of VisioTerra to fulfil the purpose for which the document was delivered to him. ” reference VT-P202-SUM-001-E CryoSat Web Client application VisioTerra User's Manual issue 1 revision 9 date 24/02/2015 page 18 of 49 fig. 14 - Layer Stack – Example of export “as KML” seen in Google Earth (bottom). 2.3.5 Product data download It is possible to download the original product data associated to any layer that is in the layer stack by right-clicking on it to open the context menu and by selecting the “Download” option. After import, a new “folder” is created in the layer stack with the origin and associated layers. This folder has the name of the origin layer. " This document discloses subject matter in which VisioTerra has proprietary rights. Recipient of this document shall not duplicate, use or disclose in whole or in part, information disclosed here on except for or on behalf of VisioTerra to fulfil the purpose for which the document was delivered to him. ” reference VT-P202-SUM-001-E CryoSat Web Client application VisioTerra 2.4 User's Manual issue 1 revision 9 date 24/02/2015 page 19 of 49 Display panel 2.4.1 Setting the 2D/3D views By default, VtCryoSat uses the 3D view. The “Mapping” option of the “Display” tab in the “Options” item of the “Tools” menu enables to permute the 2D and the 3D displays. A shortcut “Ctrl + M” is defined to switch between 2D view and 3D view. fig. 15 - Switching from 2D (top) to 3D (bottom) displays. " This document discloses subject matter in which VisioTerra has proprietary rights. Recipient of this document shall not duplicate, use or disclose in whole or in part, information disclosed here on except for or on behalf of VisioTerra to fulfil the purpose for which the document was delivered to him. ” reference VT-P202-SUM-001-E CryoSat Web Client application VisioTerra User's Manual issue 1 revision 9 date 24/02/2015 page 20 of 49 If the WebGl is set to disabled on the chosen web browser, a warning message may appear when charging the VtCryoSat URL indicating WebGl is not enabled as shown on Safari below. Then the VtCryoSat interface appears but the display area shows a 2D map instead if a 3D globe. fig. 16 - VtCryoSat appearance with WebGl disabled. " This document discloses subject matter in which VisioTerra has proprietary rights. Recipient of this document shall not duplicate, use or disclose in whole or in part, information disclosed here on except for or on behalf of VisioTerra to fulfil the purpose for which the document was delivered to him. ” reference VT-P202-SUM-001-E CryoSat Web Client application VisioTerra User's Manual issue 1 revision 9 date 24/02/2015 page 21 of 49 In this case, the user has to change this setting in order to use the 3D view. On Safari, this requires to press the “Enable WebGl” button of the “Develop” menu. Then the user only has to reload the page. fig. 17 - Enabling WebGl. 2.4.2 Navigating across the world Users can navigate across the globe with the pan, the zoom and the tilt action. Pan: left-click on map or globe and drag the pointer to move world. In 3D view, users can pan with arrow keys. Zoom: scroll mouse wheel to zoom in and out the world to pointer position. User may navigate to the native resolution. A double click zooms to pointer position. Tilt (only on 3D view): click on mouse wheel and drag up/down direction to change tilt. In 3D view, the controls are similar to the controls in Google Earth TM software. 2.4.3 Resetting the camera view The Globe camera can be reset using 'r' button: to reset the tilt and the azimuth to the default values. 'Shift'+'r' button: to reset the tilt, the azimuth, the position and the altitude to the default values. " This document discloses subject matter in which VisioTerra has proprietary rights. Recipient of this document shall not duplicate, use or disclose in whole or in part, information disclosed here on except for or on behalf of VisioTerra to fulfil the purpose for which the document was delivered to him. ” reference VT-P202-SUM-001-E CryoSat Web Client application VisioTerra User's Manual issue 1 revision 9 date 24/02/2015 page 22 of 49 Reset using 'r' button Reset using 'Shift'+'r' buttons fig. 18 - Effect of resetting controls on the camera. 2.4.4 Setting background layer The menu located at the upper-right corner of the display panel enables to select the background layer. " This document discloses subject matter in which VisioTerra has proprietary rights. Recipient of this document shall not duplicate, use or disclose in whole or in part, information disclosed here on except for or on behalf of VisioTerra to fulfil the purpose for which the document was delivered to him. ” reference VT-P202-SUM-001-E CryoSat Web Client application VisioTerra User's Manual issue 1 revision 9 date 24/02/2015 page 23 of 49 fig. 19 - Background layer selection menu in 2D (left) and 3D (right) view. Figures fig. 20, to fig. 32 here after show the available background layers. fig. 20 - OSGeo – Vmap0 background layer. " This document discloses subject matter in which VisioTerra has proprietary rights. Recipient of this document shall not duplicate, use or disclose in whole or in part, information disclosed here on except for or on behalf of VisioTerra to fulfil the purpose for which the document was delivered to him. ” reference VT-P202-SUM-001-E CryoSat Web Client application VisioTerra User's Manual issue 1 revision 9 date 24/02/2015 page 24 of 49 fig. 21 - Demis.nl – coastlines background layer. fig. 22 - NASA – Blue Marble background layer. fig. 23 - NASA – Landsat-7 background layer. " This document discloses subject matter in which VisioTerra has proprietary rights. Recipient of this document shall not duplicate, use or disclose in whole or in part, information disclosed here on except for or on behalf of VisioTerra to fulfil the purpose for which the document was delivered to him. ” reference VT-P202-SUM-001-E CryoSat Web Client application VisioTerra User's Manual issue 1 revision 9 date 24/02/2015 page 25 of 49 fig. 24 - Terrestris Open Street Map background layer. fig. 25 - Open Street Map background layer. fig. 26 - Microsoft Bing Map background layer. " This document discloses subject matter in which VisioTerra has proprietary rights. Recipient of this document shall not duplicate, use or disclose in whole or in part, information disclosed here on except for or on behalf of VisioTerra to fulfil the purpose for which the document was delivered to him. ” reference VT-P202-SUM-001-E CryoSat Web Client application VisioTerra User's Manual issue 1 revision 9 date 24/02/2015 page 26 of 49 fig. 27 - NASA – MODIS mosaic background layer. fig. 28 - NASA – Earth at night background layer. fig. 29 - NASA – MODIS watermask background layer. " This document discloses subject matter in which VisioTerra has proprietary rights. Recipient of this document shall not duplicate, use or disclose in whole or in part, information disclosed here on except for or on behalf of VisioTerra to fulfil the purpose for which the document was delivered to him. ” reference VT-P202-SUM-001-E CryoSat Web Client application VisioTerra User's Manual issue 1 revision 9 date 24/02/2015 page 27 of 49 fig. 30 - Stamen toner background layer. fig. 31 - Stamen water colour background layer. fig. 32 - VisioTerra - MERIS mosaic background layer. It is also possible not to display a globe, using the "None" background layer. " This document discloses subject matter in which VisioTerra has proprietary rights. Recipient of this document shall not duplicate, use or disclose in whole or in part, information disclosed here on except for or on behalf of VisioTerra to fulfil the purpose for which the document was delivered to him. ” reference VT-P202-SUM-001-E CryoSat Web Client application VisioTerra User's Manual issue 1 revision 9 date 24/02/2015 page 28 of 49 3 VTCRYOSAT FUNCTIONNALITIES 3.1 Data search In order to retrieve data, criteria have to be entered in VtCryosat. Options have to be selected before pressing the “Search” button. fig. 33 - The VtCryoSat search interface. 3.1.1 Geographic criteria, choice of an Area of Interest Setting an area of interest (AOI) is the first step when using VtCryosat. If no AOI is specified, VtCryosat will search for data of the entire Earth. With the radio button provided for this purpose, an AOI can be defined in three different ways: by checking the “World” option, by importing a polygon contained in a KML file input, by using the VtWeb tool on the display panel. 3.1.1.1 Getting the AOI from a KML file Activating the “Browse” button displays an “Open” file chooser. Areas of interest are closed polygons without holes stored in graphic files according to a specific format. VtWeb only recognizes the KML format in input. KML stands for “Keyhole Markup Language”, which is a format originally managed by Google Earth. " This document discloses subject matter in which VisioTerra has proprietary rights. Recipient of this document shall not duplicate, use or disclose in whole or in part, information disclosed here on except for or on behalf of VisioTerra to fulfil the purpose for which the document was delivered to him. ” reference VT-P202-SUM-001-E CryoSat Web Client application VisioTerra User's Manual issue 1 revision 9 date 24/02/2015 page 29 of 49 AOI may match complex patterns with an undefined number of vertices, with undefined extents on the Earth. 3.1.1.2 Getting an AOI from the display panel The AOI may be chosen using the VtWeb tool on the display panel. It allows four types of AOI design options. AOI designed as a bounding box The AOI is the inside area of a box whose latitudes and longitudes extents have been defined by minimum and maximum values. Green upper left and lower right points can be dragged in order to set the extent of this box as well as the yellow central point to move the box. fig. 34 - Bounding box AOI on Iceland. " This document discloses subject matter in which VisioTerra has proprietary rights. Recipient of this document shall not duplicate, use or disclose in whole or in part, information disclosed here on except for or on behalf of VisioTerra to fulfil the purpose for which the document was delivered to him. ” reference VT-P202-SUM-001-E CryoSat Web Client application VisioTerra User's Manual issue 1 revision 9 date 24/02/2015 page 30 of 49 AOI designed as a circle The AOI is the inside area of a circle defined by its yellow centre and a green point on the circle which determines the radius value. Both can be dragged to change the values. fig. 35 - Circle AOI on Svalbard. AOI designed as a polygon The AOI is the inside area of a polygon delimited by various points. Each delimiting green points can be dragged in order to modify the polygon, as well as the yellow centre point to move the whole polygon. fig. 36 - Polygon AOI on South Georgia. AOI designed as a corridor The AOI is the inside area of a corridor defined by a central polyline and a point at the edge to delimit the buffer width around this polyline. The green points of the polyline or the green points at the edge can be dragged to modify the orientation and the width of the corridor. " This document discloses subject matter in which VisioTerra has proprietary rights. Recipient of this document shall not duplicate, use or disclose in whole or in part, information disclosed here on except for or on behalf of VisioTerra to fulfil the purpose for which the document was delivered to him. ” reference VT-P202-SUM-001-E CryoSat Web Client application VisioTerra User's Manual issue 1 revision 9 date 24/02/2015 page 31 of 49 fig. 37 - Corridor AOI on Greenland's East coast. 3.1.2 Temporal criteria, choice of a time period The temporal extent of the search may be limited by a starting and an ending date. Both can be entered manually using the YYYY-MM-DD date format or by using the calendar tool on the right that opens with a left click. fig. 38 - Date choice tools. " This document discloses subject matter in which VisioTerra has proprietary rights. Recipient of this document shall not duplicate, use or disclose in whole or in part, information disclosed here on except for or on behalf of VisioTerra to fulfil the purpose for which the document was delivered to him. ” reference VT-P202-SUM-001-E CryoSat Web Client application VisioTerra User's Manual issue 1 revision 9 date 24/02/2015 page 32 of 49 3.1.3 Choice of allowed CryoSat datasets Checkboxes list the available modes. Users can select one datasets by checking the corresponding boxes. fig. 39 - Dataset choice tool. 3.2 List of CryoSat products Once the search button is pressed, CryoSat products that match the criteria are listed as shown below. fig. 40 - List of matching CryoSat products. This list can be arranged by mode or by product names. Each product keeps the name defined by ESA, using the pattern: MM_CCCC_TTTTTTTTTT_yyyymmddThhmmss_YYYYMMDDTHHMMSS_bvvv.ttt where: MM CCCC 3.3 TTTTTTTTTT yyyymmddThhmmss YYYYMMDDTHHMMSS b vvv ttt is the mission identifier, which is CS for CryoSat, is the file class which can be OFFL (Off-Line Systematic Processing), NRT_ (Near Real Time), RPRO (ReProcessing), TEST (Testing) or LTA_ (Long Term Archive), is the CryoSat SIRAL dataset used for the acquisition, is the start time window as extracted from Job Order, is the stop time window as extracted from Job Order, is the baseline identifier as read-in from the PCONF, is the version number of the file, is the extension: HDR for Header and DBL for binary data Managing search results (CryoSat products) 3.3.1 Display product A CryoSat product can be displayed in the default style. It is the style in which it is displayed in the temporary layer stack. The default style can be changed by using the tools below the products list. " This document discloses subject matter in which VisioTerra has proprietary rights. Recipient of this document shall not duplicate, use or disclose in whole or in part, information disclosed here on except for or on behalf of VisioTerra to fulfil the purpose for which the document was delivered to him. ” reference VT-P202-SUM-001-E CryoSat Web Client application VisioTerra User's Manual issue 1 revision 9 date 24/02/2015 page 33 of 49 As shown in section 2.3.3.2, another style different from the default one can be applied. An existing style that has been copied or a new style that as been previously created may also be edited. It is possible to do so thanks to the following modal window which is accessible from the contextual menu by choosing Style / Create new style, Style / Copy or Style / Edit on a non predefined Style. By using the current parameters, a new style can also be crated with the "Save as new style" button. A pre-filled window will then appear. Both interfaces have the same widgets to select the measure, the scale, the colour, the line thickness and the opacity of the vector. fig. 41 - The new style window. 3.3.1.1 Choosing the measure to display When opening this window and by using the pulldown menu called “Measure”, users can choose the measures of the level 2 that should be displayed. " This document discloses subject matter in which VisioTerra has proprietary rights. Recipient of this document shall not duplicate, use or disclose in whole or in part, information disclosed here on except for or on behalf of VisioTerra to fulfil the purpose for which the document was delivered to him. ” reference VT-P202-SUM-001-E CryoSat Web Client application VisioTerra User's Manual issue 1 revision 9 date 24/02/2015 page 34 of 49 fig. 42 - Selection of the measure to display. 3.3.1.2 Choosing the scale factor of the display The scale factor of the measure as shown on the globe can also be changed by setting the scale field to a positive number value. Since the measures may have a value in the centimetre scale, a large value might be needed in order to get an observable output. 3.3.1.3 Choosing the colour of the display Colours differentiate the various measurements of a same CryoSat product. By pressing the “Change” button, a widget which specifies a colour from the Hue Saturation Value (HSV) or Red Green Blue (RGB) spaces is opened. fig. 43 - The colour picking window. " This document discloses subject matter in which VisioTerra has proprietary rights. Recipient of this document shall not duplicate, use or disclose in whole or in part, information disclosed here on except for or on behalf of VisioTerra to fulfil the purpose for which the document was delivered to him. ” reference VT-P202-SUM-001-E CryoSat Web Client application VisioTerra User's Manual issue 1 revision 9 date 24/02/2015 page 35 of 49 The last colours specified are accessible from a pull-down menu to keep several styles accessible in an easier way. fig. 44 - Use of the last colours menu. 3.3.1.4 Choosing the opacity of the display The degree of opacity of the vectors can be changed by using the Opacity slide bar the same way it is described in Erreur ! Source du renvoi introuvable.. fig. 45 - Setting the style opacity. " This document discloses subject matter in which VisioTerra has proprietary rights. Recipient of this document shall not duplicate, use or disclose in whole or in part, information disclosed here on except for or on behalf of VisioTerra to fulfil the purpose for which the document was delivered to him. ” reference VT-P202-SUM-001-E CryoSat Web Client application VisioTerra User's Manual issue 1 revision 9 date 24/02/2015 page 36 of 49 fig. 46 - Layer stack – Opacity set around 30% (left) 70% (centre) and 100% (right). 3.3.1.5 Applying the style The style may be tested and displayed on the selected CryoSat product by using the "Apply style" button. fig. 47 - Applying the style. 3.3.1.6 Saving the style The current style may be saved under the given Style name by pressing the "Save style" button. fig. 48 - Applying the style. " This document discloses subject matter in which VisioTerra has proprietary rights. Recipient of this document shall not duplicate, use or disclose in whole or in part, information disclosed here on except for or on behalf of VisioTerra to fulfil the purpose for which the document was delivered to him. ” reference VT-P202-SUM-001-E CryoSat Web Client application VisioTerra 3.3.1.7 User's Manual issue 1 revision 9 date 24/02/2015 page 37 of 49 Cancelling the style creation / edition The current style editing may be cancelled by pressing the "Cancel" button. fig. 49 - Cancelling the style edition. 3.3.1.8 Default styles For each default style, the opacity is set at 80% and the line thickness (which is not an implemented feature on Windows) set to 1 point. For each measure, an histogram has been computed for each measurement of each product. Its cumulative histogram has been calculated so that the 0.1% and 99,9% could be found. The values outside this interval have been considered as outliers so that the dynamic could be focused on the central 99,8% values, rather than taking into account very rare or aberrant values 3.3.2 Export product The user can export a profile derived from the values of a granule's measure in KML or KMZ. Pressing the "Download" button in the context menu then picking "As KML" opens a new modal window that specifies a local folder and a file name for the KML export. This file only contains the measure and style that were used to display the profile in the layer stack. It doesn't contain the full data. fig. 50 - Exporting a product. 3.3.3 Download data Original CryoSat products can be obtained from the ESA CryoSat dissemination server by pressing the “Download” button in the context menu and by selecting the “Product data” option. This will open a " This document discloses subject matter in which VisioTerra has proprietary rights. Recipient of this document shall not duplicate, use or disclose in whole or in part, information disclosed here on except for or on behalf of VisioTerra to fulfil the purpose for which the document was delivered to him. ” reference VT-P202-SUM-001-E CryoSat Web Client application VisioTerra User's Manual issue 1 revision 9 date 24/02/2015 page 38 of 49 transient window called “Download data” which enables users to sign in and to select the level of CryoSat products to be downloaded (see fig. 51). 3.3.3.1 Restricted access The user has to specify a login and password provided by ESA. For further information, please, visit the "Data Access" pages of the ESA Web site (https://earth.esa.int/web/guest/data-access). User may let the password in clear when typing it or hide it as stars using the "Hide" checkbox. Once logged in, one won't be asked to do it for further downloads during the session. 3.3.3.2 Product levels The selected input product file, whose original version is required, is extracted from a level 2 CryoSat product file available in datasets such as LRM, SAR, SIN, GDR, FDM. The "output file" that is to be downloaded is a ZIP archive that contains a DBL product file and the associated HDR header file. The product file may be the input product file itself or another product file according to the following rules: If the input product file is a GDR product, user may only download the GDR granule. If the input product file is a FDM or a GOP product file, user may select one of the following options: o Level 1 - to download the level 1 granule matching exactly the level 2 product in input. o Level 2 - to download the input product file and the associated header file. Otherwise, user may select one of the following options: o Level 1 - to download the level 1 granule matching exactly the level 2 product in input. o Level 2 - to download the input product file and the associated header file. o GDR - to download the GDR granule that includes the input product file. Note: GDR products are level 2 products. Their size has the scale order of a whole revolution. 3.3.3.3 Download path Pressing "Cancel" will abort the download operation. Otherwise the browser-specific "Download as" window will be called to specify the file path and name. " This document discloses subject matter in which VisioTerra has proprietary rights. Recipient of this document shall not duplicate, use or disclose in whole or in part, information disclosed here on except for or on behalf of VisioTerra to fulfil the purpose for which the document was delivered to him. ” reference VT-P202-SUM-001-E CryoSat Web Client application VisioTerra User's Manual issue 1 revision 9 date 24/02/2015 page 39 of 49 fig. 51 - The download product data window. If the login / password combination is invalid, another modal window will be displayed to inform the user. " This document discloses subject matter in which VisioTerra has proprietary rights. Recipient of this document shall not duplicate, use or disclose in whole or in part, information disclosed here on except for or on behalf of VisioTerra to fulfil the purpose for which the document was delivered to him. ” reference VT-P202-SUM-001-E CryoSat Web Client application VisioTerra User's Manual issue 1 revision 9 date 24/02/2015 page 40 of 49 ANNEX A OTHER FUNCTIONALITIES OF THE VTWEB PLATFORM A.1 Getting associated meteorological data It is possible to import a layer in relation with an EO product by right clicking on it to have the context menu appear and then by selecting the “Get associated layer” option. For example, one may find useful for the interpretation to display meteorological data contemporary of a selected CryoSat track. fig. 52 - Layer Stack – Getting associated data. Different parameters have to be set before importing an associated layer. Dataset: Select a dataset from a list. The attached list gives the four meteorological layers available in the VtMeteo collection. Bounding box: Select a bounding box for the associated layer between -bounding box of the origin layer (in our example a Landsat-8 OLI-TIRS layer), -the bounding box of the current project, or –a bounding box defined by user. Default value is the original layer bounding box. Date-Time: Select application date of the new layer. Default value is median of the origin layer date start and date stop. Temporal resampling: Select a temporal interpolation method from the attached list. Default value is “nearest neighbour” interpolation. Once parameters have been set, users can import the associated layer by pressing the “Import” button or quit without import by pressing the “Cancel” button. " This document discloses subject matter in which VisioTerra has proprietary rights. Recipient of this document shall not duplicate, use or disclose in whole or in part, information disclosed here on except for or on behalf of VisioTerra to fulfil the purpose for which the document was delivered to him. ” reference VT-P202-SUM-001-E CryoSat Web Client application VisioTerra User's Manual issue 1 revision 9 date 24/02/2015 page 41 of 49 A.2 On-the-fly processing and dataset rendering A.2.1 Multiscale display - The VtQuadtree organisation VtQuadtree organisation is a multi-scale tile-pyramid which enables to display data with an adapted resolution on the screen. The pyramid contains different levels: level 0 corresponds to the full resolution of the data. Figure fig. 53 shows different levels of a VtQuadtree. For pedagogic purposes, the borders and the coordinates (level, x and y value) of each tile appear in green in this example. fig. 53 - VtQuadtree example – Level 4 (top left), Level 2 (top right) and Level 0 (bottom). " This document discloses subject matter in which VisioTerra has proprietary rights. Recipient of this document shall not duplicate, use or disclose in whole or in part, information disclosed here on except for or on behalf of VisioTerra to fulfil the purpose for which the document was delivered to him. ” reference VT-P202-SUM-001-E CryoSat Web Client application VisioTerra User's Manual issue 1 revision 9 date 24/02/2015 page 42 of 49 A.2.2 On-the-fly processing pipe The “on-the-fly” process is divided in three parts. When an EO product several bands, the first step made is “RGB mapping”. The second step, for all type of data, is “Radiometry processing by Histogram transformation” and the third step is “Radiometry processing by filtering”. There is an implicit final step that is the data remapping. A.2.2.1 Step 1 – RGB mapping The RGB mapping, also called “Colours Composite (CC)” allows the selection of three bands and assign them to the “Red”, “Green” and “Blue” channels. The following figures show different processes of “RGB mapping”. fig. 54 - Landsat-8 CC 4 3 2. " This document discloses subject matter in which VisioTerra has proprietary rights. Recipient of this document shall not duplicate, use or disclose in whole or in part, information disclosed here on except for or on behalf of VisioTerra to fulfil the purpose for which the document was delivered to him. ” reference VT-P202-SUM-001-E CryoSat Web Client application VisioTerra User's Manual issue 1 revision 9 date 24/02/2015 page 43 of 49 fig. 55 - Landsat-8 CC 7 6 5. fig. 56 - Landsat-8 CC 9 6 1. A.2.2.2 Step 2 – Radiometry processing by “Histogram transform” This process applies a global transformation on radiometric values by “histogram transform”. For example, an automatic stretching can be applied as can be seen in the following figures. Figures fig. 57, fig. 58, and fig. 59 show different transformations. " This document discloses subject matter in which VisioTerra has proprietary rights. Recipient of this document shall not duplicate, use or disclose in whole or in part, information disclosed here on except for or on behalf of VisioTerra to fulfil the purpose for which the document was delivered to him. ” reference VT-P202-SUM-001-E CryoSat Web Client application VisioTerra User's Manual issue 1 revision 9 date 24/02/2015 page 44 of 49 fig. 57 - Default histogram transform. fig. 58 - Automatic stretching 2%. " This document discloses subject matter in which VisioTerra has proprietary rights. Recipient of this document shall not duplicate, use or disclose in whole or in part, information disclosed here on except for or on behalf of VisioTerra to fulfil the purpose for which the document was delivered to him. ” reference VT-P202-SUM-001-E CryoSat Web Client application VisioTerra User's Manual issue 1 revision 9 date 24/02/2015 page 45 of 49 fig. 59 - Automatic stretching 14%. A.2.2.3 Step 3 – Radiometry processing by “Filtering” This process applies a radiometric transformation by filtering relative to a local statistics window. Figures fig. 60 and fig. 61 show a data before and after filtering. fig. 60 - No filtering. " This document discloses subject matter in which VisioTerra has proprietary rights. Recipient of this document shall not duplicate, use or disclose in whole or in part, information disclosed here on except for or on behalf of VisioTerra to fulfil the purpose for which the document was delivered to him. ” reference VT-P202-SUM-001-E CryoSat Web Client application VisioTerra User's Manual issue 1 revision 9 date 24/02/2015 page 46 of 49 fig. 61 - Sharpening. A.2.3 Dataset rendering There are two different ways of modifying dataset rendering parameters. One can either select “Tools > Options”, tab “Dataset Rendering” or right-click on an EOP, select “style and create” or “edit a style”. A.2.3.1 Standard greyscale rendering " This document discloses subject matter in which VisioTerra has proprietary rights. Recipient of this document shall not duplicate, use or disclose in whole or in part, information disclosed here on except for or on behalf of VisioTerra to fulfil the purpose for which the document was delivered to him. ” reference VT-P202-SUM-001-E CryoSat Web Client application VisioTerra User's Manual issue 1 revision 9 date 24/02/2015 page 47 of 49 A greyscale rendering has the following processes. Histogram transform: o Default - Converts data from 16 bits to 8 bits. o Automatic stretching - Automatic stretching is effectuated with independent left and right saturation percent. o Histogram equalisation - Automatic stretching is effectuated with a flat histogram model. o Gaussian equalisation - Automatic stretching is effectuated with a gaussian histogram model. This model is defined with two parameters, mean and standard deviation. Filtering: o Contrast enhancement - Performs a local transformation to increase the data contrast. This process takes two parameters: sharpening factor and size of convolution window. o Convolution - Performs a local transformation to apply a directional gradient. This process takes three parameters: convolution type, gain and offset of the convolution. " This document discloses subject matter in which VisioTerra has proprietary rights. Recipient of this document shall not duplicate, use or disclose in whole or in part, information disclosed here on except for or on behalf of VisioTerra to fulfil the purpose for which the document was delivered to him. ” reference VT-P202-SUM-001-E CryoSat Web Client application VisioTerra A.2.3.2 User's Manual issue 1 revision 9 date 24/02/2015 page 48 of 49 Look-up table: Select a lookup table. For each of them, users define the left bound, the right bound and if the table is cyclic or not. Standard RGB rendering With the check boxes ( or ), users may define a same rendering for the “Red”, “Green” and “Blue” channels or a rendering per channel. There are two processes: “Histogram transform” and “Filtering”. These processes have the same parameters as of GreyScale rendering detailed in section A.2.3.1. " This document discloses subject matter in which VisioTerra has proprietary rights. Recipient of this document shall not duplicate, use or disclose in whole or in part, information disclosed here on except for or on behalf of VisioTerra to fulfil the purpose for which the document was delivered to him. ” reference VT-P202-SUM-001-E CryoSat Web Client application VisioTerra A.2.3.3 User's Manual issue 1 revision 9 date 24/02/2015 page 49 of 49 Standard complex field rendering The rendering parameters of a complex field depend of the field. The attached capture shows rendering parameters for a “wind field”. The following parameters are common to all complex fields. Spatial resampling: interpolation method, Output range: defines the output range of field, Left range: define left bound of lookup table, Right range: defines right bound of lookup table, Lookup table: defines the lookup table and if it is cyclic or not. defines spatial " This document discloses subject matter in which VisioTerra has proprietary rights. Recipient of this document shall not duplicate, use or disclose in whole or in part, information disclosed here on except for or on behalf of VisioTerra to fulfil the purpose for which the document was delivered to him. ”