1
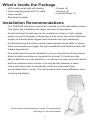
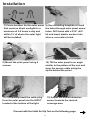
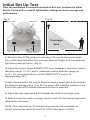
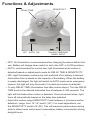
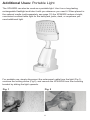
TM
XP645DS
Pure Digital Version
Motion Activated
Solar Powered LED Matrix Light
Please do not return this item to the store.
For service or questions about your solar light, call our
customer service associates at (866) 427-3946.
Introduction
Thank you for purchasing the XP645DS light with the world’s first digitally controlled
system. With its easy setup and lightweight design, the XP645DS conforms to most
of your lighting needs. It’s the most cost-effective way to illuminate and protect
areas around your home, business and recreational area, especially where AC is
not accessible.
No matter the area, environmentally friendly solar energy is converted to electricity
so that lighting is available wherever and whenever you desire. Simply install or
set the solar charging panel in a suitable area facing the sky where sun exposure
is prevalent. The attached 15’ cable provides sufficient length for easy placement.
When fully charged and switched to the ON mode, the XP645DS will provide up to
14 hours of continuous illumination. A full charge will require 2-3 days of direct sun
exposure. In AUTO mode, (normal operation setting) the light illuminates when it is
dark and motion is detected, then automatically resets. Charging time results may
vary depending upon weather conditions, season, and geographic location.
Important Safety Information
• Never look directly into the light or shine in another person’s eyes.
• Do not expose the light to fire or intense heat.
• Do not dispose of battery in fire.
• Do not immerse in water.
• Do not dispose the rechargeable battery in a regular waste system,
waterway, stream or any other body of water.
• Preserve the environment by disposing battery in accordance with local,
state and federal regulations
• Consult your local construction safety guidelines for installing the light
fixture on a building.
• Use Xepa Technologies rechargeable batteries only.
2
What’s Inside the Package
• LED matrix solar light with battery
• Solar charging panel with 15’ cable
• User manual
• Mounting template
• Screws (8)
• Anchors (8)
• Locking Screw (1)
Installation Recommendations
• The XP645DS light fixture should be installed on a flat and stable surface.
The higher the installation the larger the area of illumination.
• Avoid installing the light near an air conditioner, heater or high voltage
system as quick changes in temperature may cause the motion detection
system to produce false triggers and illuminate the light needlessly.
• Avoid positioning the motion sensor head towards street traffic or where
other movements may trigger the light needlessly and therefore drain the
battery prematurely.
• The solar panel should be installed in a sunny area facing the sky where
direct sunlight can shine on the panel for at least 3-5 hours per day.
• Motion detection is most sensitive to movement moving across the device
and less sensitive when motion is moving directly towards or away.
• Use a soft damp cloth to periodically clean the solar panel from
accumulated dust or snow. This will preserve solar panel efficiency when
charging the battery.
Shown with optional table-top cradle. Sold separately.
See page 10 for more details.
3
Installation
1) Remove mounting plate from
the light by sliding in a downward
motion.
2) Open the battery compartment,
plug in the battery and close the
battery cover.
3) Use mounting template or mark
the holes through the mounting
plate screw holes (2 or 4).
4) Drill holes with a 3/16” drill bit
and insert plastic anchors into
stucco, concrete or brick.
5) Place the mounting plate on the
wall and secure with screws.
6) Slide the light onto the mounting
plate. Then secure the light with the
locking screw (optional).*
*NOTE: The locking screw is meant for permanent mounting of the light to the mounting plate. You may
choose not to insert the locking screw, so the light can easily be removed for portable use (see page 11).
4
Installation
7) Find a location for the solar panel
that receives direct sunlight for a
minimum of 3-5 hours a day and
within 15’ of where the solar light
will be installed.
8) Use mounting template or mark
the holes through solar panel screw
holes. Drill holes with a 3/16” drill
bit and insert plastic anchors into
stucco, concrete or brick.
9) Mount the solar panel using 4
screws.
10) Tilt the solar panel to an angle
similar to the pattern of the sun and
wrap the excess cable using the
zip-tie behind the panel.
11) Completely insert the cable plug
from the solar panel into the INPUT
located at the bottom of the light.
12) Adjust the motion detection
sensor towards the desired
coverage area.
Proceed with the Initial Set Up Test on the following page.
5
Initial Set Up Test
After the installation is complete and before first use, perform the Initial
Set Up Test in order to adjust light/motion settings for best coverage and
performance.
Fig. A
DELAY TIME
Fig. B
SENSITIVITY
Coverage
Area
10’- 60’
OFF AUTO ON
SOLAR CHARGING
PANEL INPUT
1) Switch to the AUTO position to activate a 10-minute test period when
any motion detected within the coverage area will trigger and illuminate the
light during daylight hours. (Fig. A)
2) Adjust the motion range SENSITIVITY knob between L (minimum motion
detection range, 10’-15’) and H (maximum motion detection range up
to 60’). For most applications, set the SENSITIVITY knob to M
(approximately 30’).
3) Adjust and position the motion detection sensor head (pan & tilt) towards
the desired coverage area. (Fig. B) The green LED indicator located on the
front of the light will illuminate whenever motion is detected.
4) Adjust the light head (pan & tilt) towards the desired coverage area.
5) Walk through the entire coverage area to check for the desired response;
readjust as necessary.
NOTE: The Initial Set Up 10-minute test period can be overridden by
quickly moving the switch from AUTO to ON, then back to AUTO.
6
Functions & Adjustments
SENSITIVITY
DELAY TIME
SOLAR CHARGING
PANEL INPUT
OFF AUTO ON
• OFF: No illumination; recommended when charging the device before first
use. Battery will charge when switch is set to the OFF or AUTO positions
• AUTO: recommended for normal use; light illuminates when motion is
detected based on adjustments made for DELAY TIME & SENSITIVITY.
• ON: Light illuminates continuously until switched off or battery is drained;
illumination time is based on the capacity of the battery. When the battery
is nearly discharged, the light will switch to AUTO mode as an emergency
reserve; the light will only illuminate if it is dark and motion is detected.
• To vary DELAY TIME (illumination time after motion stops): Turn the DELAY
TIME knob to the desired estimated time of between 5-180 seconds. The
light will illuminate when motion is detected. Once movement stops, light
turns off automatically based on the delay time selected.
• Adjust the motion range SENSITIVITY knob between L (minimum motion
detection range, from 10’-15’) and H ( 60’). For most applications, set
the SENSITIVITY knob to M (30’). This will maximize performance during
dusk to dawn hours and prevent unnecessary battery consumption during
daylight hours.
7
Troubleshooting Tips
Symptom
Possible Solution
The light will not illuminate
•In AUTO mode, light illuminates only when motion is
detected when it is dark.
•Make sure solar panel plug is fully inserted.
•In ON mode, light illuminates until battery is drained.
•Make certain the battery plug is connected inside the
battery compartment.
•Battery energy is low; set switch to OFF or AUTO
mode and allow solar panel to absorb direct sunlight
for 2+ days in order to recharge battery fully.
•Make sure there is no other bright light source near
the unit.
The light provides less than
14 hours of continuous
illumination in ON mode
• Battery is at less than 100% full charge; set switch
to OFF mode and allow solar panel to absorb direct
sunlight for up to 2 -3 days in order to recharge fully.
Delay Time is too short
•Adjust DELAY TIME knob. The knob allows for an
estimated 5 to 180 second delay (see page 7).
Motion is not detected within
the coverage area
•Avoid installing the light near air conditioner, central
heater, or hot air flow.
•Check the motion sensor lens for dust or damage.
The battery does not fully
charge
The light stays on
continuously while in AUTO
mode
•While in AUTO mode, if there is frequent activity from
dusk to dawn or continuous overcast days, the solar
panel may not convert sufficient ambient daylight to
recharge the battery sufficiently.
•Reposition solar panel to receive more sunlight.
•Clean dust and debris from solar panel.
•Make sure the solar panel cable is not damaged.
•Check the motion detector sensor head to ensure that
it is not directed towards street traffic or where other
movements may trigger the light needlessly.
Specifications
Motion Detection Range: 180 degrees / variable up to 60’
Matrix Light: 45 super bright LEDs
Rechargeable Battery: 7.4V 1.5Ah lithium-polymer battery
Solar Charging Panel: 10VDC/2.5W Monocrystalline
Continuous Illumination Time: Up to 14 hours on a 100% full charge (2-3 sunny days)
Operation Temperature: -25F to +125F degrees
Complies with FCC Part 15 Class B and ICES-003:2004
Weight: 1.3 lbs.
8
One Year Limited Warranty
Xepa Technologies warrants this product against defects in material or workmanship
for a period of one (1) year from the date of original purchase. During this period, Xepa
Technologies will replace a defective part with a new or refurbished part without charge
to you. It is your responsibility to retain original packaging or provide like packaging
in order to facilitate the warranty process. Xepa Technologies will incur no liability
whatsoever to provide packaging for warranty items. Upon receipt of the warranty item,
should it be determined that the packaging is insufficient, Xepa Technologies may at its
discretion, void the warranty. The consumer is responsible for the transportation cost to
Xepa Technologies. You must receive a return authorization number before sending a
unit in for service.
To Obtain Warranty Service
Should it be necessary to contact Customer Support, call (866) 427- 3946. You will be
instructed on how your claim will be processed. Have pertinent information available
including proof of purchase and an understanding of the issue.
You must retain the original bill of sale to provide proof of purchase. Call a customer
support representative to assess the problem. No service or shipment will be accepted
unless an RA# is provided to you and attached or printed to the shipping carton along
with a copy of the bill of sale. This warranty is effective only if the product was purchased
through an Authorized Retail Seller and the unit is operated in North America. You are
responsible for all tariffs and taxes imposed to ship or receive warranty or replacement
units to and from the U.S. Warranty extends only to defects in materials or workmanship
and does not extend to any other products that have been lost, discarded or damaged
by misuse, accident, neglect, acts of God, such as lightning, improper installation,
improper maintenance or modification. Warranty does not cover cosmetic damage or lost
accessories. The consumer is responsible for the installation, removal and reinstallation
of the product.
This warranty gives you specific rights and these rights may vary from state to state.
Some states do not allow limitation on how long the warranty lasts or exclusions or
limitation of incidental or consequential damages, so the above may not apply to you.
9
Accessories
XP645PBS
XP645DLPB
Table Top Cradle
Replacement Battery
Supports the XP645DS and converts it to
a portable table lamp.
Li-Polymer rechargeable battery for the
XP645DS.
To order, please visit
www.xepatech.com
10
Additional Uses: Portable Light
The XP645DS can also be used as a portable light. Use it as a long-lasting
rechargeable flashlight and take it with you wherever you need it. When placed in
the optional cradle (sold separately, see page 10) the XP645DS makes a bright,
convenient cordless table light for the backyard, patio, deck, or anywhere you
need additional light.
For portable use, simply disconnect the solar panel cable from the light (Fig.1),
unscrew the locking screw (Fig.2), and remove the XP645DS from the mounting
bracket by sliding the light upwards.
Fig. 1
Fig. 2
11
TM
www.xepatech.com
100527