1
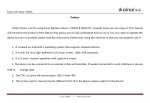
PSD3-Solar Powered
LED Security
Camera Light &
Wireless DVR
DVR Operation Instruction
Please do not return this item to the store.
For service or questions about your solar light, call our customer service at
800.284.8828 (8:30am - 5:30pm, Monday to Friday, Pacific Time) or visit
www.xepatech.com.
Turn On the DVR
Turn on DVR (On/Off switch on backside of DVR); press the Menu key to enter the main menu.
1.
Settings: Main Menu screen and enter Settings
1.1.
Settings > Motion Detection
1.1.1. Motion Detection > Video and Photo Options
1.1.1.1.When you select Videos, system will start recording video automatically when motion
is detected. Recording will stop after 10 seconds. During recording, you can also press
the Video key on the DVR to stop immediately.
1
1.1.1.2.When you select Photos, system will automatically take a picture when motion is
detected.
1.1.2. Motion Detection > Alert Option
Select On to have a beeping sound alert you when motion is detected.
1.2.
Settings > Date and Time
Press Up/Down keys to change number; press Left/Right keys to switch to next block.
1.3.
Settings > Language Select the language you prefer.
1.4
Settings > Brightness
Adjust the brightness by Left/Right keys.
1.5
Settings > Recording Overwrite
1.5.1 Auto Delete Option
1.5.1.1 AutoDeleteOn:System willautomaticallyoverwrite the oldest file or folder by date if SD
card gets full.
1.5.1.2 Auto Delete Off: A warning screen will appear if SD card gets full, so you can manually
select the file of folder to delete by pressing Delete button on DVR.
1.6
Settings > System Information
Check free space for storage
2.
Album
2.1.
Album > Video: Browse saved videos
Video files are stored chronologically, with file names consisting of the hour, minute,
and second at time of recording as well as camera #. Select video file and press OK to
play it. Press Cancel to stop reviewing. Use Right/Left keys to fast forward/rewind.
Press Record key to auto play, and press it again to exit
2.2
Album > Photos: Browse saved pcitures
Picture files are stored chronologically, with file names consisting of the hour, minute,
2
and second at time of recording as well as camera #. Select picture file and press
OK to play. Use Left/Right keys to browse. Press Record key to auto play, and press
it again to exit.
3.
Camera
3.1.
Camera Rotation Setting: Camera > Camera Rotating
(Note: this feature only applies to multiple cameras)
3.1.1.
Never: Manually select cameras by using left/right keys.
3.1.2.
10 Seconds: When multiple cameras are registered, the video feed displayed rotates
among cameras every 10 seconds.
3.1.3. 20 Seconds: When multiple cameras are registered, the video feed displayed rotates
among cameras every 20 seconds.
3.1.4. 30 Seconds: When multiple cameras are registered, the video feed displayed rotates
among cameras every 30 seconds.
3.1.5. 60 Seconds: When multiple cameras are registered, the video feed displayed rotates
among cameras every 60 seconds.
3.2.
Camera Registration: Camera > Register Camera
3.2.1.
Select Monitor to check whether camera is working properly.
3.2.2.
If live monitoring doesn’t work, go back to Register Camera to check camera
registration status. (Camera should be registered by default). This security system
allows for up to four cameras. Only one camera is included in this packaging, so
please choose Camera 1 to register.
3.2.3.
If camera is unregistered, select register first (as shown in pic.1.4), and then push
the Pair button on the bottom of the light to pair the camera. If failed, repeat this
step until camera gets registered.
3
Pic. 1.4
4
If you need more adds-on units, please contact 800.284.8828 or visit www.xepatech.com
4.
Live Monitoring: Main Menu > Monitor
4.1.
Select Full screen or Quad screen Press OK key to toggle between full screen
and quad screen views on the live monitoring screen.
4.2.
Manual Operation of Video Recording & Photography under Live Monitorig
4.2.1. Video Recording
Press Video key on DVR to begin videotaping, and press it again to stop. A red
light flashes on the screen’s task bar during recording. The recorded content will
be saved and filed automatically by time and date.
4.2.2. Picture Snapshot
Press Capture key on DVR to take a picture, which will be saved and filed
automatically.
4.3.
Pushing the Delete button besides the SD card slot, you can delete any file
selected manually.