1
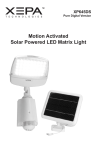
Solar Powered LED Security
Camera Light & Wireless DVR
MODEL: PSD3
Please do not return this item to the store.
For service or questions about your solar light, call our customer service at
800.284.8828 (8:30am - 5:30pm, Monday to Friday, Pacific Time) or visit
www.xepatech.com.
Introduction
Thank you for purchasing the PSD3 Solar-Powered Security
Light with the digital wireless DVR security system—the most
cost-effective way to illuminate and protect your home,
business, and recreational areas. With its easy setup and
lightweight design, this light conforms to most of your lighting
needs and is especially useful where an electrical outlet is not
accessible.
The PSD3 Solar-Powered Security Light converts sunlight to
electricity, so lighting is available wherever and whenever you
desire. Simply install the solar charging panel in an area where
sun exposure is prevalent (the attached 15’ cable provides
sufficient length for easy placement). In AUTO mode (normal
operation setting), the light illuminates at night only when
motion is detected, then automatically resets.
1
Important Safety Information
• Do not expose the light to fire or intense heat.
• Do not immerse in water.
• Never look directly into the light or shine it in another person’s
eyes.
• Dispose of the battery in accordance with local, state, and
federal regulations. (Do not burn or discard the battery in a
municipal water system or other body of water.)
• Consult local safety guidelines for installing the light fixture
on a building.
• Only use batteries from XEPA TECHNOLOGIES to ensure
compatibility. (Refer to the product’s original battery for
correct size.)
• Always position the battery so it has the correct polarity: (+)
and (-).
• Light will not work once battery is removed from the jacket.
Please plug in the solar panel charger or any other approved
power adaptor after put battery back to the jacket to reactivate
the light.
2
What’s Inside the Package:
PSD3 solar light with built-in camera and rechargeable battery
Solar charging panel with 15’ cable
DVR with adapter and a 2G SD card
User manual, including installation template sticker
Quick Start Guide
Screws and anchors
Audio/video connecting RCA cable
Features:
• Solar-powered lighting—no electricity bill
• 2 x 5W super bright LEDs (equal to 60W incandescent bulb)
• 2.4 GHz digital wireless transmission—enables DVR to receive
pictures and sound without any drops or interference
• SD card enables storage of videos and photos Detects motion
at a distance of up to 50 ft.
• Two lamp heads for dual direction illumination
• Auto illumination from dusk to dawn
• High-efficiency, rechargeable lithium battery produces zero
emissions
3
Product Profile:
1.
2.
3.
4.
5.
4
Lamp Head
Motion Activated Indicator
Motion Sensor Lens
Built-in Camera
Antenna
6.
7.
8.
9.
Battery Housing
Horizontal Adjust Knob
Vertical Adjust Knob
Adjust Knob
Installation Recommendations:
• The PSD3 light fixture should be installed on a flat and stable
surface—the higher the light is placed, the larger the area of
illumination.
• Avoid installing the light near an air conditioner, heater, or highvoltage system, since quick changes in temperature may activate
the motion- detection system and run down the light’s power.
• Avoid positioning the motion sensor head towards street traffic, or
where other movements may trigger the light needlessly and drain
the battery.
• The solar panel should be installed facing the sky where direct
sunlight can shine on the panel at least 6-8 hours per day. (Before
initial use, the panel will need 2-3 days of sunlight exposure to fully
charge the battery.)
• The motion sensor is most sensitive to movement across the
device, and less sensitive to motion directly towards or away from it.
• Periodically use a soft, damp cloth to clean accumulated dust or
snow off of the solar panel. This will preserve the panel's battery
charging efficiency.
5
Installing the LED Security Light:
1. Mark holes on the wall through the Installation template.
2. Drill holes with a 3/16” drill bit.
3. Gently tap the plastic anchors into the holes until they are
flush with the mounting surface.
4. Secure the screws into the plastic anchors—leave approximately
3/16” of each screw exposed for mounting the unit.
5. Place the light/camera unit over the screws—gently push
down on the unit to slide the screws into locking position.
6
6. Rotate/tilt the motion-detection sensor/camera towards the
desired coverage area.
Installing the Solar Panel:
1. Find a location for the solar panel that receives direct
sunlight for a minimum of 6-8 hours a day; and is within 15’ of
where the Security Light will be installed.
2. Mark the holes through the mounting template.
3. Using a 3/16” drill bit, drill holes in the spots you marked.
7
4. Gently tap the mounting anchors into the holes until they
are flush with the mounting surface.
5. Place the base of the solar panel over the drilled holes—
secure the screws through the base into the plastic
mounting anchors.
6. Extend the cord from the solar panel to the light box—
completely insert the cable plug into the INPUT hole located
on the bottom of the light unit.
7. Adjust the motion detection sensor and camera towards the
desired coverage area.
8
Light/Camera Functions:
• OFF: Neither the light nor the camera will function; the
product will be completely off, but the solar panel will keep
charging the battery.
• AUTO: The LED light will illuminate for 1 minute when motion
is detected at night. The camera will turn on when motion is
detected during the day or night. Motion will be recorded for
10 seconds each time.
• TEST: The LED light will illuminate continuously for 5 minutes
and flicker for 1 minute to ensure the appropriate settings are
in place. For a period of 6 minutes, the camera will turn on and
record 10 seconds of video or photography when motion is
detected. (Be sure to switch the device to AUTO when testing
is complete.)
Recharging the Battery:
• Plug in the solar panel charger; the battery will charge
whether the switch is set to OFF, AUTO, or TEST positions.
• You can also charge the light with an approved power adapter
(9V/2000mA adapter not included, but available on website).
9
• Light will not work once battery is removed from the jacket.
Please plug in the solar panel charger or any other approved
power adaptor after put battery back to the jacket to reactivate
the light.
Warning: Do not mix old and new batteries and Do not mix
alkaline, standard (carbonzinc) or rechargeable (ni-cad,
ni-mh, etc) batteries. Only Xepa Technology rechargeable
batteries should be used! It is available on
www.xepatech.com or contact 800-284-8828.
FCC Part 15 Class B & C
CAUTION: Modifications not approved by the party responsible
for compliance could void user’s authority to operate the
equipment.
NOTE: This equipment has been tested and found to comply with
the limits for a Class B digital device, pursuant to part 15 of the
FCC Rules. These limits are designed to provide reasonable
protection against harmful interference in a residential installation.
This equipment generates and can radiate radio frequency energy
10
and, if not installed and used in accordance with the instructions,
may cause harmful interference to radio or television reception.
The source of the interference can be tested by turning the
equipment off and on. The user is encouraged to try to correct the
interference by one or more of the following measures:
• Reorient or relocate the receiving antenna.
• Increase the separation between the equipment and the receiver.
• Connect the equipment into an outlet/circuit different from where
the receiver is connected.
• Consult the dealer or an experienced radio/TV technician for
help.
Using the Wireless DVR:
1. Use the AV cable supplied with your unit to connect to it to a
TV/monitor.
2. Insert the 5V AC power adapter into the power jack on the
DVR; power it on.
3. Rotate the antenna if necessary to get a clear picture.
4. See detailed instructions in DVR Operation Instruction.
11
Troubleshooting Tips.
Symptom
Possible Solution
The light will
not illuminate.
• Switch to TEST mode to check that the light can illuminate even
during the daytime.
• Make sure battery is not drained and solar panel plug is fully
inserted.
• Make sure the battery plug is connected inside the battery
compartment.
• Set switch to OFF or AUTO mode and allow the solar panel to
absorb direct sunlight for two or more days to recharge the battery.
• Make sure there is no other brighter light source near the unit at
night time.
• Once battery is removed from the jacket. Make sure plug in the
solar panel charger or any other approved power adaptor after put
battery back to the jacket to reactivate.
The battery
does not fully
charge.
• While in AUTO mode, if there is frequent activity from dusk to
dawn or consecutive overcast days, the solar panel may not
convert sufficient ambient daylight to recharge the battery.
• Reposition solar panel to receive more sunlight.
• Clean dust and debris from solar panel.
• Make sure the solar panel cable is not damaged.
The light stays
on continuously
while in AUTO
mode.
12
• Check the motion detector to ensure that it is not directed towards
street traffic or where other movements may trigger the light
needlessly.
The lights on the • Check DVR menu to ensure camera is registered and auto paired.
receiver do not
work.
There is no
picture on the
monitor, or the
• Check that the DVR power supply is working.
• Make sure the distance between the DVR and the
picture is not
clear.
light/camera unit does not exceed 50-100 feet.
• Check the connection between DVR and TV.
• Adjust DVR antenna direction to capture digital signal.
Motion has not
been detected
within the
coverage area.
• Check the motion sensor lens for dust or damage.
• Avoid installing the light near an air conditioner, central heater,
or hot air flow.
Specifications
Rechargeable Battery: 7.4V/2200mah
Lithium-Ion battery
Solar Charging Panel: 12V/3W Mono
Crystalline
Complies with FCC Part 15 Class B&C
Emission Frequency: 2400~2483.5MHz
Emission Power: 14dBm
Luminous Flux: up to 600lm
Color Temperature: 6000K~7000K
Motion Distance: up to 50ft
Motion Range: 160°
Video coding: H264 480*272 25fps
Switch Model: OFF-AUTO-TEST
Receiver Power Supply: DC12V
Receiver Sensitivity: ≤-85dBm
Receiving Range: up to 300ft
Model: NTSC
Product Size: Lamp: 230X125X195mm
Solar Panel: 180mmX150mmX15mm
Receiver: 91X45X120mm
13
Product Warranty & Support Information
For customer support call (800) 284-8828 between 8:30am and
5:30pm, Monday to Friday, Pacific Time or visit www.xepatech.com.
This product comes with a limited warranty of 1 year from the day of
purchase. (Proof of the date of purchase must be provided if the
product is returned.) If the product is found to be defective in material
or workmanship, APEX will replace the defective part(s). If any of the
product parts are found to be missing, please contact APEX within ten
(10) days of purchase.
XEPA TECHNOLOGIES by
APEX DIGITAL INC.
4401 Eucalyptus Avenue, Suite 100
Chino, California 91710
01.06.2012
Made in China
14