1
FEATURE Build a Better Firewall—Linux HA Firewall Tutorial
Leave the default settings in the next dialog window and click
the Next button.
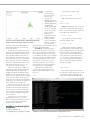
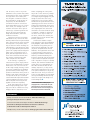
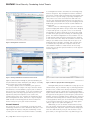
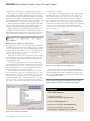
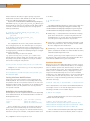
The third dialog window (Figure 4) is where the failover
protocol and virtual IP addresses are defined. For each interface
tab at the top of the dialog window, enter the values according
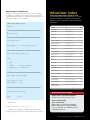
to the information in Table 1.
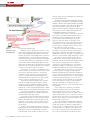
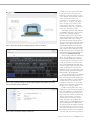
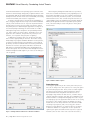
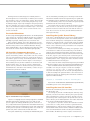
Figure 3. Changing Interface IP Addresses on the Copied Firewall
This creates an exact copy of lj-fw-1 in the object tree and opens
it for editing in the editor panel at the bottom of the screen.
Rename the newly created firewall object to lj-fw-2. Click
“Yes” on the warning message that is displayed about changing
the name of all child objects. The lj-fw-2 firewall object will show
in the object tree with all its child objects expanded.
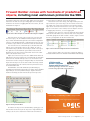
When the firewall is duplicated, the interface IP addresses on
the new firewall are the same as the interface IP addresses on the
original firewall. Update the interface IP addresses to match the
correct IP addresses for the eth0 interface on the lj-fw-2 firewall
as shown in Figure 3. Repeat this process for IP addresses of
interfaces eth1 and eth2.
The final step is to identify the interface that will be used to
manage each of the lj-fw-1 and lj-fw-2 firewalls. This will be used
later by the installer to determine which IP address to use to connect to the firewall. Double-click on the interface object named
“eth1” of the lj-fw-1 firewall to open it for editing and check the
box labeled “Management interface” in the editor panel. Repeat
the process for the lj-fw-2 firewall.
Figure 4. Setting Cluster Interface Values
After all interfaces have been configured, click Next. On the
next dialog window, leave the default setting of “Do not use any,
I will create new Policy and NAT rules”, and click Next. The final
dialog window will show a summary of the cluster configuration.
Review it, and if everything is correct, click Finish to create the
cluster object.
After the cluster is created, it is displayed in the object tree.
Double-click on the “State Synch Group” object located under
the newly created lj-fw-cluster object. The State Synch Group
defines the interfaces that are being used for the conntrackd
FTFW synchronization traffic. Click on the Manage Members
button at the bottom of the editor panel. In the dialog window
that appears, click the eth2 interface below the lj-fw-1 firewall
and click the right arrow to add the interface as a cluster member.
Repeat the process for the eth2 interface of the lj-fw-2 firewall.
Click OK to accept the changes.
Double-click the Policy object under the lj-fw-cluster object in
the object tree. The Policy is where the firewall rules are configured. Click the green + sign at the top of the window to add a
new rule. By default, new firewall rules are set to deny everything.
Edit rules by dragging and dropping objects from
the object tree into the fields of the rule.
Creating Cluster Objects in Firewall Builder
Now that the firewall objects have been created, the next step is
to create a new cluster object with the lj-fw-1 and lj-fw-2 firewalls
as members of the cluster. Right-click on the Cluster system folder
in the object tree and select the New Cluster menu item. This
launches the new cluster wizard, which walks you through the
steps required to create a new firewall cluster.
On the first dialog window, enter the cluster name (lj-fw-cluster),
and select lj-fw-1 and lj-fw-2 as cluster members (make sure lj-fw-1
is the master). Click the Next button.
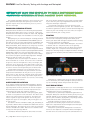
Table 1. Cluster Interface Configuration Parameters
Configuring Rules for the Cluster
INTERFACE
LABEL
FAILOVER
PROTOCOL
VIRTUAL IP
NETMASK
eth0
cluster-outside
VRRP
192.168.1.1
255.255.255.0
eth1
cluster-inside
VRRP
10.1.1.1
255.255.255.0
eth2
cluster-synch
None
n/a
n/a
lo
cluster-loopback
None
n/a
n/a
6 0 | may 2011 w w w. l i n u x j o u r n a l . c o m
For this example, let’s create three simple firewall
rules and a single NAT rule. The first firewall
rule should be a rule that allows the firewall to
communicate with itself using the loopback
interface. This is needed because many applications rely on unfiltered access to the loopback
for interprocess communication.
Drag and drop the interface object named
“lo” from the lj-fw-cluster in the object tree to