1
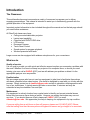
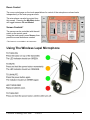
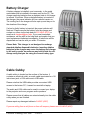
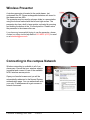
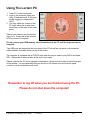
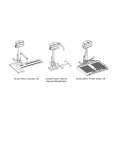
Classroom Technology User Manual A reference guide for ClassTech supported classrooms Contents Introduction ...............................................................................................................3 The Classroom ......................................................................................................3 What we do. ..........................................................................................................3 Quality of service ................................................................................................ 3 The Touch Panel ......................................................................................................4 Turning On The System.........................................................................................4 Touch Panel Basics ............................................................................................... 5 Room Control ........................................................................................................6 Screen Controls* ...................................................................................................6 Using The Wireless Lapel Microphone .....................................................................6 Battery Charger ........................................................................................................7 Cable Cubby .............................................................................................................7 Wireless Presenter ...................................................................................................8 Connecting to the campus Network ..........................................................................8 Connecting Your Laptop ........................................................................................... 9 Using The Lectern PC ............................................................................................ 10 Using The Document Camera ................................................................................ 11 Getting Help ........................................................................................................... 12 Lets Talk… .......................................................................................................... 12 Classroom Technology at NC State 5/18/2012 2 Introduction The Classroom This multimedia classroom incorporates a variety of resources to empower you to deliver engaging presentations. This manual is intended to assist you in familiarizing yourself with the general operation of the equipment. Important contact information is also included throughout the manual and on the last page should you need further assistance. All ClassTech classrooms have: Ceiling-mounted data/video projector Laptop input capability Computer with DVD/CD-RW drive LCD monitor Document Camera Touch Panel Control Sound system for program playback Wireless presenter with laser Larger rooms are also equipped with wireless microphones for your convenience. What we do. Quality of service It is our goal to provide you with quick and effective support anytime you encounter a problem with the room. Whether it’s a burnt out lamp in a projector or a computer issue, or should you need training, give us a call at 5-HELP (4357) and we will address your problem or direct it to the appropriate party as soon as possible. Familiarization We encourage anyone who has not used our equipment to take time to familiarize themselves with basic operation before class begins. We would be delighted to meet with you to help with this process. Simply contact us at [email protected] and ask to schedule a training session with one of our technicians. A typical session will take no more than 15 minutes and may be scheduled at any time between 7am and 6pm. Maintenance Our equipment is actively checked on a regular basis to identify and correct potential issues before they become an issue during a lecture. However, we realize that issues may occur at any time. If you should discover a fault, please call 5-HELP (4357) or email [email protected]. We appreciate your help in keeping our equipment in tip top condition. If you are calling from a cell phone or from off campus, please use 515-HELP (4357) Please note that calling from the classroom phone will bypass all menus and go straight to an associate. Classroom Technology at NC State 5/18/2012 3 The Touch Panel This room is equipped with a touch panel that controls all the basic functions of the room such as audio levels and selection of the source to be displayed on the projector. The touch panel is normally located on the surface of the lectern and initially the touch panel may appear to be “switched off”. It is merely in sleep mode to conserve power and screen life. Simply touch the screen to wake it up. The touch panel has two rows of buttons on each side as well as a touch sensitive screen for control. You may use the buttons on the side panel or touch the “buttons” on the screen to control this room. The system on and off buttons will always be available. Turning On The System To turn the system on, touch the “ON” button, on the bottom right hand side of the screen. The projector fan will start and may be audible. If the room has a screen control, the screen will automatically deploy. If not, you will need to locate the screen control switch and set it to the “down” position. The screen control switch is usually located in the vicinity of the whiteboard. In a few moments, the projector should have warmed up and you should proceed to the next page, Touch Panel Basics, to select a source. If the projector does not start, please call the helpdesk (5-HELP). A technician will be dispatched to inspect the system. If the cause of failure is a blown bulb, it will be replaced as soon as possible. If you are calling from a cell phone or from off campus, please use 515-HELP (4357) Classroom Technology at NC State 5/18/2012 4 Touch Panel Basics Once you have turned the system on you must select one of the options on the left for the input method you would like to use. The touch screen will allow you to choose: PC Laptop Doc Cam Room Control There is also an “Image Mute” button, highlighted here in red. This button will allow you to mute the VIDEO output of the projector without having to turn the unit off. This feature is very useful when you want to warm up the system and be able to set up your presentation privately. On the right hand column you will find the audio controls, Mute, program volume and system on/off buttons. To select a source: Make sure the source is switched on. Touch the button on the left of the touch panel corresponding to the desired source. Adjust volume levels to the desired setting. Classroom Technology at NC State 5/18/2012 5 Room Control The room control page on the touch panel allows for control of the microphone volume levels independently of the main program audio. The microphone can also be muted from this screen. Pressing the Mic Mute button will toggle between On and Muted Screen Controls* The screen can be controlled with the wall switch or the control panel. Using the touch panel, press Screen, then press the screen buttons as needed. *This feature is not available in all classrooms. Using The Wireless Lapel Microphone Classroom Technology at NC State 5/18/2012 6 Battery Charger A battery charger is installed, most commonly, in the metal rack drawer that is installed in the same rack as the PC. The charger can bring batteries from a depleted state to full charge in around 15 minutes. When a depleted battery is inserted in the charger, the power indicator will turn red and remain on. The cooling fan in the charger will also spin up and stay on for the duration of the charge. If a bad or faulty battery is inserted, the power indicator will flash red. Please remove the battery from the charger and contact us, either via the help desk at 515 HELP (4375) or email us at [email protected]. If you need immediate assistance, call the staff at the help desk and explain that you need replacement batteries immediately. A technician will be dispatched and can be with you within 10 minutes. Please Note: This charger is not designed to recharge standard alkaline disposable batteries. Inserting alkaline batteries in the charger may cause the battery and charger to fail and is unsafe, as pressure may build inside the cell. Always verify that you are using the correct battery type. Cable Cubby A cable cubby is located on the surface of the lectern. It contains an electrical outlet, an audio cable terminated in a 1/8 inch stereo jack, a VGA cable and a USB cable. Please note that the USB cable provides convenient USB access to the lectern PC, it cannot be used with a laptop. The audio and VGA cable can be used to connect your laptop to the projector and room program audio speakers. Please ensure that all cables are retracted neatly into the cable cubby when you are finished. Please report any damaged cables to 5-HELP (4357) If you are calling from a cell phone or from off campus, please use 515-HELP (4357) Classroom Technology at NC State 5/18/2012 7 Wireless Presenter A wireless presenter is located in the metal drawer, just underneath the PC. Spare rechargeable batteries are stored in the drawer and are AAA. The presenter may be used to advance slides in a presentation using the buttons marked with the left and right arrows. The presenter also has a built in laser pointer, activated by pressing and holding the button at the 12 oclock position. Please return the presenter to the drawer after use. f you have any issues whilst trying to use the presenter, please contact us, either via the help desk at 515 HELP (4375) or email us at [email protected]. Connecting to the campus Network Wireless networking is available in all of our classrooms. Ensure that your wireless adaptor is enabled and connect to one of the available NCSU wireless access points. Open your favorite browser and you will be automatically redirected to the Nomad System authentication page. You can authenticate with your unity ID and password to gain access to network resources. Classroom Technology at NC State 5/18/2012 8 Connecting Your Laptop A Laptop computer may be connected using the VGA cable located in the cable cubby. Extend the cable by pulling up and out of the cable cubby. Approximately 6 feet of cable is available. If resistance is felt, stop pulling. Attempting to over extend the cable may cause damage to the cable and internal connectors. 1. 2. 3. 4. Plug your laptop in and turn it on. Locate your Laptop external VGA connector Plug in the laptop VGA cable and secure it with the thumbscrews, do not overtighten! Touch the laptop button on the touch screen To set the laptop to display on the Projector: Make sure the laptop is plugged in properly and the projector is on. To change the display you must press the Function (FN) key on your laptop, along with a second key. Use the table below to determine which key should be used for your laptop brand. Compaq: FN+F2 Dell: FN + F8 or FN + F12 Gateway: FN+F3 IBM: FN + F7 Micron: FN +F2 or FN + F12 Mac OS F7 or Reboot with connection Laptop Connections Diagram If your laptop is not one of the brands listed above, or if you are having problems switching displays, please call 515-HELP. If you are calling from a cell phone or from off campus, please use 515-HELP (4357) Classroom Technology at NC State 5/18/2012 9 Using The Lectern PC 1. Press PC on the touch panel. 2. Login to the computer using your Unity ID and password. If you have trouble logging in, please call 5HELP. 3. You may adjust the volume of the PC audio using the up and down arrow keys on the right of the touch panel. Please have patience as the machine logs you in. It may take a few minutes for this process to complete. Do not connect your USB memory stick (thumbdrive) to the PC until the login process is complete. Two USB ports are located on the front panel of the PC as well as one more on an extension cable located in the cable cubby on top of the lectern. The computer is equipped with a DVD/CD drive and this may be used to play DVD’s and audio CD’s. Remember to remove them at the end of your class. Please note that the PC has a separate, independent volume control located in the bottom right of the taskbar. It is recommended that you set this to full volume and use the touch panel controls to set a comfortable audio level. Remember to log off when you are finished using the PC. Please do not shut down the computer! Classroom Technology at NC State 5/18/2012 10 Using The Document Camera The document camera is a versatile tool that can be used to project images of documents, transparencies and 3D objects. There are a number of features on the unit such as autofocus, zoom (via the green control wheel) and image freeze. 1. Press Doc Cam on the touch panel. 2. Gently tug the arm upwards to lift it and the light into working position. 3. Turn the camera head to the desired viewing angle, if necessary. 4. Place your document or object on the surface of the presenter. 5. Use the controls on the front of the camera to adjust the projected image 6. Press Power button on the side of the Document Camera to turn the power off. The document camera folds flat when not in use for your convenience. Please note that proper operation of the arm mechanism is vital. Any deviation from the proper opening and closing method will damage the arm mechanism! To open, take hold of the green ring on the elbow of the doc cam arm and lift up. It is important to “move with” the natural curve of the elbow as the arm deploys. To close, simply reverse the procedure. Classroom Technology at NC State 5/18/2012 11 Getting Help This room is equipped with a hotline telephone. If you are experiencing difficulty or need to report a problem, just pick up the phone and dial 5-HELP. This will connect you to the NC State University Help Desk for immediate assistance. If we cannot solve the problem over the phone, a technician may be dispatched to help you. Note that if you are calling from any other phone other than the classroom phone you will be routed to the auto attendant menu system. Using the classroom phone will save time. Please specify whether or not a technician may interrupt your class to assist, or if you would like to schedule assistance at another time. Lets Talk… We would like to hear from you anytime you discover any opportunity for improvement to this facility. We’d also like to discuss ideas about what you’d like to try to achieve in this classroom and others, as well as how improvements or additions might better enable you to do so. If you have any questions or suggestions, please e-mail us at: [email protected] REMEMBER! If you experience any difficulty, simply pick up the phone and get HELP. (5-HELP) If you are calling from your cellphone, or from off campus, remember to dial 515-HELP Classroom Technology at NC State 5/18/2012 12