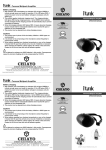
1
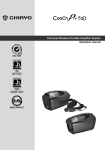
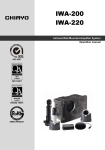
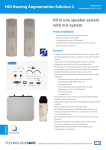
IWA-200/IWA-220
IWH-301/IWH-201/IWM-302/IWM-202
Infrared Wall-mount Amplifier System
OPERATION MANUAL
CHIAYO ELECTRONICS CO., LTD.
Web site: http://www.chiayo.com.tw
E-mail: [email protected]
OFFICE: 30, LANE 27, SEC.4. JEN-AL ROAD, TAIPEI, TAIWAN / TEL: 886-2-2741-5741
FACTORY: 88, CHUNG HSIAO STREET 2, CHIAYI, TAIWAN. / TEL: 886-5-271-1000
Printed in Taiwan, Feb. 2009
FAX: 886-2-2752-5242
FAX: 886-5-276-7611
12I1061
CHIAYO ELECTRONICS CO., LTD.
User's manual
Thank you for purchasing our infrared wireless microphone system. Please be sure to
read the manual thoroughly and keep it for future reference.
Cautions
Do not cover the infrared emitter area of the wireless microphone or the surface of the
infrared sensor, which may disturb the unit and cause abnormal operation.
Since the unit uses infrared reflectance. Do not expose receiver to the black ceiling or
wall which may cause abnormal operation.
1. Do not have the microphone near the speaker because it may cause howling.
2. Do not drop and wet microphone.
3. Do not replace the battery when power is not off.
4. Do not install the unit near heat source or in a place subject to direct sun-light, excessive
dust, mechanical vibration or shock.
5. Do not use two A or B channels at same time because it may cause abnormal operation.
1
10
Beltpack Transmitter IWM-202
IWA-200/IWA-220
Parts and functions
Parts and functions
1.battery cover
2.power high/low switch
3.lavalier or headset
microphone input
4.power
5.power indicator
6.infrared emission source
7.volume control
7
3
5
3
7
8
9
1
2
6
10
IWA-220
2
IN
L
12
AUX
L
OUT
TONE
LINE
3
P OWER
13
17
Operating procedures
1.Open battery cover and put 2*AA alkaline batteries.
2.Connect with lavalier or headset microphone input.
3.Power the transmitter to make the power indicator turn green. If red or remaining
off, it means power shortage or no power. Please replace with new batteries.
4.Adjust amplifier volume control.
5.Never cover with infrared emission source.
11
MIC IN
R
R
1
4
IR
MIC
4
INPUT
14
5
15
6
Custom made rechargeable Ni-MH battery
1.This battery is exclusively designed for the infrared wireless microphone.
2.Be sure to charge the attached battery before use.
3.For surely you do not recharge the battery before full discharge.
4.Keep clean the terminal of charge, otherwise you may not charge the battery.
5.Do not repeatedly recharge the battery before full discharge, if you repeat
above, battery life will be shortened.
6.Battery life about 1 year or 500 recharge cycles under normal operation, when
you feel operating time becomes shorter even full charging, the battery is
exhausted.
7.Replace with new battery.(Be sure to use exactly same type as attached.)
Battery operating time
Continuous operating time of fully charged Ni-MH battery(2100mA/2.4V) is as below.
Low
High
12 hours
8 hours
position of power selector switch
operating time
9
18 (optional)
16 (optional)
1. Power and IR1 indicator
2. Power and IR2 indicator
3. Power switch
4. External speaker input (8Ω load)
5. External DC supply input (12~15V)
6. External sensor input
7. IR volume control
8. Cabled microphone volume control
9. External input volume control
10. Treble and bass control
11. Cabled microphone input
12. External input signal R/ L
13. External output signal R/ L
14. Power cable
15. Power supply
16. External sensor(wall/ceiling-mount)
17. Infrared sensor
18. External sensor(ceiling-mount)
2
Connections
Charging the batteries of IWM-302:
EXTERNAL SENSOR
OR
IS-30A
IS-20A
IWA-200/220 INFRARED AMPLIFIER
1. Charging
2. Full charged
3. DC out
4. 2nd charging input
5. DC in
INPUT
AC
POWER SUPPLY
Ins talling the externa l sens or IS- 20A( wal l/ceiling -mou nt type )
TV
fixing holder with a screw
TV
3
4
5
When IWM-302 is on, the LED glows Green to indicate enough power. If red or no
light, the batteries might be weak or wrongly installed. Please check the
installation polarity again.
90°
angle-adjustable shaft
1.Covering range of infrared rays.
2.Find the best position for sensor to be mounted as illustrated.
3.How to mount the infrared external sensor
wall mounting
1
2
ceiling mounting
IWM-302 can be recharged by HC-37. To charge IWM-302, switch it off and connect
the adapter to a wall outlet. Slot IWM-302 into this charger and charging process
will start automatically. During charging, the" CHG"LED (red) keeps lighting up until
the "FULL" LED(green) lights up, meaning the batteries are full.
Please notice that this charger is specified to CHIAYO rechargeable batteries
only. Batteries with other specifications might not cause the charger to work
normally.
(a)Mount (Refer to illustration) the FIXING HOLDER (wall or ceiling) by using a
screw provided or two double-coated tapes
(b)Find the best position with wide view of the room. Mount the sensor along with
the FIXING HOLDER on the wall or ceiling.
NOTE: POWER UP. The LED of infrared sensor will light up to red if not please
consult with you nearest dealer.
3
8
Beltpack Transmitter IWM-302
Installing the external sensor IS-30A(ceiling-mount type)
Parts and functions
A.In an ordinary space such as a classroom
1
2 3
1.Locate the IS-30A sensor in
the middle of the ceiling (as
illustrated in right picture).
2.Connect the sensor cable to
the IWA-200/220 amplifier.
3.Turn on the IR amplifier system
and operation can be started.
4
IS-30A
8
8
10
11
12
7
5
6
9
1. Volume control
2. Power on / Battery-status indicator:
3. Power switch
4. 5-pin mini XLR connnector
5. Lavalier microphone
6. Mic clip
7. Infrared emitter
8. Cover-release button
9. Charging contacts
10. Transmission-strength selector
11. Channel selector
12. MT
Making changes to settings in IWM-302
Channel changing
First open the cover of IWM-302's battery compartment by pressing its release buttons
on both sides. There are 2 channels for selection, namely "A" and "B".Either can be
chosen by switching this selector(B).
B.In a larger space such as a fitness center
1.Locate 2 or 3 IS-30A sensors on
the suggested positions on the
imaginary catercorner of the ceiling
(as illustrated in below picture).
2.Connect all sensor cables to the
IWA-200/220 amplifier.
3.Turn on the IR amplifier system
and operation can be started.
IS-30A
MT adjusting
Low-impedance "MT" gain control is situated inside the battery compartment. It can be
adjusted by using a small screw driver to rotate till a desired audio output level has been
selected.
Battery installation
To install the batteries, first open the battery compartment by pressing the release
buttons on both sides of the IWM-302. Batteries used are 2 pcs of NiMH 1.2V/2100 mAH
type(rechargeable) or Alkaline type(not rechargeable). When inserting batteries, please
place them according to the correct polarity.
7
IS-30A
4
Handheld IR Transmitter IWH-201/IWH-301
Ba ttery cha rge r cha rgi ng the ba ttery (HC- 10)
power high/low for IWH-201
channel A/B for IWH-301
Parts and functions
1.Grille cover.
2.Status LED: Bicolor LED will glow when switch is put to ON :
Green : Battery is full and transmitter is in normal mode.
Red : Battery is weak and will shut off soon. Please charge the battery.
3.Power switch Slide to turn microphone on or off.
4.Battery compartment.
5.Infrared emitter with charging contacts. IR ray radiates from here. Do not block or hold this
part of the body.
6.Channel selector (IWH-301). A stands for 2.08MHz and B stands for 2.54MHz.
Power Selector Switch (Lo/Hi)(IWH-201)
This switch changes transmitting intensity of infrared ray. At Lo position transmitting
distance is approx. 20M and at Hi position approx. 30M.
If transmission system may pick up some noise at Lo position.
It means the transmitting distance may be insufficient. Set the switch to Hi position.
Factory setting is Lo position.
At Hi power operation, operating time is approx. 8 hours.
At Lo power operation, operating time is approx. 12 hours.
7.Sensitivity control. Clockwise to increase sensitivity level. Factory preset is max level.
Battery installation/replacement
Turn the battery cover counterclockwise and pull out. As shown in figure. Make sure the power
switch is in OFF position when installing or replacing batteries.And then install the new battery
according to its correct polarity.
Installing provided NiMH battery set
Installing AA battery x 2 (with a provided battery sleeve)
battery sleeve
Ope ration:
1.connect the DC plug of the adapter to the DC
socket of the charger.
2.Du ring charging the indication lamp is Re d.
CHARGE
3.Ea ch press on CHARGE/ DI SCHARGE button
swi tches betwe en DI SCHARGE( yellow) and
CHARGE( red).
4.When full charge , (Gr een) and sounded .
5.When connecting the charging plug to the
ring output socket of the charger, the right
charger's trough could be an external
charger.
6.Th e full charge capacity is 700mAH.
7.It can be charged wi th 4 x2100mA/ 1.2V or 2100mA/1.2V
2 x2100mA/ 2.4V.
ADAPTOR
LED
DISCHARGING LED
CHARGING BATTERY
2100mA/2.4V
Handheld mic charger holder(HC-20)
Operation:
1.Connect the Adapter to a wall outlet.
2.Insert an infrared wireless microphone
to the charger.
3.The red LED of charger will light up
during charging. Charging time will be
approx. 3.5 hours.
4.When charging is completed, the green
LED indicator will turn on and red LED off.
5.Rechargeable battery has to be exactly
the same type as attached only. When
other type of battery is installed in
microphone, you can not charge the
battery.
provided NiMH battery set
NOTE: Be sure to use specified battery only. You can not charge other types of
battery. Do not use any battery and battery charger other than specified.
5
6