1
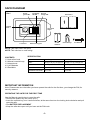
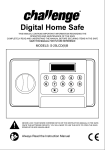
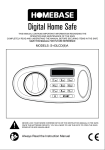
Digital Home Safe
THIS MANUAL CONTAINS IMPORTANT INFORMATION REGARDING THE
OPERATION AND MAINTENANCE OF THE SAFE
COMPLETELY READ AND UNDERSTAND THE MANUAL BEFORE SECURING ITEMS IN THE SAFE
SAVE THIS MANUAL FOR FUTURE REFERENCE
MODELS: S-25EA(II) / S-50EA(II)
NEVER LOCK YOUR SPARE OVERRIDE KEYS OR THE INSTRUCTION MANUAL IN THE SAFE.
ONCE THE BATTERIES DEPLETE, YOU WILL NEED TO USE THE KEYS TO OPEN THE SAFE.
SPARE KEYS ARE UNAVAILABLE!
Always Read the Instruction Manual
SAFE DIAGRAM
Dia.1
Ready
green LED
Low battery
red LED
Proceed
orange LED
Locking
knob
Instructions
Concealed
hinges
Lock cover
4 x ‘AA’
batteries
Electronic key pad
Override keys
4 x rawlbolts
NOTE: This safe is NOT fire proof.
NOTE: This safe has no cash rating.
CONTENTS
1 X Instruction book
2 X Manual override keys
1 X Internal mat
4 X ‘AA’ Batteries
4 X Rawlbolts
SPECIFICATION
SIZE :
S-25EA(II)
S-50EA(II)
35 (w) x 25 (h) x 27 (d) Cm
35 (w) x 31 (h) x 50 (d) Cm
NET WEIGHT:
9.15Kgs
17.15Kgs
POWER SUPPLY:
4x ‘AA’ 1.5V Batteries
4x ‘AA’ 1.5V Batteries
INTERNAL VOLUME:
23.3 Litre
54.3 Litre
IMPORTANT INFORMATION
Note: Please make sure that after you have opened the safe for the first time, you change the PIN, for
security reasons.
OPERATING THE SAFE FOR THE FIRST TIME
Use the Manual override key to open the safe.
• Remove the plastic key lock cover (dia 1)
• Insert the override key; turn it anti-clockwise, at the same time turn the locking knob clockwise and pull
open the safe.
• See BATTERY REPLACEMENT
• Keep the safe door open until you have set the PIN code.
-1-
PROGRAMMING YOUR PIN NUMBER (personal identification number)
DEFAULT FACTORY PIN: 159
Each time a button is pressed, a beep will be heard and the Orange LED will flash. This is a safety
feature so that you will know when the safe is being accessed and cannot be switched off.
Keep PIN Codes in a safe place.
Do not use personal information like birthdays, telephone
numbers etc.
Dia.2
• Write down your PIN codes so you do not forget it. (any
combination of numbers from 3 to 8 digits)
• With the door open, remove the security cap by unscrewing it,
Security cap
(dia.2).
covering reset
• Depress the red reset button located at the back of the door.
button
• Two beeps will be heard and the Orange LED will light.
• You now have 20 seconds to enter your PIN.
• Key in your new PIN.
• Press the “A” or “B” button once.
• Two beeps will be heard and the Orange LED will go out.
• You PIN has now been set.
• Screw the security cap back onto the red reset button. Ensure you do this for security reasons.
While the door is open familiarise yourself with the door opening procedure, and leave the door open
until you are satisfied that you fully understand the opening and closing method. You can re-set the PIN
at any time by following the above procedure.
OPENING THE DOOR USING YOUR PIN NUMBER (personal identification number)
Each time a button is pressed, a beep will be heard and the Orange LED will flash.
• Enter your PIN number.
• Press the “A” or “B” button.
• Two beeps will be heard and the Orange LED will flash.
• The Green LED will light to indicate that the safe door can be opened.
• You now have 5 seconds to open the door before it will lock again.
• Open the safe door by turning the knob clockwise and pulling it open.
If the Red and Green LED lights simultaneously when the correct PIN is entered, then the
batteries MUST be replaced immediately before closing the door as this indicates that the
batteries are too low.
If an incorrect PIN is entered, the safe will not open, three warning beeps will be heard & the
Orange LED will flash and the Green LED won’t light. Entering an incorrect PIN three
consecutive times will freeze the locking mechanism and keypad for 20 seconds, during which
time you will not be able to access the safe. After three more incorrect PIN attempts, the
locking mechanism and keypad will freeze for 5 MINUTES during which time you will not be
able to access the safe.
-2-
OPENING THE SAFE USING THE OVERRIDE KEY
Dia.5
Use the Manual override key to open the safe.
• Remove the plastic key lock cover (dia 1)
• Insert the override key; turn it anti-clockwise, at the same time
turn the locking knob clockwise and pull open the safe.
BATTERY REPLACEMENT
1. The digital safe uses four ‘AA’ type batteries (supplied).
• Remove the battery cover on the rear of the door (dia 5).
Push the catch in and pull out the cover.
• Install the 4x ‘AA’ batteries supplied. Ensure correct polarity.
• Replace the battery cover.
• Keep the safe door open until you have set the PIN code.
The battery life is approximately one year.
Make a note of the battery replacement date; they
should last approximately one year.
However, we recommend checking the batteries every
6 months just to make sure.
If power is removed from the safe the set PIN code will
be only remain in its memory for approximately 4 hrs
then it will need re-setting.
Wall
Nut & Washer
on the inside of
the safe
SECURING YOUR SAFE
ADVICE: WE STRONGLY RECOMMEND THAT YOU SECURE
YOUR SAFE TO A WALL OR FLOOR FOR SECURITY
REASONS.
You may wish to secure your safe to a fixed part of the house (i.e.
stone wall or wooden beam).
This can be achieved by using 2 of the 4 rawl bolts supplied in the
back of the safe or using the 4 rawlbolts in the base of the safe.
Use the holes in the safe to mark where you need to drill. Loosely
attach the rawlbolts onto the safe with the nuts and washers
provided. Hold the safe over the drilled holes and locate the
rawlbolts into these holes (Dia 6). Tighten the nuts from the inside
of the safe to secure firmly.
Note : The rawlbolts are packed inside the safe
-3-
Back of safe
Dia.6
Dia.4
TROUBLE SHOOTING
PROBLEM
CAUSE
SOLUTION
1
Can I get a replacement key/
extra key?
Replacement keys are not
available due to security
reasons.
2
The keypad becomes
inoperable
Low or depleted batteries
Use override keys and replace
batteries.
3
My PIN works and the green
light lights, however, the safe
won’t open
Low batteries. Will operate the
keypad but not the lock relay.
Use override keys and replace
batteries.
4
I have lost the keys and
forgotten the PIN number, can
I obtain spare keys.
If the safe cannot be opened
properly then you will need
to forcibly open it. Please
contact our helpline for more
information.
5
I am experiencing problems
using the back up key; it is
unable to slide smoothly into
the keyhole.
Spray inside the keyhole with
WD40, leave for a few minutes
and then try again.
6
We recently changed the
batteries in the safe, the safe
has reset the code itself, and
the code I’ve been using is no
longer valid?
If the batteries are completely
depleted for more than a day
then the safe will not retain the
code.
Try the factory default code
159 or use the override key;
then refer to the user manual
to reset your original code or
to enter a new code.
7
The Red and Green LED
lights simultaneously when the
correct PIN is entered.
The batteries are depleted.
Immediately replace the
batteries.
8
The batteries I bought don’t fit
the safe?
Batteries can vary in size.
Try another brand.
9
When I use the override key, I
can’t open the door.
Ensure that you are tuning the
key anti-clockwise, holding it
in that position and then turn
the locking knob clockwise to
release the catch.
-4-
HELPLINE
In the unlikely event of a defect occurring please contact our Helpline.
Office hours 9am – 4pm, Monday-Friday. Outside office hours or during peak times you will be
directed to an
answer phone. Please leave your name, a brief description of your enquiry and your number.
One of our operators will contact you as soon as possible.
Telephone Number 02083 916 767
Alternatively check the Q&A on our website www.hilka.co.uk/faq.php
NOTE:
These important safeguards and instructions cannot cover all possible conditions and situations
that may occur. It must be understood that common sense and caution are factors, which cannot
be built into any product. These factors must be supplied by the person using this product.
Manufactured on behalf of Home Retail Group
489 - 499 Avebury Boulevard,
Central Milton Keynes,
MK9 2NW
IB-S-25EA(II)-E-IB-S-50EA(II)-Issue1-09-03-11