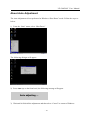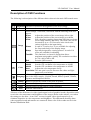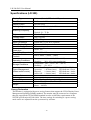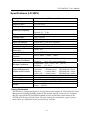
1
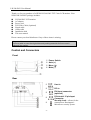
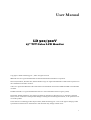
User Manual LD 500/500V 15” TFT Color LCD Monitor Copyright NESO Technology Inc., 2002. All rights reserved. IBM and VGA are registered trademarks of International Business Machines Corporation. Microsoft, Windows, Windows NT, and the Windows logo are registered trademarks of Microsoft Corporation in the United States and other countries. VESA is a registered trademark of the Video Electronics Standards Association. DPMS and DDC are trademarks of VESA. ENERGY STAR is a registered trademark of the U.S. Environmental Protection Agency (EPA). Disclaimer: NESO Technology Inc. shall not be liable for technical or editorial errors or omissions contained herein; nor for incidental or consequential damages resulting from furnishing this material, or the performance or use of this product. In the interest of continuing product improvement, NESO Technology Inc. reserves the right to change product specifications without notice. Information in this document may change without notice. 1 LD 500/500V User Manual Federal Communications Commission (F.C.C.) Statement This equipment has been tested and found to comply with the limits for a class B digital device, pursuant to Part 15 of the FCC rules. These limits are designed to provide reasonable protection against harmful interference in a residential installation. This equipment generates, uses and can radiate radio frequency energy and, if not installed and used in accordance with the instructions, may cause harmful interference to radio communications. However, there is no guarantee that interference will not occur in a particular installation. If this equipment does cause harmful interference to radio or television reception, which can be determined by turning the equipment off and on, the user is encouraged to try to correct the interference by one or more of the following measures: Relocate the receiving antenna Increase the separation between the equipment and receiver Connect the equipment into an outlet on a circuit different from that to which the receiver is connected. Consult the dealer or an experienced radio/TV devices technician for help. Use only shielded cables or connect I/O devices to this equipment. You are cautioned that changes or modifications not expressly approved by the party responsible for compliance could void your authority to operate the equipment. -2- LD 500/500V User Manual Table of Contents Federal Communications Commission (F.C.C.) Statement ................................................... 2 Safety Precautions .................................................................................................................. 4 Control and Connectors.......................................................................................................... 5 Quick Installation Guide ........................................................................................................ 6 Illustration .............................................................................................................................. 7 Operation................................................................................................................................ 9 Front Panel Buttons................................................................................................................ 9 About Auto Adjustment ....................................................................................................... 10 Description of OSD Functions ............................................................................................. 12 Specifications (LD 500) ....................................................................................................... 13 Specifications (LD 500V) .................................................................................................... 14 Standard Timing Table ......................................................................................................... 15 Pin Assignment .................................................................................................................... 15 Troubleshooting.................................................................................................................... 16 DDC Plug & Play................................................................................................................. 17 Cleaning the LCD Monitor .................................................................................................. 18 -3- LD 500/500V User Manual Safety Precautions Please read following instructions before use: 1. Do not apply pressure to the LCD screen. Excess pressure may cause permanent damage to the display. 2. Do not scratch or press on the panel with any sharp objects, such as a pen or pencil, as this may result in damage to the panel. 3. Store the LCD monitor at a temperature of –20°C ~ 60°C (or –4° ~ 140°F). 4. Avoid exposing the monitor to direct sunlight and ensure the area around the monitor is free from moisture. Never allow any liquid to get inside the monitor. 5. Do not place any objects on the case. 6. Never place the monitor near a heat source such as a radiator. 7. Do not open the case of the monitor, as doing so may expose you to dangerously high voltage levels. Never attempt to perform repairs on the monitor yourself, but refer all servicing to qualified personnel. 8. Disconnect the monitor from the power outlet when the monitor is not in use for extended periods of time. 9. To increase the life of the LCD Panel, make sure to turn off the power or reduce its brightness when the monitor is not in use. 10. The monitor is equipped with a three-wire grounding-type plug. For safety, this device should only be used with a grounding-type power outlet. If your outlet is not of this type, contact your electrician for replacement. Never use a 3-to-2 prong adapter. Safety requirements may differ. Please select a suitable power cord depending on the particular area where you are located: A. B. C. D. North America: Please select a UL listed and CSA certified power cord. Germany: Please select VDE certified power cord. Nordic countries: Please select a power cord certified by SEMKO, NEMKO, DEMKO or FEMKO Other areas: Please select a power cord suitable to the local power system and power outlet. Usually when this product is sold, a suitable power cord is provided by the manufacturer. However, this product may sometimes be resold or transported to another area with a different power system and safety requirements. Please pay attention to the selection of a suitable power cord. The plug on the power cord is intended to serve as the disconnect device, the socket-outlet shall be installed near the equipment and shall be easily accessible. 11. This monitor can only be connected to the following adapter: Brand: LINEARITY Type: LAD6019AB4 Brand: LIEN CHANG Type: LCA01F 12. This monitor is designed with a universal power supply that accommodates 100 – 240 VAC and frequency of 50 – 60Hz. -4- LD 500/500V User Manual Thank you for your purchase of a NESO LD 500/500V TFT Color LCD monitor. Your NESO LD 500/500V package includes: LD 500/500V LCD monitor AC adapter Power cord DVI Video Cable (Optional) Signal cable Audio cable Installation disk This user manual Please contact your local distributor if any of these items is missing. Important! You may wish to save the original box and packing materials for future use in shipping the monitor. Control and Connectors Front Power Switch Auto (+) Menu (↵) Mute (-) Rear Line-in DC-in DVI Input connector (optional) D-Sub mini 15 pin Input Connector Security Lock – allows for the connection to Kensington’s MicroSaver security system. -5- LD 500/500V User Manual Quick Installation Guide PC Setting Before connecting your PC to the LD 500/500V LCD monitor, change the display screen settings (resolution and frequency) to match those below. fH: 30kHz - 61kHz fV: 56Hz – 75Hz Important: The maximum resolution of this LCD monitor is 1024 x 768 at a maximum frequency of 75Hz Using the LCD monitor with Windows 95/98 A monitor information file can be found on the installation disk included in the package. This file includes information to ensure the best performance when the monitor is used with Windows 95/98. Please install the enclosed utility and select “LD 500/500V” from the monitor list in Windows 95/98. Refer to the readme.txt file in the Monitor Installation Disk. Connecting the Cables 1. Be sure that both the PC and the LCD monitor are turned OFF. 2. Place the LCD monitor as shown below to remove the connector cover. (Please refer to illustration .) When removing the connector cover, push in the buttons gently, and lift the cover up. To protect the LCD panel from scratching, it is recommended that a soft cloth or cushion be placed underneath the LCD panel. or DVI (optional) socket at the rear of 3. Plug the signal cable into the D-Sub the monitor. When connecting the signal cable, check that the shape of the cable connector matches the shape of socket on the LCD monitor. (Please refer to illustration .) 4. Plug the other end of the signal cable into the video connector at the rear of the PC. at the rear of the LCD monitor. 5. Plug the power cord into the power connector (Please refer to illustration .) 6. Plug the other end of the power cord into a power outlet. of the LCD monitor and the 7. Plug one end of the audio cable into the line-in port other end into the speaker-out port on the PC. (Please refer to illustration .) 8. After connecting all cables, fit the cables into the grooves to secure them and ensure that they can be extend out of the sides of the connector cover. (Please refer to illustration ) 9. Using your left hand, press the spring latch to the left, while using your right hand to pull the T-bar support strut into position. Then, release the spring latch. (Please refer to illustration ) 10. Reattach the connector cover (Please refer to illustration .) 11. Adjust the viewing angle (Please refer to illustration .) Important: While pulling out the T-bar support strut, be sure to press the spring latch to the left. Otherwise, damage may be caused to the monitor. -6- LD 500/500V User Manual Illustration Removing the connector cover Connecting the cables Pulling down the T-bar support strut -7- LD 500/500V User Manual Attaching the connector cover Adjusting the viewing angle -8- LD 500/500V User Manual Operation This section explains how to fine-tune your monitor's screen image to suit your personal preferences, or to adapt it for different applications or lighting conditions. Front Panel Buttons Power Switch with LED indicator Auto (+) button — Used for automatic adjustment of the display size to full-screen mode or to increase the selected values. Menu button (↵) — Brings up the OSD control menu Mute (-) button — Mutes the audio or decreases the selected values In the power-saving mode, the functions accessed by the control buttons described above will be modified as follows: Auto (+) buttons — Raises the volume. Menu button (↵) — Mute Mute (-) buttons — Lowers the volume. Important: The Auto adjustment function is intended for use on Macintosh computers, or PCs running Windows. It may not function properly if any of the following applies: 1. The PC is running MS-DOS (not Windows). 2. The background color for the “wallpaper” or “desktop” pattern is set to black or dark. 3. A graphics board that is not completely compatible is installed in the PC. -9- LD 500/500V User Manual About Auto Adjustment The Auto Adjustment is best performed at Windows “Shut Down” mode. Follow the steps as below: 1) From the “Start” menu, select “Shut Down” The following dialogue will appear. 2) Press Auto (+) on the front bezel, the following message will appear. Auto adjusting … 3) Wait until it finish all the adjustment and then select “Cancel” to return to Windows. - 10 - LD 500/500V User Manual On-Screen Display (OSD) Main Menu Your LD 500/500V TFT Color LCD monitor provides nine main control parameters that you can adjust according to preference. To access the main menu of the OSD controls, follow the steps as follows: 1. Press the Menu (↵) key. On the screen of the monitor, the menu shown below will appear. 2. Press “+” or “-“ key to scroll the highlight bar up or down the Main Menu. 3. Press the Menu key to enter into the sub-menu. Note: 1. The upper line of the OSD shows the current resolution of the monitor and vertical sync status. 2. OSD menu will disappear after 30 seconds of user-defined inactivity. 3. Allow the LCD monitor to warm up for at least 20 minutes before making adjustments. - 11 - LD 500/500V User Manual Description of OSD Functions The following is a description of the different choices shown in the main OSD control menu. Icon Function Function Description Brightness Increases or decreases the brightness of the screen image Contrast Increases or decreases the difference between dark and light color When “Image” is selected, a sub-menu with the following items will appear: Adjusts the position of the screen image left or right. H-pos Adjusts the position of the screen image up or down. V-pos Has a frequency tracking feature that offers the user better Clock screen image stability and clarity. The clock value can be increased by up to +50. Decreases in the clock value (minus) depends on the input timing. Image A total of 32 scales (0 to 31) are available for adjusting Phase the focus and clarity of the display image. Specially designed for viewing pictures. A total of 10 Sharp scales are available for adjusting. This function is to choose a display that allows Text/Gfx maximum text/graphics quality. The resolution can either be 720 x 400 or 640 x 400 Exits the OSD controls. Exit Provides three color adjustment options: Sets the CIE coordinate color temperature to 9300K 9300K Sets the CIE coordinate color temperature to 6500K 6500K Color Adjusts the color temperature freely. User Auto Gain* The auto gain is used to fine-tune the whites and light grays to an even balance. Allows users to choose from among seven languages for displaying Language text in the OSD controls—English, French, Italian, Spanish, German, Japanese and Simplified Chinese. Volume Raises or lowers the volume of the built-in speaker. Returns all adjusted parameters to factory preset values. Recall Switch between D-Sub and DVI input (Optional) Input Exits the OSD controls. Exit *Because of the differences in video signal output levels of graphics boards, disparities can be seen in the color temperature and brightness of the images shown on the monitor, even when the settings are the same. “Auto Gain” corrects irregular video signal output levels to eliminate disparities in color temperature and brightness. This adjustment should be done when a graphics board and monitor are connected. Please refer to the readme.txt file in the Monitor Installation Disk. - 12 - LD 500/500V User Manual Specifications (LD 500) Display Type 38.1-cm (15-inch) TFT color LCD panel Pixel Pitch 0.297 mm x 0.297 mm Display Colors 262,144 colors Viewing Angle Horizontal: 170°, Vertical: 170° Scanning Frequency Horizontal: 30 – 61 KHz Vertical: 56 – 75 Hz Brightness Contrast Ratio Input Signal Input Connectors Active Display Size Viewable Image Size Recommended Resolution Plug & Play Support Front-Panel User Controls Operating Conditions Storage Conditions Power Management (When audio is mute) Speaker Out Audio Input Compatibility Dimensions Weight 250 cd/m2 (typical) 500:1 (typical) RGB Analog D-Sub mini 15-pin, DVI (optional) 304 mm x 228 mm 381 mm (diagonal) 1024 x 768 VESA DDC 1/2B Power, Menu, + (Auto), - (Mute) Temperature: 10°C – 40°C (50°F – 104°F) Humidity: 20% - 85% (non-condensing) Temperature: -20°C – 60°C (-4°F – 140°F) Humidity: 5% - 85% International Energy Star, NUTEK, and VESA DPMS Operation: < 40 watts (max.) LED Indicator: Green Suspend: < 6 watts (max.) LED Indicator: Amber Active Off: < 4 watts (max.) LED Indicator: Amber 1 watt + 1 watt Stereo mini-jack PC99, Windows 95/98/me/2000/XP, Macintosh 414mm(W) x 330mm(H) x 74mm(D) Net: 3.4 KGs Gross: 4.0 KGs Energy Declaration This monitor is equipped with power-saving features that support the VESA Display Power Management Signaling (DPMS) standard. The monitor must be connected to a computer that also supports the VESA DPMS standard in order to fulfill the requirements of the NUTEK specification 803299/94/96. The time settings for switching to a power saving mode can be are adjusted from the system unit by software. - 13 - LD 500/500V User Manual Specifications (LD 500V) Display Type 38.1-cm (15-inch) TFT color LCD panel Pixel Pitch 0.297 mm x 0.297 mm Display Colors 262,144 colors Viewing Angle Horizontal: 120°, Vertical: 100° Scanning Frequency Horizontal: 30 – 61 KHz Vertical: 56 – 75 Hz Brightness Contrast Ratio Input Signal Input Connectors Active Display Size Viewable Image Size Recommended Resolution Plug & Play Support Front-Panel User Controls Operating Conditions Storage Conditions Power Management (When audio is mute) Speaker Out Audio Input Compatibility Dimensions Weight 300 cd/m2 (typical) 300:1 (typical) RGB Analog D-Sub mini 15-pin, DVI (optional) 304 mm x 228 mm 381 mm (diagonal) 1024 x 768 VESA DDC 1/2B Power, Menu, + (Auto), - (Mute) Temperature: 10°C – 40°C (50°F – 104°F) Humidity: 20% - 85% (non-condensing) Temperature: -20°C – 60°C (-4°F – 140°F) Humidity: 5% - 85% International Energy Star, NUTEK, and VESA DPMS Operation: < 40 watts (max.) LED Indicator: Green Suspend: < 6 watts (max.) LED Indicator: Amber Active Off: < 4 watts (max.) LED Indicator: Amber 1 watt + 1 watt Stereo mini-jack PC99, Windows 95/98/ME/2000/XP, Macintosh 414mm(W) x 330mm(H) x 74mm(D) Net: 3.4 KGs Gross: 4.0 KGs Energy Declaration This monitor is equipped with power-saving features that support the VESA Display Power Management Signaling (DPMS) standard. The monitor must be connected to a computer that also supports the VESA DPMS standard in order to fulfill the requirements of the NUTEK specification 803299/94/96. The time settings for switching to a power saving mode can be are adjusted from the system unit by software. - 14 - LD 500/500V User Manual Standard Timing Table If the selected timing is NOT included in the table below, this LCD monitor will use the most suitable available timing. 640 x 350 H. Freq. (KHz) 31.469 V. Freq. (Hz) 70.087 Pixel Freq. (MHz) 25.175 H/V Sync. Polarity +/- 640 x 400 31.469 70.087 25.175 -/+, -/- 640 x 480 640 x 480 640 x 480 720 x 400 800 x 600 800 x 600 800 x 600 800 x 600 1024 x 768 1024 x 768 1024 x 768 31.469 37.861 37.500 31.469 35.156 37.879 48.077 46.875 48.363 56.476 60.023 59.940 72.809 75.000 70.087 56.250 60.317 72.188 75.000 60.004 70.069 75.029 25.175 31.500 31.500 28.322 36.000 40.000 50.000 49.500 65.000 75.000 78.750 -/-/-/-/+ +/+ +/+ +/+ +/+ -/-/+/+ Resolution Mode VGA-350 VGA-400-GRAPH, NEC PC9821 VGA-480 VESA-480-72Hz VESA-480-75Hz VESA-400-TEXT SVGA VESA-600-60Hz VESA-600-72Hz VESA-600-75Hz XGA VESA-768-70Hz VESA-768-75Hz Pin Assignment The pin assignments of the connectors are listed below for the reference of technical personnel only. Please do not attempt to alter the connections yourself as doing so may seriously damage your monitor. Pin No. Assignment Pin No. Assignment 1 Red 9 DDC +5V 2 Green 10 Ground 3 Blue 11 ID (Ground) 4 ID (Ground) 12 Bi-Directional Data SDA 5 DDC Ground 13 H. Sync 6 Red Ground 14 V. Sync 7 Green Ground 15 Data Clock (SCL) 8 Blue Ground - 15 - LD 500/500V User Manual Troubleshooting This LCD monitor has been pre-configured using factory standard VGA timings. Due to the output timing differences among various VGA cards in the market, users may initially experience an unstable or unclear display whenever a new display mode or new VGA card is selected. Important: This LCD monitor supports multiple VGA modes. Refer to the standard Timing Table for a listing of modes supported by this LCD monitor. Problem No power Power on but no screen image No signal Input Out of range error message appears Vertical bars of distortion appear Horizontal bars of distortion appear. The screen has defective pixels (e.g. slightly light or dark) Incorrect display of colors Points to check with possible solutions Make sure the power button is ON Make sure the power cord is firmly connected to the back of the monitor and to a power outlet. Make sure the signal cable supplied with the monitor is fully inserted into the video output port on the back of the computer. If the other end of the signal cable is not attached permanently to the monitor, tightly secure it to the monitor. Adjust brightness and contrast. Check that the PC is turned ON Check that the signal cable is properly connected to the graphics board or PC. Check that the graphics board is correctly inserted in the PC. Use the graphics board’s utility software to change the frequency setting. (Refer to the manual for the graphics board.) For Windows 95 users (OSR 2.0 or newer) or Windows 98, restart the PC in a safe mode and change the frequency in the “Display” setting for the PC. Make adjustments to the “Image”, “Clock” setting in the OSD menu. Make adjustments to the “Image”, “Phase” setting in the OSD menu. This is due to the characteristics of the panel itself, not the LCD monitor. If any colors (red, green, or blue) are missing, check that the signal cable is firmly connected. Damaged pins in the cable connector may also result in a faulty connection. - 16 - LD 500/500V User Manual Problem Display position is incorrect The screen is too bright or too dark The Auto adjustment button does not work properly Points to check with possible solutions Adjust the vertical position or horizontal position from the OSD menu. (“Image”, “H-pos” or “V-pos”) If the problem persists, use the graphics board’s utility software to change the display position if available. Adjust the contrast and brightness from the OSD menu. (The backlight of the LCD monitor has a fixed life span. When the screen becomes dark or begins to flicker, please contact your dealer) The Auto adjustment function is intended for use on Macintosh and IBM compatibles PCs running Windows. It may not work properly if either of the following applies. - You are running MS-DOS on an AT-compatible PC. - The background color for the “wallpaper” or “desktop” pattern is set to black. DDC Plug & Play This monitor provides Plug & Play capability (VESA DDC 1/2B). To utilize this capability, your graphic card and hosting system must also be Plug & Play compatible. When properly set up, the graphic card and hosting system will automatically identify and configure the monitor, and most importantly, optimize its performance. - 17 - LD 500/500V User Manual Cleaning the LCD Monitor Caution To ensure safety, always unplug the monitor before cleaning it. Cleaning the monitor while it is plugged into a power outlet may result in electric shock. Periodically clean the area around the plug. A Buildup of dust, water, or oil on the plug may result in fire. Dust accumulation within the monitor may result in fire or equipment failure. Please keep the monitor in a dust-free environment. Never use paint thinner, benzene, alcohol, abrasive cleaners, or other strong solvents, as these may cause damage to the cabinet or LCD. Periodic cleaning is recommended to keep the monitor looking new and to prolong its operational lifetime. Clean the cabinet and LCD panel as described below. To clean the LCD Panel: 1. 2. The LCD surface can be cleaned with s soft cloth, such as cotton or lens paper. If necessary, stubborn stains can be removed by moistening part of a cloth with water before wiping. To clean the Cabinet: 1. 2. Use a soft, lightly moistened cloth and a mild detergent. Do not spray wax or cleaner directly onto the cabinet. DISCLAIMER: NESO strongly discourages the use of any paint thinner, benzene, alcohol, abrasive cleaners, or other strong solvents on the LCD Panel or cabinet, as they may damage the monitor. NESO shall not be liable for any damage to the monitor resulting from use of any above mentioned substances. - 18 -