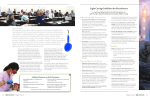
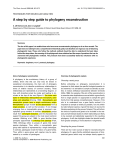
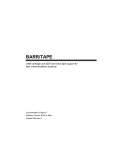
1
CHANNEL-OUT (BT) Connect S/390 channel devices directly to the computer Documentation Edition 2 For Revision 3.x Editors Becky Senn Michele Nylander Seroj Terian Hardware Ken Clark Scott Graham Al Hodges Jim Leslie Don Williams Copyright © 1996-2006 by Barr Systems, LLC All Rights Reserved. Barr Systems, LLC 4500 NW 27 Avenue Gainesville, FL 32606-7031 Phone: 800-BARR-SYS 800-227-7797 352-491-3100 Fax: 352-491-3141 Internet: Web site: FTP site: [email protected] www.barrsystems.com ftp.barrsystems.com The Barr logo is a registered trademark and BARR/CHANNEL, BARR/PRINT390, and BARR/PRINT CHANNEL are trademarks of Barr Systems, LLC. S/390 is a registered trademark of IBM in the United States. All other trademarks are the sole property of their respective owners. July 1, 2006 ii Preface Preface Welcome to a high-performance product that enables you to connect S/390 devices to the computer. This manual tells you how to install the CHANNEL-OUT (BT) hardware that comes with the PRINT370 or BARR/PRINT390 option. Follow the instructions in this manual to install the CHANNEL-OUT (BT) adapter and CHANNEL-OUT (BT) cable. See your Barr software documentation for software installation and hardware diagnostics instructions. Barr Technical Support You can contact Barr Systems by e-mail, fax, or phone to work directly with a Support Analyst. Our Frontline and Research support is available five days a week, Monday – Friday, excluding bank holidays. Refer to the Technical Support Web site (www.barrcentral.com) for specific information regarding the hours of operation. Other methods of technical support include on-site visits, remote control service, and FTP server access. You have two easy-to-use support options available 24 hours a day, 7 days a week using the Internet. Knowledgebase – The knowledgebase system (www.barrcentral.com/support/kb) offers a complete database of solutions to known problems. Our knowledgebase is designed to locate solutions based on the symptoms you are experiencing. We search the same knowledge when you call or e-mail us! When we solve your problem, we add it to our knowledgebase. Case Manager – If you’ve looked in our latest Help and knowledgebase and you still don’t find your answer, you probably need our Technical Support. We’ve opened our case tracking system up to you on Barr Central through Case Manager (www.barrcentral.com/support/cases). With Case Manager you can create a new case, add notes to the case, check its status, and attach diagnostics. Barr Systems is notified of these events so our Support team knows what you need and we keep in contact with you while the issue is being worked on. When you contact Technical Support, please include the hardware serial number and software version number in your correspondence. You can obtain the adapter serial number from any of the following places: Label on the adapter box Blue sticker on the adapter edge that is visible from the rear of the computer Back of the adapter, where it is handwritten CHANNEL-OUT (BT) iii Acknowledgments Barr Systems thanks the following people for their contributions to this manual. Hal Antonson, Microsoft Corporation, Redmond, WA Maynard Calkin, Northeast Regional Data Center, Gainesville, FL Jerry Wetherington, Northeast Regional Data Center, Gainesville, FL iv Preface Contents Preface ................................................................................................................................... iii 1. Introduction ........................................................................................................................ 1 1.1 Features................................................................................................................... 1 1.2 Computer Requirements.......................................................................................... 1 1.3 Package Contents.................................................................................................... 2 2. Install the Adapter.............................................................................................................. 3 2.1 Set the BIOS IRQ..................................................................................................... 3 2.2 Insert the Adapter in Your Computer ....................................................................... 3 2.3 Connect the Cable to the Adapter ........................................................................... 4 2.4 Test the Adapter ...................................................................................................... 4 3. Connect Your Printers .......................................................................................................5 3.1 Connect the Adapter to the First Printer .................................................................. 5 3.2 Attach Multiple Printers ............................................................................................ 7 3.3 Attach Terminator Plugs .......................................................................................... 9 Federal Communications Commission Statement ...........................................................11 European Community Statement .......................................................................................13 Glossary ................................................................................................................................15 Index ......................................................................................................................................17 CHANNEL-OUT (BT) v Notes: vi Contents 1. Introduction The CHANNEL-OUT (BT) adapter is used with either the Barr PRINT370 or BARR/PRINT390 software and allows you to connect S/390 channel devices to the computer. 1.1 Features The CHANNEL-OUT (BT) hardware includes these features. Data Streaming Channel Transfer Mode In data streaming mode, you can achieve transfer rates of 3 or 4.5 megabytes per second (MBps). Moreover, the transfer rate is independent of the total Bus & Tag cable length, which can be up to 400 feet. Block Multiplex Interface Connection Mode CHANNEL-OUT (BT) supports the block multiplex interface connection mode for the interlock and data streaming transfer modes. Block multiplex means that the software allows multiplexing between data blocks. High-Performance Adapter The CHANNEL-OUT (BT) adapter is a high-performance, PCI-compatible adapter. PCI technology offers much higher performance than ISA, which has a bandwidth limitation that cannot support 4.5 MBps data rates. Furthermore, you do not need to set any adapter jumpers or switches with a PCI-compatible adapter. The CHANNEL-OUT (BT) adapter fully supports interrupt sharing. 1.2 Computer Requirements You can install the CHANNEL-OUT (BT) adapter in a computer with one full-height PCI 32bit 2.1+ slot. CHANNEL-OUT (BT) 1 1.3 Package Contents See your Barr software documentation for software package contents. The CHANNEL-OUT (BT) package contains the following items: CHANNEL-OUT (BT) adapter 2 6-meter (19.6-foot) CHANNEL-OUT (BT) cable for connecting the adapter to the first control unit 1. Introduction 2. Install the Adapter You can install the CHANNEL-OUT (BT) adapter in a full-height 32-bit PCI slot in your computer like any other PCI adapter. Follow these steps to install the adapter. 1. Set the BIOS IRQ. 2. Insert the adapter in your computer. 3. Connect the cable to the adapter. 4. Test the adapter. 2.1 Set the BIOS IRQ PCI technology means you do not have to set any adapter switches or jumpers, but it sometimes requires computer setup. Although your computer’s BIOS program can automatically set up PCI and ISA adapters, it might encounter IRQ conflicts with non-PCI adapters. (DMA and address conflicts are unlikely with PCI adapters, because PCI adapters typically do not use a DMA setting and their address range differs from non-PCI adapters.) To prevent conflicts, you need to tell BIOS which IRQ settings your non-PCI adapters use. You also need to make sure that at least one IRQ is available for PCI adapters. Before you install the CHANNEL-OUT (BT) adapter, use your computer setup utility to check the BIOS IRQ settings. See your computer user’s manual for instructions. Note: The device drivers that accompany some PCI adapters might not allow interrupt sharing. If a conflict exists, the software will not function correctly when you try to start or operate it. If you detect a conflict, contact the vendor of the other PCI adapter. 2.2 Insert the Adapter in Your Computer After you check for an available IRQ setting, follow the instructions in your computer user’s manual to install a PCI adapter. Caution: Disconnect your computer and all attached devices from power sources before you install the CHANNEL-OUT (BT) adapter. CHANNEL-OUT (BT) 3 2.3 Connect the Cable to the Adapter Follow these steps to connect the cable to the CHANNEL-OUT (BT) adapter. Refer to section 3.1 for more information on connecting your cable to the adapter. 1. Connect the supplied 6-meter (19.6-foot) cable to the adapter. 2. Power on the computer. Note: If you also have the CHANNEL-IN (BT) adapter for connecting to an SNA host, be sure to correctly connect the adapters and cables. The CHANNEL-IN (BT) and CHANNEL-OUT (BT) adapters look identical, but they have different firmware and function differently. Connect the CHANNEL-IN (BT) cable to the adapter labeled IN. Connect the CHANNEL-OUT (BT) cable to the adapter labeled OUT. The IN and OUT adapter labels are visible from the rear of the computer. 2.4 Test the Adapter After you install the adapter, install the Barr software and run the adapter diagnostics as described in your Barr software documentation. Adapter diagnostics verify that you have correctly installed the adapter and that it functions properly. Refer to Chapter 3 for more information on connecting your printer to the CHANNEL-OUT (BT) adapter using the supplied cable. 4 2. Install the Adapter 3. Connect Your Printers After you install the adapter, you need to perform these steps to connect your printers. 1. Connect the adapter to the first printer. 2. Attach multiple printers. 3. Attach terminator plugs. Note: For some printers, the printer service representative must connect the cables. Consult your printer manual to determine whether you need to schedule this service. 3.1 Connect the Adapter to the First Printer Complete the following steps to connect the CHANNEL-OUT (BT) adapter to the first S/390 channel printer (see Figure 3-1) using the supplied CHANNEL-OUT cable (see Figure 3-2). 1. Insert the cable plug into the connector on the adapter. The cable plug is the end of the CHANNEL-OUT cable with a single plug. The other end of the CHANNEL-OUT cable has separate Bus & Tag plugs that connect to the Bus In and Tag In connectors on the printer. Note: If you also have the CHANNEL-IN (BT) adapter for connecting to an SNA host (requires the PRINT/CHANNEL or BARR/PRINT CHANNEL option), be sure to correctly connect the adapters and cables. Connect the CHANNEL-IN (BT) cable to the adapter labeled IN. Connect the CHANNEL-OUT (BT) cable to the adapter labeled OUT. The IN and OUT adapter labels are visible from the rear of the computer. 2. Attach the Bus plug to the Bus In printer connector. 3. Attach the Tag plug to the Tag In printer connector. 4. Tighten the screws that secure each connector using a screwdriver. 5. If you connect only one printer, follow the instructions in Section 3.3 to attach terminator plugs to the printer. CHANNEL-OUT (BT) 5 FIGURE 3-1 Attach the printer to the computer. If you have only one printer, also attach terminator plugs. FIGURE 3-2 CHANNEL-OUT cable Plug into adapter Plug into printer 6 3. Connect Your Printers 3.2 Attach Multiple Printers You can attach multiple S/390 printers by daisy chaining one printer to another with pairs of Bus & Tag cables, as shown in the following graphic. Daisy-chain cables are available from your printer vendor. FIGURE 3-3 Daisy chain printers using Bus & Tag cables. Connect Two Daisy-Chain Cables If your Bus & Tag cables are not long enough to span the distance between two printers, you can extend the cable length by connecting two pairs of Bus & Tag cables. However, you must correctly connect the cables to each other. Plugs at opposite ends of the cable have different colored edges. Usually the cable has plugs with black edges at one end and plugs with white or gray edges at the other end. Attach plugs of opposite colors, as shown in Figure 3-4. CHANNEL-OUT (BT) 7 FIGURE 3-4 Attach Cable 1’s white Bus plug to Cable 2’s black Bus plug. Attach Cable 3’s white Tag plug to Cable 4’s black Tag plug. Connect Two Printers Bus cables have a Bus connector at each end and tag cables have a Tag connector at each end. The connectors are distinguished by color-coded edges. Each cable has one connector with a black edge and one connector with a white or gray edge. When you connect Bus & Tag cables to printers, be sure to attach connectors of opposite colors. Complete the following steps to connect the printers. 1. Connect the Bus Out connector on Printer 1 to the Bus In connector on Printer 2. a. Attach the bus cable’s black plug to Printer 1’s white Bus Out connector. b. Attach the bus cable’s white plug to Printer 2’s black Bus In connector. 2. Connect the Tag Out connector on Printer 1 to the Tag In connector on Printer 2. a. Attach the tag cable’s black plug to Printer 1’s white Tag Out connector. b. Attach the bus cable’s white plug Printer 2’s black Tag In connector. Performance tuning: To maximize performance, put the fastest printers at the end of the chain. For example, put slower impact printers nearest to the adapter, and put faster laser printers farthest from the adapter. Maximum cable length: When you daisy chain printers, the total distance from the computer to the last printer must not exceed 60 meters (200 feet). This distance includes the lengths of the cables and the printers. 8 3. Connect Your Printers 3.3 Attach Terminator Plugs After connecting the adapter to the printer and connecting the printers, you will need to connect the Bus & Tag terminator plugs to the printer. If you connect multiple printers, attach the terminators to the last printer in the chain. Complete the following steps to connect the terminators. 1. Attach the Bus Terminator to the printer’s Bus Out connector. 2. Attach the Tag Terminator to the printer’s Tag Out connector. 3. Tighten the terminator screws by hand. CHANNEL-OUT (BT) 9 Notes: 10 3. Connect Your Printers Federal Communications Commission Statement This equipment has been tested and found to comply with the limits for a Class A digital device pursuant to Part 15 of the FCC Rules. These limits are designed to provide reasonable protection against harmful interference when the equipment is operated in a commercial environment. This equipment generates, uses, and can radiate radio frequency energy and, if not installed and used in accordance with the instruction manual, might cause harmful interference to radio communications. Operation of this equipment in a residential area is likely to cause harmful interference. If this happens, users will be required to correct the interference at their own expense. Note: A shielded and grounded cable is required. CHANNEL-OUT (BT) 11 Notes: 12 Federal Communications Commission Statement European Community Statement The following is a declaration of conformity for the European community. CHANNEL-OUT (BT) 13 Notes: 14 European Community Statement Glossary adapter Add-on piece of equipment you can plug into a computer to allow the computer to connect to another device. BIOS Acronym for Basic Input/Output System. Programs permanently stored in read-only memory (ROM) chips on your computer’s system board. channel Functional unit that directs the flow of information between control units and main storage. command Something you instruct the computer to do, such as run a program. control unit A communications device that controls the transmission of data over lines in a network. Types of control units are transmission control units and communication controllers. daisy chain A method of interconnecting a series of devices, such as printers. data rate The rate at which data can be moved between a device and a control unit during the data transfer portion of an I/O operation. CHANNEL-OUT (BT) data streaming The uninterrupted transfer of information over an interface to achieve high data transfer rates (for channel data streaming, 3 or 4.5 MBps). Data streaming is not adversely affected by signal delays introduced by long cable lengths. DCI Acronym for Direct-Coupled Interlock. A type of channel data transfer that can achieve data rates of up to 1.5 MBps. DCI Single Tag uses one signal pair (Service In, Service Out). DCI High Speed Transfer uses two signal pairs (Service In, Service Out, and Data In, Data Out). device address A number that uniquely identifies a device. diagnostics A program to detect and isolate errors in programs and faults in equipment. DMA Acronym for Direct Memory Access. A technique for moving data directly between main storage and peripheral equipment without requiring the processing unit to process the data. HST Acronym for High-Speed Transfer. A type of channel data transfer. 15 IRQ Acronym for Interrupt Request. A request for processing on a particular priority level. ISA Acronym for Industry Standard Architecture. A standard for the computer’s expansion bus (where you plug in add-on adapters). mainframe Term used for a large central computer that offers a full set of computing services. The term originated in the days when the central processor, memory, and input/output channels were located in one central housing called the mainframe. Synonymous with host computer. MBps Abbreviation for megabytes per second. megabyte One million bytes (more accurately, 1,048,576 bytes). PCI Acronym for Peripheral Component Interconnect. Standard for a highperformance, 32-bit or 64-bit computer local bus with multiplexed address and data lines. Enables fully automatic configuration of add-on adapters. terminator plug A part that ends the cable path on a computer system. The terminating plug is attached to the last device in a series. 16 Glossary Index DMA · 3 A Adapter diagnostics · 4 serial number · iii B BIOS · 3 Block multiplex · 1 Bus & Tag cable length · 1 C Cable photo · 6 terminators · 9 CHANNEL OUT cable · 2, 4 Channel transfer mode · 1 Computer requirements · 1 Conflict, hardware · 3 H Help - contact Technical Support · iii I Interrupt sharing · 1 IRQ · 3 ISA bus · 1 P PCI bus · 1, 3 Performance tuning · 8 Printer attaching multiple · 7 S Serial number · iii D T Daisy chain · 7 maximum distance · 8 Data streaming · 1 Technical Support · iii CHANNEL-OUT (BT) 17 Notes: 18 Index