1
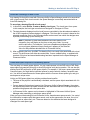
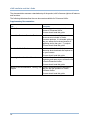
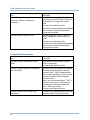
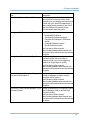
uCAD Installation and User's Guide Release 10.1 September 2014 Contents Introduction............................................................................................. 5 About the Primavera Unifier uCAD Application .................................................. 5 Client Hardware & Software Requirements ...................................................... 5 Installing the uCAD Application ..................................................................... 6 Download the uCAD Plug-in (and uClient Configurator) ........................................ 6 Install the uCAD Plug-in ............................................................................. 7 Configure uCAD ....................................................................................... 7 Uninstalling uCAD ...................................................................................... 9 Working in AutoCad with the uCAD Plug-in ....................................................... 9 Importing the Primavera Unifier Space Manager Form Designs into uCAD ................. 10 Import (or Auto Synchronize) Space Manager Level and Space Form Designs Between Primavera Unifier and uCAD................................................................... 10 Set up an AutoCAD Drawing for Use with uCAD ............................................ 10 Associate a Drawing File with a Level ....................................................... 11 Create New Space Objects or Link Existing Spaces ........................................ 11 Working with Space Objects in a Drawing ...................................................... 13 View a Space Object that is Linked to a Polyline .......................................... 13 Open a Space Object ........................................................................... 13 Delete a Space Object ......................................................................... 14 De-link a Space Object......................................................................... 14 For More Information ................................................................................ 15 Where to Get Documentation .................................................................... 15 Where to Get Training ............................................................................. 22 Where to Get Support ............................................................................. 22 Additional Support ................................................................................. 23 Legal Notices .......................................................................................... 26 3 Introduction This guide provides instructions on how to download and install the Primavera Unifier uCAD Application on your desktop and configure it to work with your AutoCAD® application. It also includes details on how to use uCAD with AutoCAD and Primavera Unifier. In This Section About the Primavera Unifier uCAD Application .......................................................... 5 Client Hardware & Software Requirements ............................................................... 5 About the Primavera Unifier uCAD Application Primavera Unifier uCAD is an AutoCAD plug-in: a desktop client application that allows space managers to graphically define levels/floors and spaces based on customer-specific space definitions and details. It works in conjunction with Primavera Unifier’s Space Manager and provides a seamless integration between AutoCAD and Primavera Unifier. Installing and configuring uCAD provides the following capabilities: Dynamic level and space data creation and updates between Primavera Unifier and AutoCAD. Ability to integrate with multiple Primavera Unifier environments by leveraging the connections created under uClient Configurator. Link uCAD space objects and polylines with Primavera Unifier’s Space Manager Levels and Space records. Ability to associate attributes to drawing objects to designate their space locations. Ability to publish AutoCAD drawings with uCAD Space information to Primavera Unifier. Ability for Primavera Unifier users to view published drawings. Ability to keep uCAD’s Space and Level attribute form designs in synch with Primavera Unifier via an Auto Synchronize feature. Client Hardware & Software Requirements The client hardware and software requirements are the same as those specified for the Primavera Unifier system. In addition, your desktop system must have a supported AutoCAD version installed. Note: For hardware and software requirements, and supported versions of AutoCAD (and AutoDesk Design Review if used), see the Tested Configurations document. 5 uCAD Installation and User's Guide To upload drawing files for use with Space Manager, you must also install the latest version of the Primavera Unifier File Transfer Utility, and choose Advanced as your File Transfer option. (The File Transfer options are found in the Primavera Unifier User Preferences window. The File Transfer Utility and installation instructions are found in the Primavera Unifier Support window, Download tab.) Installing the uCAD Application These instructions are for new and existing Unifier users who are installing or updating the uCAD application. You must have administrator privileges to install uCAD or uClient software. This installation automatically installs the Unifier Client Configurator (uClient), which is used to establish a connection from the uCAD client application to one or more Unifier environments. uClient allows you to create connections to one or multiple Unifier environments, which can be later used by uCAD to communicate with the Unifier server. If you have a previous uClient release already installed on your system, the installation of a newer release will automatically update the previous version. It is not necessary to uninstall previous versions to upgrade. Note: You must install uCAD and uClient Configurator on each computer on which you intend to use the functionality. The uCAD application and uClient Configurator run as client-side applications on the local system. If you access Unifier from a computer where these applications are not installed, any attempt to upload, download or attach files will display an error message. Download the uCAD Plug-in (and uClient Configurator) If you have not already installed uCAD application, this installation will also install the uClient Configurator. To download the uCAD Plug-in 1) Sign in to Primavera Unifier. 2) Click on the Support link in the upper right portion of the Primavera Unifier window. The Support window opens. 3) Click the Download tab. 4) Click the link: "Click here to download uCAD application." The File Download screen opens. 5) Click Save to save the uCADInstaller.zip file to your machine or network drive. This zip file contains the installation file. 6) Double-click the uCADInstaller.zip file to unzip the installation file (uCADInstaller.exe) to a location on your local system. 6 Installing the uCAD Application Install the uCAD Plug-in You must have a supported version of AutoCAD installed on the machine on which you will be installing uCAD. If you have not previously installed uCAD plug-in, the installation will also install the uClient Configurator application. You must have administrator privileges to install uCAD plug-in. To install uCAD 1) Sign out of the Primavera Unifier system. Close any other open applications (especially AutoCAD) and browser windows. 2) Double-click the installation file uCADInstaller.exe to begin the installation. The Welcome screen of the uCAD Setup Wizard opens. 3) Click Next. The License Agreement window opens. 4) Read the License Agreement, then select I Accept the terms of this agreement. Click Next. The Choose Destination Location window opens The application files will be installed in the following folders by default. For 64-bit Windows, the default installation folder is C:\Program Files (x86)\Oracle\Primavera-Unifier\uCAD For 32-bit Windows, the default installation folder is C:\Program Files\Oracle\Primavera-Unifier\uCAD 5) Click Next to start the installation process. 6) When the installation is complete, the Setup Complete window opens. Click Finish to exit the setup window. 7) Close any windows that may remain open on the desktop upon completion of the installation. Configure uCAD After installing uCAD, you can configure it. This consists of the following: View uCAD connections. This allows you to verify that all necessary connections have been created. These connections are maintained in the uClient Configurator. You can optionally configure uCAD to automatically synchronize with your AutoCAD designs. To open the uCAD Configurator Window From the Windows Start button, click Start, Oracle, Primavera-Unifier, uCAD, uCAD Configurator.The uCAD Configurator window opens, listing the connections and import options for your implementation. About the connections uCAD connects to Primavera Unifier to download level-type and space-type design definitions (the properties of which correspond to the attribute forms you designed in uDesigner for the Space type and Level type records). These designs must be imported into Primavera Unifier before uCAD can take advantage of them. (Refer to the Primavera Unifier Administration Guide for instructions on how to design and import these forms into Primavera Unifier). The connections between uCAD and Primavera Unifier are setup in the uClient Configurator. 7 uCAD Installation and User's Guide To view connection details 1) Open the uCAD Configurator window. 2) Click on each connection listed in the window. This displays the connection name and details, and the last date designs were imported. These connections are created and maintained in the uClient Configurator. To access uClient Configurator and create connections 1) If you have not already done so, you must create the connections in uClient that will be used by uCAD. From the Windows Start button, click Programs, Oracle, Primavera-Unifier, uCAD. The uClient Configurator window opens. 2) For details about setting up connections in the uClient Configurator, see the uClient Configurator Setup Guide. About Auto Synchronization uCAD enables you to integrate your AutoCAD drawings with Primavera Unifier’s Space Manager. In order to do this, you must first import Space Manager designs into uCAD. These designs include level type, space types, and the data elements on the Space Manager attribute forms that have been enabled for uCAD Integration in uDesigner. This import process can be done manually, or you can choose the uCAD Auto Synchronization option. When this option is enabled, uCAD will check for any new space types that have been imported into Primavera Unifier from uDesigner, or any changes to the data elements enabled for uCAD Integration in existing level or space types. With Auto Synchronization is enabled, uCAD tries to connect to Primavera Unifier when you open a drawing file that was previously set up with a connection to check if there have been any changes to the design. This is done in the background. If the application detects changes, you are asked if you want to import them into Primavera Unifier. If you ignore the message, you can continue working with the drawing file. If you accept the changes, close the drawing file so that uCAD can rebuild the menu structure and map data to the new imported design. If you choose not to enable Auto Synchronization, you must manually import any new designs. For more information about this process, see Working in AutoCad with the uCAD Plug-in (on page 9). To enable auto synchronization of drawing file changes between AutoCAD and Primavera Unifier 1) Open the uCAD Configurator window, and select the Connections node. 2) Click the Edit button. 3) Select Auto Synchronize of Design and click OK. To manually import Space Manager designs for the Levels and Space types 1) Open the uCAD Configurator window. 2) Click on a connection listed in the Connections node. 3) Click the Import button. 8 Uninstalling uCAD Uninstalling uCAD If necessary, you may uninstall the uCAD Application as follows: 1) From the Windows Start button, click All Programs, Oracle, Primavera-Unifier, uCAD, Uninstall uCAD. The uninstall process begins. 2) Click Finish to acknowledge the completion of the Uninstall process. Close the Add/ Remove Programs window. If you uninstall uCAD, uClient Configurator will also be uninstalled automatically. Working in AutoCad with the uCAD Plug-in How It Works Below is a brief overview of how uCAD integrates your AutoCAD drawings with Primavera Primavera Unifier’s Space Manager: Before you can use the uCAD plug-in with AutoCAD, the Space Manager attribute forms for the Level definition as well as Space types should have been designed in uDesigner and imported into Primavera Unifier. In uDesigner, you create one Level type form, and any number of Space type forms. As part of the design process, you also specify which data elements to use to integrate with uCAD (this is done in the Integration>uCAD node in uDesigner). For example, for Level integration, at a minimum, you should include the Level name and Status. For Spaces, you should include Space Name, Area, and Level Picker. (Details about Space Manager designs are found in the uDesigner User Guide.) Import the attribute forms into Primavera Unifier. Activate them in the Configuration. (See the Primavera Unifier Administration Guide for Space Manager setup details.) Install the uCAD plug-in for AutoCAD, and establish connections in uClient. A Primavera Unifier menu is now available on your AutoCAD menu bar. Open the drawing file in AutoCAD. Primavera Unifier’s Space Manager is based on the concept that each drawing file when imported into Primavera Unifier will represent and will be associated with a Level record in Primavera Unifier. Import the Primavera Unifier designs into uCAD. You can do this manually, or choose to enable automatic synchronization. This process imports level and space type details (specifically, the level type, all space types, and the data elements that have been enabled for uCAD integration in uDesigner for those level and space types) into uCAD. Set up a new AutoCAD drawing for use with uCAD. This needs to be done only once for each drawing. You can now work with uCAD to create level and space objects on the drawing. Link them to uCAD. 9 uCAD Installation and User's Guide Import the drawing file into Primavera Unifier Space Manager. Level or space objects linked to uCAD will create level and space records in Primavera Unifier. See the Primavera Unifier User Guide and Primavera Unifier Administration Guide for information about working with the Space Manager. Importing the Primavera Unifier Space Manager Form Designs into uCAD Import (or Auto Synchronize) Space Manager Level and Space Form Designs Between Primavera Unifier and uCAD The first step is to synch the Level and Space types attribute form designs from Primavera Unifier to uCAD. You can do this manually, or by Auto Synchronization. See Configure uCAD for details on enabling auto synchronization. If the Auto Synchronization is enabled, then uCAD will attempt to create a connection to Primavera Unifier and automatically import Space Manager design information. To manually import Space Manager designs for the Levels and Space types 1) Open the uCAD Configurator window. 2) Click on a connection listed in the Connections node. 3) Click the Import button. Set up an AutoCAD Drawing for Use with uCAD For each new drawing that you want to use with uCAD, you must choose which connection to use for that drawing. (These are the connections you added in uClient.) This setup only needs to be done once per drawing. To set up an AutoCAD drawing for use with uCAD 1) Start AutoCAD and open the drawing file that you want to use with the Space Manager. 2) On the AutoCAD menubar, click the Unifier menu, and select Setup uCAD. 3) In the Setup window, select a connection, for example, PM Env. The URL and company name associated with the connection name are populated. 4) Click OK. The following additional options are now available under the Unifier menu: Create or Modify <Level type>: Allows you to associate a drawing with a Space Manager level. In the above example, "Floors" was the name given in uDesigner to define the level type. Create Spaces: Allows you to create a new space object. The sub-menu lists all of the available space types as defined in uDesigner. Establish Link: Allows you to link existing AutoCAD polylines to uCAD space records. View or Modify Spaces: Allows you to list or modify all spaces defined on this drawing. The levels type and space types displayed under the Unifier menu are based on the Space Manager designs created in uDesigner, deployed into a Unifier environment, and associated with the connection selected in the Setup uCAD window. 10 Working in AutoCad with the uCAD Plug-in Associate a Drawing File with a Level Any drawing file that will be used with Primavera Unifier’s Space Manager needs to be associated with a Level record. Each Level record in the Space Manager is eventually associated with an AutoCAD drawing file. To associate a drawing file with a level record 1) In AutoCAD, select Unifier, Create or Modify <level type>. The <level type> form opens. In this example, the level type name that was designed in uDesigner is Floors. 2) The data elements displayed on this Level form are controlled by the data elements added to the uCAD integration interface design in uDesigner. This form and its content is based on the selected connection (that is, the Primavera Unifier environment from which the designs were imported) while setting up this drawing file. Note: If pulldown or picker data elements have been added uCAD integration, they will display on the form as text entry fields. You must enter a valid value. (For example, if you have a Department pulldown field, you must type a department name exactly as it appears in the Data Set value for that pulldown data definition in Primavera Unifier.) 3) After completing the form, click OK. The drawing file is now ready to be associated with a level record. This level record will either be created new, if never created before, or updated with new data if this level and associated drawing has been imported into the Space Manager in Primavera Unifier. Create New Space Objects or Link Existing Spaces The next step is to create space objects. You can create spaces in AutoCAD using uCAD. Each space object is dynamically linked to an AutoCAD polyline entity during creation. You can also link existing AutoCAD polylines to uCAD space objects. For example, if you have a space type called Common Areas, you might define individual spaces for each restroom, hallway, reception area, etc. You will then associate each of these spaces with the Common Areas space type, and give each space a unique name. Linking a uCAD space object to a polyline provides these benefits: The area of the polyline is automatically calculated, and the space object associated with it is updated. Once a drawing file has been imported into Primavera Unifier’s Space Manager, the system can dynamically create new space records that are associated with the uCAD space object or update existing spaces with new space data. In Primavera Unifier, spaces can be viewed or highlighted in Primavera Unifier’s Space Manager when searching or selecting a space record. When you import the drawing file into Primavera Unifier, these become space records. You control the information to capture with that space record, such as the space name, the area, the unit of measure (such as square feet), etc. These are based on the attributes that were designed in uDesigner for each space type. 11 uCAD Installation and User's Guide To view drawings associated with a space record AotoDesk free program AotoDesk Design Review must be separately installed. It can be downloaded from AotoDesk website. To create space objects, you can create a new object in AutoCAD using polylines, or you can link existing polylines to uCAD. Create a new space object using polylines With this procedure, you are create a new space object on the drawing using polylines (conference room, office, hallway, etc.). These new spaces will create new space records automatically in Primavera Unifier for the corresponding level. To create a new space objects 1) In AutoCAD, open the drawing that you want to add spaces to. Be sure that the drawing has already been set up to work with uCAD. 2) Select Unifier, Create Spaces, <space type>. 3) Select a space type: Common Spaces, Gross Building Area, Gross Measured Area, Major Vertical Penetration, or Usable Areas. 4) Draw the boundaries of your space. When you have defined the space boundaries and completed the space by closing the polyline or by pressing Enter, the space form opens. 5) Complete the form. The data elements displayed on this space form are those that were added to the uCAD integration design in uDesigner. This form and its content is based on the selected connection (that is, the Primavera Unifier environment from which the designs were imported) while setting up this drawing file. In the example shown above, the Usable Areas space type form is show. Notice that the Area for this Usable Area space is pre-calculated based on the space boundaries defined on the drawing. Note: If pulldown or picker data elements have been added uCAD integration, they will display on the form as text entry fields. You must enter a valid value. (For example, if you have a Department pulldown field, you must type a department name exactly as it appears in the Data Set value for that pulldown data definition in Primavera Unifier.) 6) Click OK. The space polyline is now created and linked to the uCAD space object. Notice the space tag that has been placed in the middle of the space on the drawing reflecting the space Name, Type, and Area. These data elements are defined for the space type (Edit Studio window, Options tab; refer to the uDesigner User Guide). Link an existing space to an existing polyline You can also dynamically link an existing space (that already exists as a space record in Primavera Unifier) to a polyline on the drawing. To link an existing space object to an existing polyline 1) In AutoCAD, open the drawing. 2) Click the Unifier menu and select Establish Link>space type. 12 Working in AutoCad with the uCAD Plug-in 3) Double-click a polyline space in the drawing. You can select only one polyline. The Space Type window opens, listing all the space objects of the selected type. 4) Select a space object from the list and click Link. If the space object already has a link, a message displays telling you to first unlink the object before establishing a new link. 5) When the link is established, click OK. Add a new space object to an existing polyline You can also create a new Primavera Unifier space record by linking to an existing polyline. To link an new space object to an existing polyline 1) In AutoCAD, open the drawing. 2) Click the Unifier menu and select Establish Link, space type. 3) Double-click a polyline space on the drawing. You can select only one polyline. The Space Type window opens, listing all the space objects of the selected type. 4) Click New to create a new space object. The space form opens. 5) Enter the data for the new space object. 6) Select the new space object from the list and click Link. 7) When the link is established, click OK. Working with Space Objects in a Drawing You can view and work with all space objects that are available in uCAD. View a Space Object that is Linked to a Polyline To view a space object that is linked to a polyline on a drawing 1) In AutoCAD, open the drawing. 2) Click the Unifier menu and select View, space type. The Space Type window opens, listing the space objects for the selected space type. 3) Select one or more space objects from the list. 4) Click Show on Drawing. The linked polylines are highlighted in the drawing. The Space Type window remains open, so you can look for other space objects in the drawing. The drawing pans to show multiple polylines. Open a Space Object This opens the space object form so that you can make changes to the data element fields. To open a space object 1) In AutoCAD, open the drawing. 2) Click the Unifier menu and select View, space type. The Space Type window opens, listing the space objects for the selected space type. 3) Select a space object from the list and click Open. The space window opens. 4) You can view or modify the data for the space object. 13 uCAD Installation and User's Guide 5) Click OK. Delete a Space Object This procedure will remove the between a polyline and the Primavera Unifier space record, and remove the space object from the drawing. You can also optionally remove the polyline. This procedure will not delete space records from Primavera Unifier. To delete a space object 1) De-link the space object from the drawing. 2) In AutoCAD, open the drawing. 3) Click the Unifier menu and select View, Space Type. The Space Type window opens, listing the space objects for the selected space type. 4) Select a space object from the list and click Delete. 5) Choose one of the following: Space Record and Polylines: Deletes the space record and the polyline from the drawing. Space Record Only: Deletes the space record from the drawing but leaves the polyline. 6) Click Ok. De-link a Space Object To de-link a space object 1) In AutoCAD, open the drawing. 2) Click the Unifier menu and select View, space type. The Space Type window opens, listing the space objects for the selected space type. 3) Select a space object from the list and click Delink. 4) Click Yes to confirm. 14 For More Information For More Information Where to Get Documentation If you need help with an operation in Primavera Unifier, there are a number of resources to help you. Online Help If you have a question or need further assistance regarding a specific feature, review the online help. Click the Help menu from any Primavera Unifier window, and choose: Unifier Help: This link goes to the Oracle Technical Network (OTN) Primavera Unifier Online Document Library. From here you can access: Primavera Unifier Online Help Primavera Unifier Administration Guide Primavera Unifier User's Guide Primavera uDesigner User's Guide Primavera Unifier Reference Guide You must have Adobe Acrobat Reader installed (available free at www.adobe.com). BP-specific Help: If your company has provided customized Help files for individual business processes, you can access them through the business process log or the Help menu. Note: For the full list of system requirements, supported software, and versions, see the Tested Configurations document under “Installation and Configuration Documentation” in the Primavera Unifier Online Documentation Library. Documentation Complete documentation libraries for Primavera Unifier releases are available on the Oracle Technology Network (OTN) at: http://www.oracle.com/technetwork/documentation/default-1870233.html From this location you can either view libraries online or download them to have local copies. We recommend viewing them from OTN to ensure you always access the latest versions, including critical corrections and enhancements. Primavera Unifier is configured to access its help system directly on OTN. However, a downloadable version of the help system is also available on OTN if you need to download, deploy, and access a local copy. 15 uCAD Installation and User's Guide The documentation assumes a standard setup of the product, with full access rights to all features and functions. The following table describes the core documents available for Primavera Unifier. Supplementary Documentation Title Description What's New Contains key enhancements in the current release of Primavera Unifier. All users should read this guide. Cumulative Features Overview Tool Provides an overview of features and enhancements included in Oracle Primavera products. It is intended solely to help you assess the business benefits of upgrading and to plan your I.T. projects. All users should read this guide. Readme for Media Pack Contains a table that can help you determine what downloads are required to run your licenses. All users should read this guide. Licensing Information User Manual Contains information about the third-party proprietary and open source software used in Oracle Primavera Unifier. All users should read this guide. Where to Get Documentation, Training, and Contains information about resources to Support help you with the operation of Oracle Primavera Unifier. All users should read this guide. 16 For More Information Installation Documentation Title Description Primavera Unifier Installation and Setup Guide For WebLogic Application Server Describes how to: Set up Primavera Unifier servers and third party services Install and configure Primavera Unifier components IT professionals who are installing and configuring the server environment, and the Primavera Unifier network administrator/database administrator and Primavera Unifier administrator should read this guide. Primavera Unifier Installation and Setup Guide for WebSphere Application Server Describes how to: Set up the Primavera Unifier servers and third party services on Linux (64-bit) Install and configure Primavera Unifier components IT professionals who are installing and configuring the server environment, and the Primavera Unifier network administrator/database administrator and Primavera Unifier administrator should read this guide. Unifier Performance and Sizing Guide Provides guidance for planning product deployment with: Estimates of hardware and software requirements for Primavera Unifier Recommendations for deploying small-scale to large-scale configurations The Unifier network administrator/database administrator and Unifier administrator should read this guide. Unifier Upgrade Guide Provides information on how to upgrade to the latest version of with Oracle Primavera Unifier. The Unifier network administrator/database administrator and Unifier administrator should read this guide. 17 uCAD Installation and User's Guide Title Description Tested Configurations Previously: System Configuration Information Provides the tested configurations for Oracle Primavera Unifier and includes list of applications and supported version levels. All users should read this guide. The Unifier network administrator/database administrator and Unifier administrator should read this guide. Primavera Unifier Security Guide Provides guidelines on how to plan your security strategy for Oracle Primavera Unifier. All users should read this guide. The Unifier network administrator/database administrator and Unifier administrator should read this guide. Configuration Documentation Title Description Primavera uClient Configurator Setup Guide Describes how to set up the Primavera uClient Configurator. All users should read this guide. Primavera Unifier SmartForm Installation and User Guide Describes how to download and install the Primavera Unifier SmartForm utility for Microsoft Word® 2003 Professional and how to use the SmartForm utility to create or update Primavera Unifier business process records. Note: If you use Microsoft Word® 2007 it must be a version prior to SP2 and you must save your document in Microsoft Word® 2003 (.doc) format. All users should read this guide. Primavera Unifier File Transfer Utility Instructions Describes how to download and install the Primavera Unifier File Transfer Utility. 18 For More Information Title Description uCAD Installation and User's Guide Provides instructions on how to download and install the Primavera Unifier uCAD Application on your desktop and configure it to work with your AutoCAD® application. It also includes details on how to use uCAD with AutoCAD and Primavera Unifier. All users should read this guide. Configuring BI Publisher for Unifier Provides instructions on how to: Download BI Publisher. Configure BI Publisher settings. Configure BI Publisher in Primavera Unifier. Create BI Publisher reports. Run BI Publisher reports. The Primavera Unifier network administrator/database administrator and Primavera Unifier administrator should read this guide. Configuring Unifier for Single Sign On Provides procedures to configure Primavera Unifier that is running on Windows (64-bit) or on Linux operating systems for Single Sign On (SSO). The Primavera Unifier network administrator/database administrator and Primavera Unifier administrator should read this guide. Connecting Oracle Enterprise Manager to Primavera Unifier Metrics Provides instructions on how to enable Enterprise Manager to display certain Primavera Unifier metrics. The Primavera Unifier network administrator/database administrator and Primavera Unifier administrator should read this guide. Connecting Oracle Identity Manager 11g to Guides administrators in configuring Oracle Primavera Unifier Identity Manager (OIM) to be used with Primavera Unifier. The Primavera Unifier network administrator/database administrator and Primavera Unifier administrator should read this guide. 19 uCAD Installation and User's Guide Title Description Connecting the Content Repository to Primavera Unifier Provides instructions on how to: Configure Oracle WebCenter Content Core Capabilities after you install it. Configure Microsoft SharePoint after you install it. Configure CMIS-compliant repositories after you install one. Configure the Primavera Unifier File Repository. Set your content repository settings in Primavera Unifier to connect to your content repository. The Primavera Unifier network administrator/database administrator and Primavera Unifier administrator should read this guide. User Documentation Title Description Primavera Unifier Help Provides topic-oriented information about Primavera Unifier to assist users with features and procedures. All users should read this guide. Primavera Unifier User's Guide Guides users on how to use Primavera Unifier application. All users should read this guide. Primavera uDesigner User's Guide Guides users on how to use the uDesigner feature of Primavera Unifier application. All users should read this guide. Primavera Unifier Administration Guide Provides details about the Administration Mode of Primavera Unifier, which covers access to Primavera Unifier functionality that is granted through permissions. All users should read this guide. 20 For More Information Title Description Primavera Unifier Project Controls User's Guide Explains Oracle Primavera: Capital Planning which is used for managing budget forecasts (both planned and in execution) for the user company. Cost Controls which supports project tracking and project cost management. Project Delivery Management which is designed to optimize project results. Anyone who wants to use the Unifier Project Controls base product should read this guide. Database Documentation Title Description Primavera Unifier Reference Guide Provides details about data definitions, data elements, permission settings, import codes, and pickers with Primavera Unifier. All users should read this guide. Integration Documentation Title Description Primavera Unifier Integration Interface Guide Describes the methods required for the integration, and the data being passed, between Primavera Unifier and an external system. Anyone who wants to develop applications which interact with Primavera Unifier should read this guide. Distributing Information to the Team You can copy the online documentation to a network drive for access by project participants. Each team member can then view or print those portions that specifically relate to his or her role in the organization. 21 uCAD Installation and User's Guide Where to Get Training To access comprehensive training for all Primavera products, go to: http://education.oracle.com Oracle Learning Library The Oracle Learning Library (OLL) provides online learning content covering Primavera products. Content includes whitepapers, videos, tutorials, articles, demos, step-by-step instructions to accomplish specific tasks, and self-paced interactive learning modules. To access the learning library’s Primavera content, go to: http://www.oracle.com/oll/primavera Where to Get Support If you have a question about using Oracle products that you or your network administrator cannot resolve with information in the documentation or help, click http://support.oracle.com/. This page provides the latest information on contacting Oracle Global Customer Support, knowledge articles, and the support renewals process. For more information about working with Support, visit https://support.oracle.com/epmos/faces/DocumentDisplay?id=888813.2 to view Support Tools & Tips. Access to Oracle Support Oracle customers have access to electronic support through My Oracle Support. For information, visit http://www.oracle.com/us/support/contact-068555.html or visit http://www.oracle.com/us/corporate/accessibility/support/index.html if you are hearing impaired. Using Primavera's Support Resource Centers Primavera’s Support Resource Center provides links to important support and product information. Primavera's Product Information Centers (PICs) organize documents found on My Oracle Support (MOS), providing quick access to product and version specific information such as important knowledge documents, Release Value Propositions, and Oracle University training. PICs also offer documentation on Lifetime Management, from planning to installs, upgrades, and maintenance. Visit https://support.oracle.com/epmos/faces/DocumentDisplay?id=1486951.1 to access links to all of the current PICs. PICs also provide access to: Communities, which are moderated by Oracle providing a place for collaboration among industry peers to share best practices. News from our development and strategy groups. Education via a list of available Primavera product trainings through Oracle University. The Oracle Advisor Webcast program brings interactive expertise straight to the desktop using Oracle Web Conferencing technology. This capability brings you and Oracle experts together to access information about support services, products, technologies, best practices, and more. 22 For More Information Additional Support The following is a list of additional support that are available in Unifier: Unifier Help Unifier Library Contact Support Download Plugins About Unifier Note: The Contact Support and Download Plugins options both open a single window, Support. The only difference is as follows: - Contact Support opens the Contact tab of the Support window by default - Download Plugins opens the Download tab of the Support window by default Unifier Help Click Help from the upper right-hand section of the Unifier window to open a contextual menu and click Unifier Help to open the Unifier and uDesigner Help. Unifier Library Click Help from the upper right-hand section of the Unifier window to open a contextual menu and click Unifier Library to open the Unifier documentation library. Contact Support Click Help from the upper right-hand section of the Unifier window to open a contextual menu and click Contact Support to open the Support window. The Support window has two tabs: Contact, which opens by default Download In the Contact tab, Contact Information section, you can see the name, phone, and contact instructions of someone at your company that you can contact when you need help with Primavera Unifier. For assistance, try this person, first. Note: This information is available only if your company administrator has provided internal support contact information. In the Contact tab, eLearning section, you see the location (Access), name of the contact (Contact), and any instructions that you might need in order to access the eLearning materials. 23 uCAD Installation and User's Guide Note: Your company may elect to provide access to the eLearning suite, where you can access interactive Primavera Unifier learning materials. Alternatively, your company may have its own customized support or training materials that can be accessed on an internal site/location. If your company administrator provides this contact information, it will be listed at the bottom of the window. In the Download tab, Download section, you can see a list of the following application and plug-ins available to download, with installation instructions. File Transfer Application Unifier uCAD Plug-in Each application and plug-in has two options: Download Installation instructions Follow the links within each option to proceed. Download Plugins Click Help from the upper right-hand section of the Unifier window to open a contextual menu and click Download Plugins to open the Support window. The Support window has two tabs: Contact Download, which opens by default In the Download tab, Download section, you can see a list of the following application and plug-ins available to download, with installation instructions. File Transfer Application Unifier uCAD Plug-in Each application and plug-in has two options: Download Installation instructions Follow the links within each option to proceed. In the Contact tab, Contact Information section, you can see the name, phone, and contact instructions of someone at your company that you can contact when you need help with Primavera Unifier. For assistance, try this person, first. Note: This information is available only if your company administrator has provided internal support contact information. In the Contact tab, eLearning section, you see the location (Access), name of the contact (Contact), and any instructions that you might need in order to access the eLearning materials. 24 For More Information Note: Your company may elect to provide access to the eLearning suite, where you can access interactive Primavera Unifier learning materials. Alternatively, your company may have its own customized support or training materials that can be accessed on an internal site/location. If your company administrator provides this contact information, it will be listed at the bottom of the window. About Unifier Click Help from the upper right-hand section of the Unifier window to open a contextual menu and click About Unifier to access version number, copyright information, and software agreement details for the Oracle Primavera Unifier. 25 Legal Notices Oracle Primavera uCAD Installation and User's Guide Copyright © 1998, 2014, Oracle and/or its affiliates. All rights reserved. Oracle and Java are registered trademarks of Oracle and/or its affiliates. Other names may be trademarks of their respective owners. This software and related documentation are provided under a license agreement containing restrictions on use and disclosure and are protected by intellectual property laws. Except as expressly permitted in your license agreement or allowed by law, you may not use, copy, reproduce, translate, broadcast, modify, license, transmit, distribute, exhibit, perform, publish or display any part, in any form, or by any means. Reverse engineering, disassembly, or decompilation of this software, unless required by law for interoperability, is prohibited. The information contained herein is subject to change without notice and is not warranted to be error-free. If you find any errors, please report them to us in writing. If this is software or related documentation that is delivered to the U.S. Government or anyone licensing it on behalf of the U.S. Government, the following notice is applicable: U.S. GOVERNMENT END USERS: Oracle programs, including any operating system, integrated software, any programs installed on the hardware, and/or documentation, delivered to U.S. Government end users are “commercial computer software" pursuant to the applicable Federal Acquisition Regulation and agency-specific supplemental regulations. As such, use, duplication, disclosure, modification, and adaptation of the programs, including any operating system, integrated software, any programs installed on the hardware, and/or documentation, shall be subject to license terms and license restrictions applicable to the programs. No other rights are granted to the U.S. Government. This software or hardware is developed for general use in a variety of information management applications. It is not developed or intended for use in any inherently dangerous applications, including applications that may create a risk of personal injury. If you use this software or hardware in dangerous applications, then you shall be responsible to take all appropriate failsafe, backup, redundancy, and other measures to ensure its safe use. Oracle Corporation and its affiliates disclaim any liability for any damages caused by use of this software or hardware in dangerous applications. This software or hardware and documentation may provide access to or information on content, products and services from third-parties. Oracle Corporation and its affiliates are not responsible for and expressly disclaim all warranties of any kind with respect to third-party content, products, and services. Oracle Corporation and its affiliates will not be responsible for any loss, costs, or damages incurred due to your access to or use of third-party content, products, or services. 26