1
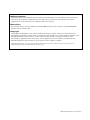
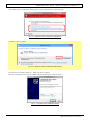
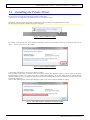
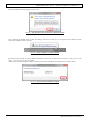
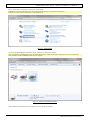
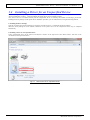
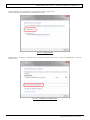
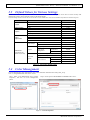
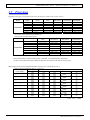
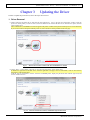
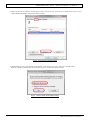
Printer Driver Instruction Manual ~For Windows 7, 8~ CP3800DW July 12, 2013. Ver.3.01 ●Safety precautions Please read the User’s Manual for the printer carefully before use, and follows the instructions. Note that the contents of directions for use and safety precautions correspond to the safety standards as of the time the User’s Manual has been created. ●Remodeling For product safety, do not remodel the CP3800DW printers or the contents of the CP3800DW printer drivers and the CD. ●Copyright Copyrights, trademarks or any other intellectual property rights whatsoever that pertain to documents, programs or other items provided with this product, are owned and/or assigned to the Mitsubishi Electric Corporation, or the respective other holders of rights. Except in cases permitted by applicable laws, these may not be duplicated or used without consent from the Mitsubishi Electric Corporation or the respective other holders of rights. Microsoft and Windows are registered trademarks of Microsoft Corporation valid in the USA and other countries. LEADTOOLS Copyright (C) 2008 LEAD Technologies, Inc. Mitsubishi Electric Corporation Contents Chapter 1 Install ______________________________________ 1 1.1 Printer and Host computer Preparation ________________________________________ 2 1.2 Installing the Driver Package ________________________________________________ 2 1.3 Installing the Printer Driver _________________________________________________ 5 1.4 Installing a Driver for an Unspecified Device ____________________________________ 9 Chapter 2 Properties__________________________________ 12 2.1 Opening Printer Properties _________________________________________________ 12 2.2 Explanation of Print Setting Functions ________________________________________ 14 2.2.1 2.2.2 2.2.3 2.2.4 2.2.5 Layout _______________________________________________________________________________________ 14 Advanced Options _____________________________________________________________________________ 15 Paper/Quality ________________________________________________________________________________ 20 Option _______________________________________________________________________________________ 20 Color Adjustment _____________________________________________________________________________ 21 2.3 Default Values for Various Settings ___________________________________________ 22 2.4 Color Management _______________________________________________________ 22 2.5 Print Area _______________________________________________________________ 23 Chapter 3 Updating the Driver__________________________ 25 Chapter 4 Driver Removal _____________________________ 32 Mitsubishi Electric Corporation [CP3800DW Printer Driver] Chapter 1 Instruction Manual for Windows 7, 8 Install Installation Flow Installation is done in the following 3 steps. Details of each step are shown in a subsequent page. STEP 1 Prepare the printer and computer → ”1.1 Printer and Host computer Preparation” Do not connect the USB cable at this step. STEP 2 Install the driver package → ”1.2 Installing the Driver Package” Insert the accessory CD into the disk drive and install the driver package. STEP 3 Install the printer driver → ”1.3 Installing the Printer Driver” USB Cable ON Connect the USB cable, turn the printer power ON, and install the printer driver. After installation is complete, reboot the computer. 1 Mitsubishi Electric Corporation [CP3800DW Printer Driver] Instruction Manual for Windows 7, 8 1.1 Printer and Host computer Preparation Check that the power for the CP3800DW printer is OFF. Have a USB cable ready. But do not connect the printer to the computer with the USB cable at this point. Please login with administrator rights to install the driver. The following explanations are given on the assumption of use with administrator rights. 1.2 Installing the Driver Package Insert the accessory CD into the disk drive. Start Explorer, and click on the corresponding drive. (If the AutoPlay function is on, select “Open folder to view files – using Windows Explorer”.) (In Windows 8 if the AutoPlay function is on, click on the message of “Tap to choose what happens with this disc.”, then select “Open folder to view files File Explorer”.) Select the following folders from the accessory CD. Windows 7 … Drive of CD:\CP3800\Driver\7 Windows 8 … Drive of CD:\CP3800\Driver\8 Fig 1.1 Driver Package Folder 2 Mitsubishi Electric Corporation [CP3800DW Printer Driver] Instruction Manual for Windows 7, 8 In the selected folder, double click on the file “DriverInstall.CMD”. (Depending on your operating environment, the .CMD extension may not be shown.) The best Driver Package Installer for your operating system (32 or 64 bit) will automatically be selected. Fig 1.2 Install File If the User Account Control dialog appears, click on “Yes”. Fig 1.3 User Account Control When the “Welcome to the Device Driver Installation Wizard!” window appears, click on “Next >”. Fig 1.4 Starting of Installation Wizard 3 Mitsubishi Electric Corporation [CP3800DW Printer Driver] Instruction Manual for Windows 7, 8 If the Windows Security confirmation window appears, click on “Install this driver software anyway”. Fig 1.5.i Windows Security confirmation (Windows 7) In Windows 8, click on “Install”. Fig 1.5.ii Windows Security confirmation (Windows 8) This starts the Driver Package installation. Please wait until it is complete. When the “Completing the Device Driver Installation Wizard” window appears, click on “Finish”. Fig 1.6 Completion of the Installation Wizard 4 Mitsubishi Electric Corporation [CP3800DW Printer Driver] Instruction Manual for Windows 7, 8 1.3 Installing the Printer Driver Connect the printer to the computer with the USB cable, and turn the printer power ON. The printer will be recognized, and the driver installation should begin. * Please refer to the manual for the CP3800DW printer for connection if needed. When driver installation begins, the message “Installing device driver software” will appear above the task bar. The message will not appear in Windows 8. Please turn to page 7. Fig 1.7 Driver Installation message By clicking on this message, the “Driver Software Installation” window will be opened, and the driver installation status will be shown. Click on “Close” to close the window. Fig 1.8 Driver Software Installation * About “Skip obtaining driver software from Windows Update” If the operating system setting is such that it will get the driver software from Windows Update, it will first search for the driver through Windows Update, so it will take more time to complete the installation. If you skip getting the driver software through Windows Update, the time to complete the installation will be decreased (Depending on the environment, it may take some time to complete the installation). Click on “Skip obtaining driver software from Windows Update” in the “Driver Software Installation” window. Fig 1.9 Skip obtaining driver software from Window Update 5 Mitsubishi Electric Corporation [CP3800DW Printer Driver] Instruction Manual for Windows 7, 8 When the confirmation window appears, click on “Yes”. Fig 1.10 Skip getting the driver software from Windows Update From a beginning of installation after a while, the message “Your device is ready to use” will appear above the task bar, and the printer driver installation will be complete. Fig 1.11 Driver Installation Complete message By clicking on this message, the “Driver Software Installation” window will be opened, and “Your device is ready to use” will be shown. Click on “Close” to close the window. (If the “Driver Software Installation” window is shown from the start of installation, the message above will not be shown.) Fig 1.12 Driver Software installation complete 6 Mitsubishi Electric Corporation [CP3800DW Printer Driver] Instruction Manual for Windows 7, 8 Select “Start”, then “Control Panel”, and open the control panel. In Windows 8, right click the Start screen, select right-under the "All apps" and select the control panel. Please click on “View devices and printers” in the control panel. Fig 1.13 Control Panel Check that the MITSUBISHI CP3800DW is shown in the Devices and Printers window. Note: In Windows 8, CP3800DW icon does not appear if the printer is offline (if the printer with the power on is not connected). Now, installation of the CP3800DW printer driver is complete. Fig 1.14 Devices and Printers window After installation of the printer-driver is complete, be sure to reboot the computer. 7 Mitsubishi Electric Corporation [CP3800DW Printer Driver] Instruction Manual for Windows 7, 8 If the CP3800DW printer driver installation was unsuccessful, the message “Device driver software was not successfully installed” will appear above the task bar. Fig 1.15 Driver Not Installed message By clicking on this message, the “Driver Software Installation” window will be opened, and the message “Device driver software was not successfully installed” will appear. Click on the “Close” button. (If the “Driver Software Installation” window is shown from the start of installation, the message above will not be shown.) If the driver insallation was unsuccessful, refer to the next section “1.4 Installing a Driver for an Unspecified Device” and install the printer driver. Fig 1.16 If the Driver is not installed successfully 8 Mitsubishi Electric Corporation [CP3800DW Printer Driver] Instruction Manual for Windows 7, 8 1.4 Installing a Driver for an Unspecified Device Before installing the driver package, connect the printer (with power ON) to the computer, to create an ”Unspecified” device in the “Devices and Printers” window. Using this method, the printer driver can be installed as follows. Also, when a driver is not installed correctly but the "Unspecified" device is created by the method of connecting a printer after installing the driver package of usual printer driver installation procedure, you can install the driver using the following method. 1. Installing the Driver Package If the driver package has not been installed yet, follow the procedure shown in “1.2 Installing the Driver Package”. When the driver package has been installed, installation of the printer driver for the Unspecified device may be completed automatically. 2. Installing a driver for an Unspecified device In the "Unspecified" device of the "Devices and Printers" window, do the right click of the "Photo Printer", and click on the "Troubleshoot" from pull-down menu. Fig 1.17 Photo Printer as an unspecified device 9 Mitsubishi Electric Corporation [CP3800DW Printer Driver] Instruction Manual for Windows 7, 8 When the “Install a driver for this device” window appears, click on “Apply this fix”. It will automatically search for the driver and installation is started. Fig 1.18 Applying the Fix When the driver is installed, “Troubleshooting has completed” appear. Please click on “Close the troubleshooter” to end the troubleshooting. Fig 1.19 Completion of Troubleshooting 10 Mitsubishi Electric Corporation [CP3800DW Printer Driver] Instruction Manual for Windows 7, 8 Check that the MITSUBISHI CP3800DW is displayed in the Devices and Printers window. Note: In Windows 8, CP3800DW icon does not appear if the printer is offline (if the printer with the power on is not connected). Now, the CP3800DW Printer Driver installation is complete. Fig 1.20 Devices and Printers After installation of the printer-driver is complete, be sure to reboot the computer. 11 Mitsubishi Electric Corporation [CP3800DW Printer Driver] Chapter 2 Instruction Manual for Windows 7, 8 Properties Various printer settings can be made using the CP3800DW Driver properties. As a rule, the printer settings should not be altered. Use the default settings present at installation. Alter paper-size settings at the Application side. Before operation, be sure to have a good understanding of the contents. 2.1 Opening Printer Properties 1. Click Start Control Panel open the control panel In Windows 8, Right click on the Start screen All apps Control Panel open the control panel 2. In the control panel, select View devices and printers ⇒ open the Devices and Printers window 12 Mitsubishi Electric Corporation [CP3800DW Printer Driver] Instruction Manual for Windows 7, 8 3. Right-click on the CP3800DW icon, and from the pull-down menu select Printer properties open the Properties window Note: In Windows 8, CP3800DW icon does not appear if the printer is offline (if the printer with the power on is not connected). 4. The CP3800DW Properties window will appear. 13 Mitsubishi Electric Corporation [CP3800DW Printer Driver] Instruction Manual for Windows 7, 8 2.2 Explanation of Print Setting Functions From the Properties window, by selecting Print Settings you can make various print settings. 2.2.1 Layout Fig 2.2.1 Layout tab Orientation Please set to Portrait Page Order When printing multiple images in the application, you can set the order. Ex.) Print order No.1 No.2 No.3 Front to Back Back to Front Pages per Sheet Prints the designated fractional size. Normally you should specify a value of 1. (If you want to specify other than 1, please use the Print Quality settings to 300x300dpi or 600x600dpi) Ex.) Fractional size 4 (Quarter-size) 1 (Whole) 9 (One-ninth size) 14 Mitsubishi Electric Corporation [CP3800DW Printer Driver] 2.2.2 Instruction Manual for Windows 7, 8 Advanced Options By selecting [Advanced Settings] in the Layout window, various settings can be made using Advanced Options. Fig 2.2.2.1 Advanced Settings Fig 2.2.2.2 Advanced Options tab Paper Size You can designate the paper size. Please match the paper size to the media size with which the printer is equipped Copy Count You can designate the number of times an image will be printed. Print Quality You can designate the print quality. Print Quality 300 x 300dpi 300 x 600dpi Function Printing in the high-speed mode Printing in the high-quality mode * If the application can not set an asymmetric aspect resolution, please set the 600x600dpi. *When you execute the "Print Test Page" in printer properties in Windows 8, depending on the specifications of the OS, is printed the aspect ratio of the printer mark is different. 600 x 600dpi Printing in the high-quality mode (Printer driver converts to 300x600dpi data, and sends it to the printer.) ICM Method ICM intent ICM Disabled ICM Handled by Host System ICM Handled by Printer Function 2.2.4 Synchronous with “Color Management: None” in paper option. 2.2.4 Synchronous with “Color Management: ICM” in paper option. Performs color management with the driver. This is the same as setting “ICM Handled by Host System”. ICM Intent This designates the rendering method when using ICM. Always have the ICC profile for the CP3800DW set to “Picture”. Please do not use it at other settings. Advanced Printing Features Always have it set to “Enabled”. Please do not use it at other settings. Pages per Sheet Layout The layout direction of a picture is specified, when Pages per Sheet setting is multiple pages per sheet. Border Synchronous with the border option in the paper option. 15 Mitsubishi Electric Corporation [CP3800DW Printer Driver] Instruction Manual for Windows 7, 8 Overcoat Finish (Depending on the version of the printer, “Glossy” may be the only option) There are two types of overcoat finish: Overcoat Finish Glossy Matte Function The printed images with a glossy surface. The printed images with a matte (luster) surface. * Re-boot computer is needed if the printer driver was updated. Otherwise this new driver function will not be available. Print Re-try (Depending on the version of the printer, “Disable” may be the only option) This sets up determines whether print data in the printer buffer is printed after error recovery. Print Re-try Disable Enable Function Printing data in the printer buffer is cleared in case of a printer error. You may be required to re-send the image data to print. When using a program that has an error recovery function, select this option. Image data in the printer buffer is held in the case of certain printer error. After the printer recover from the error, the print process resumes with the saved data. However, if the power is turned OFF, the data will not be saved. See chart below for errors which can resume printing. * Re-boot computer is needed if the printer driver was updated. Otherwise this new driver function will not be available. Printer errors recovery chart Error recovery is based on Print Re-try setting. You may be required to reset the printer power. Contents of an error Paper End Ribbon End Door is Open Paper Jam (*1) Ribbon Error (*1) Paper Error No Scrap Box System Error Print Re-try setup is “Disable” After error recovery, resend last image data not printed. Print Re-try setup is “Enable” Printing will resume after error recovery. In some cases where printer initialize is needed, printing will resume after initialization. Reset printer power to recover from this error. Then resend the last image data not printed. Reset printer power to recover from this error. Data held in the printer buffer is cleared after power reset. Resend image data is required. *1: Please refer to the user’s manual to recover from these errors. 16 Mitsubishi Electric Corporation [CP3800DW Printer Driver] Instruction Manual for Windows 7, 8 2.2.2-1 Multiple layout method 1 The CP3800DW is able to print 2 or 3 images multiple layouts. With the printer driver paper setting, multi-image layout is made possible, and the image sizes are as follows. Refer to “2.2.2-2 Multiple layout method 2” for multi-cut paper settings with the “M_” prefix. Layout designation Model Driver paper setting (layout) CP3800DW (8x4) x 2 (8x5) x 2 (8x6) x 2 (8x5) _ (8x4) (8x6) _ (8x4) (8x6) _ (8x5) (8x8) _ (8x4) (8x4) x 3 Image layout median size Image size(mm) (207.3x104.6) x 2 (207.3x130.0) x 2 (207.3x155.4) x 2 (207.3x130.0) x (207.3x104.6) (207.3x155.4) x (207.3x104.6) (207.3x155.4) x (207.3x130.0) (207.3x206.2) x (207.3x104.6) (207.3x104.6) x 3 2.54 Using media 8x12, 8x10 8x12, 8x10 8x12 8x12, 8x10 8x12, 8x10 8x12 8x12 8x12 Multiple layout is possible under the following conditions. 1. The printer driver paper size is set to one of the above sizes. 2. Multiple images are sent from the application. Note) Because the multi-image layout occurs on a per job basis, this works when there are multiple images for 1 job. If you want to print the same image, be sure to send the image data for each copy to be printed. The printer prints 2 or 3 images in one operation, and the paper is cut as it is fed out. <Multi-image layout patterns> The following combinations are possible for the multi-image layout patterns. Layout for 1 sheet with 2 same-size images ⇒ x2 Cut as sheet is fed out Layout for 1 sheet with 3 same-size images ⇒ x3 Cut as sheet is fed out Layout for 1 sheet with 2 different-size images ⇒ (8x6)_(8x4) etc. Cut as sheet is fed out 17 Mitsubishi Electric Corporation [CP3800DW Printer Driver] Instruction Manual for Windows 7, 8 Cautions for printing 2 different-size images on one sheet When printing 2 different-size images on 1 sheet, 1 inch will be cut off the top and bottom of the 2nd image when the image is being generated. When creating the original image, be aware of the following points. Ex.) When the layout is set for (8x6)_(8x4) The driver creates the layout image in the order of (1), (2). (1) It creates two 8x6inch images 8 inch 8 inch 6 inch 1 inch cut off top and bottom 4 inch 1st image 2nd image (2) The driver then lays out the 2 different-size images from (1) as one (8x10) image and outputs it to the printer. 8 inch 4 inch 6 inch Ex.) Example of creating the original image. When outputting the original image to the driver, the 1st and 2nd images are created as the same size, so factor in the space that will be cut off from the 2nd image. 8 inch 8 inch Add the area to be cut off beforehand 6 inch 1st image 2nd image 2.2.2-2 Multiple layout method 2 When running a multi-cut print of an miage that has been prepared as a multi-image layout, select the multi-cut paper size with the “M_” prefix from the table below. When these paper sizes are selected, the border option (paper option tab “Border”, or advanced option “Border”) is automatically set to disable, and cannot be changed. Because the driver processes it as no border, if a border is required, it should be added during image layout. Model CP3800DW Driver paper setting (layout) M_(8x4) x 2 M_(8x5) x 2 M_(8x6) x 2 M_(8x5) _ (8x4) M_(8x6) _ (8x4) M_(8x6) _ (8x5) M_(8x8) _ (8x4) M_(8x4) x 3 Image size Using Media 8x12, 8x10 8x12, 8x10 8x12 Refer to “2.5 Print Area” in “Print 8x12, 8x10 area of the multiple layout method 2”. 8x12, 8x10 8x12 8x12 8x12 18 Mitsubishi Electric Corporation [CP3800DW Printer Driver] Instruction Manual for Windows 7, 8 <Example of using application of Multicut layout method 1> This is an example using Windows Explorer Step 1. Select 2 or more images⇒Click “Print”. Step 5. Click on “Advanced”. Select 2 or more images Step 2. Check “Fit picture to frame” and click “Options”. Step 6. Set the Paper Size to “(8x5)x2”. Then click “OK” on the windows from steps 6⇒5, returning to the window displayed in Step 2. Step 3. Click on “Printer Properties”. Step 7. Click on “Print”. Step 4. From the “Orientation” pull-down menu, select “Portrait”. 19 Mitsubishi Electric Corporation [CP3800DW Printer Driver] Instruction Manual for Windows 7, 8 2.2.3 Paper/Quality Fig 2.2.3 Paper/Quality tab Color 2.2.4 Please set to color print. Do not use for black and white printing. Option Fig 2.2.4.2 Sharpness setting Fig 2.2.4.1 Paper option tab Border Designates yes or no for border (check means with border). Synchronous with border in the Advanced Settings. Sharpness Processes for 11 sharpness levels (Fig 2.2.4.2). 0(Initial setting) means there is no sharpness processing. Minus(-) blurs the image, and plus(+) increases the sharpness. Color Adjustment None Synchronous with the ICM Method in the Advanced Settings. Checking this item disables ICM and the Color Adjustment tab, and color management does not occur from the driver. Handled by Driver Checking this item disables ICM and 2.2.5 Color Adjustment is enabled. The adjustment values for gamma, brightness, contrast, and chroma are shown. ICM Synchronous with the ICM Method in the Advanced Settings (ICM Handled by Host System). Checking this item enables color management from the driver. ICM & Driver If you check this, ICM (color management) and color adjustment will be enabled. About Displays the driver version. 20 Mitsubishi Electric Corporation [CP3800DW Printer Driver] 2.2.5 Instruction Manual for Windows 7, 8 Color Adjustment If you check Handled by Driver in 2.2.4 Option, the respective color adjustment values in the Color Adjustment tab are reflected in the image. Fig 2.2.5 Color Adjustment tab Setting ranges in the Color Adjustment tab are as follows: Adjustment Item Adjustment Value Gamma -100(dark) ~ 100(light) (0 means no adjustment, Gamma 2.0 ~ 0.5) Adjusts the density of the highlights in the image. The greater the gamma value, the brighter the highlights. Synchronous check box ON : Sets RGB at the same value OFF:Sets RGB at a different value Brightness -100(dark) ~ 100(light) (0 means no adjustment) Adjusts the brightness of the image. The larger the value, the greater the overall brightness of the image. Synchronous check box ON :Sets RGB at the same value OFF:Sets RGB at a different value Contrast -100(weak) ~ 100(strong) (0 means no adjustment) Adjusts the contrast of the image. The larger the value, the greater the contrast. Synchronous check box ON : Sets RGB at the same value OFF: Sets RGB at a different value Chroma -100(weak) ~ 100(strong) (0 means no adjustment) Adjusts the color saturation of the image. 21 Mitsubishi Electric Corporation [CP3800DW Printer Driver] Instruction Manual for Windows 7, 8 2.3 Default Values for Various Settings Default values for each option (at the time of installation) are shown below. If the printer driver does not work correctly after changing the options, please return the options to the default settings. Note) According to the Service Pack and use environment of OS, the default value at the time of installation may differ from the following chart. Tab Layout Paper/Quality Option Color Adjustment Options Orientation Page Order Pages Per Sheet Color Border Sharpness Color Adjustment Gamma Brightness Contrast Chroma Paper/Output Advanced Default Graphic Portrait Front to Back 1 Color Disable 0 (Default) ICM 0 0 0 0 (8x10) Paper Size Copy Count Print Quality ICM Method Image Color Management ICM Intent Advanced Printing Features (Click [Advanced] button of Layout tab) Document Option Pages per Sheet Layout Printer Features Border Overcoat Finsh Print Re-try 1 300 x 300dpi ICM Handled by Host System Pictures Enable Right then Down Disable Glossy Disable Chart 2.3 Print Setting Default Values 2.4 Color Management In [Color Management], this designates the color profile. Default at installation associates [CP38_xxxx]. xxxx is a 4-digit number that refers to the version. Step 1. Select “Color Management” tab in “Printer Properties”, and click on “Color Management” button. Step 2. Choose printer: MITSUBISHI CP3800DW from a device. Fig 2.4 Color Management 22 Mitsubishi Electric Corporation [CP3800DW Printer Driver] Instruction Manual for Windows 7, 8 2.5 Print Area Depending on the paper size designated at the driver, the image size and dot count will be as follows. Model Paper CP3800DW (8x4) (8x5) (8x6) (8x8) (8x10) A4 Length (8x12) Size (inch) 8”x 4” 8”x 5” 8”x 6” 8”x 8” 8”x 10” 8”x 11.7” 8”x 12” Print Area (mm) 207.3 x 104.6 207.3 x 130.0 207.3 x 155.4 207.3 x 206.0 207.3 x 257.0 207.3 x 297.0 207.3 x 307.8 300x300 DPI Dot amount 2448 x 1236 2448 x 1536 2448 x 1836 2448 x 2436 2448 x 3036 2448 x 3544 2448 x 3636 300x600 DPI Dot amount 2448 x 2472 2448 x 3072 2448 x 3672 2448 x 4872 2448 x 6072 2448 x 7088 2448 x 7272 600x600 DPI Dot amount * 4896 x 2472 4896 x 3072 4896 x 3672 4896 x 4872 4896 x 6072 4896 x 7088 4896 x 7272 <Print area of the multiple layout method 2> The size after multiple image layout. Model Paper setting M_(8x4) x 2 M_(8x5) x 2 M_(8x6) x 2 M_(8x5) _ (8x4) CP3800DW M_(8x6) _ (8x4) M_(8x6) _ (8x5) M_(8x8) _ (8x4) M_(8x4) x 3 Print Area (mm) 207.3 x 211.8 207.3 x 262.6 207.3 x 313.4 207.3 x 237.2 207.3 x 262.6 207.3 x 288.0 207.3 x 313.4 207.3 x 319.0 300x300 DPI Dot amount 2448 x 2502 2448 x 3102 2448 x 3702 2448 x 2802 2448 x 3102 2448 x 3402 2448 x 3702 2448 x 3768 300x600 DPI Dot amount 2448 x 5004 2448 x 6204 2448 x 7404 2448 x 5604 2448 x 6204 2448 x 6804 2448 x 7404 2448 x 7536 600x600 DPI Dot amount * 4896 x 5004 4896 x 6204 4896 x 7404 4896 x 5604 4896 x 6204 4896 x 6804 4896 x 7404 4896 x 7536 *The horizontal line resolution of this printer is 300 DPI, so if 600x600 DPI is designated, the driver will reduce the image width from 4896 dots to 2448 dots and send this to the printer. Multi-image layout position information (multi-cut paper sizes with the prefix “M_”) Refer to the layout diagram (Fig.2.5.1, Fig.2.5.2) Paper setting M_(8x4) x 2 M_(8x5) x 2 M_(8x6) x 2 M_(8x5) _ (8x4) M_(8x6) _ (8x4) M_(8x6) _ (8x5) M_(8x8) _ (8x4) M_(8x4) x 3 Width [pixel] X 2448 4896 2448 4896 2448 4896 2448 4896 2448 4896 2448 4896 2448 4896 2448 4896 Y1 1236 2472 1536 3072 1836 3672 1536 3072 1836 3672 1836 3672 2436 4872 1236 2472 Image height [pixel] Y3 Y2 1236 2472 1536 3072 1836 3672 1236 2472 1236 2472 1536 3072 1236 2472 1236 1236 2472 2472 M (Margin) 30 60 30 60 30 60 30 60 30 60 30 60 30 60 30 60 Upper value = 300DPI Lower value = 600DPI 23 Mitsubishi Electric Corporation [CP3800DW Printer Driver] Y2 pixel Instruction Manual for Windows 7, 8 Image 2 (X × Y2 pixel) Margin size M pixel (Y1 + M + Y2) pixel Y1 pixel Image 1 (X × Y1 pixel) X pixel Fig.2.5.1 2-image layout Y3 pixel Image 3 (X × Y3 pixel) Margin size M pixel (Y1+M+Y2+M+Y3) pixel Y2 pixel Image 2 (X × Y2 pixel) Margin size M pixel Y1 pixel Image 1 (X × Y1 pixel) X pixel Fig.2.5.2 3-image layout 24 Mitsubishi Electric Corporation [CP3800DW Printer Driver] Chapter 3 Instruction Manual for Windows 7, 8 Updating the Driver In order to update the printer driver, follow the steps shown below. 1. Driver Removal (1) Before removing the printer-driver, shut down all other applications. Also, in the “Devices and Printers” window, select the printer icon of the printer you want to remove, check the bottom of the window that there are no documents in queue, and start removal of the driver. Note: In Windows 8, CP3800DW icon does not appear if the printer is offline (if the printer with the power on is not connected). If you can not connect to the printer with the power on, remove the device in the procedure on the next page. Fig 3.1 “Devices and Printers” window with the CP3800DW icon clicked (2) Select “Start”–“Control Panel”, and click on “View devices and printers” in the control panel. In Windows 8, right click on the Start screen, select the right-under "All apps", select "Control Panel", click on "View devices and printers" in the Control Panel. From the “Devices and Printers” window, select the CP3800DW printer, display the pull-down menu with the right click, and click on “Remove device”. Fig 3.2 Devices and Printers window; CP3800DW right-clicked menu 25 Mitsubishi Electric Corporation [CP3800DW Printer Driver] Instruction Manual for Windows 7, 8 In Windows 8, CP3800DW icon does not appear if the printer is offline (if the printer with the power on is not connected). If you can not connect to the printer with the power on, remove the device in the following procedure. (i) Right click an empty area of the "Devices and Printers" window, select the "Device Manager". Fig 3.2.i Devices and Printers window; An empty area of the screen right clicked menu (ii) Click on the check "Show hidden devices" in the menu "View". Fig 3.2.ii "Show hidden devices" menu (iii) Right click on the "CP3800DW" of "Printers", select "Uninstall". Fig 3.2.iii Devices Manager window; Printers – CP3800DW right clicked menu (iv) When the "Confirm Device Uninstall" window appears, click on “OK”. Fig 3.2.iv Confirm Device Uninstall window 26 Mitsubishi Electric Corporation [CP3800DW Printer Driver] Instruction Manual for Windows 7, 8 (3) When “Are you sure you want to remove this device?” appears, click on “Yes”. Fig 3.3 Remove device confirmation window (4) After the CP3800DW printer has been removed, select another printer (for example: Fax), and click on “Print server properties” in the menu bar. Fig 3.4 “Devices and Printers” window, showing the “Print server properties” menu 27 Mitsubishi Electric Corporation [CP3800DW Printer Driver] Instruction Manual for Windows 7, 8 (5) When the Print Server Properties window appears, click on the Drivers tab. From the list of installed printer drivers, select “MITSUBISHI CP3800DW”, and click the “Remove” button. Fig 3.5 Print Server Properties window (6) When the Remove Driver and Package window appears, select “Remove driver only”, and click on the”OK” button. Removal of the driver package takes place in the next section “2. Uninstalling a Driver Package”. Fig 3.6 Remove Driver and Package window 28 Mitsubishi Electric Corporation [CP3800DW Printer Driver] Instruction Manual for Windows 7, 8 (7) When the Print Server Properties confirmation window appears, click on the “Yes” button. Fig 3.7 Print Server Properties confirmation window (8) Using the Print Server Properties window, confirm that “MITSUBISHI CP3800DW” has been removed, and click on the “Close” button. After removing the printer driver, uninstall the driver package. Fig 3.8 Print Server Properties window 29 Mitsubishi Electric Corporation [CP3800DW Printer Driver] Instruction Manual for Windows 7, 8 2. Uninstalling a Driver Package (1) Select “Start”, then “Control Panel”, and open the control panel. Click on “Uninstall a program” in the control panel. In Windows 8, right click on the Start screen, select the right-under "All apps", select "Control Panel", click on "Uninstall a program" in the Control Panel. Fig 3.9 Control Panel (2) When the “Uninstall or change a program” window appears, double-click on “Windows Driver Package – MITSUBISHI ELECTRIC CP3800DW (mm/dd/yyyy x.x.x.x)” (mm/dd/yyyy = the date, x.x.x.x = the version). Fig 3.10 Uninstall a program 30 Mitsubishi Electric Corporation [CP3800DW Printer Driver] Instruction Manual for Windows 7, 8 (3) When the “Uninstall Driver Package” window appears, click on “Yes”. The Uninstall will be completed. After finished with uninstalling the driver package, reboot the computer. Fig 3.11 Uninstall confirmation window 3. Installing the printer-driver upgrade After removing the printer and printer-driver, install the new printer-driver. “Install”. For installation steps, please refer to Chapter 1 4. Rebooting the computer After installation of the printer-driver is complete, be sure to reboot the computer. (Do not print immediately after installation. First reboot the computer.) 31 Mitsubishi Electric Corporation [CP3800DW Printer Driver] Chapter 4 Instruction Manual for Windows 7, 8 Driver Removal For steps to remove the printer driver, refer to Chapter 3 “1. Driver Removal” and “2. Uninstalling a Driver Package”. 32 Mitsubishi Electric Corporation