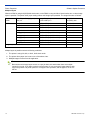
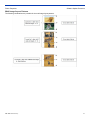
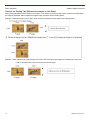
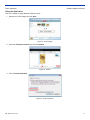
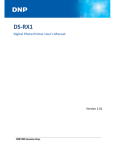
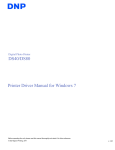
1
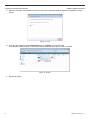
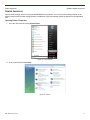
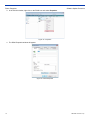
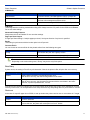
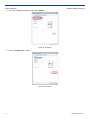
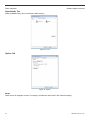
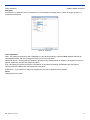
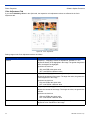
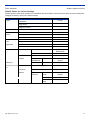
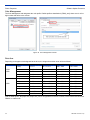
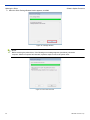
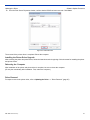
Digital Photo Printer
DS40/DS80
Printer Driver Manual for Windows Vista
Before operating the unit, please read this manual thoroughly and retain it for future reference.
© Dai Nippon Printing, 2011
v. 3.20
Basic Maintenance
DNP Photo Imaging America Corp.
Software Update Procedure
DS40/DS80 PRINTER DRIVER INSTRUCTIONS
FOR WINDOWS VISTA
Acknowledgements
The information contained in this document represents the current view of DNP IMS America Corp. on the issues discussed as of the date of publication.
Because DNP IMS America Corp. must respond to changing market conditions, it should not be interpreted to be a commitment on the part of DNP IMS
America Corp. DNP IMS America Corp. cannot guarantee the accuracy of any information presented after the date of publication.
This document is for informational purposes only. DNP IMS America Corp. MAKES NO WARRANTIES, EXPRESSED OR IMPLIED, AS TO THE
INFORMATION IN THIS DOCUMENT.
Complying with all applicable copyright laws is the responsibility of the user. Without limiting the rights under copyright, no part of this document may be
reproduced, stored in or introduced into a retrieval system, or transmitted in any form or by any means (electronic, mechanical, photocopying, recording,
or otherwise), or for any purpose, without the express written permission of DNP IMS America Corp..
DNP IMS America Corp. may have patents, patent applications, trademarks, copyrights, or other intellectual property rights covering subject matter in this
document. Except as expressly provided in any written license agreement from DNP IMS America Corp., the furnishing of this document does not give
you any license to these patents, trademarks, copyrights, or other intellectual property.
For non-commercial personal use purposes, you may make 1 copy of the Printer Driver Instruction Manual solely for back-up purposes.
Microsoft and Windows are registered trademarks of Microsoft Corporation valid in the USA and other countries. LEADTOOLS Copyright (c) 2008 LEAD
Technologies, Inc.
DNP IMS America Corp. • PO Box 767 • San Marcos, TX 78667 • USA
© 2000-2012 DNP IMS America Corp.. All rights reserved.
Purpose
This document includes instructions for installing and updating the printer drivers for DS40/80 printers on Windows Vista.
Printer and Host Computer Connection
1. Connect the DS40/DS80 USB cable to the host computer and turn the printer ON.
A t te n t i o n
Do not insert the accompanying CD at this time.
In order to install the driver, log in with administrator rights.
These instructions are written on the assumption that you have administrator rights.
2. If the Found New Hardware Wizard is initiated, install the printer using the procedures described in the section titled
“Install Using the Found New Hardware Wizard”.
If the Found New Hardware Wizard is NOT initiated, install the printer using the procedures described in the section
titled “Install from Add Printer Wizard”.
A t te n t i o n
The following instructions describe installation procedures for a DS40 printer, but instructions are the same for a
DS80. Substitute “DS80” for “DS40” when reading instructions.
DNP IMS America Corp.
1
Found New Hardware Wizard
Software Update Procedure
FOUND NEW HARDWARE WIZARD
1. When the Found New Hardware Wizard starts running, click on “Locate and install driver software (recommended)”.
Figure 1. Found New Hardware Wizard
No t e
For user account control, a confirmation window will state “Windows needs your permission to
continue”. Click Continue to proceed.
2. If the message “Insert the disc that came with your Dai Nippon Printing DS40” appears, click on “I don’t have the disc.
Show me other Options”.
Figure 2. Insert Disc
2
DNP IMS America Corp.
Found New Hardware Wizard
Software Update Procedure
3. If the message “Windows couldn’t find driver software for your device” appears, click on “Browse my computer for
driver software (advanced)”.
Figure 3. Windows Couldn’t Find Sofware...
4. Insert the accompanying CD at this point.
If the message “Browse for driver software on your computer” appears, click on the Browse button, and designate a
location for the Installation Disc. Click Next.
Figure 4. Browse Driver Software
5. If the Windows Security confirmation window appears, click on “Install this driver software anyway”.
Figure 5. Security
DNP IMS America Corp.
3
Found New Hardware Wizard
Software Update Procedure
6. The driver software will be installed. When the message “The software for this device has been successfully installed”
appears, click Close and end the wizard.
Figure 6. Finish Wizard
7. Go to the Start menu and select Control Panel. Click on Printer in the Control Panel.
Figure 7. Control Panel
8. Confirm that DS40 is shown in the list of installed printers. Installation is now complete.
Figure 8. Printers
9. Restart the system.
4
DNP IMS America Corp.
Install from the Add Printer Wizard
INSTALL
FROM THE
Software Update Procedure
ADD PRINTER WIZARD
No t e
Follow these instructions if the Found New Hardware Wizard does not initiate after connecting
your printer.
1. Go to the Start menu and select Control Panel. Click on Printer in the Control Panel.
Figure 9. Control Panel
2. Click on Add a Printer in the menu bar along the top of the Printer window.
Figure 10. Add a Printer
3. At the Choose a local or network printer window, select Add a local printer.
Figure 11. Local or Network Printer
DNP IMS America Corp.
5
Install from the Add Printer Wizard
Software Update Procedure
4. At the Choose a printer port window, select Use an existing port, and select the USB port the printer is connected to
(i.e. USB001) from the drop-down menu. Click Next.
Figure 12. Choose Printer Port
5. At the Install the printer driver window, click on the Have Disk... button.
Figure 13. Install Printer Driver
6. At the Install From Disk window, use the Browse button to designate the installation disc location. Click OK.
Figure 14. Install From Disk
6
DNP IMS America Corp.
Install from the Add Printer Wizard
Software Update Procedure
7. At the Install the printer driver window, check that DS40 is displayed under Printers. Click Next.
Figure 15. Install Printer Driver
8. At the Type a printer name window, you can enter a name for the printer. To set it as the default printer check the box
next to Set as the default printer. Click Next.
Figure 16. Printer Name
No t e
Installation will begin, but the User Account Control will request confirmation. Select Install this
driver software anyway. Click Continue.
Figure 17. Confirmation
DNP IMS America Corp.
7
Install from the Add Printer Wizard
Software Update Procedure
9. When the message “The software for this device has been successfully installed” appears, click Close to end the
wizard.
Figure 18. Close
10. Go to the Start menu and select Control Panel. Click on Printer in the Control Panel.
Confirm that the DS40 is shown in the Printer window. Installation of the printer driver is complete.
Figure 19. Printers
11. Restart the system.
8
DNP IMS America Corp.
Printer Properties
Software Update Procedure
PRINTER PROPERTIES
Various printer settings can be set using the DS40/DS80 driver properties. As a rule, the printer settings should not be
altered, instead use the default settings present at installation. Paper size settings should be altered from the application
side.
Opening Printer Properties
1. Go to the Start menu and select Control Panel.
Figure 20. Control Panel
2. In the Control Panel select Printer.
Figure 21. Printer
DNP IMS America Corp.
9
Printer Properties
Software Update Procedure
3. In the Printers window, right-click on the DS40 icon and select Properties.
Figure 22. Properties
4. The DS40 Properties window will appear.
Figure 23. DS40 Properties
10
DNP IMS America Corp.
Printer Properties
Software Update Procedure
Explanation of Print Setting Functions
From the DS40 Properties window, you can click on Printing Preferences to change various print settings.
Layout Tab
original image
orientation
Print Orientation
Set the print orientation as Portrait or Landscape.
Page Order
When printing multiple images in the application, you can set the order.
DNP IMS America Corp.
11
Printer Properties
Software Update Procedure
TPages Per Sheet
This setting prints the designate fractional size.
Example – fraction size
Advanced Options
By clicking the Advanced button in the Layout tab, various advanced settings can be changed.
Figure 24. Advanced Button & Advanced Options Tab
Paper Size
You can designate the paper size. Match the paper size to the media size with which the printer is equipped.
Copy Count
You can designate the number of times an image will be printed.
Print Quality
You can designate the print quality. Match the print quality to the printer settings.
Print Quality
300 x 300 dpi
300 x 600 dpi
Function
Print in high-speed mode
Print in high-quality mode
If the application can not set an asymmetric aspect resolution, use 600 x 600 dpi
600 x 600 dpi
Print in high-quality mode.
Printer driver converts to 300 x 600 dpi data, and sends to printer.
12
DNP IMS America Corp.
Printer Properties
Software Update Procedure
ICM Method
ICM Method
Function
ICM Disabled
Synchronous with “Color Management: None” in Paper tab.
ICM Handled by Host System
Synchronous with “Color Management: ICM” in Paper tab.
Performs color management with the driver
ICM Handled by Printer
This is the same setting as “ICM Handled by Host System”
ICM Intent
This designates the rendering method when using ICM. Always have the ICC profile for the DS40 set to Picture.
Do not use other settings.
Advanced Printing Features
Always have this set to Enabled. Do not use other settings.
Pages per Sheet Layout
If Pages per Sheet setting is “multiple pages per sheet,” the layout direction of a picture is specified.
Border
This setting is synchronous with the border option in the Paper tab.
Overcoat Finish
You can choose an overcoat finish for the printed surface from the following two types:
Overcoat Finish
Function
Glossy
This finishes the print with a glossy surface.
Matte
This finishes the print with a matte (non-glossy) surface.
No t e
Depending on the version being used, “Glossy” may be the only finish option.
Print Retry
If printer errors, the setting in Print Re-try will determine if data in the printer buffer will print after error recovery.
Print Re-try
Function
Disable
Printing data in the buffer is cleared after printer error.
After an error recovery, the cleared image data must be resent.
Enable
Printing data in the buffer is held after printer error.
After an error recovery, the print process resumes with the saved data in the buffer.
However, if printer is powered OFF, it is lost.
According to the contents of a printer error, the power supply of the printer may need to be re-switched on for error
recovery. In this case, it is not dependant on the setup of Print Re-try, and printing data in a printer buffer is cleared.
2inch cut
In the case of a specific paper size of DS40, it sets up whether the printer cuts into two or more sheets in 2” length.
2inch cut
Function
Disable
It cuts in usual size
Enable
If set to 4x6 size, the printer will cut the print into two 2” sheets.
If set to 6x8 size, the printer will cut the print into four 2” sheets.
DNP IMS America Corp.
13
Printer Properties
Software Update Procedure
Multiple Layout
When the DS40 is using 6x9 (A5W)/6x8 sized media, or the DS80 is using 8x12/8x10 sized media, two- or three-image
layout is possible. The printer driver paper setting makes multi-image layout possible. The image sizes are as follows:
Model
Driver Paper Setting (layout)
Image Size (mm)
Using Media
DS40
(6x4) x 2
(156.1x105.0) x 2
6x9 (A5W), 6x8
DS80
(6x4) x 2
(156.1x105.0) x 2
8x12, 8x10
(8x4) x2
(207.3x104.6) x 2
8x12, 8x10
(8x5) x2
(207.3x130.0) x 2
8x12, 8x10
(8x6) x2
(207.3x155.4) x 2
8x12
(8x5) _ (8x4)
(207.3x130.0) + (207.3x104.6)
8x12, 8x10
(8x6) _ (8x4)
(207.3x155.4) + (207.3x104.6)
8x12, 8x10
(8x6) _ (8x5)
(207.3x155.4) + (207.3x130.0)
8x12
(8x8) _ (8x4)
(207.3x206.2) + (207.3x104.6)
8x12
(8x4) x 3
(207.3x104.6) x 3
8x12
Median Size
2.54
Image Layout
Multiple layout is possible under the following conditions:
1. The printer is using 6x9, 6x8, or 8x12, 8x10 sized media.
2. The printer driver paper size is set to one of the above sizes.
3. Multiple images are sent from the application.
No t e
Because the multi-image layout occurs on a per-job basis, this works when there are multiple
images for one job. If you want to print the same image, be sure to send the image data for each
copy to be printed. The printer prints 2 or 3 images in one operation, and the paper is cut as it is
fed out.
14
DNP IMS America Corp.
Printer Properties
Software Update Procedure
Multi-image Layout Patterns
The following combinations are possible for the multi-image layout patterns:
DNP IMS America Corp.
15
Printer Properties
Software Update Procedure
Cautions for Printing Two Different-size Images on One Sheet
When printing two different-size images on one sheet, 1 inch will be cut off the top and bottom of the second image when
the image is generated. When creating the original image, be aware of the following points:
Example – When the layout is set for (8x6)_(8x4), the driver creates the layout image in the following order:
Example – When outputting the original image to the driver, the first and second images are created as the same size.
Factor in the space that will be cut off from the second image.
16
DNP IMS America Corp.
Printer Properties
Software Update Procedure
Using the Application
This is an example of using Windows Explorer to print:
1. Select two or more images and click Print.
Figure 25. Select Images
2. Check the Fit picture to frame box and click Options.
Figure 26. Options
3. Click on Printer Properties.
Figure 27. Printer Properties
DNP IMS America Corp.
17
Printer Properties
Software Update Procedure
4. From the Orientation drop-down menu, select Portrait.
Figure 28. Orientation
5. Click on the Advanced... button.
Figure 29. Advanced
18
DNP IMS America Corp.
Printer Properties
Software Update Procedure
6. Set the Paper Size to (6x4) x 2. Click OK until you return to the Print Pictures window.
Figure 30. Paper Size
7. Click on Print.
Figure 31. Print
DNP IMS America Corp.
19
Printer Properties
Software Update Procedure
Paper/Quality Tab
Select the Color setting. (Do not use Black & White setting.)
Figure 32. Color
Options Tab
Figure 33. Options
Border
Check the box to designate a border. This setting is synchronous with border in the Advanced settings.
20
DNP IMS America Corp.
Printer Properties
Software Update Procedure
Sharpness
Processes for 11 sharpness levels. 0 means there is no sharpness processing. Minus (-) blurs the image, and plus (+)
increases the sharpness.
Figure 34. Sharpness
Color Adjustment
None – this setting is synchronous with “ICM Method” in the Advanced settings. Checking None disables ICM and the
Color Adjustment tab, and color management does not occur from the driver.
Handled by Driver – checking this item disables ICM and the Color Adjustment tab is enabled. The adjustment values for
gamma, brightness, contrast, and chroma are shown.
ICM – this setting is synchronous with the “ICM Method” in the Advanced settings (ICM Handled by Host System).
Checking this item enables color management from the driver.
ICM & Driver – if you check this, ICM (color management) and color adjustment will be enabled.
About
Displays the driver version.
DNP IMS America Corp.
21
Printer Properties
Software Update Procedure
Color Adjustment Tab
If you check Handled by Driver in the Option tab, the respective color adjustment values are reflected in the Color
Adjustment tab.
Figure 35. Color Adjustment
Setting ranges in the Color Adjustment tab are as follows:
Adjustment Item
Gamma
Adjustment Value
-100(dark) ~ 100(light) (0 means no adjustment, Gamma 2.0 ~ 0.5
Adjusts the density of the highlights in the image. The greater the gamma
value, the brighter the highlights.
Synchronous check box
ON: sets RGB at the same value
OFF: sets RGB at a different value
Brightness
-100(dark) ~ 100(light) (0 means no adjustment)
Adjusts the brightness of the image. The larger the value, the greater the
overall brightness of the image.
Synchronous check box
ON: sets RGB at the same value
OFF: sets RGB at a different value
Contrast
-100(weak) ~ 100(strong) (0 means no adjustment)
Adjusts the contrast of the image. The larger the value, the greater the
contrast.
Synchronous check box
ON: sets RGB at the same value
OFF: sets RGB at a different value
Chroma
-100(weak) ~ 100(strong) (0 means no adjustment)
Adjusts the color saturations of the image.
22
DNP IMS America Corp.
Printer Properties
Software Update Procedure
Default Values for Various Settings
Default values for each option (at the time of installation) are shown below. If the printer driver does not work correctly after
changing the options, return to the default settings.
Tab
Layout
Options
Default
Orientation
Portrait
Page Order
Front to Back
1
Pages Per Sheet
Paper/Quality
Option
Color
Color
Frame
Disable
Sharpness
0 (Default)
Color Adjustment
ICM
Gamma
0
Color
Brightness
0
Adjustment
Contrast
0
Chroma
0
Paper/Output
Paper Size
DS40 (6x4)
DS80 (8x10)
Copy Count
1
Print Quantity
Graphic
Image Color
Management
300 x 600 dpi
ICM Method
ICM Intent
Advanced
Advanced Prin ting Features
(click Advanced on Layout
ICM Handled by Host
System
Pictures
Enable
tab)
Document
Pages Per
Sheet Layout
Options
Printer
Features
Border
Dual Image
Overcoat
Finish
DNP IMS America Corp.
Right then Down
Disable
Off
Glossy
23
Printer Properties
Software Update Procedure
Color Management
The Color Management tab designates the color profile. Default profile at installation is [DS40_xxxx] where xxxx is a fourdigit number that refers to the version.
Figure 36. Color Management & Profile
Print Area
Depending on the paper size designated at the driver, the image size and dot count will be as follows:
Model
Paper
Size (inch)
Print Area (mm)
300x300 dpi
300x600 dpi
(3.5x5)
3.5” x 5”
92.1 x 131.1
1088 x 1548
2176 x 1548
DS40/
(4x6)
4” x 6”
105.0 x 156.1
1240 x 1844
2480 x 1844
DS80
(5x7)
5” x 7”
131.1 x 181.0
1548 x 2138
1548 x 4276
(6x8)
6” x 8”
156.1 x 206.2
1844 x 2436
1844 x 4872
(6x9)
6” x 9”
156.1 x 232.0
1844 x 2740
1844 x 5480
(8x4)
8” x 4”
207.3 x 104.6
2448 x 1236
2448 x 2472
(8x5)
8” x 5”
207.3 x 130.0
2448 x 1536
2448 x 3072
(8x6)
8” x 6”
207.3 x 155.4
2448 x 1836
2448 x 3672
(8x8)
8” x 8”
207.3 x 206.0
2448 x 2436
2448 x 4872
(8x10)
8” x 10”
207.3 x 257.0
2448 x 3036
2448 x 6072
A4 Length
8” x 11.7”
207.3 x 297.0
2448 x 3544
2448 x 7088
(8x12)
8” x 12”
207.3 x 307.8
2448 x 3636
2448 x 7272
DS80
With the DS80 printer, the paper size (output size) can be designated as less then 8 inches, but the media used will be the
DS80 8-in. width media.
24
DNP IMS America Corp.
Updating the Driver
UPDATING
THE
Software Update Procedure
DRIVER
In order to update the printer driver, follow these instructions:
Driver Removal
No t e
Removing the driver is the same for both the DS40 and DS80.
1. Before removing the printer driver, shut down all other applications. Double-click the icon for the printer to be
removed, and make sure there are no documents in the queue before you begin removing the driver.
Figure 37. Printers
Figure 38. Printer Queue
2. Go to the Start menu and select Control Panel. Click on Printer in the Control Panel.
From the Printer window, right-click on the DS40 printer and select Delete.
Figure 39. Delete
DNP IMS America Corp.
25
Updating the Driver
Software Update Procedure
3. When asked “Are you sure you want to delete the printer DS40?” click Yes.
Figure 40. Are You Sure?
4. After the DS40 has been deleted, right-click where there is no icon and select Run as administrator from the menu.
Select Server Properties.
Figure 41. Run As Administrator
No t e
User Account Control will request confirmation (see below). Click Continue.
5. When the Print Server Properties window appears, click on the Drivers tab. Select DS40 from the list of installed
printer drivers and click the Remove button.
Figure 42. Print Server Properties
26
DNP IMS America Corp.
Updating the Driver
Software Update Procedure
6. When the Remove Driver and Package window appears, select Remove driver and driver package. Click OK.
Figure 43. Remove Driver and Package
7. When the Print Server Properties confirmation window appears, click Yes.
Figure 44. Confirmation
8. When the Remove Driver Package window appears, click Delete.
Figure 45. Remove Driver Package
DNP IMS America Corp.
27
Updating the Driver
Software Update Procedure
9. When the Driver Package Deleted window appears, click OK.
Figure 46. Package Deleted
No t e
Before removing the printer driver, if the following error message appears (see below), reboot the
computer. After the computer has rebooted, repeat the steps to remove the printer driver.
Figure 47. Error Has Occurred
28
DNP IMS America Corp.
Updating the Driver
Software Update Procedure
10. From the Print Server Properties window, confirm that the DS40 has been removed. Click Close.
Figure 48. DS40 Removed
The removal of the printer driver is complete. Reboot the computer.
Installing the Printer Driver Upgrade
After removing the printer and printer driver, follow the instructions at the beginning of this document for installing the printer
and printer drivers.
Rebooting the Computer
After installation of the printer and printer driver is complete, be sure to reboot the computer.
(Do not print immediately after installation. First, reboot the computer.)
Driver Removal
For steps to remove the printer driver, refer to Updating the Driver --> “Driver Removal” (page 25)
DNP IMS America Corp.
29
Updating the Driver
30
Software Update Procedure
DNP IMS America Corp.