1
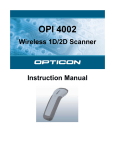
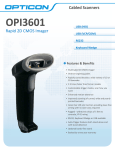
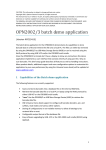
ESL
Quick Start Guide
Electronic Shelf Labeling System
ESL
Trademarks
Trademarks used are the property of their respective owners.
Opticon Inc. and Opticon Sensors Europe B.V. are wholly owned subsidiaries of OPTOELECTRONICS Co., Ltd., 12-17, Tsukagoshi 4-chome,
Warabi-shi, Saitama, Japan 335-0002. TEL +81-(0) 48-446-1183; FAX +81-(0) 48-446-1184
SUPPORT
USA
Europe
Phone: 800-636-0090
Phone: +31 235692728
Email: [email protected]
Email: [email protected]
Web: www.opticonusa.com
Web: www.opticon.com
All information subject to change without notice.
© 2012 copyright Opticon. All rights reserved.
This quick start guide may not, in whole or in part, be copied, photocopied, reproduced, translated, or converted to any written, electronic or
machine readable form without prior written consent of Opticon.
ESL
Quick Start Guide
1. Overview
The Opticon Electronic Shelf Labeling (ESL) system consists of a series of low power e-ink shelf tags that
communicate with a base station. The base station then communicates with server software in order to
manage the content displayed on the tags. This dynamic shelf labeling system makes it easy to update
real world content on a real time basis, all from one central computer. This guide assists in the quick
setup of such a system.
Note: See the User Manual for more detailed discussion and explanation of the information in this guide.
2. Kit Contents
The following components are included in the Opticon ESL Kit.
•
•
•
•
•
•
•
•
•
•
1 ESL Base Station (EBS-10) + Power Supply
5 ESL Shelf Tags (EE200) + batteries (2 ea. CR2450 Coin Lithium)
Tablet PC preloaded with Server Software, Sample Database, Sample Image Template, and Tag
Updating Application
Server Software
Sample Database
Sample Image Template
Tag Updating Application
(Optional) Opticon Barcode Terminal & Necessary Accessories
ESL User Guide
ESL QSG (this document)
3. Setup
3.1 Install Software
3.1.1 Run the file setup.exe from the included CD, or downloaded ISO.
You must have Administrator privileges before beginning this installation.
By default, the Appload program and USB drivers are deselected for installation.
• If these two items are not already on your system, please select them for installation.
• If Microsoft .NET 3.5 it is not already present, this program will install it on your computer.
• Be advised that some additional application installers (e.g., middleware programs) may appear under
this setup program window and must be completed individually before setup will proceed.
3.1.2 Install XTAdminXXL
The setup program loads only the installer for this application on your computer. The installer must be run
manually from this location: <ESLInstallFolder>/tools/XTadmin/setup.exe. Note that <ESLInstallFolder> is
shown during setup on the same screen where you select which components to install.
3.2.3 Install ESL TagLinker Utility
The ESL TagLinker Utility is used to modify the sample product database as well as modify the links that
associate a record in the database to a specific tag. This application is installed by running setup.exe from
the folder ESL TagLinker Utility within the supplied CD or downloaded ISO.
Version 1.0
2
ESL
Quick Start Guide
3.2.4 Set Static IP on PC
When connecting directly between an ESL Base Station and a PC it may be necessary to set a static IP
address on the PC to allow communication with the Base Station.
•
•
•
•
•
•
•
•
•
•
•
Launch the Control Panel from the Windows Start Menu.
Select View Network Status and Tasks (or Network and Sharing Center if in list view).
Select Change adapter settings from the menu at left.
Right-Click on the network connection to which the Base Station is connected; this connection is
typically named Local Area Connection.
Select Properties from the context-menu that appears.
Select Internet Protocol Version 4 (TCP/IPv4) and click Properties.
Choose Use the following IP address near the top.
Enter the IP address of your choice. The Base Station default is 192.168.100.100 so it is advised you
use a similar IP address (e.g. 192.168.100.x, where x can be any number from 1 to 255, excluding
100 as the PC and Base Station cannot have the same address).
Enter a Subnet mask of 255.255.0.0
Click OK
Click Close. It may take a minute or two for this change to fully take effect. You will see an hourglass
as this change is performed.
3.2. Connect hardware
3.2.1 Optional Barcode Terminal and Communication Cradles
•
Connect power and USB (or RS232) to the cradle that comes with the optional barcode terminal.
®
®
Windows will associate the appropriate driver if it was installed previously. Windows will also assign
a COM Port number to this device. To find this port number for later reference, you can check Device
Manager by using either of the following methods:
Start > Run > devmgmt.msc > expand Ports
or
Start > Control Panel > System > Hardware > Device Manager > expand Ports
•
Install the barcode terminal battery (if not already installed), and place the terminal in the cradle. The
screen should display, “ESL LINKING (APPL.).”
3.2.2 Base Station
The ESL Base Station must be connected to AC power via the supplied adapter. Additionally it must be
connected to an open Ethernet port to allow configuration. See section 3.3 for configuration details.
3.2.3 ESL Tags
The ESL Tags typically come with batteries pre-installed. If not, they can be easily installed by removing
the back shell of the tag. During setup, we recommend keeping the tags close at hand, as the barcode
label on the back will need to be readily accessed.
Version 1.0
3
ESL
Quick Start Guide
3.3. Configure Base Station
3.3.1 DHCP
NOTE: If DHCP is your preferred connection method, then skip to step 3.4, BUT ONLY after completing
all of section 3.3.1.x.
DHCP is activated by default. The ESL Server application requires input of the IP address of each base
station, so if DHCP is used you must reserve the IP address in your router. Once associated you may
determine the IP address of the base station from your router's interface or by using the supplied utility
XTAdminXXL.
3.3.1.1 XTAdminXXL
Launch XTAdminXXL from your start menu in the AK-NORD folder. The program will find any connected
base station automatically. The IP address of each base station is clearly visible. Note the IP address for
use in the ESL Server software. (See screen capture on next page for an example).
3.3.2 Static IP
NOTE: If DHCP is your preferred connection method, you may skip this section and proceed to 3.4.
By default, the base station has DHCP configured with an alternate static IP of 192.168.100.100 and a
subnet of 255.255.0.0. If this default is already appropriate for your environment then there is no need to
complete this step. Using section 3.3.1.1 above, as a guide, right-click on the IP address of the base
station and select telnet from the context menu. The telnet window will open at right. You may need to
adjust the window size to see the input field at the bottom of that window.
1. Login with password xt.
2. Input N<enter> to select the Network menu.
Version 1.0
4
3.
4.
5.
6.
7.
8.
9.
10.
ESL
Quick Start Guide
Input 2<enter> to select the DHCP menu.
Input 1=N<enter> to disable DHCP.
Input Q<enter> to return to the previous menu.
Input 6<enter> to enter the IP menu.
Input 1=<ip address><enter> to configure your desired static IP.
Input 2=<subnet><enter> to configure your desired subnet mask.
Input Q<enter> (twice) to return to the main menu.
Input R<enter> to restart the base station.
Use the refresh button in the XTAdminXXL utility to determine when the base station is rebooted and your
settings have taken effect.
3.4 Start Server Software
When the ESL Server software starts, it will automatically load the ProductData_1.csv file found in it's
Input folder. This database will need to be loaded on the barcode terminal (if used), and the IP address of
any connected base station configured. Launch the ESL Server Application from the start menu in the
folder Opticon / ESL Demo Kit. Once the program has launched, click Setup on the menu.
3.4.1 Set Up Optional Opticon Barcode Terminal (OPH1004; H13; OPL9728)
In the setup window, set the COM Port that was discovered in step 3.2.1. If the ESL Linking Application is
not loaded on an optional barcode terminal, select Update Firmware and chose the appropriate file from
the list below. It takes approximately one minute for the firmware to load. You will receive a confirmation
message when it is complete.
OPH1004 / H13 - XPA36931.HEX
OPL9728 - LFD36931.S32
Check that your product database has been downloaded to the terminal. Downloading the database might
take a minute or two, after the proper firmware has been loaded. To confirm completion of the download,
check menu item “3” on the barcode terminal. If it prompts you to scan a barcode, then the database is
present and ready. Use the CLR key on the terminal to return to the main menu.
3.4.2 Base Station
From the list at the top of the setup window, input the IP address of any connected base station—either
as discovered, or as set from section 3.3.x, above. The proper format for an IP address is shown in the
example, below. Place each base station on its own line. When you are done, click Apply.
Example IP Address: TCPC:192.168.0.100:1002
3.4.3 Frequencies
The ESL system runs on the IEEE 802.15.4 specification, and responds to the same frequency range as
Bluetooth™ and Wi-Fi networks. To ensure the most effective communication, and the most efficient
battery life, it is recommended to configure the labels and base stations to a channel that is least used in
your environment. See the ESL User Manual for details on how this can be accomplished.
Version 1.0
5
ESL
Quick Start Guide
3.5 Create Links and Modify Sample Database
To use the optional barcode terminal to create the link database skip to section 3.6
•
•
•
•
•
Start the ESL TagLinker Utility. If this application was launched prior to the first launch of the ESL
Server Software (e.g. as the last step in installation) then close and restart it.
The upper grid contains the sample product database and can be modified by selecting any field and
typing the new contents.
The lower field is the link database. At first launch this will be blank. Add new tags to the list by
selecting Add Tag from the Edit menu. All fields are case sensitive.
o The MAC address is the unique address of each ESL tag. This address is found on the label
on the back of each tag. Note that due to space constraints the first letter A on the back of
each tag must be replaced with 00124B (e.g. A00014418D5 becomes 00124B00014418D5).
o The Product ID field is the unique ID found on the upper grid. You may type the Unique ID
manually or select the full row in both the upper and lower grids and use the yellow link icon
at top.
o The Tag Type field contains a code for the model of the tag in use. The EE200 2" ESL Tag is
type H.
When all tags have been added and all data has been modified to your satisfaction click the Update
(lightning bolt) icon at the top of the window. The ESL TagLinker Utility will modify the necessary files
and the ESL Server Application will begin parsing the data and sending new images down to your
tags. You must wait for all changes to take effect before updating more changes with the ESL
TagLinker Utility or they may not take effect. Watch the Data tab in the ESL Server Application for this
information.
To retain changes without committing them to the live environment select Save Database from the
File menu. To recover your saved data after a new launch of the software select Open Database from
the File menu.
3.6. Create Link Database with an Optional Barcode Terminal
If all steps in section 3.5 are performed this section may be skipped.
After completing the previous section, view the Data tab in the ESL Server Application. You should see
your nearby ESL Tags begin to appear (based on their respective polling intervals). Note that no images
will be loaded onto your tags until they are linked with the products in the product database.
1. To create the link database, take the barcode terminal and select option “1,” Link ESLs, from the
menu. Next select the appropriate label size. The EE200 ESL Tag is the 2-inch model. The model
name can be found on the label on the back of each tag.
2. Use the terminal to create scanned pairings with the ESLs, specifically, the MAC address
barcode on the back, and the product barcode of your products. If you are using the Opticon
supplied sample database, then use the images on the last page of the User Manual as
templates for these product barcodes.
3. Once the linking has been completed, simply place the barcode terminal back in its cradle. The
link database will automatically upload. The server application will begin to process images and
transmit them to the tags. It may take a few moments for all images to propagate, depending on
the polling intervals of the tags. By default, each tag checks for new data every 20 seconds.
4. Deployment
Version 1.0
6
ESL
Quick Start Guide
When all ESLs have the desired images loaded, simply deploy them to appropriate locations in your
facility within range of the base station. The recommended maximum range is 10 meters (30 feet) though
the actual maximum range can be longer depending on your environment. Remember that for wireless
networks such as this, line-of-sight positioning is desirable, and the composition and proximity of some
structures could have adverse affects on the signal.
Once you have deployed the ESLs, monitor the ESL Server Application to determine if any of them have
trouble communicating with base stations in the network.
The example ESL layout in the picture, below, is only meant as an illustration of the possibilities
for deployment, and may not represent the optimal configuration for your purposes.
Example ESL deployment
Copyright Opticon. All rights reserved. This information is subject to change without prior notice. For availability, contact your local representative.
- The Netherlands: Hoofddorp
- France: Issy Les Moulineaux
- Germany: Dietzenbach
- Italy: Villanova di Castenaso (BO)
- Sweden: Järfälla
- United Kingdom: Luton, Bedfordshire
- U.S.A.: Renton, WA
- Brazil: São Paulo
Version 1.0
- Japan: Warabi City
- Taiwan: Taipei
- P.R.China: Shanghai
- Australia: West Ryde
Opticon, Inc.
2220 Lind Avenue SW
Suite 100
Renton, WA 98057
Toll Free: (800) 636-0090
Local: (425) 651-2120
Fax: (425) 454-0865
Email: [email protected]
[email protected]
WWW.OPTICONUSA.COM
7