1
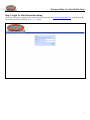
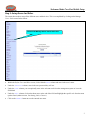
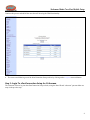
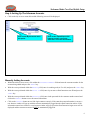
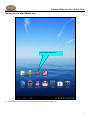
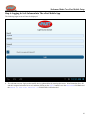
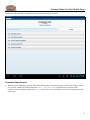
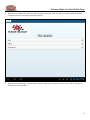
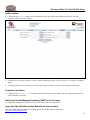
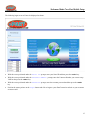
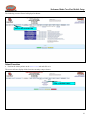
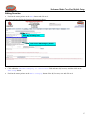
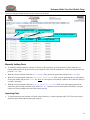
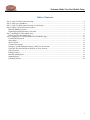
Salesman Mode For ePart Mobile Setup Table of Contents Step 1: Login To ePartConnection Setup ............................................................................................................................ 2 Step 2: Setup Users And Roles ........................................................................................................................................... 3 Step 3: Login To ePartConnection Setup As A Salesman .................................................................................................. 4 Step 4: Setting Up The Salesman Accounts........................................................................................................................ 6 Manually Adding Accounts ............................................................................................................................................ 6 Importing/Exporting Salesman’s Accounts .................................................................................................................... 7 Step 5: Installing The ePart Mobile App ............................................................................................................................ 8 Starting Up The ePart Mobile App ................................................................................................................................. 9 Step 6: Logging In As A Saleman Into The ePart Mobile App ........................................................................................ 10 Customer Name Search................................................................................................................................................. 11 ePart Option .................................................................................................................................................................. 13 eOffice Option............................................................................................................................................................... 14 Customer List Option .................................................................................................................................................... 14 Setting Up Vendor Managed Inventory (VMI) For An Account .................................................................................. 14 Login Into The ePartConnection Website As Your Account ........................................................................................ 14 Select Favorites ............................................................................................................................................................. 16 Editing Favorites ........................................................................................................................................................... 17 Manually Adding Parts ................................................................................................................................................. 18 Importing Parts.............................................................................................................................................................. 18 Uploading Pictures ........................................................................................................................................................ 20 1 Salesman Mode For ePart Mobile Setup Step 1: Login To ePartConnection Setup The owner will begin by logging into the ePartConnection Setup website (setup.epartconnection.com), using the Store ID and master password and clicking on the Login button. 2 Salesman Mode For ePart Mobile Setup Step 2: Setup Users And Roles The owner then needs to setup all the different users and their roles. This is accomplished by clicking on the Manage Users / Roles menu link as shown: Click on the Manage Users / Roles menu link. Within the Define Users and Roles screen, click within the Name column and enter in the user’s name. Under the Password column, enter in the user password they will use. Under the Code column, you can optionally enter in the salesman code from the management system or leave the field blank. Under the Role column, click on the down arrow at the end of the field and highlight the specific role from the menu options listed (Administration, Purchasing, Sales, Counter). Click on the Submit button to save the entered user name. 3 Salesman Mode For ePart Mobile Setup Continue this process and add all the users that will be using the CRM functionality. The owner would then log out of the ePartConnection Setup website by clicking on the Logoff menu tab button. Step 3: Login To ePartConnection Setup As A Salesman The salesman will now log into the ePartConnection Setup website, using the Store ID and “salesman” password that was setup in the previous step. 4 Salesman Mode For ePart Mobile Setup A Sales Report screen with a limited menu tab of options will now be displayed as shown: The Salesman Login screen displays a limited menu tab of options. 5 Salesman Mode For ePart Mobile Setup Step 4: Setting Up The Salesman Accounts Click on the My Accounts menu link and the following screen will be displayed: Click on the My Accounts menu tab option. Click on the Import/Export CSV buttons to add or export the salesman’s accounts information. Manually Adding Accounts Within the Add Accounts screen, click within the Customer Number field and enter the customer number for the account being added and press the <Tab> key. With the cursor positioned within the Ranking field, enter in a ranking code (A-Z or 0-9) and press the <Tab> key. With the cursor positioned within the Store Id field, enter in your stores ePartConnection store ID and press the <Tab> key. With the cursor positioned within the Password field, enter in the password for the customer number entered and click on the Submit button to save the entered information. Click on the Connect button to test if the login connects correctly. If the entered account information is correct, a new browser window will pop up with the customer automatically logged into the ePartConnection website. If the information entered was incorrect, a new browser window will pop up but the ePartConnection login screen will be displayed and the customer account will NOT be automatically logged in. 6 Salesman Mode For ePart Mobile Setup The Connect button is used to test if the login information was entered correctly. Importing/Exporting Salesman’s Accounts The salesman’s accounts can also be imported into the Add Accounts screen by clicking on the Choose File button and selecting the ASCII CSV (comma separated value) file and then clicking on the Import CSV button. The CSV file should contain the following fields of information: Customer Number, Ranking Code, ePart Store ID, Password. The customer accounts information can also be exported from this screen by clicking on the Export CSV button. An accounts.csv ASCII CSV file will be automatically downloaded and saved into the users download folder. The file will contain the following fields of information: Customer Number, Ranking Code, ePart Store ID, Password. 7 Salesman Mode For ePart Mobile Setup Below is a sample of an ASCII CSV accounts.csv file: The salesman would then log out of the ePartConnection Setup website by clicking on the Logoff menu tab button. Step 5: Installing The ePart Mobile App The ePart mobile application program can be installed for free onto your Android/Apple mobile devices (tablets/phones) through their respective app stores by searching for “epart”. In the event that you are unable to find the ePart app, contact the Autologue sales department and they can email the app to you directly. 8 Salesman Mode For ePart Mobile Setup Starting Up The ePart Mobile App Click on the ePart icon. From the home screen of your tablet/mobile device, click on the ePart icon. 9 Salesman Mode For ePart Mobile Setup Step 6: Logging In As A Saleman Into The ePart Mobile App The following login screen will now be displayed: The salesman can now login on their mobile device (phone/tablet) by entering their stores’ ePartConnection Store ID and their assigned salesman Password, and then clicking on the Login button. Leave the Username field blank and the Check to use with Internal IP field should be left unchecked. 10 Salesman Mode For ePart Mobile Setup A menu list of the salesman’s customer accounts will now be displayed as shown: Customer Name Search With the screen displaying a complete menu list of the salesman’s customer accounts, you have the ability to search for a specific customer by clicking within the Enter Customer Name field and enter in a portion of the customer’s name and then clicking on the Search button. The screen will display a menu list of matching customer names only. 11 Salesman Mode For ePart Mobile Setup With the screen displaying a menu list of the salesman’s customers, click on a specific customer and the following salesman welcome screen will be displayed as shown: With the screen displaying a menu list of the customers options (ePart/eOffice/Customer List), click on the specific function you want to perform. 12 Salesman Mode For ePart Mobile Setup ePart Option Clicking on the ePart menu bar option will automatically log you into the customers’ ePartConnection mobile app and the following screen will be displayed as shown: From this screen, you can perform a variety of ePart functions. See the ePartConnection Mobile App Users Guide for complete details. 13 Salesman Mode For ePart Mobile Setup eOffice Option Clicking on the eOffice menu bar will automatically open up a web browser window and log you into the customers’ eOffice website as shown: From this screen, you can perform a variety of eOffice functions. See the ePaperlessOffice-Users Guide for complete details. Clicking on the back arrow will take you back to the previous salesman welcome screen within the mobile app. Customer List Option Clicking on the Customer List menu bar will automatically return you back to the screen displaying a menu list of the salesman’s customers. Setting Up Vendor Managed Inventory (VMI) For An Account To setup vendor managed inventory for one of your accounts, follow the steps below: Login Into The ePartConnection Website As Your Account Access the ePartConnection website by entering the following URL within a web browser: http://www.epartconnection.com/. 14 Salesman Mode For ePart Mobile Setup The following login screen will now be displayed as shown: With the cursor positioned under the Store Id: prompt, enter your Store ID and then press the <Tab> key. With the cursor positioned under the Customer Number: prompt, enter the Customer Number you want to setup VMI for then press the <Tab> key. With the cursor positioned under the Password: prompt, enter the accounts password and then press the <Tab> key. Position the mouse pointer on the Login button and click to login to your ePartConnection website as your customer account would. 15 Salesman Mode For ePart Mobile Setup The following screen will now be displayed as shown: Click on the Favorites tab. Select Favorites Position the mouse pointer on the Favorites tab and click on it. The screen will now display all the favorites currently setup as shown: Click on the Edit button. 16 Salesman Mode For ePart Mobile Setup Editing Favorites Position the mouse pointer on the Edit button and click on it. The screen will now display the favorites edit screen as shown: Enter My Inventory here. Click on the Edit Category button. Click within the Add New Category to “Favorites” field and enter My Inventory and then click on the Add Group button. Position the mouse pointer on the Edit Category button of the My Inventory row and click on it. 17 Salesman Mode For ePart Mobile Setup The screen will now display the My Inventory edit screen as shown: Enter manufacturer code. Enter description. Click on the Add Part button. Enter part number. Enter stocking quantity. Manually Adding Parts To manually add parts that your customer will stock in their inventory, position the mouse pointer under the Mfg column heading and click to position the cursor within the field. Enter the manufacturer code for the part number and press the <Tab> key. With the cursor positioned within the Part Number field, enter in the part number and press the <Tab> key. With the cursor positioned within the Additional Description field, you can optionally enter in a description for the part number and press the <Tab> key. Note: If a description is not entered, customers won’t have the ability to search by description. With the cursor positioned within the Default Quantity to Order field, enter in the quantity that will be stocked for the part number and then click on the Add Part button to save the entered parts information. The part number will now be added to the end of the current parts list. Importing Parts To import parts that your customer will stock in their inventory, a comma separated value (CSV) file can be used to import the parts into the My Inventory part category. 18 Salesman Mode For ePart Mobile Setup Below is an example of the CSV formatted file: The file consists of 6 separate fields that have quotes around each field value and are separated by a comma. Here are is order of the fields: Mfr Code, Part Number, Description (optional), Category Path (optional), Picture URL (optional), Stocking Quantity. The Merge into Current Group import option should be selected. Click on the Import File button. Click on the Choose File button. Scroll down the bottom section of the screen and make sure the Merge into Current Group import option is selected. 19 Salesman Mode For ePart Mobile Setup Click on the Choose File button. Select the CSV file that contains the parts information to be imported and then click on the Open button. The file name selected will now be displayed to the right of the Choose File button. Click on the Import File button and the parts information from the selected file will now be imported into the My Inventory parts group. The screen will now display the imported parts within the My Inventory category as shown: The imported parts will now be listed below the Parts Under “My Inventory” section heading. Uploading Pictures At this point, you now have the option to upload a picture for a part number listed by clicking on the Choose File button of the row the part number is on. Select the picture file (.jpg, .tif, .gif, .bmp) to be uploaded and then click on the Open button. The filename selected will now be displayed to the right of the Choose File button of the row the part number is on. Click on the Upload Picture button to the right of the filename and the picture will now be attached to the part and the URL filename information will now be listed under the Url For Picture column. Note: The picture will NOT be visible until the information is saved in the next step. Click on the Save Changes To “Favorites” Names, Descriptions, and Picture URLs button and the picture will now be shown for the part number under the Picture column. 20 Salesman Mode For ePart Mobile Setup The screen will now display the imported pictures within the My Inventory category as shown: Pictures images are displayed here. Url’s For Pictures are displayed here. 21