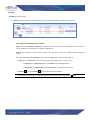
1
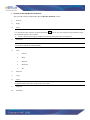
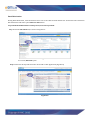
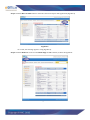
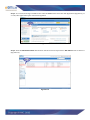
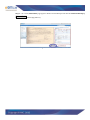
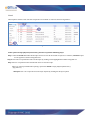
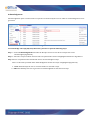
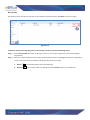
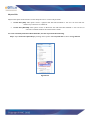
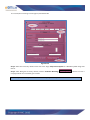
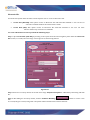
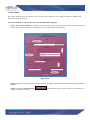
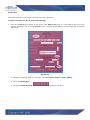
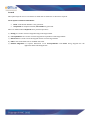
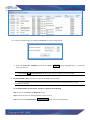
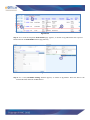
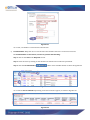
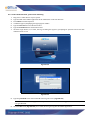
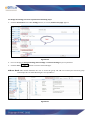
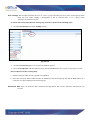
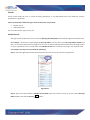
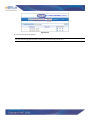
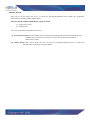
Table of Contents Introduction ............................................................................................................................................................. 5 eFile Modules ........................................................................................................................................................... 6 Receipts .................................................................................................................................................................... 7 Browse & Diarise................................................................................................................................................... 8 Email Diarisation ................................................................................................................................................. 16 Created ................................................................................................................................................................ 20 Sent ..................................................................................................................................................................... 23 Closed ................................................................................................................................................................. 25 Acknowledgement ............................................................................................................................................... 26 Recycle Bin ......................................................................................................................................................... 27 Actions on Receipts: ............................................................................................................................................ 28 Files ........................................................................................................................................................................ 30 Inbox ................................................................................................................................................................... 31 Created ................................................................................................................................................................ 35 Parked.................................................................................................................................................................. 37 Closed.................................................................................................................................................................. 38 Sent ..................................................................................................................................................................... 39 Physical File ........................................................................................................................................................ 43 Electronic File...................................................................................................................................................... 47 Create Part ........................................................................................................................................................... 50 Create Volume ..................................................................................................................................................... 51 Recycle Bin ......................................................................................................................................................... 52 Actions on Files ................................................................................................................................................... 53 Migrate File............................................................................................................................................................. 55 Create New .......................................................................................................................................................... 56 Created ................................................................................................................................................................ 57 Folder Permission ................................................................................................................................................ 58 Dispatch .................................................................................................................................................................. 59 DSC (Digital Signature Certificate) ......................................................................................................................... 64 DSC Registration ................................................................................................................................................. 64 Reports ................................................................................................................................................................... 67 Reports under Files Section .................................................................................................................................. 67 Register ....................................................................................................................................................... 67 Forwarded ................................................................................................................................................... 67 Received...................................................................................................................................................... 67 Parked Files ................................................................................................................................................. 67 Closed Files ................................................................................................................................................. 67 Reports under Receipts Section ............................................................................................................................ 67 Diary ........................................................................................................................................................... 67 Received...................................................................................................................................................... 67 Receipt Category ......................................................................................................................................... 67 VIP Details .................................................................................................................................................. 67 Closed Receipts ........................................................................................................................................... 67 Departmental Summary........................................................................................................................................ 67 My Files Pending With Others ............................................................................................................................. 67 Dispatch (Section-wise) ....................................................................................................................................... 67 Revenue Report ................................................................................................................................................... 67 Receipts Forwarded by Section ............................................................................................................................ 67 Pendency Report (File/ Receipt) ........................................................................................................................... 68 Month Wise ......................................................................................................................................................... 68 Month-wise Files Received: ............................................................................................................................. 68 Month-wise Files Forwarded: ........................................................................................................................... 68 Month-wise Receipts Created: .......................................................................................................................... 68 Month-wise Receipts Received: ........................................................................................................................ 68 Month-wise Receipts Forwarded: ..................................................................................................................... 68 File Summary Report ........................................................................................................................................... 68 Receipt Summary Report ..................................................................................................................................... 68 File Pendency Report ........................................................................................................................................... 68 PUC Pendency Report.......................................................................................................................................... 68 Settings ................................................................................................................................................................... 69 Preferences:...................................................................................................................................................... 69 Address Book:.................................................................................................................................................. 70 User Groups: .................................................................................................................................................... 71 Deactivate DSC:............................................................................................................................................... 71 Transfer............................................................................................................................................................ 72 Search ..................................................................................................................................................................... 74 Module Search ................................................................................................................................................. 74 Advance Search................................................................................................................................................ 76 Search - Actions ............................................................................................................................................... 77 Introduction eFile is a workflow based system that includes the features of existing manual handling of files with addition of more efficient electronic system. This system involves all stages, including the Diarisation of inward receipts, creation of files, movement of receipts and files and finally, the archival of records. With this system, the movement of receipts and files becomes seamless and there is more transparency in the system since each and every action taken on a file is recorded electronically. This simplifies decision making, as all the required information is available at a single point. It envisions a paperless office, with increased transparency, efficiency and accountability of the organization. A revolutionary product aimed to make office work like never before in the history of Indian Governance, is based on the Thirteenth edition of Central Secretariat Manual of Office Procedures (CSMoP) of the Department of Administrative Reforms & Public Grievances (DARPG), Govt. of India. eFile Modules Different sections that constitute eFile application are receipts, files, dispatch, reports, and so on. Each section comprises of different links that helps the user to easily utilize the functionalities of different sections of the eFile. First of all, let’s learn about how to use the receipts section of eFile. Receipts A receipt is a written document that a specified entity has been received as an exchange for services. In eFile, receipts are created by the CRU which is further attached with the file to get processed and approved from the higher authority. There are various links available under Receipts section which is mentioned below: Browse & Diarise a. Physical b. Electronic Inbox Email Diarisation Created Sent Closed Acknowledgement Recycle bin Let’s discuss the above points one by one:- Browse & Diarise The Browse and Diarise link under receipts section includes two sub modules: 1. Physical 2. Electronic Let’s have an introduction about these sub modules one by one: 1. Electronic: In Electronic Module the browsing or uploading of the scanned document is mandatory and then the Diarisation of scanned correspondence is done. 2. Physical: In Physical Module the browsing or uploading of the scanned document is not mandatory, only the Diarisation of the received correspondence is done for tracking purpose. In case of DAK that have a classified grading, proper grading levels are assigned to the DAK while diarizing them in case of both Physical and Electronic receipts. Classification levels are Normal Confidential Secret Top Secret Receipt without attachment can be put in Physical files only. Physical/Electronic Receipt with attachment can be put in Electronic File. Physical Receipt/ Document can be attached with in an Electronic Receipt and Vice-Versa. Also, the receipt attached with other receipts can be send to only one user at a time. Browse and Diarise (Electronic Receipts) A user needs to perform the following steps: Step 1: Click the Electronic module under Browse and Diarise ( shown in Fig.eFile.1: ) link of Receipts section, as Fig.eFile.1 Step 2: Select the Receipt and Click the Upload File ( screen to upload the scanned receipt as shown in fig.eFile.2. Fig.eFile.2 ) button from the Browse and Diarise In case of Classified DAK, uploading of document is not mandatory for CRU, only Delivery mode is mandatory, but when it reaches to the intended recipient or at any section/officer, scanning including all other essential fields is mandatory. Step 3: Enter the essential details in all the mandatory fields in Browse and Diarise Page. Step 4: There are 3 buttons on while browsing & Diarising the details. The buttons functionality is as under: Click the Generate ( unique diary number. ) button (Fig.eFile.2) on Browse and Diarise page to generate a If a user clicks on Generate & Send ( ) button: To generate a unique Diary number and Send it to the intended Recipient (Fig.eFile.2). Generate & Copy ( a Copy of it (Fig.eFile.2). ) button: To generate a unique Diary number and creating Browse and Diarise (Physical Receipt) Refer Browse & Diarise process of Electronic Receipt except, In case of Physical Receipt browsing and uploading of correspondence is Non Mandatory. Actions on Receipt Browse & Diarise There are 10 actions provided under Receipt Browse & Diarise section: 1. Receive 2. Reply 3. Send Pull back: User can also Pull back the sent receipt from the intended recipient even when the receipt is in the Inbox of the recipient, using the Pull Back ( then pullback option is inaccessible. 4. ) link. In case, the recipient has opened the receipt, A user can forward receipt to multiple recipients by using semi colon as separators. Put in File If any File is referenced/attached with the receipt then ‘Put in a File’ option will not work. For that, a user needs to detach the referenced File. 5. View Unread Read Physical Electronic All 6. Move To 7. Copy 8. Close The receipt in which draft is created and not been dispatched cannot be closed. For that draft needs to be dispatched first then the receipt needs to be closed. 9. Dispatch 10. Reminder Quick Actions: Latest Remarks ( Reply ( Forward ( ) ) ) Refer to the Actions on Receipts section for details. Inbox Inbox option contains the list of all the receipts that are received as an Inward Correspondence/DAK. User has to click the Receipt number to view the receipt. As a result, the user can view the content of receipt along with the details. Nature of Receipt can be verified from the character ‘E’ and ‘P’ which is written before the receipt number. Character ‘E’ symbolizes Electronic Receipt whereas character ‘P’ symbolizes Physical Receipt. The steps to view Inbox Receipt are as under: Step 1: Click on ‘Inbox’ link under the Receipts section to view all the Inbox receipts, by. As a result the, Inbox Receipts screen appears, as shown in Fig.eFile.3: Fig.eFile.3 Step 2: Select the receipt to which action needs to be performed. (Fig.eFile.3) Step 3: A user can perform any of the below mentioned actions: There are 10 actions provided under Receipt Inbox (Fig.eFile.3) 1. Receive 2. Reply 3. Send 4. Put in File 5. View Unread Read Physical Electronic All 6. Move To 7. Copy 8. Close 9. Dispatch 10. Reminder Additional Actions: While opening Electronic/ Physical receipt a user can view 4 additional actions including of above actions as highlighted in fig. eFile.4 Fig.eFile.4 a) View Draft View Draft option is available in Electronic Receipts only, as in Physical receipt it is directly dispatched to the concerned authority or to the CRU section. b) Movements c) Attach File d) Attach Receipt Quick Actions: (Fig.eFile.3): Latest Remarks ( Reply ( Forward ( ) - Shows latest remark given on any particular receipt. ) - It facilitates the user to reply to the sender of the receipt. ) - Forward a particular receipt to one or more recipient at a time. Refer to the Actions on Receipts section for details. Email Diarisation During Email Diarisation, email should have been sent to the eFile from NIC Email. User should select the email from NIC Email inbox and Select option Move To eFile button. To perform Email Diarisation to eFile process, user has to perform: Step 1: Click the NIC email link, as shown in Fig.eFile.5: As a result, NIC email opens. Fig.eFile.5 Step 2: Select the Receipt which needs to be moved to eFile Application.(Fig.eFile.6) Fig.eFile.6 Step 3: Click the Move To eFile button to move the selected receipt to eFile application.(Fig.eFile.7) Fig.eFile.7 As a result, sent message appears at top (Fig.eFile.7). Step 4: Click the Home link to move to the Home Page of eOffice Portal, as shown in Fig.eFile.8: Fig.eFile.8 Step 5: As a result, Home Page of eOffice Portal .Click the eFile Link to move into eFile Application (Fig.eFile.9), as a result, eFile application opens as shown in Fig.eFile.9 Fig.eFile.9 Step 6: Click the Email Diarisation link and then click the moved receipt from the NIC eMail Section to diarise it (Fig.eFile.10). Fig.eFile.10 Step 7: As a result, Diarisation page appears. Diarise moved Receipt and click the Generate Receipt ( ) button (Fig.eFile.11). Fig.eFile.11 Created Created option contains a list of all the receipts that has been diarised by the user but not being marked/sent. The steps to view created Receipt are as under: Step 1: Click on ‘Created’ link under the Receipts section to view all the created receipts, by. As a result the, Create Receipts screen appears, as shown in Fig.eFile.12: Fig.eFile.12 Step 2: Select the receipt to which action needs to be performed. Step 3: There are 5 actions provided under Created Section of receipt: 1. Send 2. Put in a File 3. Copy 4. Dispatch 5. View Physical Electronic All If user wants to dispatch a receipt from the Created section then the receipt will first move to inbox of that user and then from there, it can be dispatched. Step 4: While opening a Created Receipt, below highlighted actions (Fig .eFile.13) can be performed: There are 9 actions provided when opening up a Created receipt (Physical/Electronic): Fig.eFile.13 1. Send 2. Put in a File 3. Copy 4. Dispatch 5. Details 6. Movements 7. Edit Editing of the metadata is possible after every movement of the receipt, except, Received Date, Diarised Date, Letter Date and Delivery Mode. 8. Attach File 9. Attach Receipt Physical Receipt/Document can be attached with in an Electronic Receipt and Vice-Versa. Also, the receipt attached with other receipts can be send to only one user at a time. Quick Actions: - There are one useful link given under Created Section of receipt: Delete ( Receipts. )- Deletes the selected receipts, as a result deleted receipt moves to Recycle Bin section of Refer to the Actions on Receipts section for details. Sent Sent option contains a list of all the receipts that are sent as an outward correspondence. Step 1: Click on Sent link under the Receipts section to view all the sent receipts. As a result the, Sent Receipts screen appears as shown in Fig.eFile.14: Fig.eFile.14 Step 2: Select the receipt to which action needs to be performed. Step 3: A user can perform any of the below mentioned actions: There are 4 actions provided under Sent Section of receipt as highlighted in the above Fig .eFile.14 1. Send 2. View 3. Copy 4. Reminder Step 4: While opening a sent Receipt (Physical), below highlighted actions (Fig .eFile.15) can be performed: Fig.eFile.15 There are 5 actions provided while opening a particular Sent Electronic Receipt (Fig.eFile.16) Fig.eFile.16 1. Send 2. Copy 3. Details 4. Movements 5. View Draft Refer to the Actions on Receipts section for details. Closed Closed option contains a list of all the receipts that are marked as closed as shown in Fig.eFile.17: Fig.eFile.17 To Re-open a Receipt (Physical/ Electronic), user has to perform following steps: Step 1: Click on Closed link under the Receipts section to view all the closed receipts. As a result the, Closed Receipts screen appears as shown in Fig.eFile.12a: Step 2: Select the receipt which needs to be Re-Open by clicking on the highlighted checkbox in Fig.eFile.17. Step 3: A user can perform below mentioned action on closed receipt: There is 1 action provided while opening a particular Closed receipt (Physical/Electronic). (Fig.eFile.17) 1. Reopen: User can re-open the closed receipt anytime by clicking the Re-Open option. Acknowledgement Acknowledgement option contains all the receipts that are diarized by the user for which an acknowledgement can be generated. Fig.eFile.18 To acknowledge a Receipt (Physical/Electronic), user has to perform following steps: Step 1: Click on Acknowledgement link under the Receipts section to view all the receipts that can be acknowledged. (Fig.eFile.18) Step 2: Select the receipt on which actions needs to be performed as shown in highlighted checkbox in Fig.eFile.18. Step 3: A user can perform below mentioned actions on acknowledged receipt: There are 2 actions provided under Acknowledgement Section of receipt as highlighted (Fig.eFile.18). 1. View: This link helps the user to view the details of a selected receipt. 2. Edit: This link helps the user to generate an acknowledgment for the selected receipt. Recycle Bin Recycle Bin option contains list of all the receipts which are deleted from the “Created” section of receipts. Fig.eFile.19 To Restore/Delete a Receipt (Physical or Electronic), user has to perform following steps: Step 1: Click on Recycle Bin link under the Receipts section to view all the receipts that can be acknowledged. (Fig.eFile.19) Step 2: Select the receipt on which actions needs to be performed as shown in highlighted checkbox in Fig.eFile.19. There are 2 Quick Actions provided under Recycle Bin Section of receipt. 1. Delete ( 2. Restore ( ): Permanently deletes the selected Receipt. ): The receipts which are deleted from the Created section are restored back. Actions on Receipts: a) Receive: This link helps the user to receive the Physical Receipt. Without receiving the physical receipt user cannot perform any action on that particular receipt. b) Send: User can use this option to send the receipt to the intended recipient. c) Reply: This link helps the user to reply to the sender of the Receipt. d) Forward: This link helps the user to forward a particular receipt/s to one or more recipients at a time. User cannot forward multiple nature receipts i.e. Receipts with Physical nature and Electronic nature cannot be sent simultaneously. e) Put in a File: This link helps the user to attach a receipt/s to a concerned file. If any File is referenced/attached with the receipt then ‘Put in a File’ option will not work. For that, First user needs to detach the referenced File. f) View: This link helps the user to list the receipts depending upon its current state. i.e. (Unread, Read, Physical, Electronic, All). Unread - Click the Unread from the dropdown menu to view unread receipts. Read - Click the Read from the dropdown menu to view read receipts. Physical - Click the Physical from the dropdown menu to view the Physical nature receipts. Electronic - Click the Electronic from the dropdown menu to view the Electronic nature receipts. ALL - Click the ALL from the dropdown menu to view the All receipts altogether. g) Move To: This link helps the user to create New Folders and manage Existing Folders. My Folders - Click the My Folders link from the dropdown menu to view the Receipt inbox and its subfolders. Manage Folders - Click the Manage Folders link from the dropdown menu to Delete or Edit the folders created under Receipt Inbox. Create New Folder - Click the Create New Folder link from the dropdown menu to create a new folder h) Copy: This link helps the user to copy the metadata fields automatically and send it to other eOffice user. User can edit the metadata fields as per requirement and after clicking the ‘Generate Receipt’ button a new Receipt no. will be allocated to the copied receipt. i) Close: This link helps the user to close a receipt. The receipt, in which draft is created and is not dispatched, cannot be closed. For that draft needs to be dispatched first then the receipt can be closed. j) Dispatch: This link helps the user to Dispatch a receipt. The user has 2 options after filling the required metadata fields which are ‘Dispatch By Self’ and ‘Dispatch By CRU’. If user selects ‘Dispatch By Self’ option, then the physical receipt will be dispatched that same moment and also the receipts gets closed and moves to ‘Closed’ section of receipt. If user selects ‘Dispatch by CRU’ option, a popup appears. Popup contains the list of all the users mapped with CRU section (if any), Delivery Mode and Remarks. k) Details: User can use this option to view the details of the generated receipts. 4 additional links will be available on opening Electronic/ Physical receipt: a) View Draft: User can use this option to view the drafts that are already created. View Draft option is available in Electronic Receipts only, as in Physical receipt it is directly dispatched to the concerned authority or to the CRU section. b) Movements: User can use this option to track the Movements’ of the receipt which automatically gets updated as Receipt moves further. c) Attach File: User can use this option to attach the receipt with the File. d) Attach Receipt: User can use this option to attach the working receipt/document with the other Receipt(s)/Document(s) irrespective of the receipt nature. This link is visible when user opens the receipt from Receipt Inbox/Created. e) Edit: User can use this option to edit the Metadata fields of the Receipt by Clicking the Edit link ( result the Metadata fields get active. ), as a Editing of the metadata is possible after every movement of the receipt, except, Received Date, Diarised Date, Letter Date and Delivery Mode. Quick Actions: There are some useful Quick Actions in Receipt module for such as: Latest Remarks ( ( ) - Shows latest remark given on any particular receipt. ) - This image shows there is no remark given on any particular receipt. Reply ( Forward ( Delete ( Receipts. ) - It facilitates the user to reply to the sender of the receipt. ) - Forward a particular receipt to one or more recipient at a time. )- Deletes the selected receipts, as a result deleted receipt moves to Recycle Bin section of Files A File is a collection of related records which comprises of Receipts, Noting, Drafts, References, and Linked Files There are various links available under Files section which is mentioned below: Inbox Created a. Drafts b. Completed Parked Closed Sent Conversions a. Drafts b. Completed Physical File a. Create New(Non SFS) b. Create New (SFS) Electronic File a. Create New(Non SFS) b. Create New (SFS) Create Part Create Volume Recycle Bin Let’s have an introduction about these Links one by one: Inbox Inbox link contains the list of all the Files that are received/ marked by any eOffice user, as shown in Fig.eFile.20: Fig.eFile.20 The steps to view Inbox File are as under: Step 1: Click on ‘Inbox’ link under the Files section to view all the Inbox Files. As a result the, Inbox Files screen appears, as shown in Fig.eFile.20. Step 2: Select the File to which action needs to be performed. Step 3: A user can perform any of the below mentioned actions: User has to click the File number to view the File. As a result, the user can view the content of File along with the details. The convention E and P is used to discriminate between Electronic and physical File respectively. There are 7 links provided under Inbox section of Files: 1. Receive 2. Reply User can also Pull back the Sent File from the intended recipient even when the File is in the Inbox of the recipient, using the Pull Back ( to pull back the File. 3. Send 4. View 5. Move To My Folders Manage Folders Create New Folder 6. Reminder ) link. In case, the recipient has opened the File, then it is not possible 7. More Park File Park File history Close File Close File History Create Volume Only creator of the File can close the file, no other person has access to close files. 8. Create Volume: This link helps the user to create a new Volume of an existing file. Volume file is created with the Volume number suffixed adjacent to the file number. Quick Actions: - There are some useful links given in inbox for Quick Actions such as: Remarks ( Reply ( Forward ( ) - Shows latest Noting that has been done on that particular File. ) - It facilitates the user to reply to the sender of the File. ) - Forward a particular File to the recipient. Refer to the Actions on Files section for details. There are 11 actions while opening an Electronic file: 1. Noting View By Name View By Date View All 2. Correspondence 3. Draft Create New Draft View Draft 4. References Local Reference 5. Link Internal Files Referred in Files 6. Details 7. Movements 8. Edit 9. Reply 10. Send 11. Attachment File Receipt 12. More Close File Park File Park File History Close File History Merge Details Refer to the Electronic Files section for details. There are 11 actions while opening a Physical file: 1. Correspondence 2. Link Internal Files Referred in Files 3. Movements 4. Details 5. Edit 6. Reply 7. Send 8. Dispatch 9. Convert File 10. Attachment File Receipt 11. More Close File Park File Park File History Close File History Create Volume Merge Files Merge Details Refer to Physical Files section for Details Created Created files link includes: Drafts: The Files whose File numbers has not been generated and kept as draft to work later on. Fig.eFile.21 The steps to view Drafts file are as under: Step 1: Click on Created -> Drafts link under the Files section to view all the draft files created. As a result, Draft Files screen appears, as shown in Fig.eFile.21. Step 2: Select the File to which action needs to be performed. A user can actions: perform below mentioned The actions provided under Drafts Section of file as highlighted in the above Fig .eFile.21 1. View: Click on View option to list the Files (P/E) depending upon its current state. Physical- Go to Physical option under View to view all Physical Files. Electronic- Go to Electronic option under View to view all Electronic Files. 2. Delete ( ): Click on Delete option to delete the selected files. The Files in the Draft option can be deleted and sent to Recycle Bin using Delete ( ) link. Completed: The files whose file number has been generated but not marked/sent to any other eOffice user. Fig.eFile.22 The steps to view Completed file are as under: Step 1: Click on Created -> Completed link under the Files section to view all the files whose file number has been generated. As a result, Completed Files screen appears, as shown in Fig.eFile.22. Step 2: Select the File to which action needs to be performed as shown in Fig.eFile.22. There are 3 actions provided under Completed link of Created File Section: 1. View: Click on View option to list the Files (P/E) depending upon its current state. Physical- Go to Physical option under View to view all Physical Files. Electronic- Go to Electronic option under View to view all Electronic Files. All- Go to Electronic option under View to view all the Files. 2. Send: Helps the user to forward a particular File/s to the recipient. User can also Pull back the Sent File from the intended recipient even when the File is in the Inbox of the recipient, using the Pull Back ( to pull back the File. ) link. In case, the recipient has opened the File, then it is not possible 3. Create Volume: Helps the user to create a new Volume of an existing file. Quick Action: There are some useful links given in inbox for Quick Actions such as: Forward ( ) - Forward a particular File to the recipient. Parked This contains a list of all the Files that are temporary closed and work will be done later on. Parked files can be made active at any point of time. Fig.eFile.23 Pendency of File will be removed if a particular file is parked. To make Parked File as Active File, user has to perform the following steps: Step 1: Click on ‘Parked’ link under the Files section to view all the parked Files. (Fig.eFile.23) Step 2: Select the File/s to which action needs to be performed. Step 3: The Action provided under Parked link of File Section: There is 1 action provided under Parked link of File Section: 1. Mark As: Scroll mouse over ‘Mark As’ Link and click the Make Active option under it. As a result, the Files become active and move to the File Inbox. Closed Closed link contains a list of Files that are closed as complete work has been done on it already. Closed Files can be made active at any point of time. Fig.eFile.24 To make Closed File in the Active File, user has to perform the following steps: Step 1: Click on Closed to view all the closed files. Only creator of the File can close the file, no other person has access to close files. Step 2: Select the File/s to which action needs to be performed as shown in Fig.eFile.24 Step 3: The action provided under Closed link of File Section: 1. Mark As: Scroll mouse over ‘Mark As’ Link and click the Make Active option under it. As a result, the Files become active and move to the File Inbox. . Sent Sent option contains a list of all the Files that are sent as an outward correspondence. Fig.eFile.25 The steps to view Sent file are as under: Step 1: Click on Sent link under the Files section to view all the files that are sent. As a result, Sent Files screen appears, as shown in Fig.eFile.25 Step 2: Select the File to which action needs to be performed . There are 3 links provided under Sent section of File: a) View: Helps the user to list the Files depending upon its current state (Physical, Electronic, Followed Up, All). Physical-Click the Physical from the dropdown menu to view the Physical Files. Electronic-Click the Electronic from the dropdown menu to view the Electronic Files. All - Click All to view all the Files. User can also Pull back the File from the intended recipient even when the File is in the Inbox of the recipient, using the Pull Back ( pull back the File. ) link. In case, the recipient has opened the File, then it is not possible to b) Create Part: User can use this option to create a Part file of the existing file which is under submission. Part Files cannot be created if the file is already in File inbox. c) Reminder: Reminder process facilitates the user to set notification for themselves or for other eOffice users. It can be implied on Files, Receipts and Drafts. Conversions This module contains the Files which are in process of conversion or converted already. It contains 2 sub modules: Drafts Completed Let’s learn these modules one by one: Drafts: This module contains all the Physical files which are in process of conversion but has not been converted so far. During the Conversion process if users clicks the ‘Save’ button, then files moves under this module. To complete the process of conversion on a draft, user has to perform the following steps: Step 1: Click on Drafts under Conversions section. As a result following page appears as shown in Fig.eFile.26. Step 2: Click on the link under File Number to open the draft. As a result the draft file opens up as shown in Fig.eFile.26. Fig.eFile.26 Fig.eFile.27 Step 3: Under ‘Noting’ section, user can upload a noting document (Fig.eFile.27). Step 4: There are 8 actions provided after opening a Draft file: a) Correspondence b) Link Link Files Referred In Files c) Movements d) Details e) Edit f) Send g) Attachment File Receipt Close file Park File Close file History Park File History Merge Details h) More Step 5: Click on Save button to save the details. Completed: This module contains the entry of all files which have already been converted from Physical to Electronic, as shown in Fig.eFile.28: Fig.eFile.28 Physical File Physical File option under the Files section helps the user to create a Physical File. Create New (SFS): This option creates a physical file with SFS standard i.e. the user can enter File No. without any restriction or standards. Create New (Non-SFS): This option creates an Electronic file with Non-SFS standard i.e. the user has to select the available heads for the nomenclature of File. To create a new Physical File in Non-SFS mode, user has to perform the following: Step 1: Open Create New (Non-SFS) by clicking on the option under Physical File as shown in Fig: eFile.29 Fig.eFile.29 As a result, File Cover Page screen appears, add the File No. Fig.eFile.30 Step 2: Enter the necessary details on the File Cover Page. Subject Description is a Mandatory field along with File no. Step 3: After filling the necessary details, click the Continue Working ( new physical file. As a result file gets created. ) button to create a User can perform same operations on a Create New (SFS) file as explained in Create Non-SFS file There are 11 actions provided on opening a Physical File. a) Correspondence: With the help of this feature user can attach physical correspondence/Receipt to the working File. b) Link: With the help of this feature user can Link and delink other eFile(s) to the working file. It contains 2 sub links: Internal Files: This sub link helps the user to link/delink any other file from within the Organization. Linked In Files: This sub link helps the user to view other Files that are linked from some other Organization with the working file. c) Movements: With the help of this feature user can see the movement of a File i.e. the details of all the users who has worked on it. d) Details: With the help of this feature user can see the details of a File i.e. total no. of part Files created, TOC receipt, Dispatch Movement History and Linked Files. e) Edit: With the help of this feature user can make changes to the cover page of existing running file except the Basic and corresponding Heads. f) Reply: With the help of this link user can send a reply to the intended person. g) Send: With the help of this feature user can send the File to the Recipient. h) Dispatch: With the help of this feature user can Dispatch the receipt to the Recipient of different Ministries or Office. i) Convert File: Helps the user to convert the Physical File to Electronic File only irrespective of the File location, weather it is attached with a receipt or from the File inbox/Created Section. j) Attachment: This link facilitates the user to attach other files or receipts with the working File. k) More Action: With the help of this feature user can Park or Close the working file. Close File: Only creator of the File can close the file, no other person has access to close files. Park File: Parked File contains files that are temporary closed and work will be done later on. Park File History: Displays the history of the Parked file. Close File History: Displays the history of the closed file. Create Volume: With the help of this feature, user can create a new Volume of an existing file. Merge Files: This link facilitates the user to merge physical files only. Merged file will be in ‘View only’ mode. User can De-Merge or Merge the Merged File with any other File also by using the ‘De-Merge’ and ‘Merge with Another’ option available respectively under ‘Merge Details’ tab. Merge Details Electronic File Electronic File option under the Files section helps the user to create an Electronic File. Create New (Non-SFS): This option creates an Electronic file with Non-SFS standard i.e. the user has to select the available heads for the nomenclature of File. Create New (SFS): This option creates an Electronic file with SFS standard i.e. the user can enter File No. without any restriction or standards. To create a New File user has to perform the following steps: Step 1: Open Create New (Non-SFS) by clicking on the option from the Left navigation panel under the Electronic File section, as a result, File Cover Page screen appears as shown in fig.eFile.31 Fig.eFile.31 Step 2: Enter the necessary details on the File Cover Page. Subject Description is a Mandatory field along with File No. Step 3: After filling the necessary details, click the Continue Working ( ) button to create a new file. As a result, file gets created, along with a unique file number based on the selection of heads. User can also click the Work on File Later ( ) button if want to work on File later on. And so the file moves to Draft section of Created File link. In this case the unique number of file is not generated. There are 14 actions provided on opening an Electronic File: a) Noting - Add Note: It facilitates the user to view the noting By Name and By Date or All the noting together. The user can add Green Note or a Yellow note after creating a file. Once the yellow note gets confirmed, noting gets finalized and saved to main Green sheet noting of File. At a time only one noting is active, either yellow note or Main Green sheet note. b) Correspondence: With the help of this feature user can attach correspondence/Receipt to the working File. c) Draft: With the help of this feature user can Create New Draft and View existing Drafts in the File. d) Reference: With the help of this feature user can attach references corresponding to the working File. e) Link: With the help of this feature user can Link and delink other eFile(s) to the working file. It contains 2 sub links: f) Internal Files: This sub link helps the user to link/delink any other file from within the Organization Linked In Files: This sub link helps the user to view other Files that are linked from some other Organisation with the working file. Details: With the help of this feature user can view the total number of part files created. g) Movements: With the help of this feature user can have a track on the Running File and can view all the movements. h) Edit: With the help of this feature user can make changes to the cover page of existing running file except the Basic and corresponding Heads. it. Only the creator of the file has access to ‘Edit’ the Cover page of file. No other eOffice user has access to i) Reply: With the help of this link user can send a reply to the intended person. j) Send: With the help of this feature user can send the File to the Recipient. k) Attachment: This link facilitates the user to attach other files or receipts with the working File. l) Merge: This link allows the user to check the details whether the file has been previously merged with any other file (Physical files merged with other files and then converted to Electronic). m) More: With the help of this feature user can Park or Close the working file. Close File: Only creator of the File can close the file, no other person has access to close files. Park File: Parked File contains files that are temporary closed and work will be done later on. Park File History: Displays the history of the Parked file. Close File History: Displays the history of the closed file. Merge Details: Create Part The Create Part file option allows the user to create a part file against the file in submission i.e. not residing with the working user. To create a part file the user has to perform the following steps: 1. Open Create Part link by clicking on the option from the Left navigation panel under the File Section. Add File Number or upload the file, a part which is to be created as shown in Fig.eFile.32. Fig.eFile.32 2. Enter the necessary details on the File Cover Page. Subject Description is a Mandatory field along with File No. 3. Click on the Create Part ( ) button to create a part file, as a result the part file gets created. Create Volume The Create Volume option allows the user to create a new volume of an existing file which is residing with him/her in the Draft or Inbox. To create a Volume of a file the user has to perform the following steps: Step 1: Open Create Volume by clicking on the option from the Left navigation panel under the File Section. Add File Number or upload the file, a part which is to be created as shown in Fig.eFile.33. Fig.eFile.33 Step 2: Enter the necessary details on the File Cover Page. Subject Description is a Mandatory field along with File Number. Step 3: Click on the Create Volume ( Volume of a file gets created. ) Link (Fig.eFile.33) to create a Volume, as a result the new Recycle Bin Recycle Bin option contains list of all the Files which are deleted from the “Created” section of Files. There are 2 links provided under Recycle Bin Section of File: a) Delete ( b) Restore ( ): Permanently deletes the selected File. ): The File which are deleted from the Created section are restored back. Actions on Files There are 7 actions provided in Files: a) Receive: This link helps the user to receive the Physical file only. b) Reply: This link helps the user to reply to the sender of the file. User can also Pull back the Sent File from the intended recipient even when the File is in the Inbox of the recipient, using the Pull Back ( to pull back the File. ) link. In case, the recipient has opened the File, then it is not possible c) Send: This link helps the user to forward a particular File/s to the recipient. d) View: This link helps the user to list the Files depending upon its current state. i.e. (Unread, Read, Physical, Electronic, All) Unread - Click the Unread from the dropdown menu to view unread Files. Read - Click the Read from the dropdown menu to view read Files. Physical - Click the Physical from the dropdown menu to view the Physical Files. Electronic - Click the Electronic from the dropdown menu to view the Electronic Files. ALL - Click the ALL from the dropdown menu to view the All receipts altogether. e) Move To: Helps the user to create New Folders and manage Existing Folders. My Folders - Click the My Folders link from the dropdown menu to view the File inbox and its subfolders. Manage Folders - Click the Manage Folders link from the dropdown menu to Delete or Edit folders created under File Inbox. Create New Folder- Click the Create New Folder link from the dropdown menu to create a new folder under File inbox. f) Reminder g) More Park File Park File history Close File Close File History Create Volume: This link helps the user to create a new Volume of an existing file. Volume file is created with the Volume number suffixed adjacent to the file number. Only creator of the File can close the file, no other person has access to close files. Quick Actions: - There are some useful links given in inbox for Quick Actions such as: Remarks ( Reply ( Forward ( ) - Shows latest Noting that has been done on that particular File. ) - It facilitates the user to reply to the sender of the File. ) - Forward a particular File to the recipient. Migrate File With the help of Migrate File user can migrate old files from local system to the eFile application. Migrate File Link contains 3 sub links: Create New Created Folder Options Let’s learn about these links one by one: Create New This option helps the user to migrate a new file to the eFile application. To migrate new File, user has to perform the following: 1. Open the Create New by clicking on the option under Migrate File link, as a result, Migrate File Cover page appears. Add the File No. or click the Browse button to import the file which needs to be migrated as shown in Fig.eFile.34. Fig.eFile.34 2. Fill all the mandatory fields on cover page such as Description/Subject, Category (Main). 3. Enter the Opening Date. 4. Click the Continue Working ( ) to generate new file no. Created This option helps the user to save the file as drafts and can send later on whenever required. Create option contains 2 sub modules: Draft: In Drafts File Number is not generated. Completed: In Completed module, File number is generated. There are 5 links under Completed tab to perform operations: a) Noting: It is used to view the mapped noting of the migrated file. b) Correspondence: It is used to view the mapped Correspondence of the migrated file. c) References: It is used to view the mapped references in the migrated file. d) Edit: In this all the fields can be modified and saved. e) Finalize Migration: It requires Diarisation of all Correspondence and Issues being mapped into the application before finalizing the file. Folder Permission With the help of Folder Permissions, user gets the permission for section required for migration of files. To provide permission to a user, perform the following: Step 1: Click the Folder Permissions option under Migrate File link; as a result Permission page appears. Fig.eFile.35 Step 2: Search the user to provide folder permission and click the Save ( Fig.eFile.36: Fig.eFile.36 ) button, as shown in the figure Dispatch Dispatch section helps the user to view the issues that has been dispatched by them to the concerned recipient. There are two links available under Dispatch Section which is mentioned below: 1. Sent Print Envelope Create Reminder View Reminder 2. Returned Receive Resend View Reminder Let’s learn these links one by one. Sent: This module helps the CRU user to view the Sent Issues/Drafts. Issued and Sent: Refers to when the DFA has been sent by the CRU section but not dispatched finally by the CRU section Issued and Dispatched: Refers to when the DFA that has been sent to CRU section has been finally dispatched. Issued and Returned: Refers to when the sent DFA has been returned back to the CRU section. Final Dispatch can be done only after receiving the Draft/Letter. There are 3 actions provided under Sent section of Dispatch: a) Print Envelope: Helps the user to Print the envelope required for final Physical dispatch. To print the Envelope, user has to perform the following: 1. Select the Sent Issue needs to be printed/dispatched physically and click the ‘Print Envelope’ link, as shown in Fig.eFile.37: Fig.eFile.37 As a result new window appears asking for Print Size, as shown in Fig.eFile.38: Fig.eFile.38 2. Select the Print Size, Template and click the ‘Print’ ( issue gets printed. Action Link ( ) button (Fig.eFile.38), as a result the ) in Quick Actions facilitates the user to track the status of sent DFA. b) Create Reminder: Helps the user to create the reminder on sent issues. The Issue/Draft details and other Communications details cannot be changed while creating a reminder for an issue. To create Reminder on sent issues, user has to perform the following: Step 1: Click on the Sent under Dispatch section. Step 2: Select the issue for which reminder is to be created. Step 3: Click the Create Reminder ( ) link, as shown in Fig.eFile.39: Fig.eFile.39 Step 4: As a result the Dispatch Draft Details page appears, as shown in Fig.eFile.40.Fill the required fields and click on Set Reminder button (Fig.eFile.40) Fig.eFile.40 Step 5: As a result, Reminder Setting window appears, as shown in Fig.eFile.41. Enter the data in the mentioned fields and click on Save button. Fig.eFile.41 As a result, a reminder is created for the selected issue. c) View Reminder: Helps the user to view the list of all reminders that were created on sent issues. To view Reminder on sent issues, user has to perform the following: Step 1: Click on the Sent under Dispatch section. Step 2: Select the issue by clicking on the check box on which action needs to be performed. Step 3: Click the View Reminder ( ) link to view reminder Details as shown in Fig.eFile.42 Fig.eFile.42 As a result the list of reminders pertaining to the selected issue appears, as shown in Fig.eFile.43. Fig.eFile.43 Returned: Contains the list of correspondence(s)/issues that are returned by the CRU/CRU section. There are 3 actions provided under Returned section of Dispatch: a. Receive: Helps the user to receive the returned Issue/Correspondence only after which user can edit the received Document. b. Resend: Helps the user to resend the returned Issue/Correspondence after required changes (if required) to the CRU/CRU Section. c. View Reminders Refer to Sent Section in Dispatch module Quick Actions: - There is one useful link given under Dispatch as: Action Detail ( ) – It facilitates the user to view the actions done at that moment on the Letter/Correspondence received. DSC (Digital Signature Certificate) It is a Digital Signature Certificate used for e-office that has the same legal recognition and validity as handwritten signatures which implies a process of demonstrating the authenticity of a digital message or document. There is one link available under DSC section which is mentioned below: DSC Registration DSC Registration implies Digital Signature Certificate Registration. eOffice users obtain a Signing Certificate to go through DSC registration. DSC registration option facilitates the eOffice users for registration using an e-token issued to them by certificate issuing authorities like Tata Consultancy Services (TCS), National Informatics Centre (NIC), IDRBT Certifying Authority, SafeScrypt CA Services, Sify Communications, (n) Code eOffice USER ID and DSC LOGIN ID are different. Both are required to authenticate the LOG IN process, if the eOffice user has registered for DSC. DSC registration can be done either using a DSC card or e-token. User can visit the website http://nicca.nic.in, for basic information of how to obtain the DSC certificate or e-token, how to obtain the software for DSC certificate or etoken, how to install them, and finally how to how to initialize the DSC certificate or e-token. User has to properly installed drivers for the DSC Smart card and USB Token in the system before using the DSC authentication or e-token authentication. Fee structure for the different certificates and the hardware devices involved can be easily obtained by accessing, http://nicca.nic.in. Under this site, user can easily obtain the detailed information regarding the Certificate’s Fee Structures, under the Support Link. Token involves only a single pen drive device. After the user has properly enrolled for the DSC certificate or e-token, user has two level of authentication for accessing the eOffice application. User has to perform series of steps to log into the eOffice application, using e-Token or DSC card. For e-Token Enrollment, perform the following steps: 1. 2. 3. 4. 5. 6. 7. 8. 9. Type the URL of the eOffice application in the address bar of the web browser. Press Enter from the keyboard. A window appears, displaying the login page for eOffice. Type the User id in the User Name text box. Type the password in the Password text box. Click the Login button. As a result, the user gets successfully log into the eOffice application. Plug-In the e-token in your machine/system. Click the DSC Registration link under the DSC section. As a result, the DSC Enrollment Screen appears. Click the Signing Certificate link in the DSC Enrollment Screen. As a result, the DSC Enrollment screen appears. Select the certificate for enrollment. 10. Click the OK button. 11. The Message box appears, displaying the message for successful enrollment of the eOffice user. 12. Click the OK button to complete the process of DSC enrollment. For e-Token Authentication, perform the following: 1. 2. 3. 4. 5. 6. 7. Plug in the e-token device in your system. Type the URL of the eOffice application in the address bar of the web browser. Press Enter from the keyboard. A window appears, displaying the login page for eOffice. Type the User id in the User Name text box. Type the Password in the Password text box. Click the Login button, as a result, the Log On dialog box appears, prompting for password above the DSC Authentication screen. Fig.eFile.44 Fig.eFile.45 8. Type the password in the Password field in the Log On screen. (Fig.eFile.45) User can enter the wrong password only 10 times. Thereafter if the wrong password is entered, the user gets blocked. 9. Click the OK button (Fig.eFile.45). As a result, the user gets log into the eOffice application. For DSC Card Enrollment, perform the following: 1. Type the URL of the eOffice application in the address bar of the web browser. 2. Press Enter from the keyboard. 3. 4. 5. 6. 7. 8. 9. 10. 11. 12. 13. A window appears, displaying the login page for eOffice. Type the User id in the User Name text box. Type the password in the Password text box. Click the Login button. Plug-In the e-token in your machine/system, as a result, the user gets successfully log into the eOffice application. Click the DSC Registration link under the DSC section. As a result, the DSC Enrollment Screen appears. Click the Signing Certificate link in the DSC Enrollment Screen. As a result, Enter Pin dialog box appears. Enter the pin in the Enter Pin text box in the Enter PIN dialog box. Click the OK button, as a result, the DSC Enrollment screen appears. Select the certificate for enrollment and click the OK button. The message box appears, displaying the message for successful enrollment of the eOffice user. Click the OK button to complete the process of DSC enrollment For DSC Card Authentication, perform the following: 1. Plug in the DSC card in your system. 2. Type the URL of the eOffice application in the address bar of the web browser. 3. 4. 5. 6. 7. 8. Press Enter from the keyboard. A window appears, displaying the login page for eOffice. Type the User id in the User Name text box. Type the password in the Password text box. Click the Login button. As a result, the Enter PIN dialog box appears. Type the password in the Enter PIN dialog box and click the OK button. As a result, the user gets logged into the eOffice application. Reports Reports are the documents that display the results of some search/experiment based on certain predefined parameters and filters such as Sent By, Time Period, Department etc. It contains following 23 types of reports: Reports under Files Section Register: Displays a list of files that are registered/ diarised. Forwarded: Displays a list of files that have been forwarded. Received: Displays a list of files that have been received. Parked Files: Displays a list of files that have been parked. Closed Files: Displays a list of files that have been closed. Reports under Receipts Section Diary: Displays a list of receipts that have been diarised. Received: Displays a list of receipts that have been diarised. Receipt Category: Displays a list of receipts that have been received Category-wise. VIP Details: Displays a list of receipts based upon VIP Details. Closed Receipts: Displays a list of receipts that have been closed. Departmental Summary This selection generates a PDF report that contains a list of all the Receipts and Files that has been Created, Received, Sent, Parked, Closed or Pending. My Files Pending With Others Displays a list of pending files lying with other users. Dispatch (Section-wise) This selection generates a PDF report that contains a list of all the Letters which has been dispatched by the section between two specified dates. Revenue Report This selection generates a PDF report that contains a list of the revenue that has been spent in the section(s) for dispatch. Receipts Forwarded by Section This selection generates a PDF report that contains a list of all the Receipts that has been Forwarded by a section within a particular Time Duration. Pendency Report (File/ Receipt) This selection generates PDF Report of Files/Receipts which are in pendency. Month Wise Under this section the reports are generated based on Month-wise data. Month-wise Files Received: Displays a list of files received in the particular month. Month-wise Files Forwarded: Displays a list of files forwarded in the particular month. Month-wise Receipts Created: Displays a list of receipts created in the particular month. Month-wise Receipts Received: Displays a list of receipts received in the particular month. Month-wise Receipts Forwarded: Displays a list of receipts forwarded in the particular month. File Summary Report This section displays a Summary report of all the actions performed on various Files, Department-wise (segregated by Sections of the selected Department) within a particular Time Duration. Receipt Summary Report This section displays a Summary report of all the actions performed on various Receipts, Department-wise (segregated by Sections of the selected Department) within a particular Time Duration. File Pendency Report This section displays a report on all the Pending/ Parked Files, Department-wise (segregated by Sections of the selected Department) within a particular Time Duration. PUC Pendency Report This section displays a report on all the Pending/ Parked Receipts, Department-wise (segregated by Sections of the selected Department) within a particular Time Duration. Settings This section helps the user to change the preferences/settings in eFile application. The Setting section incorporates 4 modules: a) Preferences b) Address Book c) User Groups d) Deactivate DSC Let’s have an introduction about these modules one by one: Preferences: This module facilitates the user to change the user requirement general preferences and customize as per requirement. Preferences module is partitioned among different sections like: i. General Settings : It helps the user to modify the General Settings like: Max # of records/page: Refers to numbers of records that listed in a page Auto Save Duration: Refers to set mode into Auto save while making any note in eFile Application. Flash Animations: Refers to if users prefers Flash animation in eFile application or not. ii. Alert Settings: It helps the user to set alerts on Mobile, Email or both. iii. List View Settings: It helps the user to change the default view mode of Files/Receipts. User can set it to Electronic view, physical view or Default view which comprises of both. iv. DSC Settings: It helps the user to view the current status of DSC installed to his/her account (if any). v. Customize your settings: It helps the user to customize the DSC setting as per requirement. User can set it to Authentication mode, signing mode or both which comprises of Authentication and signing of DSC. To change the settings, user has to perform the following steps: 1. Click the Preferences Link under Settings section, as a result, Preferences page appears. Fig.eFile.46 2. User can change the General Settings, Alert settings or List View Settings as per requirement. 3. Click the Save ( ) Button to save the altered changes. Address Book: This module facilitates the user to create the group and add new contact/user into that group which helps the user while diarizing of a correspondence. Fig.eFile.47 User Groups: This module facilitates the user to create a group and add user list to that created group which helps the user while sending a Receipt/File to list of selected users or to a group which comprises of contained user list. To create User Group and add users to the group, user has to perform the following steps: 1. Click the User Groups Link under Settings section. Fig.eFile.48 2. Click the Create Group button, as a result new window appears. 3. Enter the Group name and description (if any), click the Create button. As a result, a new group is created. Now to add users to the created group: 1. Click the Group in which user is required to be added up. 2. Select the users from the list which needs to be added up in the selected group and click the Save button. As a result, the user gets added up in the selected group. Deactivate DSC: User can delete the DSC enrollment through Delete link and for Activation link Activate can be used. Transfer: Only Admin has access to this module. In case, an employee is transferred, Admin can transfer his/her data (Files/ Receipts) from his/ her account to any other particular employee’s account. Then onwards the transferred data will be worked upon and handled by that employee. To Transfer the data, Admin has to perform the following steps: 1. Click the Transfer Link under Settings section, as shown in Fig.eFile.49. Fig.eFile.49 2. Click the Initiate Transfer link against the Employee Name, whose transfer has been initiated and his data is to be transferred. As a result Transfer Details page appears, as shown in Fig.eFile.50: Fig.eFile.50 3. Enter details to filter search for the Data (Files/ Receipts) under selected employee, to be transferred to another employee. 4. Click on button. 5. Select the data to be transferred by clicking on the check boxes pertaining to the files/ receipts. 6. Enter the employees name in Transfer To, to whom the data is to be transferred. 7. Click on Transfer button. Search Search section helps the user to search the File(s)/Receipt(s) or any Dispatched issue from within the section/ Organisation/ application. There are basically 2 different types of search that user can perform: Module search Advanced Search Let’s learn about these types one by one: Module Search This type of search allows the user to search the Receipt/File/Dispatch from within the application module only. For example – To find any receipt lying under Receipt inbox, user first has to select Receipt Inbox module and then can search for that particular receipt. If in case user has selected Receipt inbox module and searching any File or any receipt which is not in receipt inbox, then Module Search won’t allow the user to give the required result. For module search process, perform the following: Step 1: Select the application module from which the user want to search, as shown in Fig.eFile.51: Fig.eFile.51 Step 2: Type the receipt number in Module search field which user want to search, as we have chosen Receipt Inbox module, and click the Search ( ) button. Fig.eFile.52 As a result, Search result appears. If the searched receipt/File is not received electronically, then user first need to receive it or else user can open the Receipt/File from there itself and can perform any action on it. Advance Search This type of search allows the user to search the Receipt/File/Dispatch from within the application, Section wise or globally (within Organisation). Advance Search module is divided into 3 types of search: a) Section wise search: b) Global Search: Let’s Learn about these submodules one by one: a) Section wise search: This search helps the user to find any receipt/file/dispatch from within the section to which the user lies in. User don’t have access to the receipts and files that lie under other sections. b) Global Search: This search helps the user to find any receipt/file/dispatch that lies within the Organisation i.e. the scope of search is global. Search - Actions It helps the user to perform various actions on Receipt(s)/ File(s)/ Dispatch. This can be accessed by right clicking the Search Results. Following actions can be performed on Search Results: On Receipts Receipts Inbox and Created Details: Helps the user to view the metadata details and the movements of that receipt. Send: Helps the user to forward the receipt to other eOffice user. Put in a File: Helps the user to attach the receipt to a concerned file Dispatch: Helps the user to dispatch the Letter. Receipts Sent Details: Helps the user to view the metadata details and the movements of that receipt. Receipts with other user Details: Helps the user to view the metadata details and the movements of that Receipt. Pull Up: Helps the user to force receive the Receipt from other e-Office user. No action can be performed on Receipts which are attached with a File. Actions on Closed Receipts Reopen: This action helps the user to reopen the closed receipts. On Files File Inbox and Created Details: Helps the user to view the metadata details and the movements of that File. Send: Helps the user to forward the File to other eOffice user. File with other user Details: Helps the user to view the metadata details and the movements of that File. Pull Up: Helps the user to force receive the File from other eOffice user. Actions on Parked Files Details: This action helps the user to view the details of the parked file. Make Active: This action helps the user to make the parked file active. Actions on Closed Files Reopen: This action helps the user to reopen the closed file. File Closed Reopen: Helps the user to make the File active. No action can be performed on Files which are attached with a Receipt. On Issued Dispatch Issued & Dispatched: This includes dispatch done by the user finally. Details: Helps the user to view the details of the issued dispatch. View Reminders: Helps the user to view the reminder list of that selected dispatched issue. Issued & Sent: This includes dispatch done by the user to the CRU. Details: Helps the user to view the details of the issued dispatch to the CRU. Issued & Returned: This includes dispatch returned by CRU to the user. Details: Helps the user to view the details of the issued dispatch to the CRU. Receive: User need to accept the issue returned by CRU. Resend: User can resend the dispatch after receiving the issue. Dispatch by other users Details: Helps the user to view the metadata details of the issued dispatch. Actions on Notification Self Reminder: It contains all the reminders/notification that has been set by the user for themselves or for other eOffice users. Reminder Received: It contains all the reminders/notification that has been set by other eOffice users. User can further mark the received reminder as ‘Mark as Read’ or even can ‘Delete’ the reminder.