1
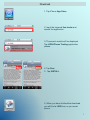
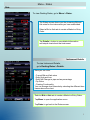
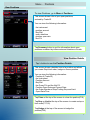
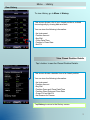
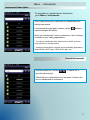
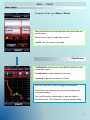
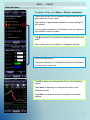
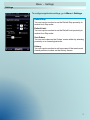
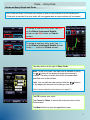
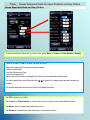
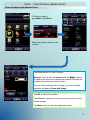
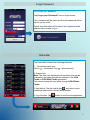
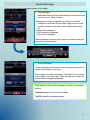
LION iPhone Trader
User Manual
1
Contents
Download
•
P3
Logon
•
P4
Menu
•
•
•
•
•
•
•
•
•
Menu
Dealing Rates
Accounts
Orders
Positions
History
Charts
Instruments
Settings
•
•
•
•
•
•
•
•
•
P5
P6
P7
P8
P9
P10
P11
P13
P14
Trade
•
•
•
•
•
•
P15
P16
P17
•
•
Open a New Position (Market Order)
Entry Orders
Preset Stop/Limit Orders for Open Positions
or Entry Orders
Close Positions (Market Order)
Hedge Positions
•
•
P19
P20
•
•
•
Forgot Password
Status Bar
System Messages
•
•
•
P21
P21
P22
Useful Features
2
Download
1. Tap iPhone App Store.
2. Input the keyword lion trader and
search the application.
3. The search results will be displayed.
Tap LION iPhone Trading application
please.
4. Tap Free.
5. Tap INSTALL.
5. When you have finished the download
you will find a LION icon on you smart
phone.
3
Logon
1. Tap LION Icon.
2. Input your Username and Password.
3. Tap ∨ at the right of Account Type, select your
Account Type, then tap Sign In.
* Before you tap Sign In, you can switch the slider from OFF
to ON at the right of Save User Name. You need not then
input Username the next time you log in.
4
Menu
Open main menu by tapping the Menu button in the upper
right corner of the application.
This menu gives you the access to the main application
screens:
· Rates
· Accounts
· Orders
· Positions
· History
· Instruments
· Charts
· Setting
5
Menu - Rates
Rate
To view Dealing Rates, go to Menu > Rates.
The Rates screen shows you the streaming Bid and
Ask rates for the instruments you have subscribed.
Select a Bid or Ask rate to create a Market or Entry
Order.
Tap Details > button to see detailed information
and simple chart about that instrument.
Instrument Details
To view Instrument Details,
go to Dealing Rates > Details.
Here you can view:
· Current Bid and Ask rates
· Daily High and Low
· Daily Net Change in pips and as percentage
· Pip Value
· Charting Functionality
You can change chart intervals by selecting the different time
frames above the chart.
Select a Bid or Ask rate to create a Market or Entry Order.
Tap Menu to open the application menu.
Tap Rates to go back to the Rates screen.
6
Menu - Accounts
Monitor your Account
To view Accounts, go to Menu > Accounts.
You can view the following information:
· Account Number
· Current Balance
· Used/Usable Margin
· Current P/L
Tap > button to see detailed information and
simple chart about that instrument.
You can view the Account Details below:
· Account number
· Used Margin
· Current Balance
· Usable Margin
· Current P/L
· Margin Utilization
· Current Equity
· the number of Open Positions
· Equity Level % (the percentage of equity to Used
Margin)
· Default Amount
Change Default Amount
To change the default amount, tap Change button.
You can set DA(lots) as fixed number of lots, which
can be bought / sold on a particular instrument.
You can also set DA(% of usable margin).This
automatically generates a default lot size based on
your Usable Margin and Margin Requirement for
the instrument traded.
Tap the option button then enter a new amount at
the right, and tap OK.
Tap Cancel to discard any changes and close the
dialog box.
7
Menu - Orders
View Orders
To view Orders, go to Menu > Orders.
You can view the following information:
· the Instrument
· Buy/Sell
· Order Amount
· Order Type
· Order Rate
· Proximity to market (in pips).
View Order Details
You can edit or remove an order by tapping an order panel
on the Orders screen and selecting Remove/ Modify option
from the context menu.
You can view the following information:
· Order ID
· the Instrument
· Buy/Sell
· Order Rate
· Order Type
· Proximity to market (in pips)
· Date/Time of order creation
· Position (Trade ID)
· Position Rate
Tap Remove/Modify button allows you to remove or modify
the order.
8
Menu - Positions
View Positions
To view Positions, go to Menu > Positions.
This screen shows a list of your open positions,
ordered by Trade ID.
You can view the following information:
· the instrument
· position amount
· Buy/Sell
· open date/time
· position open rate
· Net P/L
Tap Summary button to get the information about open
positions combined by instruments and directions of trade.
View Position Details
Tap > button to see the Position Details.
This screen shows a detailed view of a position and allows
you create Stop/Limit order, hedge or close a position.
You can view the following information:
· Position # (Trade ID)
· the Instrument
· Position Amount
· Buy/Sell
· the Gross P/L and the Net P/L
· Position Open Rate and Current Rate
· the Order Number of Stop/Trailing Stop and Limit
· Open Date/Time
Tap Close at the top of the screen to close the position(P19).
Tap Stop or Limit at the top of the screen to create a stop or
limit order(P17,18).
Tap Hedge at the top of the screen to hedge the
position(P20).
9
Menu - History
View History
To view History, go to Menu > History.
This screen shows a list of your closed positions, ordered
chronologically by closing date and time.
You can view the following information:
· the Instrument
· Position Amount
· Buy/Sell
· Close Date/Time
· Position’s Close Rate
· Net P/L
View Closed Position Details
Tap > button to see the Closed Position Details.
This screen shows a detailed view of a closed position.
You can view the following information:
· the Instrument
· Position Amount
· Buy/Sell
· Position Open and Close Date/Time
· Position Open Rate and Close Rate
· Gross P/L and Net P/L
· the Reason for Closure
Tap History to return to the History screen.
10
Menu - Instruments
Instrument Subscription
To subscribe or unsubscribe an Instrument,
go to Menu > Instruments.
This screen allows you to subscribe or unsubscribe from
trading instruments.
If instruments are grouped in folders, tap the
expand/collapse the folders.
button to
When you unsubscribe* from an instrument, it will no longer
be shown in your trading applications.
* You cannot unsubscribe from instruments on which you have
open positions or pending orders.
* Instrument subscription is synced across all trading applications –
Android/iPad, LION Trader, LION Web Trader, etc.
Search Instruments
Use the search box and the
specific instrument(s).
to search for a
Check the box to subscribe to an instrument. Uncheck the
box to unsubscribe an instrument.
11
Menu - Charts
View Charts
To create a Chart, go to Menu > Charts.
Select the desired instrument and the time interval from the
scrolling drum.
Select the chart type (Candle, Bar, or Line).
Tap OK, you can create a new chart.
Chart Screen
Tap Buy/Sell button to open a new Buy/Sell position on the
current instrument.
Tap Indicators to add indicators to the chart.
Tap Setup to go back the screen of Charts.
Scroll the chart left or right by dragging it horizontally.
Zoom in and out of the chart by using the standard multitouch zoom feature.
You can tilt the phone horizontally to view the chart in
horizontal mode. Tilt it vertically to return to vertical mode.
12
Menu - Charts
Add Indicators
To create a Chart, go to Menu > Charts > Indicators.
This screen shows a list of available indicators and lets you
apply indicators to your chart.
The numbers in parentheses indicate the current settings of
the indicator.
You can apply a maximum of 2 indicators over the chart and
one indicator outside the chart.
Tap
chart.
to the left of an indicator to add/remove it to/from the
Tap > button next to an indicator to change its settings.
Indicator Setup Screen
This screen allows you to change the settings of an indicator
such as period, colors, etc.
Tap OK to apply your changes and return to the Indicators
screen.
Tap Cancel to discard your changes and return to the
Indicators screen.
Tap Chart on Indicators screen to complete the Indicator
settings.
13
Menu - Settings
Settings
To configure application settings, go to Menu > Settings.
Default Stop:
You can input a number to set the Default Stop proximity to
market for a Stop order.
Default Limit:
You can input a number to set the Default Limit proximity to
market for a Stop order.
Sort Orders:
You can sort orders on the Orders’ screen either by selecting
proximity or in chronological order.
History:
You can input a number to set how many of the most recent
closed positions to show on the History screen.
14
Trade - Open a New Position (Market Order)
Open a New Position with Market Order
To open a new sell position, tap Bid on
the Rates/ Instrument Details screen or
tap Sell button on Charts screen.
To open a new buy position, tap Ask on
the Rates/ Instrument Details screen or
tap Buy button on Charts screen.
Tap radio button to the right of Market Order.
Rate: For a market order, this is the current market rate.
Lots: You can edit the order amount with the ▼/▲ buttons
or by tapping the amount and entering a number.
(How to preset stop/limit order please go to page17.)
Tap OK to place your order.
Tap Cancel or Rates to cancel the order and return to the
Rates screen.
Tap Menu button to open the application menu.
15
Trade - Entry Order
Create an Entry Stop/Limit Order
Entry Stop and Entry Limit orders are orders to open a new position at an off-market price.
If that price is reached, the entry order will be triggered and an open position will be created.
To create a new sell entry order, tap Bid
on the Rates/ Instrument Details
screen or tap Sell button on Charts
screen.
To create a new buy entry order, tap Ask
on the Rates/ Instrument Details screen
or tap Buy button on Charts screen.
Tap radio button at the right of Entry Order.
Rate: For an entry order, the order rate is editable by using
the ▼/▲ buttons or by tapping the rate and entering a
number. The rate you enter must follow the parameters
specified next to the edit box.
Lots: You can edit the order amount with the ▼/▲ buttons
or by tapping the amount and entering a new one.
(How to preset stop/limit order please go to page17.)
Tap OK to place your order.
Tap Cancel or Rates to cancel the order and return to the
Rates screen.
Tap Menu button to open the application menu.
16
Trade - Preset Stop/Limit Order for Open Positions or Entry Orders
Preset Stop/Limit Order for Entry Orders
To preset stop/limit orders for an entry order, go to Menu > Orders > Order Details > Modify.
Switch the slider to ON to enable a preset stop/limit.
There are three ways to preset a stop/limit order:
· edit the order Rate
· edit the Distance in Pips
· edit the Projected P/L
When one of the boxes is changed, the other two are updated automatically.
You can change the order Rate with the ▼/▲ buttons or by tapping the rate and entering a
number.
The preset stop/limit rate must be within the range specified.
Tap OK to place your order.
Tap Cancel or Order Details to cancel the order and return to the order details screen.
Tap Menu button to open the application menu.
Tap Remove to delete the order and return to the order screen.
17
Trade - Close Positions (Market Order)
Close Positions with Market Order
To close a position,
go to Menu > Positions
Select the position that you want
to close.
Tap Close button to close a Position:
Amount: You can edit the Amount with the ▼/▲ buttons or
by tapping the amount and entering a number to change the
position amount that you want to close .
You can close positions with a hedge if you have hedged
positions, by tapping Close with Hedge.
Tap OK to close your position.
Tap Cancel to cancel the closure process and return to the
Positions page.
Tap Menu button to open the application menu.
18
Trade - Preset Stop/Limit Order for Open Positions or Entry Orders
Preset Stop/Limit Order for Open Positions
To preset stop/limit orders for open positions, go to Menu > Positions > Position Details >
Stop/Limit.
There are three ways to preset a stop/limit order:
· edit the order Rate
· edit the Distance in Pips
· edit the Projected P/L
When one of the boxes is changed, the other two are updated automatically.
You can change the order Rate with the ▼/▲ buttons or by tapping the rate and entering a
number.
You can check the Trailing Distance box and enter a trailing stop distance.
The preset stop/limit rate must be within the range specified.
Tap OK to place your order.
Tap Cancel or Rates to cancel the order and return to the Rates screen.
Tap Menu button to open the application menu.
19
Trade - Hedge Positions
Hedge Positions
To hedge a position,
go to Menu > Positions
Select the position that you want
to hedge.
Tap Hedge button to hedge a Position:
Amount: You can edit the Amount with the ▼/▲ buttons or
by tapping the amount and entering a new one to change the
position amount that you want to hedge .
Tap OK to hedge your position.
Tap Cancel to cancel the hedging process and return to the
Positions page.
Tap Menu button to open the application menu.
20
Forgot Password
If you forgot your password:
Tap Forgot your Password? Icon on login screen.
Your password will be reset, and the new password will be
sent to you by email.
Please note that email will be sent to the registered email
address that we have for you.
Status Bar
The Status Bar contains the following elements:
1. Connection status icon
(Green
= connected; Gray
= disconnected)
2. System time
Note: The time zone displayed in the system time can be
changed by the trader through the settings of the LION
Trader or LION Web Trader application.
You cannot change the time zone through LION iPhone
Trader.
3. Help button. Tap the help button
any time to open
contextual help for the currently active screen.
4. Log off button. Tap
button to exit from the application.
21
System Message
There are two types of messages shown to the trader:
1. Pop Messages
Messages that are shown immediately as a result of some
action or event. These include:
· Messages received by trader as a result of his actions.
Examples: Insufficient Equity when trying to open a new
position, entering order rate outside of permitted range,
etc.
· Margin Call messages
· Lost connection messages
· Order reject messages
These messages are shown as a pop-up at the time they are
received on current screen.
2. Stored Messages
These messages accumulate in the background and can be
viewed by the trader at any time.
The number of unread messages is indicated in the red circle
in the middle of the status bar. When you tap the number, the
first received message is displayed.
Tap Cancel to remove the message and close the message
window.
Tap Next advances to the next message.
Tap OK closes the message window.
22