1
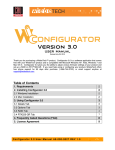
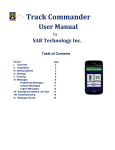
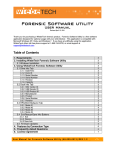
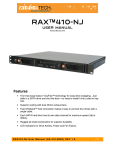
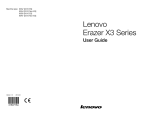
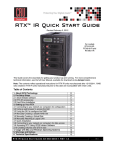
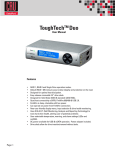
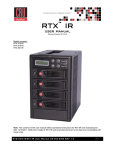
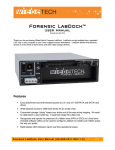
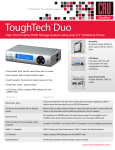
Protecting Your Digital Assets
TM
CRU® Configurator
User Manual for Windows
Features
•
Easily configure CRU storage devices
•
Receive email and SMS text notifications when warning or alarm events occur.
•
View and update the firmware of select CRU storage devices.
•
Customize temperature warning and alarm thresholds for CRU RAID enclosures and
drives.
•
Control which warning and alarm events cause a CRU RAID device’s audible buzzer to
sound.
CRU Mark
10.25.12
PMS 711
2 cyan
85 magenta
76 yellow
2
CRU Configurator User Manual
TABLE OF CONTENTS
1 INSTALLING CONFIGURATOR
1 Installing Configurator
2
2 Using Configurator
2
2.1 Configurator Bar
2
2.2 Product Tab
2
2.3 Firmware Tab
2
2.4 Options Tab
3
2.5 Alerts
4
2.5.1 Messages
Download the CRU Configurator software from the Configurator
download page: www.cru-inc.com/support/software-downloads/
configurator-software-download/
Run the setup file and follow the prompts to install the software.
2 USING CONFIGURATOR
4
2.1 CONFIGURATOR BAR
Email & SMS Tab
4
The Configurator Bar allows you to select between multiple
Setup Tab
4
CRU devices that are connected to the computer at the same
5
time. To select a product and configure it, ensure that your
Buzzers Tab
5
CRU device is connected to the computer. If the product is not
Thresholds Tab
5
visible in the drop-down box, click the Rescan button to detect
5
it. Then click on the drop-down box and choose the product.
2.5.2 RAID Device Settings
2.5.3 Log Tab
2.6 Settings Tab
5
2.7 About Tab
6
3 System Requirements and Supported Hardware
7
The “Start Monitoring” button enables Configurator’s monitoring function, which will send you email or SMS/Text alerts
when a problem with your device is detected. To use this feature, you must set up an email account in Configurator. See
Section 2.5.1.
2.2 PRODUCT TAB
The Product Tab lists status information about the selected
device. Depending on whether drives are inserted and the connection type used to attach the device to the computer, the
Product tab can display the firmware version and the status of
the enclosure, fans inside the enclosure, and the RAID (if there
is a RAID present). The Product tab also shows you volume
information of any hard drives inside the device, including the
amount of used storage space and individual drive temperature.
2.3 FIRMWARE TAB
The Firmware Tab allows you to update the firmware for the
selected device.
NOTE
Before you can update the device’s firmware, you
must remove any drives inserted into your CRU
device and connect the device to your computer with
a USB 2.0 cable. Always power off your device
before removing drives!
Click Check for Updates to begin the process. If no update is
found, the “Status” section will read “Firmware is up to date.”
Protecting Your Digital Assets
TM
3
CRU Configurator User Manual
If an update is found, an Update section will appear on the screen. Click Update Device
Firmware. Configurator will download the updated firmware and apply it to the connected device.
2.4 OPTIONS TAB
The Options Tab allows you to modify the following configuration options for the
selected device. When you are finished modifying the options, click Save to Device to
save them.
NOTE
NOTE
Before you can modify the following configuration options, you must remove any
drives inserted into your CRU device and connect the device to your computer
with a USB 2.0 cable. Always power off your device before removing drives!
Figure 1. The Firmware Tab.
If you are using Windows XP or an earlier version of Windows and you wish to
use drives with capacities larger than 2.2 terabytes, then you will need to disable
“Support drives with capacities larger than 2.2 terabytes”.
Configuration
Place or remove a check in the box next to each option to enable it. Remove a check
from the box to disable the option.
• Enable 3 gigabit data throughput - Enabled by default. Allows the product to
run at 3 Gbps SATA Revision 2.0 speed.
• Support drives with capacities larger than 2.2 terabytes - Enabled by default.
Allows operating systems to use the full capacity of drives larger than 2.2 terabytes on modern operating systems. Uncheck this option to allow obsolete operating systems like Windows XP to detect the drives larger than 2.2 terabytes.
Usable drive capacity will then be limited to a maximum of 2.2 terabytes.
• Disable cache flushing - Forces the operating system to store read or written
Figure 2. The Options Tab.
data in the drive cache, which may sometimes result in faster data read speeds,
but may cause data loss if the device loses power. This setting should only be
enabled by advanced users.
PIN
This feature allows you to set a four-digit PIN number to prevent unauthorized RAID configuration of any
CRU QR or 3QR RAID device. The front panel interface will require you to enter the PIN number when
you attempt to configure the RAID type using the front panel. Setting the PIN to 0000 disables the option.
FireWire Chip ID
This eight-digit number indicates the FireWire chip ID that the device uses to connect to the computer via
a FireWire cable. Each FireWire device connected to a computer should have a unique ID number to avoid
conflicts. If multiple connected devices are using the same ID number, only one can be recognized by the
computer at a time. This option allows you to correct such conflicts.
Protecting Your Digital Assets
TM
4
CRU Configurator User Manual
2.5 ALERTS
The Alerts Section allows you to set up Configurator’s monitoring function. To enable this function, click the
Start Monitoring button on the Configurator Bar at the top of the Configurator window.
2.5.1 Messages
Email & SMS Tab
The Email & SMS Tab allows you to select which of the following warnings and
alarm notifications you wish to receive when such events occur. You must connect an email account in order to receive notifications via email or text, because
the SMS notification services provided by the mobile carriers are email-based. If
you haven’t already done so, click on the Setup Tab to connect an email account.
Supported SMS carriers are Alltel, AT&T, Boost Mobile, Cingular, Cricket, Sprint,
T-Mobile, US Cellular, Verizon, and Virgin Mobile.
Place a check in the box next to the type of event in order to receive a notification
when it occurs:
Figure 3. The Email & SMS Tab.
•
System Warning: A drive exceeds the warning temperature threshold.
•
System Alarm: The drive and/or enclosure exceeds its alarm temperature threshold or the
device fan fails.
NOTE
•
RAID Warning: The RAID is degraded or rebuilding.
•
RAID Alarm: The RAID is invalid or has failed.
To change the temperature thresholds, go to Alerts → RAID Device Settings → Thresholds (see Section 2.5.2).
Once you have selected your warning and alarm messages, the options inside the bottom box will
become selectable, allowing you to choose how you’d like to receive notifications.
Check the box next to “Email” and enter your email address to have messages sent to that email
address.
Check the box next to “SMS/Text” and then enter your phone number and your phone’s carrier to
have messages texted to you. Your carrier’s rates will apply to each message sent.
Setup
The Setup Tab allows you to connect an email account that Configurator can
use to send notifications when warning or alarm events occur. Contact your IT
administrator to connect an email address or to get the proper SMTP settings for
your account.
Once you have entered the settings, click the Test button to send a test message. Click the Save button to save these settings.
NOTE
If you have two-step verification enabled on your mail account, you must log into
the account and generate an app-specific password for use with Configurator.
Your account password will not work.
Figure 4. The Setup Tab.
Protecting Your Digital Assets
TM
5
CRU Configurator User Manual
NOTE
If you are using a Gmail email address without two-step verification enabled,
Google will automatically block sign-in attempts from non-Google applications
because they are not part of the Google ecosystem, and therefore characterizes these applications as ‘less secure’. Log in to your Google account via a web
browser and navigate to https://www.google.com/settings/security/lesssecureapps, and then under “Access for less secure apps” choose Enable. Then click
the Done button to save your settings.
2.5.2 RAID Device Settings
This section allows you to modify and customize all alarms and temperature thresholds that are measurable in all CRU QR and 3QR RAID devices.
NOTE
Before you can modify the RAID Device Settings, you must remove any drives
inserted into your CRU device and connect the device to your computer with a
USB 2.0 cable. Always power off your device before removing drives!
Figure 5. The Buzzers Tab.
Buzzers Tab
The Buzzers Tab allows you to enable or disable audible buzzers on the device.
Place a check in the box next to the type of event in order to trigger the audible
buzzer when it occurs:
•
System Warning: A drive exceeds the warning temperature threshold.
•
System Alarm: The drive and/or enclosure exceeds its alarm temperature
threshold or the device fan fails.
•
RAID Warning: The RAID is degraded or rebuilding.
•
RAID Alarm: The RAID is invalid or has failed.
Figure 6. The Thresholds Tab.
Thresholds
The Thresholds Tab allows you to modify the temperature thresholds for the
enclosure alarm, drive warning, and drive alarms. You can also modify the temperature at which the fan turns on.
2.5.3 Log Tab
The Log Tab creates a record of each event that has been triggered. Click the Reset
button to clear all active alerts and alert history.
2.6 SETTINGS TAB
The Settings Tab allows you to modify how Configurator behaves. When finished, click
Save to save the settings. Click the Use Defaults button to reload the default settings.
Device Detection
By default, only CRU devices are shown in the drop-down box on the Configurator
Bar. Remove the checkbox to show all storage devices that are directly connected
to your computer.
Protecting Your Digital Assets
TM
Figure 7. The Settings Tab.
6
CRU Configurator User Manual
Monitoring
Here you can specify the interval at which Configurator will check the status of all
CRU devices and drives connected to the computer.
2.7 ABOUT TAB
The About Tab lets you view which version of Configurator you are running, visit CRU’s
website, and email our Tech Support or Sales teams if you need help using Configurator
or any CRU product.
Figure 8. The About Tab.
Protecting Your Digital Assets
TM
3 SYSTEM REQUIREMENTS AND SUPPORTED HARDWARE
Product Name
Supported
Operating Systems
CRU Configurator
• Windows 8.1, 8, 7, Vista, and XP
• Windows Server 2012, 2008, and 2003 product families
• Mac OS X 10.5.x or newer
Supported CRU Products
Drive eRazer Ultra, all Forensic RTX 3QJ models, all Forensic RTX QJ models, Forensic ComboDock v5,
Forensic LabDock v5, Forensic UltraDock v4, Forensic UltraDock v5, all RAX 3Q models, all RAX 3QJ
models, all RAX 3QJp models, all RAX 3QR models, all RAX QJ models, all RAX QR models, RTX400QR, RTX410-3QJ, RTX430-3QR, all RTX 2-bay QJ models, RTX Secure 410-3QR, all ToughTech Duo
models, all ToughTech mini-Q models, all ToughTech Q models, ToughTech Secure m3, all ToughTech
Secure mini-Q models, all ToughTech Secure Q models, UltraDock v5
Technical Support
Your investment in CRU products is backed up by our free technical support for the lifetime of the
product. Contact us through our website, www.cru-inc.com/support or call us at 1-800-260-9800 or
+1-360-816-1800.
©2014 CRU Acquisition Group, LLC. ALL RIGHTS RESERVED.
This User Manual contains proprietary content of CRU Acquisition Group, LLC (“CRU”) which is protected by copyright, trademark, and other intellectual property rights.
Use of this User Manual is governed by a license granted exclusively by CRU (the “User Manual License”. Thus, except as otherwise expressly permitted by that User Manual License,
no part of this User Manual may be reproduced (by photocopying or otherwise), transmitted, stored (in a database, retrieval system, or otherwise), or otherwise used through any means
without the prior express written permission of CRU.
Use of the full CRU Configurator product is subject to all of the terms and conditions of this User Manual and the above referenced User Manual License.
CRU® is a trademark owned by CRU and is protected under trademark law. This User Manual does not grant any user of this document any right to use any of the Trademarks.
End User License Agreement
This License Agreement (the “License”) is a binding agreement between you (either an individual or an entity) and CRU Acquisitions Group, LLC (“CRU”) that specifies approved usage
of this software product (the “Software”). By clicking “Accept” below, you indicate your full agreement with the following provisions.
1.
2.
3.
4.
5.
6.
7.
8.
9.
This computer Software product and all accompanying documentation are copyright © 2014 CRU Acquisitions Group, LLC. Unauthorized duplication or alteration is prohibited.
You may not decompile, disassemble, or reverse engineer the Software. CRU retains all rights to ownership of this Software including all applicable rights in patents, trademarks,
copyrights, and trade secrets contained therein.
Unless specifically approved in writing by an authorized CRU representative, you may not distribute or make available this software to any third party. Any unauthorized copying,
alteration, or distribution of the Software, written materials, or other materials accompanying the Software may be criminal and/or civil offenses for which you may be liable for
fines, damages, and legal fees.
The Software is provided “as is” by CRU. No warranties either express or implied are offered by CRU to the extent allowed by law.
You retain full control over the use of the Software and you assume all risks and liability for results obtained by the use of the Software. CRU SHALL HAVE NO LIABILITY OR
RESPONSIBILITY TO YOU OR ANY OTHER PERSON OR ENTITY WITH RESPECT TO ANY LIABILITY, LOSS OR DAMAGE CAUSED DIRECTLY OR INDIRECTLY BY USE OR
PERFORMANCE OF THE SOFTWARE PRODUCT OR ARISING OUT OF ANY BREACH OF THIS LICENSE, INCLUDING, BUT NOT LIMITED TO, ANY DAMAGES RESULTING
FROM LOST OR CORRUPTED DATA, INCONVENIENCE, LOSS OF TIME, PROPERTY, REVENUE, OR PROFIT OR ANY INDIRECT, SPECIAL, INCIDENTAL, OR CONSEQUENTIAL
DAMAGES, EVEN IF CRU HAS BEEN ADVISED OF THE POSSIBILITY OF SUCH DAMAGES.
Your right to use this product may not be transferred. You shall not assign or sublicense your rights or obligations under this License.
The term of this license agreement extends from the moment of your acceptance until you such time as you uninstall the Software product. However, failure to comply with the
conditions of this License may result in termination of the License by CRU at any time. In such an event, you shall immediately uninstall the Software. The provisions of this License
that protect the proprietary rights of CRU shall continue in force after termination of the License.
This License constitutes the entire agreement between CRU and you relative to this License. Any change hereto shall be effective only if in writing and signed by both you and a
duly authorized agent of CRU.
If any portions of this License are held to be invalid, void, or unenforceable, the remaining provisions of this License shall remain in full force and effect and shall in no way be
affected, impaired, or invalidated.
This License agreement is governed by the laws of the state of Washington.
Protecting Your Digital Assets
TM
For more information,
visit the CRU web site.
www.cru-inc.com
Part Number: A9-000-0027 Rev 2.0