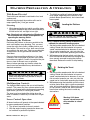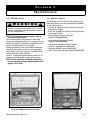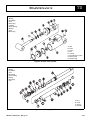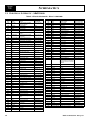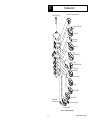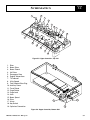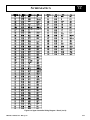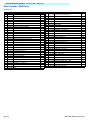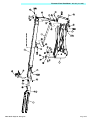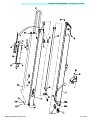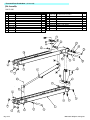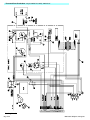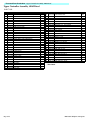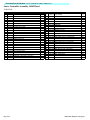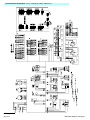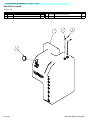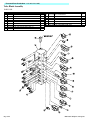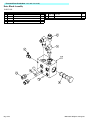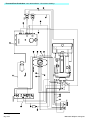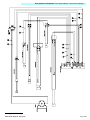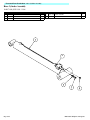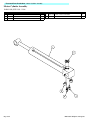
1
C5BF935@1BDC
=1>E1<
AB62 European Specification
Diesel Models
Serial Numbers 1100 - current
!
"# $
% ! "# %
Stamped
Serial Number
Upright, Inc.
1775 Park Street
Selma, California 93662
TEL: 559/891-5200
FAX: 559/891-9012
PARTS: 1-888-UR-PARTS
PARTSFAX: 559/896-9244
Call Toll Free in U.S.A.
1-800-926-LIFT
UpRight International
Support Centre
Innsbrukweg 114
3047 AH Rotterdam
Netherlands
TEL: +31-10-238-0000
FAX: +31-10-238-0001
Parts Tel: +31-10-490-8090
Parts Fax: +31-10-490-8099
P/N 104045-020
05/00 K
FOREWORD
HOW TO USE THIS MANUAL
This manual is divided into six sections. The section
number printed at the top corner of each page can be
used as a quick reference guide.
mechanical, photocopying, recording, or otherwise,
without the prior written permission of the publisher.
This includes text, figures and tables.
Special Information
!
D A N G E R
!
Indicates an imminently hazardous situation
which, if not avoided, will result in death or serious injury.
!
W A R N I N G
!
Indicates a potentially hazardous situation
which, if not avoided, could result in death or
serious injury.
!
C A U T I O N
Introduction &
Specifications
General description and machine
specifications.
Machine Preparation &
Operation
Information on how to operate the work
platform and how to prepare it for operation.
1.0
2.0
!
Indicates a potentially hazardous situation
which, if not avoided, may result in minor or
moderate injury.
NOTES: Give helpful information.
Maintenance
Preventative maintenance and service
information.
3.0
WORKSHOP PROCEDURES
CAUTION: Detailed descriptions of standard workshop procedures, safety principles and service operations are not included. Please note that this manual
does contain warnings and cautions against some
specific service methods which could cause personal
injury or could damage a machine or make it unsafe.
Please understand that these warnings cannot cover
all conceivable ways in which service, whether or not
recommended by UpRight, Inc., might be done, or of
the possible hazardous consequences of each conceivable way, nor could UpRight, Inc., investigate all
such ways. Anyone using service procedures or
tools, whether or not recommended by UpRight, Inc.,
must satisfy themselves thoroughly that neither personal safety nor machine safety will be jeopardized.
All information contained in this manual is based on
the latest product information available at the time of
printing. We reserve the right to make changes at
any time without notice. No part of this publication
may be reproduced, stored in retrieval system, or
transmitted, in any form by any means, electronic,
AB62 Work Platform - European
Troubleshooting
Causes and solutions to typical problems.
Schematics
Schematics and valve block diagram with
description and location of components.
Illustrated Parts
Breakdown
4.0
5.0
6.0
Complete parts lists with illustrations.
i
FOREWORD
NOTES:
ii
AB62 Work Platform - European
TABLE
OF
CONTENTS
SECTION 1
Introduction & Specifications . . . . . . . . . . . . . . . . . . . . . . . . . . . . . . . . . . . . . . . . . . . . . . . . . . . . . . . . . . . 1-1
1.1 Introduction . . . . . . . . . . . . . . . . . . . . . . . . . . . . . . 1-1
Purpose . . . . . . . . . . . . . . . . . . . . . . . . . . . . . . . . 1-1
Scope . . . . . . . . . . . . . . . . . . . . . . . . . . . . . . . . . . 1-1
1.2 General Description . . . . . . . . . . . . . . . . . . . . . . .
Platform . . . . . . . . . . . . . . . . . . . . . . . . . . . . . . . .
Platform Controller . . . . . . . . . . . . . . . . . . . . . . . .
Elevating Assembly . . . . . . . . . . . . . . . . . . . . . . .
Chassis . . . . . . . . . . . . . . . . . . . . . . . . . . . . . . . . .
1-1
1-1
1-1
1-1
1-1
1.3 Purpose Of Equipment. . . . . . . . . . . . . . . . . . . . . 1-1
1.4 Special Limitations . . . . . . . . . . . . . . . . . . . . . . . . 1-1
1.5 Specifications . . . . . . . . . . . . . . . . . . . . . . . . . . . . 1-2
SECTION 2
Machine Preparation & Operation . . . . . . . . . . . . . . . . . . . . . . . . . . . . . . . . . . . . . . . . . . . . . . . . . . . . . . . 2-1
2.1 Introduction . . . . . . . . . . . . . . . . . . . . . . . . . . . . . . 2-2
2.2 Pre-Operation and Safety Inspection . . . . . . . . . 2-2
System Function Inspection . . . . . . . . . . . . . . . . . 2-2
2.3 Controls and Indicators . . . . . . . . . . . . . . . . . . . . 2-3
2.4 Operation . . . . . . . . . . . . . . . . . . . . . . . . . . . . . . . .
.......................................
From the Lower Controls . . . . . . . . . . . . . . . . . . .
From the Platform Controls . . . . . . . . . . . . . . . . . .
With Boom Lowered . . . . . . . . . . . . . . . . . . . . . . .
With Boom Elevated . . . . . . . . . . . . . . . . . . . . . . .
Steering . . . . . . . . . . . . . . . . . . . . . . . . . . . . . . . .
Positioning the Platform . . . . . . . . . . . . . . . . . . . .
Multifunction Controls . . . . . . . . . . . . . . . . . . . . . .
Lower Control Operation . . . . . . . . . . . . . . . . . . . .
Emergency Operation . . . . . . . . . . . . . . . . . . . . . .
Emergency Towing . . . . . . . . . . . . . . . . . . . . . . . .
2-4
2-4
2-4
2-4
2-4
2-5
2-5
2-5
2-5
2-5
2-6
2-6
2.5 Transportation . . . . . . . . . . . . . . . . . . . . . . . . . . .
By Truck or Trailer . . . . . . . . . . . . . . . . . . . . . . . .
After Use Each Day . . . . . . . . . . . . . . . . . . . . . . .
.......................................
2-7
2-7
2-7
2-7
2.6 Maintenance . . . . . . . . . . . . . . . . . . . . . . . . . . . . .
Fueling . . . . . . . . . . . . . . . . . . . . . . . . . . . . . . . . .
Hydraulic Oil . . . . . . . . . . . . . . . . . . . . . . . . . . . . .
Lubrication . . . . . . . . . . . . . . . . . . . . . . . . . . . . . .
Battery Maintenance . . . . . . . . . . . . . . . . . . . . . . .
Tires . . . . . . . . . . . . . . . . . . . . . . . . . . . . . . . . . . .
2-8
2-8
2-8
2-8
2-8
2-8
SECTION 3
Maintenance . . . . . . . . . . . . . . . . . . . . . . . . . . . . . . . . . . . . . . . . . . . . . . . . . . . . . . . . . . . . . . . . . . . . . . . . . . 3-1
3.1 Introduction . . . . . . . . . . . . . . . . . . . . . . . . . . . . . . 3-1
3.2 Special Tools. . . . . . . . . . . . . . . . . . . . . . . . . . . . . 3-1
UpRight Connectors . . . . . . . . . . . . . . . . . . . . . . . 3-2
3.3 Preventative Maintenance . . . . . . . . . . . . . . . . . . 3-3
Preventative Maintenance Table Key . . . . . . . . . . 3-4
Preventative Maintenance Report . . . . . . . . . . . . 3-4
3.4 Supporting Elevating Assembly (Figure 3-6) . . . 3-5
Installation . . . . . . . . . . . . . . . . . . . . . . . . . . . . . . . 3-5
Removal . . . . . . . . . . . . . . . . . . . . . . . . . . . . . . . . 3-5
3.5 Battery Maintenance. . . . . . . . . . . . . . . . . . . . . . . 3-6
Battery Inspection and Cleaning . . . . . . . . . . . . . . 3-6
Battery Charging . . . . . . . . . . . . . . . . . . . . . . . . . . 3-6
3.6 Lubrication . . . . . . . . . . . . . . . . . . . . . . . . . . . . . .
Grease Fittings . . . . . . . . . . . . . . . . . . . . . . . . . . .
Lubricating Turret Gears . . . . . . . . . . . . . . . . . . . .
Hydraulic Oil and Filter . . . . . . . . . . . . . . . . . . . . .
3-6
3-6
3-6
3-7
3.7 Tilt Sensor (Figure 3-11). . . . . . . . . . . . . . . . . . . . 3-8
AB62 Work Platform - European
3.8 Hydraulic Manifold (Figure 3-14) . . . . . . . . . . . . .
Removal . . . . . . . . . . . . . . . . . . . . . . . . . . . . . . . .
Disassembly . . . . . . . . . . . . . . . . . . . . . . . . . . . . .
Cleaning and Inspection . . . . . . . . . . . . . . . . . . . .
Assembly . . . . . . . . . . . . . . . . . . . . . . . . . . . . . . .
Installation . . . . . . . . . . . . . . . . . . . . . . . . . . . . . .
3-9
3-9
3-9
3-9
3-9
3-9
3.9 Setting Hydraulic Pressures . . . . . . . . . . . . . . .
High Flow Relief Valve (#5) . . . . . . . . . . . . . . . .
Low Flow Relief Valve (#9) . . . . . . . . . . . . . . . . .
Counterbalance Relief Valves . . . . . . . . . . . . . .
3-10
3-10
3-10
3-10
3.10 Torque Hubs . . . . . . . . . . . . . . . . . . . . . . . . . . .
Changing Fluid . . . . . . . . . . . . . . . . . . . . . . . . . .
Torque Hub Removal . . . . . . . . . . . . . . . . . . . . .
Installation . . . . . . . . . . . . . . . . . . . . . . . . . . . . .
Disassembly of Torque Hub (Figure 3-16) . . . . .
Assembly of Torque Hub . . . . . . . . . . . . . . . . . .
Carrier Assemblies . . . . . . . . . . . . . . . . . . . . . . .
Sealing Compound . . . . . . . . . . . . . . . . . . . . . . .
3-12
3-12
3-12
3-12
3-13
3-13
3-14
3-14
iii
TABLE
OF
3.11 Cylinder Repair . . . . . . . . . . . . . . . . . . . . . . . . 3-16
Removal . . . . . . . . . . . . . . . . . . . . . . . . . . . . . . . 3-16
Disassembly . . . . . . . . . . . . . . . . . . . . . . . . . . . . 3-16
Assembly . . . . . . . . . . . . . . . . . . . . . . . . . . . . . . . 3-16
Installation . . . . . . . . . . . . . . . . . . . . . . . . . . . . . . 3-16
3.12 Setting Backlash on Rotational Gear. . . . . . . 3-20
CONTENTS
3.13 Rotary Manifold Removal . . . . . . . . . . . . . . . . . 3-21
Disassembly . . . . . . . . . . . . . . . . . . . . . . . . . . . . 3-21
Assembly . . . . . . . . . . . . . . . . . . . . . . . . . . . . . . . 3-21
Installation . . . . . . . . . . . . . . . . . . . . . . . . . . . . . . 3-21
3.14 Torque Specifications . . . . . . . . . . . . . . . . . . . . 3-22
Hydraulic Components . . . . . . . . . . . . . . . . . . . . 3-22
Fasteners . . . . . . . . . . . . . . . . . . . . . . . . . . . . . . 3-22
SECTION 4
Troubleshooting . . . . . . . . . . . . . . . . . . . . . . . . . . . . . . . . . . . . . . . . . . . . . . . . . . . . . . . . . . . . . . . . . . . . . . . 4-1
Introduction . . . . . . . . . . . . . . . . . . . . . . . . . . . . . . 4-1
Troubleshooting Procedure . . . . . . . . . . . . . . . . . . 4-1
Adjustment Procedures . . . . . . . . . . . . . . . . . . . . . 4-1
Checking Pump Pressure . . . . . . . . . . . . . . . . . . . 4-1
4.1 Troubleshooting DMR-30 Controller . . . . . . . . . . 4-3
4.2 Machine Operation . . . . . . . . . . . . . . . . . . . . . . . . 4-3
4.3 Optimizer Settings and Sequence . . . . . . . . . . . . 4-7
4.4 Hydraulic Troubleshooting . . . . . . . . . . . . . . . . . . 4-8
SECTION 5
Schematics . . . . . . . . . . . . . . . . . . . . . . . . . . . . . . . . . . . . . . . . . . . . . . . . . . . . . . . . . . . . . . . . . . . . . . . . . . . 5-1
Introduction . . . . . . . . . . . . . . . . . . . . . . . . . . . . . . 5-1
5.2 Hydraulic Schematic, AB62 . . . . . . . . . . . . . . . . . 5-6
5.1 Electrical Schematic - AB62 Diesel . . . . . . . . . . 5-2
SECTION 6
SECTION 6
Illustrated Parts Breakdown . . . . . . . . . . . . . . . . . . . . . . . . . . . . . . . . . . . . . . . . . . . . . . . . . . . . . . . . . . . . . 6-1
6.1 Introduction . . . . . . . . . . . . . . . . . . . . . . . . . . . . . 6-1
iv
AB62 Work Platform - European
LIST
OF
FIGURES
SECTION 1
In tr od u c ti on & S p e ci fi c ati o n s
Figure 1-1: Work Platform . . . . . . . . . . . . . . . . . . . . . . . . . . . . . . 1-1
SECTION 2
M ac h i n e Pr e pa ra ti on & O p er ati o n
Figure 2-1: Chassis Controls . . . . . . . . . . . . . . . . . . . . . . . . . . . . 2-3
Figure 2-6: Disengaging Drive Hub . . . . . . . . . . . . . . . . . . . . . . . 2-7
Figure 2-2: Platform Controls . . . . . . . . . . . . . . . . . . . . . . . . . . . . 2-3
Figure 2-3: Key Switch . . . . . . . . . . . . . . . . . . . . . . . . . . . . . . . . . 2-3
Figure 2-7: Securing the Machine for Transportation . . . . . . . . . . 2-7
Figure 2-8: Fuel Tank . . . . . . . . . . . . . . . . . . . . . . . . . . . . . . . . . . 2-8
Figure 2-4: Foot Switch . . . . . . . . . . . . . . . . . . . . . . . . . . . . . . . . 2-3
Figure 2-9: Hydraulic Oil Tank . . . . . . . . . . . . . . . . . . . . . . . . . . . 2-8
Figure 2-5: Typical Fall Restraint Anchorage Point . . . . . . . . . . . 2-4
SECTION 3
M a i n te n a n c e
Figure 3-1: UpRight Connector Kit, Small . . . . . . . . . . . . . . . . . . 3-1
Figure 3-2: UpRight Connector Kit, Large . . . . . . . . . . . . . . . . . . 3-1
Figure 3-14: Torque Hub Assembly . . . . . . . . . . . . . . . . . . . . . . 3-12
Figure 3-3: Plugs and Receptacles, UpRight Connectors . . . . . . 3-2
Figure 3-4: Locking Finger, UpRight Connector . . . . . . . . . . . . . . 3-2
Figure 3-16: Master Cylinder (S/N 1109 - Current) . . . . . . . . . . 3-17
Figure 3-5: Heavy Duty UpRight Connector . . . . . . . . . . . . . . . . . 3-3
Figure 3-18: Boom Cylinder (S/N 1109 - Current) . . . . . . . . . . . 3-18
Figure 3-6: Supporting Elevating Assembly . . . . . . . . . . . . . . . . . 3-5
Figure 3-7: Elevating Assembly Brace . . . . . . . . . . . . . . . . . . . . . 3-5
Figure 3-19: Extend Cylinder (S/N 1109 - Current) . . . . . . . . . . 3-18
Figure 3-8: Turret Gear . . . . . . . . . . . . . . . . . . . . . . . . . . . . . . . . 3-7
Figure 3-9: Turret Bearing Grease Zerk . . . . . . . . . . . . . . . . . . . . 3-7
Figure 3-10: Tilt Sensor . . . . . . . . . . . . . . . . . . . . . . . . . . . . . . . . 3-8
Figure 3-11: Linkage Limit Switch . . . . . . . . . . . . . . . . . . . . . . . . 3-8
Figure 3-12: Proximity Switch . . . . . . . . . . . . . . . . . . . . . . . . . . . 3-8
Figure 3-13: Hydraulic Manifold . . . . . . . . . . . . . . . . . . . . . . . . . 3-11
Figure 3-15: Torque Hub . . . . . . . . . . . . . . . . . . . . . . . . . . . . . . 3-15
Figure 3-17: Riser Cylinder (S/N 1109 - Current) . . . . . . . . . . . . 3-17
Figure 3-20: Axle Lock Cylinder . . . . . . . . . . . . . . . . . . . . . . . . . 3-19
Figure 3-21: Steering Cylinder . . . . . . . . . . . . . . . . . . . . . . . . . . 3-19
Figure 3-22: Jib Cylinder (S/N 1111 - Current) . . . . . . . . . . . . . . 3-20
Figure3-23:SettingRotationalGearBacklash(Viewedfrombottomofturret)
3-20
Figure 3-24: Rotary Manifold . . . . . . . . . . . . . . . . . . . . . . . . . . . 3-21
SECTION 4
T r o u b l es h o o ti n g
Figure 4-1: DMR-30 Receiver . . . . . . . . . . . . . . . . . . . . . . . . . . . 4-2
Figure 4-2: DMT-30 Transmitter . . . . . . . . . . . . . . . . . . . . . . . . . . 4-2
SECTION 5
S ch e m a t ic s
Figure 5-1: Electrical Schematic - Diesel - 104049-000#1 . . . . . . 5-3
Figure 5-7: Upper Controller Wiring Diagram - Diesel (1 of 2) . . 5-10
Figure 5-2: Electrical Schematic - Diesel - 104049-000#2 . . . . . . 5-4
Figure 5-8: Upper Controller Wiring Diagram - Diesel (2 of 2) . . 5-11
Figure 5-3: Hydraulic Schematic - 104048-000 . . . . . . . . . . . . . . 5-7
Figure 5-9: Lower Control Box . . . . . . . . . . . . . . . . . . . . . . . . . . 5-12
Figure 5-4: Valve Manifold Assembly . . . . . . . . . . . . . . . . . . . . . . 5-8
Figure 5-10: Lower Control Box Wiring Diagram - Diesel (1 of 2) 5-13
Figure 5-5: Upper Controller, Top Half . . . . . . . . . . . . . . . . . . . . . 5-9
Figure 5-11: Lower Control Box Wiring Diagram - Diesel (2 of 2) 5-14
Figure 5-6: Upper Controller, Bottom Half . . . . . . . . . . . . . . . . . . 5-9
SECTION 6
Illustrated Parts Breakdown 6-1
AB62 Work Platform - European
v
LIST
OF
TABLES
SECTION 1
I n tr o d u ct i o n & S p ec i fi c a ti o n s
Table 1-1: Work Platform Specifications . . . . . . . . . . . . . . . . . . . . . . . . . . . . . . 1-2
SECTION 2
M ac h in e Pr ep a rat i on & Op e r ati on
SECTION 3
M a i n te n a n c e
Table 3-1: Preventative Maintenance Check List . . . . . . . . . . . . . . . . . . . . . . . 3-4
Table 3-2: Torque Specifications for Hydraulic Components . . . . . . . . . . . . . 3-22
Table 3-3: Torque Specifications for SAE Fasteners . . . . . . . . . . . . . . . . . . . . 3-22
Table 3-4: Torque Specifications for Metric Fasteners, U.S. Customary Units 3-23
Table 3-5: Torque Specifications for Metric Fasteners, SI Units . . . . . . . . . . . 3-23
SECTION 4
T ro u b le s h o o ti n g
Table 4-1: Electrical Truth Table - AB62 Diesel . . . . . . . . . . . . . . . . . . . . . . . . . 4-9
Table 4-2: Hydraulic Truth Table - AB62 . . . . . . . . . . . . . . . . . . . . . . . . . . . . . 4-12
SECTION 5
Sc h e m ati c s
Table 5-1: Electrical Schematic - Diesel - 104049-000 . . . . . . . . . . . . . . . . . . . 5-2
Table 5-2: Hydraulic Schematic Legend - 104048-000 . . . . . . . . . . . . . . . . . . . 5-6
vi
AB62 Work Platform - European
Section 1
INTRODUCTION & SPECIFICATIONS
1.1 INTRODUCTION
Chassis
Purpose
The chassis is a structural frame that supports all the
components of the AB62 Work Platform.
The purpose of this service and parts manual is to
provide instructions and illustrations for the operation
and maintenance of the AB62 Work Platform manufactured by UpRight, Inc., of Selma, California.
Scope
The manual includes procedures for proper operation, maintenance, adjustment, and repair of this
product as well as recommended maintenance
schedules and troubleshooting.
1.2 GENERAL DESCRIPTION
The AB62 Work Platform consists of the platform,
controller, elevating assembly, power module, control
module, and chassis.
1.3 PURPOSE OF EQUIPMENT
The objective of the work platform is to provide a
quickly deployable, self-propelled, variable height
work platform to elevate personnel and materials to
overhead work areas and be driven over normal terrains.
1.4 SPECIAL LIMITATIONS
Travel with the platform raised is limited to a creep
speed range.
Elevating of the work platform is limited to firm, level
surfaces only. Any degree of slope greater than 5°
will sound a warning alarm.
Platform
The platform has a non-slip aluminum floor, 45 inch
(1.4 m) high guardrails with midrail, 6 inch (152 mm)
toeboards, and an entrance gate at the rear of the
platform.
!
W A R N I N G
!
D A N G E R
!
The elevating function shall ONLY be used when
the work platform is level and on a firm surface.
The work platform is NOT intended to be driven
over uneven, rough or soft terrain when elevated
!
4
DO NOT use the work platform without guardrails
properly assembled and in place.
Platform Controller
2
3
The controller contains the controls to operate the
machine. It is located at the front of the platform
cage. The foot switch must be depressed to operate
any function from the platform. A complete explanation of control functions can be found in Section 2.
Elevating Assembly
The platform is raised and lowered by the elevating
assembly, an articulated boom powered by two single-stage lift cylinders. The hydraulic pump, driven by
the engine, powers the cylinders. Solenoid operated
valves control raising and lowering.
1
5
6
1. Platform
2. Platform Controller
3. Elevating Assembly
4. Boom
5. Chassis Control Module
6. Chassis
Figure 1-1: Work Platform
AB62 Work Platform - European
1-1
Section
INTRODUCTION & SPECIFICATIONS
1.5
1.5 SPECIFICATIONS
Table 1-1: Work Platform Specifications
ITEM
AB62 4WD Diesel
Height
Working Height
Max. Platform Height
20,7 m [68 ft.]
18,9 m [62 ft.]
Platform step in Height
343 mm [13.5 in.]
Up and Over Height
Drivable Height
9,1m [30 ft.]
18,9 m [62 ft.]
Horizontal Outreach
10,7 m [35 ft.]
Turret Rotation
Platform Rotation
360° Continuous
180°
Tail Swing
0 ft.
Jib Length
Jib Arc
1,9 m [6ft. 4 in.]
140°
Inside Turning Radius
2,5 m [8 ft.]
Outside Turning Radius
5.5 m [18 ft.]
6,8 km/h [4.25 mph] (high) - 2,6 km/h [1.6 mph] (low)
Drive Speed (boom stowed and lowered)
Drive Speed (Elevated)
,96 km/h [.6 mph]
Maximum Gradeability
Dimensions (boom stowed)
22° [40%]
Platform Size
Optional 8 ft. (2,4 m) Platform
1m x 1,8 m [39 in. x 72 in.]
1 m x 2,4 m [39 in. x 96 in.]
Guardrails
1,4 m [45 in.]
Toeboard
Platform Capacity (Maximum)
152 mm [6 in.]
Occupants (Maximum)
227 kg [500 lbs.]
2
Weight
10,614 kg [23,400 lbs.]
Overall Height
Overall Length
2,5 m [8 ft. 2 in.]
8,2 m or 7,2 m Minimum - [27 ft. or 23 ft. 6 in. Minimum]
Overall Width
2,3 m [7 ft. 7.5 in.]
Wheel Base
2,5 m [8 ft. 6 in.]
Ground Clearance
0,46 m (center) 0,32 m (axle) - [18 in. (center) 12.5 in. (axle)]
Power Source
Perkins 704-30
System Voltage
12 VDC
345 bar [5000 PSI]
Maximum Hydraulic Pressure
Controls
Electric Proportional
Tires
19 x 15 NHS - 14 PLY 5.5 bar (80 PSI)
NOTE: Specifications subject to change without notice. Hot weather or heavy use may affect performance.
1-2
AB62 Work Platform - European
Section 2
MACHINE PREPARATION & OPERATION
Warning
All personnel shall carefully read, understand and follow all safety rules and operating instructions before operating or
performing maintenance on any UpRight aerial work platform.
Safety Rules
Electrocution Hazard
THIS MACHINE IS
NOT INSULATED
Tip Over Hazard
NEVER operate the boom or
drive with the platform elevated unless on firm, level
surface.
Collision Hazard
NEVER position the platform without first checking
for overhead obstructions
or other hazards .
Fall Hazard
NEVER climb, stand or
sit on the platform guardrails or midrail.
Use of the aerial work platform: This aerial work platform is intended to lift persons and his tools as well as the material used for
the job. It is designed for repair and assembly jobs and assignments at overhead workplaces (ceilings, cranes, roof structures, buildings etc.). All other uses of the aerial work platform are prohibited!
This aerial work platform is not insulated! For this reason it is imperative to keep a safe distance from live parts of electrical
equipment!
All occupants must wear an approved fall restraint properly attached to designated platform anchorage point. Attach only one fall
restraint to each anchorage point.
Exceeding the specified permissible maximum load of 225 kg (500 lbs) or two persons on the platform is prohibited!
The use and operation of the aerial work platform as a lifting tool or a crane (lifting of loads from below upwards or from up high on
down) is prohibited!
Never exceed 200 N (45 lbs) of side force per occupant.
Distribute all platform loads evenly on the platform.
Never operate the machine without first surveying the work area for surface hazards such as holes, drop-offs, bumps, curbs, or
debris; and avoiding them.
Operate the machine only on surfaces capable of supporting wheel loads.
Never operate the machine when wind speeds exceed 45 km/h (28 mph) (12,5 m/sec.= Beaufort scale 6).
In case of emergency push emergency stop button to cut power to all machine functions.
Climbing up the railing of the platform, standing on or stepping from the platform onto buildings, steel or prefab concrete structures,
etc., is prohibited.
Dismantling the swing gate or the liftable bar or other railing components is prohibited! Always make certain that the swing gate or
the liftable bar is closed and securely locked! It is prohibited to keep the swing gate or the liftable bar in an open position (e.g. held
open with tie-straps) when the platform is raised!
To extend the height or the range by placing of ladders, scaffolds or similar devices on the platform is prohibited!
Inspect the machine thoroughly for cracked welds, loose or missing hardware, hydraulics, loose wire connections, and damaged
cables or hoses before using.
Verify that all labels are in place and legible before using.
Never use a machine that is damaged, not functioning properly, or has damaged or missing labels.
If Alarm Sounds while boom is elevated, STOP, carefully retract boom and lower the platform without rotating. Move the machine to
a firm, level service.
To bypass any safety equipment is prohibited and presents a danger for the persons on the aerial work platform and in its working
range.
Never charge battery near sparks or open flame. Charging batteries emit explosive hydrogen gas.
Modifications to the aerial work platform are prohibited or permissible only at the approval by UpRight.
Never tow the machine. Transport by truck or trailer only.
After use, secure the work platform from unauthorized use by turning both keyswitches off and removing all keys.
AB62 Work Platform - European
2-1
Section
2.1
MACHINE PREPARATION & OPERATION
2.1 INTRODUCTION
System Function Inspection
This manual covers the operation of internal combustion powered models of the AB62RT Articulated
Boom. This manual must be stored on the machine
at all times.
NOTE: Refer to figures 2-1 and 2-2 for chassis
and platform control locations.
1. Before performing the following tests, check area
around machine and overhead for obstructions,
holes, drop-offs, and debris.
2. Turn chassis key switch to chassis, and pull out
the emergency stop switches to the ON position
at the chassis control panel and at the platform
control panel.
3. Turn key switch on, and wait for glow plug light to
go off. When glow plug light goes off, start
engine.
4. Push in the chassis emergency stop button;
engine should stop. Repeat for platform emergency stop button. Return both emergency stop
buttons to the ON position, and start engine.
5. Operate each function switch to raise/lower,
extend/retract, rotate left/right, each section of
the elevating assembly, and observe the operation of the machine. All functions should operate
through full cycle smoothly.(Make sure that the
Boom Speed Control is not at zero).
6. Turn chassis key switch to PLATFORM.
7. Mount the platform, lower the bar, and attach
approved fall restraint to designated platform
anchorage point. Attach only one fall restraint to
each point.
8. Start the engine.
9. Without depressing the foot switch, move the
drive control handle; machine should not function.
10. Depress the foot switch and move the drive control handle forward and reverse. Observe that
proportional functions operate smoothly, and that
brakes apply quickly after control is released.
11. While depressing foot switch, operate steer
switch to left and right. Observe that steering
wheels turn properly.
12. While depressing foot switch, turn function speed
control knob to desired setting, and operate
boom controls. Observe that boom operates
smoothly, and that upper boom, jib, turret rotation,
platform level, riser, and boom extend operate
proportionally in conjunction with function speed
control knob. Observe that platform maintains
level when boom is elevated.
2.2 PRE-OPERATION AND SAFETY
INSPECTION
Carefully read, understand and follow all safety
rules, labels, and operating instructions; then
perform the following steps each day before
use.
Perform a complete visual inspection of the entire
unit prior to operating. Check the following areas for
discrepancies:
1. Open covers and check hydraulic components/
hoses for damage or leaks. Check electrical components / wiring for damage or loose connections.
2. Inspect chassis, axles, hubs, and steering linkage
for damage, deformation, buckled paint, loose or
missing hardware, and cracked welds.
3. Check tires for damage, punctures, and inflation;
tire pressure must be 5.5 bar (80 psi).
4. Check all hoses/cables for wear.
5. Inspect elevating assembly for damage, deformation, buckled paint, loose or missing hardware,
and cracked welds.
6. Inspect platform and guardrails for damage,
deformation, buckled paint, loose or missing
hardware, and cracked welds. Ensure that gate
operates freely and latches securely.
7. Check hydraulic fluid level with platform fully lowered.
8. Check battery fluid level (see Battery Maintenance, page 2-8).
9. Check fuel level; add fuel if necessary (see Fueling, page 2-8).
10. Ensure that radiator is cold; check coolant level.
Add if necessary.
!
W A R N I N G
!
NEVER remove the cap from a hot radiator.
Hot coolant can cause severe burns.
2-2
AB62 Work Platform - European
Section
MACHINE PREPARATION & OPERATION
13. With the upper boom elevated one foot, operate
drive control handle. Observe that drive speed is
limited to creep (0,3m [1 foot] per second). Lower
upper boom to stowed position.
14. Press the service horn button. Observe that horn
is audible.
!
W A R N I N G
19
20
2.3
21
22
23 24 25 26 27 28
31
32
33
!
DO NOT use a machine that is damaged or
malfunctioning. Tag and remove the unit from
service until it is repaired.
29
2.3 CONTROLS AND INDICATORS
30
34 35
36
Figure 2-2: Platform Controls
1
3
2
4
5
7
6
8
9
11
10
12
13
17
14
16
15
19. Riser
20. Boom Raise
21. Boom Extend
22. Jib Raise
23. Emergency Stop
24. YELLOW-Tilt
25. RED-Oil Pressure
Warning
26. Hi/Low Speed
27. Gas/Propane Select/
Glow Plug Light
28. Auxiliary Power
29. Turret Rotate
30. Cage Rotate
31. Cage Level
32. Auxiliary Light
33. Horn
34. Generator
35. Boom Speed
36. Drive Control Handle
37. Key Switch
38. Foot Switch
18
Figure 2-1: Chassis Controls
37
1. Hour Meter
2. Water Temp.
3. Oil Pressure
4. Breaker
5. Glow Plug Light
6. Function Enable
7. Engine Start
8. Key Switch
9. Emergency Stop
10. Riser
11. Boom Extend
12. Jib Raise
13. Boom Raise/Lower
14. Turret Rotate
15. Platform Rotate
16. Platform Level
17. Boom Speed HI/LOW
18. Auxiliary Power
Figure 2-3: Key Switch
38
Figure 2-4: Foot Switch
AB62 Work Platform - European
2-3
Section
2.4
MACHINE PREPARATION & OPERATION
2.4 OPERATION
Before operating the work platform ensure that:
Pre-operation and safety inspection has been completed, and any discrepancies have been corrected.
The operator has been thoroughly trained on the
operation of the machine.
The work area is clear of all obstructions, holes,
drop-offs, or persons in the route of travel.
The surface is capable of supporting wheel loads.
Refer to figures 2-1 and 2-2 for control locations.
Starting the Engine
From the Lower Controls
1. From the platform controls, turn the key switch
on.
2. Turn the chassis key switch to CHASSIS position.
3. Press the start button to crank the engine.
Release when the engine starts.
4. For diesel machines: Turn key to ON position and
wait for glow plug light to go off. Start engine.
From the Platform Controls
Emergency Stop
At any time during operation, press the emergency
stop button to stop all functions in an emergency.
Driving
Service Horn
At any time during operation, press the service horn
button to sound an audible warning if necessary.
!
W A R N I N G
1. Turn the chassis key switch to platform controls.
2. Turn the platform switch fully clockwise to crank
the engine. Release when engine starts.
3. For diesel machines: Turn key to ON position and
wait for glow plug light to go off. When glow plug
light goes off, start engine.
!
Always wear an approved fall restraint properly
attached to designated platform anchorage
point when driving or elevating the machine
(see figure 2-5). Attach only one fall restraint to
each anchorage point.
With Boom Lowered
1. Turn chassis key switch to PLATFORM, and turn
on (turn clockwise) the chassis emergency stop
switch.
2. Mount the platform, close and latch the gate.
3. Attach approved fall restraint to designated platform anchorage point. Attach only one fall
restraint to each point.
4. Start engine.
5. Check that the area around and above the work
platform is clear of obstructions, holes, drop-offs,
persons in the route of travel, and the surface is
capable of supporting wheel loads.
6. Depress the foot switch and move the drive control handle forward to travel forward and reverse
to travel in the reverse direction.
NOTE: When the boom is rotated to the front of
the chassis (steering wheels aft), directions of
travel and steering will be reversed. Observe
the color-coded arrows on the control panel
near the drive control handle and on the chassis. They will indicate the direction of travel
when the drive control handle is moved
Figure 2-5: Typical Fall Restraint Anchorage Point
2-4
AB62 Work Platform - European
MACHINE PREPARATION & OPERATION
With Boom Elevated
Travel with boom elevated is restricted to firm, level
surfaces only.
When driving elevated, the machine will travel at
creep speed (0,3m [1 foot] per second.
Leveling the Platform
1. While depressing the foot switch, push the steering switch (located on top of the control handle) to
the left to turn left, and right to turn right.
Note: Steering is not self-centering. Wheels must
be returned to the straight ahead position by
operating the steering switch.
Positioning the Platform
Positioning the platform as close as possible to the
work area requires some planning. First, you must
survey the work site to find a suitable place to park
the machine. This must be a firm, level area as close
as possible to the work area. Take into consideration
all obstructions on the ground and overhead, and
avoid them.
Once you have moved the machine to a firm, level
surface as near as possible to the work area, follow
instructions on pages 2-5 and 2-6 to position the platform as close to the work area as possible.
Always, before operating any function, check the
area around and overhead for any obstructions or
electrical conductors.
W A R N I N G
!
NEVER exit the platform while the boom is elevated. Keep both feet firmly planted on the platform floor at all times.
Multifunction Controls
The UpRight AB62 employs the use of multifunction
controls. This means that riser or boom extension will
function at full speed while simultaneously operating
upper boom, jib, turret, or rotating the platform.
The turret may be rotated while driving when the
boom is lowered, if necessary to make turns in tight
areas.
!
W A R N I N G
All boom functions will operate at the speed selected
by upper speed control functions.
1. Turn chassis keyswitch to chassis controls.
2. With the engine running, operate the boom control switches to position the platform.
!
DO NOT operate the machine if the platform
does not maintain level when elevated.
NOTE: Platform leveling should be done only to
calibrate the automatic leveling system.
1. Set the function speed control dial to the desired
setting. Rotate the dial clockwise to increase
speed, counterclockwise to decrease. If you are
not sure what speed to use, start out slow; the
speed can be varied while operating the function.
2. While depressing the foot switch, push the platform level control switch forward to swing the platform upward, rearward to swing the platform
downward. Release the switch to stop leveling.
Rotating the Turret
1. Set the function speed control dial to the desired
setting. Rotate the dial clockwise to increase
speed, counterclockwise to decrease. If you are
not sure what speed to use, start out slow; the
speed can be varied while operating the function.
2. While depressing the footswitch, push the turret
rotation control lever right to rotate counterclockwise, left to rotate clockwise. Release the switch
to stop rotation. Observe the area around the
boom when rotating the turret to avoid any
obstructions.
Warning: If tilt alarm
sounds, retract boom and
drive machine to a level
surface.
Lower Control Operation
AB62 Work Platform - European
2.4
3. The High/Low switch will select between maximum speed, depending on the position of the
platform Boom Speed control, and a lower fixed
boom speed.
Steering
!
Section
Stop When Tilt
Alarm Sounds
2-5
Section
2.4
MACHINE PREPARATION & OPERATION
Elevating the Riser
1. Set the function speed control dial to the desired
setting. Rotate the dial clockwise to increase
speed, counterclockwise to decrease.
2. While depressing the foot switch, push the riser
control lever forward to elevate the riser, rearward
to lower the riser. Release the control lever to
stop elevating/lowering.
Elevating the Upper Boom
1. Set the function speed control dial to the desired
setting. Rotate the dial clockwise to increase
speed, counterclockwise to decrease. If you are
not sure what speed to use, start out slow; the
speed can be varied while operating the function.
2. While depressing the foot switch, push the upper
boom control lever forward to elevate the upper
boom, rearward to lower the upper boom.
Release the control lever to stop elevating/
lowering.
not sure what speed to use, start out slow; the
speed can be varied while operating the function.
2. While depressing the foot switch, push the jib
control lever forward to elevate the jib, rearward
to lower the jib. Release the control lever to stop
elevating/lowering.
Rotating the Platform
1. While depressing the foot switch, push the platform rotation control lever right to go counterclockwise and left to go clockwise. Release the
lever to stop rotation.
Emergency Operation
In the event of powered function failure, the elevating
assembly may be operated by using the Emergency
Power Unit. Hold in the Emergency Power button and
operate the Lowering Controls as normal.
!
W A R N I N G
!
NEVER climb down the elevating assembly. If
controls do not respond, ask someone on the
ground to lower the boom manually.
Emergency Towing
Extending the Upper Boom
1. Set the function speed control dial to the desired
setting. Rotate the dial clockwise to increase
speed, counterclockwise to decrease. If you are
not sure what speed to use, start out slow; the
speed can be varied while operating the function.
2. While depressing the foot switch, push the boom
extension control lever rearward to extend the
boom, forward to retract the boom. Release the
control lever to stop extending/retracting.
Elevating the Jib
1. Set the function speed control dial to the desired
setting. Rotate the dial clockwise to increase
speed, counterclockwise to decrease. If you are
2-6
Perform the following only when the machine will not
operate under its own power and it is necessary to
move the machine or when winching onto a trailer for
transportation
1. Insure that the platform is fully lowered, and that
the turret is rotated so that the platform is to the
rear of the machine.
2. Attach chain/cable of sufficient strength for towing
the machine to front or rear tie down lugs.
!
W A R N I N G
Chock wheels before
Machine may roll.
disengaging
!
hubs.
3. Refer to Figure 2-6 and disengage all four drive
hubs. Remove two screws and center cap. Reinstall center cap in the opposite direction.
NOTE: When hubs are disengaged, the brakes
are ineffective. The machine will roll freely.
AB62 Work Platform - European
MACHINE PREPARATION & OPERATION
4. When ready to move the machine, remove the
chocks. Tow or winch into position and replace
chocks.
5. Engage all four drive hubs by returning the center
caps to their original orientation.
!
C A U T I O N
!
DO NOT move the machine faster than 5 km/h
(3 mph). Faster speeds will damage drive components and void warranty.
Section
2.5
NOTE: When hubs are disengaged, the brakes
are ineffective. The machine will roll freely.
6. Secure the machine to the transport vehicle using
chains/straps of adequate load capacity (refer to
specifications on page 1-2) attached to chassis
tie down lugs (See Figure 2-7).
7. Place a wooden block (20cm x 10cm x 75cm)
7.5” x 4” x 28” under platform support braces as
shown (See Figure 2-7).
8. Attach ratchet strap under platform floor grating,
over support braces (See Figure 2-7). Tighten
securely; do not overtighten.
!
W A R N I N G
!
NEVER elevate the machine while on a truck or
trailer.
Drive Hub
Wooden Block
20 cm x 10 cm x 75 cm
(8” x 4” x 28”)
Center Cap
Chassis Tie Down
Lifting Lug (typ.)
Figure 2-7: Securing the Machine for Transportation
Figure 2-6: Disengaging Drive Hub
After Use Each Day
2.5 TRANSPORTATION
By Truck or Trailer
1. Insure that boom is fully lowered and retracted.
2. Raise the jib before the machine starts up or
down ramp to avoid platform contacting ground.
3. Maneuver the machine onto the bed of truck/
trailer.
4. When winching, follow instructions for emergency
towing on page 2-6. Attach winch cable to front
tie down lugs.
!
C A U T I O N
1. Ensure that the platform is fully lowered.
2. Park the machine on level ground, preferably
under cover, secure against vandals, children or
unauthorized operation.
3. Turn the upper key switch to OFF, the lower key
switch to PLATFORM, and remove all keys to prevent unauthorized operation.
!
Do not winch machine faster than 5 km/h (3
mph).
5. After winching, ensure that wheels are chocked.
AB62 Work Platform - European
2-7
Section
2.6
MACHINE PREPARATION & OPERATION
2.6 MAINTENANCE
Battery Maintenance
Fueling
!
Gasoline
1. Open left turret cover, then open fill cap.
See Figure 2-8.
2. Fill to capacity with unleaded motor fuel only.
3. Fuel tank full capacity is 159 L 42 US gallons.
Diesel
1. Open left turret cover, then open fill cap.
See Figure 2-8.
2. Fill to capacity with diesel motor fuel only, grade
#1-D or #2-D. Use distillate fuel only; do not use
residual or blend.
3. Fuel tank full capacity is 159 L (42 US gallons).
Hydraulic Oil
1. Open turret cover and check oil level at sight
gauge with the boom stowed and retracted;
engine running or stopped. See Figure 2-9.
2. If necessary, fill to capacity with clean ISO 46
compatible hydraulic oil.
3. Clean area around cap before opening.
4. Open filler/breather cap to add hydraulic oil.
5. Replace cap.
W A R N I N G
!
Hazard of explosive gas mixture. Keep sparks,
flame and smoking materials away from batteries.
Always wear safety glasses when working with
batteries.
Battery fluid is highly corrosive. Rinse away any
spilled fluid thoroughly with clean water.
Check battery fluid level daily, especially if the work
platform is being used in a warm, dry climate.
If electrolyte level is lower than 10mm (3/8 in.) above
the plates, add distilled water only. DO NOT use tap
water; it will shorten battery life.
Tires
Tire selection can affect the stability of the machine.
Use only tires supplied by UpRight unless approved
by the manufacturer in writing. Check air filled tire
pressure daily 5.5 bar (80 psi).
Lubrication
Refer to Maintenance Section for lubrication chart
and guidelines.
Hydraulic Oil Filler Cap
Fuel Cap
Level Gauge
Figure 2-9: Hydraulic Oil Tank
Figure 2-8: Fuel Tank
2-8
AB62 Work Platform - European
Section 3
MAINTENANCE
3.1 INTRODUCTION
!
W A R N I N G
3.2 SPECIAL TOOLS
!
Be sure to read, understand and follow all information in the Operation Section of this manual
before attempting to operate or perform service
on any work platform.
NOTE: For Information on the engine, refer to
your local engine dealer.
This section contains instructions for the maintenance of the AB62 Work Platform. Procedures for the
operation inspection, adjustment, scheduled maintenance, and repair/removal are included.
Referring to Section 2 will aid in understanding the
operation, and function of the various components
and systems of the work platform, and help in diagnosing and repair of the machine.
Refer to “Preventative Maintenance Check List” on
page 4 for recommended maintenance intervals.
NOTE:Unless otherwise specified, torque all fittings according to Torque Specifications Chart
(pages 3-22 & 3-23).
Figure 3-1: UpRight Connector Kit, Small
AB62 Work Platform - European
The following is a list of special tools which may be
required to perform certain maintenance procedures
on the work platform.
• 0-69 bar (0-1000 psi) Hydraulic Pressure Gauge
with Adapter Fittings
• 0-207 bar (0-3000) psi Hydraulic Pressure Gauge
with Adapter Fittings
• Small UpRight Connector Field Kit
(UpRight P/N 030899-000)
• Large UpRight Connector Field Kit
(UpRight P/N 030898-000)
• Inclinometer (UpRight P/N 010119-000)
• Optimizer (UpRight P/N 100329-000)
• Optimizer Adapter Cable (100329-005)
• Quick Disconnect Hydraulic Adapter (063965-002)
Figure 3-2: UpRight Connector Kit, Large
3-1
Section
MAINTENANCE
3.2
UpRight Connectors
Figure 3-3: Plugs and Receptacles, UpRight Connectors
Deutsch connectors are designed so that connector
parts, contacts or electrical cables may be replaced
without replacing the entire connector.
Releasing Locking Fingers
Male Connector (Plug)
1. Disconnect the male connector (plug) from the
female connector (receptacle).
2. Using the flat end of the Removal Tool (or flat
blade screwdriver), pry the Locking Wedge from
the Male Connector. Care should be taken that
the Silicon Gasket is not damaged during this
procedure.
3. Check all parts for damage. Replace all parts
which are damaged or worn.
4. Replace or recrimp the wires and contacts. Refer
to “Crimping” procedure.
Female Connector (Receptacle)
1. Disconnect the male connector (plug) from the
female connector (receptacle).
2. Using the notched end of the Removal Tool (or a
wire hook), pull the Locking Wedge from the
Female Connector.
3. Check all parts for damage. Replace all parts
which are damaged or worn.
4. Replace or recrimp the wires and contacts. Refer
to “Crimping” procedure.
3-2
Figure 3-4: Locking Finger, UpRight Connector
1. The Locking Fingers can be released following
the removal of the Locking Wedge of either the
male or female connector.
2. Use the removal tool (or flat blade screwdriver) to
push the Locking Fingers aside. This will release
the grip on the contact.
3. Pull the wire and contact out of the connector.
Crimping
Note: Complete crimping instructions are
included in each Field Kit.
1. Strip 1/4” (6 mm) from the wire.
2. Insert the contact into the crimping tool.
3. Insert the stripped wire into the contact. Copper
strands should be visible in the bleed hole of the
contact, and no copper strands should be loose
(outside) of the contact barrel.
4. Completely close the handles of the crimping
tool. Release the handles of the crimping tool and
remove the crimped contact.
AB62 Work Platform - European
MAINTENANCE
5. Inspect the crimped contact to ensure that all
strands are secure in the crimp barrel.
Removing Contact From Heavy Duty Plug
1. Slip the removal tool along the wire to be
replaced.
2. Push the removal tool into the connector until the
contact is released.
3. Pull the wire and contact out of the plug.
AB62 Work Platform - European
3.3
3.3 PREVENTATIVE MAINTENANCE
The complete inspection consists of periodic visual
and operational checks, together with all necessary
minor adjustments to assure proper performance.
Daily inspection will prevent abnormal wear and prolong the life of all systems. The inspection and maintenance schedule is to be performed at regular
intervals. Inspection and maintenance shall be performed by personnel who are trained and familiar
with mechanical and electrical procedures.
!
Figure 3-5: Heavy Duty UpRight Connector
Section
W A R N I N G
!
Before performing preventative maintenance,
familiarize yourself with the operation of the
machine.
Always block the elevating assembly whenever
it is necessary to perform maintenance while
the platform is elevated.
The preventative maintenance table has been
designed to be used primarily for machine service
and maintenance repair. Please photocopy the following page and use this table as a checklist when
inspecting the machine for service.
3-3
Section
MAINTENANCE
3.3
Preventative Maintenance Table Key
Preventative Maintenance Report
Date:___________________________________
Owner: _________________________________
Model No: _______________________________
Serial No: _______________________________
Serviced By: _____________________________
Service Interval: __________________________
Interval
Daily=each shift or every day
50h/30d=every 50 hours or 30 days
250h/6m=every 250 hours or 6 months
1000h/2y=every 1000 hours or 2 years
Y=Yes/Acceptable
N=No/Not Acceptable
R=Repaired/Acceptable
Table 3-1: Preventative Maintenance Check List
COMPONENT
Battery
Engine Oil and
Filter
Engine Fuel
System
Engine
Coolant
Hydraulic Oil
*See Note
Hydraulic
System
INSPECTION OR SERVICES
INTERVAL
Check electrolyte level
Daily
Clean exterior
3m
Clean terminals
3m
Check level and condition
INTERVAL
Check for leaks
Daily
Check oil level
250h/6m
50h/30d
Check for leaks
Daily
Check hardware & fittings for proper torque
6m
Change oil & filter (Diesel)
500h
Check linkage for wear areas
30d
Change oil & filter (Gas)
200h
Check fuel level
Daily
Steering
System
Oil all pivot points
30d
Check steering cylinder for leaks
30d
Check for leaks
Daily
Check for missing/loose retainers
Daily
Replace fuel filter
6m
Inspect for structural cracks
Daily
Check air cleaner
Daily
Check pivot points for wear
30d
Check coolant level (with engine cold)
Daily
Replace coolant
3m
Check pivot pin retaining bolts for proper
torque
30d
Check oil level
Daily
Check members for deformation
Daily
Change filter
6m
Check hoses for pinch or rubbing points
Daily
Check component mounting for proper
torque
6m
Drain and replace with ISO 46 compatible
2y
Check for leaks
Daily
Check hose connections
30d
Check hoses for exterior wear
Elevating
Assembly
Chassis
30d
Check operation of all controls
Daily
Control Cable
Check the exterior of the cable for
pinching, binding or wear
Daily
Check fasteners for proper torque
Daily
3-4
Torque Hubs
INSPECTION OR SERVICES
2000h/2y
Controller
Hydraulic
Drive System
COMPONENT
Change Oil (SAE 90 wt. gear oil)
Daily
Hydraulic
Pump
R
Daily
Operate the emergency lowering valve and
check for serviceability
Tires
N
Change Oil after break-in period
Emergency
Hydraulic
System
Platform Floor
and Rails
Y
Lift Cylinder
Turret
Check welds for cracks
Daily
Check the cylinder rod for wear
30d
Check pivot pin retaining bolts for proper
torque
30d
Check seals for leaks
30d
Inspect pivot points for wear
30d
Check fittings for proper torque
30d
Check ring gear for proper
lubrication and wear
Daily
Check welds for cracks
Daily
Lubricate ring gear (MoS2 grease)
150h/3m
Check condition of platform
Daily
Check for and repair collision damage
Daily
Check condition of anchorage points
Daily
Check fasteners for proper torque
3m
Check condition of operator manual
Daily
Check for corrosion-remove and repaint
6m
Check for damage
Entire Unit
Daily
Lubricate
30d
Check lug nuts
(torque to 190 ft. lbs.[257Nm])
30d
Check for peeling, missing, or unreadable
labels & replace
Daily
Check air pressure (80 psi [5.5 bar])
Daily
Wipe clean
30d
Check for leaks at mating surfaces
30d
Check for hose fitting leaks
Daily
Check mounting bolts for proper torque
30d
Check hydraulic drive motor operation
Daily
Check hoses,fittings, and valve block for
leaks
Daily
Labels
Y
N
R
*ISO grade 46, for temperatures above 32° F (0° C).
*For colder climates: ISO grade 32, for temperature range of 0° F (-17° C) up to 32° F (0° C).
*ISO grade 15, for temperatures below 0° F (-17° C).
AB62 Work Platform - European
MAINTENANCE
Section
3.4
3.4 SUPPORTING ELEVATING ASSEMBLY
(FIGURE 3-6)
!
W A R N I N G
!
Never perform service on the work platform in
the elevating assembly area while the platform
is elevated without first blocking the elevating
assembly.
DO NOT stand in the elevating assembly area
while deploying or storing brace.
Installation
1. Park the work platform on a firm, level surface.
2. Fully retract upper boom.
3. Verify that the platform emergency stop switch is
ON.
4. Turn platform/chassis switch to CHASSIS.
5. Using the Boom Raise/Lower Switch, elevate the
boom.
6. Use a brace (figure 3-6) with a minimum capacity
of two tons, to support the elevating assembly.
7. Using the Boom Raise/Lower Switch gradually
lower the elevating assembly until the brace is
supporting the elevating assembly as shown in
figure 3-7.
Figure 3-6: Supporting Elevating Assembly
Removal
1. Using the Boom Raise/Lower Switch, gradually
raise the platform until boom is free of support.
2. Remove support.
3. Using the Boom Raise/Lower Switch, completely
lower the platform.
Figure 3-7: Elevating Assembly Brace
AB62 Work Platform - European
3-5
Section
3.5
MAINTENANCE
3.5 BATTERY MAINTENANCE
!
W A R N I N G
Battery Charging
!
Hazard of explosive gas mixture. Keep sparks,
flame and smoking material away from battery.
Always wear safety glasses when working with
batteries.
Battery fluid is highly corrosive. Thoroughly
rinse away any spilled fluid with clean water.
Battery Inspection and Cleaning
Check battery fluid level daily, especially if the work
platform is being used in a warm, dry climate. If
required, add distilled water ONLY. Use of tap water
will shorten battery life.
The battery should be inspected regularly for signs of
cracks in the case, electrolyte leakage and corrosion
of the terminals. Inspect cables for worn spots or
breaks in the insulation and for broken cable
terminals.
Clean the battery when it shows signs of corrosion at
the terminals or when electrolyte has overflowed during charging. Use a baking soda solution to clean the
batteries, taking care not to get the solution inside
the cells. Rinse thoroughly with clean water. Clean
battery and cable contact surfaces to a bright metal
finish whenever a cable is removed.
!
W A R N I N G
!
Charge the battery only in a well-ventilated
area.
Do not charge the battery when the work platform is in an area containing sparks or flames.
Permanent damage will result if the battery is
not immediately recharged after discharging.
Never leave the charger unattended for more
than two days.
Never disconnect the cables from the battery
when the charger is operating.
Keep the charger dry.
Charge battery as follows:
1. Check the fluid level. If the electrolyte level is
lower than 10mm (3/8 in) above the plates, add
clean, distilled water only.
2. Connect the charger plug to a properly grounded
outlet of the proper voltage and frequency.
3. Use a charger which turns off automatically when
the batteries are fully charged.
3.6 LUBRICATION
Refer to Table 3-1 for the lubrication intervals and
Figures 3-8 and 3-9 for location of items that require
lubrication service. Refer to the appropriate sections
for lubrication information on the Steering Linkage,
Torque Hubs, Hydraulic Oil, Filter, and Engine Oil and
Filter.
Grease Fittings
Wipe each fitting before and after greasing. Using
multipurpose grease in a grease gun, pump the
grease into the fitting until grease just begins to
appear at the edges of the pivot. Wipe off any excess
grease.
Lubricating Turret Gears
Using a brush, apply open gear grease to the turret
gears (Figure 3-8).
3-6
AB62 Work Platform - European
MAINTENANCE
Section
3.6
3. Remove the drain plug and allow all oil to drain
into the container. Be sure to dispose of oil properly.
4. Reinstall the drain plug.
5. Remove filter element from filter head.
6. Apply a thin film of clean hydraulic oil (ISO No.46)
to the gasket of the replacement filter.
7. Thread replacement filter onto the filter head until
the gasket makes contact then rotate 3/4 of a turn
further.
8. Fill the hydraulic oil tank to operating level on
sight gauge with ISO No.46 hydraulic oil.
Open gear lube
Figure 3-8: Turret Gear
Figure 3-9: Turret Bearing Grease Zerk
Hydraulic Oil and Filter
Fluid Level
With the platform fully lowered, check oil level on
sight gauge. If the oil is NOT in operating range, add
hydraulic fluid until oil is visible in operating range on
dipstick or visible in sight gauge. DO NOT fill above
operating range or when the platform is elevated.
Oil and Filter Replacement
1. Operate the platform for 10-15 minutes to bring
the hydraulic oil up to normal operating temperature.
!
C A U T I O N
!
The hydraulic oil may be hot enough to cause
burns. Wear safety gloves and safety glasses
when handling hot oil.
2. Provide a suitable container to catch the drained
oil.
AB62 Work Platform - European
3-7
Section
MAINTENANCE
3.7
3.7 TILT SENSOR (FIGURE 3-11)
The Tilt Sensor has three wires: red, power (12v in);
black, ground; and white, output (12v out). To verify
that the sensor is working properly, there is one red
LED under the sensor that indicates the sensor is off
level.
1. Check tires for proper pressure.
2. Place the machine on a firm, level surface.
3. Use Inclinometer to ensure that the front and rear
of the chassis are level.
4. Adjust the three leveling locknuts until the bubble
is centered in the circle on the attached bubble
level.
5. Elevate the platform until down limit switch opens,
and push the tilt sensor base to test the alarm circuit. The red LED should turn on, and the tilt
alarm should sound.
Adjustment
Screw
Figure 3-11: Linkage Limit Switch
Bubble Level
Adjustment nuts
Figure 3-10: Tilt Sensor
Figure 3-12: Proximity Switch
3-8
AB62 Work Platform - European
MAINTENANCE
Section
3.8
3.8 HYDRAULIC MANIFOLD (FIGURE 3-14)
Installation
It is not necessary to remove the manifold to perform
all maintenance procedures. Prior to performing
maintenance, determine if the manifold needs to be
removed.
1. Attach manifold assembly to mounting plate with
bolts.
2. Connect solenoid leads to terminal strip (as previously tagged).
3. Connect hydraulic hoses. Be certain to tighten
hoses to manifold.
4. Reconnect the battery.
5. Operate each hydraulic function and check for
proper operation and leaks.
6. Adjust lift relief and counterbalance valve pressures according to instructions in Section 3-10.
Removal
1. Disconnect the battery.
2. Tag and disconnect the solenoid valve leads from
the terminal strip.
3. Tag, disconnect, and plug hydraulic hoses.
4. Remove the bolts that hold the manifold to the
mounting bracket.
5. Remove the manifold block.
Disassembly
NOTE: Mark all components as they are removed
so as not to confuse their location during
assembly. Refer to Figure 3-14 often to aid in
disassembly and assembly.
1. Remove coils from solenoid valves.
2. Remove spool valve cover and spool valve.
3. Remove solenoid valves, lift relief valve, counterbalance valves and divider combiner valve.
4. Remove fittings, plugs, springs, balls, and orifices.
Cleaning and Inspection
1. Wash the manifold in cleaning solvent to remove
built-up contaminants, then blow out all passages
with clean compressed air.
2. Inspect the manifold for cracks, thread damage
and scoring where O-rings seal against internal
and external surfaces.
3. Wash and dry each component and check for
thread damage, torn or cracked O-rings, and
proper operation.
4. Replace parts and O-rings found unserviceable.
Assembly
NOTE: Lubricate all O-rings before installation to
prevent damage to O-rings. Seat all balls in
manifold block by lightly tapping on the ball
with a brass drift punch.
1. Install fittings, plugs, springs, balls, and orifices.
Use one drop of Locktite #242 on each screw-in
orifice.
2. Install solenoid valves, lift relief valve, counterbalance valves, divider combiner valve, and spool
valve.
AB62 Work Platform - European
3-9
Section
3.9
MAINTENANCE
3.9 SETTING HYDRAULIC PRESSURES
Figure 3-14 shows complete hydraulic manifold
assembly.
NOTE: Check hydraulic pressures whenever the
pump, manifold, or any relief valve has been
serviced or replaced.
High Flow Relief Valve (#5)
1. Operate the hydraulic system 10-15 minutes to
warm the oil.
2. Install a 0-3000 PSI pressure gauge to the pressure test port #3-using Part # 063965-002, Quick
Disconnect Adapter.
3. Retract boom completely.
4. While activating the boom retract function, set the
pressure to 186 bar (2700 PSI) maximum by
slowly turning the adjusting screw. Turning the
adjusting screw clockwise increases pressure;
counterclockwise decreases pressure.
5. Remove the pressure gauge, and reinstall all
plugs.
Low Flow Relief Valve (#9)
1. Operate the hydraulic system 10-15 minutes to
warm the oil.
2. Install a 0-207 bar (0-3000 psi) pressure gauge to
the pressure test port.
3. Completely extend jib function.
4. Continue activating function and set the pressure
to 97 bar (1400 psi) by slowly turning the adjustment screw. Turning the adjusting screw clockwise increases pressure; counterclockwise
decreases pressure.
5. Remove the pressure gauge, and reinstall all
plugs.
Counterbalance Relief Valves
1. If any counterbalance relief valve is faulty, completely lower the jib, and retract the boom.
2. Replace or recalibrate the counterbalance valve.
3. Slowly cycle function related to replaced counterbalance valve several times to remove air from
the system.
3-10
AB62 Work Platform - European
Section
MAINTENANCE
3.9
16
17
19
1. Diverter Valve
2. High Flow Proportional Valve
3. Gage Port Plug - High Pressure
4. 4-Way Valve - Steering
5. High Pressure Relief Valve
6. 4-Way Motor Spool Valve - Riser
7. 4-Way Valve - Boom Extend/Retract
8. Low Flow Proportional Valve
9. Low Pressure Relief Valve
18
10. 4-Way Center Valve 3/4 - Boom Raise
11. 4-Way Motor Spool Valve 3/4 - Platform Level
12. Platform Rotate Flow Control Valve
13. Fitting, Straight
14. Fitting, Straight
15. Fitting, Straight
16. 4-Way Center Valve 3/4 - Jib
17. 4-Way Motor Spool Valve 3/4 - Turret Rotate
18. Gage Port Plug - Low Pressure
19. 4-Way Motor Spool Valve 3/4 - Platform Rotate
Figure 3-13: Hydraulic Manifold
AB62 Work Platform - European
3-11
Section
3.10
MAINTENANCE
NOTE: Change fluid in torque hubs after the first
50 hours of operation. Change every 1000
hours thereafter.
11. Separate brake from torque hub. Discard gasket.
12. Remove 1/2-20 nuts and washers from torque
hub.
13. Remove torque hub.
Changing Fluid
Installation
NOTE: It is not necessary to remove torque hub
to change fluid.
1. Raise the axle using an eight-ton hydraulic jack.
Place eight ton-jack stands under each end of the
axle.
2. Remove wheel and rotate torque hub so drain
plug on side is at bottom of hub.
3. Remove drain plugs at bottom of hub and front
cover, and drain oil from unit.
4. Rotate hub so plug opening in front cover is
slightly above half full position and side plug
opening is at the top.
5. Fill unit with 90 wt. gear oil until oil comes out
front plug opening (torque hub must be 1/2 full).
6. Replace plugs.
7. Install wheel and lower machine to the ground.
NOTE: Torque all hardware to torques listed on
pages 3-22 and 3-23 unless otherwise specified.
1. Install the torque hub using hardware previously
removed.
2. Using SAE 90W weight gear lube, fill the torque
hub. Torque hub must be half full.
3. Install new gasket and brake.
4. Install new gasket and drive motor.
5. Secure assembly using washers and bolts.
6. Connect hydraulic brake lines.
7. Connect hoses to drive motor.
8.Install wheels.Torque lug nuts to 257Nm
(190 ft/lbs).
9. Bleed brake lines if necessary.
10. Remove jack stands and lower rear end.
11. Connect battery terminal.
12. Operate machine and check for proper operation
of torque hub. Check function of brake.
3.10 TORQUE HUBS
Torque Hub Removal
1. Park the work platform on firm level, ground and
block the wheels to prevent the work platform
from rolling.
2. Disconnect battery negative terminal.
3. Loosen the wheel lug nuts on the torque hub to
be removed.
4. Raise the axle of the work platform using an
eight- ton jack.
5. Position two eight-ton jack stands under the axle
to prevent the work platform from falling if the jack
fails.
6. Remove the wheel nuts and wheel.
7. Disconnect hydraulic brake line from brake.
!
C A U T I O N
!
Clean all fittings before disconnecting the hose
assemblies.
Plug all port holes and hose assemblies IMMEDIATELY to prevent contamination from dust
and debris.
8. Mark and remove hoses from drive motor.
9. Remove mounting bolts from drive motor.
10. Separate drive motor from brake. Discard gasket.
3-12
REAR
FRONT
Figure 3-14: Torque Hub Assembly
AB62 Work Platform - European
MAINTENANCE
Disassembly of Torque Hub (Figure 316)
1. Slide the coupling (1) from splines on input shaft
(2).
2. Position the assembly upright on face of spindle.
3. Remove the disengage cover (31) if necessary.
4. Remove eight bolts (29) and the large cover (28)
from the unit. The thrust washer (25) and the disengage plunger (26) usually remain attached to
the large cover (28) when it is removed. Remove
thrust washer (25), disengage plunger (26) and
O-ring (27) from the large cover (28).
5. Remove primary sun gear (24) from end of input
shaft (2).
6. Remove the primary carrier assembly (22).
7. Remove the secondary carrier assembly (21).
8. Remove the input shaft (2) from spindle (3).
Remove the retaining rings (17), washers (18),
and disengage spring (19) from input shaft (2)
only if replacement is required.
9. One tab of lock washer (15) will be engaged in
slot of bearing nut (16); bend back to release.
Remove the bearing nut (16), lock washer (15),
and thrust washer (14).
NOTE: A special locknut wrench is required for
the removal of the bearing locknut. The Bearing
Locknut Tool, Bearing Cone Driver and Spindle/Shaft Drive Tool are included in the Service
Kit, part number 100254-020.
10. Bolt Spindle Drive Tool (Service Kit #100254020) to ring gear (20). Grade 8 bolts should be
used. Drive spindle (3) from hub by turning the
center bolt of Spindle Drive Tool. Care should be
taken to avoid damaging splines and threads on
spindle.
NOTE: Bearing cone (13) has been designed with
a press fit with respect to spindle (3). Considerable force will be required to remove cone from
spindle.
11. Remove Spindle Drive Tool from ring gear (20).
12. Remove the eighteen bolts (9) and washers (10)
from hub (11) and remove ring gear (20). It may
be necessary to strike ring gear (20) with a rubber mallet to loosen from hub (11).
13. Remove the boot seal (4) and oil seal (5) and
bearing cones (6 & 13) from hub (11). Inspect
bearing cups (7 & 12) in position and remove only
if replacement is required.
AB62 Work Platform - European
Section
3.10
Assembly of Torque Hub
1. Press new bearing cups (7 & 12) in each side of
the hub (11). It is recommended that bearing
cups (7 & 12) and cones (6 & 13) be replaced in
sets.
2. Assemble bearing cone (6) into cup (7) at seal
end of hub (11) and press a new seal (5) into hub
(11). Install boot seal (4) on hub (11) if unit is so
equipped.
3. Position spindle (3) upright on bench. Lubricate
lips of seal (5) and lower hub (11) on to spindle
(3). Hub (11) should be centered as it is lowered
over spindle (3) to prevent seal damage.
4. Assemble bearing cone (13) over spindle (3).
Press bearing cone (13) over spindle bearing
journal using press and cylindrical Bearing Cone
Driver (Service Kit 100254-020). Press bearing
cone (13) down until rollers just touch cup (12).
Take care to avoid pressing cone (13) too far.
NOTE: If a press is not available, place Bearing
Cone Driver Tool over spined end of spindle (3)
on the edge of bearing cone(13), and drive into
place with hammer or mallet. If this method is
used, care must be taken to avoid damage to
bearing cone and spindle.
5. Install thrust washer (14) with tab in keyway of
spindle and bearing nut (16). DO NOT install
lock washer (15) at this time.
6. Clean mating surfaces and apply a bead of silicone sealant to face of hub (11) that mates with
ring gear (20). See instructions on sealant package. Hub (11) is attached to ring gear (20) with 18
3/8-24 grade 8 hex head cap screws (9) and flat
washers (10). Torque cap screws to 50-52 lb-ft.
(70-81 Nm).
7. Place Spindle Drive Tool (Service Kit #100254020), over spindle (3) and bolt or pin to ring gear
(20). Make sure center bolt of Drive Tool is not
touching spindle and is prevented from rotating
by jam nuts provided on tool.
8. Check initial rolling torque by installing a lb.-in.
torque wrench (arm or dial type) on center nut of
Spindle Drive Tool and turning hub (11) slowly
and steadily with the torque wrench. Note mean
torque. An initial bearing torque of greater than
52 lb.-in. with boot seal installed or 46 lb.-in. without boot seal means that the cone (13) was
pressed on to tightly in step 4. In this case, back
off bearing cone (13) by pressing spindle (3) out
of cone (13) until initial preload is relieved. See
step 10 of disassembly procedure.
3-13
Section
3.10
MAINTENANCE
9. Torque bearing nut (16) with Bearing Locknut
Tool (Service Kit #100254-020) until a bearing
rolling torque of 42-50 lb.-in., with a boot seal
installed, or 38-46 lb.-in., without a boot seal, is
reached. This may require several trials of pressing the cone (13) by torquing the nut (16) and
then checking the rolling torque. Rotate hub (11)
by hand as nut is being tightened in order to seat
bearings.
NOTE: Up to 250 lb.-ft. of torque may have to be
applied to bearing nut (16) in order to press
cone (13) into position.
10. Remove bearing nut (16) and install lock washer
(15). Replace bearing nut (16).
11. Re-torque bearing nut (16) to 80-90 Nm-ft (60-70
lb.)
12. Secure bearing nut (16) by bending a lock
washer (15) tab into one of four bearing nut slots.
If no tab aligns with a slot, the nut may be tightened until one of the slots aligns with a lock
washer tab.
13. Assemble a washer (18), spring (19), a second
washer (18), and a retaining ring (17) in the middle grooves of input shaft (2). Install a second
retaining ring (17) in groove near small end of
input shaft (2).
14. Assemble the splined end of the input shaft (2)
down into spindle (3).
15. Assemble the secondary carrier assembly (21) to
spindle (3) at splines.
16. Assemble the primary carrier assembly (22) into
the ring gear (20). It will be necessary to rotate
carrier to align secondary sun gear (part of primary carrier assembly (22)) with planet gear
teeth in secondary carrier assembly (21). Assemble primary sun gear (24) over input shaft (2).
Rotate primary sun gear (24) to align input shaft
(2) to gear splines and gear teeth in primary carrier assembly (22).
17. Lubricate O-ring (27) and assemble in groove
inside cover hole; push disengage plunger (26)
into cover (28) with pointed end facing inside of
unit.
18. Assemble the thrust washer (25) with tangs
engaged with cover (28). NOTE: A small amount
of grease applied to the back side of thrust
washer (25) will hold washer in place. Apply a
bead of silicone sealant to end of face of ring
3-14
gear (20). Assemble cover (28) aligning holes of
cover and ring gear. Assemble the eight 5/16-18
x 1 inch hex head bolts (29). Torque bolts to
27-34 Nm (20-25 lb.-ft.).
19. Assemble the disengage cover (31) with dimpled
center protruding out if wheel is to be used to
drive the vehicle. Assemble and torque the two
5/16-18 x 1/2 inch bolts (32). Torque bolts to
13-27 Nm (10-20 lb.-ft.).
20. Invert the torque hub assembly and assemble the
coupling (1), with counterbore out, to the input
shaft (2).
21. After motor is assembled to drive or drive is
sealed at spindle, fill with lubricant to proper level
and replace all plugs.
Carrier Assemblies
Do not attempt to service primary or secondary carrier assemblies.
Sealing Compound
Silastic RTV732 sealer and General Electric Silimate
RTV No. 1473 or RTV No. 1503 are currently recommended for sealing gasket surfaces. Sealant should
be applied in a continuous bead, which should be
centered on the surface to be sealed but should
move to the inside of the hole at each bolt hole location.
AB62 Work Platform - European
Section
MAINTENANCE
3.10
1
2
3
8
4
11
9
5
12
6
10
13
7
14
15
16
22
17
23
19
24
20
25
26
27
18
28
21
29
31
30
1. Coupling
2. Input Shaft
3. Spindle
9. Hex Head Bolt (Grade 8)
10 Flat Washer
11. Hub
16. Bearing Nut
17. Retaining Ring
18. Washer
19. Disengage Spring
20. Ring Gear
21. Secondary Carrier Assembly
32
22. Primary Carrier Assembly
23. Retaining Ring
24. Primary Sun Gear
26. Disengage Plunger
28. Large Cover
29. Hex Head Bolt
30. Magnetic Plug
31. Disengage Cover
32. Hex Head Bolt
33. Quick Disconnect Gasket
34. Quick Disconnect Assembly
35. Hex Head Bolt
Service Kit (100254-020) contains:
4. Boot Seal
5. Oil Seal
6. Bearing, Cone
7. Bearing, Cup
8. Wheel Bolt
12. Bearing, Cup
13. Bearing, Cone
14. Thrust Washer
15. Lock Washer
25. Thrust Washer
27. O-Ring
Figure 3-15: Torque Hub
AB62 Work Platform - European
3-15
Section
3.11
MAINTENANCE
3.11 CYLINDER REPAIR
Assembly
Removal
NOTE: Torque all hardware to torques listed on
pages 3-22 and 3-23 unless otherwise specified.
1. Lubricate all components with clean hydraulic
fluid.
NOTE: To avoid cutting the seals, do not use
sharp-edged tools during seal replacement.
After installing seals, allow at least one hour
for the seals to elastically restore to their original shape before assembling cylinder.
2. Install new seal kit components.
3. Lubricate rod wiper and seal with hydraulic fluid,
and slide head onto rod.
4. Lubricate seals on piston and head.
5. Carefully slide rod assembly into cylinder.
6. Secure head into cylinder.
1. Remove cylinder from machine.
NOTE: Refer to “Illustrated Parts Section” for
location of cylinder and list of parts which
secure cylinder.
NOTE: If necessary, refer to “Supporting Elevating Assembly” in Section 3.4.
2. Mark and disconnect hoses and IMMEDIATELY
cap the openings to prevent contamination.
!
W A R N I N G
!
Cylinders may be very heavy. Support heavy
cylinders before removing pins which secure a
cylinder to the machine.
Disassembly
Installation
1. Remove head from cylinder body.
2. Carefully slide rod assembly out of cylinder.
3. Remove seal kit components (wipers, rod seals,
O-rings, and backup rings) from head and piston.
4. Inspect parts for scratches, pits or polishing.
Check seal grooves and sealing surfaces.
Scratches or pits deep enough to catch the fingernail are unacceptable; replace the cylinder.
Polishing is a sign of uneven loading. When this
occurs, the surface should be checked for roundness. Cylinders not round within .007” should be
replaced.
1. Installation is the reverse of removal.
2. Carefully remove elevating assembly support.
3. Slowly cycle cylinder several times to remove air
from the hydraulic system.
4. Check for proper cylinder operation. Check cylinder and hydraulic connections for leaks.
3-16
AB62 Work Platform - European
MAINTENANCE
Seal Kit 104258-011 (S/N 1100-1108)
Seal Kit 104258-010 (S/N 1109-Current) includes:
1. O-ring
2. Rod Wiper
3. Seal
4. Wear Ring
5. O-Ring
6. Back-up Ring
7. O-Ring
8. Seal
9. Wear Ring
Section
3.11
NOTE: Torque Locknut “D” to 339 - 407 Nm (250-300 ft. lbs
A. Rod
B. Head
C. Piston
D. Nut
E. Cylinder
F. Counterbalance Valve
Figure 3-16: Master Cylinder (S/N 1109 - Current)
Seal Kit 104260-011 (S/N 1100-1108)
Seal Kit 104260-010 (S/N 1109-Current) includes:
1. Rod Wiper
2. Seal
3. Wear Ring
4. O-Ring
5. Back-up Ring
6. O-Ring
7. Seal
8. O-ring
9. Wear Ring
NOTE: Torque Locknut “D” to 1898 - 1700 Nm (1,400-1,700 ft. lb
A. Rod
B. Head
C. Piston
D. Nut
E. Cylinder
F. Counterbalance Valve
Figure 3-17: Riser Cylinder (S/N 1109 - Current)
AB62 Work Platform - European
3-17
Section
MAINTENANCE
3.11
Seal Kit 104256-011 (S/N 1100-1108)
Seal Kit 104256-010 (S/N 1109-Current) includes:
1. Rod Wiper
2. Seal
3. Wear Ring
4. O-Ring
5. Back-up Ring
6. O-Ring
7. Wear Ring
8. Seal
A. Rod
B. Head
C. Spacer
D. Piston
E. Set Screw
F. Cylinder
G. Counterbalance Valve
Figure 3-18: Boom Cylinder (S/N 1109 - Current)
Seal Kit 104255-011 (S/N 1100-1108)
Seal Kit 104255-010 (S/N 1109-Current) includes:
1. Rod Wiper
2. Seal
3. Seal
4. O-Ring
5. Back-up Ring
6. O-Ring
7. Wear Ring
8. Wear Ring
A. Rod Wiper
B. Head
C. Spacer
D. Set Screw
E. Piston
F. Cylinder
G. Counterbalance Valve
Figure 3-19: Extend Cylinder (S/N 1109 - Current)
3-18
AB62 Work Platform - European
MAINTENANCE
Seal Kit (104556-010) includes:
1. O-Ring
2. Rod Wiper
3. Seal
4. Wear Ring
5. O-Ring
6. Back-up Ring
7. O-Ring
8. Seal
9. Wear Ring
Section
3.11
NOTE: Torque Locknut “D” to 237 - 271 Nm (175-200 ft.lbs.)
A. Rod
B. Head
C. Piston
D. Nut
E. Cylinder
F. Counterbalance Valve
G. Washer Seal
H. Bleeder Plug
Figure 3-20: Axle Lock Cylinder
Seal Kit 100557-010 includes:
1. O-Ring
2. Rod Wiper
3. Seal
4. Wear Ring
5. Back-up Ring
6. O-Ring
7. Wear Ring
8. Seal
A. Rod
B. Head
C. Spacer
D. Cylinder
Figure 3-21: Steering Cylinder
AB62 Work Platform - European
3-19
Section
MAINTENANCE
3.12
Seal Kit 104257-011 (S/N 1100-1110)
Seal Kit 104257-010 (S/N 1111-Current) includes:
1. O-Ring
2. Rod Wiper
3. Seal
4. Wear Ring
5. Back-up Ring
6. O-Ring
7. Cast Iron Ring
8. Wear Ring
9. Seal
NOTE: Torque Locknut “D” to 237 - 271 Nm (175-200 ft. lbs.)
A. Rod
B. Head
C. Piston
D. Nut
E. Cylinder
F. Relief Valve
G. Counterbalance Valve
Figure 3-22: Jib Cylinder (S/N 1111 - Current)
3.12 SETTING BACKLASH ON ROTATIONAL
GEAR
Backlash is the shortest distance between tooth surfaces of adjacent teeth in mating gears.
1. Position boom directly over center of rear axle
(standard forward driving position).
2. Loosen the grearbox mounting bolts just enough
to allow the gearbox to be adjusted in and out.
3. Turn adjusting screws in until gearbox teeth make
contact with bearing teeth and adjusting screws
become snug.
4. Unscrew adjusting screws five turns. Do not
move the gearbox.
5. Place the magnetic indicator base on the bottom
of the turret assembly. Set the dial indicator probe
on the gearbox pinion straight across from the
bearing (Figure 3-24) and adjust the dial to
ZERO.
6. Move the gearbox away from the bearing until the
indicator shows the correct amount of backlash
(.007”-.009”).
7. Carefully torque the gearbox mounting bolts while
watching the indicator to make sure the correct
backlash is maintained.
8. Snug the adjusting bolts against the gearbox and
tighten the jamb nuts.
ROTATION BEARING
DIAL INDICATOR
GEARBOX PINION
MOUNTING PLATE
Figure 3-23: Setting Rotational Gear Backlash (Viewed from bottom of turret)
3-20
AB62 Work Platform - European
MAINTENANCE
Section
3.13
Figure 3-24: Rotary Manifold
3.13 ROTARY MANIFOLD REMOVAL
Assembly
1. Mark and tag all hoses.
2. Remove all hoses from Rotary Manifold.
3. Remove Rotary Manifold from the machine.
NOTE: Provide a clean work area for this operation, and observe clean assembly practices.
Seals and O-rings are highly sensitive to contamination that may not be visible to the naked
eye.
NOTE: Torque all hardware and fittings to torques
listed on pages 3-22 and 3-23 unless otherwise
specified.
1. Lubricate all seals with clean hydraulic oil prior to
assembly.
2. Install new seals on body and housing.
3. Carefully slide body into housing.
4. Reinstall O-rings and retaining rings.
Disassembly
Installation
1. Remove Retaining Rings from each end of
Rotary Manifold.
2. Carefully slide body out of housing.
3. Remove seal kit components (O-rings, seals, and
retaining rings).
4. Thoroughly clean all parts with solvent. Rinse the
inside of the tube and allow to drain. A high pressure rinse and wipe with a lint free rag is preferable.
5. Inspect the body and housing for scratches, pits,
or polishing. Check seal grooves and sealing surfaces. Scratches or pits deep enough to catch the
fingernail are unacceptable, replace the manifold.
1. Installation is reverse of removal.
2. Replenish hydraulic fluid in tank.
3. Run hydraulic system for several minutes to
remove air from hydraulic lines. Cycle cylinders
for each boom function.
4. Rotate turret completely.
5. Check Rotary Manifold for leaks. Check that all
boom functions are operating properly.
AB62 Work Platform - European
3-21
Section
MAINTENANCE
3.13
3.14 TORQUE SPECIFICATIONS
Hydraulic Components
NOTE: Always lubricate threads with clean
hydraulic oil prior to installation
Use the following values to torque hydraulic components used on UpRight Work Platforms.
Table 3-2: Torque Specifications for Hydraulic Components
Type: SAE Part Series
Cartridge Poppet
Ft/Lbs
N/A
#4
Fittings
Hoses
Nm
N/A
Ft/Lbs
N/A
Nm
N/A
Ft/Lbs
135-145
Nm
15-16
#6
N/A
N/A
10-20
14-27
215-245
24-28
#8
#10
25-30
35-40
34-41
47-54
25-30
35-40
34-41
47-54
430-470
680-750
49-53
77-85
#12
85-90
115-122
85-90
115-122
950-1050
107-119
#16
130-140
176-190
130-140
176-190
1300-1368
147-155
Fasteners
This standard applies to the preloading of fasteners measured by installation torque.
NOTE: For other preloading methods or fasteners
consult UpRight Engineering Department.
This general standard applies to all SAE and Metric fasteners unless otherwise specified.
Thread Condition
•
For lubed or zinc plated fasteners, use K = .15
• For dry unplated fasteners, use K = .20
Torque Tables
Table 3-3: Torque Specifications for SAE Fasteners
Nominal Thread
Size
Clamp
Load
Unified Coarse Thread Series
lbs.
3-22
1/4 -20 2,000
5/16 - 18 3,350
lbs.
SAE J429 Grade 8
Tightening Clamp Tightening
Torque
Load
Torque
K=.15 K=.20
K=.15 K=.20
in-lbs. in-lbs.
75
157
100
210
ft-lbs. ft-lbs.
lbs.
2850
4700
Nominal Thread
Size
107
220
143
305
lbs.
ft-lbs. ft-lbs.
4,950
23
31
6950
32.5
44
7/16-14
6,800
37
50
9600
53
70
1/2-13
9,050
57
75
12800
80
107
9/16-12 11,600
82
109
16400
115
154
5/8-11
113
151
20300
159
211
3/4-10
21,300
200
266
30100
282
376
7/8-9
29,435
321
430
41550
454
606
1-8
38,600
483
640
54540
680
900
Clamp
Load
Tightening
Torque
SAE J429 Grade 8
Clamp
Load
Tightening
Torque
K=.15
K=.20
K=.15
K=.20
lbs.
in-lbs.
in-lbs.
lbs.
in-lbs.
in-lbs.
1/4 -28
5/16-24
2,300
3,700
85
173
115
230
3250
5200
120
245
163
325
lbs.
ft-lbs.
ft-lbs.
lbs.
ft-lbs.
ft-lbs.
3/8-24
7/16-20
5,600
7,550
26
42
35
55
7900
10700
37
59
50
78
1/2-20
in-lbs. in-lbs.
3/8-16
14,500
SAE J429 Grade 5
Unified Fine Thread Series
SAE J429 Grade 5
10,200
64
85
14400
90
120
9/16-18 13,000
5/8-18 16,300
92
128
122
170
18300
23000
129
180
172
240
3/4-16
23,800
223
298
33600
315
420
7/8-14
1-12
32,480
42,270
355
528
473
704
45855
59670
500
745
668
995
AB62 Work Platform - European
Section
MAINTENANCE
3.13
Table 3-4: Torque Specifications for Metric Fasteners, U.S. Customary Units
Nominal
Thread
Size
Clamp
Load
mm
3
3.5
4
5
6
7
lbs.
1,389
1,966
2,826
8
10
12
14
16
18
20
22
24
27
30
33
36
3,579
11,742
8,244
11,246
15,883
19,424
2,304
30,653
35,711
46,435
56,753
70,208
82,651
8.8
10.9
Grade 8.8
Grade 10.9
Tightening Torque
K = .15
K = .20
in-lbs.
in-lbs.
41.0
19.5
69.7
28.3
116.8
37.2
ft-lbs.
ft-lbs.
14.1
18.8
27.9
37.2
48.7
64.9
77.4
103.3
125.4
166.7
171.9
229.4
243.4
325.3
331.9
442.5
420.4
562.0
617.3
84.8
837.9
1117.4
1140.3
1520.1
1464.1
1952.3
Clamp
Load
lbs.
1,987
2,813
4,044
5,122
8,117
11,797
16,093
21,971
26,869
34,286
42,403
49,400
64,235
78,509
97,121
114,334
Tightening Torque
K = .15
K = .20
in-lbs.
in-lbs.
58.7
19.5
100.0
28.3
167.3
37.2
ft-lbs.
ft-lbs.
20.1
26.9
39.9
53.3
69.7
92.2
110.6
147.5
173.3
230.9
238.2
317.2
337.8
449.9
458.8
612.2
583.4
778.1
853.4
1138.1
1159.4
1545.2
1576.9
2102.8
2025.3
2700.9
12.9
Grade 12.9
Clamp
Load
lbs.
823
1,109
1,436
2,322
3,287
4,727
5,986
9,486
13,787
18,808
25,677
31,401
40,070
49,556
57,733
75,069
91,751
113,503
133,620
Tightening Torque
K = .15
K = .20
in-lbs.
in-lbs.
14.6
19.5
22.9
30.5
33.9
45.2
68.6
91.2
116.8
155.8
195.6
260.2
ft-lbs.
ft-lbs.
23.6
31.4
46.7
62.3
81.1
108.4
129.1
172.6
202.1
269.2
278.1
371.0
394.6
525.9
536.2
715.4
682.2
909.4
997.2
1329.8
1354.9
1807.0
1843.9
2457.5
2367.6
3156.0
Table 3-5: Torque Specifications for Metric Fasteners, SI Units
AB62 Work Platform - European
Nominal
Thread
Size
Clamp
Load
mm
3
3.5
4
5
6
7
8
10
12
14
16
18
20
22
24
27
30
33
36
N
6,177
8,743
12,570
15,921
52,230
36,670
50,025
70,650
86,400
10,250
136,350
158,850
206,550
252,450
312,300
367,650
8.8
10.9
Grade 8.8
Grade 10.9
Tightening Torque
K = .15
K = .20
N-m
N-m
4.63
2.2
7.87
3.2
13.2
4.2
19.1
25.5
37.8
50.5
66
88
105
140
170
226
233
311
330
441
450
600
570
762
837
115
1136
1515
1546
2061
1985
2647
Clamp
Load
N
8,840
12,512
17,990
22,784
36,105
52,475
71,587
97,732
119,520
152,513
188,618
219,743
285,728
349,223
432,015
508,582
Tightening Torque
K = .15
K = .20
N-m
N-m
6.63
2.2
11.3
3.2
18.9
4.2
27.3
36.5
54.1
72.2
94.5
125
150
200
235
313
323
430
458
610
622
830
791
1055
1157
1543
1572
2095
2138
2851
2746
3662
12.9
Grade 12.9
Clamp
Load
N
3,660
4,932
6,387
10,330
14,623
21,025
26,626
42,195
61,328
83,663
114,218
139,680
178,238
220,433
256,808
333,923
408,128
504,885
594,368
Tightening Torque
K = .15
K = .20
N-m
N-m
1.65
2.2
2.59
3.45
3.83
5.11
7.75
10.3
13.2
17.6
22.1
29.4
32
42.6
63.3
84.4
110
147
175
234
274
365
377
503
535
713
727
970
925
1233
1352
1803
1837
2450
2500
3332
3210
4279
3-23
Section
3.13
MAINTENANCE
NOTES:
3-24
AB62 Work Platform - European
Section 4
TROUBLESHOOTING
Introduction
!
W A R N I N G
!
When troubleshooting, ensure that the work
platform is resting on a firm, level surface.
When performing any service which requires
the platform to be raised, the Elevating Assembly must be blocked.
Disconnect the battery when replacing or testing the continuity of any electrical component.
5. Verify that repair is complete. Do a full function
test from both platform and chassis controls to
verify that all functions are operating correctly
and machine is performing to specified values.
UPRIGHT USA
TEL: 1-559-891-5200
FAX: 1-559-891-8931
UPRIGHT
INTERNATIONAL
TEL: +31-10-238-0000
FAX: +31-10-238-0001
Adjustment Procedures
This manual cannot cover all possible problems that
may occur. If a specific problem is not covered in this
manual, call our toll free number for service assistance.
Referring to Sections 2.0 and 5.0 will aid in understanding the operation and function of the various
components and systems of the AB62, and help in
diagnosing and repair of the machine.
Hydraulic settings must be checked whenever a component is repaired or replaced.
Remove counterbalance valves and “bench test”
them if they are suspect.
Connect a pressure meter of appropriate range to the
test port located on the right side of the hydraulic
manifold.
Correct pressure settings are listed in Section 5.
Refer to DMR 30 (See page 4-3) settings listed in this
section.
Troubleshooting Procedure
Checking Pump Pressure
Determine whether the problem is mechanical (interference), electrical or hydraulic. Some functions
require power at more than one solenoid.
Thoroughly study hydraulic and electrical schematics
in Section 5. Check for loose connections and short
circuits. Check/repair/replace each component in the
Truth Table which is listed under each machine function which does not operate properly.
Use the charts on the following pages to help determine the cause of a fault in your UpRight AB62.
1. Verify your problem. Do a full function test from
both platform controlsand chassis controls, and
note all functions thatare not operating correctly.
2. Narrow the possible causes of the malfunction.
Use the troubleshooting guide to determine
which components are common to all circuits that
are not functioning correctly.
3. Identify the problem component. Test components that are common to all circuits that are not
functioning correctly. Remember to check wires
and terminals between suspect components. Be
sure to check connections to battery negative.
4. Repair or replace faulty component.
AB62 Work Platform - European
Drive Pump
Check charge pressure at tee added to charge filter
line.
To check drive pressure, connect pressure tester to
port “G” on the 2-speed/axle lock valve block.
4-1
Section
4
TROUBLESHOOTING
Figure 4-1: DMR-30 Receiver
Figure 4-2: DMT-30 Transmitter
4-2
AB62 Work Platform - European
TROUBLESHOOTING
4.1 TROUBLESHOOTING DMR-30
CONTROLLER
There are two components to the DMR-30 system. A
DMT-30 transmitter in the upper control box transmits
inputs from the operator controls to the DMR-30
receiver in the lower control box. The DMR-30
receives the digital signal and commands the appropriate functions. A corresponding LED for each input
and output is added to the DMR30 -DMT-30 for easier diagnosis.
These LEDs correspond to wire position in the plugs
and acknowledge a signal on the wire. Using the
charts in figures 4-1 and 4-2, a signal or series of signals can be followed from switch to actuator to help in
determining the cause of a problem.
Four "blinking" diagnostic LEDs, located at the bottom-center of the DMR-30, are labeled as to their
function and are also used for diagnostic purposes.
A. CPU LED: DMR-30 is powered up operating properly. Solid light indicates internal failure. Not lit when
no power input.
B. INPUT LED: Indicates an input from lower control
panel switches, including ignition switch. This LED
should flash with CPU LED.
C. OUTPUT LED: Indicates an output to boom or
drive functions. This LED flashes only when operating boom or drive functions from either controller.
D. BUSS LED: Indicates an input from the DMT-30
(upper controller). This LED should flash with CPU
LED and INPUT LED as the upper ignition must be
on to operate.
Section
4.1
The CPU LED on the DMR-30 should be flashing on/
off. The BUSS LED on the DMR-30 should be flashing on/off. The INPUT LED should be flashing ON/
OFF.
Engine Start
BT1-02 on DMR-30 (start) illuminated when operating start switch.
The hour meter should flash; BT4-08 (oil pressure
input) will illuminate while engine is running.
NOTE: If no oil pressure is detected, ignition signal is deactivated. Engine will not continue
to run.
Glow Plug
BT1-08 on DMR-30 illuminated. Glow plugs are automatic.
Boom
Speed control knob in UPPER control box must be
turned past 5 to operate.
Boom Up
Function enable pushed.
LEDs on DMR-30 illuminated:
BT1-03 (chassis selected), BT2-04 (lift input), BT509 (lift output to valve), BT6-12 (low flow output),
BT5-06 (throttle output).
Boom Down
Function enable pushed.
LEDs on DMR-30 illuminated:
BT1-03 (chassis selected), BT2-05 (boom down
input), BT6-04 (boom down output to valve), BT6-12
(low flow output), BT5-06 (mid throttle output).
Boom Riser Up
4.2 MACHINE OPERATION
Lower Control Box
Electrical Power Up
Both Emergency Stop Switches are pulled out.
Lower control box key switch in CHASSIS position.
Upper key ON.
BT1-03 chassis selected will be illuminated.
Other LEDs on DMR-30 that may be illuminated:
BT1-05 (tilt), BT2-01 (telescope interlock), BT1-11
(lift interlock #1), BT1-12 (lift interlock #2).
Function enable pushed.
LEDs on DMR-30 illuminated:
BT1-03 (chassis selected), BT2-02 (riser up input),
BT5-12 (riser up to valve output), BT6-10 (high flow
output to valve), BT5-06 (throttle output).
Riser Lower
Function enable pushed.
LEDs on DMR-30 illuminated:
BT2-03 (riser lower input), BT6-01 (riser lower output), BT6-10 (high flow output to valve), BT5-06
(throttle output).
Boom Extend
Function enabled.
LEDs on DMR-30 illuminated:
AB62 Work Platform - European
4-3
Section
4.2
TROUBLESHOOTING
BT2-06 (boom extend input), BT6-07 (boom extend
output to valve), BT6-10 (high flow output). BT5-06
(throttle output)
Boom Retract
Function enabled.
LEDs on DMR-30 illuminated:
BT2-07 (boom retract input), BT6-08 (boom retract
output to valve), BT6-10 (high flow output). BT5-06
(throttle output)
Turret Rotate
Swing Right
Function enabled.
LEDs on DMR-30 illuminated:
BT2-09 (swing right input), BT7-09 (turret valve output), BT5-06 (throttle output), BT6-12 (low flow valve
output).
Swing Left
Function enabled.
LEDs on DMR-30 illuminated:
BT2-08 (swing left input), BT7-08 (turret valve output), BT5-06 (throttle output), BT6-12 (low flow output).
Jib
Jib Up
Function enabled.
LEDs on DMR-30 illuminated:
BT2-10 (jib up input), BT7-06 (jib up output to valve),
BT6-12 (low flow valve output), BT5-06 (throttle output).
Jib Down
Function enabled.
LEDs on DMR-30 illuminated:
BT2-11 (jib down input), BT7-07 (jib down output to
valve), BT6-12 (low flow valve output), BT5-06 (throttle output).
Cage Rotate
Cage Right
Function enabled.
LEDs on DMR-30 illuminated:
BT4-03 (cage right input), BT7-03 (cage right output
to valve), BT6-12 (low flow valve output), BT5-06
(throttle output).
4-4
Cage Left
Function enabled.
LEDs on DMR-30 illuminated:
BT4-02 (cage left input), BT7-04 (cage left output to
valve), BT6-12 (low flow valve output), BT5-06 (throttle output).
Cage Trim Up
Function enabled.
LEDs on DMR-30 illuminated:
BT2-12 (cage trim up input), BT6-05 (cage trim up
output to valve), BT6-12 (low flow valve output), BT507 (throttle output).
Cage Trim Down
Function enabled.
LEDs on DMR-30 illuminated:
BT4-01 (cage trim down input), BT6-06 (cage trim
down output to valve), BT6-12 (low flow valve output),
BT5-07 (throttle output).
Auxiliary Power (Emergency Functions)
Both Emergency Stops are pulled out (upper and
lower).
Auxiliary Switch enabled.
Relay #9 activated (12 volts at relay #9, terminals
#30 & #87).
NOTE: If the auxiliary switch is depressed when
the engine is running, the engine will stop
immediately.
Upper Control Box
Power-Up
Both Emergency Stops are pulled out (upper and
lower).
Lower Control Box key switch in PLATFORM position. Platform key switch on.
LEDs on DMR-30 illuminated:
BT1-01 (platform selected)
LEDs on DMT-30 illuminated:
BT1-11 & BT1-12 (limit switch)
BT1-05 (tilt)
Engine Start
Operate start switch.
LEDs on DMT-30 illuminated:
BT5-11 (starter output), BT5-08 (glow plug outputdiesel only), BT4-04 (oil pressure), LED’s on DMR-30
illuminated: BT3-03 (start input).
AB62 Work Platform - European
TROUBLESHOOTING
Boom Lift Function
Riser Up
Function enabled - foot switch depressed.
LEDs on DMT-30 illuminated:
BT4-03 (foot switch), BT 3-09 (riser up).
LEDs on DMR-30 Illuminated: BT5-12 (riser up output), BT5-06 (throttle output), BT6-10 (high flow valve
output).
Riser Down
Function enabled - foot switch depressed.
LED’s on DMT-30 illuminated: BT4-03 (foot switch)
BT 4-08 (riser down) LED’s on DMR 30 Illuminated:
BT6-01 (riser down output) BT5-06 (throttle output)
BT6-10 (high flow valve output)
Boom Up
Function enabled - foot switch depressed.
LEDs on DMT-30 illuminated:
BT4-03 (foot pedal), BT4-09 (boom up)
LEDs on DMR-30 illuminated:
BT5-09 (boom up output) BT5-06 (throttle output),
BT6-12 (low flow valve output).
Boom Down
Function enabled - foot switch depressed.
LEDs illuminated:
BT4-03 (foot pedal), BT4-04 (boom down).
LED’s on DMR-30 illuminated:
BT5-04 (boom down output), BT5-06 (throttle output), BT6-12 (low flow valve output).
Boom Extend
Function enabled - foot switch depressed.
LEDs on DMT-30 illuminated:
BT4-03 (foot pedal), BT3-11 (boom extended).
LEDs on DMR-30 illuminated:
BT6-07 (boom extend output), BT5-06 (throttle output), BT6-10 (high flow valve output).
Boom Retract
Function enabled - foot switch depressed.
LEDs on DMT-30 illuminated:
BT4-03 (foot pedal), BT3-06 (boom retract).
LEDs on DMR-30 illuminated:
BT6-08 (boom retract output), BT5-06 (throttle output), BT6-10 (high flow valve output).
AB62 Work Platform - European
Section
4.2
Turret Rotate Functions
Swing Right
Function enabled - foot switch depressed.
LEDs on DMT-30 illuminated:
BT4-03 (foot pedal), BT3-07 (turret rotate right).
LEDs on DMR-30 illuminated:
BT7-09 (turret rotate right output), BT5-06 (throttle
output), BT6-12 (low flow valve output).
Swing Left
Function enabled - foot switch depressed.
LEDs on DMT-30 illuminated:
BT4-03 (foot pedal), BT3-01 (turret rotate left).
LEDs on DMR-30 illuminated:
BT7-08 (turret rotate left output), BT5-06 (throttle output), BT6-12 (low flow valve output).
Jib
Jib Up
Function enabled - foot switch depressed.
LEDs on DMT-30 illuminated:
BT4-03 (foot pedal), BT4-07 (jib up).
LEDs on DMR-30 illuminated:
BT7-06 (jib up output), BT5-06 (throttle output), BT612 (low flow valve output).
Jib Down
Function enabled - foot switch depressed.
LEDs on DMT-30 illuminated:
BT4-03 (foot pedal), BT4-02 (jib down).
LEDs on DMR-30 illuminated:
BT7-07 (jib down output), BT5-06 (throttle output),
BT6-12 (low flow valve output).
Cage Rotate
Cage Right
Function enabled - foot switch depressed.
LEDs on DMT-30 illuminated:
BT4-03 (foot pedal), BT4-01 (cage rotate right)
LEDs on DMR-30 illuminated:
BT7-03 (cage rotate right output), BT5-06 (throttle
output), BT6-12 (low flow valve output).
Cage Left
Function enabled - foot pedal depressed.
LEDs on DMT-30 illuminated:
BT4-03 (foot pedal), BT4-12 (cage rotate left)
4-5
Section
4.2
TROUBLESHOOTING
LEDs on DMR-30 illuminated:
BT7-04 (cage rotate left output), BT5-06 (throttle output), BT6-12 (low flow valve output).
Cage Trim Up
Function enabled - foot switch depressed.
LEDs on DMT-30 illuminated:
BT4-03 (foot pedal), BT4-11 (cage trim up).
LEDs on DMR-30 illuminated:
BT6-05 (cage trim up output), BT5-06 (throttle output), BT6-12 (low flow valve output).
Cage Trim Down
Function enabled - foot switch depressed.
LEDs on DMT-30 illuminated:
BT4-03 (foot pedal), BT4-06 (cage trim down).
LEDs on DMR-30 illuminated:
BT6-06 (cage trim down valve), BT5-06 (throttle output), BT6-12 (low flow valve output).
Auxiliary Power (Emergency Functions)
DMT-30 BT3-08 (auxiliary power)
DMR-30 BT5-10 (auxiliary output)
NOTE: If the auxiliary switch is depressed when
the engine is running, the engine will stop
immediately.
Drive Functions
Drive functions are relayed to the drive pump from
the joystick control. All adjustments are made at the
joystick controller. Brake release and throttle commands are relayed from the joystick controller to the
DMT-30 on BT3-08 (JSA) Joystick actuator.
Steer Left
Function enabled - foot switch depressed.
BT4-10 on DMT-30 (steer left) BT5-06 on DMR-30
(throttle output) BT6-10(high flow valve) BT7-01 on
DMR-30 (steer left output)
High Torque Position
No signal on DMT-30 or DMR-30.
High Speed Position
BT3-10 on DMT-30 (high speed) is illuminated, BT507 on DMR-30 (shift) is illuminated.
Braking
Brakes are normally locked when the machine is not
in use. Brakes are unlocked by a charge pressure
(380 PSI) from the drive pump. A 12 volt signal is
sent to the brake solenoid by BT5-04 on DMR-30.
Tilt
A 12 volt signal is at BT1-05 (tilt signal input) when
the machine is level. If the machine is out of level or
the level sensor fails, the machine will stop. Red wire
on level sensor is power in, and white wire is signal
out.
Interlocks
There are two interlocks on the machine.
1. Lift Interlock: A12 Volt signal is sent to BT2-01 on
DMR-30; allows high speed travel.
2. Telescope interlock (at tail end of boom): A 12
volt signal is sent to BT1-11 & BT1-12 on DMR30 when boom is fully retracted; allows high
speed travel.
Drive Forward
Function enabled - footswitch depressed.
BT3-02 on DMT-30 (jsa) joystick actuator, BT5-06 on
DMR-30 (throttle output), BT5-04 (brake release).
Drive Reverse
Function enabled - footswitch depressed.
BT3-02 on DMT-30 (jsa) joystick actuator, BT5-06 on
DMR-30 (throttle output), BT5-04 (brake release).
Steer Right
Function enabled - foot switch depressed.
BT4-05 on DMT-30 (steer right), BT5-06 on DMR-30
(throttle output), BT6-10 on DMR-30 (high flow
valve), BT7-02 on DMR-30 (steer right output).
4-6
AB62 Work Platform - European
TROUBLESHOOTING
4.3 OPTIMIZER SETTINGS AND SEQUENCE
The AB62 uses a Digital Multiplex Receiver (DMR30) system manufactured by OEM to control the proportionality of boom functions. There is a transmitter
(DMT-30) in the upper control box that takes the
operator’s control inputs and relays them to the
receiver, via data link (two wires). The Optimizer can
be plugged into the upper control box, with the use of
an adapter (part #100329-005), or directly to the
DMR-30 in the lower control box on port P-8.
Remove existing plug on P-8 to access port.
The AB62 uses two groups of settings: "High flow,"
which pertains to the BOOM RISER, BOOM
EXTEND and STEER functions and the "Low flow,"
pertaining to the BOOM RAISE, JIB, TURRET
ROTATE, and CAGE LEVEL functions. CAGE
ROTATE is also altered by adjusting the flow control
valve, located on the bottom of the valve block below
the cage rotate valve. All settings correspond with
how all the functions in that particular group will react
to the rheostat control on the upper control box. Each
adjustment will affect that whole group. For example:
setting high flow, will change the threshold on boom
riser, extend and steer. It is important not to deviate
very far from the listed settings. Before making any
changes, record the current settings. This will help to
diagnose an existing or potential problem with a function on the machine.
Make all settings only in the order in which they are
displayed.
Max Out or MX pertains to the extension of the cylinders in the group.
Low Range or LR pertains to the retraction of the cylinders in the group.
Sequence
Emergency stop switches must be pulled and ignition
switches on. It is not necessary to have the engine
running when retrieving the initial settings or resetting
the DMR-30.
Plug the Optimizer in at either location and it should
read "Run mode normal functions off.”
If not, ensure that all switches are on and the Optimizer is plugged into P-8. If plugged into the upper
control box, ensure that there is a four-wire plug in P8 port in the lower control box.
Low Flow: Select THRESHOLD by pushing the
threshold button. The preset value will appear.
AB62 Work Platform - European
Section
4.3
If it needs to be changed, use the + or - to raise or
lower the value. Continue to MAXOUT and so on until
all low flow ranges are set, then push ENTER to save
changes.
High flow: Push ENTER, then + (readout will say
ERROR): push + again, high flow will appear. Push
ENTER. The TH, MX, RU, RD, LR icons will appear
and TH will be flashing.
Push ENTER and the display will read: CHANGE;
YES = + NO = ENTER.
Push + and the preset value will be displayed. To
adjust, push + to raise value or - to lower value.
If preset value is right or after resetting the value,
push ENTER. You will be back to Run mode, normal
functions off. To reset the other functions, repeat the
procedure until TH is flashing, as it did above, then
use the + or - to scroll to other functions; then continue.
IMPORTANT: After making changes, thoroughly
test all functions for smoothness and
proper operation.
Settings (Serial Numbers 1100 to 1115)
Low Flow System
Threshold ----- 58-62%
High Range----80-87%
Ramp Up------ .5 Sec.
Ramp Down-- .0 Sec.
Low Range--- 25-50%
High Flow System
Threshold----- 67%
High Range--- 95%
Ramp Up------ .5 Sec.
Ramp Down-- .0 Sec.
Low Range---- 95%
Settings (Serial Numbers 1116 - Current)
Low Flow System
Threshold ----- 28-30%
High Range----56-58%
Ramp Up------ .2 Sec.
Ramp Down-- .0 Sec.
Low Range--- 46-48%
High Flow System
Threshold----- 27-29%
High Range--- 95%
Ramp Up------ .2 Sec.
Ramp Down-- .0 Sec.
Low Range---- 95%
4-7
Section
4.4
TROUBLESHOOTING
4.4 HYDRAULIC TROUBLESHOOTING
The AB62 has three independent hydraulic systems:
one for drive; one for high flow lift functions; and one
for low flow lift functions. The drive system uses an
electrically controlled, variable displacement piston
pump that powers four piston type wheel motors. The
high flow system uses a gear type pump to power
riser up/down, boom extend/retract, and steer functions. The low flow system, also using a gear type
pump, operates Boom up/down, Jib up/down, Swing
right/left, Cage rotate and Cage level.
High flow and low flow system pressures can be verified by connecting a 3000 PSI gauge to the upper
port on the valve block. Operate Riser down to test
high flow system or Jib up to test the low flow system.
Operate function until it stops and system bypasses.
The high flow relief valve is located just below the
gauge port.
The low flow relief valve is located below the high
flow relief valve.
High flow pressure, 2700 PSI.
Low flow pressure, 1400 PSI.
!
W A R N I N G
!
Counterbalance valves must never be removed
if the platform is raised and hydraulic system is
under pressure. Be sure the platform is completely stowed before removing counterbalance
valves.
4-8
AB62 Work Platform - European
Section
TROUBLESHOOTING
4.4
Throttle Actuator
Alarm, Tilt
ALT
Alternator
X
X
Battery, Engine Start
X
X
BAT2
Battery, Auxiliary Power
CB1
Circuit Breaker (20 AMP)
X
CB2
Circuit Breaker (10 AMP)
X
X
X
X
X
X
X
X
CB3
Circuit Breaker (10 AMP)
Controller, DMR-30
X
X
CONT2
Controller, Glow Plug
X
X
X
X
X
X
X
X
X
X
X
X
X
X
X
X
X
X
X
X
X
X
X
X
X
X
X
X
X
X
X
X
X
X
X
X
X
X
X
X
X
X
X
X
X
X
X
X
D1
Diode, Auxiliary Power
D3
Diode, Power to Platform
D4
Diode
X
D5
Diode, Auxiliary Pump
Relay
X
Diode
Diode, Alternator
D8
Diode, Spike Protection
D9
Diode, Spike Protection
FUSE1
Fuse (175 AMP)
HORN
Horn
X
X
Tilt lamp
Glow Plug Lamp
LS1
Linkage Limit Switch
X
LS2
Proximity Switch
X
MOT1
Auxiliary Pump Motor
THROTTLE CONTROLLER
X
X
X
X
X
X
X
X
X
X
X
X
X
X
MOT2
Engine Start Motor
X
X
MTR1
Engine Temperature Meter
X
X
MTR2
Oil Pressure Meter
X
X
MTR3
Hour Meter
PMP
Drive Pump
AB62 Work Platform - European
X
X
Lamp
3,4
Axle Release, Left
X
X
Lamp2
R8
X
X
Distress Lamp
Engine Start Relay
X
X
Charge Isolator
Drive Motion Alarm
X
X
ISO
R5
X
X
X
Lamp1
R1
G ENERATOR - O PTIONAL
X
X
CONT1
D7
DRIVING LIGHTS - O PTIONAL
X
X
BAT1
D6
HORN
EMERGENCY LOWERING
TORQUE HIGH/LOW
TILT A LARM
PARKING BRAKE RELEASE
TURRET ROTATE
TILT LIGHT
FRONT AXLE LOCK
PLATFORM ROTATE CW/CCW
PLATFORM LEVEL UP/DOWN
BATTERY CHARGE
JIB UP/DOWN
STEER LEFT/RIGHT
SPEED HIGH/CREEP
DRIVE FORWARD/R EVERSE
BOOM EXTEND/RETRACT
BOOM UP/DOWN
RISER RAISE/LOWER
X
LOWER CONTROL FUNCTIONS
X
UPPER CONTROL FUNCTIONS
ENGINE START/RUN LOWER CONTROLS
ACT1
ALM1
ENGINE START/RUN UPPER CONTROLS
COMPONENT
FUNCTION
Table 4-1: Electrical Truth Table - AB62 Diesel
X
X
X
X
X
X
4-9
Section
Power to DMR-30
R12
Auxiliary Pump
R13
Relay
X
X
X
X
X
X
X
X
X
X
X
X
X
X
X
X
X
X
X
X
X
X
R14
Drive Enable Relay
R15
Auxiliary Pump Motor
Relay
SW1
Emergency Stop Switch
X
SW2
Ignition Switch
X
SW4
Auxiliary Power Switch
(Upper)
X
SW5
Generator Switch (Upper)
X
SW6
Drive Hi/Lo Switch (Upper)
X
SW7
Cage Level Switch (Upper)
X
SW8
Boom Up/Down Switch
(Upper)
X
SW9
Turret Rotate (Upper)
X
SW10
Cage Rotate (Upper)
X
SW11
Jib Up/Down (Upper)
X
SW12
Riser Up/Down (Upper)
X
SW13
Boom Retract/Extend
(Upper)
X
SW14
Driving Lights (Upper)
SW17
Oil Pressure Switch
SW18
Horn (Upper)
X
X
X
X
X
X
X
X
X
X
X
X
X
X
X
X
X
X
X
X
X
X
X
X
X
X
X
X
X
X
X
X
X
X
X
X
X
X
X
X
X
X
X
X
X
X
X
X
X
X
X
X
SW19
Foot Interlock (Upper)
SW21
Emergency Stop (Lower)
X
X
X
X
X
X
X
X
X
X
X
X
X
X
X
X
X
X
X
X
X
X
X
X
SW22
Selector Switch (Lower)
X
X
X
X
X
X
X
X
X
X
X
X
X
X
X
X
X
X
X
X
X
X
X
X
SW23
Auxiliary Power Switch
(Lower)
SW24
Enable Switch (Lower)
X
SW26
Boom Hi/Lo Speed
(Lower)
X
SW28
Engine start Switch
(Lower)
SW29
Turret Rotate Switch
(Lower)
X
SW30
Boom Up/Down Switch
(Lower)
X
SW31
Cage Level Switch (Lower)
X
4-10
THROTTLE CONTROLLER
X
GENERATOR - OPTIONAL
X
DRIVING LIGHTS - OPTIONAL
X
HORN
EMERGENCY LOWERING
R11
TORQUE HIGH/LOW
X
TILT ALARM
X
PARKING BRAKE RELEASE
Axle Release, Right
Axle Release Signal
TURRET ROTATE
FRONT AXLE LOCK
R9
R10
TILT LIGHT
PLATFORM ROTATE CW/CCW
PLATFORM LEVEL UP/DOWN
BATTERY CHARGE
JIB UP/DOWN
STEER LEFT/RIGHT
SPEED HIGH/CREEP
DRIVE FORWARD/REVERSE
BOOM EXTEND/RETRACT
BOOM UP/DOWN
RISER RAISE/LOWER
UPPER CONTROL FUNCTIONS
ENGINE START/RUN LOWER CONTROLS
ENGINE START/RUN UPPER CONTROLS
FUNCTION
COMPONENT
LOWER CONTROL FUNCTIONS
TROUBLESHOOTING
4.4
X
X
X
X
X
X
X
X
X
X
X
X
X
X
X
AB62 Work Platform - European
Section
SW32
Cage Rotate Switch
(Lower)
X
SW33
Jib Up/Down Switch
(Lower)
X
SW34
Rise Up/Down Switch
(Lower)
X
SW35
Boom Extend/Retract
(Lower)
X
THROTTLE CONTROLLER
GENERATOR - OPTIONAL
DRIVING LIGHTS - OPTIONAL
HORN
EMERGENCY LOWERING
TORQUE HIGH/LOW
TILT ALARM
PARKING BRAKE RELEASE
TURRET ROTATE
TILT LIGHT
X
X
X
X
SNSR1
Tilt Sensor
SNSR2
Engine Temperature
Sensor
X
X
SNSR3
Engine Oil Pressure
Sensor
X
X
SOL1
Cage Level Solenoid
x
SOL2
Cage Level Solenoid
x
X
SOL3
Jib Up Solenoid
SOL4
Jib Down Solenoid
SOL5
Boom Up Solenoid
X
SOL6
Boom Down Solenoid
X
SOL7
Boom Extend Solenoid
X
SOL8
Boom Retract Solenoid
X
X
X
X
SOL9
Riser Up
X
SOL10
Riser Down
X
SOL11
Cage Rotate CW
X
SOL12
Cage Rotate CCW
X
SOL13
Turret Rotate CW
SOL14
Turret Rotate CCW
SOL15
Steer Right
X
SOL16
Steer Left
X
X
X
SOL17
Low Flow
SOL18
High Flow
SOL19
Generator Valve
SOL20
Brake
SOL21
Torque
SOL22
Axle Lock
SOL23
Fuel
X
TRANS
Transmitter, DMT-30
X
AB62 Work Platform - European
FRONT AXLE LOCK
PLATFORM ROTATE CW/CCW
4.4
PLATFORM LEVEL UP/DOWN
BATTERY CHARGE
JIB UP/DOWN
STEER LEFT/RIGHT
SPEED HIGH/CREEP
DRIVE FORWARD/REVERSE
BOOM EXTEND/RETRACT
BOOM UP/DOWN
RISER RAISE/LOWER
LOWER CONTROL FUNCTIONS
UPPER CONTROL FUNCTIONS
ENGINE START/RUN LOWER CONTROLS
ENGINE START/RUN UPPER CONTROLS
COMPONENT
FUNCTION
TROUBLESHOOTING
X
X
X
X
X
X
X
X
X
X
X
X
X
X
X
X
4-11
Section
TROUBLESHOOTING
4.4
Counterbalance Valve, Riser
CB2
Counterbalance Valve, Boom Extend
CB3
Counterbalance Valve, Boom Raise
X
X
Counterbalance Valve, Jib Cylinder
CB5
Counterbalance Valve, Master Cylinder
X
CB6
Counterbalance Valve, Slave Cylinder
X
X
CB7
Counterbalance Valve, Cage Rotate
CB8
Counterbalance Valve, Turret Rotate
CB9
Counterbalance Valve, Left Axle Cylinder
X
X
X
X
CB10
Counterbalance Valve, Right Axle Cylinder
CV1-2
High Pressure Test Port Check Valve
CV3-7
Low Pressure Test Port Check Valve
CV8
Boom Extend Cylinder Check Valve
CV9
Turret Rotate Check Valve
CV10
High Pressure Check Valve
CV11
Low Pressure Check Valve
CV12
Return Filter Check Valve
CYL1
Steer Cylinder
CYL2
Riser Cylinder
CYL 3
Boom Extend Cylinder
CYL4
Boom Raise Cylinder
CYL5
Jib Cylinder
CYL6
Master Cylinder
X
CYL7
Slave Cylinder
X
CYL8
Turret Rotate Brake Cylinder
X
X
X
X
X
X
X
X
X
X
X
X
X
CYL9-10
Wheel Brake Cylinders
CYL11
Left Axle Lock Cylinder
CYL12
Right Axle Lock Cylinder
FD1-2
Flow Divider
X
FL1
Suction Filter
X
FL2
Return Filter
Suction Filter
FL4
Return Filter
X
X
X
X
X
X
X
X
X
X
X
X
X
x
FL5
Suction Filter
MOT1
Left Rear Drive Motor
X
MOT2
Right Front Drive Motor
X
MOT3
Right Rear Drive Motor
X
MOT4
Left Front Drive Motor
X
MOT5
Swing Motor
4-12
EMERGENCY LOWER
X
CB4
FL3
BRAKE RELEASE
FRONT AXLE LOCK
DRIVE FORWARD/REVERSE
TURRET ROTATE CW/CCW
CAGE ROTATE CW/CCW
CAGE LEVEL UP/DOWN
JIB UP/DOWN
BOOM RAISE/LOWER
BOOM EXTEND/RETRACT
RISER ELEVATE/DESCEND
COMPONENT
CB1
STEER
FUNCTION
Table 4-2: Hydraulic Truth Table - AB62
X
X
AB62 Work Platform - European
Section
Riser Orifice
ORF3
Drive Orifice
PMP1
Boom Pump Low Flow
PMP2
Boom Pump High Flow
PMP3
Variable Drive Pump
PMP4
Auxiliary Pump
ROT
Cage Rotator
RV1
Low Pressure Relief Valve
RV2
High Pressure Relief
RV3
Jib Cylinder Relief
V1
Steering Valve
V2
Riser Valve
V3
Boom Extend Valve
V4
Boom Raise Valve
V5
Jib Valve
V6
Cage Level Valve
V7
Turret Rotate Valve
V8
Cage Rotate
V9
Low Flow Valve
V10
High Flow Valve
V11
Diverter Valve
X
EMERGENCY LOWER
DRIVE FORWARD/REVERSE
TURRET R OTATE CW/CCW
CAGE ROTATE CW/CCW
CAGE LEVEL UP/DOWN
JIB UP/DOWN
BOOM RAISE/LOWER
BOOM EXTEND/RETRACT
X
X
X
X
X
X
X
X
X
X
X
X
X
X
X
X
X
X
X
X
X
X
X
X
X
X
X
X
X
X
X
X
X
X
X
X
X
X
X
X
V12
Brake Valve
V13
Axle Float Valve
V14
High Speed Valve
X
V15
Rear Drive Torque/Speed Valve
X
V16
Front Drive Torque/Speed Valve
X
AB62 Work Platform - European
BRAKE RELEASE
ORF2
4.4
FRONT AXLE LOCK
Turret Orifice
RISER ELEVATE/DESCEND
COMPONENT
ORF1
STEER
FUNCTION
TROUBLESHOOTING
X
X
4-13
Section
4.4
TROUBLESHOOTING
Notes:
4-14
AB62 Work Platform - European
Section 5
SCHEMATICS
Introduction
Schematic
This section contains electrical and hydraulic power
schematics and associated information for maintenance purposes.
The diagrams are to be used in conjunction with the
Troubleshooting Truth Tables in Section 4. They
allow understanding of the makeup and functions of
the systems for checking, tracing, and faultfinding
during troubleshooting analysis.
The components that comprise the electrical and
hydraulic systems are given a reference designation
and are explained as to function and location in the
following tables.
Introduction . . . . . . . . . . . . . . . . . . . . . . . . . . . . . 1
Electrical Schematic - AB62 Diesel . . . . . . . . . . 2
Hydraulic Schematic, AB62 . . . . . . . . . . . . . . . . 6
AB62 Work Platform - European
Page
5-1
Section
SCHEMATICS
5.1
5.1 ELECTRICAL SCHEMATIC - AB62 DIESEL
Table 5-1: Electrical Schematic - Diesel - 104049-000
l
REFERENCE
ACT1
ALM1
ALT
BAT1
BAT2
CB1
CB2
CB3
CONT1
CONT2
D1
D2
D3
D4
D5
D6
D7
NAME
FUNCTION
Actuator
Alarm, Tilt
Throttle
Provide warning sound when
machine is off-level
Alternator
Charge Battery
Battery
Start Engine
Battery
Auxiliary Power
Circuit Breaker
Overload protection for DMR-30
Circuit Breaker
Overload protection Platform
Control
Circuit Breaker
Overload protection Platform
Accessories
Controller, DMR-30 Controls machine functions
Controller
Glow Plug Controller
Diode
Auxiliary Power from Platform
Diode
Not Used
Diode
Power to Platform Controls
Diode
Prevents Auxiliary Pump operation
when ignition is on
Diode
Auxiliary Pump Relay Signal
Diode
Auxiliary Power to Lower Controls
Diode
Alternator exciter signal
D8
D9
FUSE 1
HORN
ISO
Lamp1
Lamp2
Lamp3&4
LS1
LS2
Diode
Diode
Fuse
Horn
Isolator
Lamp
Lamp
Lamp
Limit Switch
Limit Switch
Spike Protection Diode
Spike Protection Diode
Auxiliary Power Motor
Sound Alarm
Charge Isolator
Distress, Engine
Tilt
Glow Plug
Linkage Limit Switch
Proximity Switch
MOT1
MOT2
MTR1
MTR2
MTR3
PMP
R1
R5
R6
R7
R8
R9
R10
R11
R12
R13
Motor
Motor
Meter
Meter
Meter, Hour
Pump
Relay
Relay
Relay
Relay
Relay
Relay
Relay
Relay
Relay
Relay
R14
R15
SW1
SW2
SW3
SW4
SW5
SW6
Relay
Relay
Switch
Switch, Ignition
Not Used
Switch
Switch
Switch
Auxiliary Pump
Start Engine
Engine Temperature
Oil Pressure
Hours machine has operated.
Drive
Engine Start Relay
Drive Motion Alarm
Not Used
Not Used
Left Axle Release
Right Axle Release
Axle Release Signal
Power to DMR-30
Auxiliary Pump Relay
Ignition cutout during Auxiliary
Power
Drive Enable
Auxiliary Pump Motor
Emergency Stop
Start Engine
5-2
Auxiliary Power
Generator
Drive Hi/Low Speed
LOCATION
Engine Module
Lower Control Box
Engine
Under Hydraulic Block
Under Hydraulic Block
Lower Control Box
Lower Control Box
Lower Control Box
Lower Control Box
Engine Module
Lower Control Box
Engine Module
Lower Control Box
Lower Control Box
Lower Control Box
Engine, near
Alternator
Engine Module
Engine Module
Control Module
Upper Control Box
Engine
Upper Control Box
Upper Control Box
Upper & Lower Box
Lower Linkage Assy.
Right side, rear of
main Boom
Control Module
Engine
Lower Control Box
Lower Control Box
Lower Control Box
Engine Module
Engine Module
Lower Cntrol Box Strip
Lower Cntrol Box Strip
Lower Cntrol Box Strip
Lower Cntrol Box Strip
Lower Cntrol Box Strip
Lower Cntrol Box Strip
Lower Control Box
Lower Control Box
Lower Control Box
Platform Control Box
Control Module
Platform Control Box
Platform Control Box
Platform Control Box
Platform Control Box
Platform Control Box
REFERENCE
SW7
SW8
SW9
SW10
SW11
SW12
SW13
SW14
SW17
SW18
SW19
SW21
SW22
SW23
SW24
SW26
SW28
SW29
SW30
SW31
SW32
SW33
SW34
SW35
SNSR1
SNSR2
SNSR3
SOL1
SOL2
SOL3
SOL4
SOL5
SOL6
SOL7
SOL8
SOL9
SOL10
SOL11
SOL12
SOL13
SOL14
SOL15
SOL16
SOL17
SOL18
SOL19
SOL20
SOL21
SOL22
SOL23
TMR
TRANS
NAME
Switch
Switch
Switch
Switch
Switch
Switch
Switch
Switch
Switch
Switch
Switch
Switch
Switch
Switch
Switch
Switch
Switch, Ignition
Switch
Switch
Switch
Switch
Switch
Switch
Switch
Sensor, Tilt
FUNCTION
Level the Platform
Boom, Up/Down
Turret Rotate
Cage Rotate
Jib, Up/Down
Riser, Up/Down
Boom, Retract/Extend
Driving Lights
Oil Pressure Switch
Horn
Interlock, Foot
Emergency Stop
Selector
Auxiliary Power
Enable
Boom, Speed
Engine Start
Turret Rotate
Boom, Up/Down
Level the Platform
Cage Rotate
Jib, Up/Down
Riser, Up/Down
Boom, Extend/Retract
Activate tilt alarm. Disable all
machine functions except Platform
Lower when machine is more than
3° off level.
Sensor
Engine Temperature
Sensor
Engine Oil Pressure
Solenoid
Trim, Up
Solenoid
Trim, Down
Solenoid
Jib, Up
Solenoid
Jib, Down
Solenoid
Boom, Up
Solenoid
Boom, Down
Solenoid
Boom, Extend
Solenoid
Boom, Retract
Solenoid
Riser, Up
Solenoid
Riser, Down
Solenoid
Cage Rotate, CW
Solenoid
Cage Rotate, CCW
Solenoid
Turret Rotate, CW
Solenoid
Turret Rotate, CCW
Solenoid
Steer, Right
Solenoid
Steer, Left
Solenoid
Low Flow Proportional
Solenoid
High Flow Proportional
Solenoid
Generator Valve
Solenoid
Brake
Solenoid
Torque
Solenoid
Axle Lock
Solenoid
Fuel
Timing Module
Fuel Solenoid Pull Circuit
Transmitter DMT-30 Transmit signal to controller
LOCATION
Platform Control Box
Platform Control Box
Platform Control Box
Platform Control Box
Platform Control Box
Platform Control Box
Platform Control Box
Platform Control Box
Engine Module
Lower Control Box
Platform Control Box
Lower Control Box
Lower Control Box
Lower Control Box
Lower Control Box
Lower Control Box
Lower Control Box
Lower Control Box
Lower Control Box
Lower Control Box
Lower Control Box
Lower Control Box
Lower Control Box
Lower Control Box
Control module
Engine
Engine
Boom Valve Block
Boom Valve Block
Boom Valve Block
Boom Valve Block
Boom Valve Block
Boom Valve Block
Boom Valve Block
Boom Valve Block
Boom Valve Block
Boom Valve Block
Boom Valve Block
Boom Valve Block
Boom Valve Block
Boom Valve Block
Boom Valve Block
Boom Valve Block
Boom Valve Block
Boom Valve Block
Gen Valve Block
Engine Module
Engine Module
Engine Module
Engine Module
Engine
Platform Control Box
AB62 Work Platform - European
Section
SCHEMATICS
5.1
LS2
SNSR1
HORN
LS1
SOL1
SOL2
SOL3
SOL4
SOL5
SOL6
SOL7
SOL8
R15
SOL9
SOL10
FU1
SOL11
SOL12
SOL13
SOL14
BAT1
BAT2
MOT1
SOL15
SOL16
ISO
SOL17
SOL18
PMP1
ACT1
ALT
SNSR2
SNSR3
SW17
SOL19
SOL23
SOL20
D7
MOT2
D9
SOL21
SOL22
TMR
R1
D8
CONT2
Figure 5-1: AB62 Electrical Schematic - Diesel - 104049-000 (1 of 2)
AB62 Work Platform - European
5-3
SW19
5-4
D4
MTR3
R11
MTR2
MTR1
D2
SW22
D1
SW24
D3
ALM1
D6
LAMP2
LAMP1
SW28
SW26
SW29
SW30
SW31
SW32
SW33
SW34
SW35
CB1
SW2
SW3
SW14
SW18
SW13
SW12
SW11
SW10
SW9
SW8
SW4
SW5
SW6
SW7
R10
R9
R8
R7
R6
R5
CONT1
DRIVE CONTROLLER
CB2
CB3
LAMP3
TRANS
LAMP4
5.1
D5 R13
R12
SW23
SW21
R14
SW1
Section
SCHEMATICS
Figure 5-2: AB62 Electrical Schematic - Diesel - 104049-000 (2 of 2)
AB62 Work Platform - European
SCHEMATICS
Section
5.1
Notes:
AB62 Work Platform - European
5-5
Section
SCHEMATICS
5.2
5.2 HYDRAULIC SCHEMATIC, AB62
Table 5-2: Hydraulic Schematic Legend - 104048-000
REFERENCE
CB1
CB2
CB3
CB4
CB5
CB6
CB7(2)
CB8
CB9
CB10
NAME
Counterbalance
Valve
Counterbalance
Valve
Counterbalance
Valve
Counterbalance
Valve
Counterbalance
Valve
Counterbalance
Valve
Counterbalance
Valve
Counterbalance
Valve
Counterbalance
Valve
Counterbalance
Valve
CV1&2
Check Valve
CV3-7
Check Valve
CV8
Check Valve
CV9
Check Valve
CV10
Check Valve
CV11
Check Valve
CV12
CYL1
CLY2
CYL3
CYL4
CYL5
CYL6
CYL7
CYL8
CYL9-10
CYL11
CYL12
FD1-2
FL1
FL2
FL3
FL4
FL5
MAN1
MOT1
MOT2
MOT3
MOT4
ORF1
ORF2
Check Valve
Cylinder
Cylinder
Cylinder
Cylinder
Cylinder
Cylinder
Cylinder
Cylinder
Cylinder
Cylinder
Cylinder
Flow Divider
Filter
Filter
Filter
Filter
Filter
Manifold
Drive Motor
Drive Motor
Drive Motor
Drive Motor
Orifice
Orifice
ORF3
Orifice
PMP1
PMP2
Pump
Pump
5-6
FUNCTION
Riser Counterbalance
LOCATION
Riser Cylinder
Boom Extend Counterbalance Boom Extend Cylinder
Boom Raise Counterbalance
Jib Counterbalance
Master Counterbalance
Slave Counterbalance
Boom Raise Cylinder
Jib Cylinder
Master Cylinder
Slave Cylinder
Cage Rotate Counterbalance
Cage Rotate Valve
Block
Turret Rotate Counterbalance
Turret Rotate Motor
Left Axle Counterbalance
Right Axle Counterbalance
Left AXle Lock Cylinder
Right Axle Lock
Cylinder
High Pressure Test Port
Main Valve Block
Check Valve
Low Pressure Test Port Check
Main Valve Block
Valves
Boom Extend Cylinder Check
Boom Extend Cylinder
Valve
Turret Rotate Valve
Turret Rotate Check Valve
Block
Boom Pump High Pressure
Boom Pump
Check Valve
Boom Pump Low Pressure
Boom Pump
Check Valve
Return Filter Check Valve
Return Filter
Steering Cylinder
Chassis
Riser Cylinder
Riser
Boom Extend Cylinder
Inside Boom
Boom Raise Cylinder
Front of Boom
Jib Cylinder
Jib
Master Cylinder
Rear of Boom
Slave Cylinder
Front of Boom
Turret Rotate Brake Cylinder
Turret Rotate Motor
Brake Cylinders
Brakes
Left Axle Lock Cylinder
Front Axle
Right Axle Lock Cylinder
Front Axle
Flow Divider
Drive Valve Block
Suction Filter
Tank
Return Filter
Tank
Suction Filter
Tank
Return Filter
Tank
Suction Filter
Tank
Rotary Manifold
Turret Assembly
Left Rear Drive Motor
Left Rear Axle
Right Front Drive Motor
Right Front Axle
Right Rear Drive Motor
Right Rear Axle
Left Front Drive Motor
Left Front Axle
Limit Turret Rotate Speed
Main Valve Block
Limit Riser down speed
Riser Cylinder
Limit Flow Between Front and
Drive Valve Block
Rear Drive Motors
Boom Pump Low Flow
Engine Module
Boom Pump High Flow
Engine Module
REFERENCE
NAME
PMP3
PMP4
ROT
RV1
RV2
RV3
V1
V2
V3
V4
V5
V6
V7
V8
V9
V10
V11
Pump
Pump
Rotator
Relief Valve
Relief Valve
Relief Valve
Valve
Valve
Valve
Valve
Valve
Valve
Valve
Valve
Valve
Valve
Valve
FUNCTION
V12
Valve
Brake Valve
V13
Valve
Axle Float Valve
V14
Valve
High Speed Valve
V15
V16
Valve
Valve
Rear Drive Valve
Front Drive Valve
Variable Drive Pump
Auxiliary Pump
Cage Rotator
Low Pressure Relief
High Pressure Relief
Jib Cylinder Relief
Steer Valve
Riser Valve
Boom Extend Valve
Boom Raise Valve
Jib Valve
Cage Level
Turret Rotate
Cage Rotate
Low Flow Valve
High Flow Valve
Diverter Valve
LOCATION
Engine Module
Engine Module
Platform
Main Valve Block
Boom Valve Block
Jib Cylinder
Main Valve Block
Main Valve Block
Main Valve Block
Main Valve Block
Main Valve Block
Main Valve Block
Main Valve Block
Main Valve Block
Main Valve Block
Main Valve Block
Main Valve Block
Brake, Axle Lock,
2-Speed Valve Block
Brake, Axle Lock,
2-Speed Valve Block
Brake, Axle Lock,
2-Speed Valve Block
Drive Valve Block
Drive Valve Block
AB62 Work Platform - European
Section
SCHEMATICS
5.2
CYL8
CYL11
CYL12
MOT1
MOT2
MOT3
MOT4
CYL2
CYL1
CYL3
CYL4
CYL5
CYL6
CB8
CYL7
ROT
RV3
CB5
CB6
CB3
CB2
CV9
CB7
CB1
V15
CB10
ORF2
V16
CB9
CYL9
FD1
CYL10
CB4
CV8
FD2
V1
ORF3
CV1
CV2
V2
V3
V10
V4
V5
V6
V7
CV3
CV4
RV2
CV5
RV1
V8
ORF1
CV6
CV7
V9
V11
MAN1
PMP3
V12
V13
CV10
PMP2
V14
CV11
PMP1
FL4
FL2
FL1
CV12
FL3
PMP4
FL5
Figure 5-3: Hydraulic Schematic - 104048-000
AB62 Work Platform - European
5-7
Section
SCHEMATICS
5.2
Diverter Valve (V11)
High Flow Proportional Valve (V10)
High Pressure Gauge
Port
Steering (V1)
High Pressure
Relief (RV2)
Riser (V2)
Boom
Extend/Retract (V3)
Low Flow
Proportional Valve (V9)
Low Pressure
Relief (RV1)
Boom Raise (V4)
Jib (V5)
Cage Level (V6)
Turret Rotate (V7)
Platform Rotate
Flow Control Valve
Low Pressure Gauge Port
Cage Rotate (V8)
Figure 5-4: Valve Manifold Assembly
5-8
AB62 Work Platform - European
Section
SCHEMATICS
5.2
2
1
3
4
5
6
7
8
9
10
11
12
13
14
15
16
Figure 5-5: Upper Controller, Top Half
1. Riser
2. Boom Raise
3. Boom Extend
4. Jib Raise
5. Emergency Stop
6. Engine Temperature
7. Tilt Indicator
8. Hi/Lo Speed
9. Fuel Selector/Glow Plug
10. Auxiliary Power
11. Turret Rotate
12. Cage Rotate
13. Cage Level
14. Horn
15. Boom Speed
16. Drive
17. Alarm
18. Key Switch
19. Optimizer Connection
18
17
19
Figure 5-6: Upper Controller, Bottom Half
AB62 Work Platform - European
5-9
Section
5.2
SCHEMATICS
Figure 5-7: Upper Controller Wiring Diagram - Diesel (1 of 2)
5-10
AB62 Work Platform - European
SCHEMATICS
Section
5.2
Figure 5-8: Upper Controller Wiring Diagram - Diesel (2 of 2)
AB62 Work Platform - European
5-11
Section
SCHEMATICS
5.2
22
2
1
21
6
3
9
4
5
8
10
19
7
11
20
14
15
12
16
18
13
17
1.
2.
3.
4.
5.
6.
7.
8.
Hour Meter
Water Temp
Oil Pressure
Circuit Breaker
Key Switch
Engine Start
Enable
Choke/Glow Plug Light
9. Emergency Stop
10. Riser
11. Boom Raise
12. Boom Speed HI/LOW
13. Boom Extend
14. Jib
15. Turret
16. Platform Rotate
17. Platform Level
18. Auxiliary Power
19. Relay 12 Volt
20. Terminal Strip
21. Relay Card Assembly
22. Multiflex Receiver
Figure 5-9: Lower Control Box
5-12
AB62 Work Platform - European
SCHEMATICS
Section
5.2
Figure 5-10: Lower Control Box Wiring Diagram - Diesel (1 of 2)
AB62 Work Platform - European
5-13
Section
5.2
SCHEMATICS
Figure 5-11: Lower Control Box Wiring Diagram - Diesel (2 of 2)
5-14
AB62 Work Platform - European
Section 6
Section 6
ILLUSTRATED PARTS
BREAKDOWN
6.1
INTRODUCTION
This section lists and illustrates the replaceable assemblies and parts of this product, as
manufactured by UpRight, Inc.
Each parts list contains the component parts for that assembly.
C ONTENTS
Final Assembly, AB62 Diesel
104000-001 . . . . . . . . . . . . . . . . . . . . . . . . . . . . . . . . . . . . . . . . . . . . . . . 6-2
Basic Assembly, AB62 Diesel
104006-000 . . . . . . . . . . . . . . . . . . . . . . . . . . . . . . . . . . . . . . . . . . . . . . . 6-6
Chassis Assembly
104007-000 . . . . . . . . . . . . . . . . . . . . . . . . . . . . . . . . . . . . . . . . . . . . . . . 6-8
Front Axle Assembly
104016-000 . . . . . . . . . . . . . . . . . . . . . . . . . . . . . . . . . . . . . . . . . . . . . . 6-10
Elevating Assembly
104009-000 . . . . . . . . . . . . . . . . . . . . . . . . . . . . . . . . . . . . . . . . . . . . . . 6-12
Linkage Assembly
104010-000 . . . . . . . . . . . . . . . . . . . . . . . . . . . . . . . . . . . . . . . . . . . . . . 6-14
Straight Boom Assembly
104011-000 . . . . . . . . . . . . . . . . . . . . . . . . . . . . . . . . . . . . . . . . . . . . . . 6-16
Jib Assembly
104012-000 . . . . . . . . . . . . . . . . . . . . . . . . . . . . . . . . . . . . . . . . . . . . . . 6-18
Turret Assembly
104008-000 . . . . . . . . . . . . . . . . . . . . . . . . . . . . . . . . . . . . . . . . . . . . . . 6-20
Engine Module Assembly, AB62 Diesel
1004013-000 . . . . . . . . . . . . . . . . . . . . . . . . . . . . . . . . . . . . . . . . . . . . . 6-22
Cover Assembly
104015-000 . . . . . . . . . . . . . . . . . . . . . . . . . . . . . . . . . . . . . . . . . . . . . . 6-26
Upper Controller Assembly, AB62 Diesel
104017-000 . . . . . . . . . . . . . . . . . . . . . . . . . . . . . . . . . . . . . . . . . . . . . . 6-28
Lower Controller Assembly, AB62 Diesel
104019-000 . . . . . . . . . . . . . . . . . . . . . . . . . . . . . . . . . . . . . . . . . . . . . . 6-34
Six Foot Cage Assembly
102037-100 . . . . . . . . . . . . . . . . . . . . . . . . . . . . . . . . . . . . . . . . . . . . . . 6-38
Eight Foot Cage Assembly, Option
102037-001 . . . . . . . . . . . . . . . . . . . . . . . . . . . . . . . . . . . . . . . . . . . . . . 6-39
Control Module Assembly
104021-000 . . . . . . . . . . . . . . . . . . . . . . . . . . . . . . . . . . . . . . . . . . . . . . 6-40
Fuel Tank Assembly
104024-000 . . . . . . . . . . . . . . . . . . . . . . . . . . . . . . . . . . . . . . . . . . . . . . 6-42
Hydraulic Tank Assembly
104025-000 . . . . . . . . . . . . . . . . . . . . . . . . . . . . . . . . . . . . . . . . . . . . . . 6-43
Valve Block Assembly
104033-000 . . . . . . . . . . . . . . . . . . . . . . . . . . . . . . . . . . . . . . . . . . . . . . 6-44
Valve Block Sub-Assembly
104251-000 . . . . . . . . . . . . . . . . . . . . . . . . . . . . . . . . . . . . . . . . . . . . . . 6-45
Drive Block Assembly
104035-000 . . . . . . . . . . . . . . . . . . . . . . . . . . . . . . . . . . . . . . . . . . . . . . 6-46
Valve Block Assembly, Two Speed/Brake/Axle Lock
104036-000 . . . . . . . . . . . . . . . . . . . . . . . . . . . . . . . . . . . . . . . . . . . . . . 6-47
AB62 Work Platform - European
Cage Rotate Valve Block Assembly
104034-000 . . . . . . . . . . . . . . . . . . . . . . . . . . . . . . . . . . . . . . . . . . . . .
Rotary Manifold Assembly
104026-000 . . . . . . . . . . . . . . . . . . . . . . . . . . . . . . . . . . . . . . . . . . . . .
Hose Kit Installation - Chassis/Turret/Linkage
104046-000 . . . . . . . . . . . . . . . . . . . . . . . . . . . . . . . . . . . . . . . . . . . . .
Drive Pump Assembly
104029-000 . . . . . . . . . . . . . . . . . . . . . . . . . . . . . . . . . . . . . . . . . . . . .
Lift Pump Assembly
104027-000 . . . . . . . . . . . . . . . . . . . . . . . . . . . . . . . . . . . . . . . . . . . . .
Jib Cylinder Assembly
104040-000 (S/N 1100-1110) . . . . . . . . . . . . . . . . . . . . . . . . . . . . . . .
Jib Cylinder Assembly
104040-001 (S/N 1111- Current) . . . . . . . . . . . . . . . . . . . . . . . . . . . .
Riser Cylinder Assembly
104037-000 (S/N 1100 - 1108) . . . . . . . . . . . . . . . . . . . . . . . . . . . . . .
Riser Cylinder Assembly
104037-001 (S/N 1109 - Current) . . . . . . . . . . . . . . . . . . . . . . . . . . . .
Extend Cylinder Assembly
104038-001 (S/N 1100 - 1108) . . . . . . . . . . . . . . . . . . . . . . . . . . . . . .
Extend Cylinder Assembly
104038-001 (S/N 1109 - Current) . . . . . . . . . . . . . . . . . . . . . . . . . . . .
Level Cylinder Assembly
104041-000 (S/N 1100 - 1108) . . . . . . . . . . . . . . . . . . . . . . . . . . . . . .
Level Cylinder Assembly
104041-001 (S/N 1109 - Current) . . . . . . . . . . . . . . . . . . . . . . . . . . . .
Master Cylinder Assembly
104042-000 (S/N 1100 - 1108) . . . . . . . . . . . . . . . . . . . . . . . . . . . . . .
Master Cylinder Assembly
104042-001 (S/N 1109 - Current) . . . . . . . . . . . . . . . . . . . . . . . . . . . .
Boom Cylinder Assembly
104039-000 (S/N 1100 - 1108) . . . . . . . . . . . . . . . . . . . . . . . . . . . . . .
Boom Cylinder Assembly
104039-001 (S/N 1109 - Current) . . . . . . . . . . . . . . . . . . . . . . . . . . . .
Label Kit, AB62 Diesel
104047-100 . . . . . . . . . . . . . . . . . . . . . . . . . . . . . . . . . . . . . . . . . . . . .
Tire & Wheel Assembly
100090-000 Left . . . . . . . . . . . . . . . . . . . . . . . . . . . . . . . . . . . . . . . . .
100090-001 Right . . . . . . . . . . . . . . . . . . . . . . . . . . . . . . . . . . . . . . . .
Control Cable
104032-000 . . . . . . . . . . . . . . . . . . . . . . . . . . . . . . . . . . . . . . . . . . . . .
Motion Alarm Option
104485-000 . . . . . . . . . . . . . . . . . . . . . . . . . . . . . . . . . . . . . . . . . . . . .
Flashing Beacon, Option
104486-000 . . . . . . . . . . . . . . . . . . . . . . . . . . . . . . . . . . . . . . . . . . . . .
6-48
6-49
6-50
6-54
6-55
6-56
6-57
6-58
6-59
6-60
6-61
6-62
6-63
6-64
6-65
6-66
6-67
6-68
6-70
6-70
6-71
6-72
6-73
Page 6-1
Illustrated Parts Breakdown - Final Assembly, AB62 Diesel
Final Assembly, AB62 Diesel
104000-001
ITEM
1
2
3
4
5
6
7
8
9
10
11
12
13
14
15
16
17
18
19
20
21
22
24
25
26
27
28
29
30
32
35
37
PART NO. PART/MATERIAL DESCRIPTION
104043-000
104006-000
102037-100
104017-000
104046-000
104049-000
104048-000
068820-000
063906-000
064479-000
100387-000
104047-100
029945-013
029435-099
011252-006
014996-004
011248-004
011252-010
066695-006
020032-001
100436-001
020032-003
011252-008
013949-003
011250-003
102373-000
011723-036
011240-012
011248-012
011238-004
100783-000
029961-001
Page 6-2
SPECIFICATION SHEET
BASIC ASSEMBLY AB62 DSL
PLATFORM (6 FT.) EURO
UPPER CONTROL BOX ASSY- DSL
HOSE KIT
ELECTRICAL SCHEMATIC
HYDRAULIC SCHEMATIC
RETAINING STRAP-FOOTSWITCH
FOOT SWITCH
SWITCH GUARD, FOOT
CAP, TAMPER PROOF
LABEL KIT-DIESEL EURO.
LEVEL SENSOR
CONTROL CABLE, 3-12GA
SCREW, 1/4-20 UNC HEX HD CAP X 3/4
WASHER, 1/4 DIA SAE FLAT
LOCKNUT, 1/4-20 UNC HEX
SCREW, 1/4-20 UNC HEX HD CAP X 1 1/4
SCREW, #10-24 UNC FLAT HD X 3/4
FITTING AERO 2033-4-4S
FITTING AERO FF1898T-0404S
FITTING AERO 2033-6-6S
SCREW, 1/4-20 UNC HEX HD CAP X 1
LOCKWASHER, #10 STAR EXT. TOOTH
NUT, #10-24 UNC HEX
BRACKET, CHAIN TIE-DOWN
SCREW, 3/4-10 UNC HEX HD CAP X 4 1/2
WASHER, 3/4 DIA ST FLAT
LOCKNUT, 3/4-10 UNC HEX
LOCKWASHER, 1/4 DIA SPLIT
RECEPTACLE, FEMALE
SEAL
QTY.
ITEM
REF
1
1
1
1
REF
REF
2
1
1
2
1
1
85 ft
10
8
12
2
2
1
3
1
4
2
2
2
4
4
4
4
1
2
38
39
40
42
43
44
45
46
47
201
202
203
204
205
206
208
209
210
211
212
213
214
215
216
217
218
219
220
221
222
223
PART NO. PART/MATERIAL DESCRIPTION
011715-006
011248-047
104032-000
029433-099
068865-000
029961-000
100385-099
100386-099
061692-099
15790-005
15790-003
15790-008
15790-009
29496-099
029620-002
068334-010
068334-095
029447-099
29601-008
014914-001
29601-005
029931-003
029601-039
029473-099
029470-099
029472-099
104387-001
104387-002
104387-003
029931-001
029610-002
SCREW, #6-32 RD HD MACH X 3/4
LOCKNUT, #6-32 HEX
CONTROL CABLE ASSEMBLY
CONTROL CABLE, 18 GA X 24 COND
OUTLET PLATE
PLUG, INLET
HOSE GUARD
HOSE GUARD
TRIM LOK
CONNECTOR, DEUTSCH PLUG
SOCKET, CONTACT 16-18
SOCKET, CONTACT 14-16
BOOT, DEUTSCH PLUG
CABLE, 2 COND/16 GA.
CONN. BUTT, 14-16
BATTERY CABLE ASSY X 10
BATTERY CABLE ASSY X 95
CABLE, 3 COND/16 GA
CONN. RING 22-18 5/16 DIA
CONN MALE PUSH 16-14
CONN RING 18-22 GA #10
CONN. FEM. PUSH 16-14
CONN. RING 12-10 GA 5/16 DIA
WIRE, 12 GA WHITE
WIRE, 12 GA RED
WIRE, 12 GA BLACK
CONNECTOR, 3 COND
BACKSHELL, CONNECTOR 3 COND
CONTACT, CONNECTOR
CONN. FEM. PUCH 18-22 GA
CONN. FORK 16-4 GA #8
QTY.
8
8
1
6ft
1
1
A/R
A/R
A/R
1
39
1
1
12 FT
2
2
2
28 FT
1
3
18
5
4
6 FT
6 FT
6 FT
1
1
3
2
2
AB62 Work Platform - European
Illustrated Parts Breakdown - Final Assembly, AB62 Diesel
Drawing # 1 of 2
AB62 Work Platform - European
Page 6-3
Illustrated Parts Breakdown - Final Assembly, AB62 Diesel
Drawing # 2 of 2
Page 6-4
AB62 Work Platform - European
Illustrated Parts Breakdown -
NOTES:
AB62 Work Platform - European
Page 6-5
Illustrated Parts Breakdown - Basic Assembly, AB62 Diesel
Basic Assembly, AB62 Diesel
104006-000
ITEM
1
2
3
4
5
6
7
8
9
10
11
12
13
14
15
16
17
18
19
20
21
22
23
24
25
26
27
28
29
PART NO. PART/MATERIAL DESCRIPTION
104007-000
104008-000
104009-000
104021-000
104013-000
104015-000
104100-000
100550-002
104306-000
104025-000
011291-028
011239-010
014918-016
011239-016
104226-000
104144-004
101016-002
011254-006
011240-006
011248-006
104019-000
104285-000
104284-000
104211-000
104326-000
011254-008
011238-006
011252-006
011240-004
Page 6-6
CHASSIS ASSY
TURRET ASSY
ELEVATING ASSY
CONTROL MODULE ASSY
ENGINE MODULE ASSY (DIESEL)
COVER ASSY
COUNTER WEIGHT
CAGE ROTATE MOUNT
CAGE MOUNT
HYDRAULIC RESERVOIR ASSEMBLY
SCREW, 5/8-11 UNC HHC GR 8 X 3 1/2
WASHER, 5/8 DIA FLAT ASTM A325
SCREW, 1-8 UNC HHC GR 5 X 2 LG
WASHER FLAT ASTM A325 1 DIA
TRAY PIN WELDMENT
WASHER, THRUST
BEARING, 1.50 I.D. X 1.25 LG
SCREW 3/8-16 UNC HHC GR 5 X 3/4
WASHER, 3/8 DIA STD FLAT
LOCKNUT, 3/8-16 HEX
LOWER CONTROLLER ASSEMBLY (DIESEL)
TOP CONTROL BRACKET
BOTTOM CONTROL BRACKET
PIN WELDMENT
PIN WELDMENT
SCREW, 3/8-16 UNC HEX HD CAP X 1
LOCKWASHER, 3/8 SPLIT
SCREW, 1/4-20 UNC HEX HD CAP X 3/4
WASHER, 1/4 STD FLAT
QTY.
ITEM
1
1
1
1
1
1
1
1
1
1
20
20
3
3
1
2
2
18
28
25
1
1
1
2
2
6
7
8
30
30
34
35
36
37
38
39
40
41
42
43
45
46
47
48
49
50
52
53
54
55
57
58
59
60
61
62
PART NO. PART/MATERIAL DESCRIPTION
011248-004
0104469-00
104088-000
011256-008
011238-008
104328-000
104329-000
104333-000
104334-000
104342-000
104346-000
013923-006
011254-024
061796-099
104375-005
104375-004
104504-000
011239-012
011248-012
011254-028
011254-020
015736-001
011765-024
104470-001
104074-000
011828-010
011256-010
LOCKNUT, 1/4-20 UNC HEX
PIN WELDMENT
ENGINE SUPPORT WELDMENT
SCREW, 1/2-13 UNC HEX HD CAP X 1
LOCKWASHER, 1/2 DIA SPLIT
COVER, HOSE WIDE
RETAINER, HOSE WIDE
COVER, HOSE NARROW
RETAINER, HOSE NARROW
COVER, VALVE BLOCK
COVER JIB
SCREW, #10 TYPE AB HEX WASHER HD X 3/4
SCREW, 3/8-16 UNC HEX HD CAP X 3
TRIM
BEARING, 2.0 I.D. X 2.O LG
BEARING, 2.0 I.D. X 1.5 LG
ROTATOR PIN WELDMENT
WASHER, 3/4 STD FLAT
LOCK NUT, 3/4-10 UNC HEX
SCREW, 3/8-16 UNC HEX HD CAP X 3 1/2
SCREW, 3/8-16 UNC HEX HD CAP X 2 1/2
FITTING, ELBOW 4MB-4MJ 90° LONG
RETAINING RING, 1-1/2” EXTERNAL
SLEEVE, PIN HEAD
ENGINE SLIDE MOUNT
SCREW, 1/4-20 UNC FLAT HD X 1 1/4
SCREW, 1/2-13 UNC HEX HD CAP X 1 1/4
QTY.
22
2
1
2
8
2
6
2
6
1
1
2
3
1.67 FT.
4
4
1
1
1
1
4
2
2
2
1
2
6
AB62 Work Platform - European
Illustrated Parts Breakdown - Basic Assembly, AB62 Diesel
AB62 Work Platform - European
Page 6-7
Illustrated Parts Breakdown - Chassis Assembly
Chassis Assembly
104007-000
ITEM
1
2
3
4
5
6
7
8
9
*
10
12
13
14
15
16
17
18
19
20
21
22
23
PART NO. PART/MATERIAL DESCRIPTION
104125-000
104016-000
100090-001
100090-000
104507-000
104147-000
104228-000
104482-000
100556-000
100556-010
104144-003
100244-001
104362-000
102279-000
100254-000
011469-006
011254-010
011248-006
011239-006
100782-000
011257-040
011254-008
011240-006
Page 6-8
CHASSIS WELDMENT
FRONT AXLE ASSEMBLY
WHEEL & TIRE ASSEMBLY R.H.
WHEEL & TIRE ASSEMBLY L.H.
MOTOR COVER WELDMENT
TURRET STOP
AXLE PIN WELDMENT
CYLINDER PIN WELDMENT
AXLE CYLINDER
SEAL KIT, AXLE CYLINDER
WASHER, NYLATRON
SLEW BEARING
DRIVE MOTOR 45CC MAX x 17CC MIN
BRAKE-AUSCO
PLANETARY
LUGNUT, 5/8
SCREW, 3/8-16 UNC HEX HD CAP X 1 1/4
LOCKNUT, 3/8-16 UNC HEX
WASHER, 3/8 DIA ASTM A325
O-RING, WHEEL MOTOR
SCREW, 5/8-11 UNC HEX HD CAP X 5
SCREW, 3/8-16 UNC HEX HD CAP X 1
WASHER, 3/8 DIA STD FLAT
QTY.
ITEM
1
1
2
2
2
2
1
4
2
1
2
1
2
2
2
36
8
8
17
4
1
1
4
24
25
26
27
28
29
30
31
32
34
35
36
37
38
40
41
42
43
44
45
46
47
PART NO. PART/MATERIAL DESCRIPTION
011239-008
011254-006
011238-006
011248-010
011239-010
014033-036
011291-026
011239-010
014033-008
104462-000
104142-000
104461-000
100434-002
011934-026
011934-001
011941-019
011934-024
011257-024
068680-007
003556-001
011253-008
011238-005
WASHER, 1/2 DIA ASTM A325
SCREW, 3/8-16 UNC HEX HD CAP X 3/4
LOCKWASHER, 3/8 SPLIT
LOCKNUT, 5/8-11 UNC HEX
WASHER, 5/8 DIA ASTM A325
SCREW, 1/2-13 UNC HEX HD CAP GR 8 X 4 1/2
SCREW, 5/8-11 UNC HEX HD CAP GR 8 X 3 1/4
WASHER, 5/8 ASTM A325
SCREW, 1/2-13 UNC HEX HD CAP GR 8 X 1
DRIVE BLOCK ASSEMBLY
ROTARY BRACE
BRACKET, DRIVE VALVE
FITTING, ELBOW 4FFORB-4MB 90°
FITTING, ELBOW 4MB-6MJ 90°
FITTING, ELBOW 4MB-4MJ 90°
FITTING, STR 12MB-10MJ
FITTING, ELBOW 10MB-6MJ 90°
SCREW, 5/8-11 UNC HEX HD CAP X 3
FITTING, 90°
FITTING
SCREW, 5/16-18 UNC HEX HD CAP X 1
LOCKWASHER, 5/16 DIA SPLIT
QTY.
12
6
11
13
12
4
20
20
8
1
1
1
4
2
2
4
2
12
1
1
2
2
AB62 Work Platform - European
Illustrated Parts Breakdown - Chassis Assembly
AB62 Work Platform - European
Page 6-9
Illustrated Parts Breakdown - Front Axle Assembly
Front Axle Assembly
104016-000
ITEM
1
2
3
4
*
5
6
7
8
9
10
11
12
*
*
13
14
15
16
PART NO. PART/MATERIAL DESCRIPTION
104114-000
104120-000
104123-000
100557-000
100557-010
104143-000
104148-001
104232-000
104245-000
101016-005
101016-004
101016-003
100254-000
100254-010
100254-011
104363-000
104386-004
068885-000
011934-004
Page 6-10
FRONT AXLE WELDMENT
RIGHT FRONT MOUNT WELDMENT
LEFT FRONT MOUNT WELDMENT
STEERING CYLINDER
SEAL KIT, STEERING CYLINDER
STEERING LINK SLEEVE
STEERING LINK
BOTTOM KING PIN WELDMENT
TOP WHEEL PIN
BEARING, 2.5 I.D. X 2.5 LG
BEARING, 2.0 I.D. X 2.0 LG
BEARING, 1.0 I.D. X 2.0 LG
PLANETARY
SEAL KIT W/BEARINGS - DRIVE HUB
STUD, 5/8” DRIVE HUB
WHEEL MOTOR - 40 CC MAX x 15 CC MIN
FITTING, ELBOW 90° MB10-FB10
FITTING, SWIVEL 90°
FITTING, ELBOW 6MB-6MJ
QTY.
ITEM
1
1
1
1
1
4
4
2
2
2
4
2
2
1
1
2
4
4
2
17
18
19
20
21
22
23
24
25
27
28
29
30
31
32
33
35
PART NO. PART/MATERIAL DESCRIPTION
011248-010
011239-010
011291-022
011254-010
011238-006
011291-024
014033-010
011239-008
011257-034
104144-002
011254-032
011248-006
011941-011
100434-002
011934-024
100782-000
015717-007
LOCKNUT, 5/8-11 UNC HEX
WASHER, 5/8 DIA FLAT ASTM A325
SCREW, 5/8-11 UNC HEX HD CAP GR 8 X 2 3/4
SCREW, 3/8-16 UNC HEX HD CAP X 1 1/4
LOCKWASHER, 3/8 SPLIT
SCREW, 5/8-11 UNC HEX HD GR 8 CAP X 3
SCREW, 1/2-13 UNC HEX HD CAP GR 8 X 1 1/4
WASHER, 1/2 DIA FLAT ASTM A325
SCREW, 5/8-11 UNC HEX HD CAP X 4 1/4
THRUST WASHER, 2 I.D.
SCREW, 3/8-16 UNC HEX HD CAP X 4
LOCKNUT, 3/8-16 UNC HEX
FITTING, 8MB-10MJ
FITTING, ELBOW 4FFORB-4MB 90°
FITTING, ELBOW 10MB-6MJ 90°
O-RING, WHEEL MOTOR
FITTING, ADAPTER MB12-FB10
QTY.
20
40
4
6
6
12
4
4
4
6
2
2
4
2
2
2
4
AB62 Work Platform - European
Illustrated Parts Breakdown - Front Axle Assembly
AB62 Work Platform - European
Page 6-11
Illustrated Parts Breakdown - Elevating Assembly
Elevating Assembly
104009-000
ITEM
1
2
3
4
*
*
5
*
*
6
7
8
9
10
11
12
13
14
15
16
17
PART NO
104010-000
104011-000
104012-000
104041-001
104258-001
104258-010
104039-001
104256-001
104256-010
104042-001
104202-000
104203-000
104201-000
104206-000
104207-000
104160-000
104213-000
104224-000
104244-000
104242-000
104321-100
Page 6-12
PART/MATERIAL DESCRIPTION
LOWER LINKAGE ASSEMBLY
STRAIGHT BOOM ASSY
JIB ASSEMBLY
LEVEL CYLINDER SUB ASSEMBLY
LEVEL CYLINDER - Serial # 1109 - Current
SEAL KIT, LEVEL CYLINDER - Serial # 1109 - Current
BOOM CYLINDER SUB ASSEMBLY
BOOM CYLINDER - Serial # 1109 - Current
SEAL KIT, BOOM CYLINDER - Serial # 1109 - Current
MASTER CYLINDER SUB ASSEMBLY
PIN WELDMENT (8)
PIN WELDMENT (9)
PIN STRAIGHT BOOM (PIN 10)
PIN WELDMENT (10)
PIN WELDMENT, EXTEND
PIN ROTATOR
PIN MASTER CYLINDER
PIN WELDMENT CYLINDER
SUPPORT BRACKET WELDMENT
SUPPORT PLATE
SWITCH MOUNT PLATE
QTY.
ITEM
PART NO
1
1
1
1
18
19
20
21
22
23
24
25
26
27
28
29
30
31
32
33
34
35
36
37
100380-000
013923-006
011254-010
011254-006
011254-026
011828-006
011254-020
011238-006
104375-002
011248-004
011248-006
066516-004
011765-024
104343-000
068556-002
104375-005
011708-012
011248-002
014033-040
011248-008
1
1
1
1
1
1
1
1
1
1
1
1
1
PART/MATERIAL DESCRIPTION
SWITCH, SENSOR
SCREW, #10 SELF TAPPING HWH TYPE AB X 3/4
SCREW HHC 3/8-16 UNC X 1 1/4
SCREW HHC 3/8-16 UNC X 3/4
SCREW, HHC 3/8-16 UNC X 3 1/4
SCREW FH 1/4-20 UNC X 3/4
SCREW, 3/8-16 UNC HEX HD CAP X 2 1/2
WASHER LOCK 3/8
BEARING, 1 1/2 I.D. X 1 1/4 LG
NUT HEX ESNA 1/4-20 UNC
NUT HEX ESNA 3/8-16 UNC
PLUG, 4.00 DIA
RETAINING RING
BRACKET, LIMIT SWITCH
SWITCH, LIMIT
BEARING, 2.0 I.D. X 2 LG
SCREW, #8-32 UNC RD HD MACH X 1 1/2
LOCKNUT, #8-32 UNC HEX
SCREW, 1/2-13 UNC HEX HD CAP GR 8 X 5
LOCKNUT, 1/2-13 UNC HEX
QTY.
1
2
4
4
1
4
1
4
8
4
6
1
2
1
1
4
2
2
2
2
AB62 Work Platform - European
Illustrated Parts Breakdown - Elevating Assembly
AB62 Work Platform - European
Page 6-13
Illustrated Parts Breakdown - Linkage Assembly
Linkage Assembly
104010-000
ITEM
1
*
*
2
3
4
5
6
7
8
9
10
11
12
13
PART NO. PART/MATERIAL DESCRIPTION
104037-001
104260-001
104260-010
104375-005
104375-004
104210-000
104211-000
104212-000
104274-000
104216-000
104178-000
104191-000
104185-000
104195-000
104183-000
Page 6-14
RISER CYLINDER SUB ASSEMBLY
RISER CYLINDER - Serial # 1109 - Current
SEAL KIT, RISER CYLINDER - Serial # 1109 - Current
BUSHING 2 ID x 2.00 LG
BUSHING 2 ID x 1.50 LG
PIN WELDMENT
PIN WELDMENT
PIN WELDMENT
PIN, UPPER BOOM
PIN WELDMENT
LOWER RISER WELDMENT
LOWER BOOM WELDMENT
UPPER TENSION LINK WELDMENT
UPPER BOOM WELDMENT
LOWER TENSION LINK WELDMENT
QTY.
ITEM
1
14
15
16
17
19
20
21
22
23
24
25
26
28
4
8
1
4
1
1
1
1
1
1
1
2
PART NO. PART/MATERIAL DESCRIPTION
104188-000
104187-000
104221-000
011254-006
014033-040
011254-008
011248-008
011238-006
104375-006
104241-000
065214-001
011254-010
104375-007
UPPER RISER WELDMENT
TENSION LINK WELDMENT
RISER PIN
SCREW, 3/8-16 UNC HEX HD CAP X 3/4
SCREW, 1/2-13 UNC HEX HD CAP GR 8 X 5 LG
SCREW, 3/8-16 UNC HEX HD CAP X 1
LOCKNUT, 1/2-13 UNC HEX
LOCKWASHER, 3/8 DIA SPLIT
BUSHING, 2.00 ID X 2 1/2 LG
PIN WELDMENT
ROD END RETAINER
SCREW, 3/8-16 UNC HEX HD CAP X 1 1/4
BUSHING 2 ID x 1.75 LG
QTY.
1
1
2
7
6
2
6
11
12
2
2
2
4
AB62 Work Platform - European
Illustrated Parts Breakdown - Linkage Assembly
AB62 Work Platform - European
Page 6-15
Illustrated Parts Breakdown - Straight Boom Assembly
Straight Boom Assembly
104011-000
ITEM
1
2
*
*
3
4
5
6
7
8
9
10
12
13
PART NO. PART/MATERIAL DESCRIPTION
104163-000
104038-001
104255-001
104255-010
104175-000
104176-000
104177-000
104222-000
104223-000
104182-000
104181-000
068691-030
104315-000
104207-000
Page 6-16
BASE BOOM WELDMENT
EXTEND CYLINDER ASSEMBLY
EXTEND CYLINDER - Serial # 1109 - Current
SEAL KIT, EXTEND CYLINDER - Serial # 1109 - Current
TIP BOOM WELDMENT
WEAR PAD
WEAR PAD
WEAR PAD
WEAR PAD
EXTENSION TUBE WELDMENT
EXTENSION TUBE MOUNTING BRACKET
CATRAC
EXTEND CYLINDER SUPPORT
PIN WELDMENT, CYLINDER
QTY.
ITEM
1
1
15
16
17
18
19
20
21
22
24
25
26
27
28
1
2
2
2
2
1
1
1
1
1
PART NO. PART/MATERIAL DESCRIPTION
011254-016
011240-006
104375-006
011248-006
011248-005
011253-008
011238-006
011254-006
104335-000
011254-008
104411-000
104412-000
011253-006
SCREW, 3/8-16 UNC HEX HD CAP X 2.0
WASHER, 3/8 DIA STD FLAT
BEARING, 2 I.D. X 2 1/2 LG
LOCKNUT, 3/8-16 UNC HEX
LOCKNUT, 5/16-18 UNC HEX
SCREW, 5/16-18 UNC HEX HD CAP X 1
LOCKWASHER, 3/8 SPLIT
SCREW, 3/8-16 UNC HEX HD CAP X 3/4
TUBE, HOSE
SCREW, 3/8-16 UNC HEX HD CAP X 1
SHORT TUBE GUIDE
LONG TUBE GUIDE
SCREW, 5/16-18 UNC HEX HD CAP X 3/4
QTY.
4
4
2
4
12
4
33
23
1
10
2
2
8
AB62 Work Platform - European
Illustrated Parts Breakdown - Straight Boom Assembly
AB62 Work Platform - European
Page 6-17
Illustrated Parts Breakdown - Jib Assembly
Jib Assembly
104012-000
ITEM
1
2
3
*
*
4
5
6
7
8
PART NO. PART/MATERIAL DESCRIPTION
104151-000
104156-000
104040-001
104257-001
104257-010
104375-001
104161-000
104159-000
104375-002
011765-024
BOTTOM JIB FRAME WELDMENT
ROTATOR FRAME WELDMENT
CYLINDER JIB ASSEMBLY
JIB CYLINDER - Serial # 1111 - Current
SEAL KIT, JIB CYLINDER - Serial # 1111 - Current
BEARING 1 1/4 I.D. X 1 1/4 LG
PIN, CYLINDER
PIN
BEARING, 1 1/2 I.D. X 1 1/4 LG
RETAING RING, 1 1/2 DIA
QTY.
ITEM
1
1
1
9
10
11
13
14
15
16
17
18
8
2
1
18
2
PART NO. PART/MATERIAL DESCRIPTION
104034-000
104375-003
104467-000
011248-005
011253-022
011252-014
011248-004
104151-001
104389-001
CAGE ROTATE VALVE ASSEMBLY
BEARING, 1 1/2 I.D. X 2 LG
ROTATE VALVE SPACER
LOCKNUT, 5/16-18 UNC HEX
SCREW, 5/16-18 UNC HHC GR 5 X 2 3/4 LG
SCREW, 1/4-20 UNC HHC GR 5 X 1 3/4 LG
LOCKNUT, 1/4-20 UNC HEX
TOP JIB FRAME WELDMENT
FITTING, SWIVEL MB4-MJ4 90°
QTY.
1
2
1
2
2
2
2
1
2
18
Page 6-18
AB62 Work Platform - European
Illustrated Parts Breakdown -
NOTES:
AB62 Work Platform - European
Page 6-19
Illustrated Parts Breakdown - Turret Assembly
Turret Assembly
104008-000
ITEM
1
2
3
*
4
5
*
6
7
8
9
10
11
12
13
14
15
16
17
18
19
20
PART NO. PART/MATERIAL DESCRIPTION
104101-000
104113-000
100242-000
100242-011
104026-000
100241-001
100241-010
100261-001
101016-002
068904-000
104052-000
011715-006
104237-000
101016-006
011934-026
011941-002
011424-012
011239-010
011256-010
011239-008
011253-016
011239-005
Page 6-20
TURRET WELDMENT
SLEW DRIVE MOUNT
SWING GEAR BOX
GASKET, GEAR BOX
ROTARY MANIFOLD ASSEMBLY
MOTOR
SEAL KIT, SWING MOTOR
MOTOR VALVE BLOCK
BEARING, 1.50 I.D. X 1.25 LG
LATCH ANCHOR
LINK PAD
SCREW, #6-32 RD HD MACH X 3/4
STOP PIN
BEARING, 1.50 I.D. X 2.50 LG
FITTING, ELBOW 90° 4MB-6MJ
FITTING, STR 4MB-6MJ
SCREW, 5/8-11 UNC SOC HD CAP GR 8 X 1 1/2
WASHER, 5/8 DIA ASTM A325
SCREW, 1/2-13 UNC HEX HD CAP X 1 1/4
WASHER, 1/2 DIA ASTM A325
SCREW, 5/16-18 UNC HEX HD CAP X 2
WASHER, 5/16 DIA ASTM A325
QTY.
ITEM
1
1
1
1
1
1
1
1
1
REF
2
4
1
1
2
2
4
16
2
6
2
2
21
23
24
25
26
27
28
29
30
31
32
33
34
35
36
37
38
43
44
45
46
PART NO. PART/MATERIAL DESCRIPTION
011424-028
011248-010
011256-020
104378-001
063783-003
011248-006
011741-010
104053-000
104322-000
011707-016
011273-008
104142-000
011240-006
011254-008
100394-000
011240-001
011248-047
013336-001
068679-003
068678-024
029958-001
SCREW, 5/8-UNC SOC HD CAP GR 8 X 3 1/2
LOCKNUT, 5/8-11 UNC HEX
SCREW, 1/2-13 UNC HEX HD CAP X 2 1/2
SNAP PIN 3/8 DIA X 3 GRIP
LANDYARD ASSEMBLY
LOCK NUT, 3/8-16 UNC HEX
SCREW, 3/8-16 UNC FLT HD SOC X 1 1/4
RISER PAD
ROD, STOP PIN
SCREW, 1/2-13 UNC SET HEX SOC X 2
NUT, JAM 1/2-13 UNC
ROTARY BRACE
WASHER, 3/8 DIA STD FLAT
SCREW, 3/8-16 UNC HEX HD CAP X 1
WASHER
WASHER, #6 STD FLAT
LOCKNUT, #6-32 HEX
FITTING, GREASE
FITTING, BULKHEAD
TUBING, POLYURETHANE
HORN, 12 VOLT
QTY.
8
8
4
1
1
13
8
1
1
1
1
REF
4
2
4
8
4
1
1
1
1
AB62 Work Platform - European
Illustrated Parts Breakdown - Turret Assembly
AB62 Work Platform - European
Page 6-21
Illustrated Parts Breakdown - Engine Module Assembly, AB62 Diesel
Engine Module Assembly, AB62 Diesel
1004013-000
ITEM
1
2
3
4
5
6
7
8
9
10
11
12
13
14
15
16
17
18
19
20
21
22
23
24
25
27
28
29
30
31
32
33
34
35
37
39
40
41
42
43
44
45
46
47
PART NO. PART/MATERIAL DESCRIPTION
104060-000
104352-000
100180-030
100180-038
104352-010
104368-000
100180-041
100180-051
104297-000
100180-042
100180-043
100180-044
100180-045
104296-000
100180-046
100180-050
100180-048
104295-000
104029-000
104027-000
068823-000
100209-000
027972-000
104036-000
104323-000
100324-000
068565-001
010150-005
011979-008
104409-000
011252-006
011239-004
011248-004
011252-020
011248-006
011254-028
100192-000
014996-008
011238-008
011252-012
011238-006
011254-008
067672-020
011238-005
Page 6-22
ENGINE TRAY WELDMENT
ENGINE, PERKINS DIESEL
AIR CLEANER
CLAMP, AIR CLEANER
RAIN CAP
MUFFLER
CLAMP. MUFFLER
SEPARATOR, FUEL
MUFFLER MOUNT WELDMENT
THROTTLE CONTROL
SPLINED COUPLER
GASKET, EXHAUST FLANGE
NUT, EXHAUST FLANGE
EXHAUST PIPE
EXHAUST CLAMP
GLOW PLUG CONTROLLER
FLANGE
EXHAUST PIPE
PUMP, DRIVE ASSEMBLY
PUMP, LIFT ASSEMBLY
OVER-FLOW BOTTLE
ENGINE MOUNT, ISOLATOR
SOLENOID START 12 VOLT
VALVE BLOCK ASSY, BRAKE
ISOLATOR BRACKET
POWER CONVERTER
ACCUMULATOR
FITTING, BULKHEAD
O-RING
ISOLATOR COVER WELDMENT
SCREW, 1/4-20 UNC HEX HD CAP X 3/4
WASHER, 1/4 DIA FLAT ASTM
LOCKNUT, 1/4-20 UNC HEX A325
SCREW, 1/4-20 UNC HEX HD CAP X 2 1/2
LOCKNUT, 3/8-16 UNC HEX
SCREW, 3/8-16 UNC HEX HD CAP X 3 1/2
WASHER, SNUBBER
WASHER, 1/2 DIA FLAT
LOCKWASHER, 1/2 DIA SPLIT
SCREW, 1/2-13 UNC HEX HD CAP X 1 1/2
LOCKWASHER, 3/8 DIA SPLIT
SCREW, 3/8-16 UNC HEX HD CAP X 1
SCREW, M8 X 1.25 HEX HD CAP X 20MM
LOCKWASHER, 5/16 DIA SPLIT
QTY.
ITEM
1
1
1
1
1
1
1
1
1
1
1
1
3
1
1
1
1
1
1
1
1
4
1
1
1
1
1
1
1
1
12
14
16
2
14
8
8
2
2
2
2
6
4
4
48
49
50
51
52
53
54
55
56
57
58
59
60
62
63
64
201
202
203
204
205
206
207
208
209
210
211
212
213
214
215
216
217
218
219
220
221
222
223
224
225
226
PART NO. PART/MATERIAL DESCRIPTION
011253-006
011248-005
012702-002
011915-001
068954-001
100333-000
029945-018
011937-004
011922-006
100332-000
063947-005
012865-099
011254-024
020541-001
012739-099
012733-099
015790-015
015790-013
015790-003
067990-030
067990-031
100338-013
100338-014
029480-099
029470-099
029454-099
029452-099
029451-099
029368-099
029453-099
068334-080
068334-050
068334-032
029610-006
029601-012
029601-039
029617-002
029931-003
029931-005
029825-002
029433-099
029496-099
SCREW, 5/16 -18 UNC HEX HD CAP X 3/4
LOCKNUT, 5/16-18UNC HEX
FITTING, STR 2MP-2MP
FITTING, TEE ADAPTER 2FP-2FP-2FP
OIL PRESSURE SWITCH
OIL PRESSURE SENDING UNIT
LEVEL SENSOR
FITTING, ELBOW 90° 8FJ-8MJ
FITTING, ADAPTER 6MP-8FP
SENDING UNIT, TEMP
NUT, JAM 5MM
WIRE LOOM, 3/4”
SCREW 3/8-16 UNC HHC X 3” LG
HOSE CLAMP
HOSE, 1/4 FUEL LINE
HOSE, 5/16 FUEL LINE
CONNECTOR, (24 PIN)
BOOT
SOCKET 16-18 GA
CONNECTOR ( 8 PIN)
CONNECTOR (8 PIN)
CONTACT, 16 GA PIN
CONTACT, 16 GA SOCKET
WIRE, 10 GA RED
WIRE, 12 GA. RED
WIRE, 16 GA. RED
WIRE, 16 GA. BLACK
WIRE, 16 GA. WHITE
WIRE, 16 GA. RED/YEL
WIRE, 16 GA. ORANGE
BATTERY CABLE ASSY X 80 LG
BATTERY CABLE ASSY X 50 LG
BATTERY CABLE ASSY X 32 LG
CONN. FORK TERM, #8 Ø 14-16 GA.
CONN. RING TERM. #8 Ø 16-14 GA.
CONN. RING TERM. Ø 5/16 12-10 GA.
CONN. MALE PUSH (.25) 16-14 GA.
CONN. FEM. PUSH (.25) 16-14 GA.
CONN. FEM. PUSH (.25) 10-12 GA.
DIODE, 5 AMP
CABLE, 18 GA 24 COND
CABLE, 16 GA 2 COND
QTY.
6
6
1
1
1
1
REF
1
1
1
1
30 FT
2
4
18 FT
18 FT
1
1
24
1
1
8
8
6 FT.
6 FT.
6 FT.
6 FT.
6 FT.
6 FT.
6 FT.
1
1
1
4
3
15
3
7
3
3
6 FT.
6 FT.
NOTE: Items 3 through 18 included with Item 2.
AB62 Work Platform - European
Illustrated Parts Breakdown - Engine Module Assembly, AB62 Diesel
Drawing # 1 of 2
AB62 Work Platform - European
Page 6-23
Illustrated Parts Breakdown - Engine Module Assembly, AB62 Diesel
Drawing # 2 of 2
Page 6-24
AB62 Work Platform - European
Illustrated Parts Breakdown -
NOTES:
AB62 Work Platform - European
Page 6-25
Illustrated Parts Breakdown - Cover Assembly
Cover Assembly
104015-000
ITEM
1
2
3
4
5
6
7
8
9
10
11
12
13
14
15
16
17
18
PART NO. PART/MATERIAL DESCRIPTION
104075-000
068904-000
104099-000
104098-000
104292-000
104450-000
104056-000
104084-000
104089-000
104090-000
104078-000
104077-000
104451-000
104093-000
104092-000
104057-000
104076-000
104455-000
Page 6-26
TURRET COVER RIGHT
LATCH
LATCH BLOCK
LATCH BLOCK
EXHAUST PIPE
STRUT BRACKET RIGHT
RIGHT COVER BRACE
HINGE
HINGE MOUNT RIGHT FRONT
HINGE MOUNT RIGHT REAR
RIGHT DOOR MOUNT
LEFT DOOR MOUNT
STRUT BRACKET LEFT
HINGE MOUNT LEFT REAR
HINGE MOUNT LEFT FRONT
LEFT COVER BRACE
TURRET COVER LEFT
SPRING MOUNT
QTY.
ITEM
1
4
2
2
1
1
1
4
1
1
1
REF
1
1
1
1
1
2
19
20
23
24
26
27
28
29
30
31
32
34
35
36
37
41
42
PART NO. PART/MATERIAL DESCRIPTION
104416-000
104415-000
011248-004
011252-022
013923-008
061692-099
100370-099
104374-000
104374-001
011240-005
104479-000
011253-008
011253-006
011248-005
011826-004
011240-006
011248-006
COVER PANEL, RIGHT
COVER PANEL, LEFT
LOCKNUT, 1/4-20 UNC HEX
SCREW, 1/4-20 UNC HEX HD CAP X 2 3/4
SCREW, #10 TYPE AB SLFTP HWH X 1
GROMMET MATERIAL
DOOR SEAL, “C”
SPRING, GAS
BALL JOINT ASSEMBLY
WASHER, 5/16 DIA STD FLAT
SPACER, DOOR MOUNT
SCREW, 5/16-18 UNC HEX HD CAP X 1
SCREW, 5/16-18 UNC HEX HD CAP x 3/4
LOCKNUT, 5/16-18 UNC HEX
SCREW, #10-32 UNF RD HD MACH X 1/2
WASHER, 3/8 DIA STD FLAT
LOCKNUT, 3/8-16 UNC HEX
QTY.
1
1
9
9
4
A/R
A/R
2
4
88
2
44
5
48
8
8
8
AB62 Work Platform - European
Illustrated Parts Breakdown - Cover Assembly
AB62 Work Platform - European
Page 6-27
Illustrated Parts Breakdown - Upper Controller Assembly, AB62 Diesel
Upper Controller Assembly, AB62 Diesel
104017-000
ITEM
1
2
3
5
6
*
*
*
*
*
*
*
*
*
7
8
9
10
11
12
13
14
15
16
17
18
19
20
21
22
23
24
PART NO. PART/MATERIAL DESCRIPTION
104270-000
068594-000
066805-012
012797-000
104497-000
104497-002
066544-013
066786-011
066786-012
066786-013
066786-016
066786-021
066786-024
06892-008
012798-004
068590-000
068591-001
068595-002
068595-001
064446-003
064443-002
064417-001
067654-000
068593-004
008271-001
064443-001
067652-000
104307-000
104308-000
011709-004
011248-003
015964-000
Page 6-28
ENCLOSURE, UPPER CONTROLS
JOYSTICK - OPERATOR
CONTACT BLOCK N.O./N.C.
TOGGLE SWITCH, SPDT
CONTROLLER ASSEMBLY
PC BOARD W/POT
BOOT HANDLE
HANDLE HALVE FRONT
HANDLE HALVE REAR
GASKET HANDLE
BOOT ROCKER
SWITCH PUSH BUTTON
SWITCH STEERING MICRO
SWITCH DRIVE MICRO
SWITCH TOGGLE, DPDT MOMMENTARY
BASE, INDICATOR LAMP
LAMP T-2 1/2
LENS AMBER
LENS RED
EMERGENCY STOP BUTTON
CONTACT BLOCK, N.C.
FLANGE MOUNT
SWITCH, PUSH BUTTON
SWITCH
SWITCH GUARD
CONTACT BLOCK, N.O.
SWITCH, PUSH BUTTON
MAIN COVER
TOP COVER
SCREW, #10-24 UNC RD HD MACH X 1/2
LOCKNUT, #10-24 UNC HEX
PLUG, HOLE
QTY.
ITEM
1
6
12
1
1
1
1
1
1
1
1
1
1
1
1
3
3
2
1
1
2
2
1
1
2
3
1
1
1
8
8
2
201
202
203
204
205
206
207
210
211
212
213
214
215
216
217
218
219
220
221
222
301
302
303
304
305
306
307
308
PART NO. PART/MATERIAL DESCRIPTION
104270-000
029925-002
029939-002
100334-000
066807-001
068132-001
026553-003
065926-012
015790-003
028800-015
104387-000
029928-010
011252-006
011240-004
011248-004
104383-000
011248-002
011708-006
104480-000
100337-099
029610-002
029610-007
029616-004
029617-004
029428-099
029371-099
029601-005
029601-016
UPPER CONTROL BOX
CONNECTOR CABLE 1/2 NPT
LOCKNUT 1/2 NPT
SWITCH, LEVER
ALARM 107DB
RELAY, 12 VDC
RIVET, POP 3/16 .126-.250 GRIP
CONNECTOR, PLUG 31 SOCKET
SOCKET, 16-18 GA
PLUG, SEALING
CONNECTOR,
TERMINAL. STRIP
SCREW 1/4-20 UNC HHC X 3/4 LG
WASHER 1/4 FLAT
LOCKNUT 1/4-20 UNC
MULTIPLEX TRANSMITTER
LOCKNUT, #8-32 UNC HEX
SCREW, #8-32 UNC RD HD MACH X 3/4
MOUNTING PLATE, UPPER CONTROLLER
O-RING CORD 3/16
CONN, FORK 16-14 #8
CONN, FORK 22-16 #8
CONN, FEMALE PUSH 22-16
CONN, MALE PUSH 22-16
WIRE, 18 GA. WHITE
WIRE, 16 GA. YELLOW/GREEN
CONN, RING 22-16 #10 DIA
CONN, RING 22-16 #2 DIA
QTY.
REF
1
1
1
1
1
1
1
26
5
1
1
4
4
4
1
2
2
1
FT 3.5
28
35
7
2
A/R
A/R
3
8
* Not shown
AB62 Work Platform - European
Illustrated Parts Breakdown - Upper Controller Assembly, AB62 Diesel
Drawing # 1 of 4
AB62 Work Platform - European
Page 6-29
Illustrated Parts Breakdown - Upper Controller Assembly, AB62 Diesel
Drawing # 2 of 4
Page 6-30
AB62 Work Platform - European
Illustrated Parts Breakdown - Upper Controller Assembly, AB62 Diesel
Drawing # 3 of 4
AB62 Work Platform - European
Page 6-31
Illustrated Parts Breakdown - Upper Controller Assembly, AB62 Diesel
Drawing # 4 of 4
Page 6-32
AB62 Work Platform - European
Illustrated Parts Breakdown -
NOTES:
AB62 Work Platform - European
Page 6-33
Illustrated Parts Breakdown - Lower Controller Assembly, AB62 Diesel
Lower Controller Assembly, AB62 Diesel
104019-000
ITEM
1
2
3
4
5
6
7
8
10
11
12
13
14
*
15
16
17
18
19
20
21
22
23
24
25
26
PART NO. PART/MATERIAL DESCRIPTION
104271-000
104312-000
068582-010
068582-020
067652-000
064443-001
067654-000
104499-000
012798-000
008271-000
064446-003
064443-002
100335-000
068807-010
068860-000
100331-000
100330-000
015752-000
104397-000
068132-001
029928-010
104398-000
015790-006
015790-011
015790-014
015790-004
Page 6-34
LOWER CONTROLS ENCLOSURE
CIRCUIT MOUNT
CIRCUIT BREAKER, 10 AMP
CIRCUIT BREAKER, 20 AMP
BUTTON PUSH, GREEN
CONTACT BLOCK, N.O.
BUTTON PUSH, BLK
BUTTON PUSH, YELLOW
SWITCH, TOGGLE SPDT
GUARD, SWITCH
SWITCH, E-STOP
CONTACT BLOCK, N.C.
KEY SWITCH, KEYED
KEY
CONTACT BLOCK, N.O.
OIL PRESSURE GUAGE
TEMPERATURE GUAGE
HOUR METER
MULTIFLEX RECEIVER ASSEMBLY
RELAY, 12 VDC
TERMINAL STRIP
RELAY CARD ASSEMBLY
CONNECTOR, RECEPTICAL 40 PIN
CONNECTOR, RECEPTICAL 24 PIN TYPE A
CONNECTOR, RECEPTICAL 24 PIN TYPE B
PIN, 16-18 GA
QTY.
ITEM
1
1
2
1
1
5
2
1
7
7
1
2
1
1
2
1
1
1
1
3
1
1
1
1
1
77
27
28
29
30
31
32
33
34
35
36
37
201
202
203
204
205
206
207
208
209
210
211
212
213
214
215
PART NO. PART/MATERIAL DESCRIPTION
028800-015
011709-004
011708-004
011248-003
011248-002
011708-003
104387-004
011709-010
011715-005
011248-032
011708-006
029610-007
029610-002
029615-001
029615-002
029616-003
029616-002
029616-004
029610-002
029610-001
029617-004
029428-099
029371-099
029473-099
029472-099
029507-099
PLUG, SEALING
SCREW, #10-24 UNC RD HD MACH X 1/2
SCREW, #8-32 UNC RD HD MACH X 1/2
LOCKNUT, #10-24 UNC HEX
LOCKNUT, #8-32 UNC HEX
SCREW, #8-32 UNC RD HD MACH X 3/8
CONNECTOR,
SCREW, #10-24 UNC RD HD MACH X 1 1/4
SCREW, #6-32 UNC RD HD MACH X 5/8
LOCKNUT, #6-32 HEX
SCREW, #8-32 RD HD MACH X 3/4
CONN, FORK 22-16 #8
CONN, FORK 16-14 #8
CONN, FEMALE PUSH 22-18 UNINSLATED
CONN, FEMALE PUSH 16-14 UNINSULATED
CONN, FEMALE PUSH 10-12 INSULATED
CONN, FEMALE PUSH 16-14 INSULATED
CONN, FEMALE PUSH 22-16 INSULATED
CONN, BUTT 14-16
CONN, BUTT 22-18
CONN, MALE PUSH 22-16 INSULATED
WIRE, 18 AWG WHITE
WIRE, 16 AWG YELLOW /GREEN
WIRE, 12 AWG WHITE
WIRE, 12 AWG BLACK
WIRE, 12 AWG GREEN
QTY.
11
12
4
16
11
3
1
4
2
2
4
28
48
20
8
2
6
7
3
7
2
A/R
A/R
A/R
A/R
A/R
AB62 Work Platform - European
Illustrated Parts Breakdown - Lower Controller Assembly, AB62 Diesel
Drawing # 1 of 3
AB62 Work Platform - European
Page 6-35
Illustrated Parts Breakdown - Lower Controller Assembly, AB62 Diesel
Drawing # 2 of 3
Page 6-36
AB62 Work Platform - European
Illustrated Parts Breakdown - Lower Controller Assembly, AB62 Diesel
Drawing # 3 of 3
AB62 Work Platform - European
Page 6-37
Illustrated Parts Breakdown - Six Foot Cage Assembly
Six Foot Cage Assembly
102037-100
ITEM
1
2
3
4
5
6
7
PART NO. PART/MATERIAL DESCRIPTION
102193-001
100478-000
100481-000
011253-022
011248-005
100468-001
026551-005
Page 6-38
CAGE WELDMENT (6 FT.)
LIFT-GATE WELDMENT
ROLLER TUBE
SCREW, HHC. 5/16-18 UNC X 2 3/4
LOCKNUT, HEX. 5/16-18 UNC ESNA
PANEL, DECAL MOUNT
POP RIVET, 1/8” DIA. (3/16-1/4 GRIP)
QTY.
ITEM
1
1
2
2
2
1
3
8
9
10
11
12
13
PART NO. PART/MATERIAL DESCRIPTION
102271-061
011252-008
014996-004
102244-000
026554-001
011248-004
GRIP STRUT
SCREW, HHC 1/4-20 UNC X 1
WASHER 1/4 FLAT
SILL GATE EURO
RIVET, POP 1/4 .125-.250 GRIP
LOCKNUT, HEX 1/4-20 UNC ESNA
QTY.
3
39
39
1
4
39
AB62 Work Platform - European
Illustrated Parts Breakdown - Eight Foot Cage Assembly, Option
Eight Foot Cage Assembly, Option
102037-001
ITEM
1
2
3
4
5
6
PART NO. PART/MATERIAL DESCRIPTION
102193-000
100478-000
100481-000
011253-022
011248-005
100468-001
CAGE WELDMENT (8 FT.)
LIFT-GATE WELDMENT
ROLLER TUBE
SCREW, HHC. 5/16-18 UNC X 2 3/4
LOCKNUT, HEX. 5/16-18 UNC ESNA
PANEL, DECAL MOUNT
AB62 Work Platform - European
QTY.
ITEM
1
1
2
2
2
REF
7
8
9
10
11
PART NO. PART/MATERIAL DESCRIPTION
026551-005
102271-082
014996-004
011248-004
011252-008
POP RIVET, 1/8” DIA. (3/16-1/4 GRIP)
GRIP STRUT
WASHER, 1/4” FLAT
LOCKNUT, HEX 1/4-20 UNC ESNA
SCREW, HHC 1/4-20 UNC X 1
QTY.
REF
3
44
44
44
Page 6-39
Illustrated Parts Breakdown - Control Module Assembly
Control Module Assembly
104021-000
ITEM
1
2
*
3
4
5
6
7
8
9
10
11
12
13
14
15
16
17
18
19
20
21
22
23
24
27
PART NO. PART/MATERIAL DESCRIPTION
104023-000
062299-002
062299-004
104391-000
104033-000
104359-000
027972-000
010148-001
104421-000
104077-000
104309-000
104310-000
104291-000
104287-000
104288-000
011254-008
011254-006
011254-024
011253-006
011238-005
011252-006
011238-004
010149-000
011828-010
011934-004
011248-004
Page 6-40
FUEL TANK ASS’Y
BATTERY, 12 V M/C
BATTERY,12V DRY
BATTERY, 12 V
VALVE BLOCK ASS’Y
AUX POWER UNIT, 12 VDC 1 GPM
RELAY, MOTOR START
FUSE 175 AMP
GENERATOR FRAME WELDMENT
LEFT DOOR MOUNT
TOP BLOCK MOUNT
BOTTOM BLOCK MOUNT
REAR PAN SUPPORT
FRONT PAN SUPPORT
LEFT PAN WELDMENT
SCREW HHC GR5 3/8-16 UNC X 1
LOCK NUT, 3/8-16 UNC ESNA
SCREW HHC GR 5 3/8-16 UNC X 3
SCREW HHC GR 5 5/16-18 UNC X 3/4
LOCKWASHER, 5/16 SPLIT
SCREW HHC GR5, 1/4-20 UNC X 3/4
LOCKWASHER, 1/4 DIA SPLIT
FUSE BLOCK
SCREW, 1/4-20 UNC FLT HD SOC X 1 1/4
FITTING, ELBOW 6MB-6MJ
LOCKNUT, 1/4-20 UNC HEX
QTY.
ITEM
1
1
1
1
1
1
1
1
1
1
1
1
1
1
1
5
13
6
4
6
2
2
1
2
2
4
29
30
31
32
33
34
35
36
37
38
39
40
41
42
43
45
46
47
48
49
50
51
52
53
54
PART NO. PART/MATERIAL DESCRIPTION
014252-005
014252-004
014252-006
104418-000
104402-000
104404-000
011240-004
064040-001
063082-000
104472-000
100295-000
014435-001
011240-006
010154-000
011253-008
011253-022
011248-005
011709-006
011252-028
104396-016
011252-020
020331-000
020541-001
-
INSERT, 5/16-18 UNC
INSERT, 1/4-20 UNC
INSERT, 3/8-16 UNC
ADAPTER, AUX. POWERUNIT
STRAP, FUEL TANK
ANCHOR, FUEL TANK STRAP
WASHER, 1/4 STD FLAT
BATTERY HOLD DOWN BAR
J-BOLT, BATTERY HOLD DOWN
BATTERY HOLD DOWN
J-BOLT, BATTERY HOLD DOWN
TERMINAL, BATTERY
WASHER, 3/8 STD FLAT
COVER, BATTERY TERMINAL
SCREW, 5/18 -18 UNC HEX HD CAP X 1
SCREW, 5/16-18 UNC HEX HD CAP X 2 3/4
LOCKNUT, 5/16-18 UNC HEX
SCREW, #10-24 UNC RD HD MACH X 3/4
SCREW, 1/4-20 UNC HEX HD CAP X 3 1/2
PUMP, FUEL
CLAMP BLOCK
SCREW, 1/4-20 UNC HEX HD CAP X 2 1/2
FILTER, FUEL INLINE
CLAMP, HOSE
FUEL LINE
QTY.
2
2
4
1
1
1
4
1
2
1
2
2
7
4
4
4
6
2
1
REF
2
1
1
3
REF
AB62 Work Platform - European
Illustrated Parts Breakdown - Control Module Assembly
AB62 Work Platform - European
Page 6-41
Illustrated Parts Breakdown - Fuel Tank Assembly
Fuel Tank Assembly
104024-000
ITEM
1
2
PART NO. PART/MATERIAL DESCRIPTION
104337-000 FUEL TANK
068982-002 FILLER CAP
Page 6-42
QTY.
ITEM
PART NO. PART/MATERIAL DESCRIPTION
QTY.
1
1
4
5
104456-000 WITHDRAWL TUBE WELDMENT
010178-005 FITTING, BARBED 1/4
2
2
AB62 Work Platform - European
Illustrated Parts Breakdown - Hydraulic Tank Assembly
Hydraulic Tank Assembly
104025-000
ITEM
1
2
3
*
4
5
6
7
8
9
10
11
12
PART NO. PART/MATERIAL DESCRIPTION
104265-000
011940-018
100285-000
100285-010
012467-006
014902-005
011940-034
011916-008
011940-020
068840-000
100287-000
100286-001
100288-000
HYDRAULIC TANK
FITTING, ELBOW 12 MP-8MJ 90°
FILTER
FILTER ELEMENT
PIPE NIPPLE 3/4 NPT X 3 LG
FITTING, TEE 12MP-12FP
FITTING, ELBOW 12MP-6MJ 90°
FITTING, ELBOW 12FP-12FP
FITTING, ELBOW 12MP-12MJ 90°
BREATHER, FILLER
GAUGE, FLUID LEVEL
SUCTION STRAINER
PLUG, MAGNETIC
AB62 Work Platform - European
QTY.
ITEM
1
3
2
1
2
2
1
2
2
1
1
2
1
13
14
15
16
17
18
19
20
21
22
23
PART NO. PART/MATERIAL DESCRIPTION
068711-000
104318-000
104317-000
011919-006
061818-000
026526-004
104414-000
011253-008
011248-005
011939-029
020343-008
BREATHER, TANK
ACCESS COVER GASKET
ACCESS COVER
PLUG, 12MP
STRAINER
SCREW, #10 TYPE AB SELF TAP SLOTTED X 1/2
SHIELD, OIL DRIP
SCREW, 5/16-18 UNC HEX HD CAP X 1
LOCKNUT, 5/16-18 UNC HEX
FITTING, STR 20MP-16MJ
FITTING, PLUG 8FJ
QTY.
1
1
1
1
1
8
1
2
2
2
1
Page 6-43
Illustrated Parts Breakdown - Valve Block Assembly
Valve Block Assembly
104033-000
ITEM
1
2
3
4
5
6
7
8
9
PART NO. PART/MATERIAL DESCRIPTION
104354-000
063965-001
068683-000
060390-018
104355-000
104353-000
104357-000
104356-000
068684-000
Page 6-44
SOLENOID SPOOL VALVE
PLUG, GAGE PORT
3 POS 4-WAY VALVE
RELEIF VALVE
3 POS 4-WAY VALVE
SOLENOID SPOOL VALVE
RELIEF VALVE
3 POS 4 WAY CLOSED CENTER VALVE 3/4
3 POS 4-WAY CLOSED MOTOR SPOOL VALVE 3/4
QTY.
ITEM
1
2
1
1
1
1
1
2
3
10
11
12
13
14
15
16
PART NO. PART/MATERIAL DESCRIPTION
104370-000
011941-005
011939-021
104251-000
012004-004
068558-000
104377-000
VALVE, FLOW CONTROL
FITTING, STRAIGHT 6MB- 6MJ
FITTING, STRAIGHT 12MP-12MJ
VALVE BLOCK SUB ASSEMBLY
PLUG, #4 SAE
VALVE, DIVERTER
3 POS 4-WAY MOTOR SPOOL VALVE
QTY.
1
19
1
1
1
1
1
AB62 Work Platform - European
Illustrated Parts Breakdown - Valve Block Sub-Assembly
Valve Block Sub-Assembly
104251-000
ITEM
1
2
3
4
5
PART NO. PART/MATERIAL DESCRIPTION
104250-000
012004-004
063977-001
063977-010
05135-000
VALVE BLOCK
PLUG, #4 S.A.E.
PLUG, KOENIG 9MM (MB-800-090)
PLUG, KOENIG 1/4”
STEEL BALL 5/16” DIA.
AB62 Work Platform - European
QTY.
ITEM
1
24
10
11
9
7
9
10
11
PART NO. PART/MATERIAL DESCRIPTION
013987-009
011240-001
061827-006
104496-000
SPRING, Ø 1/4 X 19/32 LG.
WASHER FLAT #6 STD
STEEL BALL 3/16” DIA
SPRING, COMP.
QTY.
9
12
2
2
Page 6-45
Illustrated Parts Breakdown - Drive Block Assembly
Drive Block Assembly
104035-000
ITEM
1
2
3
4
5
PART NO. PART/MATERIAL DESCRIPTION
104253-000
015736-004
011941-020
011934-004
011941-011
Page 6-46
VALVE BLOCK, DRIVE
FITTING, ELBOW 8MB-10MJ EXTENDED 90°
FITTING, STR 12MB-12MJ
FITTING, ELBOW 6MB-6MJ 90°
FITTING, STR 8MB-10MJ
QTY.
ITEM
1
2
1
1
2
6
7
8
PART NO. PART/MATERIAL DESCRIPTION
020021-006 PLUG, 6MB
061827-003 BALL, 3/8
102292-002 VALVE, FLOW DIVIDER
QTY.
2
2
1
AB62 Work Platform - European
Illustrated Parts Breakdown - Valve Block Assembly, Two Speed/Brake/Axle Lock
Valve Block Assembly, Two Speed/Brake/Axle Lock
104036-000
ITEM
1
2
3
4
5
PART NO. PART/MATERIAL DESCRIPTION
100258-001
011934-026
011941-001
011941-004
100432-002
VALVE BLOCK, BRAKE, AXLE LOCK, 2-SPEED
FITTING, ELBOW 90° 4MB-6MJ
FITTING, STR., ADAPTER, 4MB-4MJ
FITTING, STR., ADAPTER, 6MB-4MJ
FITTING, STR., ADAPTER, 4MFFOR-4MB
AB62 Work Platform - European
QTY.
ITEM
1
1
1
1
3
6
7
8
9
PART NO. PART/MATERIAL DESCRIPTION
015717-015
015919-002
100432-004
100258-005
FITTING, STR., ADAPTER, 6FB-4MB
ORIFICE, #815
FITTING, STR, ADAPTER, 4MFFOR-6MB
SOLENOID
QTY.
1
1
1
3
Page 6-47
Illustrated Parts Breakdown - Cage Rotate Valve Block Assembly
Cage Rotate Valve Block Assembly
104034-000
ITEM
1
2
3
PART NO. PART/MATERIAL DESCRIPTION
100269-000 VALVE BLOCK - STERLING
104389-001 FITTING, ELBOW MB4-MJ4 90° SWIVEL
011941-001 FITTING, STRAIGHT MB4-MJ4
QTY.
ITEM
1
2
2
4
5
PART NO. PART/MATERIAL DESCRIPTION
012004-004 FITTING, PLUG SAE #4
068778-015 COUNTERBALANCE VALVE
QTY.
2
2
5
Page 6-48
AB62 Work Platform - European
Illustrated Parts Breakdown - Rotary Manifold Assembly
Rotary Manifold Assembly
104026-000
ITEM
1
*
2
3
4
5
6
7
PART NO. PART/MATERIAL DESCRIPTION
100558-000
100558-010
011935-003
011935-004
100433-002
011934-003
011934-015
020733-002
ROTARY MANIFOLD
SEAL KIT, ROTARY MANIFOLD
FITTING, ELBOW 45° 6MB-6MJ
FITTING, ELBOW 45° 8MB-8MJ
FITTING, ELBOW 45° 4MFFOR-6MB
FITTING, ELBOW 90° 6MB-4MJ
FITTING, ELBOW 12MB-12MJ
FITTING, TEE 6FJ-6MJ
AB62 Work Platform - European
QTY.
ITEM
1
1
5
1
5
1
1
3
8
10
11
12
14
15
PART NO. PART/MATERIAL DESCRIPTION
011937-003
011941-027
011941-009
020021-012
100448-001
011935-013
FITTING, ELBOW 6FJ-6MJ
FITTING, STRAIGHT 16MB-12MJ
FITTING, STRAIGHT 8MB-6MJ
FITTING, PLUG MB12
FITTING, TEE 4FFOR-4MFOR
FITTING, ELBOW 45° 6MB-4MJ
QTY.
2
3
2
1
1
1
Page 6-49
Illustrated Parts Breakdown - Hose Kit Installation - Chassis/Turret/Linkage
Hose Kit Installation - Chassis/Turret/Linkage
104046-000
ITEM
1
2
3
4
5
6
7
8
9
10
11
12
13
14
15
16
17
18
19
20
21
22
23
24
25
26
PART NO. PART/MATERIAL DESCRIPTION
062192-083
102403-040
102403-034
102403-057
100424-059
068737-038
068737-073
100424-040
063469-055
063469-042
063469-017
062192-094
068963-084
068963-082
068963-090
068963-099
068963-095
068963-109
063469-017
102421-029
102421-038
063469-092
020032-001
100436-001
020032-003
100424-032
Page 6-50
1/4 HOSE ASSY X 83 4C7S 6FJX-6FJX
1/4 HOSE ASSY X 40 4M3K 4FFORX-4FFORX
1/4 HOSE ASSY X 34 4M3K 4FFORX-4FFORX
1/4 HOSE ASSY X 57 4M3K 4FFORX-4FFORX
1/4 HOSE ASSY X 59 4M2T 4FFORX-4FFORX
1/4 HOSE ASSY X 38 4C7S 4FJX-4FJX
1/4 HOSE ASSY X 73 4C7S 4FJX-4FJX
1/4 HOSE ASSY X 40 4M2T 4FFORX-4FFORX
3/8 HOSE ASSY X 55 6C7S 6FJX-6FJX
3/8 HOSE ASSY X 42 6C7S 6FJX-6FJX
3/8 HOSE ASSY X 17 6C7S 6FJX-6FJX
1/4 HOSE ASSY X 94 4C7S 6FJX-6FJX
5/8 HOSE ASSY X 84 10C13 10FJX-10FJX
5/8 HOSE ASSY X 82 10C13 10FJX-10FJX
5/8 HOSE ASSY X 90 10C13 10FJX-10FJX
5/8 HOSE ASSY X 99 10C13 10FJX-10FJX
5/8 HOSE ASSY X 95 10C13 10FJX-10FJX
5/8 HOSE ASSY X 109 10C13 10FJX-10FJX
3/8 HOSE ASSY X 17 6C7S 6FJX-6FJX
3/4 HOSE ASSY X 29 12C13 12FJX-12FJX90°
3/4 HOSE ASSY X 38 12C13 12FJX-12FJX90°
3/8 HOSE ASSY X 92 6C7S 6FJX-6FJX
FITTING, TEE 4FJX-4FJX
FITTING, TEE 4FFORX-4FFORX
FITTING, TEE 6FJX-6FJX
1/4 HOSE ASSY X 32 4M2T 4FFORX-4FFORX
QTY.
ITEM
2
2
2
2
1
2
1
2
1
2
1
2
2
1
1
1
1
2
1
1
1
4
REF
REF
REF
1
201
202
204
205
206
207
208
209
210
211
212
213
214
215
216
217
218
219
300
301
302
303
304
305
306
307
PART NO. PART/MATERIAL DESCRIPTION
063469-032
104437-087
068739-098
068763-121
104458-099
064156-151
104458-137
104436-059
104436-061
068737-056
102404-066
100424-065
062192-133
064156-028
068965-093
068965-097
100424-023
062192-027
104440-305
068965-475
104440-449
104508-848
062192-427
102400-467
068763-827
062192-067
3/8 HOSE ASSY X 32 6C7S 6FJX-6FJX
1/2 HOSE ASSY X 87 8M3K 6FJX-8FJX
1 HOSE ASSY X 98 16C4 16FJX-16FJX
1/4 HOSE ASSY X 121 4C7S 4FJX-6FJX
3/4 HOSE ASSY X 99 12C1T 12FJX-12FJX
1/2 HOSE ASSY X 151 8C7S 8FJX-8FJX
3/4 HOSE ASSY X 137 12C1T 12FJX-12FJX90°
3/4 HOSE ASSY X 59 12C13 12FJX90°-12FJX90°
3/4 HOSE ASSY X 61 12C13 12FJX90°-12FJX90°
1/4 HOSE ASSY X 56 4C7S 4FJX-4FJX
1/4 HOSE ASSY X 66 4M2T 4FFORX-4FFORX90°S
1/4 HOSE ASSY X 65 4M2T 4FFORX-4FFORX
1/4 HOSE ASSY X 133 4C7S 6FJX-6FJX
1/2 HOSE ASSY X 28 8C7S 8FJX-8FJX
3/8 HOSE ASSY X 93 6M3K 6FJX-6FJX90°
3/8 HOSE ASSY X 97 6M3K 6FJX-6FJX90°
1/4 HOSE ASSY X 23 4M2T 4FFORX-4FFORX
1/4 HOSE ASSY X 27 4C7S 6FJX-6FJX
3/8 HOSE ASSY X 305 6M3K 6FJX-6FJX
3/8 HOSE ASSY X 475 6M3K 6FJX-6FJX 90°
3/8 HOSE ASSY X 449 6M3K 6FJX-6FJX
1/4 HOSE ASSY X 848 4C7S 6FJX-6FJX 45°
1/4 HOSE ASSY X 427 4C7S 6FJX-6FJX
1/4 HOSE ASSY X 467 4M3K 4FF0RX4FF0RX 90°
1/4 HOSE ASSY X 827 4C7S 4FJX-6FJX
1/4 HOSE ASSY X 67 4C7S 4FJX-4FJX
QTY.
1
1
2
1
1
1
1
1
1
1
1
1
2
1
1
1
2
1
2
2
2
2
2
2
2
2
AB62 Work Platform - European
Illustrated Parts Breakdown - Hose Kit Installation - Chassis/Turret/Linkage
Drawing # 1 of 3 Chassis
AB62 Work Platform - European
Page 6-51
Illustrated Parts Breakdown - Hose Kit Installation - Chassis/Turret/Linkage
Drawing # 2 of 3 Turret
Page 6-52
AB62 Work Platform - European
Illustrated Parts Breakdown - Hose Kit Installation - Chassis/Turret/Linkage
Drawing # 3 of 3 Linkage
AB62 Work Platform - European
Page 6-53
Illustrated Parts Breakdown - Drive Pump Assembly
Drive Pump Assembly
104029-000
ITEM
1
2
3
4
PART NO. PART/MATERIAL DESCRIPTION
104361-000
011935-016
068812-000
100433-016
Page 6-54
PUMP, REXROTH
FITTING, 45° 10MB-12MJ
MANIFOLD FITTING KIT
FITTING, 45° 12MFOR-16MJ
QTY.
ITEM
1
1
2
1
5
6
7
PART NO. PART/MATERIAL DESCRIPTION
100434-002 FITTING, 90° 4MFOR-4MB
011934-007 FITTING, 90° 8MB-6MJ
104376-001 FITTING, 45° 12 FLANGE-12MJ CODE 62
QTY.
2
1
2
AB62 Work Platform - European
Illustrated Parts Breakdown - Lift Pump Assembly
Lift Pump Assembly
104027-000
ITEM
1
2
PART NO. PART/MATERIAL DESCRIPTION
104360-000 PUMP
015717-002 FITTING, REDUCER. 8MB-6FB
AB62 Work Platform - European
QTY.
ITEM
1
2
3
4
PART NO. PART/MATERIAL DESCRIPTION
011935-015 FITTING, 45° ADAPTER 12MB-16MJ
068779-000 VALVE, CHECK
QTY.
1
2
Page 6-55
Illustrated Parts Breakdown - Jib Cylinder Assembly
Jib Cylinder Assembly
104040-000 (S/N 1100-1110)
ITEM
1
*
2
PART NO. PART/MATERIAL DESCRIPTION
104257-000 JIB CYLINDER
104257-011 SEAL KIT, JIB CYLINDER
011941-001 FITTING, STRAIGHT MB4-MJ4
Page 6-56
QTY.
ITEM
1
1
2
3
4
PART NO. PART/MATERIAL DESCRIPTION
060390-022 VALVE, RELIEF
068778-013 VALVE, COUNTERBALANCE
QTY.
1
1
AB62 Work Platform - European
Illustrated Parts Breakdown - Jib Cylinder Assembly
Jib Cylinder Assembly
104040-001 (S/N 1111- Current)
ITEM
1
*
PART NO. PART/MATERIAL DESCRIPTION
104257-001 JIB CYLINDER
104257-010 SEAL KIT, JIB CYLINDER
QTY.
ITEM
1
1
2
3
PART NO. PART/MATERIAL DESCRIPTION
011941-002 FITTING, STRAIGHT MB4-MJ6
100555-015 COUNTERBALANCE VALVE
QTY.
2
2
3
AB62 Work Platform - European
Page 6-57
Illustrated Parts Breakdown - Riser Cylinder Assembly
Riser Cylinder Assembly
104037-000 (S/N 1100 - 1108)
ITEM
1
*
2
PART NO. PART/MATERIAL DESCRIPTION
104260-000 RISER CYLINDER
104260-011 SEAL KIT, RISER CYLINDER
011941-005 FITTING, STRAIGHT MB6-MJ6
QTY.
ITEM
1
1
2
3
4
PART NO. PART/MATERIAL DESCRIPTION
102477-008 ORIFICE ASSEMBLY
068778-013 COUNTERBALANCE VALVE
QTY.
1
1
4
Page 6-58
AB62 Work Platform - European
Illustrated Parts Breakdown - Riser Cylinder Assembly
Riser Cylinder Assembly
104037-001 (S/N 1109 - Current)
ITEM
1
*
2
PART NO. PART/MATERIAL DESCRIPTION
104260-001 RISER CYLINDER
104260-010 SEAL KIT, RISER CYLINDER
011941-005 FITTING, STRAIGHT MB6-MJ6
QTY.
ITEM
1
1
2
3
4
PART NO. PART/MATERIAL DESCRIPTION
102477-008 ORIFICE ASSEMBLY
100555-015 COUNTERBALANCE VALVE
QTY.
1
1
4
AB62 Work Platform - European
Page 6-59
Illustrated Parts Breakdown - Extend Cylinder Assembly
Extend Cylinder Assembly
104038-001 (S/N 1100 - 1108)
ITEM
1
*
2
3
PART NO. PART/MATERIAL DESCRIPTION
104255-000
104255-011
011941-005
068778-011
Page 6-60
EXTEND CYLINDER
SEAL KIT, EXTEND CYLINDER
FITTING, STRAIGHT MB6-MJ6
VALVE, COUNTERBALANCE
QTY.
1
1
2
1
AB62 Work Platform - European
Illustrated Parts Breakdown - Extend Cylinder Assembly
Extend Cylinder Assembly
104038-001 (S/N 1109 - Current)
ITEM
1
*
2
PART NO. PART/MATERIAL DESCRIPTION
104255-001 EXTEND CYLINDER
104255-010 SEAL KIT, EXTEND CYLINDER
011941-005 FITTING, STRAIGHT MB6-MJ6
QTY.
ITEM
1
1
1
3
4
PART NO. PART/MATERIAL DESCRIPTION
QTY.
011941-009 FITTING, STRAIGHT MB8-MJ6
100555-015 COUNTERBALANCE VALVE
1
1
3
4
AB62 Work Platform - European
Page 6-61
Illustrated Parts Breakdown - Level Cylinder Assembly
Level Cylinder Assembly
104041-000 (S/N 1100 - 1108)
ITEM
1
*
2
PART NO. PART/MATERIAL DESCRIPTION
104258-000 LEVEL CYLINDER
104258-011 SEAL KIT, LEVEL CYLINDER
100434-002 FITTING, ELBOW MB4-MFOR4 90°
Page 6-62
QTY.
ITEM
1
1
2
3
4
PART NO. PART/MATERIAL DESCRIPTION
020021-004 PLUG, MB4
068778-013 VALVE, COUNTERBALANCE
QTY.
2
2
AB62 Work Platform - European
Illustrated Parts Breakdown - Level Cylinder Assembly
Level Cylinder Assembly
104041-001 (S/N 1109 - Current)
ITEM
1
*
2
PART NO. PART/MATERIAL DESCRIPTION
104258-001 LEVEL CYLINDER
104258-010 SEAL KIT, LEVEL CYLINDER
100434-002 FITTING, ELBOW MB4-MFOR4 90°
AB62 Work Platform - European
QTY.
1
1
2
Page 6-63
Illustrated Parts Breakdown - Master Cylinder Assembly
Master Cylinder Assembly
104042-000 (S/N 1100 - 1108)
ITEM
1
*
2
PART NO. PART/MATERIAL DESCRIPTION
104258-000 LEVEL CYLINDER
104258-011 SEAL KIT, LEVEL CYLINDER
011934-026 FITTING, ELBOW MB4-MJ6 90°
Page 6-64
QTY.
ITEM
PART NO. PART/MATERIAL DESCRIPTION
QTY.
1
3
4
100432-002 FITTING, STRAIGHT MB4-MFOR4
068778-013 VALVE, COUNTERBALANCE
2
2
2
AB62 Work Platform - European
Illustrated Parts Breakdown - Master Cylinder Assembly
Master Cylinder Assembly
104042-001 (S/N 1109 - Current)
ITEM
1
*
PART NO. PART/MATERIAL DESCRIPTION
104258-001 LEVEL CYLINDER
104258-010 SEAL KIT, LEVEL CYLINDER
AB62 Work Platform - European
QTY.
ITEM
PART NO. PART/MATERIAL DESCRIPTION
QTY.
1
1
2
3
011941-002 FITTING, STRAIGHT 4MB-6MJ
011937-003 FITTING, ELBOW 6MB-6MJ 90°
2
2
Page 6-65
Illustrated Parts Breakdown - Boom Cylinder Assembly
Boom Cylinder Assembly
104039-000 (S/N 1100 - 1108)
ITEM
1
*
PART NO. PART/MATERIAL DESCRIPTION
104256-000 BOOM CYLINDER
104256-011 SEAL KIT, BOOM CYLINDER
Page 6-66
QTY.
ITEM
1
1
2
3
PART NO. PART/MATERIAL DESCRIPTION
011941-005 FITTING, STRAIGHT MB6-MJ6
068778-013 VALVE, COUNTERBALANCE
QTY.
2
1
AB62 Work Platform - European
Illustrated Parts Breakdown - Boom Cylinder Assembly
Boom Cylinder Assembly
104039-001 (S/N 1109 - Current)
ITEM
1
*
PART NO. PART/MATERIAL DESCRIPTION
104256-001 BOOM CYLINDER
104256-010 SEAL KIT, BOOM CYLINDER
QTY.
ITEM
1
1
2
3
PART NO. PART/MATERIAL DESCRIPTION
011941-005 FITTING, STRAIGHT MB6-MJ6
100555-015 COUNTERBALANCE VALVE
QTY.
2
1
3
AB62 Work Platform - European
Page 6-67
Illustrated Parts Breakdown - Label Kit, AB62 Diesel
Label Kit, AB62 Diesel
104047-100
ITEM
1
2
6
7
9
10
11
13
14
15
17
18
19
20
22
23
24
25
26
27
28
29
30
PART NO. PART/MATERIAL DESCRIPTION
061205-002
065368-000
101210-000
066555-000
101208-000
101203-001
027898-001
010076-001
010076-000
104044-020
011248-004
011252-008
062557-012
104434-000
064444-000
066554-000
068979-000
104332-000
104347-001
100340-002
104331-000
104330-000
066562-005
Page 6-68
NAME PLATE
TACK
LABEL, BATTERY LEVEL
LABEL, CAUTION DO NOT ADJUST
LABEL, PINCH POINT
LABEL, HYDRAULIC FLUID
LABEL, DIESEL FUEL
LABEL, ATTENTION
MANUAL CASE
USER MANUAL
LOCKNUT, 1/4-20 UNC HEX
SCREW, 1/4-20 UNC HEX HD CAP X 1
MAX LOAD 500 LBS / 225 Kg
LABEL, 4WD
LABEL, USA
LABEL, BEFORE OPERATING
CHOCK WHEELS
LABEL, UPPER CONTROLS
LABEL, UPPER CONTROLS
LABEL, UPPER CONTROLS - EMERGENCY STOP
LABEL, UPPER CONTROLS
LABEL, LOWER CONTROLS
LABEL, TIRE PRESSURE
QTY.
ITEM
1
4
1
1
6
1
1
1
1
1
4
4
1
1
1
3
4
1
1
1
1
1
4
31
32
33
34
35
36
39
40
42
43
44
45
46
49
51
52
53
54
55
56
57
PART NO. PART/MATERIAL DESCRIPTION
104429-000
068632-000
068633-001
068635-000
068637-000
068637-001
104430-000
062814-000
061683-018
104433-000
104432-000
061683-019
061683-011
100339-099
100104-000
100100-000
100102-000
100103-000
030768-002
100105-000
100101-000
LABEL, AB62 RT
LABEL, HOLD DOWN
LABEL, READ & UNDERSTAND-EURO
LABEL, HARNESS POINT
LABEL, ARROW YELLOW
LABEL, ARROW ORANGE
LABEL, AB62
LABEL, INSERT PIN
LABEL, UPRIGHT
LABEL, BOOM
LABEL, LIFT
LABEL, UPRIGHT
LABEL, UPRIGHT
TAPE, SAFETY YELLOW & BLACK
LABEL, OPERATING INSTRUCTIONS
LABEL, EMERGENCY DOWN
LABEL, NON-INSULATED
LABEL, TILT ALARM
LABEL, GS
CG LOGO
LABEL, ENTRY
QTY.
2
6
1
2
4
4
1
2
2
1
1
1
1
EA .10
1
1
1
1
1
2
2
AB62 Work Platform - European
Illustrated Parts Breakdown - Label Kit, AB62 Diesel
AB62 Work Platform - European
Page 6-69
Illustrated Parts Breakdown - Tire & Wheel Assembly
Tire & Wheel Assembly
100090-000 Left
100090-001 Right
ITEM
1
2
3
PART NO. PART/MATERIAL DESCRIPTION
100091-000 WHEEL, 19.5 X 12 9 HOLE
100092-000 TIRE, 19.5 X 15 NHS 14 PLY
012282-001 VALVE STEM
Page 6-70
QTY.
1
1
1
AB62 Work Platform - European
Illustrated Parts Breakdown - Control Cable
Control Cable
104032-000
ITEM
1
2
3
4
PART NO. PART/MATERIAL DESCRIPTION
015790-012
065926-012
029433-099
015790-003
CONNECTOR, PLUG 24 CONTACT
CONNECTOR, PLUG 31 CONTACT
CABLE, 18 GA 24 COND
SOCKET CONTACT 16-18
AB62 Work Platform - European
QTY.
ITEM
1
1
85 FT
48
5
6
PART NO. PART/MATERIAL DESCRIPTION
015790-009 BOOT, PLUG
028800-015 PLUG, SEALING
QTY.
1
7
Page 6-71
Illustrated Parts Breakdown - Motion Alarm Option
Motion Alarm Option
104485-000
ITEM
1
2
3
4
PART NO. PART/MATERIAL DESCRIPTION
066807-004
029616-002
029452-099
011252-004
Page 6-72
ALARM - 112 db
CONN F PUSH 16-14 GA
WIRE 16 GA BLK
SCREW HHC 1/4-20 UNC X 1/2
QTY.
ITEM
1
1
5
6
FT
PART NO. PART/MATERIAL DESCRIPTION
011240-004 WASHER, FLAT 1/4
029617-002 CONN M PUSH 16-14 GA
QTY.
1
1
6
1
AB62 Work Platform - European
Illustrated Parts Breakdown - Flashing Beacon, Option
Flashing Beacon, Option
104486-000
ITEM
1
2
3
4
5
PART NO. PART/MATERIAL DESCRIPTION
012848-004
013283-002
029496-099
011709-008
011248-003
FLASHING STROBE LIGHT
CABLE TY WRAP
WIRE 2 COND 16 GA
SCREW #10-24 X UNC X 1 LG
LOCKNUT #10-24 UNC ESNA
AB62 Work Platform - European
QTY.
ITEM
2
8
6
7
8
FT 16
4
4
PART NO. PART/MATERIAL DESCRIPTION
029610-002 CONN FORK 16-14GA
029620-002 CONN BUTT 16-14GA
029620-002 DIODE, 5 AMP
QTY.
1
6
1
Page 6-73
Illustrated Parts Breakdown -
NOTES:
Page 6-74
AB62 Work Platform - European
Upright, Inc.
1775 Park Street
Selma, California 93662
TEL: 559/891-5200
FAX: 559/891-9012
PARTS: 1-888-UR-PARTS
PARTSFAX: 559/896-9244
Call Toll Free in U.S.A.
1-800-926-LIFT
UpRight International
Support Centre
Innsbrukweg 114
3047 AH Rotterdam
Netherlands
TEL: +31-10-238-0000
FAX: +31-10-238-0001
Parts Tel: +31-10-490-8090
Parts Fax: +31-10-490-8099
P/N 104045-020
05/00 K