1
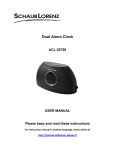
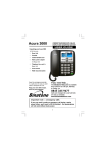
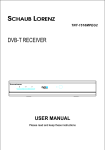
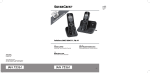
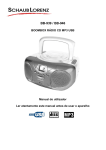
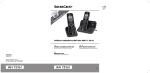
Digital Cordless Telephone User Manual TH-103DBK / TH-103DWE TH-103D2BK / TH-103D2WE Please read and retain these instructions Summary Getting started Important Installing the telephone base Operating range of the handset Signal strength Installing and charging the battery Low battery warning Battery performance Package contents 3 4 4 4 4 5 5 6 Presentation of your telephone Handset LCD screen of the handset Navigating the Menu 7 9 10 Menu Operation Call Log Received Call from the Call Log Storing a Number from the Received list to the Phone Book Deleting a Number from the Received list Deleting all Number from the Received list Dialed Call from the Call Log Storing a Number from the Dialed list to the Phone Book Deleting a Number from the Dialed list Deleting all Numbers from the Dialed list 11 11 11 11 12 12 12 12 Phone book Phone Book List Adding a Phone Book Entry Editing Name or Number Deleting an Entry Deleting all Entry Checking Phone Book Memory Status 12 13 13 13 13 13 Base settings Removing a Handset The Dialing Mode Flash Time (Recall) Modifying the PIN Code (System PIN Code) Set Zero Emission (NEMO) Restoring the Default Base Setting -1- 14 14 14 14 15 15 Handset settings Alarm Function Handset Ringer Tone Handset Key Beep Setting the Language Handset Name Auto Answer Call Barring Date Time Setting Adjusting LCD Contrast Manual Selection Restoring the Default Handset Setting Register handset 15 15 16 16 16 17 17 17 17 17 18 18 Telephone Operations Make a Phone Call Make a Phone Call from Redial List Answering an Incoming Calls Handsfree Function Mute Function Adjusting the Ringer Volume Setting the Pause Receive second call (call waiting) Handset Key Lock Transfering an External Call Conference mode Internal Call (Intercom) Receiving an External Call during an Internal Call 19 19 19 19 19 19 19 20 20 20 20 20 20 Troubleshooting Declaration of conformity 21 22 -2- Getting started IMPORTANT SAFETY INSTRUCTIONS Please read carefully and keep these instructions with the product. Important • To reduce the risk of fire, electric shock and injury, always observe the following basic precautions when using your telephone: • This appliance is intended for indoor use only. • Observe all markings on the product. • Do not expose your telephone to moisture and avoid contact with liquids. • To prevent electric shock, do not disassemble the handset or the telephone base. • Avoid interposing any metal objects (clip, key, etc.) between the battery contacts and charging contacts. • Your telephone may have a slight chance of being damaged by lightning. Unplug the telephone base from the mains and disconnect the telephone line during a thunderstorm. • Do not use the telephone in the vicinity of a gas leak. • Do not use the handset near any intensive care medical equipment. People with pacemakers should consult their doctor or cardiologist before using this telephone. • Clean your telephone with a dry, soft, lint-free cloth. Do not use any cleaning agents or solvents, especially aggressive ones. • Exchanges between the telephone base and handset being carried out by radio signals, wearers of hearing aids may be bothered by a small buzz. • Your telephone may interfere with other electrical appliances such as answering machine, television, radio, clock radio or computer when it is sufficiently close to such equipment. To avoid this, place the telephone base at least one meter away from other electrical appliances. • We do not guarantee privacy of communications through your telephone. • The receiver of the handset may attract small metal objects (staples, pins, etc). Be careful when placing the handset near these items. • Your telephone does not work in case of power failure and by consequence cannot be used for emergency calls. To avoid such inconvenience, always keep a traditional corded telephone in your home. • To prevent electric shock, do not use your telephone during a thunderstorm. Refer to the information printed on your telephone directory. • You can connect this product to a PSTN telephone line or an analog PBX extension port. Warning: Connecting this telephone to a digital PBX extension port may cause damage. • Install your telephone close to an easily accessible electrical outlet. • Do not overload wall outlets and extension cords as this may cause a fire or electric shock. • To eliminate any voltage within the telephone, unplug the power cord from the mains. • If the telephone will not be used for a long period of time, unplug the adapter to save power. • If the power cord of the adapter is damaged, do not try to replace or repair it. Discard the adapter. • Observe the polarity indicated while installing the batteries. • It is dangerous to use other battery types or non-rechargeable batteries: they can cause interference and/or damage to the product. The manufacturer shall not be liable for any damages caused by such non-compliance. • Do not use a charger other than the one supplied with the telephone; otherwise the batteries can be damaged. • Do not immerse a battery in water and do not throw it in a fire. • The socket-outlet shall be installed near the equipment and shall be easily accessible. CAUTION Only use the telephone base with the supplied power adapter. Failure to observe the correct polarity or voltage of the adapter may cause damage to the telephone base. -3- For phone models TH-103DBK and TH-103DWE: Adapter for the telephone base: 5E-AD060050-E Input: 100-240V~ 50/60Hz 150mA Output: DC 6V 500mA For phone models TH-103D2BK and TH-103D2WE: Adapter for the telephone base: 5E-AD070042-E Input: 100-240V~ 50/60Hz 150mA Output: DC 7V 420mA Installing the telephone base The telephone base should be placed at least 1 meter away from other electrical appliances in order to avoid interference. The handset exchanges radio signals with the telephone base. The strength of these signals depends on the position of the base. You can obtain a stronger signal by placing the base higher. Operating range of the handset The operating range of your telephone is 300 meters outdoors without obstructions between the telephone base and handset. Obstructions reduce the operating range. When the telephone base is located indoors, while the handset is indoors or outdoors, the operating range is reduced to 50 meters. Thick concrete walls reduce the operating range significantly. Signal strength When the handset is within the operating range of the telephone base, appears on the screen. If the handset is out of range of range, [SEARCHING] appears on the display and the flashes on the display. Get closer to the telephone base to turn off this indicator. symbol Installing and charging the battery Telephone Jack Adapter Jack 1. Insert the plug of the supplied adapter to the bottom of the telephone base and the other end into an electrical outlet. 2. Plug the telephone line cord to the bottom of the telephone base and the other end into a telephone wall jack. 3. Insert the rechargeable Ni-MH batteries supplied into the handset by following the correct polarity as indicated. Close the battery compartment. 4. Place the handset on the telephone base and let the batteries charge for 24 hours before using it for the first time. -4- Charger (only for duo phone models TH-103D2BK/ TH-103D2WE Adapter Jack Low battery warning When the batteries are very low, flashes on the handset screen and a warning beep will sound every minute to prompt you to recharge the batteries. Battery performance When fully charged, the batteries offer approximately 10 hours of talk time and 100 hours of standby time under ideal conditions. Please note that a new battery reaches its full capacity after several days of normal use. The battery capacity decreases over time, reducing the talk time and standby time. Replace the batteries if necessary. The batteries and the handset will become hot during charging. This is normal. Tip When you are not using your handset, place it on the charger so that you can always have fully charged batteries. WARNING DO NOT USE STANDARD OR ALKALINE BATTERIES. THEY MAY EXPLODE AND CAUSE INJURY. ONLY USE RECHARGEABLE NI-MH BATTERIES AS INDICATED IN THIS USER MANUAL. Risk of explosion if you use incompatible batteries. Never use non-rechargeable batteries. Use only batteries that are identical to the ones supplied with your telephone. • Never use alkaline or lithium batteries. • Do not throw a battery into a fire. • Do not open or damage batteries. Electrolyte is corrosive and can cause irritation to eyes and skin. It is also toxic and must not be swallowed. • If you must handle the batteries, avoid them from coming into contact with metal objects. This may cause short circuit or overheating and you may burn yourself. • Do not attempt to recharge the batteries by heating. The battery electrolyte may leak, and may irritate your eyes or skin. • Observe the polarity indicated. Reversing the polarity of the battery may result in electrolyte leakage and explosion. • Remove the batteries if you do not intend to use your phone for several months. • Do not use any other telephone base for charging the handset – the batteries can be damaged. -5- Warning: Danger of explosion if batteries are incorrectly installed. Use only NiMH batteries. The autonomy for the handsets indicated is based on the original capacity of the batteries. Dispose of used batteries according to the instructions of your local authorities. Package contents The box of phone model TH-103DBK / TH-103DWE contains the following: Telephone base Cordless handset AC adapter Telephone cable User manual Rechargeable 1.2V Ni-MH battery (400mAh) Quantity 1 1 1 1 1 2 The box of duo phone model TH-103D2BK / TH-103D2WE contains the following: Telephone base Charger Cordless handset AC adapter Telephone cable User manual Rechargeable 1.2V Ni-MH battery (400mAh) Quantity 1 1 2 2 1 1 4 Important: YOU ARE USING A BROADBAND OR ADSL LINE To ensure proper functioning of your telephone, you need to install a filter (not supplied) between the telephone wall jack and the telephone base. Without this filter, you may experience interference to the phone and loss of broadband signal. Consult the instructions to install the filter properly. -6- Presentation of your telephone Handset -7- KEY 1 2 3 4 DESCRIPTION FUNCTION DEFINITION Talk / Hands Free When there is new call coming, press this key to answer the call. During conversation, press this key to transfer handset and hands-free mode. MENU/FLASH/OK Entry to the menu functions in idle mode; Confirming selections; In talk mode press the key to perform Flash (Recall) function. Ringer Off / 3-way Conference Activate three way conference by long press 2 seconds during intercom between two handset and hold up external line. To activate silence function by long press for 3s. Space/Pause 5 Intercom / Escape 6 Flash/Delete 7 UP / Redial 8 Phonebook 9 HANG UP 10 DOWN / View CID 11 The key will perform PAUSE function if press and hold for 3 seconds after any digit input both in talk mode and in standby mode. Add a space during enter character on phone book name. To set up an internal call to another handset; To transfer an incoming call to another handset; Escape back one menu level when menu operations The key is used to delete memory. Delete the wrong digit by a short pressing during menu edit. In talk mode press the key to perform mute function. In talk mode press to dial the last dialled numbers; Scrolling up through lists and menu options; This key is used to enter the phonebook both in standby mode and in talk mode; In talk mode, press once to hang up the call; Press this key to return to idle mode; In standby mode, press once to view latest incoming caller number and scroll back; Scrolling down through lists and menu options; A Long press (3s) to lock and unlock keypad. Keypad Lock 12 Volume / Ringer In talk mode, increase volume level and loop back to min level after reach highest volume level In standby mode, short press to adjust ringer level In standby mode, long press 3 seconds to select ringer melody -8- LCD screen of the handset Icon Function The antenna icon will always be shown on the LCD, it indicates for signal strength, flashes when the handset is out of range. The icon will be displayed when the user has pressed TALK key. The alarm icon will be shown as steady on when the alarm is set. The alarm icon will flash when the alarm is triggered. The icon will be displayed when ringer set to off. The phonebook icon will be displayed when viewing the phonebook. This icon will be shown when a new voice message is received from the network. (if you telecom operator supports this function). The icon will be displayed when a new call comes. ▲ ▼ When you scroll and review the numbers. When you scroll and review the numbers. The icon will display when you reviewing a number which is more than 12 digits. The icon will display when you reviewing a number which is more than 12 digits. The icon will be displayed when in handsfree speakerphone mode. The battery icon will provide both a charging indication and an indication of the current battery status to the user. INT The icon will be displayed when making an internal call. Microphone is mute during talk. -9- Navigating the Menu To enter the menu, press the <MENU> button. Use the <▲> or <▼> button to scroll to the menu option. Press <OK> button to select further options or to confirm the setting displayed. The arrows on the display and shows the possible scroll direction in the menu. To go back in the menu press the <ESC> button. CALL LOG RECEIVED DIALED PHONE BOOK LIST NEW ENTRY EDIT RECORD DEL RECORD DELETE ALL MEM STATUS Base Setting DELETE HANDSET DIAL MODE FLASH TIME MODIFY PIN SET ZERO EMISSION BASE DEFAULT - 10 - Handset Setting REGISTRATION ALARM BASE 1 RING SETUP BASE 2 TONE SETUP BASE 3 LANGUAGE BASE 4 HANDSET NAME AUTO ANSWER BARRING DATE & TIME CONTRAST SELECT BASE HANDSET DEFAULT Menu Operation Press key <MENU>. Use <▲> or <▼> key to select the desired menu. Then press <MENU> key to enter the sub-menu. Call Log Received Call Received Call from the Call Log All call in numbers are shown under [RECEIVED] menu directory. Those numbers are including missed and pick-up calls. (1) Use the <▲> or <▼> button scroll through the Call List until the desired number is shown on the display. (2) Press the <TALK ON> button. The number will be dialed automatically. Storing a Number from the Received list to the Phone Book (1) Scroll through the Call List until the desired number is shown on the display. (2) Press the <OK> button and then use the <▲> or <▼> button to select [ADD TO PB ?] (3) Press the <OK> button again. (4) [NAME ?] will appear and you can add the name by numeric keypad. (5) Press the <OK> button to save the name. (6) The last number will show again and you can then edit the telephone number. (7) Press the <OK> button again to confirm and to go to select ring tone. (8) Use the <▲> or <▼> button to select ringtone and press the <OK> button to confirm. (9) It will show the phone entry name and back to Received Call list. Deleting a Number from the Received list (1) Scroll through the Call List until the desired number is shown on the display. (2) Press the <OK> button and then use the <▲> or <▼> button to select [DELETE ?] (3) Press the <OK> button again. (4) [CONFIRM ?] will appear. (5) Press the <OK> button to delete or <ESC> button to back. Deleting all Number from the Received list (1) Scroll through the Call List until the desired number is shown on the display. (2) Press the <OK> button and then use the <▲> or <▼> button to select [DELETE ALL ?] (3) Press the <OK> button again. (4) [CONFIRM ?] will appear (5) Press the <OK> button to delete or <ESC> button to back - 11 - Dialed call Dialed Call from the Call Log All dialed out numbers are shown under [DIALED] menu directory. (1) Use the <▲> or <▼> button scroll through the Dialed List until the desired number is shown on the display. (2) Press the <TALK ON> button. The number will be dialed automatically. Storing a Number from the Dialed list to the Phone Book (1) Scroll through the Call List until the desired number is shown on the display. (2) Press the <OK> button and then use the <▲> or <▼> button to select [ADD TO PB ?] (3) Press the <OK> button again. (4) [NAME ?] will appear and you can add the name by alphanumerical keypad. (5) Press the <OK> button to save the name. (6) The last number will show again and you can then edit the telephone number. (7) Press the <OK> button again to confirm and to go to select ring tone. (8) Use the <▲> or <▼> button to select ringtone and press the <OK> button to confirm. (9) It will show the phone entry name and back to Received Call list position. Deleting a Number from the Dialed list (1) Scroll through the Call List until the desired number is shown on the display. (2) Press the <OK> button and then use the <▲> or <▼> button to select [DELETE ?] (3) Press the <OK> button again. (4) [CONFIRM ?] will appear (5) Press the <OK> button to delete or <ESC> button to back Deleting all Numbers from the Dialed list (1) Scroll through the Call List until the desired number is shown on the display. (2) Press the <OK> button and then use the <▲> or <▼> button to select [DELETE ALL ?] (3) Press the <OK> button again. (4) [CONFIRM ?] will appear (5) Press the <OK> button to delete or <ESC> button to back Phone book Phone Book List (1) Press the <▲> or <▼> button to select [PHONE BOOK] or Press the <Phone book > button once to enter the phone book. (2) Press <OK> button and [LIST] will display. (3) Enter the first letter of the desired name via the alphanumerical keypad. (4) The first name in the list with this letter appears on the display. (5) Press the <▲> or <▼> button to search the name you want to dial. (6) Press the <TALK ON> button and the number will be dialed automatically. (7) Press the <TALK OFF> button when you want to terminate the call. - 12 - Adding a Phone Book Entry (1) Press the <▲> or <▼> button to select [PHONE BOOK] to enter the phone book. (2) Press <OK> button and [NEW ENTRY] will display. (3) Press <OK> and enter the name by using the alphanumerical keypad. (4) Press the <OK> button to confirm the name. (5) Enter the telephone number, and press the <OK> button to confirm. (6) Select melody by using the <▲> or <▼> button and press the <OK> button to confirm. Editing Name or Number (1) Press the <▲> or <▼> button to select [PHONE BOOK] to enter the phone book. (2) Press the <▲> or <▼> button to select [EDIT RECORD] and press <OK> button to confirm. (3) Press the <▲> or <▼> button to search the name you want to edit. (4) Press the <OK> button to enter the phone book menu. (5) Delete the characters by the button. (6) Use the keypad to enter the new name. Press the <OK> button to confirm. (7) Enter/delete the telephone number. Press the <OK> button to confirm. (8) Select ringer tone by using the <▲> or <▼> button and press the <OK> button to confirm. Deleting an Entry (1) Press the <▲> or <▼> button to select [PHONE BOOK] to enter the phone book. (2) Press the <▲> or <▼> button to select [DEL RECORD]. (3) Press the <OK> button to enter the phone book list. (4) Press the <▲> or <▼> button to search the name you want to delete. (5) Press the <OK> button to confirm and the handset will prompt you [CONFIRM ?] to reconfirm the delete function. (6) Press the <OK> button to confirm. Deleting all Entry (1) Press the <▲> or <▼> button to select [PHONE BOOK] to enter the phone book. (2) Press the <▲> or <▼> button to select [DELETE ALL]. (3) Press the <OK> button to confirm and the handset will prompt you [CONFIRM ?] to reconfirm the delete function. (4) Press the <OK> button to confirm. Checking Phone Book Memory Status Each handset has a maximum of 50 entries. (1) Press the <▲> or <▼> button to select [PHONE BOOK] to enter the phone book. (2) Press the <▲> or <▼> button to select [MEM STATUS]. (3) Press the <OK> button to confirm and the handset will prompt you XX/50. XX is how many phone book entries stored. - 13 - Base settings Removing a Handset You can remove a handset from a base to allow another handset to be registered. (1) Press the <MENU> button. (2) Use the <▲> or <▼> button to scroll to [BS SETTINGS] and press <OK>. (3) Use the <▲> or <▼> button to scroll to [DELETE HS] and press <OK>. (4) Enter the PIN code (0000) and press <OK>. (5) Use the <▲> or <▼> button to scroll to the handset number (1 to 5) you want to remove and press <OK>. Note: You can only cancel subscription of another handset, not the handset you are using to do the remove procedure. The Dialing Mode There are two types of dialing mode: Tone and Pulse dialing. (1) Press the <MENU> button. (2) Use the <▲> or <▼> button to scroll to [BS SETTINGS] and press <OK>. (3) Use the <▲> or <▼> button to scroll to [DIAL MODE] and press <OK>. (4) Use the <▲> or <▼> button to select [TONE] or [PULSE] and press <OK>. Flash Time (Recall) When you press the <R> button during conversation, also called flash or recall, the unit generates a line interruption. It gives you the possibility to use the special services of your telephone provider and/or to transfer calls when you have a telephone exchange. Setting the Flash Time: (1) Press the <MENU> button. (2) Use the <▲> or <▼> button to scroll to [BS SETTINGS] and press <OK>. (3) Use the <▲> or <▼> button to scroll to [FLASH TIME] and press <OK>. (4) Use the <▲> or <▼> button to select two values of flash time durations. The unit of flash time value is msec. (5) Press <OK> to confirm. Modifying the PIN Code (System PIN Code) The 4-digit PIN code is required for changing the settings of the telephone base and for registering/de-registering a handset. The default PIN code is “0000”. (1) Press <MENU> button. (2) Use the <UP> or <DOWN> button to scroll to [BS SETTINGS] and press <OK>. (3) Use the <UP> or <DOWN> button to scroll to [MODIFY PIN] and press <OK>. (4) Enter the old PIN and press <OK>. (5) Enter the new PIN and press <OK>. (6) Press the new PIN again and press <OK>. If it is successful, you would hear a long beep. NOTE: If the wrong PIN code is entered, it will give error beep indication and ask for input the PIN numbers again. - 14 - Set Zero Emission (NEMO) For DECT system, the base unit should always keep sending a beacon signal to handset unit to make sure its existence. So that it can guarantee base unit can immediately connect to handset unit whenever ring come. This beacon signal is a 1V/m 1.8GHz RF power with 0.5ms for every 10ms. This DECT phone is equipped with a NEMo (No Emission Mode) feature to make real no emission and still can achieve immediate reaction. In other word, when handset in stand-by status, the base unit is no RF emission. To set the handset to normal DECT system or Zero Emission (1) Press the <MENU> button. (2) Use the <▲> or <▼> button to scroll to [BS SETTINGS] and press <OK>. (3) Use the <▲> or <▼> button to scroll to [NEMO] and press <OK>. (4) Use the <▲> or <▼> button to scroll to [ON] and press <OK>. Note: It has a drawback on NEMO mode that the handset cannot detect out of range at stand-by status. Restoring the Default Base Setting You can restore the factory settings for the telephone base at any time. (1) Press the <MENU> button. (2) Use the <▲> or <▼> button to scroll to [BS SETTINGS] and press <OK>. (3) Use the <▲> or <▼> button to scroll to [BS DEFAULT] and press <OK>. (4) Enter the PIN code and press <OK> Handset settings Alarm Function You can use handset as an alarm clock to wake you up by defined time. (1) Press <MENU> button (2) Use the <▲> or <▼> button to scroll to [HS SETTINGS] and press <OK>. (3) Use the <▲> or <▼> button to scroll to [ALARM] and press <OK>. (4) Use the <▲> or <▼> button to scroll to [ON] and press <OK>. (5) Use the <▲> or <▼> button to enter hours in 24 hour format and press <OK>. (6) Use the <▲> or <▼> button to enter minutes and press <OK>. (7) Use the <▲> or <▼> button to turns snooze on or off and press <OK>. Handset Ringer Tone Set External Call Ring Tone You can change the ringer tone for an incoming call (external). (1) Press <MENU> button or press and hold button for 3 seconds. (2) Use the <▲> or <▼> button to scroll to [HS SETTINGS] and press <OK>. (3) Use the <▲> or <▼> button to scroll to [RING SETUP] and press <OK>. (4) Use the <▲> or <▼> button to scroll to [EXT RING] and press <OK>. (5) Select the ringer tone you want, and then press <OK>. Set Intercom Ring Tone You can change the ringer tone for Intercom call (internal). (1) Press <MENU> button (2) Use the <▲> or <▼> button to scroll to [HS SETTINGS] and press <OK>. - 15 - (3) Use the <▲> or <▼> button to scroll to [RING SETUP] and press <OK>. (4) Use the <▲> or <▼> button to scroll to [INT RING] and press <OK>. (5) Select the ringer tone you want, and then press <OK>. Set Ringer Volume You can change the ringer volume for all calls (no individual external and internal volume setting). (1) Press <MENU> button or short press <Ringer> button (2) Use the <▲> or <▼> button to scroll to [HS SETTINGS] and press <OK>. (3) Use the <▲> or <▼> button to scroll to [RING SETUP] and press <OK>. (4) Use the <▲> or <▼> button to scroll to [VOLUME] and press <OK>. (5) Use the <▲> or <▼> button to select volume value and then press <OK>. Handset Key Beep Set Key Tone You can set the handset to make a beep when you press a key. (1) Press <MENU> button. (2) Use the <▲> or <▼> button to scroll to [HS SETTINGS] and press <OK>. (3) Use the <▲> or <▼> button to scroll to [TONE SETUP] and press <OK>. (4) Use the <▲> or <▼> button to scroll to [KEY TONE] and press <OK>. (5) Use the <▲> or <▼> button to scroll to [ON] and press <OK>. Set Battery Low Warning Tone You can set the handset to play warning beep during battery level is low. (1) Press <MENU> button. (2) Use the <▲> or <▼> button to scroll to [HS SETTINGS] and press <OK>. (3) Use the <▲> or <▼> button to scroll to [TONE SETUP] and press <OK>. (4) Use the <▲> or <▼> button to scroll to [BATTERY LOW] and press <OK>. (5) Use the <▲> or <▼> button to scroll to [ON] and press <OK>. Set Out of Range Warning Tone You can set the handset to play warning beep when handset unlinked to base unit. (1) Press <MENU> button. (2) Use the <▲> or <▼> button to scroll to [HS SETTINGS] and press <OK>. (3) Use the <▲> or <▼> button to scroll to [TONE SETUP] and press <OK>. (4) Use the <▲> or <▼> button to scroll to [RANGE ALARM] and press <OK>. (5) Use the <▲> or <▼> button to scroll to [ON] and press <OK>. Setting the Language (1) Press <MENU> button. (2) Use the <▲> or <▼> button to scroll to [HS SETTINGS] and press <OK>. (3) Use the <▲> or <▼> button to scroll to [LANGUAGE] and press <OK>. (4) Use the <▲> or <▼> button to scroll to the language you want and press <OK>. Handset Name You can change the name that appears on the idle screen: (1) Press the <MENU> button. (2) Use the <▲> or <▼> button to scroll to [HS SETTINGS] and press <OK>. (3) Use the <▲> or <▼> button to scroll to [HS NAME] and press <OK>. (4) The current handset name is shown. Delete the character by the (5) Use the keypad to enter the new name. (6) Press the <OK> button to confirm. - 16 - button. Auto Answer You can take a call without pressing the Talk key by just picking up the handset from charge cradle if the Auto Answer set to ON by following procedure (1) Press the <MENU> button. (2) Use the <▲> or <▼> button to scroll to [HS SETTINGS] and press <OK>. (3) Use the <▲> or <▼> button to scroll to [AUTO ANSWER] and press <OK>. (4) Use the <▲> or <▼> button to scroll to [ON] and press <OK>. Call Barring You can set four numbers for call barring. The phone numbers which start with these numbers cannot be dialed out. This function is to prevent children or house attendant dial pay calls. (1) Press the <MENU> button. (2) Use the <▲> or <▼> button to scroll to [HS SETTINGS] and press <OK>. (3) Use the <▲> or <▼> button to scroll to [BARRING] and press <OK>. (4) Enter PIN code (0000)and press <OK>. (5) Use the <▲> or <▼> button to scroll to [ON] and press <OK>. (6) Use the <▲> or <▼> button to select from NUMBER 1 to 4. (7) After input maximum 4 digits barring numbers and press <OK>. Date Time Setting (1) Press <MENU> button (2) Use the <▲> or <▼> button to scroll to [HS SETTINGS] and press <OK>. (2) Use the <▲> or <▼> button to scroll to [DATE & TIME] and press <OK>. (3) Use the <▲> or <▼> button to set the Year and press <OK>. (4) Use the <▲> or <▼> button to set the Month and press <OK>. (5) Use the <▲> or <▼> button to set the Date and press <OK>. (6) Use the <▲> or <▼> button to set the Hours and press <OK>. (7) Use the <▲> or <▼> button to set the Minute and press <OK>. Adjusting LCD Contrast You can adjust the LCD contrast by following operation: (1) Press <MENU> button (2) Use the <▲> or <▼> button to scroll to [HS SETTINGS] and press <OK>. (3) Use the <▲> or <▼> button to scroll to [CONTRAST] and press <OK>. (4) Use the <▲> or <▼> button to adjust 8 levels of LCD contrast. (5) Press <OK> to confirm setting. Manual Selection If you set the handset to manual selection, the handset will only choose the base unit you have set. Press <MENU> button. (1) Use the <▲> or <▼> button to scroll to [HS SETTINGS] and press <OK> (2) Use the <▲> or <▼> button to scroll to [SELECT BASE] and press <OK> (3) Use the <▲> or <▼> button to select to [AUTO] or [BASE #]. (4) Select one of the base number to link with and press <OK> (5) If you set a base number not yet registered before, it gives an error tone and asking for select another base number. - 17 - Note: a. If there is a “ + “ appeared to the right side base number, it means the handset has already been registered to this base. b. When you have activated automatic base selection and the handset is out of range from the current base, the handset will only search for the strong base with strongest signal in standby (not during communication). c. Before you can select a base unit, the handset must be subscribed to the base first. Restoring the Default Handset Setting The handset can store its default setting if you do the following: (1) Press the <MENU> button. (2) Use the <▲> or <▼> button to scroll to [HS SETTINGS] and press <OK>. (3) Use the <▲> or <▼> button to scroll to [HS DEFAULT] and press <OK>. (4) Enter the PIN code and press <OK> Register handset You can subscribe 5 handsets to 1 base unit. By default, each handset is subscribed as handset 1 on the base unit upon delivery (base unit 1). You only need to subscribe the handset if: The handset subscription has been removed from the base unit You want to subscribe a different handset to this base unit. If your base unit has the PAGE button option: Press and hold the <PAGE> button on base for 10 seconds. The base unit will be in registration mode for 3 minutes. If your base unit does not has the PAGE button option: Cut off the base power and connect again, then the base will be in registration mode for 3 minute. Please do the following to subscribe the handset: (1) Press <MENU> button (2) Use the <▲> or <▼> button to scroll to [REGISTRATION] and press <OK>. (3) Use the <▲> or <▼> button to select the number of the base unit (from 1 to 4) you would like to subscribe the handset to and press <OK>. (4) Enter the base PIN code (0000) and press <OK>. (5) The unit will start searching for the base. (6) When the handset is registered, it will show [HS] followed by the handset number. - 18 - Telephone Operations Make a Phone Call (1) Press <TALK ON> button. You will hear the dial tone. (2) Enter the desired telephone number to make a call. (3) Press the <TALK OFF> button when you want to terminate the call. or (1) Enter the desired telephone number. (2) Press the <TALK ON> button. The number will be dialled automatically. (3) Press the <TALK OFF> button when you want to terminate the call. NOTE: When you haven’t pressed a button for 10 seconds, the number you’ve already entered will disappear and the handset returns to standby mode. Make a Phone Call from Redial List (1) Press <TALK ON> button. You will hear the dial tone. (2) Press the key. The number you last called is dialed automatically. or (1) Press the button. The number you last called appears on the display. (2) Press the <▲> or <▼> button to select the desired number you want to dial out. (3) Press the <TALK ON> button, the number shown on the display is dialed automatically. (4) After finishing your call, press the <TALK OFF> button to hang up. Answering an Incoming Calls (1) When a call comes in, the handset will start to ring. (2) Press the <TALK ON> button to answer the incoming call. Handsfree Function (1) When you are on the phone, press the key to activate the hands-free function. (2) Press the same button to deactivate the hands-free function. Mute Function During a call, press caller cannot hear you. to switch Mute on/off. When on, you voice will be muted so your (1) Press the button during a conversation. The microphone will be deactivated. The [MUTE ON] icon appears on the display. (2) Press the <MUTE> button again when you want to continue the conversation. Adjusting the Ringer Volume During a conversation you can set the volume alternatively in between (1 to 5): (1) Press button once, the volume will increase one level up (2) After reach max volume, if press the button once again, the volume will go back to min level When you are calling in Handsfree mode and you want to change the volume, it is same as step 1 and 2. Setting the Pause If you wish to insert a pause, press the seconds. button on the location where you want a pause of 3 - 19 - Receive second call (call waiting) – user needs to acquire this service from telephony service company If you are on a phone, and another call comes in, you can hear beep sound reminder. If you wish to take the new call press the button then it will swap to second caller and first caller will be on hold until you press the key again. Handset Key Lock (1) Press and hold the locked. button. [HS LOCKED] appears on the display and the keypad is (2) Press and hold the key again to un-lock the keypad. NOTE: When there is an incoming call, you can still answer the call by pressing the <TALK ON> key. During the call, the keypad functions as normal. When the call is ended, the keypad will be locked again. Transfering an External Call (1) During an external call, press <INT > button. The external call is automatically placed on hold. Enter the handset number to which you want to transfer the call. (2) The other handset will start to ring. When it answers, press the <TALK OFF> button to transfer the call. (3)If the handset does not answer, press <INT > to return to the external call. Conference mode The conference feature allows two handsets to communicate with an external call. It does not require any subscription to your telephone service provider. (1) During an external call, press <INT > button. The external call is automatically placed on hold. Enter the handset number to which you want to transfer the call. (2) The other handset will start to ring. When it answers, press and hold the < * > button for 2 seconds start three-party conversation. Or press the <INT> button again to return to the external call. (3) Press the <TALK OFF> button to end the call. Internal Call (Intercom) (1) In standby press the <INT> button followed by the number (1 to 5) of the other handset. (2) The other handset will start to ring. You can stop the ringing by pressing the <TALK OFF> or the <INT> button. (3) If the other handset answers the call by pressing the <TALK ON> you can talk internally. (4) Press the <TALK OFF> to end the call. Receiving an External Call during an Internal Call If you receive an external call during an internal call, you will hear a call waiting tone (double beep) on both handsets being used for an internal call. (1) Press the <TALK OFF> key to end the internal call. (2) Press the <TALK ON> key to accept the external call. (3) After finishing your call, press the <TALK OFF> key to hang up. - 20 - Troubleshooting Problem No dial tone in the handset. The antenna icon flashes. The handset is left on the charger for 24 hours but the battery indicator is still empty. No icon is displayed on the screen. Poor audio quality (crackles, echo, etc.) The phone does not ring when there is an incoming call. The keys do not work. Busy tone & call-in-progress indicator turned on Cannot register a handset. The battery icon does not turn on when the handset is placed on the telephone base. Cannot save contact in the phonebook. Suggestions 1. Check the mains and telephone line connection of the telephone base. 2. Get closer to the telephone base. 3. Recharge the batteries. 4. Reinstall the batteries by following the correct +/- polarity as indicated. 5. Register the handset. 1. Register the handset. 2. Get closer to the telephone base. 3. Check the mains connection and the telephone line connection of the telephone base. 1. Install a new AAA rechargeable Ni-MH battery. 2. Check that the battery icon is animated while charging. 3. Reinstall the batteries by following the correct +/- polarity as indicated 4. Check the mains connection of the telephone base. 1. Recharge the battery. 2. Make sure the telephone base is properly connected. 1. Try installing the telephone in another location, sufficiently far away from other electrical appliances. 2. Install the telephone base in another room or use an extension cord. 3. Get closer to the telephone base. 4. Install an ADSL filter between the telephone wall jack and the telephone line cable connected to the base. 5. Ask your operator to check your telephone line. 1. Activate the ringer. 2. Disconnect some phones from the telephone line. 3. Check the connections of the telephone base. Press and hold the key again to un-lock the keypad. 1. Check all handsets and end all calls. 2. Check the telephone line connection of the telephone base. De-register handsets that you are not using and try again. 1. Adjust the position of the handset. 2. Clean the battery contacts with a dry cloth. 3. You can leave the handset on the base even when the battery is fully charged. 1. Delete contacts that you do not use. 2. Please refer to page 14 for adding a phone book entry. Note: If none of the above suggestions solves your problems, try unplugging the telephone base from the mains and removing the batteries from all handsets. Wait 15 minutes and then reconnect everything. - 21 - Declaration of conformity This appliance complies with the essential requirements and other provisions of Directive 1995/5/EC. The declaration of conformity is available at: www.logisav.fr - This logo on the product indicates that it is an appliance whose treatment as waste falls within the framework of Directive 2002/96/EC of 27 January 2003 on waste electrical and electronic equipment (WEEE). The presence of hazardous substances in electrical and electronic equipment may have potential effects on the environment and human health in the reprocessing cycle of this product Therefore, at the end of service life of this appliance, you should not dispose of it as normal household waste. Your role as an end-user is vital in the cycle of reuse, recycling and other forms of recovery of waste electrical and electronic equipment. Recycling and collection systems are made available by local authorities and distributors. You have an obligation to use the collection systems at your disposal. Used batteries shall be deposited at an appropriate collection point. Never dispose of batteries with normal household waste. Imported by ADMEA, 12 Rue Jules Ferry, 93110 Rosny sous bois, France. THOMSON is a trademark of Technicolor SA used under license by ADMEA. - 22 -